HS-21-SQR Penguin - HS-21-SQR Penguin Manual
←
→
Page content transcription
If your browser does not render page correctly, please read the page content below
Y600 Thermo-Seal-Jet

                                            Manual
                      HS-21-SQR Penguin
thermopatch.com

                  September 2020 ENG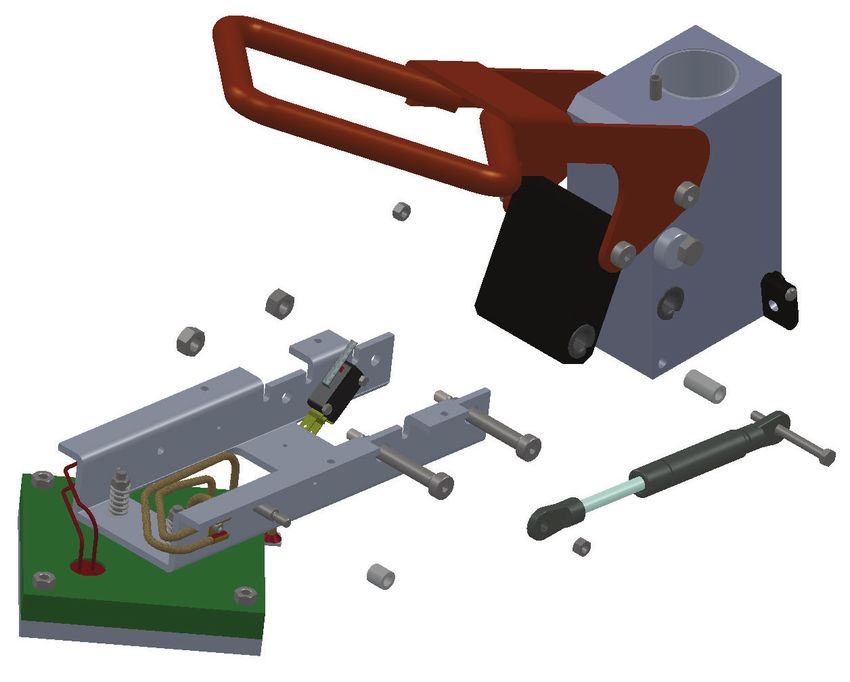
Copyrights
                  © 2020, Thermopatch bv, Almere, the Netherlands.
                  No part of this publication may be reproduced by any means without the prior written
                  permission of Thermopatch bv, the Netherlands.
                  Thermopatch and the Thermopatch logo, Thermoseal and Thermocrest are registered
                  trademarks of Thermopatch.

                  Introduction
                  Dear user,
                  Congratulations and welcome to the ever growing number of Thermopatch users.
                  You have acquired a machine which has been manufactured by Thermopatch with the
                  greatest possible care. We are confident that you will be enjoying the use of this machine
                  for a long time.
                  Please take note of the contents of this manual to familiarize yourself with the workings and
                  safety aspects of the machine. This manual was written for the benefit of all users and
                  technicians who install and maintain the machine. You will find information on operating,
                  safety and maintenance as well as spare parts and supplies.
thermopatch.com

                                                                                                                  2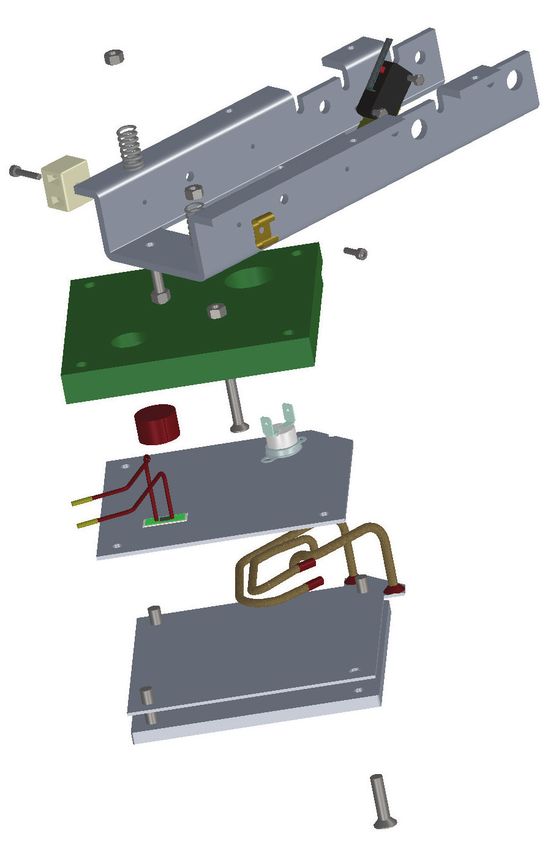
Content
                            Copyrights                                     2
                            Introduction                                   2
                            Content                                        3
                            1. General description                         4
                            1.1 What did you receive ?                     4
                            1.2 Warranty                                   4
                            3. Assembly and installation                   5
                            3.1 Installing the HS-21-SQR                   5
                            3.2 Electrical Requirements                    5
                            4. Operating manual                            6
                            4.1 How to operate the HS-21-SQR HS-21-SQR     6
                            4.2 The HS-21-SQR display                      6
                            4.3 How to operate the display                 6
                            5. Overview of safety measures and warnings    9
                            5.1 Safety                                     9
                            6. Technical specifications                   10
                            6.1 Specifications of the HS-21-SQR           10
                            7. Transport and storage                      11
                            7.1 Transport                                 11
                            7.2 Storage                                   11
                            8. Maintenance                                11
                            8.1 Daily maintenance                         11
                            8.2 Periodical maintenance                    11
                            9. Technical annexes                          12
                            9.1 Faults:                                   12
                            9.2 Replacement parts                         12
                            9.3 Exploded views and parts                  13
                            9.3A Heating plate enhancement June 2018      25
                            9.4 Wiring diagram                            26
                            10. End of life                               27
                            11. Declaration of conformity                 28
                            12. Disclaimer                                29
thermopatch.com

                                                                               3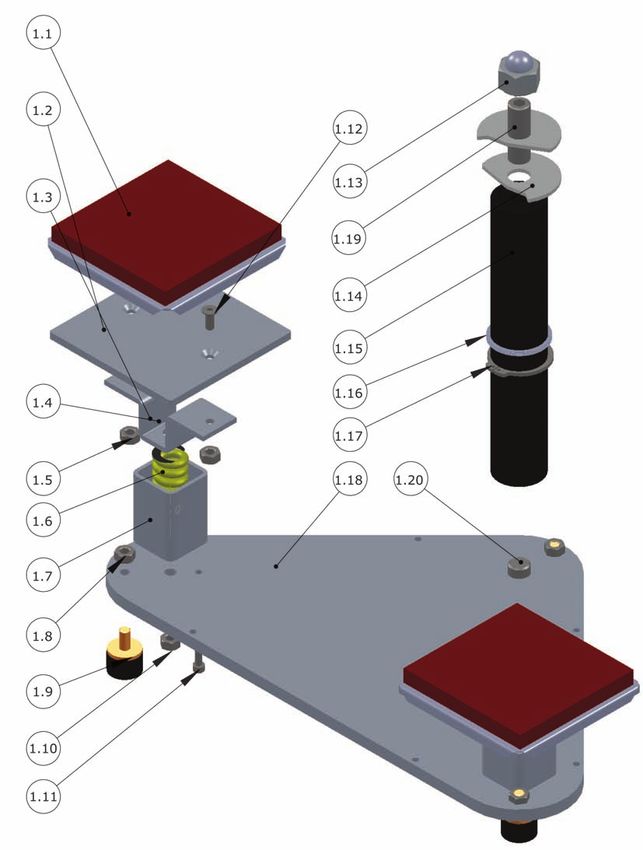
1. General description
                  Labels, patches, transfers and emblems can be applied quickly thanks to the two press
                  plates. With a warm-up time of less than a minute, efficient work is guaranteed. The HS-21-
                  SQR provides full digital control; the graphic display clearly shows the current status of the
                  press, including temperature and heat seal time.
                  1.1 What did you receive ?
                  The HS-21-SQR has been packed in a cardboard box. The following articles should have
                  been delivered:
                  • HS-21-SQR heat seal machine
                  • Electrical power cable
                  • User’s Guide on USB
                  If one of these articles is missing, please contact our customer service or your Thermopatch
                  supplier.
                  1.2 Warranty
                  Thermopatch refers to its warranty and product liability conditions as laid down in our
                  general conditions. These can be obtained at your Thermopatch supplier.
thermopatch.com

                                                                                                                   4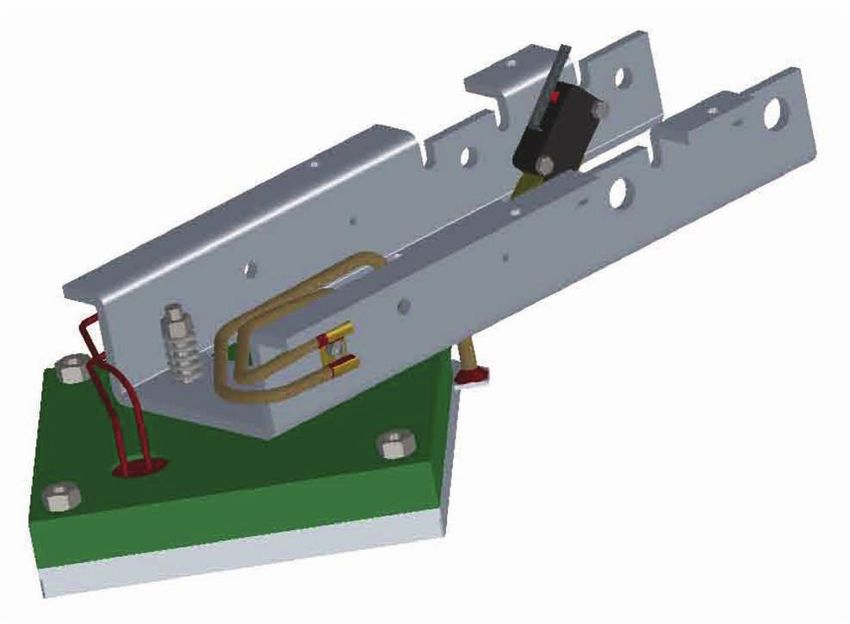
2. Intended use
                  The HS-21-SQR has been developed to heat seal labels, patches, transfers and emblems
                  quickly thanks to the two press plates. The machines warms up to the required temperature
                  within a minute which ensures efficient working.

                  3. Assembly and installation
                  3.1 Installing the HS-21-SQR
                  Take the machine out of the box and put it on a worktable near an earthed wall socket.
                  Ensure that there is sufficient free space around the HS-21-SQR. Also ensure that there are
                  no items near the HS-21-SQR, which are sensitive to heat radiation.
                  3.2 Electrical Requirements
                  The HS-21-SQR should be connected to the electricity grid (230V) with the supplied
                  electrical cable (A).
                  The HS-21-SQR is earthed and has been provided with two fuses of 3 Amps (B).

                                                                        C      B A
thermopatch.com

                                                                                                                5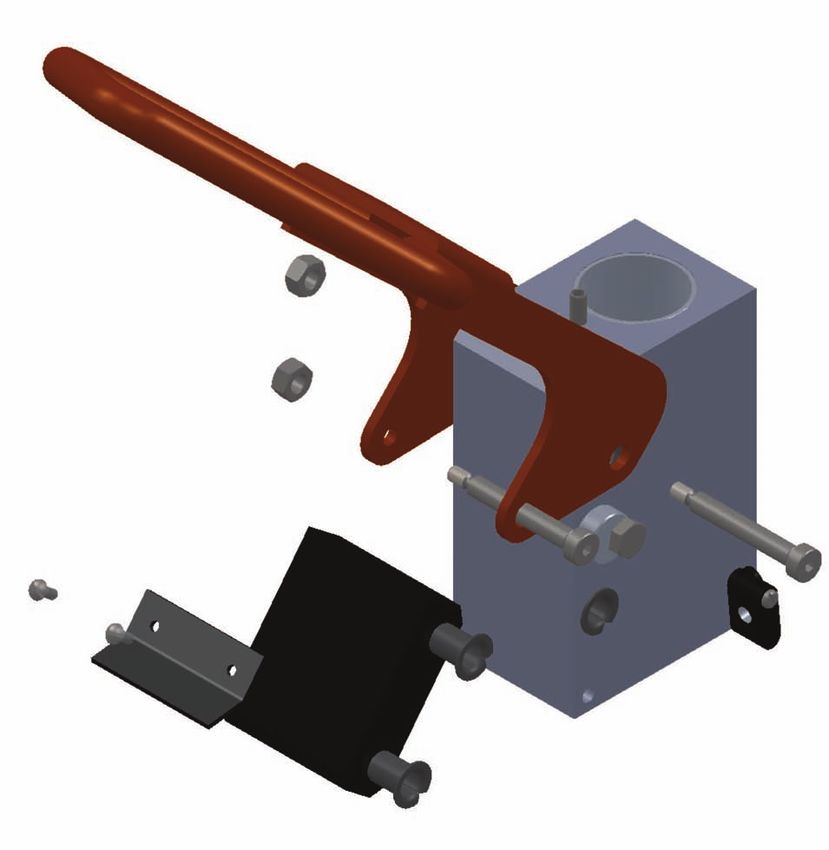
4. Operating manual
                  4.1 How to operate the HS-21-SQR
                  • Starting up:
                  1. Switch on the machine: pushing the on-off switch at the back to “on” (C, see page 5).
                  2. Wait until the standard set temperature has been reached.
                  The standard sealing temperature is set on 204 °C. During warming up, which will take a
                  few minutes and the actual temperature is displayed. When the HS-21-SQR has reached
                  the desired temperature we advise to close it for several moments to heat up the silicone
                  rubber sealing pad.

                  4.2 The HS-21-SQR display

                                               1                                3

                                               2                                4

                  4.3 How to operate the display
                  The display has one set of buttons on the left (1+2) - and one set on the right side (3+4),
                  with a digital LED screen in the middle.
                  To adjust the heat seal temperature:
                  Press the upper left button (1) and increase (3) or decrease (4) the temperature per degree
                  with the buttons on the right side.
                  Default set heat seal temperature: 204 °C
                  The set temperature can be checked and confirmed with Thermopatch temperature
                  measuring strips.
                  If the temperature on the screen should not equal the set temperature, adjust it as follows:
                  Push the upper (1) and lower (2) left buttons at the same time for 3 seconds and adjust
                  temperature with the buttons 3 and 4.
thermopatch.com

                  The new setting will be stored if the buttons are not touched for 3 seconds.
                  • Should you want to seal a garment with a much lower temperature other than the
                      standard seal temperature, you should set the HS-21-SQR to the desired values.

                                                                                                                 6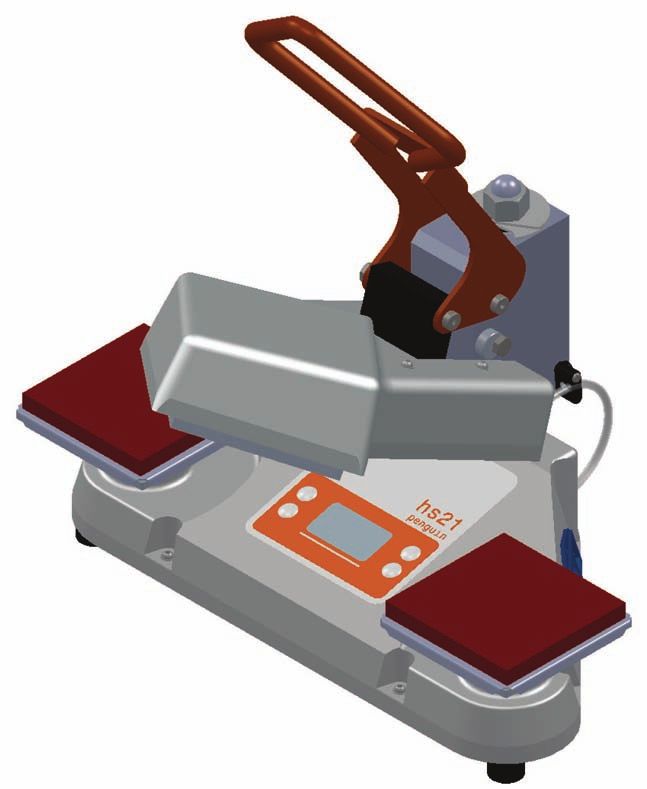
To change from Celsius to Fahrenheit and vice versa
                  Press the 3 and 4 buttons and hold for more than 3 seconds and the changed setting will be
                  shown on the LED screen.
                  To adjust the heat sealing time:
                  Press the lower left button (2) once and change the seal time in seconds (3) or (4).
                  Default set heat sealing time: 12 seconds.
                  • The seal time ranges from 0-60 seconds.
                  To adjust the energy saver setting:
                  Press the lower left button (3) twice to set the energy saver in
                  minutes (3) or (4).
                  The energy saver will start after the set time in minutes.
                  Default start energy saver: 20 minutes
                  The new setting will be stored if the buttons are not touched for 3 seconds.
                  Energy saving is active when the sleeping penguin is shown on the LED display:

                  To adjust the day total counter:
                  Press the upper right button (3) once to see the day count during 5 seconds. When pushed
                  3 seconds, the day count will become 0.
                  To see the grand total counter:
                  Press the lower right button (4) once to see the grand total during 5 seconds.
                  The grand total is shown with this symbol:

                  To adjust the heat sealing pressure:
                  The pressure on the HS-21-SQR is not adjustable. Due to its unique construction, a
                  constant pressure is maintained while heat sealing.
                  Working with Thermopatch heat seal products:
                  With the HS-21-SQR it is very easy to apply heat seal products such as HiQ-labels, Digiline-
                  emblems and Thermopatch repair patches to textiles.
                  Follow the procedure listed below:
                  • Set the time.
                  Almost all Thermopatch heat seal products need 12 - 15 seconds for correct adhesion.
                  • Pull the fabric tightly over the silicone rubber sealing pad.
                  Make sure that the fabric is pulled tight and no seams, buttons, zippers or other thick parts
                  are under the machine.
                  These will take away pressure from the heat seal product and can cause problems with the
                  adhesion.
                  • Place the label (or any other heat seal product).
                  Note: Thermopatch materials cannot be removed easily. The material is meant for
                  permanent adhesion.
                  Therefore, make sure that the position is correct.
                  • Close the machine by pressing the press arm down until it locks.
                  This will start the heat sealing cycle.
thermopatch.com

                  At the end of the set heat sealing time, the buzzer will be activated, indicating that the heat
                  sealing cycle is completed and the garment needs to be removed.
                  • Open the press.
                  Open the press by moving the arm upward and remove the fabric and check the result.
                  Once cooled off, the heat seal product is permanently attached.
                  • Repairs
                  Preferably repair damages without the loss of fibres, such as right-angled tears, from the
                  inside of the fabric.
                  In almost all cases it is sufficient to use a press time of 12 - 15 seconds.
                  Exceptions are thick fabrics like materials for gauntlets and patches for protective clothing,
                  which can require up to 20 seconds.                                                               7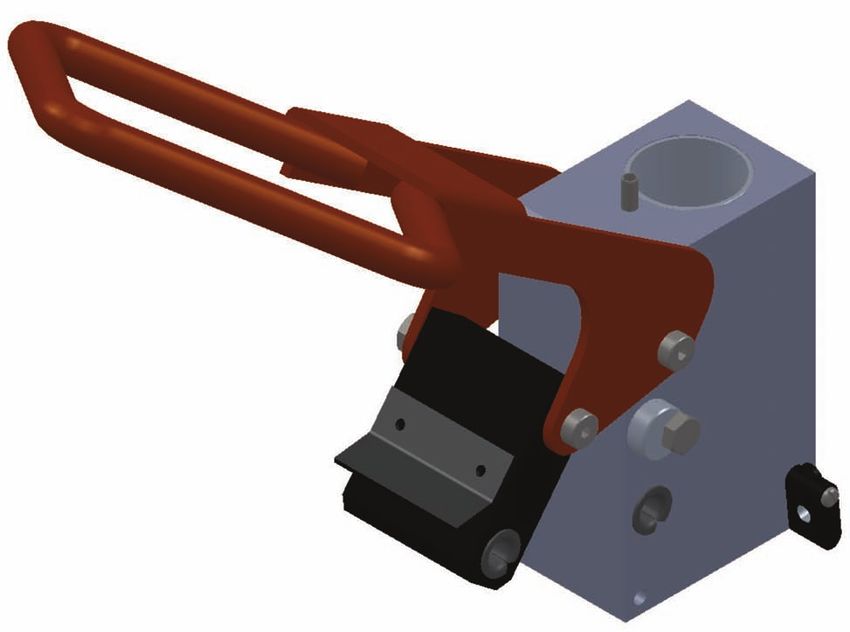
• Labels and emblems
                  Shrinkage, finishes and coatings on the textile can influence the heat sealing result in a
                  negative way.
                  Pre-heating can offer a solution in some cases.
                  If it appears that there is not a complete adhesion, it is recommended to re-seal another 10
                  seconds.
                  Remark:
                  Some modern fabrics cannot withstand the heat sealing temperature of 204 °C. If you
                  cannot be sure of the result, use a sample of the same fabric, if possible, to establish
                  its heat resistance. Also care labels in garments can inform you of their heat resistant
                  properties (iron ability). When it is necessary to lower the temperature, it is necessary to
                  press for a longer time.
                  How to remove heat sealed Thermopatch labels:
                  Because Thermopatch labels must be wash resistant to all industrial washing processes, it
                  is not easy to remove heat seal products.
                  When necessary you can try following procedure:
                  • Put the garments with the label to be removed under the press for about 7 seconds. The
                       glue layer will melt again.
                  • Leave the garment on the plate and remove the label, if necessary by means of a blunt
                       scraper or tweezers.
                  • Please note: Heating plate and labels are hot!!
                  • Repeat this procedure if you are not successful the first time trying.
                  Interrupting the heat sealing cycle:
                  You can interrupt the operation at any moment by unlocking the arm of the closed heat seal
                  machine during the press cycle.
                  When you wish to shut down the machine, switch the main switch to off. It is located on the
                  right side of the machine.
                  The indicators on the control panel are then turned off.
                  Trouble shooting:
                  Some problems and failures that can occur, are listed below.
                  After describing each problem, the possible cause (sometimes more than one) is given, as
                  well as a possible solution.
                  If the described solution cannot solve the problem, please contact the service department
                  of your distributor.
                  Heat sealing problems:
                  Insufficient adhesion of the glue layer
                  • Press time too short.
                  • Increase the time in steps of 2 seconds and try again.
                  • Temperature too low.
                  • Check with Thermolabels and increase the temperature, if necessary.
                  The pressure is not sufficient.
                  • The silicone rubber sealing pads are worn out: replace when worn.
                  • The sealing pressure is set in the factory and cannot be adjusted.
                  • The teflon self-adhesive coating of the press element is dirty or worn-out.
                  • Clean with a damp cloth and replace it, if necessary. When replacing the old teflon, it is
                       very important that adhesive residue is removed from the heating element. To do this it
thermopatch.com

                       is necessary to heat up the machine, scrape off the glue remains by using a blunt edged
                       scraper. It is important to avoid scratching the metal of the heating plate.
                  • After this is done, degrease the heating element and apply the self-adhesive teflon
                       cover.
                  Glue layer becomes too thin, causing adhesion problems
                  • Sealing time too long.
                  • Lower the time in steps of 2 seconds and try again.
                  • Temperature too high.
                  Check with Thermolabels and lower the temperature, if required.

                                                                                                                 8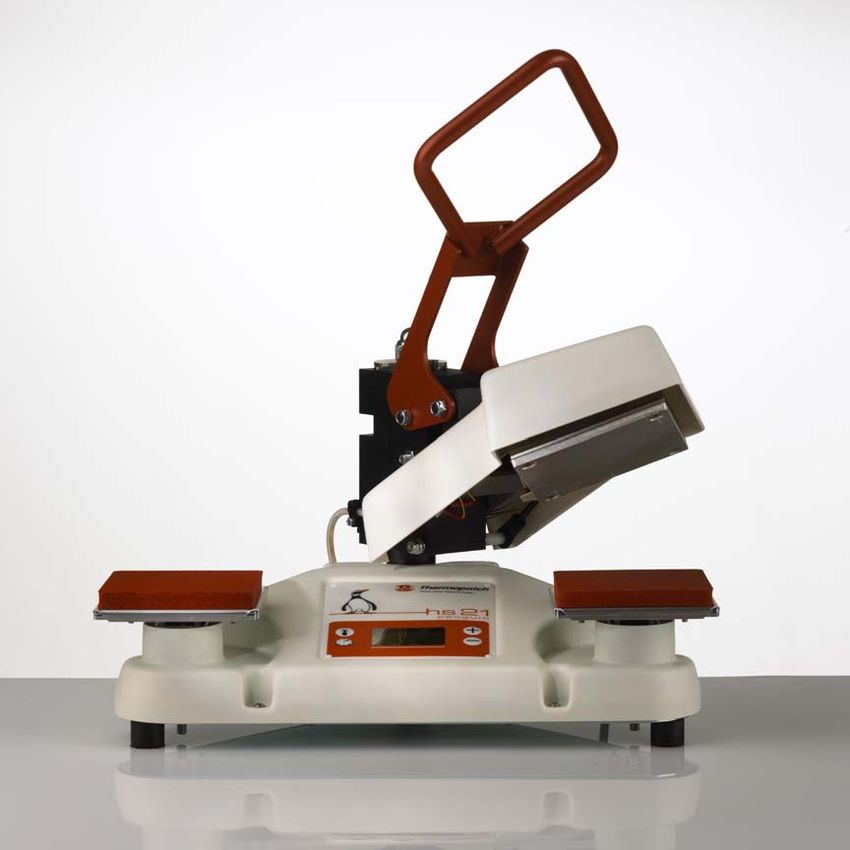
5. Overview of safety measures and warnings
5.1 Safety
The HS-21-SQR has been equipped with various safety features to ensure safe operation.
1. Safety thermostat
The safety thermostat is installed to prevent overheating when the controller should fail. It
switches off the power to the heating element when the temperature exceeds 260°C.
If this happens, the machine has to be checked by a qualified technician.
2. Acoustic signal
Once the press cycle is complete an acoustic signal will be sound after which the press must
be opened.
3. Automatic Switch-Off
When the HS-21-SQR is not opened after 10 seconds it will automatically switch off to
prevent damaging it.
4. Warning symbols
The HS-21-SQR is marked with appropriate heat radiation safety symbols on either side of
the press head and the hazardous voltage symbol next to the power inlet on the back.
WARNING!
Hot surface
WARNING!
Electric tension
Safety tips
The customer service of your distributor has its own service engineers, and if required,
maintenance is available. A maintenance contract ensures prompt service in the
event of appliance failure together with additional periodic inspections.
Under normal conditions accidents are rare; however, listed below are some practical points
to ensure your safety:
• Pull out the electrical plug from the wall socket when doing maintenance or cleaning work
on the appliance.
• Ensure that there is sufficient space around the appliance. Cables and connections must
not get jammed. Although the heat radiation of the press is low, there should be enough
thermopatch.com
space for cooling down.
• Avoid contact with the heating element.
9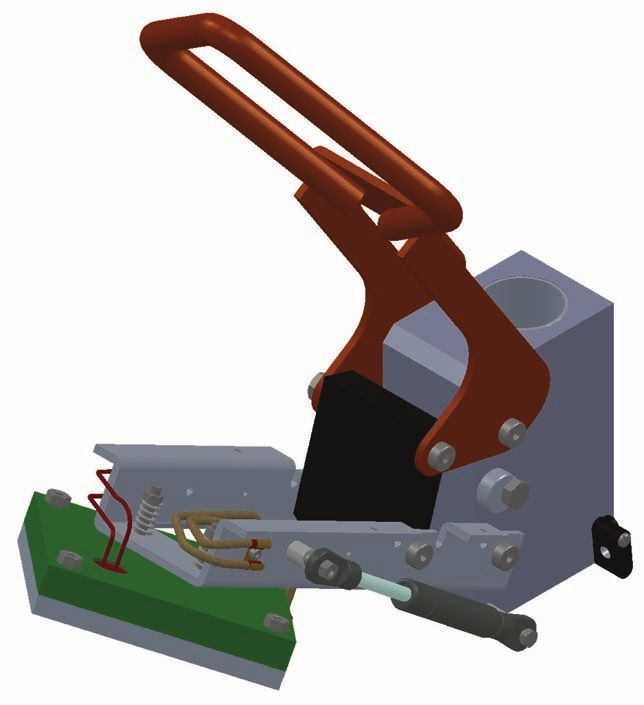
6. Technical specifications
                  6.1 Specifications of the HS-21-SQR
                  Power consumption 				               650 W
                  Power supply 					230 V
                  Temperature 					50-225 °C
                  Machine height (open) 			            525 mm
                  Machine height (closed) 			          315 mm
                  Machine width 				                   465 mm
                  Machine depth (connections included) 420 mm
                  Net weight 				                      15 kg
                  Press pad dimensions 			             Square 120 x 120 mm
                  Fuses 					                          3 amps
thermopatch.com

                                                                             10
A-weighed noise level < 70 dB (A)
7. Transport and storage
7.1 Transport
When the machine needs to be moved, Thermopatch recommends to use the original
packaging.
7.2 Storage
When the machine needs to be stored, Thermopatch recommends to use the original
packaging. The machine should preferably be stored on a pallet, off the floor, in dry
conditions.
8. Maintenance
8.1 Daily maintenance
For good heat sealing results it is important to keep the press surfaces clean. Therefore,
clean the teflon coating of the upper plate with a clean, dry cloth.
Also clean the rubber pads daily with a dry cloth. Do not use solvents or other chemical
substances to remove impurities.
Do not let buttons, zippers, etc. come between the plates. It will keep the silicone rubber
undamaged for a long time.
8.2 Periodical maintenance
The mechanism needs no maintenance.
First switch off the machine, let it cool down and pull the plug out of the socket.
Replace the rubber pads and the teflon regularly.
Clean the outside of the machine regularly with a clean, moist cloth.
In order to replace the teflon, the press machine must be warm (± 80°C). Remove the
teflon and carefully remove all glue residues from the metal surface with a putty knife.
Then use a copper brush to clean the surface.
Finally, use a dry cloth to clean the element. The surface must be absolutely clean and
smooth, so that the new teflon sticks well, without air bubbles.
thermopatch.com
119. Technical annexes
9.1 Faults:
1. Press does not warm up, the time does not count down or the temperature does not rise
on the display:
• The machine is not connected to the electricity grid. Put the plug of the power cable in
an earthed socket and switch the machine on.
• The machine is not connected. Set the switch at the back of the machine to the ON
position.
• A switch has broken or a connector has come loose. Please contact the service
department.
2. Press does not warm up:
• The sensor is defective. Please contact the service department.
• The safety thermostat has been activated. Please contact the service department.
• The heating element is defective. Please contact the service department.
3. The press time cannot be set correctly:
• The electronics are defective. Please contact the service department.
• There is no signal at the end of the press time.
• The timer or the beeper is defective. Please contact the service department .
• The electronics are defective. Please contact the service department.
4. Press does not close or is difficult to open:
• Adjust the excenter screw (A) and close the machine. By turning the eccentric, the
momentum for opening can be easily adjusted. Turn clockwise for a lighter setting and
counter clockwise for a heavier setting.
• Turn the excenter screw from left to right for
a lighter setting.
• Turn the excenter screw from right to left for
a heavier setting.
A
Error codes:
Below you will find an overview of the error codes which appear on the display. If these
error codes occur, please contact your Thermopatch supplier.
thermopatch.com
• Error code 1: Breakage of wire in PT1600 (resistance high)
• Error code 2: PT1600 short circuit (resistance low or 0)
• Error code 3: Heating element is broken down.
• Error code 4: Electronics are broken down.
9.2 Replacement parts
The following parts should be replaced regularly:
Silicone rubber sealing pad 120 x 120 mm square SPAPEN-21026
Self-adhesive teflon cover 120 x 120 mm square SPAPEN-21316
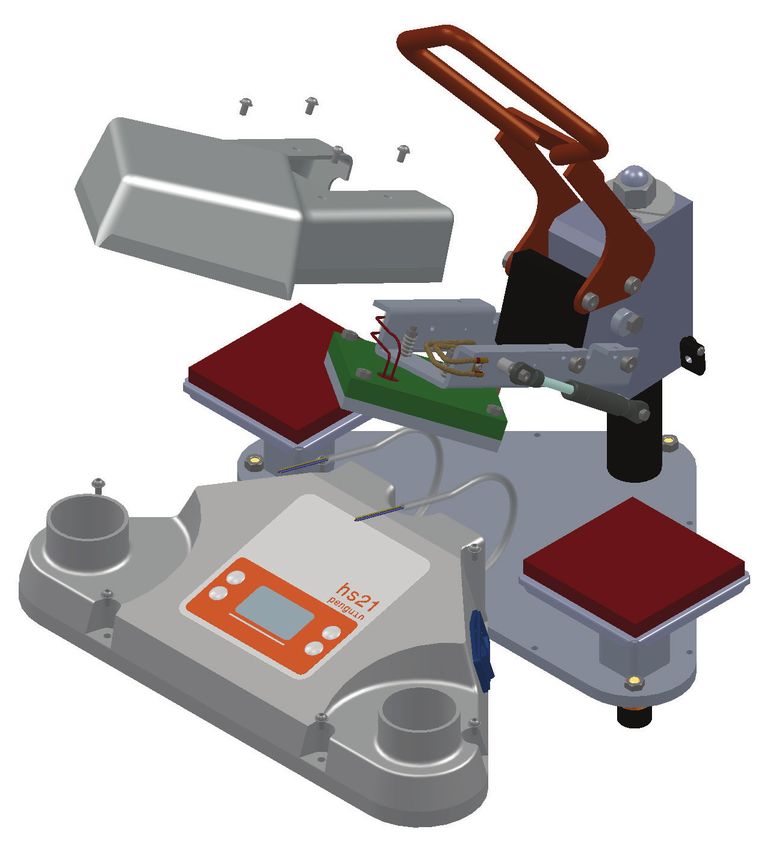
129.3 Exploded views and parts
Please visit our website for more information: www.thermopatch.com, Equipment and parts
thermopatch.com
131.1 Sealing plate 120 x 120 2 SPAPEN-21026
1.1 Sealing plate 60 x 20 2 SPAPEN-21026A
1.1 Sealing plate 70 x 30 2 SPAPEN-21026B
1.1 Sealing plate 100 x 120 2 SPAPEN-21026C
1.2 Sealing plate 2 SPAPEN-21025
support
1.3 Spring support 2 SPAPEN-21006
1.4 Allen screw M8 X 65 2 DIN 912
1.5 Nut M5 M5 2 DIN 934
1.6 Press spring 2 SPAPEN-21033
1.7 Spring retainer 2 SPAPEN-21004
1.8 Nut M6 3 DIN 934
1.9 Rubber foot D25 h 20 3 SPAPEN-01-03
1.10 Nut + spring M8 2 DIN 934
washer
1.11 Allen screw + M5 X 20 2 DIN 912
spring washer
1.12 Countersunk M5 X 16 4 DIN 7991
screw
1.13 Cap nut + spring M16 1 DIN 1587
washer
1.14 Locking disc 2 SPAPEN-21013
thermopatch.com
1.15 Main column 1 SPAPEN -21010
1.16 Filling washer X SPAPEN-01-01
1.17 Circlip Ø40 1 SPAPEN-01-12
1.18 Mounting plate 1 SPAPEN-21023
1.19 Set screw M16 x 40 1 DIN913
1.20 Bolt M16 x 40 1 DIN931
14thermopatch.com 15
2.1    Tapping screw        3 x 25        2     DIN 965
                  2.2     Nylock nut            M8          1     DIN 7971
                  2.3    Collar bearing     10170-P14       4   SPAPEN-21012
                                             10-12-10

                  2.4    Spring dowel        Ø 6 x 40       1     DIN 7344
                  2.5       Bearing         4030-P10        2   SPAPEN-21203
                  2.6     Hinge block                       1   SPAPEN-21017
                  2.7      Pull relief                      2   SPAPEN 02-02
                  2.8        Ring               M8          1     DIN 9021
thermopatch.com

                  2.9    Spring dowel     Ø 10 x 8.5 x 60   1     DIN 7346
                  2.10        Bolt           M8 x 80        1     DIN 933
                  2.11   Eccentric disc                         SPAPEN-21005

                                                                               16
thermopatch.com 17
3.1        Handle                           1   SPAPEN-21015
                  3.2      Nylock nut              M8         2     DIN 985
                  3.3    Nylon press link                     1   SPAPEN-21001
                  3.4     Collar bearing       10170-P14      4   SPAPEN-21012
                  3.5     Shoulder bolt       C7111.080.070   2     ISO 7393
                  3.6         Screw             3 x 10mm      2     DIN 7971
                  3.7   Cover plate (black)                   1   SPAPEN 009
thermopatch.com

                                                                                 18
thermopatch.com 19
4.1        Nylock nut           M5       6      DIN 985
                  4.2      Spring D-180S       D-180S      2   SPAPEN-21032
                  4.3    Connector Porcelain   Porcelein   1   SPAPEN-03-04
                  4.4        Allen screw       M3 x 20     1      DIN 912
                  4.5        Press arm                     1   SPAPEN-21011
                  4.6           Nut               M5       2      DIN 934
                  4.7      Isolating plate                 1   SPAPEN-21027
                  4.8          Rubber                      1   SPAMA-01-01-A
                  4.9       Heat sensor        PT 1600     1   SPAPEN-03-11
                  4.10      Sensor plate                   1   SPAPEN-21023
                  4.11    Heating element                  1   SPAPEN-21031
                  4.12       Heat shield                   1   SPAPEN-21021
                  4.13      Micro switch                       SPAPEN 03-09
thermopatch.com

                  4.14    Allen screw + nut    M3 x 16     2      DIN 912
                  4.15      Cable clamp                    1   SPAPEN-21033
                  4.16       Allen screw        M3 x 5     1      DIN 912
                  4.17   Countersunk screw     M5 X 35     2     DIN 7991
                  4.18       Thermostat                    1   SPAPEN 03-02
                  4.19   Countersunk screw     M5 X 30     4     DIN 7991

                                                                               20
thermopatch.com 21
5.1           Nylock nut                M6         1     DIN 985
                  5.2           Nylock nut                M8         2     DIN 985
                  5.3         Shoulder bolt            M5 x 35       1     DIN 7379
                  5.4         Nylon bushing          10 x 10 x 6,5   1   SPAPEN 02-08
                  5.5   Shoulderbolt 07111-080-070     M8 x 70       2     DIN 7379
                  5.6           Gas spring             21 381K       1   SPAPEN 02-09
                  5.7         Nylon bushing          20 x 10 x 6,5   1   SPAPEN-02-13
                  5.8            Hex bolt              M6 X 95       1     DIN 933
                  5.9           Nylock nut                M5         1     DIN 985
thermopatch.com

                                                                                        22
thermopatch.com 23
6.1   Cap screw                    M5 x 10          10   ISO 7380
                  6.2   Press arm cover                               1    SPAPEN-21020
                  6.3   Harness, low voltage                          1    SPAPEN-21603
                  6.4   Base cover                                    1    SPAPEN-029
                  6.5   Panel sticker                                 1    SPAPEN-21029
                  6.6   Power inlet                                   1    SPAPEN-03-13
                  6.7   Harness, 230 Volt                             1    SPAPEN-21607
                  6.8   Electronics                  Not on drawing   1
thermopatch.com

                  6.9   Teflon self adhesive cover   120 x 120 mm     1    SPAPEN-21316

                                                                                          24
9.3A Heating plate enhancement June 2018
ITEM NO. PART NUMBER DESCRIPTION QTY.
1 SPAPEN-21031 Heating element HS-21 SQR 1
2 SPAPEN-21027 Insulation plate HS-21 1
3 SPAPEN-21021-1 Heating element protector HS-21 square 1
4 SPAPEN-21023 Heater shield HS-21 square 1
5 SPAPEN-21021 SQR Heater Shield 1
2
Construction before
HS-21SQR-18-12867
4 (up to June 2018)
1
3
5
UNLESS OTHERWISE SPECIFIED: FINISH: DEBUR AND
DO NOT SCALE DRAWING REVISION
DIMENSIONS ARE IN MILLIMETERS BREAK SHARP
Thermopatch
SURFACE FINISH: EDGES
TOLERANCES:
LINEAR:
ANGULAR:
SIGNATURE DATE
From serial number
NAME TITLE:
DRAWN RS 29-05-2018
HS21SQR-18-12867
CHK'D
APPV'D
MFG
Q.A MATERIAL:
A3
DWG NO.
Replace setup square heater
WEIGHT: SCALE:1:2 SHEET 1 OF 1
ITEM NO. PART NUMBER DESCRIPTION QTY.
1 SPAPEN-21031 Heating element HS-21 SQR 1
2 SPAPEN-21027 Insulation plate HS-21 1
3 SPAPEN-21021-B SQR Heater Shield 1
4 SPAPEN-21023 Heater shield HS-21 square 1
2
Construction starting from
HS-21SQR-18-12917
4
(after June 2018)
1
3
thermopatch.com
UNLESS OTHERWISE SPECIFIED: FINISH: DEBUR AND
DO NOT SCALE DRAWING REVISION
DIMENSIONS ARE IN MILLIMETERS BREAK SHARP
Thermopatch
SURFACE FINISH: EDGES
TOLERANCES:
LINEAR:
ANGULAR:
NAME SIGNATURE DATE TITLE:
DRAWN RS 29-05-2018
From serial number
HS21SQR-18-12917
CHK'D
APPV'D
MFG
Q.A MATERIAL:
A3
DWG NO.
New setup square heater
WEIGHT: SCALE:1:2 SHEET 1 OF 1
25thermopatch.com
8 7 6 5 4 3 2 1
MAINFILTER
115V : FUSE 2 X 6A
POWER ON/OFF
D FUSE 230V : FUSE 2 X 3.15A D
N
AC INPUT A BROWN
PE ROUND - SPAPEN-022
BLUE * NOTE SPAPEN-03-02
B
SQUARE- SPAPEN-21031
HEATER
9.4 Wiring diagram
THERMAL FUSE
L
BLUE 1 2
FUSE
BROWN 260 C
E YELLOW/GREEN
SPACE-2019 YELLOW/GREEN
EARTH
BLUE EARTH
1
2
3
4
5
6
C C
WIRING FOR115 OR 230V AC !!
NOTE
BROWN
YELLOW
BLUE
SPAPEN-03-18
START PRESS NO
YELLOW SPAPEN-03-09
COM NC
7
8
9 WHITE 2
10 WHITE 1 PT1600
SPAPEN-03-11
1
2
3
4
5
6
1
2
3
4
5
6
B B
230V AC 115V AC
CONTRAST
REV: 2 DATE: 27-10-2010 ENG: RS
PROJECT: PENGUIN
A FILENAME: HS21 WIRING.UTSCH A
COMPANY: THERMOPATCH BV
ADDRESS: DRAAIBRUGWEG 14-16
CITY 1332 AD ALMERE
COUNTRY: NETHERLANDS
INITIAL 10-01-2003 PAGE: 1 OF: 1
8 7 6 5 4 3 2 1
2610. Recycling
Choose to dispose of the machine responsibly when it has reached its end of life.
Electrical machinery, accessories and packaging should be recycled as much as possible
in an environmentally responsible manner.
• Dismantle the machine groups: steel parts / pneumatic components / electrical
components
• These can be separated and returned for recycling.
Always dispose according to current and locally applied guidelines for health and safety
and disposal requirements.
thermopatch.com
2711. Declaration of conformity
We,
Thermopatch B.V.
Draaibrugweg 14
1332 Almere
Netherlands
Declare under our own responsability that the heat sealing
machine:
Thermopatch HS-21-SQR Penguin
which this declaration refers to, is in accordance with the
conditions of the following Directive(s):
2014/30/EU (emc directive)
2014/35/EU (Low tension directive)
Netherlands, Almere, 01-9-2020
Jan Bausch,
Director
thermopatch.com
2812. Disclaimer
The information contained in these documents is confidential, privileged and only for the
information of the intended recipient and may not be used, published or redistributed
without the prior written consent of Thermopatch B.V.
The opinions expressed are in good faith and whilst every care has been taken in preparing
these documents, Thermopatch B.V. makes no representations and gives no warranties of
whatever nature in respect to these documents, including but not limited to the accuracy or
completeness of any information, facts and/or opinions contained therein.
Thermopatch B.V., its subsidiaries, the directors, employees and agents cannot be held
liable for the use and reliance of the opinions and findings in this document.
For any warranty Thermopatch B.V. refers to its general terms and conditions.
We can confirm that the machines we supply conform to CE when in standard configuration.
Using sealing pads of any format other than the standard supplied with the machine may
render the CE declaration invalid.
Thermopatch accepts no responsibility for any damage or injury that may result from
possible non-conformity.
Choosing an alternative configuration other than the standard is at the customer’s own
responsibility.
thermopatch.com
29Y600 Thermo-Seal-Jet
thermopatch.com
Thermopatch Corporate Headquarters USA T +1 315 446 8110 F +1 315 445 8046 sales@thermopatch.com
Thermopatch European Headquarters The Netherlands T +31 36 549 11 11 F +31 36 532 03 98 sales@thermopatch.nl
Thermopatch Australia Pty Ltd Australia T +61 39 532 57 22 F +38 62 805 52 32 marktpatchaust@bigpond.com.au
Thermopatch Canada Inc Canada T +15 19 748 50 27 F +15 19 748 15 43 broussel@thermopatch.com
Thermopatch UK United Kingdom T +44 15 397 22 122 F +44 15 397 21 000 team@thermopatch.uk
V. 3.0 ENG
Jan2014
V. 4.0 ENG
Jan2015You can also read