IMAGE & VIDEO SPECIFICATIONS - JANUARY 2016 - SOLIDWORKS 2016
←
→
Page content transcription
If your browser does not render page correctly, please read the page content below
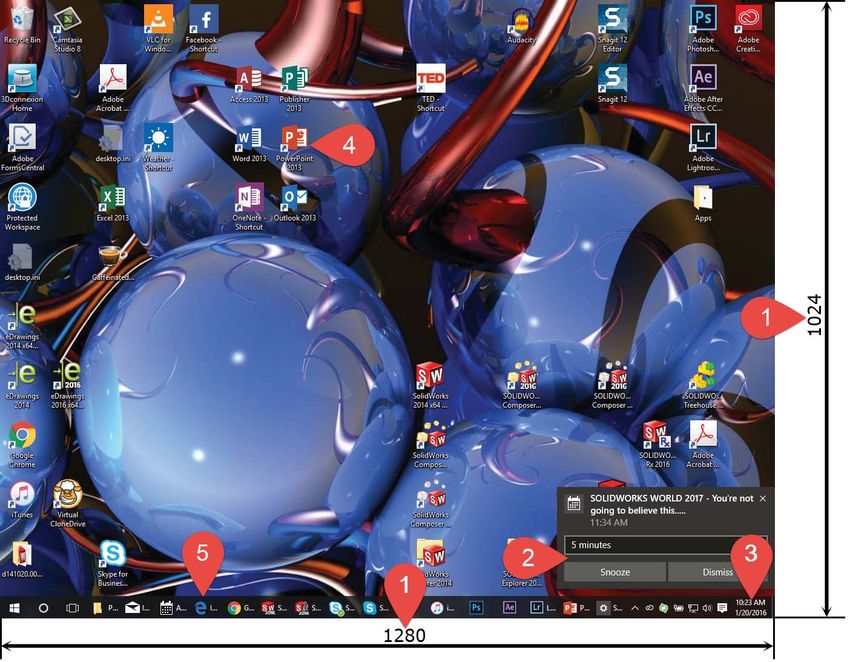
IMAGE & VIDEO SPECIFICATIONS
                                                                                  JANUARY 2016

THE IMPORTANCE OF MAKING IMAGES AND VIDEOS CONSISTENT
Images and videos of SOLIDWORKS software are quite often a prospect’s first experience of
Dassault Systèmes SOLIDWORKS or one of its products. To make this a positive experience, it is essential that we
provide a consistent look and feel to images and videos of all our products. This document details the exact
requirements for creating images and videos and should be adhered to when delivering content to the SOLIDWORKS
portfolio to the general public.
INTRODUCTION
IMPORTANCE OF CONSISTENT CONTENT
A QUICK COMPARISION
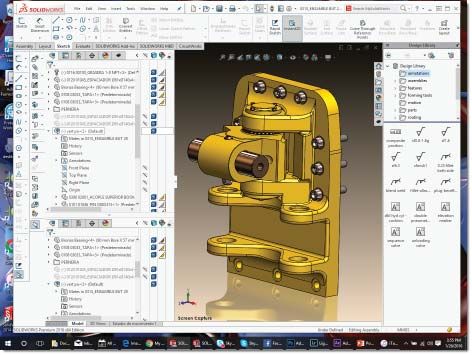
Compare these two screenshots.
The screenshot on the right breaks all the rules. Whereas
the screenshot below is inline with the standards defined
in this document.
Ask yourself the question: which application is more visually
appealing and showcased as simple and refined?
While this may seem a little extreme, variations of the
image on the right are a common occurrence and should be
avoided at all costs. Whether creating images or videos, all
visual SOLIDWORKS assets should be consistent.
These standards may vary slightly with each release of
SOLIDWORKS software and it’s recommended that this
document is referenced for each release.
Figure 1: SOLIDWORKS 2016 - Clean User Interface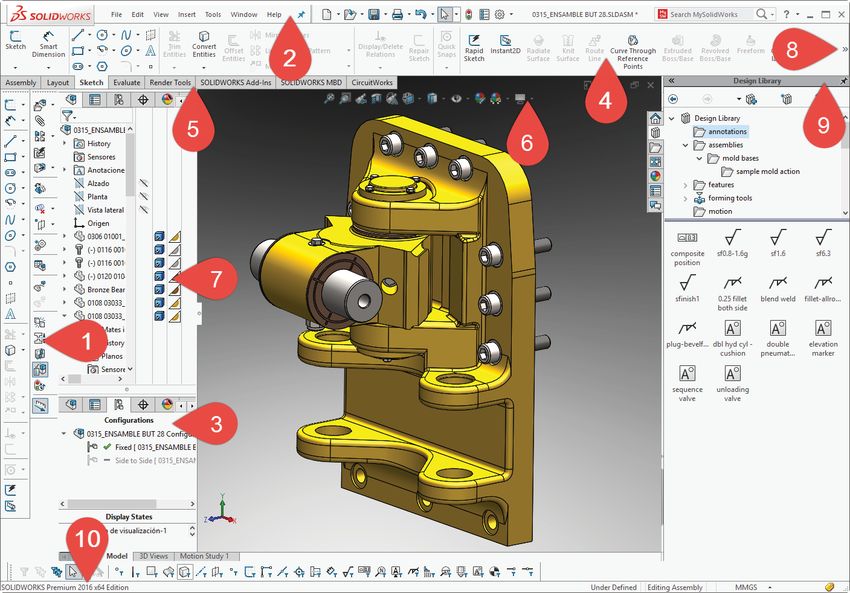
SETTING UP WINDOWS
CONSISTENCY IS KEY
MINIMIZE DISTRACTING INFORMATION
Setting up Windows to look right is an important first step of the process. Windows 10 is the latest supported operating system,
but Windows 7 & 8 can also be used for all images and videos. Previous versions of Windows, or Windows configured to look like
previous versions of Windows, is not acceptable.
For the most part the Windows desktop will not be visible to the viewer since SOLIDWORKS will be maximized to full screen and
will cover everything behind it. However, this is not sufficient because some elements can still be seen when using Windows Aero
on Windows 7, so it is important that any potential viewer distractions are reduced. Microsoft doesn’t offically support Aero for
Windows 8 and 10, and should not be added by 3rd party applicaitons.
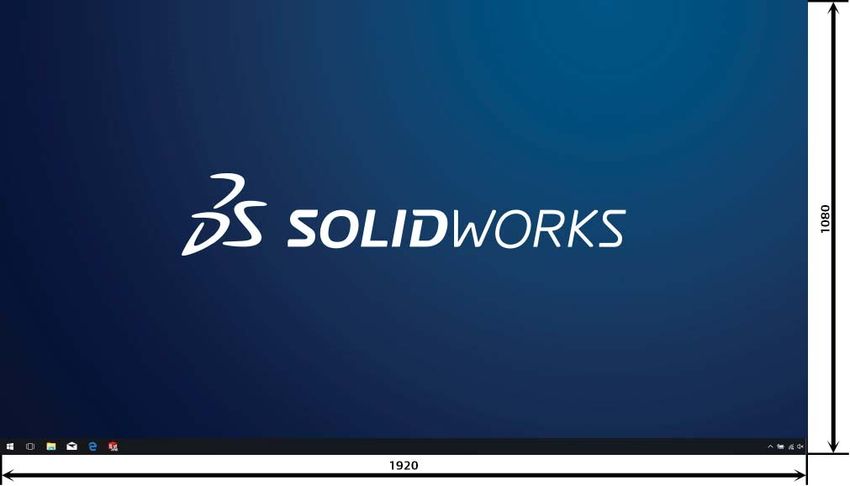
The screenshot below shows a Windows 10 desktop with a number of problems that can easily reduce customer engagement
simply because the user interface is far too distracting. Keeping the desktop clear and uncluttered like the screenshot shown in
Figure 2 ensures the viewer is focused on SOLIDWORKS and not on the Windows desktop. The following sections describe in detail
how Windows should be configured and must be followed exactly.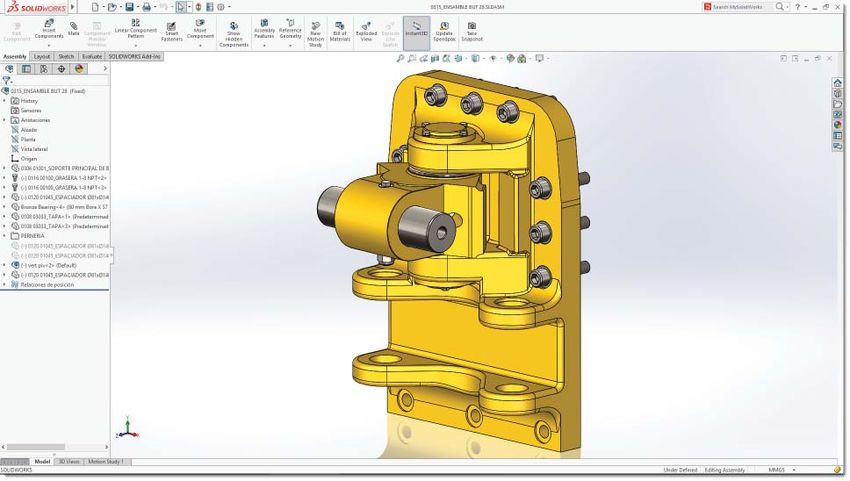
Screen Background Image & Border Size/Color To make the Windows desktop resemble the screenshot in Figure 2, double-click the “SOLIDWORKS 2016.deskthemepack” file attached to this PDF and open it. This will create a new Windows theme for you to use whenever you need to create images or videos of SOLIDWORKS software. If the attachment wasn’t displayed when the PDF was first opened, click the paperclip icon on the left to expand the attachments panel. For Windows 7 and 8.1, use the supplied “SOLIDWORKS 2016 - Win7_8.1.themepack” The “theme” adds the SOLIDWORKS background logo, sets the Windows border size to “1” to prevent black lines appearing next to the task pane when SOLIDWORKS is maximized, and sets the Windows color scheme to “frost”, which is the closest system color to the SOLIDWORKS window color. Screen Clutter There are times when it is necessary to show the Windows desktop, for example during a SOLIDWORKS Enterprise PDM demo or when using the Windows key ()and the Tab key () to switch between applications. Hiding application shortcuts and file icons on the desktop and closing unnecessary applications and Windows gadgets will reduce system overhead whilst recording, and reduce viewer distraction. To hide all desktop icons and Windows gadgets, right-click on the desktop, expand the “View” menu, and uncheck “Show desktop icons” and “Show desktop gadgets”. Remember to close all unused applications and consider terminating all unused services when recording videos to prevent unwanted pop-up messages and excessive system resource usage. System Clock The system clock, usually displayed in the lower right hand corner of the Windows taskbar, is not required for any videos. Most of the time the system clock will not be visible anyway, but it might be necessary to have it visible during SOLIDWORKS Enterprise PDM demonstrations. First, showing the system clock dates the recording, so even though the demonstration functionality may not have changed, the viewer may get the impression that the video is out of date. Second, any edits to the video become obvious if the time on the clock changes significantly during the video. To hide the system clock, right-click on the “up arrow” next to the Windows system tray and select “Properties”. This enables you to hide or show the system clock and other system icons that may be unnecessary.
Screen Resolution
The final SOLIDWORKS image or video size required is 1920x1080 pixels, which is a standard 16:9 - 1080p widescreen format.
Additionally, when creating customer facing collateral it’s important to keep SOLIDWORKS displayed at full-screen. If the need
to switch between products using the Windows keyboard shortcut “Alt-Tab” is the best option to minimize the disruption in
your workflow.
• Support for 4k monitors was announced with the launch of SOLIDWORKS 2016 however the recommeneded resolution for creating
  image and video collateral is 1920x1080.
• If using a high resolution monitor it is recommended that the Windows font scaling should NOT be adjusted over 100% as it creates
  distortions with the mouse cursor when hovering over an edge, vertex, or face in SOLIDWORKS.
When using Windows 10 the “Auto-hide” option provides acceptable results when creating videos for computers with a single
display. Should a secondary display be available then it’s recommended to move SOLIDWORKS to the secondary display at full-
screen and keep primary display for your preferred video or image editing software. When using two monitors, the Windows
Taskbar can reside on the primary display keeping the secondary display strictly for SOLIDWORKS products.

Figure 2: Windows 10 - Clean desktop/user interface.
If using Windows 7 or 8.1 the default operating system does not allow applications to appear on top of the taskbar and
“auto-hide” does not produce an acceptable results. When SOLIDWORKS is maximized in this state the taskbar can be seen
overlapping the bottom of the window. To get the exact size of 1920 x 1080 pixels for the final image or video, a custom screen
resolution of 1920 x 1120 pixels should be used to “hide” the standard 40 pixel high taskbar.
The exception to this rule is SOLIDWORKS Enterprise PDM. If you need to include the taskbar in your image or video, use an
exact 1920x1080 pixel screen resolution.
Laptop computers with NVIDIA graphics cards should follow these steps to create a custom
screen resolution. The process for creating custom screen resolutions on graphics cards
from other vendors may vary. For desktop computers, it may be necessary to use two
monitors – set one monitor to a 1920x1080 resolution and place the Windows taskbar on
the other.
Right-click on the Windows desktop and select “NVIDIA Control Panel”. If this option
does not appear on the menu then select “Screen resolution”, then “Advanced Settings”,
then select the tab in the dialog for your graphics card, and then select “Start the NVIDIA
Control Panel”.The layout of the NVIDIA Control Panel may vary depending upon your
graphics card and driver version. To ensure you are using a compatible graphics card with
full RealView capabilities and the correct driver for the version of SOLIDWORKS you are
running, click here.
Navigate to the “Manage custom resolutions” task and select “Create”. For “Horizontal
desktop pixels” enter “1920” and for “Vertical desktop lines” enter “1120”, then press
“Test”. If all is well, press “Yes” to accept the resolution and it will be added to your list of
available screen resolutions.
SUMMARY - SETTING UP SOLIDWORKS
•    Use the “themepack” file attached to this PDF
•    Hide desktop icons, gadgets, and the system clock
•    Close all unused applications and services, especially those with pop-up message windows
•    Final image or video size must be 1920 x 1080 pixels
•    Create a custom screen resolution of 1920 x 1120 pixels to avoid showing the taskbar or move the taskbar to an alternate
     screen
•    Do not use “auto-hide” on the taskbar on Windows 7 or 8.1.
•    SOLIDWORKS Enterprise PDM demos may include the taskbar, so use a resolution of 1920 x 1080 pixels

TOP 10 - USER INTERFACE CONSIDERATIONS
SOLIDWORKS has a very easy to use user interface, however it can be configured to include as many interface elements as
required. This enables long time users and power users to access commands that new users do not need in order to become
productive. To an unfamiliar user, this has the potential to make SOLIDWORKS look difficult to use. The SOLIDWORKS “out of
the box” or “demo” settings provide a clean and easy to navigate user experience as shown in Figure 1.

Figure 3:   SOLIDWORKS - User Interface Considerations:        1. Extra unused toolbars.     2. Menu bar pinned.
3 FeatureManager split. 4. Custom placed icons not used. 5. Unused add-ins enabled. 6. No RealView and wrong scene.
7. FeatureManager not at default width. 8. SOLIDWORKS window not maximized. 9. Task Pane pinned. 10. SOLIDWORKS
version number shown (Optional).
The following is a list of typical user interface mistakes that may go unnoticed when creating images and videos, but will
certainly be noticed by the end user. This list is in some order of importance, but all items should be followed if possible.
1.   Extra unused toolbars shown either floating or docked to the left, the bottom, or the top right of the user interface. Most of
     these icons are available on the Command Manager, which should be used at all times. If any icons are missing, customize
     the Command Manager and add them in a logical place, as long as the icons are relative to the functionality you are
     showing. The CommandManager should also have the descriptions for each command shown, not just the icons.
2.   Menu bar pinned. Most functionality can be accessed from icons on the Command Manager and should be used at
     all times. If any menu functionality is required, simply mouse over the SOLIDWORKS logo in the top left corner of the
     SOLIDWORKS window which will expand the menu bar temporarily.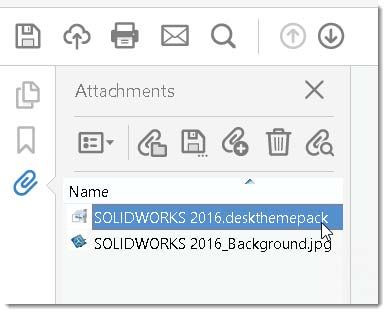
3.   FeatureManager split, showing unused tabs. Configurations and Display States should be accessed from the tabs in the
     main FeatureManager tree. Display States can also be accessed by right-clicking the double arrow icon at the top right of
     the FeatureManager. The FeatureManager should only be split during a simulation demo.
4.   Unused, unnecessary, or out of context icons added to the Command Manager. The Command Manager should use out of
     the box settings unless it helps in the flow of the demo.
5.   Unused add-ins enabled. SOLIDWORKS has a comprehensive toolset of core functionality and add-ins. Displaying all the
     add-in Command Manager tabs or Task Pane tabs just makes the user interface look busy. Unload any add-ins which are
     not relevant to the context of the image or video.
6.   Model does not use RealView, shadows, reflection, correct appearances, full scene anti-aliasing etc. The demo scene
     provides lighting with good contrast and enables all the eye-catching graphics capabilities of SOLIDWORKS. Select
     “Backdrop – Studio Room 2” from the “Apply Scene” pull-down menu at the top of the graphics area to get the correct
     lighting, then right-click in the graphics area and select “Edit Scene”, browse for softbox.png, then select “Stretch image
     to fit SOLIDWORKS window”, select OK then save your model. Also ensure your models use correct materials and correct
     appearances to look as lifelike as possible. For images, use ambient occlusion to provide an even more realistic result.
7.   FeatureManager, Property Manager, or Task Pane not set to default width. Unless you need to specifically expand the
     FeatureManager to show information in the tree, expand the Property Manager to show an element of the user interface
     (like Assembly Visualization), or expand the Task Pane to show the SOLIDWORKS Enterprise PDM tree, keep them at the
     default width. The default width can be set by dragging the edge of the Feature Manager or Task Pane until it “clicks” into
     place. SOLIDWORKS remembers the width of the FeatureManager for each document.
8.   SOLIDWORKS window not maximized so window border shows. Follow the instructions above to setup the Windows
     Desktop and then maximize the SOLIDWORKS window.
9.   Task Pane pinned. The Task Pane should only be pinned if it needs to be referenced frequently in a video, or is relevant to
     the image, such as in a SOLIDWORKS Enterprise PDM demo or when using SOLIDWORKS Toolbox.
10. SOLIDWORKS version displayed in the status bar. The version of SOLIDWORKS should only be shown in a “What’s New”
    demo for that particular version. Showing the version dates the image or video. By removing the version, images and
    videos made in previous versions of SOLIDWORKS can be used for years to come without having to recreate them. To
    remove the version number follow the instructions below.

SETTING UP THE SOLIDWORKS TOOLBARS AND MENUS
To quickly set the correct layout of the SOLIDWORKS toolbars and menus, double-click the “sldreg” file attached to this PDF.
This will create a backup of your current settings, then apply the standard layout required for images and videos. This standard
layout also sets the “shortcut” toolbar (also known as the “S” key) and mouse gestures, which should be used extensively during
any demo videos. Further customization may then be added to this standard layout if required, in the context of the image or
video, and without violating any of the rules set out above. Modify the shortcut toolbar and mouse gestures to suit your style
of working or to make your demo flow smoother.

REMOVING THE SOLIDWORKS VERSION
To remove the SOLIDWORKS version number from the status bar, a command
line “switch” must be added to the SOLIDWORKS startup shortcut. This “switch”
cannot be added to the SOLIDWORKS shortcut created during the install of
SOLIDWORKS, so a new one must be created manually.
To create a new shortcut, right-click on the Windows desktop, expand the “New”
menu, and select “Shortcut”.
In the dialog that appears, browse to the SOLIDWORKS executable which by
default can be found at: C:\Program Files\SOLIDWORKS Corp\SOLIDWORKS\
SLDWORKS.exe
Select “Next”, then enter a new name for the shortcut such as
“SOLIDWORKS 2016”. Next, right-click the new shortcut icon and select
“Properties”.
In the Properties dialog box, scroll to the end of the “Target” text
box, and after the quote marks type a space followed by the following:

• /SWGenericMainWinTitle

When creating images and videos, use this shortcut to start SOLIDWORKS.
Since the desktop icons will be hidden, adding the shortcut to the Windows taskbar
will enable quick and easy access. To do this, simply drag the shortcut from the
desktop to the taskbar along the bottom of the screen, then hide the desktop icons.
SUMMARY – SETTING UP SOLIDWORKS
• Use the “sldreg” file attached to this PDF.
• Hide unused toolbars, icons, and add-ins.
• Unpin the menu bar and task pane.
• Do not split the Feature Manager and keep it at default width.
• Use RealView at all times.
• Maximize the SOLIDWORKS window and remove the version number.
CREATING IMAGES
Once the Windows desktop, SOLIDWORKS window, and required final image are setup
correctly, use a screen capture tool such as SnagIt from TechSmith which will enable
you to select the exact 1920 x 1080 area to capture. Using the “Print Screen” button on
the keyboard and pasting the content of the clipboard into an image editing software
such as Microsoft Paint is sufficient, but will require editing to remove the Windows
taskbar from the bottom of the screen which may not be very easy.
Images to be used in videos, or viewed on the web, a computer screen, or projector (e.g.
in a PowerPoint presentation) should be saved in 32-bit true color plus alpha channel
PNG (Portable Network Graphics) format, using the demo scene as shown in Figure 7
and described in “Top 10 - User Interface Considerations”, section 6.
Images to be used in print should be saved in uncompressed 32-bit true color plus alpha
channel TIFF (Tagged Image File) format, using the CMYK color space and a 300 dpi
resolution. This is the standard format required by professional printers.
To give a professional appreaance, it’s necessary
to modify the SOLIDWORKS background to plain
white. To do this simply right-click on the graphics
area in SOLIDWORKS, selecting “Edit Scene”,
then setting the background drop-down menu to
“Color”.
To revert back to the default background, edit the
scene again and change the background image to
softbox.png.
To create an image of a SOLIDWORKS model only, excluding the SOLIDWORKS user
interface, follow the procedure above with a white background and turn off reflections,
otherwise they will appear to stop abruptly. The exception to this is if the image is to be
placed where the reflection falls off the bottom of the page or screen.
CREATING VIDEOS
For best results when creating videos of SOLIDWORKS software, use Camtasia Studio from TechSmith. Camtasia Studio version
8.0 or above installs the new TechSmith Screen Codec 2 which produces higher quality videos during screen recording. Failure
to do this may result in slow screen captures, dropped frames, and stuttering videos. When delivering the final edited video, it
is recommended to use TechSmith Screen Capture Codec as described below.
Setting up Camtasia is simple, set the
screen capture size to 1920 x 1080 and
move the screen capture rectangle to the
top left of the screen. If the Windows
desktop has been setup correctly, the
entire display should be enclosed by the
screen capture rectangle.IMPORTANT: If you are using Camtasia Studio 7 or below (not recommended), before starting any new recording using
Camtasia Recorder, the compression rate should be reset to “Faster Compression” every time to maintain a constant frame rate
of 15 fps (frames per second), otherwise dropped frames and stuttering videos may result. This is because Camtasia Studio,
used to edit the videos and render the final output, will default this setting to “Better Compression” every time it is used. If you
are using Camtasia Studio 8.0 or above, this is not an issue.
• In Camtasia Recorder, go to “Tools” , “Options...” , select the “Inputs” tab, then “Video settings...”, “Configure...”, then slide the
compression control all the way over to the left, and then press OK on each dialog to apply and dismiss. Keep the default screen
capture frame rate at 15fps.
Camtasia Recorder 7 Only!
Figure 4: Setting the compression rate in Camtasia Recorder 7.
After creating a screen capture video, edit it in Camtasia Studio to remove any pauses or mistakes. If the AVI videos are to be
edited in Adobe After Effects, Premiere Pro, or similar, the raw AVI footage must first be rendered with Camtasia Studio at
30 fps in high resolution using the TechSmith Screen Capture Codec. This will ensure that the video has better compression, but
also fixes issues with keyframes, intermediate frames, and seeking, so the footage will work better and be easier to use when
editing these videos in software other than Camtasia Studio.
Scripts & Voiceovers
Videos are an effective tool to demonstrate the benefits and capabilities of SOLIDWORKS software. The accompanying script
is just as important, to convey the intended message. After working out the flow of the demo and recording and editing the
video, write a script. The script should be precise and to the point and logically follow the flow of the demo whilst highlighting
the many business benefits of SOLIDWORKS software. It should be worded in such a way as to be usable as a prospect-facing
tool (i.e. if the video is shown to a prospect or customer, or is posted on YouTube, it conveys DS SOLIDWORKS and SOLIDWORKS
software in a professional way and talks about the benefits of using the software, not how to use it).
It is recommended that videos should be voiced over using your written script. This will help with the timing and intonation that
the final voice should use. Record your voice separately using Adobe Soundbooth or similar audio recording software, and then
use Camtasia Studio to match the voice to the video or vice versa, inserting or removing pauses if necessary.SUMMARY - IMAGES & VIDEO DELIVERABLES
• Images and videos should be 1920x1080 pixels
• On-screen images should be in 32-bit PNG format
• Print images should be in 32-bit uncompressed TIFF format, using CMYK color space at 300 dpi
• Videos should be recorded with “Faster Compression” at 15 fps
• Videos should be delivered in high resolution AVI with audio at 30 fps, using TechSmith Screen Capture Codec
Any questions should be directed to your contact at SOLIDWORKS Product Introduction or local Technical Territory Manager.
or registered trademarks of Dassault Systèmes or its subsidiaries in the U.S. and/or other countries. All other trademarks are owned by their respective owners. Use of any Dassault Systèmes or its subsidiaries trademarks is subject to their express written approval.
©2016 Dassault Systèmes. All rights reserved. 3DEXPERIENCE®, the Compass icon and the 3DS logo, CATIA, SOLIDWORKS, ENOVIA, DELMIA, SIMULIA, GEOVIA, EXALEAD, 3D VIA, 3DSWYM, BIOVIA, NETVIBES, and 3DEXCITE are commercial trademarks
Our 3DEXPERIENCE® platform powers our brand applications, serving 12 industries, and provides a
rich portfolio of industry solution experiences.
Dassault Systèmes, the 3DEXPERIENCE® Company, provides business and people with virtual universes to imagine sustainable innovations. Its
world-leading solutions transform the way products are designed, produced, and supported. Dassault Systèmes’ collaborative solutions foster social innovation,
expanding possibilities for the virtual world to improve the real world. The group brings value to over 190,000 customers of all sizes in all industries in more than
140 countries. For more information, visit www.3ds.com.
Americas Europe/Middle East/Africa Asia-Pacific
Dassault Systèmes Dassault Systèmes Dassault Systèmes K.K.
175 Wyman Street 10, rue Marcel Dassault ThinkPark Tower
Waltham, Massachusetts CS 40501 2-1-1 Osaki, Shinagawa-ku,
02451-1223 78946 Vélizy-Villacoublay Cedex Tokyo 141-6020
USA France JapanYou can also read