INPS VISION BASIC CLINICAL SYSTEM USER GUIDE FOR THE LOCUM GP & NEW STARTERS
←
→
Page content transcription
If your browser does not render page correctly, please read the page content below
InPS Vision
Basic Clinical System
     User Guide

 For the Locum GP
  & new starters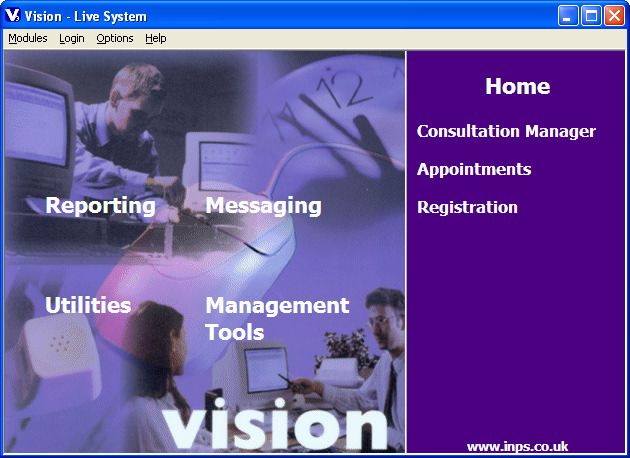
Contents
  Overview ......................................................................................................1
  Opening Vision .............................................................................................2
  User Defined Options in Consultation Manager: ..........................................3
  Select a patient.............................................................................................4
  The Consultation Screen ..............................................................................5
  Add Medical History .....................................................................................7
  Add Acute Prescription and Print..................................................................9
  Issue Repeat Prescription ..........................................................................11
  Reauthorise repeat.....................................................................................14
  Drug check displays ...................................................................................14
  Add drug or non-drug allergy or no known allergies ...................................16
  Adding Weight and Height..........................................................................17
  Adding BP ..................................................................................................18
  Adding Smoking .........................................................................................18
  Update an entry if you have made a mistake .............................................19
  Entering data using Guidelines...................................................................19
  Complete the Consultation .........................................................................21
  About Insight Solutions...............................................................................22
Why are we so good at what we do? .............................................................22
Become an Insight Member ...........................................................................22
Free of Charge Newsletters ...........................................................................22
What our customers say about us … .............................................................23
  Other Insight Products................................................................................24
Basic User Guide – Clinicians & Locums .......................................................24
Basic User Guide – Administrators ................................................................24
System Management & General House-keeping Guide ................................24
Other Manuals ...............................................................................................24
Posters...........................................................................................................24

   This document has been prepared by Insight Solutions to assist practices
   in their training and support of locum and additional staff. It has been
   provided electronically so that practices can re print it as often as they
   wish, but the copyright only allows use within a single practice and
   unauthorised transmission is strictly forbidden.

                             © Insight Solutions IT Services Ltd 2011
Getting Started with Vision Overview Vision is a Windows based program that accesses patient data stored on a clinical server in the practice or remotely at another location. To enable the programme to display the patient data the workstation must be logged onto the network using a valid user name and password that will have been set-up prior to access being granted to any of the workstations. This document assumes that the user can navigate a Windows workstation using the mouse or keyboard and that the workstation login process has been completed. Access to the clinical system is provided by the practice to individual users. Before attempting to access the system please ensure that you have a user account set-up and agree to comply with the relevant policies applicable to your role namely the Information Governance, Code of Confidentiality, Data Protection Act, Freedom of Information, Access to Health Records, IT Security Policy (including Email and Internet Use) and Computer Misuse Act. Before you are given access to the system the practice will check your compliance with these and any other policies in place. Vision Basic Clinician Locum Manual Aug 2011 V1 © Copyright 2011 Page 1
Opening Vision

         Double left click on Vision Icon

Select your login name from list provided
Click in Password window and enter password (not visible)
Click OK

Note: Once logged into the system you are responsible for all entries and
activity using your login. It is important that you do not permit anybody to use
your login or record any data whilst logged in as yourself. Your password will
require changing normally every 90 days and you must ensure that you keep
this password secure. If you believe that your login and password has been
used by anybody else you must notify the system manager immediately. You
can change your password at any time by selecting Login | Change Password
from the Vision Menu.

Vision Basic Clinician Locum Manual Aug 2011 V3
© Copyright 2011                                                           Page 2
You are presented with the vision main menu
Modules
Options
All modules available to your login are displayed by either selecting the
module within the displayed option or clicking Modules on the menu bar
Note: It is important that all modules are closed and you exit the
program before leaving or shutting down the computer.
User Defined Options in Consultation Manager:
Within the consultation manager there is a number of user defined options that can
be configured. The options are not included within the scope of this document;
however the practice will have configured your view to fit in with the policies and data
entry requirements applicable. Further information on setting up the consultation
manager view and options can be found in section 17 of the Training manuals.
Vision Basic Clinician Locum Manual Aug 2011 V3
© Copyright 2011 Page 3Consultation Manager
From the vision Main Menu select the consultation manager by clicking
once
Select a patient
Within the consultation manager click on the icon or press F3
Type the first few letters of the surname and initial e.g. smi j for John
smith and press Enter
A list of patients matching the search criteria used is displayed. Scroll
down or select the patient required and click OK
The patient record will display with the Name, Date of Birth, Gender
and Address displayed in the title bar
OR:
If the practice is using the Appointments module, then you can call the
next patient in from the Appointments List in Consultation Manager.
Clicking will display the appointments for the logged in user
The arrival status and any comments for the patient is displayed
Double clicking on the name will start the consultation for the selected
patient. If the practice uses a Jayex board using the Call Patient button
or right click (if Jayex board used) selects and displays the patient's
record and visually calls the patient in.
Now and again on the Appointments, press the Refresh icon so that
any last minute appointments made by the receptionists, or waiting
status, are updated on your Appointments list.
Vision Basic Clinician Locum Manual Aug 2011 V3
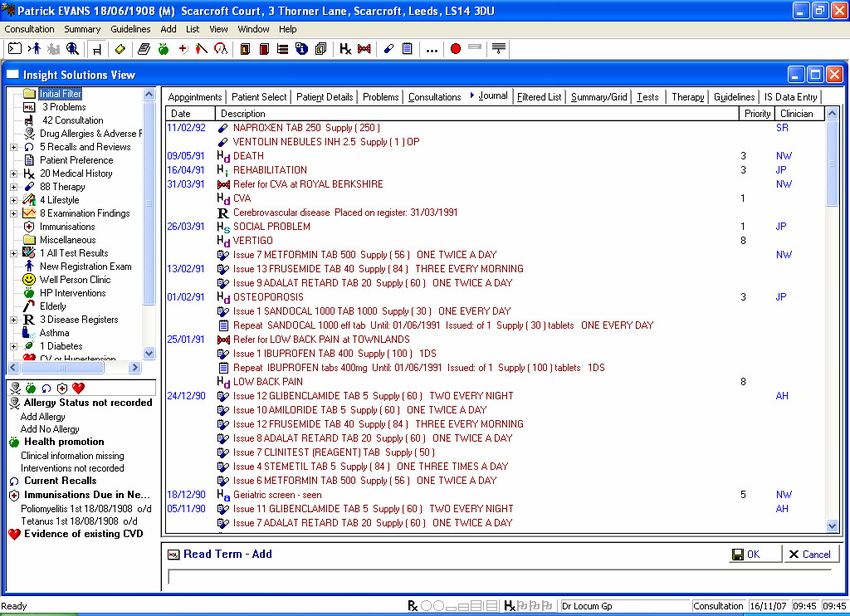
© Copyright 2011 Page 4The Consultation Screen
Patient data can be viewed within the consultation screen by either
clicking the relevant tab:
Acute
Appointment prescriptions
list
Repeat
prescriptions
Select
patient
Tabbed
Views
Complex
data view
(Structured Clinical
Data Area) Entries
Recalls and DataEntry
Data entry
missing data area
Area
Problems – Displays all active or past problems
Consultations – Displays data recorded under each consultation
Journal – Displays all entries by date of entry
Tests – Shows all test data (Laboratory, Imaging, Diagnostic etc).
Right clicking on any line will allow the data to be shown as a graph
Therapy – All therapy data including current repeat and acute
prescriptions
Guidelines – Practice index of data entry guidelines used for
recording clinical data
Filtered list – If any of the complex data types are selected entries will
display here
OR
Vision Basic Clinician Locum Manual Aug 2011 V3
© Copyright 2011 Page 5Click on the navigation pane (Medical Records Overview
column/Complex Data View) of the Patient Record (top left pane of
screen)
Click on the to expand the data types and click the line to display the
selected data
When viewing a patient record, prompts may be
displayed. These prompts indicate if some
important data is required for the patient.
Vision Basic Clinician Locum Manual Aug 2011 V3
© Copyright 2011 Page 6Add Medical History
Records are automatically stored either in a generalised Medical History or in
Structured Data Areas. Entries can be made either by clicking on the Journal
tab, or selecting a guideline if you are making multiple entries e.g. during a
clinic/review
1. Select the Journal tab of the patient record or click Add |
Medical History.
2. Click into the Read Term – Add field
Either:
3. Type in a keyword, such as headache and press Enter to
display the first matching entry. Then use the up ↑ and down ↓
keys to display the next or previous entry to find appropriate
term and click OK.
Or:
Enter a known READ code preceded by # and press Enter.
If the required entry is found move to Step 5.
4. If this is not the correct entry, double click or press the
function key to display a READ Dictionary screen, giving a list
based on the keyword entered. This will include READ
descriptions from different parts of the READ dictionary, shown
by the different codes, e.g. chapter 1 History and Symptoms or
Diagnostic codes starting with Capital ;letters
Vision Basic Clinician Locum Manual Aug 2011 V3
© Copyright 2011 Page 7If the required entry is shown on the list, double click on it.
The following options are available if the required entry is not listed:
Deselect by removing the tick from the box
(click with the left mouse button). This will display all matching
entries from the whole READ dictionary.
Bearing in mind the fact that many READ Terms do not have
keywords, it may be necessary to display entries by READ code.
To do this, highlight a suitable line and click on
to tick/check the box. A Find Read
Code screen will be displayed. To open one of the closed folders
and view the contents of that branch of the hierarchy, double
click on the symbol. The path through the hierarchy is clearly
visible by following the open folder symbol up the branch. The
selected entry is highlighted. To close an open folder, double
click on. Any entries with a 'piece of paper' symbol cannot be
expanded any further - they are at the bottom of that branch of
the hierarchy and can be selected.
Once the correct entry has been found and highlighted, click on
the OK button.
5. The History Add screen is displayed again with the READ term
you selected entered in READ Term for Characteristic. All you
need do now is press OK unless you want to make one of the
optional changes:
Vision Basic Clinician Locum Manual Aug 2011 V3
© Copyright 2011 Page 8You can also read