Introduction to iOS 8 Overview
←
→
Page content transcription
If your browser does not render page correctly, please read the page content below
Introduction to iOS 8

Overview
iOS 7 visually changed the entire iOS user interface from what users and developers had come to expect,
right from the first iPhone OS. IOS 8 continues with this by providing many frameworks for developers,
which allows users to control almost every aspect of their life straight from their iPhone. For example health
and fitness can be analyzed with HealthKit, passcodes are obsolescent with biometric authentication using
LocalAuthentication, App extensions open up a communication channel between 3rd party apps, and
HomeKit allows the ability to turn your house into a Home of the Future.

If iOS 7 was about delighting users, iOS 8 focuses on delighting developers with a whole range of these
tasty new tools.

This guide introduces the new APIs for Xamarin.iOS developers. In addition to the aforementioned this
includes:

      App Extensions
      Document Picker
      Handoff
      Unified Storyboards
      Updates to Games
      Updates to Photos
      Changes to Existing Frameworks

There are also a few APIs that have been deprecated in iOS 8, which are detailed at the end of this
document.

Requirements
The following are required to create beautiful iOS 8 apps in Xamarin Studio:

      Xcode 6 and iOS 8 – Apple’s Xcode 6 and iOS 8 APIs need to be installed and configured on the
      developer’s computer.
      Xamarin Studio – The latest version of Xamarin Studio should be installed and configured on the user
      device.
      iOS 8 Device or Simulator – An iOS device running the latest version of iOS 8 for testing.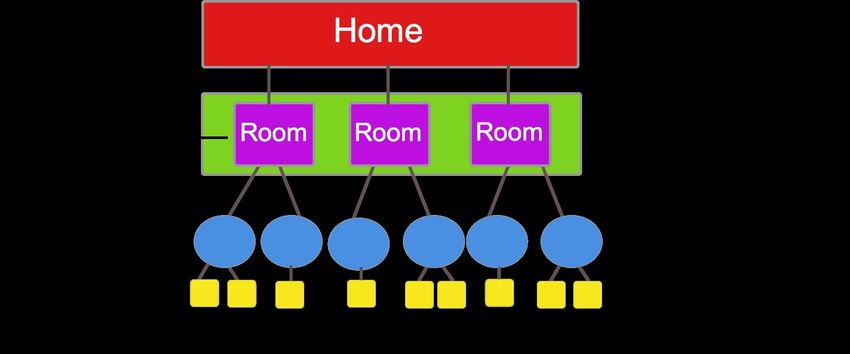
Home and Leisure
iOS 8 has helped to firmly plant Apple, and the iOS device straight into the heart of your home through the
use of HomeKit and HealthKit. In this section, we will look at how both these new frameworks work, and how
they can be integrated into your Xamarin.iOS application.

HomeKit

Controlling your appliances from your iPhone is not a new application of technology; many connected-home
products can be controlled via an iOS app. However HomeKit now takes this a step further by promoting a
common protocol for home automation devices, and by making a public API available to certain
manufacturers, such as iHome, Philips and Honeywell. To the user, this means that they can control almost
every aspect of their home seamlessly from inside one application. It is irrelevant for them to know they are
using a Philips Hue lightbulb, or a Nest alarm. Users can also chain numerous smart home processes
together into "Scenes".

With HomeKit, third-party apps and Siri can discover accessories and add them to their personal home
configuration database, edit and act upon this data, and communicate with accessories and their services to
perform an action.

Configuration

The diagram below shows the basic hierarchy of the configuration of HomeKit accessories:

To get started with HomeKit, developers will need to make sure that their provisioning profile has the
HomeKit service selected. Apple has also provided developers with a HomeKit simulator add-in for Xcode.
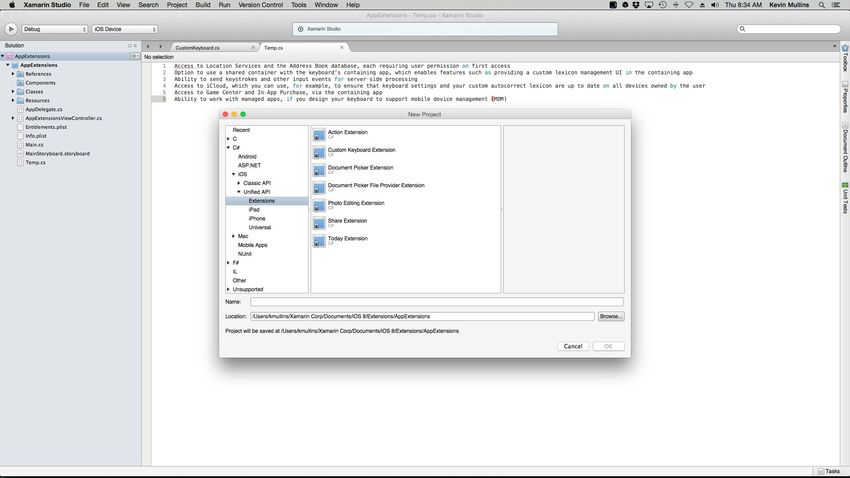
This can be found in the Apple Developer Center, under Hardware IO Tools for Xcode.

HealthKit

HealthKit is a framework introduced in iOS 8 that provides a centralized, coordinated, and secure datastore
for health-related information. The operating system ensures the privacy and security of health information
and, with the Health app, a dashboard for the user. With the user’s permission, applications can read and
write a broad variety of health information.

For more information on using this in your Xamarin.iOS app, refer to the Introduction to HealthKit guide.

Extending iPhone Functionality
With iOS8, developers are being given much more control over who can use their app, and increased
capability for more open communication between third party apps. Features such as App Extensions and
Document Picker open a world of possibilities for how applications can be used in Apple’s ecosystem.

App Extensions

App Extensions, to oversimplify, are a way for third party apps to communicate with one another. To
maintain high security standards and to uphold the integrity of the sandboxed apps, this communication
doesn’t happen directly between applications. Instead, it is carried out by an Extension in the middle.

The first step in creating an App Extension is to define the correct extension point—this is important in
ensuring the behavior and availability of the correct APIs. To create an App Extension in Xamarin Studio,
add it to an existing application by adding a new project to your solution.

In the New Project dialog navigate to C# > iOS > Unified API > Extensions, as illustrated in the
screenshot below:
The New Project dialog provides seven new project templates for creating App Extensions, and are
discussed below. Notice that many of the extensions relate to other new APIs in iOS, such as Document
Picker:

      Action – This allows developers to create unique custom action buttons allowing users to performs
      certain tasks
      Custom Keyboard – This allows developers to add to the range of built in Apple Keyboards by adding
      their own custom one. The popular keyboard, Swype uses this to bring their keyboard to iOS.
      Document Picker – This contains a Document Picker View Controller which allows users to access
      files outside the application’s sandbox.
      Document Picker File Provider – This provides secure storage for files using the Document Picker.
      Photo Editing – This expands on the filters and editing tools already provided by Apple in the Photos
      application to give users more control and more options when editing their photos.
      Today – This gives applications the ability to display widgets in the Today section of Notification
      Center.

For more information on using App Extensions in Xamarin, refer to the Introduction to App Extensions guide.

Touch ID

Touch ID was introduced in iOS 7 as a means of authenticating the user—similar to a passcode. However, it
was limited to unlocking the device, using the App Store, using iTunes, and authenticating the iCloud
keychain only

There are now two ways to use Touch ID as an authentication mechanism in iOS 8 applications using the
Local Authentication API. It is currently not possible to use Local Authentication to authenticate remotely.

Firstly, it aids the existing Keychain services through the use of new Keychain Access Control Lists (ACLs).
Keychain data can be unlocked with the successful authentication of a users fingerprint.

Secondly, LocalAuthentication provides two methods to authenticate your application locally. Developers
should use CanEvaluatePolicy to determine if the device is capable of accepting Touch ID, and then
EvaluatePolicy to start the authentication operation.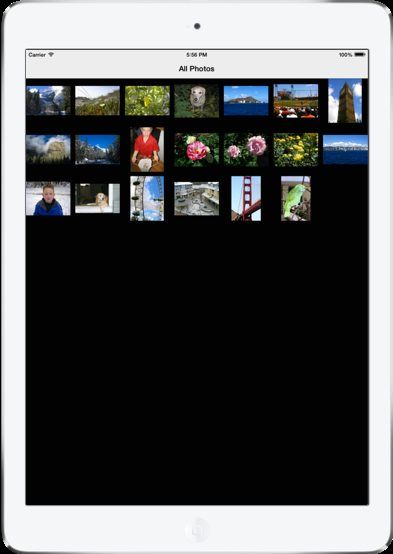
For more information on Touch ID and to learn how to integrate it into a Xamarin.iOS application, refer to the
Introduction To TouchID guides.

Document Picker

Document Picker works with a users iCloud drive to allow the user to open files that have been created in a
different app, import and manipulate them and export them back out again. This creates an intuitive
workflow, and therefore a much better experience, for users. iCloud syncing takes this one step further—any
changes made in one application will also be reflect consistently across all your devices.

To learn about the Document Picker in more depth, and to learn how to integrate it into a Xamarin.iOS
application, refer to the Introduction to The Document Picker guide.

Handoff

Handoff, which is part of the larger Continuity feature, takes a step further towards integrating OS X and
iOS. This includes cross-platform AirDrop, the ability to take iPhone calls, SMS on the iPad and Mac, and
improvements in tethering from your iPhone.

Handoff works with iOS 8 and Yosemite, and requires an iCloud account to be logged in to all the different
devices you want to use. It should work with most pre-installed Apple apps, including Safari, iWork, Maps,
Calendars, and Contacts.

Unified Storyboards
iOS 8 includes a new simpler to use mechanism for creating the user interface—the unified storyboard. With
a single storyboard to cover all of the different hardware screen sizes, fast and responsive views can be
created in a true "design once, use many" style.

Prior to iOS8, developers used UIInterfaceOrientation to distinguish between portrait and landscape
modes, and UIInterfaceIdiom to distinguish between iOS devices. In iOS8 it is no longer necessary to
create separate storyboards for iPhone and iPad devices—orientation and device are determined by using
Size Classes.

Every device is defined by a Size Class, in both the vertical and the horizontal axis, and there are two types
of size classes in iOS 8:

      Regular - this is for either a large screen size (such as an iPad) or a gadget that gives the impression
      of a large size (such as a UIScrollView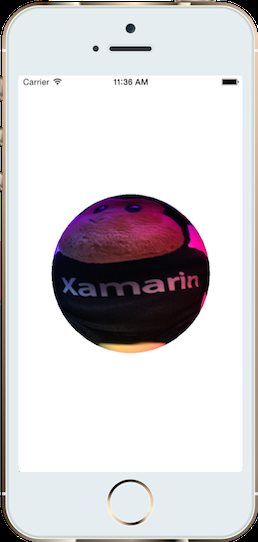
Compact - this is for smaller devices (such as the iPhone). This size takes into account the orientation
      of the device.

If the two concepts are used together, the result is a 2 x 2 grid that defines the different possible sizes that
can be used in both the differing orientations, as seen in the following diagram:

For more information about size classes, including how to get started and a walkthrough refer to the
Introduction to Unified Storyboards and Walkthrough - Using Unified Storyboards guides.

Photos

Photo Kit

Photo Kit is a new framework that allows applications to query the system image library and create custom
user interfaces to view and modify its contents. It includes a number of classes that represent image and
video assets, as well as collections of assets such as albums and folders.

Model Objects

Photo Kit represents these assets in what it calls model objects. The model objects that represent the
photos and videos themselves are of type PHAsset. A PHAsset contains metadata such as the asset’s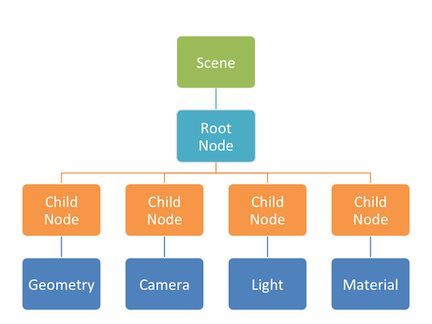
media type and its creation date. Similarly, the PHAssetCollection and PHCollectionList classes
contain metadata about asset collections and collection lists respectively. Asset collections are groups of
assets, such as all the photos and videos for a given year. Likewise, collection lists are groups of asset
collections, such as photos and videos grouped by year.
Querying Model Data
Photo Kit makes it easy to query model data through a variety of fetch methods. For example, to retrieve all
images, you would call PFAsset.Fetch, passing the PHAssetMediaType.Image media type.
PHFetchResult fetchResults = PHAsset.FetchAssets (PHAssetMediaType.Image, null);
The PHFetchResult instance would then contain all the PFAsset instances representing images. To get
the images themselves, you use the PHImageManager (or the caching version,
PHCachingImageManager) to make a request for the image by calling RequestImageForAsset. For
example, the following code retrieves an image for each asset in a PHFetchResult to display in a
collection view cell:
public override UICollectionViewCell GetCell (UICollectionView collectionView,
NSIndexPath indexPath)
{
var imageCell = (ImageCell)collectionView.DequeueReusableCell (cellId,
indexPath);
imageMgr.RequestImageForAsset ((PHAsset)fetchResults
[(uint)indexPath.Item], thumbnailSize,
PHImageContentMode.AspectFill, new PHImageRequestOptions (), (img, info) =>
{
imageCell.ImageView.Image = img;
});
return imageCell;
}
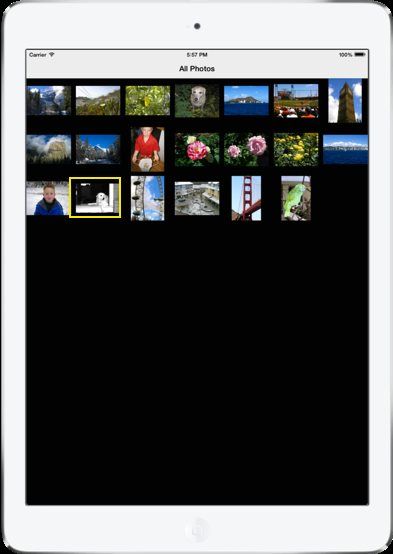
This results in a grid of images as shown below: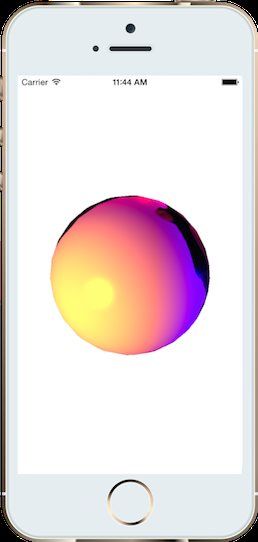
Saving Changes to the Photo Library

That’s how to handle querying and reading data. You can also write changes back to the library. Since
multiple interested applications are able to interact with the system photo library, you can register an
observer to be notified of changes using a PhotoLibraryObserver. Then, when changes come in, your
application can update accordingly. For example, here’s a simple implementation to reload the collection
view above:

class PhotoLibraryObserver : PHPhotoLibraryChangeObserver
{
     readonly PhotosViewController controller;
     public PhotoLibraryObserver (PhotosViewController controller)

     {
           this.controller = controller;
     }

     public override void PhotoLibraryDidChange (PHChange changeInstance)
     {
           DispatchQueue.MainQueue.DispatchAsync (() => {
           var changes = changeInstance.GetFetchResultChangeDetails
(controller.fetchResults);
           controller.fetchResults = changes.FetchResultAfterChanges;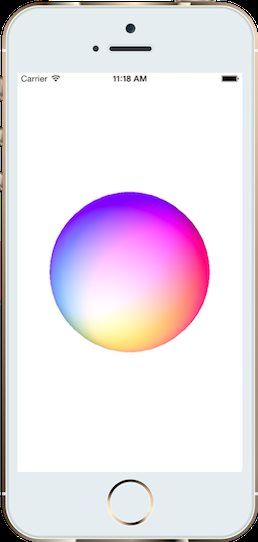
controller.CollectionView.ReloadData ();
});
}
}
To actually write changes back from your application, you create a change request. Each of the model
classes has an associated change request class. For example, to change a PHAsset, you create a
PHAssetChangeRequest. The steps to perform changes that are written back to the photo library and sent
to observers like the one above are:
Perform the editing operation.
Save the filtered image data to a PHContentEditingOutput instance.
Make a change request to publish the changes form the editing output.
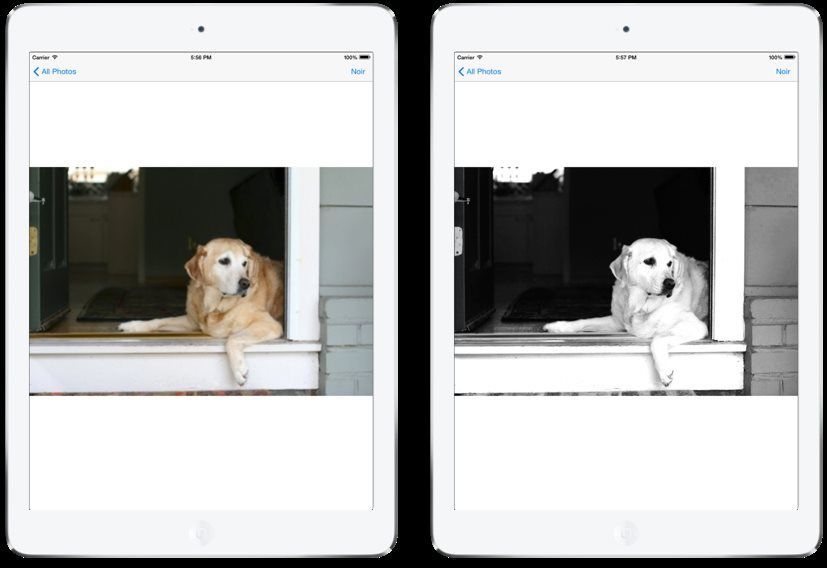
Here’s an example that writes back a change to an image that applies a Core Image noir filter:
void ApplyNoirFilter (object sender, EventArgs e)
{
Asset.RequestContentEditingInput (new
PHContentEditingInputRequestOptions (), (input, options) => {
// perform the editing operation, which applies a noir filter in this case
var image = CIImage.FromUrl (input.FullSizeImageUrl);
image =
image.CreateWithOrientation((CIImageOrientation)input.FullSizeImageOrientation);
var noir = new CIPhotoEffectNoir {
Image = image
};
var ciContext = CIContext.FromOptions (null);
var output = noir.OutputImage;
var uiImage = UIImage.FromImage (ciContext.CreateCGImage (output,
output.Extent));
imageView.Image = uiImage;
//
// save the filtered image data to a PHContentEditingOutput instance
var editingOutput = new PHContentEditingOutput(input);
var adjustmentData = new PHAdjustmentData();
var data = uiImage.AsJPEG();
NSError error;
            data.Save(editingOutput.RenderedContentUrl, false, out error);
            editingOutput.AdjustmentData = adjustmentData;
      //
      // make a change request to publish the changes form the editing output
            PHPhotoLibrary.GetSharedPhotoLibrary.PerformChanges (() => {
                 PHAssetChangeRequest request =
PHAssetChangeRequest.ChangeRequest(Asset);
                 request.ContentEditingOutput = editingOutput;
          },
          (ok, err) => Console.WriteLine ("photo updated successfully: {0}", ok));
    });
}

When the user selects the button, the filter is applied:

And thanks to the PHPhotoLibraryChangeObserver, the change is reflected in the collection view when the
user navigates back: Games Scene Kit Scene Kit is a 3D scene graph API that simplifies working with 3D graphics. It was first introduced in OS X 10.8, and has now come to iOS 8. With Scene Kit creating immersive 3D visualizations and casual 3D games does not require expertise in OpenGL. Building on common scene graph concepts, Scene Kit abstracts away the complexities of OpenGL and OpenGL ES, making it very easy to add 3D content to an application. However, if you are an OpenGL expert, Scene Kit has great support for tying in directly with OpenGL as well. It also includes numerous features that complement 3D graphics, such as physics, and integrates very well with several other Apple frameworks, such as Core Animation, Core Image and Sprite Kit. Scene Kit is extremely easy to work with. It is a declarative API that takes care of rendering. You simply set up a scene, add properties to it, and Scene Kit handles the rendering of the scene. To work with Scene Kit you create a scene graph using the SCNScene class. A scene contains a hierarchy of nodes, represented by instances of SCNNode, defining locations in 3D space. Each node has properties such as geometry, lighting and materials that affect its appearance, as illustrated by the following figure:
Create a Scene

To make a scene appear on screen, you add it to an SCNView by assigning it to the view’s Scene property.
Additionally, if you make any changes to the scene, SCNView will update itself to display the changes.

scene = SCNScene.Create ();
sceneView = new SCNView (View.Frame);
sceneView.Scene = scene;

Scenes can be populated from files exported via a 3d modeling tool, or programmatically from geometric
primitives. For example, this is how to create a sphere and add it to the scene:

sphere = SCNSphere.Create (10.0f);
sphereNode = SCNNode.FromGeometry (sphere);
sphereNode.Position = new SCNVector3 (0, 0, 0);
scene.RootNode.AddChildNode (sphereNode);

Adding Light

At this point the sphere won’t display anything because there is no light in the scene. Attaching SCNLight
instances to nodes creates lights in Scene Kit. There are several types of lights ranging from various forms
of directional lighting to ambient lighting. For example the following code creates an omnidirectional light on
the side of the sphere:

// omnidirectional light
var light = SCNLight.Create ();
var lightNode = SCNNode.Create ();
light.LightType = SCNLightType.Omni;
light.Color = UIColor.Blue;
lightNode.Light = light;
lightNode.Position = new SCNVector3 (-40, 40, 60);
scene.RootNode.AddChildNode (lightNode);

Omnidirectional lighting produces a diffuse reflection resulting in an even lighting, sort of like shining a
flashlight. Creating ambient light is similar, although it has no direction as it shines equally in all directions.
Think of it like mood lighting :)

// ambient light
ambientLight = SCNLight.Create ();
ambientLightNode = SCNNode.Create ();
ambientLight.LightType = SCNLightType.Ambient;
ambientLight.Color = UIColor.Purple;
ambientLightNode.Light = ambientLight;
scene.RootNode.AddChildNode (ambientLightNode);

With the lights in place, the sphere is now visible in the scene.
Adding a Camera

Adding a camera (SCNCamera) to the scene changes the point of view. The pattern to add the camera is
similar. Create the camera, attach it to a node and add the node to the scene.

// camera
camera = new SCNCamera {
     XFov = 80,
     YFov = 80
};
cameraNode = new SCNNode {
     Camera = camera,
     Position = new SCNVector3 (0, 0, 40)
};
scene.RootNode.AddChildNode (cameraNode);

As you can see from the code above, Scene Kit objects can be created using constructors or from the
Create factory method. The former allows using C# initializer syntax, but which one to use is largely a matter
of preference.

With the camera in place, the entire sphere is visible to the user:
With the camera in place, the entire sphere is visible to the user:
You can add additional lights to the scene as well. Here is what it looks like with a few more omnidirectional
lights:
Additionally, by setting sceneView.AllowsCameraControl = true, the user can change the point of
view with a touch gesture.
Materials
Materials are created with the SCNMaterial class. For example to add an image onto the sphere’s surface,
set the image to the material’s diffuse contents.
material = SCNMaterial.Create ();
material.Diffuse.Contents = UIImage.FromFile ("monkey.png");
sphere.Materials = new SCNMaterial[] { material };This layers the image onto the node as shown below: A material can be set to respond to other types of lighting too. For example, the object can be made shiny and have its specular contents set to display specular reflection, resulting in a bright spot on the surface, as shown below:
shown below:

Materials are very flexible, allowing you to achieve a lot with very little code. For example, instead of setting
the image to the diffuse contents, set it to the reflective contents instead.

material.Reflective.Contents = UIImage.FromFile ("monkey.png");

Now the monkey appears to sit visually within the sphere, independent of the point of view.

Animation

Scene Kit is designed to work well with animation. You can create both implicit or explicit animations, and
can even render a scene from a Core Animation layer tree. When creating an implicit animation, Scene Kit
provides its own transition class, SCNTransaction.

Here’s an example that rotates the sphere:

SCNTransaction.Begin ();
SCNTransaction.AnimationDuration = 2.0;
sphereNode.Rotation = new SCNVector4 (0, 1, 0, (float)Math.PI * 4);
SCNTransaction.Commit ();

You can animate much more than rotation though. Many properties of Scene Kit are animatable. For
example, the following code animates the material’s Shininess to increase the specular reflection.

SCNTransaction.Begin ();
SCNTransaction.AnimationDuration = 2.0;
material.Shininess = 0.1f;
SCNTransaction.Commit ();

Scene Kit is very straightforward to use. It offers a wealth of additional features including constraints,
physics, declarative actions, 3D text, depth of field support, Sprite Kit integration and Core Image integration
to name just a few.

Sprite Kit

Sprite Kit, the 2D game framework from Apple, has some interesting new features in iOS 8 and OS X
Yosemite. These include integration with Scene Kit, shader support, lighting, shadows, constraints, normal
map generation, and physics enhancements. In particular, the new physics features make it very easy to
add realistic effects to a game.
Physics Bodies Sprite Kit includes a 2D, rigid body physics API. Every sprite has an associated physics body (SKPhysicsBody) that defines the physics properties such as mass and friction, as well as the geometry of the body in the physics world. Creating a Physics Body from a Texture Sprite Kit now supports deriving the physics body of a sprite from its texture. This makes it easy to implement collisions that look more natural. For example, notice in the following collision how the banana and monkey collide nearly at the surface of each image: Sprite Kit makes creating such a physics body possible with a single line of code. Simply call SKPhysicsBody.Create with the texture and size: sprite.PhysicsBody = SKPhysicsBody.Create (sprite.Texture, sprite.Size); Alpha Threshold In addition to simply setting the PhysicsBody property directly to the geometry derived from the texture, applications can set and alpha threshold to control how the geometry is derived. The alpha threshold defines the minimum alpha value a pixel must have to be included in the resulting physics body. For example, the following code results in a slightly different physics body:
sprite.PhysicsBody = SKPhysicsBody.Create (sprite.Texture, 0.7f, sprite.Size);

The effect of tweaking the alpha threshold like this fine-tunes the previous collision, such that the monkey

falls over when colliding with the banana:

Physics Fields

Another great addition to Sprite Kit is the new physics field support. These allow you to add things such as
vortex fields, radial gravity fields and spring fields to name just a few.

Physics fields are created using the SKFieldNode class, which is added to a scene just like any other
SKNode. There are a variety of factory methods on SKFieldNode to create different physics fields. You can
create a spring field by calling SKFieldNode.CreateSpringField(), a radial gravity field by calling
SKFieldNode.CreateRadialGravityField(), and so on.

SKFieldNode also has properties to control field attributes such as the field strength, the field region, and
the attenuation of field forces.

Spring Field

For example, the following code creates a spring field and adds it to the scene:

SKFieldNode fieldNode = SKFieldNode.CreateSpringField ();
fieldNode.Enabled = true;
fieldNode.Position = new PointF (Size.Width / 2, Size.Height / 2);
fieldNode.Strength = 0.5f;
fieldNode.Region = new SKRegion(Frame.Size);
AddChild (fieldNode);

You can then add sprites and set their PhysicsBody properties so that the physics field will affect the
sprites, as the following code does when the user touches the screen:

public override void TouchesBegan (NSSet touches, UIEvent evt)
{
     var touch = touches.AnyObject as UITouch;
     var pt = touch.LocationInNode (this);
     var node = SKSpriteNode.FromImageNamed ("TinyBanana");
     node.PhysicsBody = SKPhysicsBody.Create (node.Texture, node.Size);
     node.PhysicsBody.AffectedByGravity = false;
     node.PhysicsBody.AllowsRotation = true;
     node.PhysicsBody.Mass = 0.03f;
     node.Position = pt;
     AddChild (node);
}

This causes the bananas to oscillate like a spring around the field node:

Radial Gravity Field

Adding a different field is similar. For instance, the following code creates a radial gravity field:

SKFieldNode fieldNode = SKFieldNode.CreateRadialGravityField ();
fieldNode.Enabled = true;
fieldNode.Position = new PointF (Size.Width / 2, Size.Height / 2);
fieldNode.Strength = 10.0f;
fieldNode.Falloff = 1.0f;
This results in a different force field, where the bananas are pulled radially about the field:
Other Changes
As well as the major changes in iOS 8 that are described above, Apple has additionally updated many
existing frameworks. These are detailed below:
Core Image – Apple has expanded upon its image processing framework by adding better support for
the detection of rectangular regions, and QR codes inside images. Mike Bluestein explores this in his
blog post entitled Image Detection in iOS 8
Deprecated APIs
With all the improvements made in iOS 8, a number of APIs have deprecated. Some of these are detailed
below.
UIApplication – The methods and properties used for registering remote notifications have
deprecated. These are registerForRemoteNotificationTypes and enabledRemoteNotificationTypes.UIViewController – Traits and size classes have replaced the methods and properties used to
describe interface orientation. Refer to the Introduction to Unified Storyboards for more information on
how to use these.
UISearchDisplayController – This has been replaced by UISearchController in iOS8.
Summary
In this article we looked at some of the new features introduced by Apple in iOS 8.You can also read