LEGO MINDSTORMS EV3 Introduction to Programming
←
→
Page content transcription
If your browser does not render page correctly, please read the page content below

Introduction to Programming
LEGO® MINDSTORMS® EV3
                  Teacher’s Guide
      The Introduction to Programming EV3 Curriculum was
       produced by Carnegie Mellon’s Robotics Academy
   The Introduction to Programming EV3 Curriculum is not a LEGO® MINDSTORMS® product.
    LEGO Education or the LEGO Group does not sponsor, endorse, or support this product.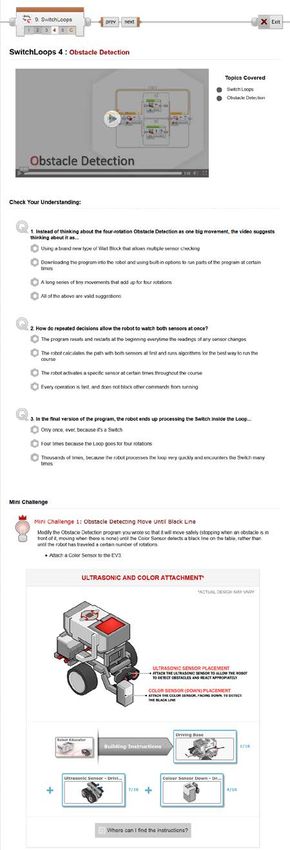
Preface
There is a growing recognition that Computational Thinking Practices are critical for
all students to learn. They form the cornerstone of the language of innovation, and
will drive all future STEM discoveries. They are a new set of “basic skills” that all
students need to know.

But what are they? At first glance, concepts like “consider problems analytically”
and “use data to inform decisions” seem abstract and difficult to comprehend.
Educational robotics systems like the EV3 provide a much-needed tool to make
them real and approachable.

Consider the first few activities in this curriculum: students program a robot to drive
fixed distances in set patterns. Even these simple programming constructs require
precise, thoughtful communication between student and robot – how far should
the robot move? How far should it turn? As the challenges become more complex,
students learn to break the large problems down into simpler ones, and construct
solutions with care, one step at a time.

Sensors add the element of data and make key information about the robot’s
environment available; numeric abstractions become a reality – 35 centimeters to
the nearest wall, turn 90 degrees – enable the student to make smart decisions
about the robot’s behavior.

These practices – precise logical thinking, using data to make decisions, analyzing
problems, and building solutions in teams – are critical in all forms of problem-
solving, not just robotic ones.

Robotics activities are concrete, contextualized, and provide immediate feedback
– important factors in satisfying a student’s desire for success and creating the
motivation to continue learning. Students also learn about the robotics technologies
themselves, which impact all modern industries, from agriculture to healthcare,
banking, manufacturing, transportation, energy, and security. The pervasiveness of
robotics technologies, from airplane autopilots, to bank machines, to smartphones,
to self-driving cars helps students to be “engaged learners” as they believe that the
content that they are studying is important or will be valuable to them.
The Introduction to Programming curriculum is just that: an introduction. For many
teachers this will be your first experience at teaching robotics and programming. If
you need help, the Robotics Academy has lots of free resources on its website and
regularly offers teacher courses. If you have questions or find issues, we would love
to hear from you.

Enjoy your school year.

Ross Higashi
Ross Higashi ,					                                 Robin Shoop,
Robotics Academy Learning Scientist 		              Robotics Academy Director

                                                                                          1
           The Virtualto
       Introduction    NXT is not a LEGO®
                         Programming      MINDSTORMS®
                                        EV3            product.
                                            ©2014 Carnegie      LEGO
                                                           Mellon    Education
                                                                  Robotics Academy
             or the LEGO Group does not sponsor, endorse, or support this product
Table of Contents

 Table of Contents
 3
 4
         FAQ
         Checklist
                                                    21 The Movement Unit
                                                    21-28   The Moving Straight Chapter
                                                    29-35   The Turning Chapter
 1       Introduction
 5       What is the Introduction to Programming    36 The Sensor Unit
         EV3 Curriculum?                            36-42   The Touch Sensor Chapter
 6       Why should I use the Introduction to       43-49   The Ultrasonic Sensor Chapter
         Programing EV3 Curriculum?                 50-55   The Gyro Sensor Chapter
 6       What are the Curriculum’s Learning         56-62   The Color Sensor Chapter
         Objectives?
 6       When should I use the EV3 Curriculum in
         my class?
                                                    63 The Robot Decisions
 7       How do I use the Curriculum?                  Unit
 8       What topics are covered in each Unit?      63-69   The Loop Chapter
 9       What “Big Ideas” does the Curriculum       70-76   The Switch Chapter
         teach?                                     77-82   The Switch Loops Chapter
                                                    83-86   The Line Follower Chapter
 10 Standards
 10      Math Practices
                                                    87 The Final Challenge
                                                    87-89   Final Challenge Resources
 10      Math Content
                                                    90-91   The Search and Rescue Challenge
 11      Common Core English/Language Arts
 11
 12
         Next Gen Science Standards
         Computer Science Standards
                                                    92 Reproducibles
                                                    Pages 92 - 142 Unit Quizzes, Answer Keys,
 13 Classroom Setup                                        Handouts, Worksheets and Rubrics
                                                    Note: We have been asked by practicing teachers
         How should student work stations be        NOT to make these public and so they are not
         setup?
                                                    printed with this document. They are made available
         What are the System Requirements?
                                                    with the curriculum.

 14 In the classroom
 14      General layout of all Units
 14-17   Batteries, Firmware, Ports, Menus
 18 -19 Big Ideas that all students will learn
 20      Using the EV3 Software

                                                                                                          2
                The Virtualto
            Introduction    NXT is not a LEGO®
                              Programming      MINDSTORMS®
                                             EV3            product.
                                                 ©2014 Carnegie      LEGO
                                                                Mellon    Education
                                                                       Robotics Academy
                     or the LEGO Group does not sponsor, endorse, or support this product
Frequently Asked Questions

FAQ

 Frequently Asked Questions (FAQ)
 Before starting
 ►► Will Introduction to Programming help me teach to Standards?
      Yes! See Standards, pages 10 - 12.
 ►► What do I need to prepare for class?
      See Checklist, page 4 and Best Workstation Setup page 15.
 ►► What topics are covered?
      See Topics, page 8 and General Layout, page 14.
 ►► What’s the lesson structure?
      See How To Use, page 5.
 ►► I already have programming tutorials in my software. Is this the same thing?
      No. Introduction to Programming focuses on building critical thinking skills through programming,
          rather than rote knowledge of code. See What are the Big Ideas taught..., page 9.

 During class
 ►► How do I begin with Introduction to Programming in my class?
      See How do I use the Introduction to Programming Curriculum in my classroom, page 7.
 ►► Are there notes available to help me teach the lessons?
      Yes. Every page in Introduction to Programming is summarized and annotated starting on page
          14. There are additional notes at the beginning of each chapter.
 ►► What do I do about students who go faster/slower than the others?
      All lessons are self-paced, so minor variation in pacing is not a problem. You can also include or
           omit activities marked as Optional, and even let students work ahead on later chapters.

 After class
 ►► Are there quizzes or homework?
      Each Chapter includes one or more Reflection Questions designed to let students apply their
         skills and knowledge to a more sophisticated and writing-intensive task.
      You can find additional Handouts, Worksheets and Rubrics starting on page 92.

                                                                                                           3
            The Virtualto
        Introduction    NXT is not a LEGO®
                          Programming      MINDSTORMS®
                                         EV3            product.
                                             ©2014 Carnegie      LEGO
                                                            Mellon    Education
                                                                   Robotics Academy
                or the LEGO Group does not sponsor, endorse, or support this product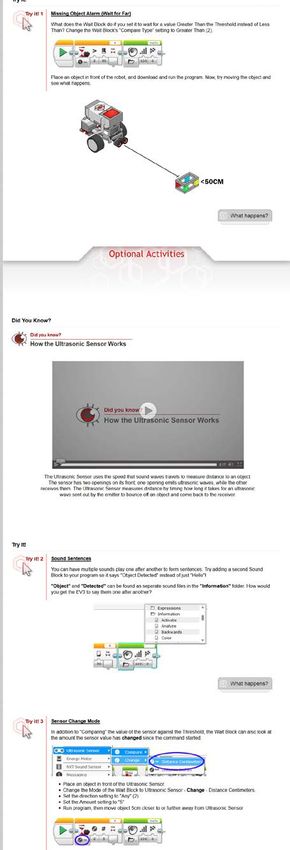
Introduction to the Teacher

Checklist

   Checklist
      Identify the Focus of your Lesson
      Robotics can be used to teach to lots of standards. This curriculum is designed
      to introduce students to how to program, an important part of robotics, but not the
      only thing that you can teach through robotics. Please read pages 5 - 12 of this
      guide to learn more.

      Set up the student workstations
      See page 13, Workstation Setup.

      (Recommended) Build the Driving Base for each robot
      Since mechanisms aren’t the focus of this module, pre-building the basic robot
      for your students can save multiple weeks of class time and allow them to begin
      work immediately on Day 1. The plans can be found in the Moving Straight Unit
      page 23.

      Become familiar with the lessons
      See page 7 to become familiar with the lesson flow. The general layout of the
      Introduction to Programming the EV3 Curriculum is found on page 14. Review
      the first couple lessons starting with Moving Straight on page on page 21.

      Determine overall pacing for the module
      Identify key dates that you would like to have each project due by; make these
      clear to students in your syllabus or assignment sheets.

      Review Big Ideas and Computational Thinking
      See pages 18 and 19.

      Review and print the Reflection Questions for each chapter
      Chapter review questions, answer guides, and rubrics begin on page 92.
      Note: The reflection questions can be used as class discussion questions, given as homework,
      or as a quiz.

                                                                                                     4
             The Virtualto
         Introduction    NXT is not a LEGO®
                           Programming      MINDSTORMS®
                                          EV3            product.
                                              ©2014 Carnegie      LEGO
                                                             Mellon    Education
                                                                    Robotics Academy
                 or the LEGO Group does not sponsor, endorse, or support this product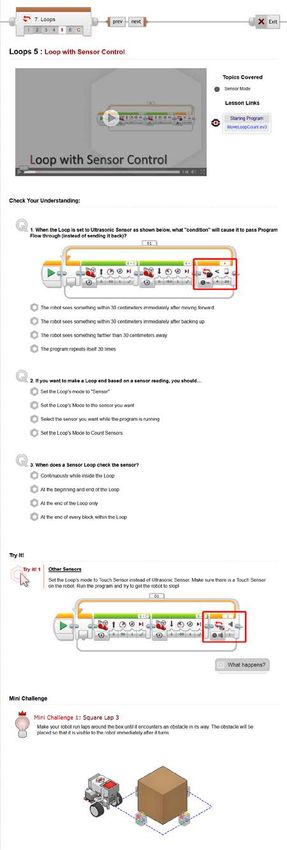
Introduction to the Teacher

Checklist

 What is the Introduction to Programming EV3 Curriculum?
10 Projects and One Capstone Programming Challenge
   The Introduction to Programming EV3 Curriculum is a curriculum module designed
   to teach core computer programming logic and reasoning skills using a robotics
   engineering context. It contains a sequence of 10 projects (plus one capstone
   challenge) organized around key robotics and programming concepts.

   Each project comprises a self-contained instructional unit in the sequence,
   and provides students with:
   ►► An introduction to a real-world robot and the context in which it operates

   ►► A challenge that the robot faces

   ►► A LEGO-scale version of the problem for students to solve with their robots

   ►► Step-by-step guided video instruction that introduces key lesson concepts
      (e.g. Loops) by building simple programs that progress toward the challenge task

   ►► Built-in questions that give students instant feedback on whether they
      understood each step correctly, to aid in reflection and self-pacing

   ►► Semi-guided “Try It!” exploration activities that expose additional uses for and
      variants on each behavior

   ►► Semi-open-ended Mini-Challenges which ask students to use the skill they
      have just learned to solve a relevant small portion of the final challenge

   ►► The Unit Challenge based on the original robot’s problem, for students to solve
      in teams as an exercise and demonstration of their mastery of the concept

   ►► Additional Reflection Questions found in the back of this Teacher’s Guide allow
      you to assess the depth of students’ understandings while challenging them to
      apply their learning to a higher-order problem-solving and writing task.

                                                                                         5
             The Virtualto
         Introduction    NXT is not a LEGO®
                           Programming      MINDSTORMS®
                                          EV3            product.
                                              ©2014 Carnegie      LEGO
                                                             Mellon    Education
                                                                    Robotics Academy
                or the LEGO Group does not sponsor, endorse, or support this product
Introduction to the Teacher

Checklist

                  Why should I use the Introduction to
                   Programming EV3 Curriculum?
   Introduction to Programming provides a structured sequence of programming
   activities in real-world project-based contexts. The projects are designed to get
   students thinking about the patterns and structure of not just robotics, but also
   programming and problem-solving more generally.
   By the end of the curriculum, students should be better thinkers, not just coders.

              What are the Learning Objectives of the
          Introduction to Programming EV3 Curriculum?
   ►► Basic concepts of programming
        • Commands
        • Sequences of commands
   ►► Intermediate concepts of programming
        • Program Flow Model
        • Simple (Wait For) Sensor behaviors
        • Decision-Making Structures
             • Loops
             • Switches
   ►► Engineering practices
        • Building solutions to real-world problems
        • Problem-solving strategies
        • Teamwork

      When should I use the Introduction to Programming
               EV3 Curriculum with my class?
   Introduction to Programming the EV3 is well-suited for use at the beginning of a
   robotics class, as it will allow students to engage immediately and begin building
   core programming and problem-solving skills before undertaking more ambitious
   open-ended projects later in the course. This curriculum module should take
   approximately 6 weeks.

                                                                                        6
              The Virtualto
          Introduction    NXT is not a LEGO®
                            Programming      MINDSTORMS®
                                           EV3            product.
                                               ©2014 Carnegie      LEGO
                                                              Mellon    Education
                                                                     Robotics Academy
                or the LEGO Group does not sponsor, endorse, or support this product
Introduction to the Teacher

Checklist

          How do I use the Introduction to Programming
                  EV3 Curriculum in my class?
   Introduction to Programming is designed for student self-pacing in small groups,
   preferably pairs. Each pair of students should work together at one computer, with
   one EV3 robot.
   Curriculum tasks are designed to involve some – but not extensive – mechanical
   consideration, so that hands-on design tasks may remain authentic without
   becoming logistically difficult.
   Solutions will not require parts in excess of those included in the 45544 EV3 Core
   set, so it is sufficient to leave each team with one kit (although access to additional
   parts may allow students to construct more creative solutions to problems).
   A typical plan for an Introduction to Programming chapter is:
   1. View the introductory video as a class, or in individual groups, then review the
      challenge task for the unit
      •   In a group, identify and note key capabilities the robot must develop, and
          problems that must be solved in individual engineering journals or class logs
          (e.g. on sticky paper posted on the walls)
   2. Groups proceed through the video trainer materials at their own pace, following
      the video instruction directly, and constructing solutions to the Try It! and Mini-
      Challenge steps as they go
   3. Each group constructs its own solution to the Unit Challenge
      •   Groups may be asked to document their solutions in journals or logs, and
          especially to explain how they overcame the key problems identified at the
          start of the unit
   4. Assign the Reflective Question for the chapter
      •   Students answer the Reflection Question for the chapter individually, as an in-
          class or homework assignment
      •   Reflection Questions for each chapter can be found in the Reproducibles
          section of this Teacher’s Guide

                                                                                             7
              The Virtualto
          Introduction    NXT is not a LEGO®
                            Programming      MINDSTORMS®
                                           EV3            product.
                                               ©2014 Carnegie      LEGO
                                                              Mellon    Education
                                                                     Robotics Academy
                or the LEGO Group does not sponsor, endorse, or support this product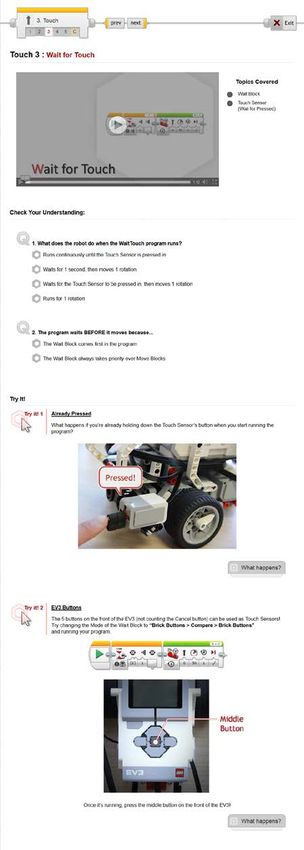
Introduction to the Teacher

Checklist

                 What topics are covered in each Unit?

    Unit Name                                    Main Topics
    1. Moving Straight                           Motors, Sequences of Commands,
                                                 Block Settings, Downloading and
                                                 Running Programs, Move Steering Block
    2. Turning                                   Turning, Types of Turns, Move Steering
                                                 vs. Move Tank Block
    3. Move Until Touch                          Sensors, Wait For Block, Touch Sensor,
                                                 Move Until Behaviors
    4. Move Until Near                           Ultrasonic Sensor, Thresholds
    5. Turn for Angle                            Gyro Sensor, Compensating for Sensor
                                                 Error
    6. Move until Color                          Color Sensor
    7. Loops                                     Loops, Patterns of Behavior
    8. Switches                                  Switches, Conditional Reasoning
    9. Switch-Loops                              Obstacle Detection Behavior, Repeated
                                                 Decisions Pattern
    10. Line Follower (Mini-Unit)                Line Following (a Repeated Decisions
                                                 Pattern Behavior)
    11. Final Challenge                          Cumulative Application of Skills and
                                                 Knowledge

                                                                                          8
             The Virtualto
         Introduction    NXT is not a LEGO®
                           Programming      MINDSTORMS®
                                          EV3            product.
                                              ©2014 Carnegie      LEGO
                                                             Mellon    Education
                                                                    Robotics Academy
               or the LEGO Group does not sponsor, endorse, or support this product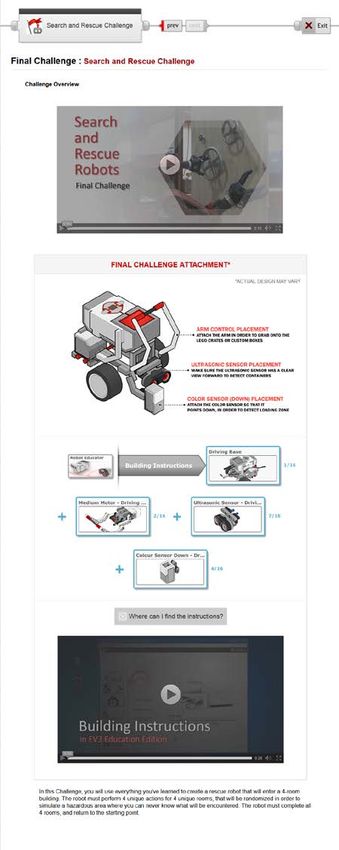
What are the Big Ideas taught in the
       Introduction to Programming EV3 Curriculum?

Robotics can be something you teach with, as well as something you teach about.
Introduction to Programming uses robots, and covers robotics content, but ultimately
seeks to give students experience and access to a much broader set of skills and
perspectives called Computational Thinking.
►► Big Idea #1: Programming is Precise
   If you want a robot to do something, you need to communicate that idea with
   mathematical and logical precision, or it won’t quite be what you intended.
►► Big Idea #2: Sensors, Programs, and Actions
   Data from sensors gives a robot information about its environment. A program
   uses that data to make decisions, and the robot Acts on those decisions. Data
   underlies the core of the entire process.
►► Big Idea #3: Make Sense of Systems
   To understand the way something works, construct a mental “model” of it in your
   head that captures the important features and rules of the system. This helps you
   make sense of it, and also gives you a tool to “play out” (similar) new scenarios in
   your head to predict what would happen.
►► Big Idea #4: Break Down Problems and Build Up Solutions
   To solve a difficult problem, try breaking it down into smaller problems. Then,
   solve the smaller problems, building up toward a solution to the big problem.
►► Big Idea #5: Computational Thinking Applies Everywhere
   These skills – mathematical and logical clarity, using data, systems thinking with
   mental models, and problem solving – are not just for robotics. They are key to
   solving many problems in the world.
A video introduction to these topics can be found in the “Big Ideas” block of the
Basics section of the product.

                                                                                          9
           The Virtualto
       Introduction    NXT is not a LEGO®
                         Programming      MINDSTORMS®
                                        EV3            product.
                                            ©2014 Carnegie      LEGO
                                                           Mellon    Education
                                                                  Robotics Academy
             or the LEGO Group does not sponsor, endorse, or support this product
What Standards does the Introduction to
Programming EV3 Curriculum address?
Common Core Mathematics Practices
Skills math educators at all levels should seek to develop in their students
Standard (CCSS.Math.Practice) Introduction to Programming the EV3
MP1 Make sense of problems and persevere in Chapters are all based around solving real-world
solving them robot problems; students must make sense of
the problems to inform their solutions
MP2 Reason abstractly and quantitatively Programming requires students to reason about
physical quantities in the world to plan a solution,
then calculate or estimate them for the robot
MP4 Model with mathematics Many processes, including the process of
programming itself, must be systematically
modeled on both explicit and implicit levels
MP6 Attend to precision Robots require precise (and accurate) input, or
their output action will be correspondingly sloppy
MP7 Look for and make use of structure Understanding the structure of the physical
environment, the interrelated components of
robot hardware and software, and commands
within a program are vital to successful solutions
MP8 Look for and express regularity in repeated Any programmed solution to a class of
reasoning problems relies on the programmer recognizing
and exploiting important patterns in the
problem structure. There is also an emphasis
throughout the module on recognizing common
programmatic patterns, as well as patterns within
a solution that invite the use of Loops.
Common Core Mathematics Content
Standard (CCSS.Math.Content) Introduction to Programming the EV3
6.RP.A.1 Understand the concept of a ratio Students use ratio language to describe and
and use ratio language to describe a ratio make use of the relationship between quantities
relationship between two quantities such as Wheel Rotations and Distance Traveled
6.RP.A.2 Understand the concept of a unit The relationship between Wheel Rotations
rate a/b associated with a ratio a:b with b!=0, and Distance Traveled is a rate, customarily
and use rate language in the context of a ratio understood through a unit rate such as “# cm per
relationship rotation”.
6.R.A.3 Use ratio and rate reasoning to solve Students are required to apply ratios and rates
real-world and mathematical problems when they build their prototype examples of their
real world robots.
7.RP.A.3 Use proportional relationships to solve Comparisons between rate-derived quantities
multistep ratio and percent problems. are common during robot navigation tasks.
Common Core English Language Arts
10
The Virtualto
Introduction NXT is not a LEGO®
Programming MINDSTORMS®
EV3 product.
©2014 Carnegie LEGO
Mellon Education
Robotics Academy
or the LEGO Group does not sponsor, endorse, or support this productWhat Standards does the Introduction to
Programming EV3 Curriculum address? (continued)
Standard (CCSS.ELA-Literacy) Introduction to Programming the EV3
WHST.6-8.1 Write arguments focused on Reflection Questions ask students to analyze,
discipline-specific content. evaluate, and synthesize arguments in response
[See also: WHST.6-8.1.a to WHST.6-8.1.e] to robotics and programming problems
WHST.6-8.4 Produce clear and coherent writing Reflection Question tasks include composing
in which the development, organization, and technical critiques, technical recommendations,
style are appropriate to task, purpose, and and creative synthesis.
audience.
Next Generation Science Standards (NGSS)
Standard Introduction to Programming the EV3
MS-ETS1-2. Evaluate competing design Solving challenges requires students to create
solutions using a systematic process to and evaluate both hardware and software
determine how well they meet the criteria and designs according to scenario scoring criteria.
constraints of the problem. Some Reflection Questions require students to
make recommendations between competing
alternatives based on criteria that they define.
MS-ETS1-4. Develop a model to generate When solving more difficult and complex
data for iterative testing and modification of a challenges, students are guided toward iterative
proposed object, tool, or process such that an testing and refinement processes. Students
optimal design can be achieved. must optimize program parameters and design.
HS-ETS1-2. Design a solution to a complex real- Problem Solving methodology for challenges
world problem by breaking it down into smaller, directs students to break down large problems
more manageable problems that can be solved into smaller solvable ones, and build solutions
through engineering. up accordingly; challenges give students
opportunities to practice, each of which is based
on a real-world robot
HS-ETS1-3. Evaluate a solution to a complex Some Reflection Questions require students
real-world problem based on prioritized criteria to make recommendations about real-world
and trade-offs that account for a range of policies (e.g. requiring sensors on automobiles)
constraints, including cost, safety, reliability, and based on the impact of that decision
aesthetics as well as possible social, cultural,
and environmental impacts.
11
The Virtualto
Introduction NXT is not a LEGO®
Programming MINDSTORMS®
EV3 product.
©2014 Carnegie LEGO
Mellon Education
Robotics Academy
or the LEGO Group does not sponsor, endorse, or support this productWhat Standards does the Introduction to
Programming EV3 Curriculum address? (continued)
Computer Science Principles Framework (CSP)
Learning Objective Introduction to Programming the EV3
1.1.1 Use computing tools and techniques to Challenge activities result in the creation
create artifacts. [P2] of a (simple) algorithmic solution and an
accompanying program that implements it.
1.1.2 Collaborate in the creation of Students work in teams to accomplish tasks.
computational artifacts. [P6]
1.1.3 Analyze computational artifacts. [P4] Students perform debugging on their own code,
as well as analyze and evaluate others’ code
and suggested code in Reflection Questions.
1.3.1 Use programming as a creative tool. [P2] Students use programming to solve model
challenges based on challenges real robots face.
2.2.1 Develop an abstraction. [P2] Robots gather information about the world
through sensors, which turn physical qualities of
the world into digital abstractions. Students must
understand and work with this data to develop
then implement their solution algorithms.
2.3.1 Use models and simulations to raise and Students construct and use a “program flow”
answer questions. [P3] model of programming itself to understand how
the robot uses data to make decisions and
control the flow of its own commands.
4.1.1 Develop an algorithm designed to be Students develop solution algorithms to
implemented to run on a computer. [P2] each challenge and mini-challenge problem
before implementing them as code. Reflection
Questions also ask students to evaluate
algorithms expressed as pseudocode.
4.2.1 Express an algorithm in a language. [P5] Students develop code to robotics challenges in
the EV3 Programming Language.
5.1.1 Explain how programs implement Students must communicate solution ideas
algorithms. [P3] within groups and as part of class discussion, as
well as in Reflection Questions.
5.3.1 Evaluate a program for correctness. [P4] Students test and debug their own code, and
evaluate others’ in the Reflection Questions.
5.3.2 Develop a correct program. [P2] Programmed solutions to challenges must work.
5.3.3 Collaborate to solve a problem using Students develop solutions in teams.
programming. [P6]
5.4.1 Employ appropriate mathematical and Relationships such as “distance per wheel
logical concepts in programming. [P1] rotation” are important to making solutions work.
7.4.1 Connect computing within economic, Reflection Questions ask students to make
social, and cultural contexts. [P1] evaluative recommendations based on the
impacts of robotic solutions in context.
12
The Virtualto
Introduction NXT is not a LEGO®
Programming MINDSTORMS®
EV3 product.
©2014 Carnegie LEGO
Mellon Education
Robotics Academy
or the LEGO Group does not sponsor, endorse, or support this productWhat is the best setup for student workstations?
Ideally, each pair of students will work together at one computer, with one EV3 robot.
Set up each workstation with:
• LEGO® MINDSTORMS® Education EV3 Programming Software installed
from its DVD
• Education version required*
• Access to the Introduction to Programming LEGO® MINDSTORMS® EV3
curriculum software
• This can be installed locally or on a local network server via DVD
• This may also be accessed remotely via internet, if your school’s
network infrastructure and policies allow
• Two pairs of headphones with headphone splitters
• One pair for each student
• Avoid using speakers, as multiple workstations in the same classroom
will generate too much overlapping noise
• One 45544 LEGO® MINDSTORMS® Education Set
What are the System Requirements for the
Introduction to Programming EV3 Curriculum?
LEGO® MINDSTORMS® Education EV3 Programming Software: See packaging
Introduction to Programming EV3 Curriculum
• HTML5-compatible browser (Firefox, Chrome, Internet Explorer 10+)
• Tablets (iPad, Android, Windows) with HTML5 browsers should work as well,
if accessing the curriculum from the Internet
* Retail versions of the EV3 set do not include the Gyro Sensor or software support for it by default
13
The Virtualto
Introduction NXT is not a LEGO®
Programming MINDSTORMS®
EV3 product.
©2014 Carnegie LEGO
Mellon Education
Robotics Academy
or the LEGO Group does not sponsor, endorse, or support this productWhat is the general layout of the
Introduction to Programming EV3 Curriculum?
Introduction to Programming
LEGO® MINDSTORMS® EV3
This is the main menu. Click any section to
open the first step, or click a page number to
go directly to the page.
Basics Unit
Getting Started: Set up the robot and learn
about its basic operation and maintenance
Big Ideas: Five big ideas that will be
important throughout the course
Using the Software: General usage patterns
in the EV3 Programming Software
Behaviors Unit
Movement: Use sequential commands to
make the robot move and turn
Sensors: Use Sensors to stop the robot in
different situations
Decisions: Use Loops and Switches to
control the program with smarter decisions
Final Challenge Unit
Combine the techniques of earlier units to
tackle a more complex challenge
14
The Virtualto
Introduction NXT is not a LEGO®
Programming MINDSTORMS®
EV3 product.
©2014 Carnegie LEGO
Mellon Education
Robotics Academy
or the LEGO Group does not sponsor, endorse, or support this productBasics - Getting Started
Basics> Getting Started Chapter
The Getting Started portion is designed to get a new EV3 user up and running as
quickly as possible. Instructors should follow along with all steps, but the first two
pages in the chapter could be considered optional for students.
Key Concepts: EV3 operation and maintenance, battery requirements, firmware
►► Getting Started 1: Batteries
Walks through the options and procedures for powering the EV3
►► Getting Started 2: Firmware
Introduces the concept of firmware and walks through the process of updating
the EV3 to the latest version
►► Getting Started 3: Ports
Identifies and describes the functions of the various ports on the EV3
►► Getting Started 4: Menus
Walks through and explains the main areas and functions available through the
EV3’s on-screen menus
Hints:
►► Go through Battery and Firmware installation prior to using the robots with
students. You may want students to view these videos as well for familiarity,
should issues arise.
►► The Ports (3rd) and especially Menus (4th) videos are very helpful for students.
Teacher’s Edition Note: This chapter’s notes will point out common structural elements such as Check
Your Understanding Questions. In later sections, common notes will be omitted, as they are the same
throughout the product.
15Basics - Getting Started Getting Started 1: Batteries This step walks you through the process of charging and installing the rechargeable battery pack in the EV3. Batteries Video Walks you through the process of charging and installing the battery. Follow along with the video as it covers each step! Check Your Understanding Questions These questions are designed to quickly check comprehension of the topics covered in the video. Answer them before moving on. Getting Started 2: Downloading Firmware This step explains the idea behind Firmware, and walks you through the process of loading firmware onto the robot. Firmware Video Walks you through the process of loading Firmware onto the robot. Follow along with the video as it covers each step! Check Your Understanding Questions These questions are designed to quickly check comprehension of the topics covered in the video. Answer them before moving on. Bottoms of pages will sometimes be omitted from the Teacher’s Guide if they do not contain important notes. That is the case here – the next page of the guide will go straight to the third Getting Started video. 16
Basics - Getting Started

 Getting Started 3: Ports
 This step provides an overview of the Ports
 on the EV3 brick.

 Ports Video
 Identifies and explains the function of each
 port on the EV3 brick.

 Check Your Understanding Questions
 These questions are designed to quickly
 check comprehension of the topics covered
 in the video. Answer them before moving on.

 Getting Started 4: Menus
 This step explains the general interface
 conventions and tours the main areas of the
 EV3 on-brick menu interface.

 Menus Video
 Shows you how to use the EV3 on-screen
 menus to control robot settings, run
 programs, and more.

 Check Your Understanding Questions
 These questions are designed to quickly
 check comprehension of the topics covered
 in the video. Answer them before moving on.

                                                17
Basics - Big Ideas
Big Ideas 1 & 2
Big Ideas 1 & 2 Video
This video introduces two concepts:
Big Idea #1: Programming is Precise
If you want a robot to do something, you need to
communicate that idea with mathematical and logical
precision, or it won’t quite be what you intended
Big Idea #2: Sensors, Programs, and Actions
Data from sensors gives a robot information about
its environment. A program uses that data to make
decisions, and the robot Acts on those decisions.
Data underlies the core of the entire process
Check Your Understanding Questions
These questions are designed to quickly
check comprehension of the topics covered
in the video. Answer them before moving on.
Big Idea 3
Big Idea 3 Video
This video introduces:
Big Idea #3: Make Sense of Systems
To understand the way something works, construct
a mental “model” of it in your head that captures
the important features and rules of the system. This
helps you make sense of it, and also gives you a tool
to “play out” (similar) new scenarios in your head to
predict what would happen
Check Your Understanding Questions
These questions are designed to quickly
check comprehension of the topics covered
in the video. Answer them before moving on.
18Basics - Big Ideas
Big Ideas 4 & 5
Big Ideas 4 & 5 Video
This video introduces two concepts:
Big Idea #4: Break Down Problems and Build Up
Solutions
To solve a difficult problem, try breaking it down into
smaller problems. Then, solve the smaller problems,
building up toward a solution to the big problem.
Big Idea #5: Computational Thinking Applies
Everywhere
These skills – mathematical and logical clarity, using
data, systems thinking with mental models, and
problem solving – are not just for robotics. They are
key to solving many problems in the world.
Check Your Understanding Questions
These questions are designed to quickly
check comprehension of the topics covered
in the video. Answer them before moving on.
19Basics: Using the
Basics - Big
EV3 Ideas
Software
Using the Software
Using the EV3 Software Video
This video provides introductory tips and trick of how
to use the EV3 software
►► How to Open the Software
►► Finding Building Instructions
►► Beginning Programming
►► How to Link Blocks
►► Mode Settings
►► Configuring Blocks
►► Saving
►► How to Run the Program
►► Navigating to the Program on the EV3
►► Scrolling on the Software Interface
►► Commenting Your Code
Check Your Understanding Questions
These questions are designed to quickly
check comprehension of the topics covered
in the video. Answer them before moving on.
20Introduction to the
Moving Straight Unit
Movement > Moving Straight Chapter
In Moving Straight, students program the robot to move forward, then explore
variations such as moving for different distances or at different speeds.
Key Concepts: Writing and running programs, Move Steering Block, Rotations and
Distance, Sequential commands
►► Moving Straight 1: Introduction to Sensabot
Introduces the real-world robot (Sensabot), and the challenge modeled after it
(Sensabot Challenge)
►► Moving Straight 2: Robot Config
Contains building and setup instructions for the rest of the chapter
►► Moving Straight 3: Steering Forward
Introduces the Move Steering Block and programming the forward movement
►► Moving Straight 4: Arm Control
Introduces the Medium Motor Block and programming the arm to move
►► Moving Straight 5: Review
Explains sample solutions to mini-challenges from this chapter
►► The Moving Straight Challenge
Requires students to make the robot move to 3 marked lines by controlling the
distance of each movement
Hints:
►► Remember that each chapter is based around the real-world robot theme and
challenges. Use these contextual surroundings to help ground discussions
and decision-making processes (e.g. “Do you think guessing to find the correct
distance would be appropriate, since Sensabot needs to perform this task reliably
in the real world?”). [NGSS: MS-ETS1, CCSS.Math.Practice.MP1]
►► The Distance a robot moves is (Wheel Circumference * Wheel Rotations). This
is because the turning of the robot’s wheels are what propel it along the ground.
[CCSS.Math.Practice.MP4, CCSS.Math.Content.7.RP.A.2]
Teacher’s Edition Note: This chapter’s notes will point out common structural elements such as Check
Your Understanding Questions. In later sections, common notes will be omitted, as they are the same
throughout the product.
21Movement - Straight
Moving Straight 1: Introduction
This module introduces the Sensabot real-
world robot that the chapter Challenge is
based on.
Sensabot Video
Introduces the real-world robot and
summarizes the chapter Challenge. Students
should watch this video before beginning
work on the chapter.
Check Your Understanding Questions
These questions are designed to quickly
check comprehension of the topics covered
in the video. Students should answer them
before moving on.
These generally correspond to Remembering and
Understanding tasks in Bloom’s Taxonomy.
Higher-level enrichment and assessment will be
handled by Try It! exploration items and Mini-
Challenge activities in later steps.
22Movement - Straight
Moving Straight 2:
Robot Configuration
The Building Instructions are located inside
the LEGO Programming Software. Follow the
instructions on this page to view them.
As of EV3 Software version 1.0.1, the
instructions cannot be printed, and must be
viewed on-screen.
Moving Straight 3:
Steering Forward
This step introduces the Move Steering
Block, and walks students through
programming a straight forward movement.
Step-by-Step Video
Walks students through the process of
starting up the software, writing the Moving
Straight program, and running it. Make sure
students follow along with the instructions as
the video plays (pause as needed).
Check Your Understanding Questions
Quickly check comprehension of the topics
covered in the video. Students should
answer them before moving on.
23Movement - Straight
Moving Straight 3 (cont’d)
Mini-Challenge: 50 cm challenge
Challenges students to make the robot move
a specific distance by adjusting the Rotations
setting.
Mini-challenges ask students to perform a task that is
very closely related to what they have already done in
the video-guided portion.
Hints are provided, and can be revealed (one at a
time) by clicking the Show Hint button on the box
below the picture.
Mini-Challenges typically align to Applying tasks in
Bloom’s Taxonomy.
Optional Activity Cutoff Line
Activities below this line are helpful but not critical to
the completion of the Challenge. Use these activities
to help with class pacing.
[Optional] Try It!: Brake vs. Coast
Prompts students to try changing the Brake
setting on the Move Steering Block to “Coast”
and see what happens.
Try It! activities prompt students to explore an
additional feature or area of the software.
The What Happens? button will show the result so
students can confirm their observations.
Sometimes this exploration is for enrichment, but
often it is important to the Challenge. Use the Optional
Cutoff to identify when an activity is critical.
[Optional] Did You Know?: Projects
and Programs
Explains the relationship between Projects
and Programs in the EV3 Programming
Software.
Did You Know? activities provide additional
background information on various topics.
24Movement - Straight
Moving Straight 3 (cont’d)
[Optional] Did You Know?:
Rename Program
Programs can be renamed within Projects,
although this is typically only done when a
Project contains multiple programs.
[Optional] Did You Know?:
EV3 Menus
A brief overview of useful functions in the
EV3 on-screen menu system. See the
Basics unit or the EV3 manual for more in-
depth information.
[Optional] Did You Know?:
Auto-Detecting Ports
The EV3 has the built-in capability to locate
and identify any motor or sensor plugged into
it. This means you don’t have to worry about
port numbers, as long as there is only one of
a given device type attached (e.g. only one
Touch Sensor).
However, since there are two motors on the
robot, you do need to pay attention to which
one is the left and which is the right.
25Movement - Straight
Moving Straight 4: Arm Control
This step introduces the concept of
sequential commands. The Medium Motor
Block, which controls the single arm motor is
added to the program..
Step-by-Step Video
Walks students through adding a second
and third command to the program, using the
Medium Motor Block to control the robot’s
arm. Students should follow along with the
video.
Check Your Understanding Questions
These questions are designed to quickly
check comprehension of the topics covered
in the video. Students should answer them
before moving on.
Try It!: Negative Power
Negative power levels make the robot move
backward.
Mini-Challenge: Cargo Retrieval
Challenges students to build on their previous
programs by making the robot move forward,
then lower its arm, then move back to its
starting location.
26Movement - Straight
Moving Straight 4 (cont’d)
Did You Know?: Getting the Program
Stuck
Explains one of the common problems with
sequentially-executed programs: if any of
the commands cannot complete (e.g. if the
arm hits the ground and cannot lower any
further), the entire program will be “stuck”
and unable to progress.
Check Your Understanding Questions
These questions are designed to quickly
check comprehension of the topics covered
in the video. Students should answer them
before moving on.
Moving Forward 5: Review
Review steps come at the end of the guided
portion of a unit, just before the main
Challenge. Sample solutions to the Mini-
Challenges are shown here in picture format.
Placing the mouse cursor over any block in
the program will show a detailed explanation
identifying the block, describing the literal
command it issues, and explaining what
action it performs in context.
27Movement - Straight
Moving Straight Challenge
This step lays out the details for the
Sensabot Chapter Challenge. Students
should work in their teams to complete the
challenge objectives.
Challenge Video
Describes the challenge in video format. The
robot must move to three marked locations
on a game board, and raise and lower its
arm at each location to represent taking a
sensor reading.
Challenge Diagram
A non-technical summary of the Sensabot
Chapter Challenge.
Challenge PDF
A link to the official rules and gameboard
layout for the Challenge in PDF format.
Detailed measurements for the board layout,
as well as instructions for setting it up, rule
details, and hints for solving the challenge
can be found in the attached printable
document.
Sensabot Challenge PDF
Detailed measurements for the board layout,
as well as instructions for setting it up, rule
details, and hints for solving the challenge
can be found in this printable document.
28Introduction to the
Turning Unit
Movement > Turning Chapter
In Turning, students program the robot to turn in place, then explore variations such
as turning in the opposite direction, and turning in a wide arc.
Key Concepts: Turning, Types of Turns, Steering setting
►► Turning 1: Introduction to Autonomous Tractor
Introduces the real-world robot (Autonomous Tractor), and the challenge
modeled after it (Orchard Challenge)
►► Turning 2: Robot Configuration
Contains building and setup instructions for the rest of the chapter
►► Turning 3: Turning in Place
Uses the Steering slider on the the Move Steering Block to create turns
►► Turning 4: Other Turns
Uses other settings on the Steering slider to create wide turns
►► Turning 5: Review
Explains sample solutions to mini-challenges from this chapter
►► The Orchard Challenge
Requires students to program the robot to navigate rows of trees in an orchard
Hints:
►► The “angle” turned by a robot is generally in reference to its heading. A 90 degree
turn means that the robot’s heading has changed by 90 degrees.
►► When turning, a robot’s wheels travel along a curved path. The shape and angle
of the turn is determined by how far each wheel travels along that path. [CCSS.
Math.Practice.MP4, CCSS.Math.Content.7.RP.A.2]
Teacher’s Edition Note: Notes on the purpose of common structural elements such as Check Your
Understanding Questions are omitted from this section onward. To review these general notes,
please see the Movement > Moving Straight chapter.
29Movement - Turning
Turning 1: Introduction
Introduces the Autonomous Tractor and the
Orchard Challenge.
Autonomous Tractor Video
Introduces the real-world robot and
summarizes the chapter Challenge. Students
should watch this video before beginning
work on the chapter.
Check Your Understanding Questions
These questions are designed to quickly
check comprehension of the topics covered
in the video. Students should answer them
before moving on.
Turning 2: Robot Configuration
Building Instructions for the robot are the
same as Moving Straight.
30Movement - Turning Turning 3: Turning in Place This step introduces the Steering slider to make the robot turn to the side. For now, only the center and ends of the slider are used. Intermediate settings produce “wide” turns and are explored in the next step. Mini-Challenge: 90 Degree Turn Challenges students to make the robot turn a specific amount (90 degree change in the direction the robot is facing). This activity is directly analogous to the “50 cm mini-challenge” in the previous chapter, and pointing out the parallels in the two problems is appropriate. The ratio of Wheel Rotations to Body Turn on the REM-EV3 driving base model is approximately 2:1; that is, it takes 2 wheel rotations to turn the robot around exactly 1 time. Turning the robot 90 degrees, then, would take 0.5 wheel rotations (180 degrees). [Optional] Try It!: Direction of Turn Prompts students to try moving the Steering slider to the other side. This produces a turn in the opposite direction. The direction of turn always matches what you would get if you turned a steering wheel in the same direction (“left” or “right”). 31
Movement - Turning

Turning 3 (continued)

[Optional] Did you notice?: Wheel Pointers
Calls attention to a design feature of the robot:
pointers on the robot’s wheels help you see which
direction each wheel is turning, and how much.
The amount a wheel turns (e.g. 360 degrees of
wheel rotation) is proportional – but not identical –
to the amount the robot’s body will turn.

Turning 4: Other Turns
This step introduces off-center “wide” turns using
the Move Tank Block, which controls the robot’s two
wheel motor powers separately.
Any time the robot’s wheels move at different
speeds, the robot’s path will curve. The specific
shape of the curve is determined by the combination
of powers used.

                                                        32
Movement - Turning
Turning 4 (continued)
Mini-Challenge: Dizzy Drill
Challenges students to make the robot move
around an obstacle using a combination of
straight moves and turns (wide or in-place).
[Optional] Try It!: Different Motions
Prompts students to try different combinations
of motor powers. This produces differently-
curved turns.
Helper Activity: Role-play the robot
One student acts as the robot, while another student
issues left-foot and right-foot commands with different
power levels.
For instance, “left foot 50; right foot 0” means taking
a small step forward with the left foot and holding the
right foot in place. Straightening out your body from this
stance will make you turn slightly to the right, pivoting
around your right foot just as the robot does with a
Move Tank Block set to left 50, right 0.
33Movement - Turning
Turning 5: Turning Review
Sample solutions to the mini-challenges can
be found on this page.
Dizzy Drills has two sample solutions
provided: one for a strategy that uses two
right-angle turns to go around the back of
the obstacle, and one that uses a single
U-shaped turn to swing around the obstacle.
34Movement - Turning
Orchard Challenge
This step lays out the details for the Orchard
Challenge. Students should work in their
teams to complete the challenge objectives.
Teams get to choose where they start
their robot for this challenge. It is to their
advantage to pick a specific spot and use
it every time, rather than moving the start
position or aligning the robot sloppily.
The route shown in the picture is just an
example, not the required (or necessarily
easiest) route.
Retain this Challenge board intact, if possible, as it
will be re-visited in the Switch-Loops chapter.
Orchard Challenge PDF
Detailed measurements for the board layout,
as well as instructions for setting it up, rule
details, and hints for solving the challenge
can be found in this printable document.
35Introduction to the
Touch Sensor Unit
Sensors > Move Until Touch Chapter
In Move Until Touch, students program a robot to wait until its Touch Sensor is
pressed before proceeding with other commands, then combine that behavior with
Motors On and Motors Off commands to make the robot stop and go based on
Touch Sensor commands.
This chapter is an exception to the pattern of “bookending” every set of activities with real-world
robots and challenges. While the chapter is still challenge-based, it is focused on the idea of sensors
rather than a specific robot that uses them.
Key Concepts: Wait Block, Touch Sensor, Forward Until Pattern
►► Touch 1: Introduction to Sensors
Introduces the idea of Sensors, the Touch Sensor, and some of the Touch
Sensor-based behaviors in the lesson
►► Touch 2: Robot Configuration
Contains building and setup instructions for the rest of the chapter
►► Touch 3: Wait for Touch
Uses the Wait for Touch Block to make a robot wait for a Touch Sensor press
before continuing
►► Touch 4: Forward until Touch
Combines Motor On and Motor Off commands with the Wait for Touch Block to
make the robot move forward until the Touch Sensor is pressed
►► Touch 5: Review
Explains sample solutions to mini-challenges from this chapter
►► The Arm Position Challenge
Requires students to program a Touch Sensor-based “raise arm” behavior that
moves the arm to its “closed” position regardless of where the arm starts.
Hints:
►► All of the chapters in the Sensors unit follow the general pattern laid out in this
chapter: Introduction, Wait for (Sensor), Forward until (Sensor), Challenge.
►► The Touch Sensor does not have a real-world robot because simple touch
switches are not commonly found on real-world robots; typically, robots shouldn’t
physically collide with their surroundings to sense them.
36Touch Sensor
Touch 1: Introduction
Introduces the idea of Sensors on the robot.
This chapter does not use a real-world robot.
Instead, it focuses on the first use of sensors
on the EV3 robot.
Touch 2: Robot Config
The robot is the driving base from the
Movement Unit, with a Touch Sensor added.
37Touch Sensor
Touch 3: Wait for Touch
This step introduces both the Touch Sensor
and the Wait For (Sensor) Block.
The Touch Sensor physical mechanism is
explained at the bottom of the page.
The Wait For (Sensor) Block “holds up” the
program’s flow until the sensor condition is
met. When the condition is met, the program
continues (with a Move Steering block in this
case). This is the simplest way in which the
sensor can be used to control a behavior,
and is used throughout the Sensors Unit.
Try It!: Already Pressed
Since the Wait for Touch Block literally waits
for the “Pressed” state, it can be triggered
instantly if the sensor is already pressed in
when the program starts.
This is a common source of error with
all sensors: if the sensor is already in a
“triggered” position, the “wait” is invisibly
short. This is often mistaken for the program
“ignoring” the sensor.
Try It!: EV3 Buttons
The buttons on the front of the EV3 are
essentially touch sensors, and can be used
as such.
38Touch Sensor
Touch 3 (continued)
[Optional] Did You Know?:
How the Touch Sensor Works
An interactive animation showing how a
Touch Sensor acts as an electrical switch to
create a flow of electricity the EV3 detects.
39Touch Sensor
Touch 4: Forward until Touch
This step introduces the Motor On and Motor
Off modes of the Move Steering Block.
Motor On – Wait for Touch – Motor Off
form a common pattern that makes the
robot move forward until the Touch Sensor
is pressed, then stop. This pattern is
sometimes referred to as “Forward until”.
Try It!: Forward Until Release
Prompts students to try the “Released”
setting for the Wait for Touch Block instead of
“Pressed”. The robot will move until the Touch
Sensor is NOT pressed.
Make sure the Touch Sensor starts pressed
in, or the “Released” state will be detected
immediately, and the robot will go nowhere
(see “Already Pressed” on the previous page).
40Touch Sensor
Touch 4 (continued)
Mini-Challenge: Four Walls
Challenges students to make the robot
move to touch all four walls of an enclosed
rectangular space.
The desired behavior can be thought of as
“Forward until Touch (the wall), then turn”
four times. Backing up prior to turning may
help to avoid getting caught on the wall.
Students with prior programming experience
may know that a Loop Block would be helpful
here; it is up to you to decide whether it is
allowed at this time.
Touch 5: Touch Sensor Review
Expanded explanations for both in-video
programs and a sample solution for the mini-
challenge can be found on this page.
41Touch Sensor
Arm Position Challenge
This step lays out the details for the Arm
Position Challenge.
This challenge involves more physical
construction than programming, as students
will need to find a way to position the
Touch Sensor so that it can detect the Arm
reaching the top of its motion.
Students should be allowed limited freedom
to modify the robot’s arm or add extensions
during this Challenge, but should not need to
modify or disassemble the driving base.
A concept picture of one possible layout is
shown on the page, but no specific building
instructions are provided: students should
work to complete a design on their own.
Arm Position Challenge PDF
Detailed measurements for the board layout,
as well as instructions for setting it up, rule
details, and hints for solving the challenge
can be found in this printable document.
42Introduction to the
Ultrasonic Sensor Unit
Sensors > Move Until Near Chapter
In Move Until Near, students program a robot to wait until its Ultrasonic Sensor
detects an object within a certain “threshold” distance before proceeding with other
commands. This is combined with Motors On and Motors Off to produce a Forward
Until behavior parallel to the one constructed using Touch in the previous chapter.
Key Concepts: Ultrasonic Sensor, Threshold Value, Forward Until Pattern
►► Ultrasonic 1: Introduction to Sensors
Introduces the real-world robot (Hexarotor), and the challenge modeled after it
(Maze Challenge)
►► Ultrasonic 2: Robot Config
Contains building and setup instructions for the rest of the chapter
►► Ultrasonic 3: Wait for Near
Uses the Wait for Near Block to make a robot wait for the Ultrasonic Sensor to
detect an object closer than the threshold value before continuing
►► Ultrasonic 4: Forward until Near
Combines Motor On and Motor Off commands with Wait for Near to make the
robot move forward until the Ultrasonic Sensor detects something nearby
►► Ultrasonic 5: Review
Explains sample solutions to mini-challenges from this chapter
►► Maze Challenge
Requires students to program an Ultrasonic Sensor-based solution to a maze,
detecting distances from key walls to known when to turn.
Hints:
►► All of the chapters in the Sensors unit follow the general pattern laid out in this
chapter: Introduction, Wait for (Sensor), Forward until (Sensor), Challenge.
43Ultrasonic Sensor
Ultrasonic 1: Introduction
Introduces the Autonomous Hexarotor and
the Maze Challenge.
Ultrasonic 2: Robot Config
This chapter uses the driving base model,
plus a forward-facing Ultrasonic Sensor.
Sensors from the previous chapter can be
left on or removed as convenient, as long
as they do not interfere with the Ultrasonic
Sensor (i.e. are not within its “cone” of view).
44Ultrasonic Sensor
Ultrasonic 3: Turning in Place
This step introduces the Ultrasonic Sensor
and Wait for Near Blocks. The Sound Block
is used also, as a way of indicating when the
sensor has been triggered.
Mini-Challenge: Threshold Value
Challenges students to alter the Threshold
value on their Wait for Near Block to trigger
at 10 cm, and at 100 cm.
Thresholds are a key concept in robotics
programming, because they allow programs
to easily make decisions based on sensor
readings that range over hundreds of
possible values (1 cm, 2 cm, 3 cm...). Rather
then write hundreds of different responses,
the robot simply responds to the number
being above or below the Threshold cutoff.
45Ultrasonic Sensor Ultrasonic 3 (continued) Try It!: Missing Object Alarm Prompts students to try using Greater Than Threshold instead of Less Than Threshold. This is analogous to Wait for Release instead of Wait for Pressed. [Optional] Did You Know?: How the Ultrasonic Sensor Works A video animation showing how an Ultrasonic Sensor uses sonar to calculate the distance to an object. [Optional] Try It!: Sound Sentences Adding sounds within your program provide excellent clues that alert you that a behavior has just completed. Focusing on the Sound Block, this Try It! prompts students to string together multiple blocks (saying different words) into a sentence. [Optional] Try It!: Sensor Change Mode Prompts students to try using the Change mode to wait for a change in Ultrasonic values, rather than a value above or below below a particular threshold (as it does in Compare mode). 46
You can also read