Lenovo 100e/300e/500e Chromebook Gen 3 User Guide - Etilize
←
→
Page content transcription
If your browser does not render page correctly, please read the page content below

Lenovo 100e/300e/500e Chromebook Gen 3 User Guide
Read this first

Before using this documentation and the product it supports, ensure that you read and understand the
following:
• Safety and Warranty Guide
• Setup Guide
• Generic Safety and Compliance Notices

First Edition (April 2021)

© Copyright Lenovo 2021.
LIMITED AND RESTRICTED RIGHTS NOTICE: If data or software is delivered pursuant to a General Services
Administration “GSA” contract, use, reproduction, or disclosure is subject to restrictions set forth in Contract No. GS-
35F-05925.
Contents
Discover your Chromebook . . . . . . . . . . . ii                                   Set the power plan . . . . . . . . . . . .                      14
                                                                                    Shut down your Chromebook . . . . . . .                         14
Chapter 1. Meet your Chromebook . . . 1
Front view . . . . . .     .   .   .   .   .   .   .   .   .   .   .   .    1   Chapter 3. CRU replacement . . . . . 17
Side view . . . . . .      .   .   .   .   .   .   .   .   .   .   .   .    3   What are CRUs . . . . .     .   .   .   .   .   .   .   .   .   .   17
Bottom view . . . . .      .   .   .   .   .   .   .   .   .   .   .   .    5   Replace a CRU . . . . .     .   .   .   .   .   .   .   .   .   .   17
Rear view . . . . . .      .   .   .   .   .   .   .   .   .   .   .   .    5       Pen dummy . . . .       .   .   .   .   .   .   .   .   .   .   17
Specifications . . . .     .   .   .   .   .   .   .   .   .   .   .   .    5       Base cover assembly .   .   .   .   .   .   .   .   .   .   .   18
    USB specifications .   .   .   .   .   .   .   .   .   .   .   .   .    5
                                                                                Chapter 4. Help and support . . . . . 21
Chapter 2. Explore your                                                         Frequently asked questions . . . . .            .   .   .   .   .   21
Chromebook . . . . . . . . . . . . . . . 7                                      Call Lenovo . . . . . . . . . . .               .   .   .   .   .   21
Charge your Chromebook . . . . . . . . . .                         . . 7             Before you contact Lenovo . . .            .   .   .   .   .   21
Lock your Chromebook. . . . . . . . . . .                          . . 7             Lenovo Customer Support Center .           .   .   .   .   .   22
Connect to a cellular network (for selected                                     Get help from Google . . . . . . .              .   .   .   .   .   23
models) . . . . . . . . . . . . . . . . .                          .   .    8
Interact with your Chromebook . . . . . . . .                      .   .    8   Appendix A. Compliance
     Use the keyboard shortcuts . . . . . . .                      .   .    9   information . . . . . . . . . . . . . . . 25
     Use the touchpad . . . . . . . . . . .                        .   .    9
     Use the touch screen (for Lenovo 300e/500e                                 Appendix B. Open source
     Chromebook Gen 3 only) . . . . . . . .                        .       10   information . . . . . . . . . . . . . . . 31
     Use the electronic pen (for selected models of
     Lenovo 300e/500e Chromebook Gen 3) . .                        .       12   Appendix C. Notices and
     Get to know your Chromebook modes (for                                     trademarks . . . . . . . . . . . . . . . 33
     Lenovo 300e/500e Chromebook Gen 3) . .                        .       12
     Connect to an external display . . . . . .                    .       13

© Copyright Lenovo 2021                                                                                                                              i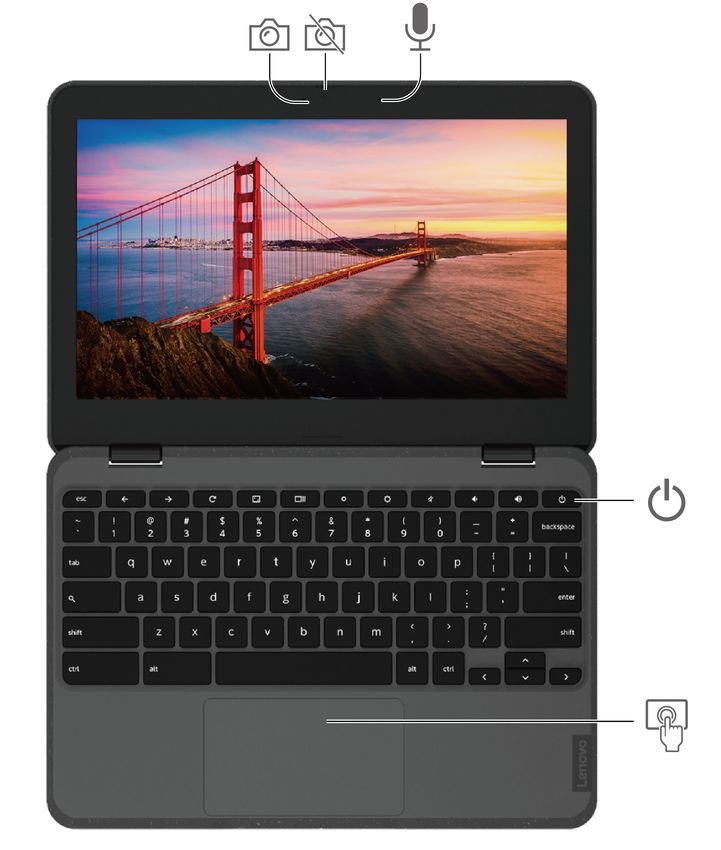
Discover your Chromebook
Thank you for choosing a Lenovo® Chromebook™! We are dedicated to delivering the best solution to
you.

Before starting your tour, please read the following information:
• Illustrations in this documentation might look different from your product.
• Depending on the model, some optional accessories, features, software programs, and user interface
  instructions might not be applicable to your Chromebook.
• Documentation content is subject to change without notice. To get the latest documentation, go to https://
  pcsupport.lenovo.com.
Chapter 1. Meet your Chromebook

Front view

Lenovo 100e Chromebook Gen 3

                   Camera         Webcam privacy shutter

                   Microphone     Power button

                   Touchpad

© Copyright Lenovo 2021                                    1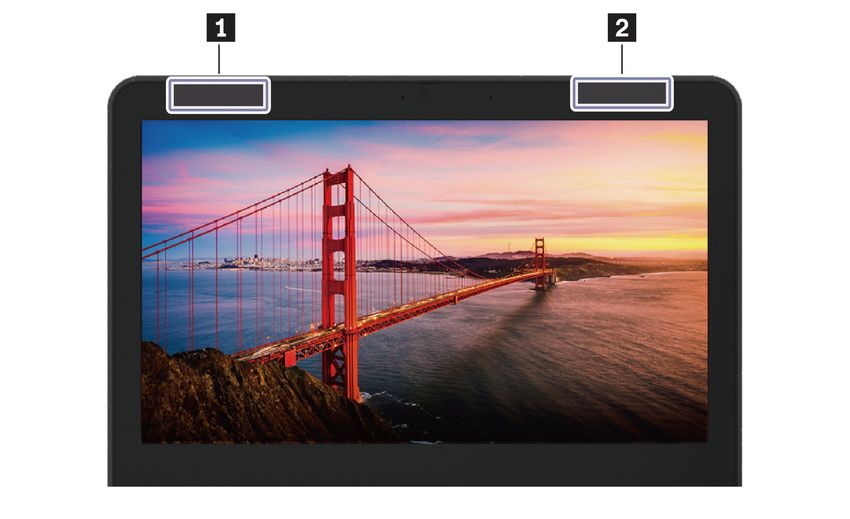
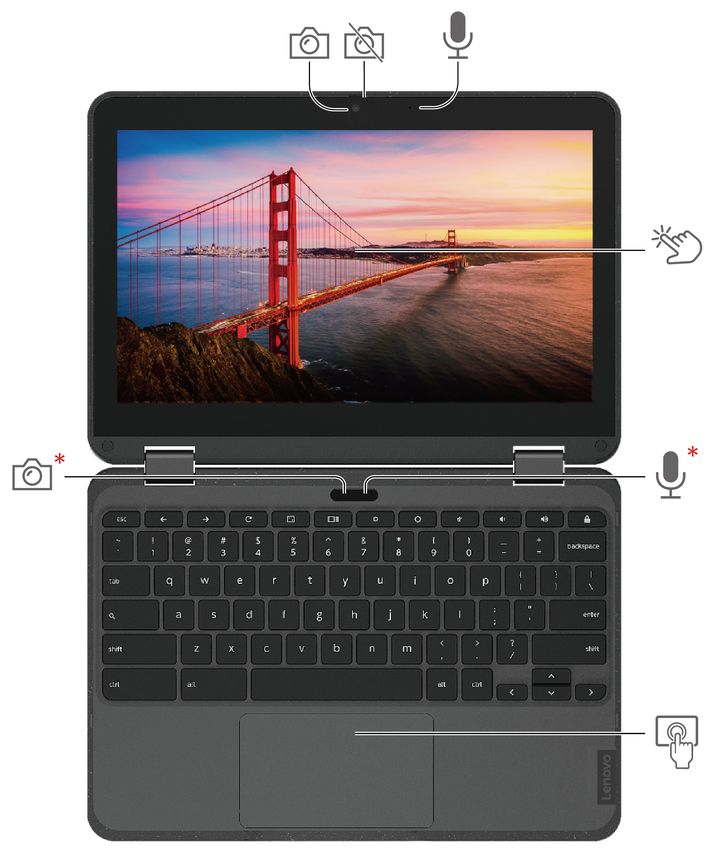
Lenovo 300e/500e Chromebook Gen 3

                  Camera*                                               Webcam privacy shutter

                  Microphone*                                           Touch screen

                  Touchpad

* for selected models

      Webcam privacy shutter
Slide the webcam privacy shutter to cover or uncover the camera lens. It is designed to protect your privacy.

Related topics
•   “Use the touch screen (for Lenovo 300e/500e Chromebook Gen 3 only)” on page 10
•   “Get to know your Chromebook modes (for Lenovo 300e/500e Chromebook Gen 3)” on page 12
•   “Use the touchpad” on page 9

2   Lenovo 100e/300e/500e Chromebook Gen 3 User Guide
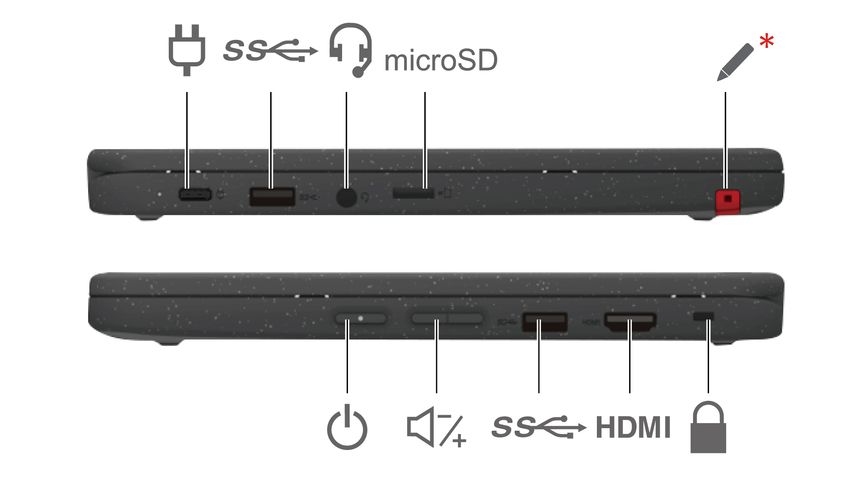
Side view

Lenovo 100e Chromebook Gen 3

Lenovo 300e/500e Chromebook Gen 3

                 USB-C® (3.2 Gen 1) power connector   USB 3.2 connector Gen 1

                 Audio connector                      Security-lock slot

                 Electronic pen*                      Volume buttons

                 Power button

* for selected models

                                                           Chapter 1. Meet your Chromebook   3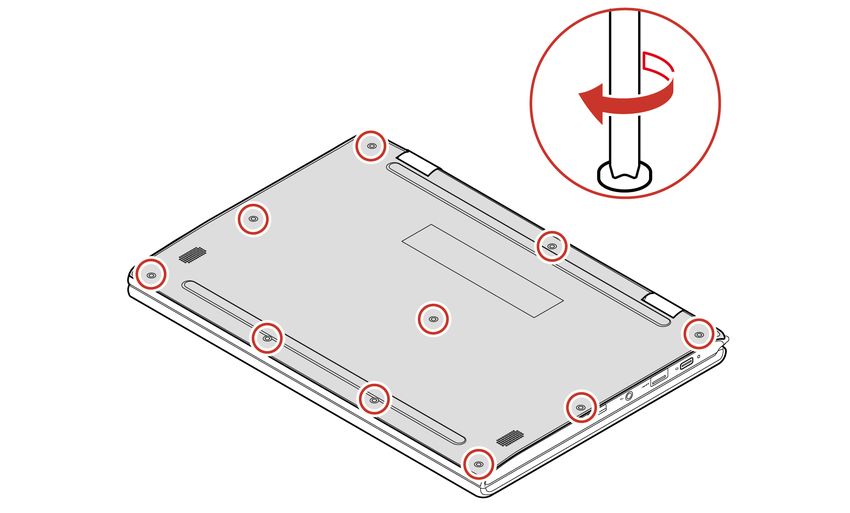
Related topics
•   “Charge your Chromebook” on page 7
•   “USB specifications” on page 5
•   “Use the electronic pen (for selected models of Lenovo 300e/500e Chromebook Gen 3)” on page 12
•   “Lock your Chromebook” on page 7
•   “Connect to an external display” on page 13

4   Lenovo 100e/300e/500e Chromebook Gen 3 User Guide
Bottom view

                 Keyboard drainage hole

     Keyboard drainage hole
Drain out liquid from your Chromebook if you accidentally spill liquid on the keyboard.

Rear view

                 Nano-SIM-card tray*

* for selected models

Specifications
For detailed specifications of your Chromebook, go to https://psref.lenovo.com.

USB specifications
Note: Depending on the model, some USB connectors might not be available on your Chromebook.

                                                                             Chapter 1. Meet your Chromebook   5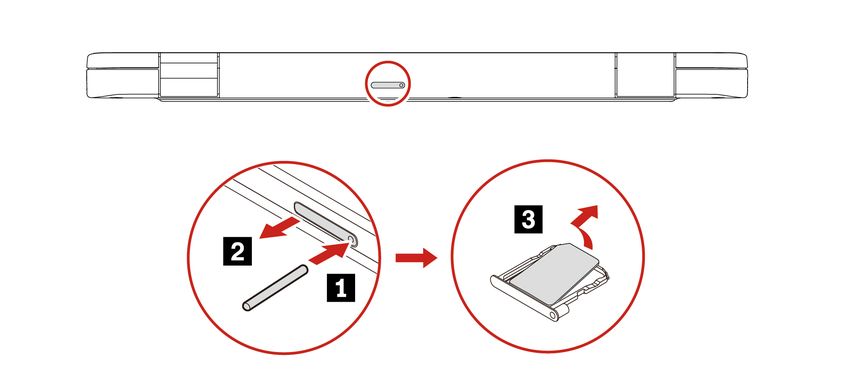
Connector name                                 Description

                                                Connect USB-compatible devices, such as a USB keyboard, USB
                                                mouse, USB storage device, or USB printer.

      USB 3.2 connector Gen 1

                                                • Charge USB-C compatible devices with the output voltage and
                                                  current of 5 V and 1.5 A.
                                                • Connect to an external display:
                                                     – For Lenovo 100e/300e Chromebook Gen 3:
                                                        – USB-C to VGA: up to 1900 x 1200 pixels, 60 Hz
                                                        – USB-C to DP: up to 3840 x 2160 pixels, 30 Hz
                                                     – For Lenovo 500e Chromebook Gen 3:
                                                        – USB-C to VGA: up to 1980 x 1200 pixels, 60 Hz
                                                        – USB-C to DP: up to 4096 x 2160 pixels, 60 Hz
 USB-C (3.2 Gen 1) connector                    • Connect to USB-C accessories to help expand your Chromebook
                                                  functionality. To purchase USB-C accessories, go to https://
                                                  www.lenovo.com/accessories.

Statement on USB transfer rate
Depending on many factors such as the processing capability of the host and peripheral devices, file
attributes, and other factors related to system configuration and operating environments, the actual transfer
rate using the various USB connectors on this device will vary and will be slower than the data rate listed
below for each corresponding device.

 USB device                                     Data rate (Gbit/s)

 3.2 Gen 1 / 3.1 Gen 1                          5
 3.2 Gen 2 / 3.1 Gen 2                          10
 3.2 Gen 2 × 2                                  20
 Thunderbolt 3                                  40
 Thunderbolt 4                                  40

6   Lenovo 100e/300e/500e Chromebook Gen 3 User Guide
Chapter 2. Explore your Chromebook Charge your Chromebook Power source of the ac power adapter: • Power: 45 W or 65 W (depending on the model) • Sine-wave input at 50 Hz to 60 Hz • Input rating of the ac power adapter: 100 V to 240 V ac, 50 Hz to 60 Hz CAUTION: All plugs must be firmly and securely inserted into receptacles. Lock your Chromebook Lock your Chromebook to a desk, table, or other fixtures through a compatible security cable lock. Note: The slot supports cable locks that conform to the Kensington NanoSaver® lock standards using Cleat™ locking technology. You are responsible for evaluating, selecting, and implementing the locking device and security feature. Lenovo is not responsible for the locking device and security feature. You can purchase the cable locks at https://smartfind.lenovo.com. © Copyright Lenovo 2021 7
Connect to a cellular network (for selected models)
If your Chromebook has a wireless wide area network (WAN) card and a nano-SIM card installed, you can
connect to a cellular data network and get online everywhere.

Note: The cellular service is provided by authorized mobile service carriers in some countries or regions.
You must have a cellular plan from a service carrier to connect to the cellular network.

To establish a cellular connection:
    1. Turn off the Chromebook.
    2. Locate the nano-SIM card slot and insert the nano-SIM card as shown. Note the orientation of the card
       and ensure that it is seated correctly.

    3. Turn on the Chromebook.
    4. Click the network icon in the system tray, and then turn on Mobile data. Provide required information, if
       needed.

Interact with your Chromebook
This section introduces various ways to interact with your Chromebook.

8     Lenovo 100e/300e/500e Chromebook Gen 3 User Guide
Use the keyboard shortcuts
The function keys on the keyboard help you work more easily and effectively.
Refresh your current page.
Make the current window full screen.
Open the task view to see all your open windows.
Darken the display.
Brighten the display.
Mute the speakers.
Decrease the speaker volume.
Increase the speaker volume.
Lock the screen.
*
* Turn on the Chromebook, put it to sleep mode, or wake it up.
* for selected models
Your Chromebook also supports some key combinations.
alt + Go to the previous page.
alt + Go to the next page.
ctrl + Take a screenshot.
Switch the letter case between the upper case and lower case.
alt +
Lock the screen.
l+
ctrl + alt + ? View all keyboard shortcuts.
To change the keyboard settings:
1. Click the setting icon in the system tray, and then click Device ➙ Keyboard.
2. Follow the on-screen instructions to change the settings as you prefer.
Use the touchpad
The entire touchpad surface is sensitive to finger touch and movement. You can use the touchpad to perform
all the pointing, clicking, and scrolling functions of a traditional mouse.
Chapter 2. Explore your Chromebook 9Use the touch gestures
Tap once to select or open an item. Tap twice quickly to display a shortcut menu.
Scroll through items.
Two-finger zoom in or zoom out.
Open the task view. Show the current window.
Notes:
• When using two or more fingers, ensure that you position your fingers slightly apart.
• Some gestures are only available when you are using certain apps.
• If the touchpad surface is stained with oil, turn off the Chromebook first. Then, gently wipe the touchpad
surface with a soft and lint-free cloth moistened with lukewarm water or computer cleaner.
To change the settings:
1. Click the setting icon in the system tray, and then click Device ➙ Touchpad.
2. Follow the on-screen instructions to change the settings as you prefer.
If Enable tap-to-click is turned on, you can tap or press the touchpad. Otherwise, you can only press the
touchpad to achieve the clicking function of a traditional mouse.
Use the touch screen (for Lenovo 300e/500e Chromebook Gen 3 only)
If your Chromebook display supports the multi-touch function, you can navigate the screen with simple
touch gestures.
Note: Some gestures might not be available depending on the app you use.
10 Lenovo 100e/300e/500e Chromebook Gen 3 User GuideTap and hold to right-click
Tap once to single click
Drag
Slide to scroll through items
Zoom out Zoom in
Tap with two fingers to open a shortcut menu Swipe upwards to unfold the app Launcher
Maintenance tips:
• Turn off the Chromebook before cleaning the multi-touch screen.
• Use a dry, soft, and lint-free cloth or a piece of absorbent cotton to remove fingerprints or dust from the
multi-touch screen. Do not apply solvents to the cloth.
• The multi-touch screen is a glass panel covered with a plastic film. Do not apply pressure or place any
metallic object on the screen, which might damage the touch panel or cause it to malfunction.
• Do not use fingernails, gloved fingers, or inanimate objects for input on the screen.
• Regularly calibrate the accuracy of the finger input to avoid a discrepancy.
Chapter 2. Explore your Chromebook 11Use the electronic pen (for selected models of Lenovo 300e/500e Chromebook Gen 3) Selected models are shipped with an electronic pen. To use the pen, slide it out of the pen slot. When not in use, put it back into its slot. Notes: • You might need to install additional apps such as Google Keep for better use of the pen. • For computer models come with a pen dummy, you can purchase an electronic pen to use. To purchase the pen, go to https://www.lenovo.com/accessories. To remove the pen dummy, see “Pen dummy” on page 17. Use the electronic pen You can perform the following operations with the pen: • To open an app or a Web page, tap the display once. • To display the shortcut menu or make a selection, tap the display and hold the pen there for one second. Get to know your Chromebook modes (for Lenovo 300e/500e Chromebook Gen 3) Rotate the display to switch among different modes according to your preference. The keyboard is automatically disabled in the stand mode, tent mode, and tablet mode. Use the touch screen to control your Chromebook instead. Attention: Do not rotate the Chromebook display with too much force, or apply too much force to the upper-right or upper-left corner of the Chromebook display. Otherwise, the display or hinges might get damaged. 12 Lenovo 100e/300e/500e Chromebook Gen 3 User Guide
Laptop mode                                          Stand mode

                     Tent mode                                           Tablet mode

Warning: When operating in the tablet mode with any external device connected, the upper case
(keyboard’s side) of the Chromebook may become hot. Avoid keeping your hands, lap, or any part of the
body in contact with the upper case for over one minute.

Connect to an external display
Connect your Chromebook to a projector or a monitor to give presentations or expand your workspace.

                                                                      Chapter 2. Explore your Chromebook   13
Supported resolution The following table lists the supported maximum resolution of the external display. Table 1. Lenovo 100e/300e Chromebook Gen 3 Connect the external display to Supported resolution USB-C (3.2 Gen 1) connector Up to 3840 x 2160 pixels @ 30 Hz HDMI connector Up to 3840 x 2160 pixels @ 30 Hz Table 2. Lenovo 500e Chromebook Gen 3 Connect the external display to Supported resolution USB-C (3.2 Gen 1) connector Up to 4096 x 2160 pixels @ 60 Hz HDMI connector Up to 4096 x 2160 pixels @ 24 Hz To change display settings: 1. Click the setting icon in the system tray, and then click Device ➙ Displays. 2. Follow the on-screen instructions to change the display settings as you prefer. Set the power plan For ENERGY STAR® compliant Chromebooks, the following power plan takes effect when your Chromebooks have been idle for a specified duration: Table 3. Default power plan (when plugged into ac power) • Turn off the display: After seven minutes and 30 seconds • Put the Chromebook into sleep: After eight minutes and 30 seconds To reset the power plan to achieve the best balance between performance and power saving: 1. Click the setting icon in the system tray, and then click Device ➙ Power. 2. Follow the on-screen instructions to change the settings as you prefer. Shut down your Chromebook When you finish working with your Chromebook, shut it down to save power. 14 Lenovo 100e/300e/500e Chromebook Gen 3 User Guide
• Click   in the system tray.
• Press the power button.

                                Chapter 2. Explore your Chromebook   15
16 Lenovo 100e/300e/500e Chromebook Gen 3 User Guide
Chapter 3. CRU replacement
Customer Replaceable Units (CRUs) are parts that can be upgraded or replaced by the customer. The
computers contain the following types of CRUs:
• Self-service CRUs: Refer to parts that can be installed or replaced easily by customer themselves or by
  trained service technicians at an additional cost.
• Optional-service CRUs: Refer to parts that can be installed or replaced by customers with a greater skill
  level. Trained service technicians can also provide service to install or replace the parts under the type of
  warranty designated for the customer’s machine.

If you intend on installing a CRU, Lenovo will ship the CRU to you. CRU information and replacement
instructions are shipped with your product and are available from Lenovo at any time upon request. You
might be required to return the defective part that is replaced by the CRU. When return is required: (1) return
instructions, a prepaid shipping label, and a container will be included with the replacement CRU; and (2) you
might be charged for the replacement CRU if Lenovo does not receive the defective CRU within thirty (30)
days of your receipt of the replacement CRU. For full details, see the Lenovo Limited Warranty
documentation at https://www.lenovo.com/warranty/llw_02.

What are CRUs
Refer to the following CRU list for your Chromebook.

Self-service CRUs
• ac power adapter
• Pen dummy*
• Electronic pen*
• Nano-SIM-card tray*
• Power cord

Optional-service CRUs
• Base cover assembly

* for selected models

Note: Replacement of any parts not listed above, including the built-in rechargeable battery, must be done
by a Lenovo-authorized repair facility or technician. Go to https://support.lenovo.com/partnerlocation for more
information.

Replace a CRU
Follow the replacement procedure to replace a CRU.

Pen dummy

Prerequisite
Before you start, read Generic Safety and Compliance Notices and print the following instructions.

For access, do the following:

© Copyright Lenovo 2021                                                                                      17
1. Ensure that your computer is off or in sleep mode. Disconnect the computer from ac power and all
    connected cables.
 2. Close the computer display and turn the computer over.

Removal procedure
Use a tool as shown to release the pen dummy, then remove it.

Base cover assembly

Prerequisite
Before you start, read Generic Safety and Compliance Notices and print the following instructions.

Note: Do not remove the base cover assembly when your Chromebook is connected to ac power.

For access, do the following:
 1. Disable the built-in battery. Press together with the power button for about five seconds, and at the
    same time detach the ac power adapter from the Chromebook.

     Note: Power supply from the built-in battery will resume after you reconnect the Chromebook to the ac
     power adapter.
 2. Close the Chromebook display and turn over the Chromebook.

Removal procedure

18   Lenovo 100e/300e/500e Chromebook Gen 3 User Guide
Chapter 3. CRU replacement 19
Installation procedure

Troubleshooting
If the Chromebook does not start up after you reinstall the base cover assembly, disconnect the ac power
adapter and then reconnect it to the Chromebook.

20   Lenovo 100e/300e/500e Chromebook Gen 3 User Guide
Chapter 4. Help and support

Frequently asked questions
                                          1. Press and hold the power button until the Chromebook turns off. Then, restart
                                             the Chromebook.
                                          2. If step 1 does not work:
                                             • For models with an emergency reset hole: Insert a straightened paper clip
                                               into the emergency reset hole to cut off power supply temporarily. Then,
                                               restart the Chromebook with ac power connected.
 What do I do if my Chromebook
 stops responding?                           • For models without an emergency reset hole:
                                                – For models with the removable battery, remove the removable battery
                                                  and disconnect all power sources. Then, reconnect to ac power and
                                                  restart the Chromebook.
                                                – For models with the built-in battery, disconnect all power sources.
                                                  Press and hold the power button for about seven seconds. Then,
                                                  reconnect to ac power and restart the Chromebook.

                                          1. Carefully unplug the ac power adapter and turn off the Chromebook
                                             immediately. The more quickly you stop the current from passing through the
                                             Chromebook the more likely you will reduce damage from short circuits.

                                             Attention: Although you might lose some data or work by turning off the
 What do I do if I spill liquid on the       Chromebook immediately, leaving the Chromebook on might make your
 Chromebook?                                 Chromebook unusable.
                                          2. Do not try to drain out the liquid by turning over the Chromebook. If your
                                             Chromebook has keyboard drainage holes on the bottom, the liquid will be
                                             drained out through the holes.
                                          3. Wait until you are certain that all the liquid is dry before turning on your
                                             Chromebook.

                                          1. Squeeze out excess liquid from wipe or disinfecting cloth before using.
                                             Recommended wipes are hydrogen peroxide wipes and alcohol based wipes.
                                             Do not use wipes containing sodium hypochlorite (bleach).
                                          2. Gently wipe the Chromebook thoroughly, being careful to ensure no liquid
 How do I disinfect my                       drips into the Chromebook. Do not wipe on connector pins.
 Chromebook?                              3. After disinfecting, follow the cleaning procedure from the wipe supplier to
                                             minimize chemical buildup of disinfectant residue.
                                          4. Always allow the Chromebook to completely dry prior to any use.
                                         For more information about cleaning and disinfecting, go to https://
                                         support.lenovo.com/in/en/solutions/ht035676.

Call Lenovo
If you have tried to correct the problem yourself and still need help, you can call Lenovo Customer Support
Center.

Before you contact Lenovo
Prepare the following before you contact Lenovo:
 1. Record the problem symptoms and details:

© Copyright Lenovo 2021                                                                                                     21
• What is the problem? Is it continuous or intermittent?
• Any error message or error code?
• What operating system are you using? Which version?
• Which software applications were running at the time of the problem?
• Can the problem be reproduced? If so, how?
2. Record the system information:
• Product name
• Machine type and serial number
The following illustration shows where to find the machine type and serial number of your Chromebook.
Lenovo Customer Support Center
During the warranty period, you can call Lenovo Customer Support Center for help.
Telephone numbers
For a list of the Lenovo Support phone numbers for your country or region, go to https://
pcsupport.lenovo.com/supportphonelist for the latest phone numbers.
Note: Phone numbers are subject to change without notice. If the number for your country or region is not
provided, contact your Lenovo reseller or Lenovo marketing representative.
Services available during the warranty period
• Problem determination - Trained personnel are available to assist you with determining if you have a
hardware problem and deciding what action is necessary to fix the problem.
• Lenovo hardware repair - If the problem is determined to be caused by Lenovo hardware under warranty,
trained service personnel are available to provide the applicable level of service.
• Engineering change management - Occasionally, there might be changes that are required after a product
has been sold. Lenovo or your reseller, if authorized by Lenovo, will make selected Engineering Changes
(ECs) that apply to your hardware available.
22 Lenovo 100e/300e/500e Chromebook Gen 3 User GuideServices not covered
• Replacement or use of parts not manufactured for or by Lenovo or nonwarranted parts
• Identification of software problem sources
• Configuration of UEFI BIOS as part of an installation or upgrade
• Changes, modifications, or upgrades to device drivers
• Installation and maintenance of network operating systems (NOS)
• Installation and maintenance of programs
For the terms and conditions of the Lenovo Limited Warranty that apply to your Lenovo hardware product,
go to:
• https://www.lenovo.com/warranty/llw_02
• https://pcsupport.lenovo.com/warrantylookup
Get help from Google
After signing in to your Chromebook, start Get Help from the app Launcher. The Get Help app provides
comprehensive instructions on using your Chromebook.
In addition, if you are interested in visiting the Chromebook Help Center and Community, go to http://
google.com/support/chromebook.
Chapter 4. Help and support 2324 Lenovo 100e/300e/500e Chromebook Gen 3 User Guide
Appendix A. Compliance information
For more compliance information, refer to Regulatory Notice at https://pcsupport.lenovo.com and Generic
Safety and Compliance Notices at https://pcsupport.lenovo.com/docs/generic_notices.
Locate the wireless antennas
Your computer has a wireless antenna system. You can enable wireless communication wherever you are.
The following illustrations show the antenna locations on your computer.
For models with wireless-LAN card only
1 Wireless-LAN antenna (auxiliary)
2 Wireless-LAN antenna (main)
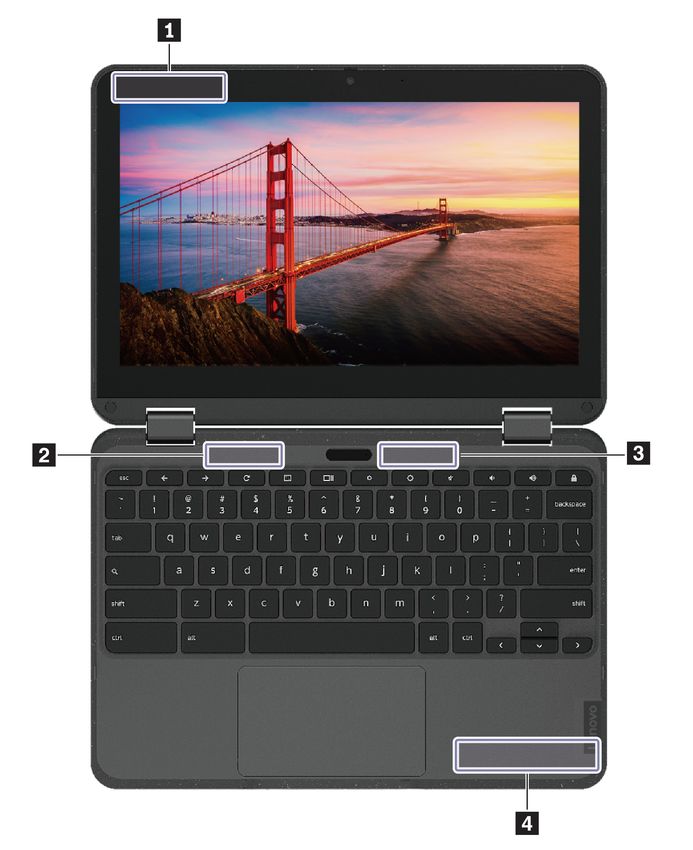
© Copyright Lenovo 2021 25For models with wireless-LAN and wireless-WAN cards
Lenovo 100e Chromebook Gen 3
1 Wireless-WAN antenna (auxiliary)
2 Wireless-WAN antenna (main)
3 Wireless-LAN antenna (auxiliary)
4 Wireless-LAN antenna (main)
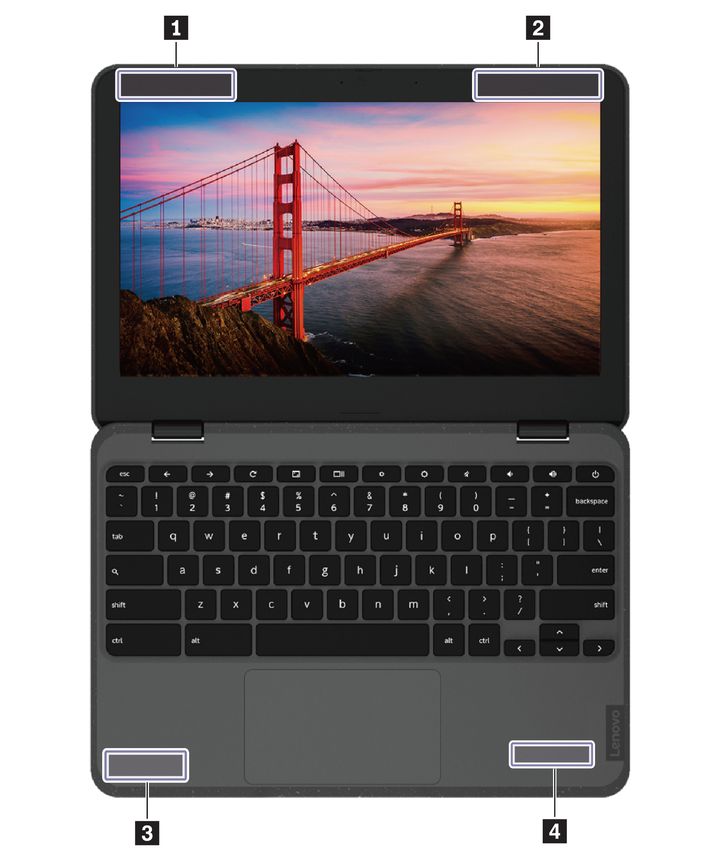
26 Lenovo 100e/300e/500e Chromebook Gen 3 User GuideLenovo 300e/500e Chromebook Gen 3
1 Wireless-WAN antenna (auxiliary)
2 Wireless-LAN antenna (auxiliary)
3 Wireless-LAN antenna (main)
4 Wireless-WAN antenna (main)
Certification-related information
Product name Machine types
Lenovo 100e Chromebook Gen 3 82J7 and 82J8
Lenovo 300e Chromebook Gen 3 82J9 and 82JA
• Lenovo 500e Chromebook Gen 3
• (82JB)Lenovo 500e Chromebook Gen 3* 82JB and 82JC
• (82JC)Lenovo 500e Chromebook Gen 3*
* for India only
The latest compliance information is available at:
Appendix A. Compliance information 27https://www.lenovo.com/compliance
Federal Communications Commission (FCC) Supplier’s Declaration of
Conformity
The following information refers to the following products:
Product name Machine type
Lenovo 100e Chromebook Gen 3 82J7 and 82J8
Lenovo 300e Chromebook Gen 3 82J9 and 82JA
Lenovo 500e Chromebook Gen 3 82JB and 82JC
This equipment has been tested and found to comply with the limits for a Class B digital device, pursuant to
Part 15 of the FCC Rules. These limits are designed to provide reasonable protection against harmful
interference in a residential installation. This equipment generates, uses, and can radiate radio frequency
energy and, if not installed and used in accordance with the instructions, may cause harmful interference to
radio communications. However, there is no guarantee that interference will not occur in a particular
installation. If this equipment does cause harmful interference to radio or television reception, which can be
determined by turning the equipment off and on, the user is encouraged to try to correct the interference by
one or more of the following measures:
• Reorient or relocate the receiving antenna.
• Increase the separation between the equipment and receiver.
• Connect the equipment into an outlet on a circuit different from that to which the receiver is connected.
• Consult an authorized dealer or service representative for help.
Lenovo is not responsible for any radio or television interference caused by using other than recommended
cables and connectors or by unauthorized changes or modifications to this equipment. Unauthorized
changes or modifications could void the user’s authority to operate the equipment.
This device complies with Part 15 of the FCC Rules. Operation is subject to the following two conditions: (1)
this device may not cause harmful interference, and (2) this device must accept any interference received,
including interference that may cause undesired operation.
Responsible Party:
Lenovo (United States) Incorporated
7001 Development Drive
Morrisville, NC 27560
Email: FCC@lenovo.com
Location for the FCC ID and IC ID
If you purchased your computer in the United States or Canada and the computer includes factory-
preinstalled wireless modules, a piece of text containing identification strings for these modules (FCC ID and
IC ID) is visible on the computer’s bottom cover. The text may either be laser etched on the bottom cover or
on a physical label affixed to it. To obtain the FCC ID or IC ID for the factory-preinstalled wireless module,
check the bottom cover for strings directly after “FCC ID” or “IC ID”.
28 Lenovo 100e/300e/500e Chromebook Gen 3 User GuideSafety instructions for teachers, parents and adult supervisors
This Chromebook is intended for use as a child development tool primarily by children, 6 years of age or
above. There must be supervision by an adult. It is a must to have a thorough explanation to children on safe
and proper handling of the computer, battery pack, and ac power adapter.
• For ITE with power supplies not intended to be handled by children: As with all electrical products,
precautions should be observed handling and use to prevent electric shock. The ac power adapter should
not be handled by children.
• The computer should not be placed on the bare skin (lap) of the child for long periods. The computer
should be placed on a flat surface, like desktop, if your child intends to use it for more than a few minutes.
• The computer (including the ac power adapter and the battery pack, as applicable) should not be left in
the rain or subjected to exposure to water. If cleaning is necessary do not immerse it in water; wipe clean
with damp cloth.
• The computer (including the ac power adapter and the battery pack, as applicable) should not be
dropped, crushed (stepped on) or otherwise abused.
• An adult should caution his or her child about the potential trip hazard as posed by the cable between a
power source and the computer. An adult should inspect the computer (including the ac power adapter
and the battery pack, as applicable) periodically for damage. Similarly, if a child notices damaged/broken
parts, this should be reported to the teacher/parents/adult supervisors immediately. Damaged parts may
be replaced through service provided by Lenovo.
DANGER
ELECTRICALLY OPERATED PRODUCT. Not recommended for children under 3 years of age (or
other intended age range). As with all electrical products, precautions should be observed during
handling and use of electrical products to reduce the risk of electric shock.
Operating environment
Maximum altitude (without pressurization)
3048 m (10 000 ft)
Temperature
• Operating: 5°C to 35°C (41°F to 95°F)
• Storage: 5°C to 43°C (41°F to 109°F)
Note: When you charge the battery, its temperature must be no lower than 10°C (50°F).
Relative humidity
• Operating: 8% to 95% at wet-bulb temperature 23°C (73°F)
• Storage: 5% to 95% at wet-bulb temperature 27°C (81°F)
Appendix A. Compliance information 2930 Lenovo 100e/300e/500e Chromebook Gen 3 User Guide
Appendix B. Open source information
Your Chromebook may include software made publicly available by Google and other third parties, including
software licensed under the General Public License and/or the Lesser General Public License (the “open
source software”).

You may obtain a copy of the corresponding source code for any such open source software licensed under
the General Public License and/or the Lesser General Public License (or any other license requiring us to
make a written offer to provide corresponding source code to you) from Lenovo for a period of three years
without charge except for the cost of media, shipping, and handling, upon written request to Lenovo. This
offer is valid to anyone in receipt of this device. You may send your request in writing to the address below
accompanied by a check or money order for $5 to:
   Lenovo Legal Department
   Attn: Open Source Team / Source Code Requests
   8001 Development Dr.
   Morrisville, NC 27560

As part of your request, please include a “UNAME” and a “CHROME VERSION” of this device available by
typing: “Chrome://system” in a Chrome Browser’s address bar. Be sure to provide a return address.

The open source software is distributed in hope it will be useful, but WITHOUT ANY WARRANTY; without
even the implied warranty of MERCHANTABILITY or FITNESS FOR A PARTICULAR PURPOSE. See for
example the GNU General Public License and/or the Lesser General Public License for more information.

To view additional information regarding licenses, acknowledgments and required copyright notices for the
open source software used in your device, type: “Chrome://credits” in the Chrome Browser’s address bar.

This device may include certain pre-installed application programs or pre-configured links for downloading
application programs published by parties other than Lenovo. Such third-party application programs may
include open source software made publicly available by the respective publishers of those application
programs. You may obtain the corresponding source code for any such open source software directly from
the publisher of the applicable application program, to the extent permitted under the relevant open source
software license agreement. Additional information is provided by the publisher of each application program
within the menu structure of its application program.

© Copyright Lenovo 2021                                                                                    31
32 Lenovo 100e/300e/500e Chromebook Gen 3 User Guide
Appendix C. Notices and trademarks

Notices
Lenovo may not offer the products, services, or features discussed in this document in all countries. Consult
your local Lenovo representative for information on the products and services currently available in your
area. Any reference to a Lenovo product, program, or service is not intended to state or imply that only that
Lenovo product, program, or service may be used. Any functionally equivalent product, program, or service
that does not infringe any Lenovo intellectual property right may be used instead. However, it is the user's
responsibility to evaluate and verify the operation of any other product, program, or service.

Lenovo may have patents or pending patent programs covering subject matter described in this document.
The furnishing of this document does not give you any license to these patents. You can send license
inquiries, in writing, to:
   Lenovo (United States), Inc.
   8001 Development Drive
   Morrisville, NC 27560
   U.S.A.
   Attention: Lenovo Director of Licensing

LENOVO PROVIDES THIS PUBLICATION "AS IS" WITHOUT WARRANTY OF ANY KIND, EITHER EXPRESS
OR IMPLIED, INCLUDING, BUT NOT LIMITED TO, THE IMPLIED WARRANTIES OF NON-INFRINGEMENT,
MERCHANTABILITY OR FITNESS FOR A PARTICULAR PURPOSE. Some jurisdictions do not allow
disclaimer of express or implied warranties in certain transactions, therefore, this statement may not apply to
you.

Changes are made periodically to the information herein; these changes will be incorporated in new editions
of the publication. To provide better service, Lenovo reserves the right to improve and/or modify the
products and software programs described in the manuals included with your computer, and the content of
the manual, at any time without additional notice.

The software interface and function and hardware configuration described in the manuals included with your
computer might not match exactly the actual configuration of the computer that you purchase. For the
configuration of the product, refer to the related contract (if any) or product packing list, or consult the
distributor for the product sales. Lenovo may use or distribute any of the information you supply in any way it
believes appropriate without incurring any obligation to you.

The products described in this document are not intended for use in implantation or other life support
applications where malfunction may result in injury or death to persons. The information contained in this
document does not affect or change Lenovo product specifications or warranties. Nothing in this document
shall operate as an express or implied license or indemnity under the intellectual property rights of Lenovo or
third parties. All information contained in this document was obtained in specific environments and is
presented as an illustration. The result obtained in other operating environments may vary.

Lenovo may use or distribute any of the information you supply in any way it believes appropriate without
incurring any obligation to you.

Any references in this publication to non-Lenovo Web sites are provided for convenience only and do not in
any manner serve as an endorsement of those Web sites. The materials at those Web sites are not part of the
materials for this Lenovo product, and use of those Web sites is at your own risk.

© Copyright Lenovo 2021                                                                                      33
Any performance data contained herein was determined in a controlled environment. Therefore, the result
obtained in other operating environments may vary significantly. Some measurements may have been made
on development-level systems and there is no guarantee that these measurements will be the same on
generally available systems. Furthermore, some measurements may have been estimated through
extrapolation. Actual results may vary. Users of this document should verify the applicable data for their
specific environment.

This document is copyrighted by Lenovo and is not covered by any open source license, including any
Linux® agreement(s) which may accompany software included with this product. Lenovo may update this
document at any time without notice.

For the latest information or any questions or comments, contact or visit the Lenovo Web site:

https://pcsupport.lenovo.com

Trademarks
LENOVO and LENOVO logo are trademarks of Lenovo. ENERGY STAR is a registered trademark of the U.S.
Environmental Protection Agency. Google, Google Keep, and Chromebook are trademarks or registered
trademarks of Google LLC. NanoSaver and Cleat are trademarks or registered trademarks of ACCO Brands.
USB-C® is a registered trademark of USB Implementers Forum. Wi-Fi is a registered trademark of Wi-Fi
Alliance. All other trademarks are the property of their respective owners.

34   Lenovo 100e/300e/500e Chromebook Gen 3 User Guide
You can also read