Foldalite AUTO - Motion Healthcare
←
→
Page content transcription
If your browser does not render page correctly, please read the page content below
Foldalite
                AUTO

PRODUCT CODE:

FL2003                 User Manual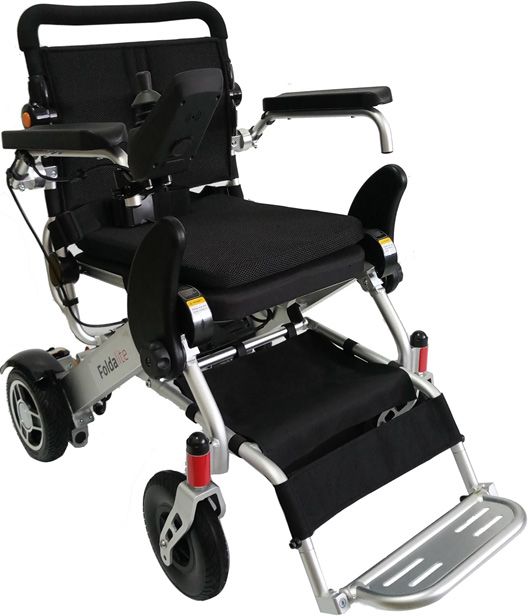
CONTENTS

      1. INTRODUCTION								3

      2. GUIDANCE FOR USE							4

      3. PRODUCT SAFETY SYMBOLS					5

      4. TECHNICAL SPECIFICATIONS					6

      5. FEATURES									7

      6. EMI											9

      7. SAFETY										10

      8. INSTALLATION GUIDE						17

      9. OPERATION GUIDE							19

      10. BRAKING									22

      11. BATTERY										23

      12. UNFOLDING AND FOLDING					27

      13. TROUBLESHOOTING						32

      14. WARRANTY									34

2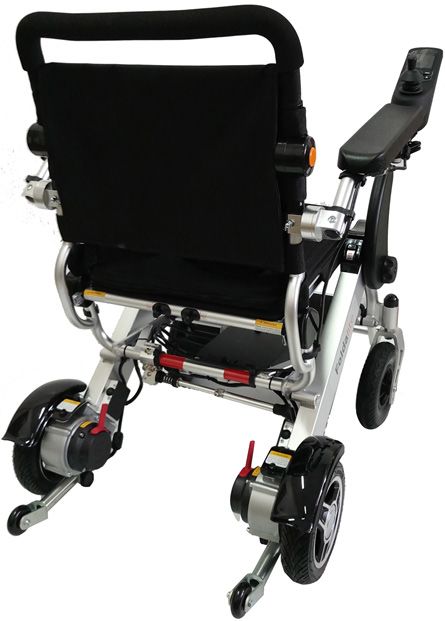
1. INTRODUCTION

Thank you for choosing Motion Healthcare’s Foldalite, your effortless travel companion. Foldalite
is ultra-compact, light-weight and portable allowing for comfortable travel, compact storage
and increasing accessibility in your daily life. Foldalite is designed to fold in just seconds thus
increasing travel opportunities and allowing for compact storage. Foldalite will allow you to go
wherever and whenever you choose!

Your safety is Motion Healthcare’s utmost priority. Please read and follow all instructions in this
owner’s manual carefully before operating your Foldalite for the first time. For your own safety,
it is crucial that you completely understand the instructions given in this owner’s manual.

Motion Healthcare is not liable for any property damage or bodily injury which may occur as a
result of improper use of this power wheelchair or failing to follow the instructions in this
owner’s manual.

If you have problem in comprehending the warnings and instructions contained in this manual,
please contact your distributor, or your provider or the manufacturer. We, at Motion Healthcare,
strive to enrich your life!

Motion Healthcare

                                                                                                      3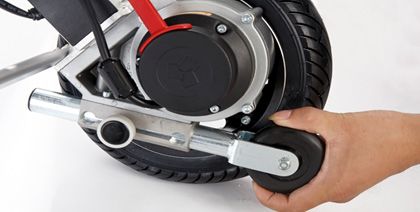
2. GUIDANCE FOR USE

    This manual must be read and understood completely before your first use.

    If you have difficulty in understanding the warnings, notes and instructions in this owner’s
    manual, or require additional assistance, please contact your authorized provider or distributor
    to obtain professional guidance and help. Failure to follow the instructions on this manual can
    lead to your safety being at risk as result of improper usage, and voiding the warranty.

    Reference

    Authorized Provider:

    Address:

    Phone Number:

    Purchase Date:

4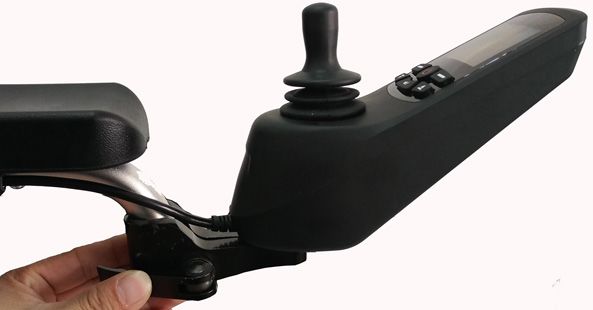
3. PRODUCT SAFETY SYMBOLS

The following symbols are used to identify warnings, mandatory actions and prohibited actions.
It is essential that you fully understand and completely familiarize yourself with these symbols
before operating Foldalite for the first time.

                    Read and follow the instructions provided in this manual.

                    Safety warning sign or an indication of a dangerous operation that may
                    endanger your safety or the safety of others.

                    Class I equipment (Canada) / Class II equipment (USA).

                    Do not use any mobile phones, walkie talkies, electronic devices or any
                    other radio transmitters while operating.

                    Finger crush / pinch point.

                    Store in a clean and dry condition; away from rain, snow, ice, salt and
                    water.

                    Test of EMI/RFI at an immunity level of 30 V/m has been passed.

                    Corrosive substance contained in the battery

                    Danger of explosion

                    Do not use batteries with different amp-hour (Ah) capacities, No mix use
                    of old and new batteries. Always replace both batteries at the same time.

                    Keep tools and other metal objects away from battery terminals. If
                    contacted, short-circuit or electric shock may occur and cause injury.

                    Flammable material, avoid exposure to heat source such as open flame
                    or sparks. Avoid transporting the batteries along with flammable or
                    combustible objects.

                    Disposal and recycle

                                                                                                   5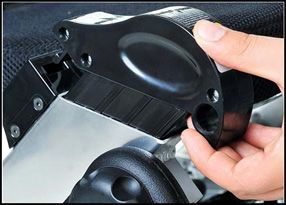
4. TECHNICAL SPECIFICATIONS

                      MODEL    Foldalite
                     LENGTH         100cm / 39”

                      WIDTH          66cm / 26”

                     HEIGHT          86cm / 35"

              FOLDED LENGTH          31cm / 12”

               FOLDED WIDTH          66cm / 26”

              FOLDED HEIGHT          76cm / 30”

                 SEAT WIDTH          38cm / 15”

                 SEAT DEPTH         42cm / 16.5”

               FRONT WHEEL        Solid 20cm / 8”

                 REAR WHEEL       Solid 20cm / 8”

               TOTAL WEIGHT         55lbs / 25kg

               HEAVIEST PART       50lbs / 22.8kg

             BATTERY WEIGHT       2 x 2.4lbs / 1.1kg

            MAX USER WEIGHT       18stone / 115kg

                      RANGE        9miles / 15km

                      SPEED         4mph / 6kph

                    BATTERY     2 x 24v 5ah Lithium

                     MOTOR     2 x 24v Brushless 180w

           GROUND CLEARANCE          3cm / 1.2”

               MAX GRADIENT             12°

             TURNING RADIUS          90cm / 35”

                  BOX DEPTH         40cm /15.5”

                  BOX WIDTH         69.5cm / 27”

                 BOX HEIGHT          90cm / 35”

6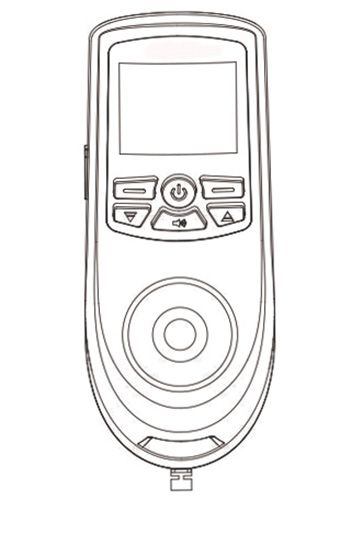
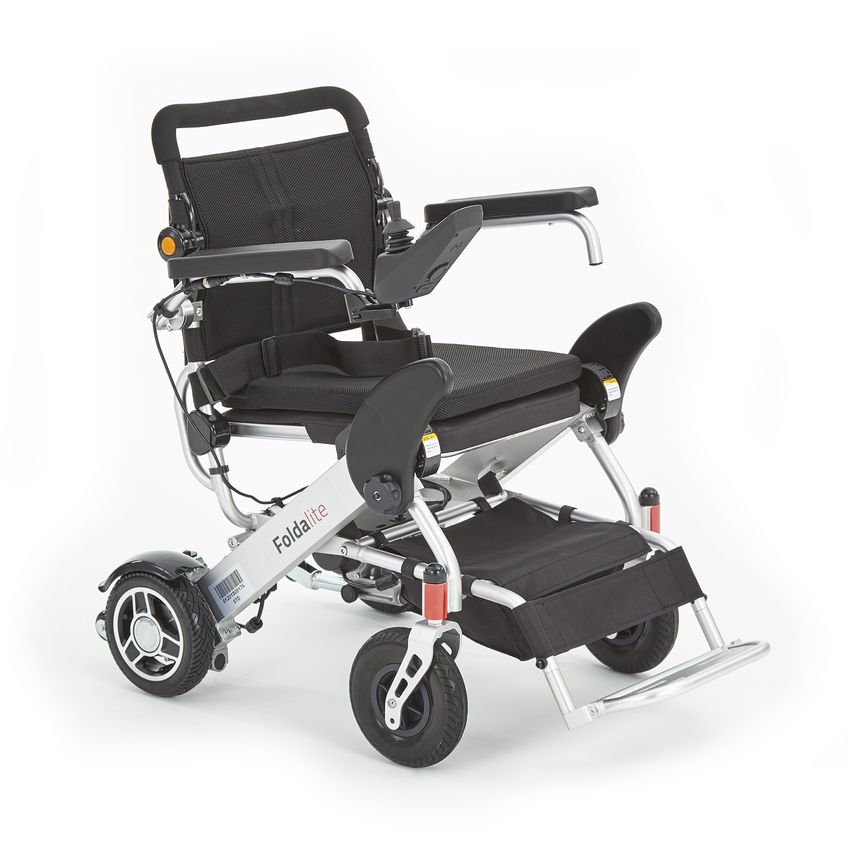
5. FEATURES

                               1   2    3             4

    3
4
5                                                                  7

                                                                       8

                                                                                  10
         9
         11

    12
                           6

                                                                                  15

                                                                                  13
                    14

1. UPPER BACKREST        2. BACK CUSHION      3. BACKREST JOINT    4. ARMREST

5. JOYSTICK              6. LITHIUM BATTERY   7. SAFETY BELT       8. SEAT BASE

9. LEG GUARD             10. FRAME            11. SPLASH GUARD     11. SPLASH GUARD

13. FOOTREST             14. FRONT WHEEL      15. STORAGE BASKET   12. MOTOR WHEEL

                                                                                       7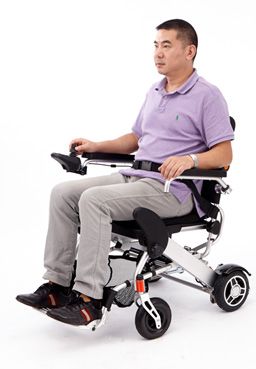
5. FEATURES

         19

               16

                                                                    20

                                    18

                                   17

       16. FOLDING RELEASE LEVER          17. ANTI-TIPPING WHEELS

       18. ELECTROMAGNETIC BRAKE LEVERS   19. CONTROL PANEL CABLE CLIP

       20. KICK STAND

8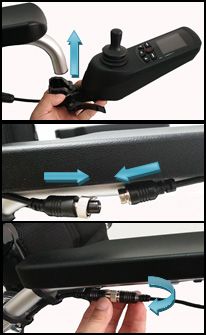
6. EMI

The power wheelchair may be affected by electromagnetic interference (EMI), which may cause
damage or interruption to the operation of the chair. It is important for you to understand the
instructions which can help you take protective measures against the risk of interference.

The sources of electromagnetic waves come from broadcasting stations, TV stations, radio
transmitters, two-way radios (such as walkie-talkies), cellular phones and computers. Interference
from these electromagnetic waves may cause malfunction or permanent damage to the chair’s
braking and control system.

         CAUTION!

          1. The power wheelchair has passed the 30 V/m EMI test and has a certain degree of
          immunity to most common electromagnetic energy sources. However, it is important
          for you to follow the safety guidelines as follows:

              a. Do not turn on or operate portable transceivers, receivers, radios or any wireless
              communication devices.

              b. Stay away from all radio wave emission sources.

          2. If interference does occur and causes unintended movement to the chair in an
          uncontrolled manner, cut off the power immediately.

          3. No modification of any form to the power wheelchair is allowed, including adding or
          removing any parts.

                                                                                                      9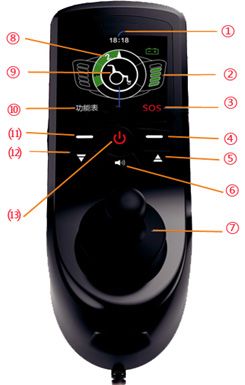
7. SAFETY

 USAGE SAFETY GUIDELINES
                   •   Check all electrical and control connections to ensure they are secured
                       safely and firmly.
                   •   Check battery levels regularly and ensure the battery is charged
                       immediately when needed.
                   •   Keep tools and any metal objects away from the negative and positive
                       poles of the battery. Short-circuits or electric shock may occur when the
                       two poles are accidentally contacted.
                   •   Familiarize yourself with Foldalite and its capabilities.
                   •   Always seek assistance during your first use until you are confident enough
                       to operate the chair independently and proficiently.
                   •   Always beware of any potential danger while using the power wheelchair.
                   •   When the power wheelchair is not in use, turn off the power, charge the
                       battery and store in a clean and dry place.

 CONTROL PANEL
 To ensure your safety while operating the power wheelchair, the control panel must be securely
 mounted (Fig. A1). If any buttons on the control panel fail or are not responding, you must stop
 using the chair immediately and contact the provider for repair or replacement.

10
7. SAFETY
STATIC POSITION
When the chair is inactive even for a moment; the power must be off (Fig. A2). This will:
• Prevent the control panel from being activated by accidental touch which may cause the
chair to move unintentionally.
• Prevent the chair from electromagnetic interference sources which may activate the chair’s
operation system and cause damage to the chair and bodily harm.
Do not allow anyone but you to touch the control panel. This will protect the chair from being
moved without your awareness and causing potential serious bodily harm.
Weather Precautions
This power wheelchair shall not be used or stored in environments of rain, snow, icy
or slippery surfaces. These conditions may adversely affect the functions of the chair.
Always keep your chair in a clean and dry area.
Malfunction may occur if the device is in contact with rain, snow or high humidity
environments. Do not expose the chair to any extremely hot or cold conditions. The chair is not
fully waterproof; a humid environment may result in rusting or corrosion inside the chair. If you
are ever caught in any of these conditions, please proceed to shelter immediately.
To prevent malfunction, please adhere to the guidelines as follows:
• Do not operate or store the chair in an environment which has direct water contact;
extremely hot or cold temperature or high humidity.
• Do not use the chair while showering, swimming, etc.
• Do not use the chair in salt or fresh water
• Do not use the chair around any water sources (e.g. rivers, lakes, etc.)
• Do not flush the chair with water.
117. SAFETY
NOTE: When the chair is wet, immediately pull out the battery and allow it to dry naturally. Put
the battery back after the chair is completely dried.
When operating on wet or frictionless ground surfaces, please carefully move at a slow speed
and follow the safety guidelines below:
• When any of the motor wheels losses traction, the chair must be stopped immediately to
avoid losing control of the chair (e.g. slipping, tipping over, etc.).
• Do not drive into slopes or ramps covered with snow, ice, water, oil, etc.
Road Surfaces
Foldalite is designed optimally for dry level surfaces; such as concrete and indoor ground
flooring.
Do not use Foldalite on sand, uneven or loose surfaces, tall grass or rough road surfaces to
prevent the wheels, bearings, axis, motor and other parts from being damaged or loosened.
Driving in Traffic Environment
It is at your own risk. Beware of the local traffic regulations. Be extremely cautious to your own
safety while driving on public roads.
For increased visibility at night, the chair has light reflecting markers attached to the chair (Fig.
B1). It is highly recommended that you wear light reflective clothing while driving at night.
• When operating the chair in traffic amongst motor vehicles, is at your own risk. Keep yourself
within the sight of the driver and keep a safe distance. It is not recommended to operate the
chair in traffic.
Figure B1
127. SAFETY
VEHICLE TRANSPORT
Please be aware that it is at your own risk and is not advisable to sit in the
Foldalite when taking any forms of transportation such as cars, buses, trains,
planes or ships.
If you must take such forms of transportation while remaining in the chair, it is extremely
important that you secure your positioning waist belt and power off the chair and push the brake
lever to “Drive” position, inspect no movement to the motor wheels and have the chair securely
tied down. This will help prevent injuries during sudden stops. However, as this chair is ultra-
compact, taking any transportation is made possible as you can fold the chair conveniently and
can be stored away in tight storage areas such as a car trunk. Please ensure the chair is stored
securely in order to avoid injury.
If you need to be transferred on or off a vehicle manually without getting off the chair, never
allow anyone to lift the chair by the armrest or rear backrest. The chair must be lifted by firmly
gripping the front and rear edges of the seat cushion frame.
Weight Distribution
To avoid tipping over while driving, the balance and stability of the power wheelchair must not be
neglected. The following factors may affect the weight distribution of the chair:
• Height and angle of the chair.
• Seating position, or weight loading position of the user’s body.
• The gradient of the ramp or slope.
• Load carried in storage basket or by the user may have adverse effects to the weight
distribution of the chair.
Do not modify or adjust Foldalite’s configuration or construction yourself.
WARNING! Do not drive at night or in rain, snow, fog or strong winds.
137. SAFETY
GETTING ON/OFF
Whenever moving your body, it is recommended to have a supporting point that is higher than
the seat cushion. To avoid and reduce the chance of falling, please be aware of the followings:
• Before getting on and off the chair, ensure that you lift up the armrest and lower the leg
guard.
• Before getting on the chair, ensure that the power is off and the brake is in “Drive”
position. Inspect that there is no movement to the motor wheels.
• Before getting out of the chair, ensure that the power is off and the brake is in “Drive”
position. Inspect that there is no movement to the motor wheels. Move the chair as close
as possible to the target position to minimize the risk of falling during transfer.
• Consult your health care professionals about the safest way to move your body in and out
of the chair.
• Fold up the footrest at all times while getting on and off the chair
• Do not stand on the footrest to move your body while getting on/off the chair.
• Make sure your feet are not tangled or jammed in the gap between the footrest
while getting on/off the chair.
Leaning or Reaching while Seated
Reaching out your hands or leaning your body in the chair may adversely affect the chair’s bal-
ance. If you do not position yourself correctly, you may fall off or tip over the chair.
• When moving your body such as lifting your body at one side or leaving the seat, do not
lean your body out of the range of the seat cushion.
• When moving forward on your seat, do not lean your body excessively. Your hip must be
always in contact with the seat cushion.
• Do not reach your hands farther than your capability as this may result in falling due to
lost balance.
• Under no circumstance should you try to pick up anything through the space between
your knees or in front of your body.
• When you extend your body, do not exert force on the footrest to avoid the chair from
tipping over, this may result in serious injury.
• Do not rest forcefully against the top of the backrest to avoid tipping over the chair and
causing damage to the backrest.
Failing to follow these guidelines may result in serious injury. If you do any of
these actions, it is at your own risk.
Never reach, bend, or lean in the chair. Doing so will change your center of gravi-
ty and the weight distribution of the chair.
147. SAFETY
STATIONARY OBSTACLES
Navigating over obstacles such as ramps, slopes, curbs, raised or uneven surfaces, pot holes and
rough roads can be hazardous. Extreme caution is needed to avoid tipping the chair over.
Do not exceed the incline guidelines and specifications in this owner’s manual.
To navigate over a stationary obstacle:
• Approach the obstacle slowly, cautiously and perpendicularly.
• With extreme caution, increase the forward speed gently when the front wheels just come
in contact with the obstacle and reduce the forward speed gently after the rear wheels
cleared the obstacle.
• Lean your upper body slowly and slightly forward, when going over an obstacle with an
ascending slope.
• With extreme caution, reduce the forward speed gently when the front wheels just come
in contact with the obstacle and increase the forward speed gently after the rear wheels
cleared the obstacle.
• Lean your upper body gently against the backrest, when going over an obstacle with a
descending slope.
• Avoid any sudden stops and starts.
• Always navigate perpendicularly towards the obstacle.
Inclined Slopes
If you feel uncomfortable driving on a slope, do seek assistance to protect you from causing bodi-
ly harm to yourself.
• It is not advisable to drive on slopes over 10°.
• It is prohibited to drive on slopes over 12°.
• It is prohibited to drive on a wet slippery slope (e.g., snow, ice, water, oil).
• It is prohibited to drive on slope if there are pits at the bottom of the slope.
• It is prohibited to drive in areas with continuous up and down slopes
Reverse Driving
When driving in reverse, please exercise extreme caution. The motor wheels may
run into an obstructive object which may lead to your chair getting out of control
and may cause your chair to tip over.
• All obstructive objects should be cleared and approach cautiously and slowly while
driving in reverse
• Never drive in reverse on inclined slopes
157. SAFETY
LOAD LIMIT
• Max Load of the chair: 253lbs (115kg)
• Do not exceed.
• The safe load of the backrest: 165lbs (74.8kg)
• Do not press down or lift up the backrest.
• Under no circumstances should the user do weight training while using the chair.
• Overloading the chair may cause damage to the chair’s frame, fastened parts and folding
device.
• Overloading caused damages will void the warranty of the chair.
Getting Up/Down Stairs and Escalators
Foldalite is not designed for long journeys or getting up and down stairs, and escalators
It is prohibited to move or use Foldalite on stairs and escalators. Serious bodily
injury may result.
The Kick Stand Instruction
The Kick stand is located at the bottom of the rear frame
where red sticker shows.
Notice:
Only after folding wheelchair , the Kick stand can be set
upright, Before unfold the wheelchair , set back kick stand
horizontally first .
Only after folding, the kick stand can be set upright! Before
unfolding the wheelchair, set back kick stand horizontally first.
please don’t adjust kick stand length
Set back kick stand followed by in
the direction shown by arrow
Open the kick stand in the direction
shown by the arrow
168. INSTALLATION GUIDE
POSITIONING WAIST BELT
The positioning waist belt is for holding your hip properly against the back of the seat and must
be strapped 45° over your hip (Fig. C) to prevent the user from falling off the chair. Please wear
the waist belt at all times while seated.
Please be aware that the waist belt is not intended for use as an auto style
seat belt. The Foldalite is not designed for being used as a seat in any forms of
transportation.
You must wear the seat belt provided in all forms of transportation.
You are at your own risk and are not recommended to use the chair as a seat when taking any
forms of transportation such as cars, buses, trains, planes or ships.
CAUTION!
1 . Always ensure the waist belt is appropriately installed onto the chair and adjusted
securely so that there is no snug, but also comfortable enough so that it does not
interfere with your breathing.
2. Always check the waist belt for any loose parts or wear and tear. If any problem is
found, contact your provider for maintenance or repair.
178. INSTALLATION GUIDE
MOUNTING THE CONTROL PANEL
The control panel can be mounted on the right or left armrest. As shown in Fig. D1, put the quick
release clamp of the control panel onto the metal grab bar and lock the quick release handle
tightly and securely.
1. As shown in Fig. D2, route the control panel cable through the cable clip
D1 D2
2. As shown in Fig. D3, plug the four – pin control plug of the control panel into the socket at
either side.
D3
189. OPERATION GUIDE
CONTROL PANELS
The Control Panel comprises of the following:
No Function: Description
1 Time The current time is displayed by LCD, Beijing time is displayed by default. If the time display is
different from your time zone, you can modify the time in the setting menu.
2 Electric quantity display The use of color LCD display shows the remaining battery capacity, you can clearly understand the
remaining battery power.
3 SOS
4 return key
5 speed increase key Increase the speed of the chair,Max. speed: 6 km/hr (3.75 m/hr).
6 speaker key Press horn to sound.
7 Control Joystick Control the direction and speed of the chair. Push the joystick towards the desired direction.
8 Speed Indicator With 5 LED lights on, the chair at its max. speed. 1 LED light on, the chair is at its lowest speed.
9 Fault display
10 Menu Setting mode
11 confirmation key
12 speed reduction key Decrease the speed of the chair.
13 power key Pressing this button will power on the chair.
Pressing this button will power off the chair.
199. OPERATION GUIDE
When the LED light flashes intermittently, which indicate specific diagnostic troubles referred in
the table below:
1. If the battery widget is in a red state, please charge as soon as possible, reduce the use of driving
function, change to the push model. If you fail to comply with this condition, you may be trapped in
an insecure location, such as a road central.
For any non-compliance with this condition caused any loss, manufacturer will not be liable.
2. When the power is lower than 10%, Battery widget is red, showing that do not allow to move, the
power is too low, the scooter will automatic shutdown a few minutes later.
3. Using the LCD screen to display the current state of charge.
When you insert the charger, the LCD display will prompt the battery is charging and the battery
widget will flicker. And prohibit moving the scooter.
4. When the battery is full, Sound will prompt
charging is completed every few minutes, the Control Joystick
battery widget will not flicker.
When operating the chair for the first time,
it is recommended to move the chair at a
5. When the power is lower than 10%, Battery low speed gently and gradually pushing
widget is red, showing that do not allow to the control joystick forward. The practice
move, the power is too low, the scooter will run will help you familiarize yourself with
automatic shutdown a few minutes later. controlling the speed and start and stop of
the chair.
6. Left wheel failure
Controller unable to communicate with the Do not do sharp turns at high speeds. The
right wheel drive, or the right wheel have fault. chair will lose its balance and tip over
causing serious bodily injury and property
damage.
7. Right wheel failure
Controller unable to communicate with the The control joystick on the control panel
right wheel drive, or the right wheel have fault. provides 360 degrees of omnibearing
manoeuvrability comfortably and
effortlessly. A spring is equipped inside the
joystick which automatically returns to its
8. Overheating
original position when let go.
Driver or controller internal temperature is
too high, may be cause to a failure, and could
Push the joystick towards the target
not work normally.
direction. The joystick can control the drive
proportionally, the harder the push, the
9. Button failure
faster it goes. The max traveling speed is
Button in the abnormal state.
6km/hr.
Release the control joystick slowly and
gradually for the chair to slow down safely.
10. Joystick failure Sudden release of the control joystick may
Joystick in the abnormal state cause the chair to lose balance and tip over
causing bodily injury.
209. OPERATION GUIDE
Movement Control lever operation
Forward Push the control lever forward
Backward Pull the control lever backward
Right Push the control lever to the right
Left Push the control lever to the left
Stop Release the control lever gradually (the chair
will slow down to stop safely)
Forward
Turn left Turn right
Reverse
2110. BRAKING
After any adjustment, repair or maintenance, check all components and parts for
tightness before use, otherwise damage or injury may occur.
Free wheel
Electromagnetic
Brake Lever Drive
Electromagnetic Brake System
The chair has 2 braking modes which can be selected by pushing the brake levers to “Drive” or
“Free wheel” position.
• In “Drive” position: the internal clutch of the electromagnetic brake is engaged and the
electromagnetic brake is started. Before powering on and attempting to operate the control
joystick, the motor wheels will not move. Having brake in the “Drive” position will ensure
the chair does not move, allowing the user to get on/off the chair safely and securely.
• In “Free wheel” position: the internal clutch of the electromagnetic brake is disengaged. In
“Free wheel” position, the motor wheels can move freely even when the chair is powered
off. This will allow the chair to move manually.
CAUTION! Before using the chair, it is important that the brake lever is in “DRIVE”
position and the electromagnetic brake is engaged to stop the rotation of the motor
wheels. This will prevent any accidents from occurring and causing bodily injury.
1. Do not operate the chair while the brake is in “Free wheel” position, without the
presence of an attendant.
2. Do not seat yourself in the chair while the brake is in “Free wheel” position, without
any assistance from an attendant
3. Do not place the chair on an incline or decline while the brake is in “Free wheel”
position, the chair may roll out of control and may cause damage to the chair or bodily
harm.
2211. BATTERY
Do not use batteries with different amp-hour (Ah) capacities. Do not mix use of
old and new batteries. Always replace both batteries at the same time.
Keep tools and other metal objects away from battery terminals. If contacted,
short-circuit or electric shock may occur and cause injury.
Avoid flammable materials. Avoid exposure to heat source such as open flame
or sparks. Do not transport the batteries along with flammable or combustible
objects.
Corrosive substance contained in the battery. Do not disassemble the battery.
Danger of explosion. When charging the batteries, place the chair and the
battery charger in a well ventilated area, away from flames and sparks.
WARNING!
• Do not attempt to connect the battery terminal directly using pliers or metal
cables to charge the battery.
• Do not use the chair when the battery is being charged. An electronic drive
locking device will be activated that prevents the chair from operating when
battery being charged.
• Do not use non-standard power supply (eg. generator or inverter).
• Do not squeeze, bend, jerk or tie the power cord.
• Do not smoke or ignite anything around the battery.
• When pulling the power cord, grab the plug to pull it out.
• Keep the power cord away from children or pets.
• If there is any issue with the circuit breaker, pull out the charger immediately
and contact your provider.
• The operating temperature of the battery is -5 °C (23 °F) to 40°C (104 °F).
2311. BATTERY
BATTERY MAINTENANCE
The battery’s life and performance may be affected by temperature, condition of the battery, and
the weight of the user. Charging the battery continuously for a long duration before the first use
can reduce the battery’s service life. It is recommended that you charge the battery for the first
time, when the lowest level of the LED light on the control panel flashes.
When charging a new battery for the first time, it must be fully charged (about 24 hours) in order
to fully activate the battery.
Always check if the battery is fully charged before use. The regular charging time is about 5 hours.
But if the power is fully run out it may take 10-12 hours to charge fully until the red LED on the
charger turns green. Thus the recommended charging time for the battery is 8-12 hrs.
When not using the chair for a long duration, charge the battery full every 2 months. If the battery
is left uncharged for a long period of time, it will damage the battery permanently.
Mounting/Removing Battery
Ensure the chair is powered off before mounting or removing the battery.
Taking out the battery:
1. Near the edge of the seat base, the batteries are located at the sides of the chair.
2. Press the button (Fig. E1) and hold the battery grip and pull the battery out of the battery
holder (Fig. E2)
E1 E2
2411. BATTERY
Mounting the battery:
1. Hold the battery grip and plug in the battery with the battery bottom aligned to the mouth
of the battery holder (Fig. E3). When a click sound is heard, the battery has been mounted
firmly.
E3
Charging the Battery
The battery can be charged with normal AC power
(AC 110-220 V, 50-60 Hz). The charging port is located
under the front part of the control panel. Before
charging, ensure the chair is powered off.
1. Plug the off-board charger 3 – pin cable into
the charging port under the front part of the
control panel (Fig. E4)
2. Plug the off-board charger into a power outlet.
When the red LED is on, it is charging.
3. When the LED on the charger changes from
red to green, keep charging for an additional
30 minutes to allow the battery to be fully
charged.
4. Unplug the off-board charger from the power
outlet before unplugging from the charging
port of the control panel.
5. Please charge the battery in an appropriate E4
temperature. The recommended ambient
temperature for charging is between 5° C to
40° C.
2511. BATTERY
Over-discharge Protector
The lithium battery will be permanently damaged, if the battery’s capacity has been completely
discharged. Therefore, Foldalite is equipped with an over-discharge protector. When the lithium
battery is running out, the protector will cut off the circuit automatically and the controller will
stop working.
When the lowest level red LED light on the battery level indicator flashes, it means that the
batteries need to be charged.
When there is no red LED light on battery level indicator, it means that the batteries must be
charged within 2 hours immediately. If not, the battery may not be activated permanently.
The charging time after over-discharge takes 10-12 hours.
When the lowest level red
LED light flashes, the
Over-current Protector
Foldalite is also equipped with an over-current protector. If the current supplied to the motor is
too high, the over-current protector will cut off the current supply. If crossing over a slope over
12o or the load is over 255 lbs or the motor rotation is jammed, the over-current protector will be
activated and the chair’s control will cut off the circuit to prevent over current and overheating of
the motor. The red LED light on the control panel will flash and the buzzer will sound.
Battery Socket Cleaning
• Check the battery pack and the positive and negative poles for any corrosion. If any, clean
with battery cleaning tools, steel brush or medium sand paper.
• When cleaning, Keep tools and other metal objects away from battery terminals. If contacted,
short-circuit or electric shock may occur and cause bodily injury.
CAUTION! Do not allow the acidic substance inside the battery comes into contact
with your skin, clothes or other items. The substance is extremely hazardous and
may cause serious burn. When contacted, immediately flush your skin with cold
water and seek medical attention.
2612. UNFOLDING AND FOLDING
After any adjustment, repair or maintenance, ensure all components are securely tightened.
When lifting the chair, it is strongly recommended to get the user off the chair
before lifting or handling the chair. If absolutely necessary to handle the chair
and yourself together, please exercise extreme caution and have at least two
attendants to assist in lifting the chair. The front and rear edges of the seat base
and frame should be held.
UNFOLDING
1. As shown in Fig. F1, pull out the chair by holding the
position shown in the figure as directed by the arrows.
F1
2. Rotate the two armrests into position as directed by the
arrow in Fig. F2
F2
3. Pull the backrest to the rear edge of the seat cushion until
the two folding levers reach the red line (Fig. F3). When a
click sound is heard, the chair is unfolded.
F3
2712. UNFOLDING AND FOLDING
4. As shown in Fig. F4, press the backrest adjusting button
and turn
F4
5. As shown in Fig. F5, press the anti-tipping wheel button
and pull out the anti-tipping wheel.
F5
6. Mount the control panel and plug in the 5 –pin control
cable in accordance with Fig. F6. (refer to the instructions on
mounting the Control Panel)
F6
7. Fully expanded power wheelchair. Fig. F7
F6
F7
2812. UNFOLDING AND FOLDING
FOLDING
1. Remove the control panel. (Fig. F9)
F9
2. Press the anti-tipping wheel button and retract the anti-tipping wheel. (Fig. F10)
F10
3. Press the backrest adjusting button (Fig. F11) and turn the back rest in the direction as shown in
Fig. F12.
F11 F12
2912. UNFOLDING AND FOLDING
4.Rotate the armrest as shown in Fig. F13.
F13
5. Loosen the knob as shown in Fig. F14 and turn the leg guard down.
F14
6. Hold the folding lever (Fig. F15) and push the backrest forward (Fig. F16).
F15
3012. UNFOLDING AND FOLDING
7. Press the chair tightly as shown in Fig. F16 until it is fully closed as shown in Fig. F17.
F16 F17
ANTI-TIPPING WHEEL
2
1
1. As shown in Fig. G1, press the anti-tipping wheel button. Pull out the anti-tipping wheel to the
position of the hole for it to lock.
2. As shown in Fig. G1, press the anti-tipping wheel button to retract the anti-tipping wheel.
3113. TROUBLESHOOTING
The control panel will display a number of possible trouble conditions by means of the LED light.
When the LED light is green, the chair is trouble-free. When a problem occurs, the LED
light will flash.
When a “Trouble” LED light flashes, turn off the power of the chair and turn it on again. If the
flashing “Trouble” LED light remains unchanged, please refer to the table below for possible
causes and solutions.
If you cannot determine the cause of the trouble condition, please contact your
provider or distributor for assistance.
No Trouble Possible cause Solution
Faulty connection of the control Re-plug the 4 – pin plug into
panel and the motor connector. the battery connector at the
side of the chair; refer to
instructions on Page 16.
Low power supply, the power cut If the power is off
off automatically. automatically, the batteries
must be recharged within 2
hrs, and charged for 10-12 hrs,
1 Power
refer to instructions on Page
23 and 24
Fault of the 3 – pin plug Pull out the battery and check
connecting to the battery. the contact for any fault and
re-insert the battery. Refer to
instructions on Page 22 and
23.
The lowest level LED light Recharge the batteries
flashes: low battery power. immediately.
The second level LED light Reconnect the plugs of the
flashes: the control panel failing to two ends of the control panel
LED light
deliver control signal cable, or replace
2
the control panel.
flashes
The third level LED light flashes: Do not use the chair, An
the batteries are being charged electronic drive locking
device preventing the
chair from operating when
batteries are being charged.
The fourth level LED light Re-plug and tighten the
flashes: motor connection failed. motor connector
3213. TROUBLESHOOTING
No Trouble Possible cause Solution
The fifth level LED light flashes: Push the electromagnetic
The electromagnetic brake is in brake lever to “Drive”
“Free wheel” Position and the chair position, please refer to
will not move. instructions on Page 20
When the power is off, and the Contact the customer
electromagnetic brake lever is in service to replace the
“Drive” position, the motor wheels electromagnetic brake.
can move freely.
3 Electromagnetic
brake When the power is on, and the Contact the customer
electromagnetic brake lever is in service to replace the
“Drive” position, the motor wheels electromagnetic brake.
cannot move.
When the power is off, and the Contact the customer
electromagnetic brake lever is in service to replace the
“Free wheel” position, the motor electromagnetic brake.
wheels cannot move.
4 Motor Wheels Noisy and vibration occurs in the Contact the customer service
course of motor run.
Low temperature environment It is normal as this is the
below 0 characteristics of lithium
batteries.
5 Distance per
and downs. Consume more battery power.
charge decreased
Battery use has exceeded its Contact customer service to
service life. replace the battery.
Faulty connection of the control Reconnect the 4 – pin plug
panel and the battery connector into the battery connector at
the side of the chair.
Control Panel damage. Contact customer service to
replace controller.
6 Charging
Charger plug damaged. Contact customer service to
replace charger.
Charging plug loosened. Reconnect firmly.
7 Fail to start After not using for a period or Turn the power on and off. To
when power on after charging. reactivate
3314. WARRANTY
Warranty Time Frame
included (From date of Description
items purchase)
Incorrect use, damaged by the user
or modifications to the chair, will void
Main Frame 5 years the warranty and repair costs will be
charged.
Damaged due to overload or
Motor 1 years for the tampering by the user will void the
motor warranty.
Damaged due to incorrect charging
Battery 1 year for the or tampering by the user will void the
lithium battery warranty.
We are not responsible for accident
caused thereof after.
Joystick
Controller Damaged due to incorrect use,
1 year modification by the user will void
Control the warranty. Repair costs will be
Panel charged.
Invoice and warranty card are required for service within the warranty period,
otherwise all repair costs will be charged. Motion Healthcare will repair or replace
at our option to the original purchaser, free of charge, any of the warranty included
items being examined by an authorized representative of Motion Healthcare and
found defective in material and/or workmanship. For repair beyond the warranty
period, material costs will be charged, whereas the purchaser shall undertake the
costs of transport.
Motion Healthcare Ltd. Tel: 0844 257 8150
Hubert Road
Brentwood www.motionhealthcare.co.uk
Essex
CM14 4JE
3414. NOTES
3536
You can also read