Light-Manager Pro+ Manual of operation
←
→
Page content transcription
If your browser does not render page correctly, please read the page content below
Light-Manager Pro+

Manual of operation

                      2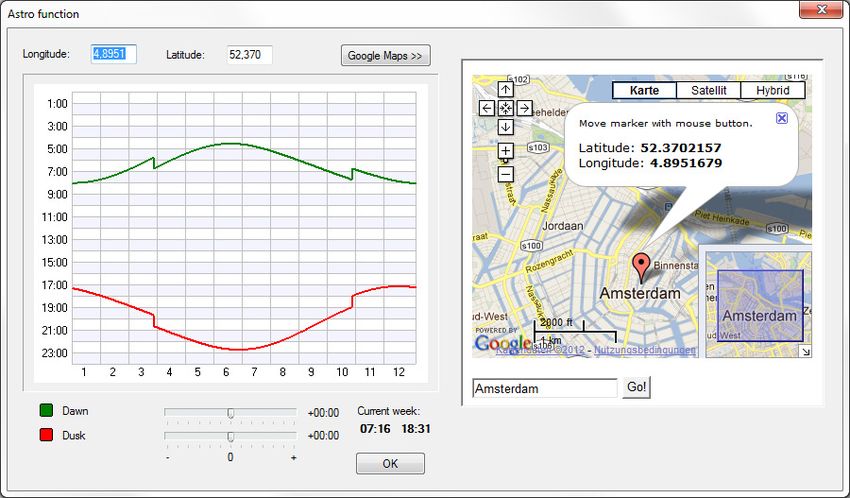
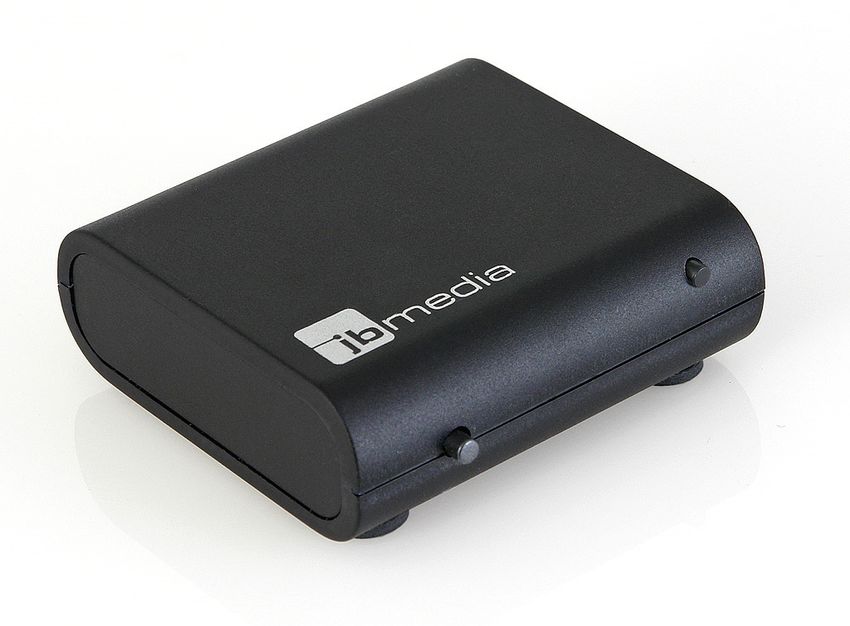
Light-Manager Pro for universal remote controls                                          Included in delivery

Thank you for choosing the Light-Manager. The Light-Manager Pro is compatible with       The package contains
all universal remote controls with infrared learning capability. This includes the
Logitech Harmony, the Philips Pronto/Prestigo and the One for All line. It supports RF       •    Light-Manager Pro
actuators of several brands including InterTechno (aka Coco, Klik Aan Klik Uit,              •    5V USB A/C adaptor
HomeEasy UK, Nexa, Chacon, Johdoton), FS20, Uniroll, Koppla and other brands. In             •    USB cable of 1.8 m length
this manual InterTechno will be used as a generic term for all the compatible brands         •    Manual of operation
listed in brackets previously.

The Light-Manager can be used as a standalone device or as an USB periphery              Lightman Studio
device connected to a PC. In the first case power supply is accomplished by the
included AC adaptor. In the latter case the Light-Manager is powered by the USB          The configuration of the Light-Manager is done with the software Lightman Studio,
bus. The configuration is done comfortably at the PC with the help of the software       which can be obtained in the download section of our website www.jbmedia.de. The
Lightman Studio.                                                                         delivery does not include a CD as this would be outdated already at time of delivery.

The Light-Manager allows creating complex light scenes containing a combination of
all supported actuators. Light scenes can be triggered by different sources:

    •    universal remote control
    •    integrated real time clock
    •    button at the front of the device
    •    web interface and smartphone app (PC connection required)
    •    integrated temperature module (optional)

The complexity of light scenes is limited only by the memory space of the Light-
Manager, which is sufficient by way of example for

    •    700 light scenes containing 1 actuator
    •    325 light scenes containing 3 actuators
                                                                                         After starting the software the main window of the application is visible. On the left
    •    112 light scenes containing 10 actuators
                                                                                         side there is a table showing all light scenes which have been configured. On the
                                                                                         right side there is the Trigger panel and below the Actuators panel. The trigger
This is significantly more than required by most real world applications.
                                                                                         panel is used to define how a scene is triggered, for example by the remote control
                                                                                         or the timer. The actuator panel is for composing the actual light scenes.

                                                                                    3    4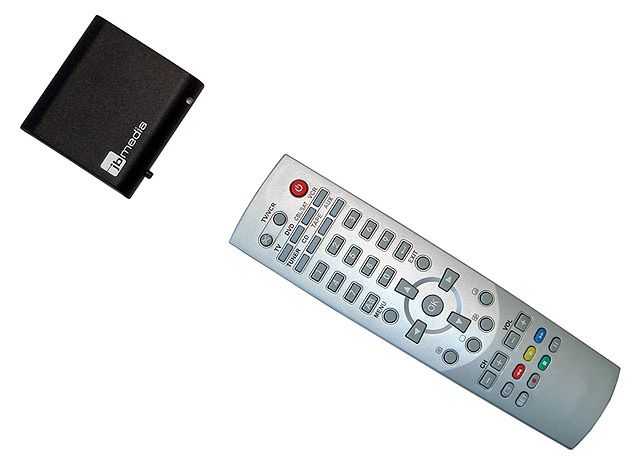
Defining actuators                                                                        Tab InterTechno / Coco / KlikAanKlikUit / HomeEasy

The first step doing the configuration of the Light-Manager is to define actuators. For   This tab is used for InterTechno actuators (and compatible brands). If the actuator is
this purpose click on the button within the actuators panel:                              an older model with dial switches on the backside, select the settings for housecode
                                                                                          and channel in the software accordingly to the adjustment of the dial switches of the
                                                                                          actuator, for example A-1. The selection made in the Type field controls the set of
                                                                                          commands which will be available for this actuator later. The option Actuator is
                                                                                          code learning will not be checked in this case.

                                                                                          If the actuator is a newer model which is equipped with a learn button then the
                                                                                          values for housecode and channel can be a selected free of choice. Important is that
                                                                                          the option Actuator is code learning is checked this time.

A new window will open up, the Actuator administration.
                                                                                          A click on the Add button will create the actuator finally and will add it to the
                                                                                          configuration whereupon it shows up in the table as Actuator 1. The name can be
                                                                                          overwritten and changed to a more meaningful one. The letter L at the end of the
                                                                                          system column signals that this actuator is learning capable.

                                                                                          To edit the properties of an actuator just select Edit from the main menu or from
                                                                                          the context menu available by doing a right click.

                                                                                          Transferring the configuration to a learning capable actuator will be described a little
                                                                                          later.

The upper part of the window consists of a table listing all actuators defined. The
first column shows the name of the actuator, the second column informs about its RF
system, e.g. InterTechno or FS20. The third column shows the actuator type which
can be dimmer or switch. In the lower part of the window there are tabs for each
actuator family used to define the settings of each actuator.

                                                                                     5    6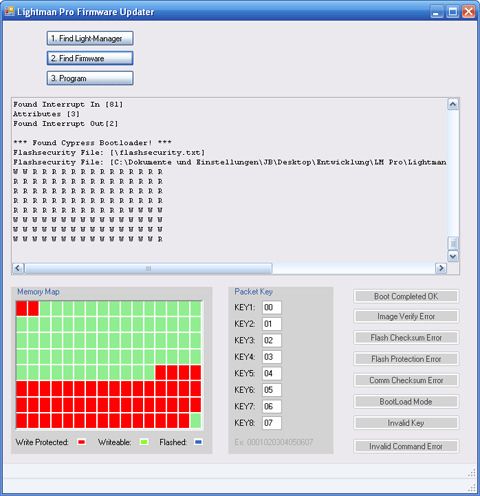
Tab FS20                                                                                 In contrast to a normal actuator the dummy has no address assigned, instead it is
                                                                                         used a placeholder actually. For this purpose the list boxes for housecode,
This tab is used to create FS20 actuators. If the actuator is not in use within a FS20   addressgroup and Jalousie # contain the special value -/- at last position.
system already the values for Addressgroup and Subaddress are free of choice. If
an FS20 address has been assigned to this actuator already it can be entered in the      Add the actuator to the list and name it dummy or something similar. When
field labeled FS20 format or again by selecting addressgroup and subaddress. The         configuring light scenes later this dummy can be used universally to control an
FS20 housecode will not be selected on this tab as it is used globally for all FS20      actuator which has previously been selected by other buttons or through the display
actuators. This parameter can be set in the main menu of Lightman Studio by              of the remote control for example. A closer description of this procedure can be
selecting Options      FS20 Settings.                                                    found in the FAQ at our homepage.

The field Type is used in the same way as previously described for InterTechno
actuators, just select switch or dimmer. A click on the Add button will add the          Zones
actuator to the list finally.
                                                                                         It is possible to group actuators into zones. One can think of a zone as a single room
                                                                                         or as a larger part of a building. To create a zone select Edit   Add zone from the
                                                                                         menu. Afterwards actuators can be dragged and dropped into a zone with the
                                                                                         mouse.

                                                                                         Zones make it easy keeping track of the actuator configuration. Besides that the web
                                                                                         interface as well as the smartphone app natively support zones and allow a more
                                                                                         comfortable control.

Tab Uniroll

Uniroll is a system of belt take-up reels and tube motors for electric blinds. The       Teaching an actuator

receiver modules are pre-installed by the manufacturer. For this system only a
unique number for each receiver has to be selected. The number is free of choice.        Learn capable actuators have no dial switches to select addresses anymore. Instead
                                                                                         they have a learn button which is used to teach the address wirelessly. All FS20
                                                                                         actuators as well as most newer types of InterTechno (and compatible) actuators

Dummy actuators                                                                          use this technic.

In some cases it can be useful to share certain buttons of the remote control among      The learning procedure can be done comfortably with the Light-Manager. Just select

different actuators. For example you may want to use the up and down buttons of          an actuator in the list by a left mouse click. Now press the learn button of the

your remote control to dim up and down a number of actuators. This requires the          actuator. InterTechno (and compatible) actuators require a short press while FS20

use of a so called dummy actuator.                                                       models require a long press of 10 seconds. In both cases a LED will start blinking to

                                                                                    7    8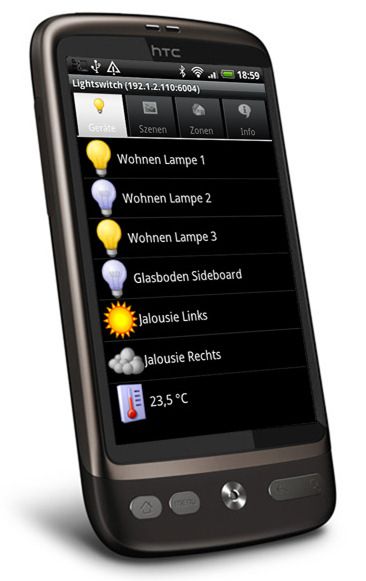
signal that the device has entered learn mode. Now select Edit        Check actuator
in from the menu. A green bar in the lower part of the window shows the process of
the learning procedure:

                                                                                           The table will show a new entry named Button 1. In the second column a name free
The process is finished when the LED stops blinking. InterTecho (and compatible)           of choice can be assigned, like Living room on.
actuators confirm it additionally by flashing the lamp, if it is connected. The address
is stored permanently in the actuator even in case of power loss. If the address
needs to be changed or deleted this can be done almost the same way. Just select
Edit   Check actuator out from the menu.

Note: Some learn capable actuators don’t have a learn button. This is especially true
for actuators which come in sets of 3 devices. These models start learn mode
automatically as soon as they are connected to power supply. If no learn action is
performed within 20 seconds this mode is concluded.
                                                                                           This entry defines that the light scene will be triggered by a certain button on the
Hint: InterTechno (and compatible) actuators allow learning more than one address.         remote control, the button which contains the infrared code 1. The only information
In fact most types can learn up to 6 different addresses. This makes it possible to        missing is which actuators are controlled by this light scene. This is defined on the
assign additional RF bus transmitters to them like wall switches, motion detectors or      Actuators panel.
magnet switches.

Creation of light scenes

A light scene consists of two parts, the trigger and the actuator(s). In the following a
light scene will be created which is triggered by the remote control. First click on
Add on the Remote control tab of the trigger panel.

                                                                                      9    10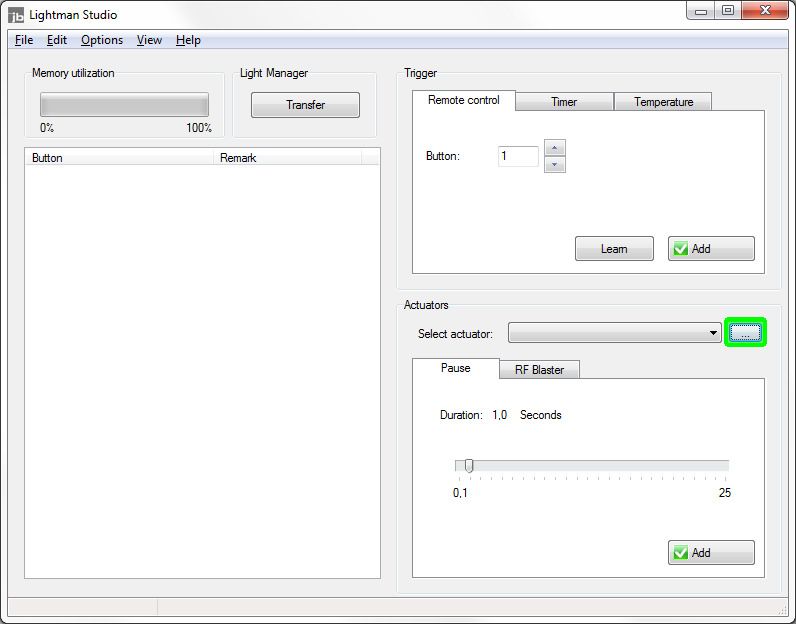
The Select actuator drop down list shows all actuators which have been defined in
the actuator administration. Below the corresponding tab is enabled containing all        By clicking on the Add button the actuator will be added to the light scene.
commands which are available for the currently selected device.

                                                                                          FS20 actuators
InterTechno / Coco / KlikAanKlikUit / HomeEasy actuators

The commands have the following meaning:                                                  The commands have the following meaning:

    •   Turn on: Turns the actuator on. In case of dimmer actuators the manual                 •   Turn on: Turns the actuator on. In case of a dimmer actuator the device

        dimming process can also be started and stopped alternatingly with this                    will be enabled with the level of brightness last used.

        command.                                                                               •   Turn off: Turns the actuator off.

    •   Turn off: Turns the actuator off.                                                      •   Toggle: Turns the actuator on and off alternatingly. This makes it possible

    •   Toggle: Turns the actuator on and off alternatingly. This makes it possible                to control an actuator comfortably with a single button.

        to control an actuator comfortably with a single button.                               •   Brighter / Darker: Increases or decreases the brightness of a dimmer

    •   Brighter / Darker: Increases or decreases the brightness of a dimmer                       actuator gradually.

        actuator gradually. (Only available for learn capable models.)                         •   Dim to: Sets an actuator to a percentage level of brightness in the range of

    •   Dim to: Sets an actuator to a percentage level of brightness in the range of               0-100%. When moving the brightness slider the corresponding dimmer will

        0-100%. When moving the brightness slider the corresponding dimmer will                    react in real time. This makes it easy to select the right level of brightness.

        react in real time. This makes it easy to select the right level of brightness.        •   Select: Selects an actuator without changing its state. The actual command

        (Only available for learn capable models.)                                                 can be set later with a different button on the remote control

    •   Select: Selects an actuator without changing its state. The actual command
        can be set later with a different button on the remote control

                                                                                   11     12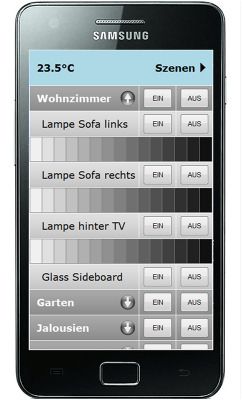
Delay: It is possible to expand the length of a dimming process to a period between
1 second and 4 ½ hours. Within this time range the dimming process will be
performed absolutely smooth. There are 4 preconfigured delays available, which can
be selected in the list. To change the default delays select Options             FS20
Settings from the main menu.

Hint: If it is desired to enable a dimmer actuator with 100% brightness select the
command Dim to 100% instead of Turn on.
                                                                                        The order of the actuators as well as of the whole light scene can be changed by

By clicking on the Add button the actuator will be added to the light scene.            drag and drop operations with the mouse. To change the name of a light scene just
                                                                                        click on it in the remark column and overwrite it.

Pauses                                                                                  To make changes to the commands select Edit from the main menu. A red frame
                                                                                        will highlight the currently selected line in the table. This signals that edit mode is

On this tab pauses within a range of 100 ms up to 25 seconds can be inserted. It is     active. Now any changes can be done on the Trigger or Actuators panel,

possible to add several pauses one after another to create even longer delays.          depending if a light scene or an actuator has been selected. A click on the Edit
                                                                                        button will apply the changes.

                                                                                        By doing a double click on an actuator you will automatically get passed to the
                                                                                        actuator administration and can alter its parameters like housecode or channel. A
                                                                                        single click on an actuator will show its address in the status bar of Lightman Studio.
                                                                                        So it is easy to keep track of all relevant data.

Note: During a pause no other commands will be executed by the Light-Manager.

Moving and editing light scenes                                                         With the copy and paste commands from the menu actuators or whole light scenes
                                                                                        and be duplicated.
After adding actuators and commands to a light scene it will be listed like the
example light scene below:

                                                                                  13    14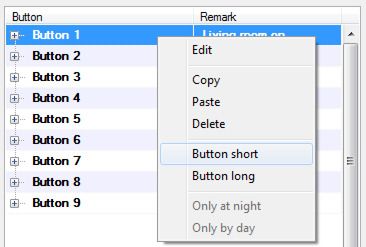
Timer

The Light-Manager has a built in timer which makes it possible to trigger light scenes
automatically at certain times on certain days.

                                                                                             The step joints within in the curves are the changeovers when daylight saving time
                                                                                             is enabled or disabled. In the lower part of the window the current point of time for

When transferring the configuration to the Light-Manager its internal clock will be          sunrise and sunset are listed. Next to it there are two sliders which allow adjusting

synced to the PC time. The clock has a reserve of at least 30 minutes in case of             these points within a range of +/- 6 hours.

power loss. Within this period the Light-Manager has to be connected to power
again. If necessary the current time can be read out and can be adjusted by                  To link a light scene to sunset the option Dusk is used.

selecting Options      Time and temperature from the main menu. The real time
clock has high accuracy with an aberration of a few seconds per month only.

The option Simulate presence will shift the programmed point of time randomly in
a range of +/- 1 hour. This ensures that external observers will not recognize that
lighting is controlled by a system.

Astro function

Instead of fixed points of time it is often reasonable to link lighting control to sunrise
                                                                                             Additionally each light scene can be shifted in a range of +/- 120 minutes
or sunset. The Light-Manager offers an extensive astro function for this purpose
                                                                                             individually with the Revision slider. Below the slider the resulting time for the
which calculates the times of civil twilight for each week of the year for any give
                                                                                             current week is displayed.
location. The location can be selected comfortably with a built in Google maps view
by selecting Options     Astro function from the main menu.

                                                                                      15     16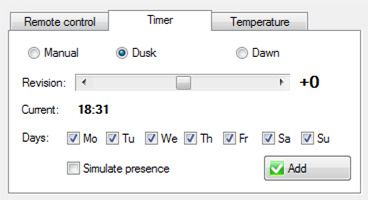
Only by night or only by day                                                              Please note that the Light-Manager can measure temperature correctly only if it is
                                                                                          not exposed to direct sunlight or another source of heat. The device uses a precision
Sometimes it can be useful to execute parts of a light scene only by night or only by     temperature chip which has an abbreviation of max. +/- 1°C within a temperature
day. So for example one could enable living room lighting automatically when the          range of 0–70°C.
activity Watching TV is started on the remote control. Of course this should happen
only when it is dark. For this purpose the Light-Manager offers the options Only by
night and Only by day, which are available from the Edit menu. These options can          Front button
be selected for each actuator within a light scene individually. The time ranges for
these options are based on the astro function. By night is defined as the points of       The button at the front of the Light-Manager offers an easy way to trigger two
time between dusk and dawn, by day vice versa accordingly.                                different light scenes, depending how long the button is pressed. A short press will
                                                                                          trigger a light scene A, a long pess (> 1 sec.) will trigger scene B. To select a scene
                                                                                          for this purpose, just mark it with a single mouse click and select Edit       Button
Temperature control                                                                       short or Button Long from the main menu.

If the Light-Manager is equipped with the optional temperature module light scenes
can be triggered depending on the change of temperature. It is possible to trigger a
light scene when the temperature runs over or under a certain point. The Light-
Manager checks temperature all 20 seconds and triggers the scene if required. This
function is useful for electric blinds, radiators or fans for example.

                                                                                          The front button is very convenient to turn on and off the whole lighting when
                                                                                          coming home or going to bed for example.

Note: The temperature module is mounted inside the Light-Manager. Self-warming            Transferring the configuration
of the device is corrected automatically. This can cause displaying a slightly too high
temperature in the first 30 minutes after the device has been connected to power.         After the configuration has been finished it has to be transferred to the Light-
                                                                                          Manager. This is done by clicking the Transfer button. The process takes a few
                                                                                          seconds only.

                                                                                   17     18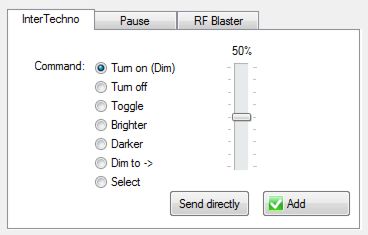
Hint: We recommend using an activity to control lighting. Within an activity, buttons
                                                                                      of a Logitech Harmony remote control usually work quicker as in device control. This
                                                                                      allows a more comfortable control in certain cases.
                                                                                      Manual teaching a remote control

                                                                                      For the control of the Light-Manager the remote control has to know the infrared
                                                                                      codes used by the Manager. Most universal remote controls have a learning
Finally the Light-Manager is ready to control your lighting.
                                                                                      capability for this purpose. The Light-Manager for his part has an infrared
                                                                                      transmitter module which allows teaching the infrared codes to the remote control.
                                                                                      To start this process place the remote control about 15 cm face to face to the Light-
Configuration of a Logitech Harmony
                                                                                      Manager.

All Logitech Harmony remote controls are perfectly suitable for use with the Light-
Manager. There is no manual learning of infrared codes required as the Light-
Manager is present in the Logitech Database. To add the Light-Manager to the
setting of your remote control please start the Logitech software and process as
following:

Click on Add device. Select Home automation            Lighting control   JBMedia.
Enter Light Manager Pro into the type field.

Now there are 65 commands available which are named L01 until L65. These
commands correspond to the light scenes 1 to 65 within Lightman Studio. If there      Now enter learning mode of the remote control, select the button you want to teach
should be demand for more commands, these can be additionally learned into the        within Lightman Studio. Finally click on Learn to finish the process.
Harmony manually. Of course the commands can also be renamed conveniently, so
instead of L01 one could name it Living room on.

Finally please update the remote control!

                                                                                19    20
These codes can be processed by several remote controls, so no manual learning is
necessary.
The LED of the Light-Manager flashes for a moment and the remote control has
learned the code. This procedure is repeated for each button you want to control. Web interface
Hint: If the remote control does not seem to learn the code correctly, change the Lightman Studio contains a web server, which makes it possible controlling lighting
duration of the transmitted signal. This is done by selecting Options remote with a smartphone or a web tablet in a very comfortable way. To use this function
control Duration for learning from the main menu. the Light-Manager has to be connected to the USB port of a PC. A connection to a
NAS or similar devices is not sufficient. The USB remote port of a Fritz!Box can be
After finishing the teaching procedure the remote control can be checked for proper used though, but it performs as a USB extender for the PC only.
operation. For this purpose please select Options remote control from the main
menu. To activate the web server please select Options Webserver and Appserver
from the main menu. Then check the option Webserver active.
If a button of the remote control is pressed the corresponding number will be shown A click on the number shown behind IP address is
in this window. A green bar on the right side signals the intensity of the infrared sufficient to open the web interface in the browser. By
signal and the LED of the Light-Manager flashes accordingly to the incoming signal. using this IP address the interface can be opened on any
web enabled device which is part of the local Wi-Fi
network.
Hexcode Table
If the web interface should be reachable from outside
A table containing the hex codes of the infrared commands in Philips Pronto format through the internet type in your external IP address into
can be opened by selecting Options Open hexcode table from the main menu. the address bar of the browser. This is the IP address
21 22you get from your DSL provider. Also port 80 has to be opened in the router to grant
access from outside.
Hint: Usually external IP addresses of DSL connections changes daily. To get a
permanent connection to the interface it is recommended to use a dynamic DNS
service, which are often free of cost (e.g. www.no-ip.com). The service translates
the changing IP address into a permanent URL which can be entered in the address
bar of your browser.
iPhone and Android app
Another way of controlling the Light-Manager is through a smartphone app. For
Android smartphones this is the app ImperiHome
which is available in the Android market. For iOS there
is the App LiteConnect available in the iTunes store.
Both apps can be used on tablets, too, of course.
Before using the app the web server has to be enabled
in Lightman Studio. This is done exactly the same way
as previously described in the last section. Please note
that the IP address of the PC has to be entered into
the settings of the app first. For access through the
internet the port has to be opened in the router
settings, too.
23 24Firmware Update
Hint: A closer description of the update procedure can be found in the FAQ at our
From time to time there are newer firmware versions available for the Light- homepage.
Manager, which add new features and fix software bugs.
To make a firmware update please click on Help Firmware update and confirm
that you want to update. The Light-Manager will cut the PC connection and
establishes a new connection as a different USB device.
If this is the first time an update is about to be performed a driver installation is
required. Please select manual installation when the driver window pops up. Then
select the directory c:\programs\Lightman Studio\Firmware as the driver
source. The driver will be installed afterwards and the update can be performed.
Note: Under 64 bit operating systems
driver signature enforcement has to be
disabled temporarily first. This is done
by pressing F8 during Windows startup
and selecting the last option from the
start menu.
Now bring Lightman Pro Firmware
Updater to foreground, which was
opened in the background
automatically. Click on Find Light-
Manager, then on Find Firmware.
Select the appropriate firmware file,
the filename is like LM_PRO_29.hex.
Finally click on Program to start the actual update procedure.
During the update the blocks on the left side will be displayed in blue color one by
one. When the process is finished the Light-Manager will automatically establish a
connection to Lightman Studio again. With the menu option Help Version Info
the current firmware version can be checked.
25 26Technical data
Supply voltage: 5 Volts
Power consumption: ~ 0.35 Watts
Dimensions: 6 x 6 x 2 cm
Radio frequency: 433.92 MHz and 868.35 MHz
Range: ca. 20 m indoor, up to 100 meters in open area
Infrared receiver frequency: 30 – 40 kHz
Infrared transmitter frequency: 38 kHz
Supported actuators: InterTechno, Coco, KlikAanKlikUit, HomeEasy UK, Nexa,
FS20, IKEA Koppla, Uniroll and compatible models
Supported operating systems of the Lightman Studio software:
Windows 2000, Windows XP, Windows Vista and Windows 7
USB-Mode: Human Interface Device (HID), no driver required
Memory retention without power supply: more than 10 years
RTC power reserve: min. 30 minutes
jbmedia Dreherstrasse 24 42899 Remscheid Germany
27 28You can also read