Management Portal Customize and Manage Sales Builder Pro
←
→
Page content transcription
If your browser does not render page correctly, please read the page content below

Management Portal
 Customize and Manage
 Sales Builder Pro

©2017 Intelligent Mobile Support

©2017 Intelligent Mobile Support
Training Workshop Sequence
 Boot Camp Portal Training Pricing Engine Certified SBP

 Quote equipment Manage the App Pricing Certified User
 q Cash Price, Down q Equipment q Calculated Price q Schedule
 Payment Management
 • Export, edit q Tax
 q Add a Discount and q Sales Presentation
 q Manage
 Rebate q Pricing Method
 § Cash Price q Good Better Best
 q Add a Finance
 § Accessories q Installation Kit
 Program & Accessory q 3 Ways to adjust for
 § Add-Ons
 (Dealer Fee “boost” q Labor Costs job complexity
 § Materials
 and Payment Factor) q Ductless Quote
 § Financing q Manage Margin
 q Add an Install Date
 o “Boost”
 and special note q Pricing Walk
 § Final Notes
 § Presentation

©2017 Intelligent Mobile Support

Management Portal
1. Export and edit the Equipment, Accessory, Add-Ons

2. Manage Accessories – add new, remove, edit pricing

3. Manage Add-Ons – add new, remove, edit pricing

4. Manage Materials – add new, remove, edit pricing

5. Manage Financing Programs – add new, remove, edit
 programs

6. Manage Final Notes – add new, remove, edit

7. Manage the Sales Presentation attachments –
 remove, add new attachments

 ©2017 Intelligent Mobile Support

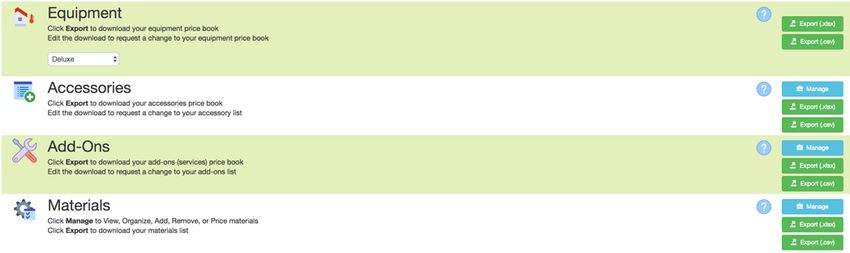
Equipment
 • Scroll to the Equipment Section
 • Select Export to download an excel spreadsheet (.xlsx)
 • If you do not have an excel compatible spreadsheet program export the worksheet as
 a .csv.
 • Only need to see equipment associated with one OEM? Use the Select OEM
 dropdown to select a brand and then Export the excel sheet.

©2017 Intelligent Mobile Support
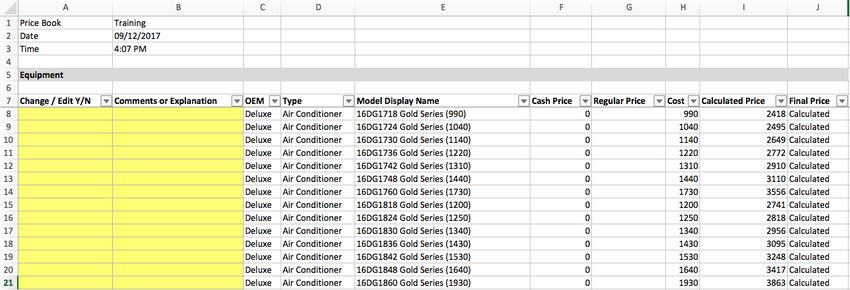
Equipment – Download the Price Book
 • Worksheet contains all active equipment models in your Price Book.
 • Equipment displays on the Option Tab in the Sales Builder Pro app.
 • The drop-down arrows that appear on each column heading allow a Sort and/or Filter to be
 applied.

©2017 Intelligent Mobile Support
Equipment – Cash, Cost, Calculated and Final Price
 • Cash Price displays on the app when the Final Price is ”Cash”.
 • Regular Price is not used for equipment. It is used for accessories and add-ons, covered later
 in the workshop.
 • Cost is the $ amount you pay your distributor (before tax) for the equipment
 • Calculated Price is the $ amount that displays on the app after the Business Rules have been
 applied.
 • Final Price can be “Calculated” when a Business Rule is applied or “Cash” when a Business
 Rule is NOT applied.
 • In this example all visible items are using Business Rules.

©2017 Intelligent Mobile Support
Equipment – Need to make changes to the Price Book?
 • Use the Change/Edit Y/N and Comments or Explanation columns to indicate the items that need to be
 changed. It is helpful to highlight cells that you have changed.
 • After completing the changes, be sure to save the document.
 • Submit the document to the Document Portal.
 • Your Customer Success Specialist will be notified of the submittal and will notify you when the work has
 been completed.

©2017 Intelligent Mobile Support
Accessories
 • Scroll to the Accessory Section
 • Select Export to download an excel spreadsheet (.xlsx)
 • If you do not have an excel compatible spreadsheet program export the worksheet as a .csv.

©2017 Intelligent Mobile Support

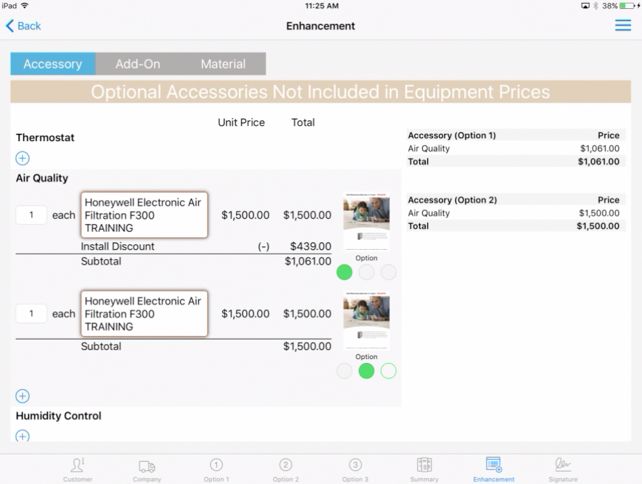
Accessory – Cash, Cost, Regular, Calculated and Final Price
 • Accessories Cash Price displays on the app when the Final Price is ”Cash”.
 • Regular Price maybe more familiar to you as “Stand-Alone” price. This would be the amount that you would
 quote the equipment for if it was NOT being installed with a new system. The sale price of the Honeywell
 Electronic Air Filtration would display $1500 when quoted alone. When the equipment is quoted with a HVAC
 system, it will display a discount of $439 and a sale price of $1061.
 • Cost is the $ amount you pay your distributor (before tax) for the equipment
 • Final Price is“Calculated” when a Business Rule is applied or “Cash” when a Business Rule is NOT applied.
 *Calculated Price is the $ amount that displays on the app after the Business Rules have been applied. Accessories
 typically do NOT use Business Rules.

©2017 Intelligent Mobile Support

Accessory – Regular and Cash Price
 Accessory Option 1:
 The equipment is quoted with an HVAC
 system The $1500 Regular price is
 discounted $439 to $1061 (Cash Price)

 Accessory Option 2:
 The equipment is quoted as a “Stand
 Alone”. The sale price of the Honeywell
 Electronic Air Filtration displays $1500
 when quoted alone.
 Note: Regular Price feature works with
 Calculated and Cash Final Price.

©2017 Intelligent Mobile Support
Accessories – Self Manage
 • Scroll to the Accessories Section
 • Select Manage

©2017 Intelligent Mobile Support
Accessories
 Section Header – “Block”

 Display Name always displays on the app and
 on the Customer Proposal

 Price will display on the app and on the
 Customer Proposal when “Show Line Item
 Pricing” is set to ON

 Select “Pencil” to edit

 *Please contact your Customer Success Specialist to change block names or add additional blocks

©2017 Intelligent Mobile Support
Accessory – Edit – Cash Price
 • Edit the Display Name, Cost, Cash Price or
 Regular Price
 • Cost is what you pay the Distributor
 • Cash Price should include Margin, Tax, Labor
 • Regular Price maybe more familiar to you as
 “Stand-Alone” price. This would be the amount
 that you would quote the equipment for if it
 was NOT being installed with a new system.
 • Remove the Check mark from Active to
 Inactivate

©2017 Intelligent Mobile Support
Accessory – Edit – Calculated Price

 • Edit Display Name, Cost, Regular Price

 • Cost is what you pay the Distributor

 • Calculated Price – Pricing rule will auto calculate
 • Regular Price maybe more familiar to you as “Stand-
 Alone” price. This would be the amount that you
 would quote the equipment for if it was NOT being
 installed with a new system.

 • Remove the Check mark from Active to Inactivate

©2017 Intelligent Mobile Support
Accessory – Add a new Accessory

 • Select the to add an Accessory
 • Display Name – appears in the app and on the Customer
 Quote
 • Cost: is what you pay the distributor
 • Cash Price: will be added to the quote
 • Regular Price: “Stand Alone” Price
 • Important: Business Rules are not applied to Accessories that
 you manually add with this Self Manage function. Always
 include margin, tax, commission, etc. in the cash price.

©2017 Intelligent Mobile Support
Accessories – Self Manage – “Pencil” – edit attachment

 Select the Pencil to edit attachments

 Self Managed – Document and thumbnail
 Self Managed – Document attached
 Self Managed – NO document

 IMS Managed

©2017 Intelligent Mobile Support
Accessories – Self Manage – Add an attachment

 File Types:
 PDF, PNG, JPG
 See the next slide for file type
 and size requirments

 Thumbnail: PNG or JPG

 Choose File
 Upload

 Choose File
 Upload

©2017 Intelligent Mobile Support
Accessory – Attachment - File Type and Size Requirements

 File File Type Recommended Size Maximum Size

 Image png, jpg Less than 2.5 MB 5 MB

 Document pdf Less than 12.5 MB 25 MB

 Thumbnail png, jpg Square (400 x 400) 500 KB

©2017 Intelligent Mobile Support
Add-Ons
 • Scroll to the Add-Ons Section
 • Select Export to download an excel spreadsheet (.xlsx)
 • If you do not have an excel compatible spreadsheet program export the worksheet as a .csv.
 • The Add-Ons export will include items that appear on the Add-Ons tab in the app. These items are usually
 services that you provide in addition to HVAC services and/or services that are associated with the installation.
 • The export is identical to the Accessories export. Please refer to the Accessories slides 8 – 9 for details.

©2017 Intelligent Mobile Support
Add-Ons – Self Manage
 • Scroll to the Add-Ons Section
 • Select Manage
 • The Add-Ons Self Manage is identical to the Accessories Self Manage features. Please
 refer to Accessories Slides 11 -17.

©2017 Intelligent Mobile Support
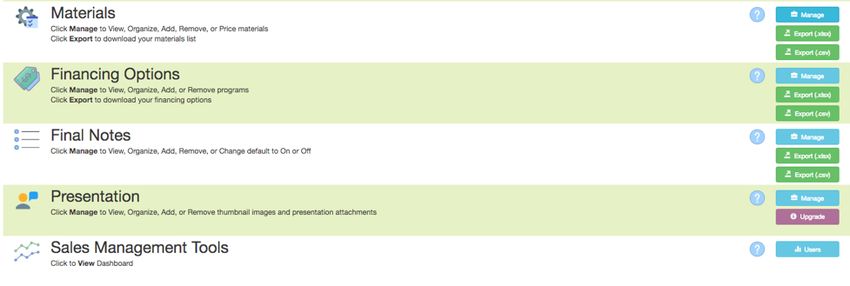
Materials
 • Scroll to the Materials Section
 • Select Export to download an excel spreadsheet (.xlsx)
 • If you do not have an excel compatible spreadsheet program export the worksheet as a .csv.

©2017 Intelligent Mobile Support
Materials – Export
 • Description displays on the app
 • Units(s) - allow you to enter a quantity to sell by the ft., hrs., lbs., oz., sq. ft., qty.
 • Price is the $ amount that displays on the app *Financing “boost” will not apply to items on the Materials tab.
 • Cost is the $ amount you pay your distributor for the material
 *Keep in mind that the Price needs to include margin, taxes, commission and financing fees.
 *These items are generally no cost or very low cost items, that you want to display on the customer proposal.

©2017 Intelligent Mobile Support
Materials – Self Manage
 • Scroll to the Materials Section
 • Select Manage

©2017 Intelligent Mobile Support
Materials – Self Manage
 Drag the cross-hatch to change the order of the line items
 Select the Pencil to Edit the line item
 Select the to add a new material line

©2017 Intelligent Mobile Support
Materials – Edit – “Pencil”

 • Select the pencil to edit an item. • Edit the Description, Price Cost and/or
 units

©2017 Intelligent Mobile Support
Materials – Add a new Material
 • Select the to add a Material
 • Display Name – appears in the app and on the Customer Quote
 • Price: the Sell Price
 *Price must include margin, tax, commission, financing fees. These items are generally no
 cost or very low cost items, that you want to display on the customer proposal.
 • Cost: is what you pay your distributor
 • Unit(s): use when you sell by the ft, hrs, etc.

©2017 Intelligent Mobile Support
Materials – Inactivate
 • Drag the cross-hatch to move the item to the Inactive list or the active list

©2017 Intelligent Mobile Support
Financing Options
 Scroll to the Financing Options Section
 Select Export to download an excel spreadsheet (.xlsx)
 If you do not have an excel compatible spreadsheet program export the worksheet as a .csv.

©2017 Intelligent Mobile Support
Financing Options – Export
 • Program Name - displays in the Finance Program
 selection pane
 • Payment Label – displays on the app and the
 Customer Proposal
 • Term – fill this field to divide the balance due into
 equal payments
 • Payment Factor % - fill this field to apply a minimum
 monthly payment – this factor is usually provided by
 the Finance Company.
 • Dealer Fee % - fill this field to increase the Sell Price
 of Equipment, Accessories and Add-Ons
 *Dealer Fee % “Boost” is standard on Accessories and
 Add-Ons, speak with your CSS if you do NOT want the
 Dealer Fee % increase to apply to Accessories and
 Options
 *Dealer Fee % “Boost” NEVER applies to items on the
 Materials Tab.

©2017 Intelligent Mobile Support
Financing Options – Self Manage

 • Scroll to the Financing Options Section
 • Select Manage

©2017 Intelligent Mobile Support
Financing Options – Self Manage

 Drag the cross-hatch to change the order of the line
 items or to inactivate a Finance Program

 Select the Pencil to Edit the Finance Program

 Select the Plus to add a new Financing Program
 Adjust Price For Down Payment – ”Yes” – the app
 will recalculate the amount of dealer fee to apply to
 the quote after the down payment has been
 applied.
 • This is a default setting, speak to your CSS if you
 want the finance fee to apply to the sale price
 before the down payment.
 • The Program with the highest Dealer Fee will
 display as Suggested Retail Price on the app

©2017 Intelligent Mobile Support
Financing Options – Edit – “Pencil”

 • Edit the Program Name, Payment Label,
 Term or Payment Factor %, and Dealer
 • Select the pencil to edit an item. Fees

©2017 Intelligent Mobile Support
Financing Options – Edit – “Pencil”
 Program Name - displays in the Finance Program selection pane
 Payment Label – displays on the app and the Customer Proposal
 Term – fill this field to divide the balance due into equal payments
 Payment Factor % - fill this field to apply a minimum monthly
 payment – this factor is usually provided by the Finance Company.
 Dealer Fee % - fill this field to “boost” the Sell Price of Equipment,
 Accessories and Add-Ons
 *Dealer Fee % increase is standard on Accessories and Add-Ons,
 speak with your CSS if you do NOT want the Dealer Fee% increase
 to apply to Accessories and Options
 *Dealer Fee % increase NEVER applies to items on the Materials
 Tab.
 *Dealer Fee % increase does not apply to Price Adjustments and
 Discounts

©2017 Intelligent Mobile Support
How is the Financing Fee applied?

 ℎ
 =
 (1 − %)

 $ 1070
 = $ 1127.00
 (1 − .05)

 = ℎ

 $ 1127.00
 = $ 18.78/ mo.
 60

©2017 Intelligent Mobile Support
Special Case : Finance Fee + Sales Tax
 If sales tax is shown on your proposal you need to
 increase your dealer fee to cover the added cost of
 financing.

 When a financing program is selected the financing fee
 must include an allowance for sales tax. We recommend
 using the highest sales tax rate that is used in your 5.36
 region in this calculation.

 • Financing Fee: 5.0%
 • Tax Rate: 7.25%
 • Adjustment of financing fee for tax
 .05 + (.05 x .0725) = .053625
 • convert to percentage à Enter 5.36 in the
 Dealer Fee field

©2017 Intelligent Mobile Support
Final Notes
 Scroll to the Final Notes Section
 Select Export to download an excel spreadsheet (.xlsx)
 If you do not have an excel compatible spreadsheet program export the worksheet as a .csv.

©2017 Intelligent Mobile Support
Final Notes Export
 Notes are selected in the Customer Notes pane on the Signature Tab.
 Show on Proposal Y/N:
 ”Y” – Note will appear on the Proposal when selected
 “N” – Note will not appear on the Proposal
 Sent to Back Office Y/N –
 “Y” – Note will be included in the Back Office Email
 “N” – Note will not be included in the Back Office Email
 Default on Y/N –
 “Y” – Note will default to ON on all proposals - user can turn off when building a quote
 “N” – Note will default to OFF on all proposals – user can turn on when building a quote

 Blank line represents a fillable text box on the app.

©2017 Intelligent Mobile Support
Final Notes – Self Manage
 • Scroll to the Final Notes Section
 • Select Manage

©2017 Intelligent Mobile Support
Final Notes – Self Manage
 Drag the cross-hatch to change the order of the line items or to inactivate a Finance Program

 Select the Pencil to Edit the Final Note

 Select the Plus to add an additional Final Note

©2017 Intelligent Mobile Support
Final Notes– Edit – “Pencil”

 Edit Final Note

 Label: – Final note content
 ☑ Show on Proposal
 Note will display on proposal.
 ☑ Sent to Back Office
 Note will be included in the Back Office Email
 ☑ Default On
 Note will default to ON on all proposals - user can turn off
 when building a quote

©2017 Intelligent Mobile Support
Final Notes – Edit – “Add”
 Label: – Final note content
 ☑ Show on Proposal
 Note will display on proposal.
 ☑ Send to Back Office
 Note will be included in the Back Office Email
 ☑ Default On
 Note will default to ON on all proposals - user can turn
 off when building a quote

 Select to save the Final Note

 The software will display the note with a fillable text box at
 the end of the self managed note. User can fill the text box
 when building the quote or leave empty. An empty text box
 will not display on the proposal.

©2017 Intelligent Mobile Support
Presentation – Self Manage
 • Scroll to the Presentation Section
 • Select Manage

©2017 Intelligent Mobile Support
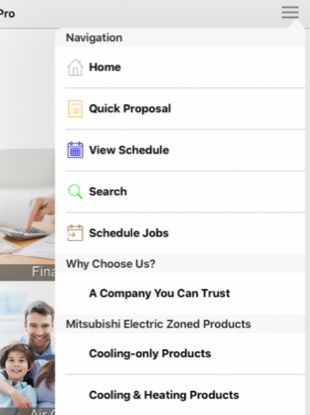
Presentation – Self Manage
 1

 2

 3

 1 “Why Choose Us?” Navigation Menu Group (Presentation Button)

 2 “A Company You Can Trust” Menu item

 3 “Our Company” Menu item attachment
 “Company Overview” Menu item attachment

©2017 Intelligent Mobile Support
Presentation – Self Manage
 Drag the cross-hatch to change the order of the line items
 Drag the item to the top of the Active/Inactive column to change activation
 status

 Select the Pencil to edit the Menu Item attachment

©2017 Intelligent Mobile Support
Presentation– Edit – “Pencil”
 Display Name: Menu Item Attachment – displays in
 presentation drop down

 File:
 Download to view current

 Upload File:
 Image, Document, Video
 Please see next slide for file type & size requirements

 Use a Web Link - remember you must be online to
 connect to a website

 Thumbnail:
 Upload File – PNG or JPG square – please see next
 slide for size requirements

©2017 Intelligent Mobile Support
Presentation – Attachment - File Type and Size Requirements

 File File Type Recommended Size Maximum Size

 Image png, jpg Less than 2.5 MB 5 MB

 Document pdf Less than 12.5 MB 25 MB

 Video mp4 Less than 25 MB 50 MB

 Thumbnail png, jpg Square (400 x 400) 500 KB

©2017 Intelligent Mobile Support
Management Portal Summary
Customize and Manage your App
1. Export and edit the Equipment, Accessory, Add-Ons,
 Materials – submit edited sheets to your CSS during
 the build process and designated update sessions.

2. Self Manage – Accessories, Add-Ons, Materials,
 Financing, Final Notes and Presentations
 • Edit display names, pricing, attachments
 • Add new items
 • Remove items

 ©2017 Intelligent Mobile Support
Need help? Have questions?

 • Attend a Live Session - Portal Workshops
 are conducted every Wednesday at 10 AM.
 • Visit our website page Training &
 Implementation to register.
 • Contact your Customer Success Specialist

 • Feedback? Questions?
 • Email June
 (jgetzinger.ims@imobilesupport.com
©2017 Intelligent Mobile Support
You can also read