Measuring Bags in Augmented Reality - Masaryk University Faculty of Informatics - IS MU
←
→
Page content transcription
If your browser does not render page correctly, please read the page content below
Masaryk University
      Faculty of Informatics

Measuring Bags in Augmented
          Reality

          Master’s Thesis

         Arcadii Rubailo

         Brno, Spring 2019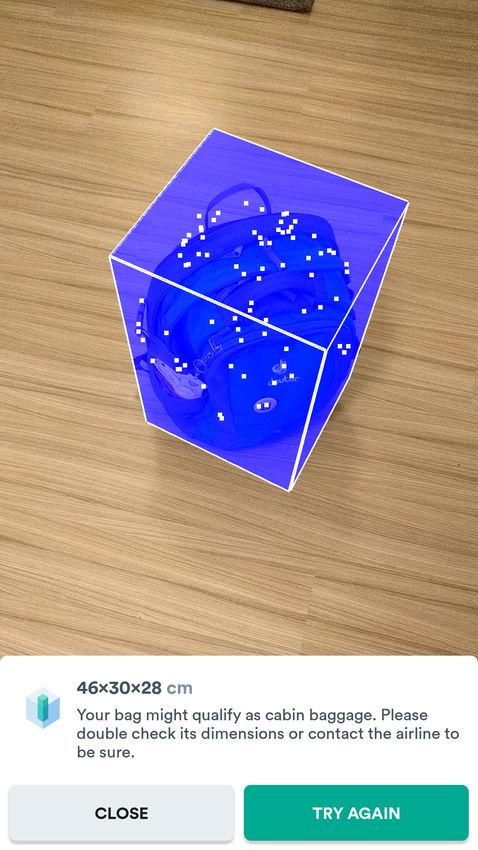
Masaryk University
      Faculty of Informatics

Measuring Bags in Augmented
          Reality

          Master’s Thesis

         Arcadii Rubailo

         Brno, Spring 2019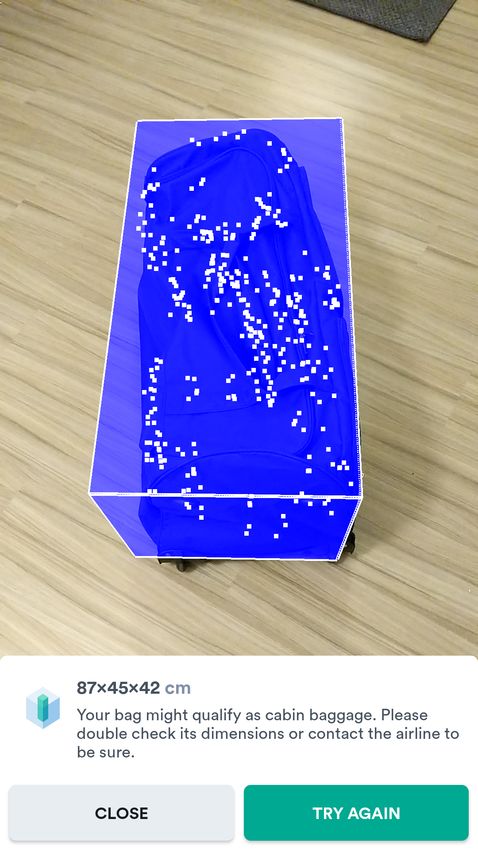
This is where a copy of the official signed thesis assignment and a copy of the
Statement of an Author is located in the printed version of the document.
Declaration
Hereby I declare that this paper is my original authorial work, which
I have worked out on my own. All sources, references, and literature
used or excerpted during elaboration of this work are properly cited
and listed in complete reference to the due source.

                                                     Arcadii Rubailo

Advisor: Vlastislav Dohnal

                                                                    i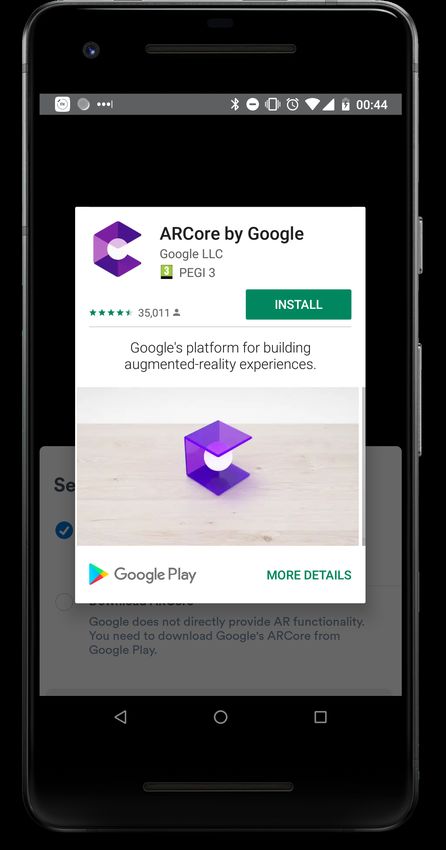
Abstract
Augmented reality technologies have become more available in the
mobile sector. It creates an excellent opportunity to improve a mobile
service by introducing AR experience for users.
    There is plenty of handy AR frameworks, which can assist in build-
ing an Android application with augmented reality. It is beneficial to
do research on picking the right one. This thesis aims to determine a
way how to build an AR tool for the Kiwi.com application. This feature
should help its users to avoid additional fees for excess baggage by
introducing AR bag measuring tool for Android smartphones.
    Based on the research of similar feature implemented by Kiwi.com’s
competitors and survey of available AR frameworks, the best way to
develop the feature is to combine the usage of Android camera API,
ARCore SDK and OpenGL ES.
    The result of the work indicates that the selected tools can provide
sufficient functionality to build the AR bag measuring tool, which
is convenient to use by Kiwi.com customers and provides accurate
results.

ii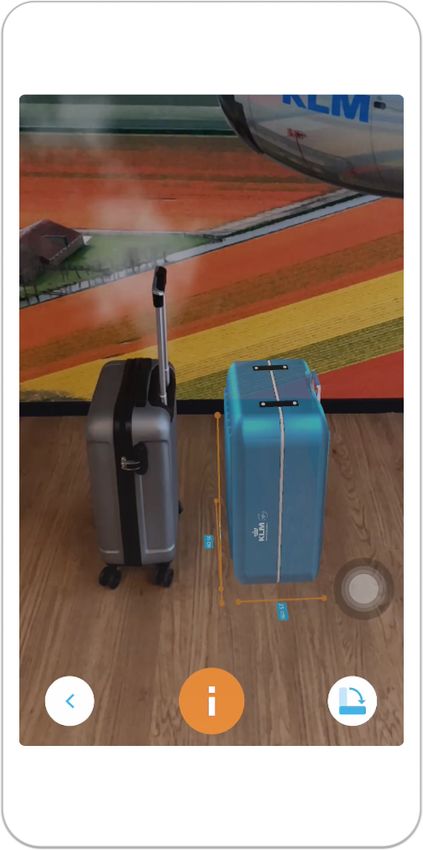
Keywords
Augmented reality, ARCore, Android, Kiwi.com, Computer vision,
Point Cloud, Mobile application, Smartphone, Camera, Bags measur-
ing

                                                              iii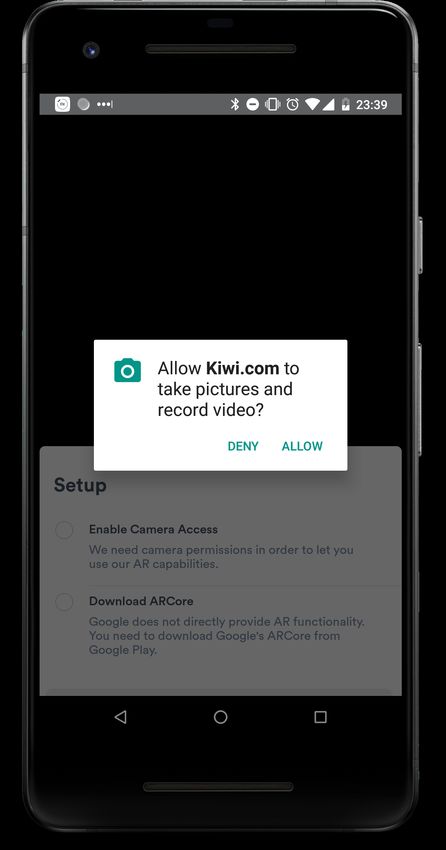
Contents
Introduction                                                                                            1

1   Measure Bags with Augmented Reality                                                                3
    1.1 Air Travelling . . . . . . . . . . . . . . . . . . . . . . . . .                               3
    1.2 Mobile Application . . . . . . . . . . . . . . . . . . . . . .                                 4

2   Augmented Reality Solutions                                                                         5
    2.1 "Size Up Your Baggage" by KAYAK            .   .   .   .   .   .   .   .   .   .   .   .   .    5
        2.1.1 Measurement process . .              .   .   .   .   .   .   .   .   .   .   .   .   .    5
        2.1.2 Advantages . . . . . . . .           .   .   .   .   .   .   .   .   .   .   .   .   .    6
        2.1.3 Disadvantages . . . . . . .          .   .   .   .   .   .   .   .   .   .   .   .   .    6
    2.2 "Hand baggage check" by KLM . .            .   .   .   .   .   .   .   .   .   .   .   .   .    7
        2.2.1 Measurement process . .              .   .   .   .   .   .   .   .   .   .   .   .   .    8
        2.2.2 Advantages . . . . . . . .           .   .   .   .   .   .   .   .   .   .   .   .   .    8
        2.2.3 Disadvantages . . . . . . .          .   .   .   .   .   .   .   .   .   .   .   .   .    8
    2.3 "Size Your Bag" by easyJet . . . . .       .   .   .   .   .   .   .   .   .   .   .   .   .    9
        2.3.1 Measurement process . .              .   .   .   .   .   .   .   .   .   .   .   .   .    9
        2.3.2 Advantages . . . . . . . .           .   .   .   .   .   .   .   .   .   .   .   .   .   10
        2.3.3 Disadvantages . . . . . . .          .   .   .   .   .   .   .   .   .   .   .   .   .   10
    2.4 Overview . . . . . . . . . . . . . .       .   .   .   .   .   .   .   .   .   .   .   .   .   10

3   Existing Augmented Reality SDKs                                                                    13
    3.1 Wikitude . . . . . . . . . . . . . .   .   .   .   .   .   .   .   .   .   .   .   .   .   .   13
         3.1.1 Frameworks support . .          .   .   .   .   .   .   .   .   .   .   .   .   .   .   13
         3.1.2 Pricing . . . . . . . . . .     .   .   .   .   .   .   .   .   .   .   .   .   .   .   14
    3.2 ARToolKit . . . . . . . . . . . . .    .   .   .   .   .   .   .   .   .   .   .   .   .   .   14
         3.2.1 Frameworks support . .          .   .   .   .   .   .   .   .   .   .   .   .   .   .   14
         3.2.2 Pricing . . . . . . . . . .     .   .   .   .   .   .   .   .   .   .   .   .   .   .   14
    3.3 ARCore . . . . . . . . . . . . . .     .   .   .   .   .   .   .   .   .   .   .   .   .   .   15
         3.3.1 Frameworks support . .          .   .   .   .   .   .   .   .   .   .   .   .   .   .   15
         3.3.2 Pricing . . . . . . . . . .     .   .   .   .   .   .   .   .   .   .   .   .   .   .   15
    3.4 The Best Choice . . . . . . . . . .    .   .   .   .   .   .   .   .   .   .   .   .   .   .   15

4   ARCore Specifics                                                 17
    4.1 Fundamental Concepts . . . . . . . . . . . . . . . . . . . . 17
        4.1.1 Motion tracking . . . . . . . . . . . . . . . . . . . 17

                                                                                                       v
4.1.2 Environmental understanding . . . . . . . . . . 18
4.1.3 Light estimation . . . . . . . . . . . . . . . . . . . 19
4.2 Working with Virtual Realm . . . . . . . . . . . . . . . . . 19
4.2.1 User actions . . . . . . . . . . . . . . . . . . . . . 19
4.2.2 Dynamic relationships . . . . . . . . . . . . . . . 20
5 Bag Detection 21
5.1 Point Cloud . . . . . . . . . . . . . . . . . . . . . . . . . . 21
5.2 Point Filters . . . . . . . . . . . . . . . . . . . . . . . . . . 22
5.2.1 Distance to camera . . . . . . . . . . . . . . . . . 22
5.2.2 Confidence . . . . . . . . . . . . . . . . . . . . . 22
5.2.3 Minimum height . . . . . . . . . . . . . . . . . . 23
5.2.4 Point cloud storage and optimisation . . . . . . . 23
5.3 Bounding Box . . . . . . . . . . . . . . . . . . . . . . . . . 24
5.3.1 Convex hull . . . . . . . . . . . . . . . . . . . . . 24
5.3.2 Minimum bounding rectangle . . . . . . . . . . 26
5.3.3 Minimum bounding box . . . . . . . . . . . . . . 28
6 Android Application Integration 29
6.1 Permissions . . . . . . . . . . . . . . . . . . . . . . . . . . 29
6.2 ARCore Support . . . . . . . . . . . . . . . . . . . . . . . 30
6.2.1 Manifest tags . . . . . . . . . . . . . . . . . . . . 30
6.2.2 Runtime check . . . . . . . . . . . . . . . . . . . 31
6.2.3 Installation of ARCore . . . . . . . . . . . . . . . 31
6.3 OpenGL ES . . . . . . . . . . . . . . . . . . . . . . . . . . 32
6.3.1 Rendering . . . . . . . . . . . . . . . . . . . . . . 33
6.4 Result . . . . . . . . . . . . . . . . . . . . . . . . . . . . . 37
7 Virtual and Real Results 39
7.1 Setup . . . . . . . . . . . . . . . . . . . . . . . . . . . . . 39
7.2 Data Acquisition . . . . . . . . . . . . . . . . . . . . . . . 40
7.3 Error Calculation . . . . . . . . . . . . . . . . . . . . . . . 41
7.4 Results Overview . . . . . . . . . . . . . . . . . . . . . . . 42
8 Conclusion 45
Bibliography 47
viList of Tables
1 Table of competitors AR features overview. 11
2 Table of measured data. 41
3 Table of experiments deviation. 42
viiList of Figures
1 Screen of KAYAK Bag Measurement tool. 6
2 Screen of KLM Hand Baggage Check feature. 7
3 Screen of easyJet Size Your Bag tool. 9
4 Illustrated example of motion tracking. 17
5 Illustrated example of environmental understanding. 19
6 Illustrated example of light estimation. 20
7 Photo of received and rendered ARCore point cloud. 21
8 Example of noise points on uneven floor. 23
9 Octree data structure. 24
10 Example of convex hull detection. 25
11 Example of a possible set of oriented bounding
rectangles. 27
12 Photo of a point cloud, convex hull and bounding box
example. 28
13 Screenshots of Kiwi.com AR feature camera setup. 29
14 Screenshot of ARCore installation dialogue. 32
15 Example of applying projection matrix onto virtual
objects. 34
16 Photo of used measurable items. 1 — a box, 2 — a
common-sized suitcase, 3 — an uncommon-shaped bag, 4
— a backpack. 40
17 Screenshots of Kiwi.com AR experiments. 44
ixIntroduction
Augmented reality (AR) is an experience of expanding a real-world
environment with computer-generated information. The main goal
of AR is to provide not visible information about real objects in more
accessible ways. It can interact with the main human senses: vision,
hearing, smell, taste and touch. Such interactions mainly depend on
the provided hardware.
Augmented reality has appeared in the early ’60s. However, the
potential level of available devices at that time was not enough to run
AR applications without significant constraints. Therefore, this tech-
nology has to wait until a big leap in hardware processing capabilities.
The level of the computational power of smartphones nowadays is
multiple times higher when the first AR system was introduced in 1992
[1]. It has happened mainly because of developing powerful chipsets
available for use in the mass production of smartphones. Along with
it, unlimited data storage and high-speed Internet connections have
been accessible from the same time [2, p. 15].
By 2018 there are more than 2.5 billion smartphone users in the
world, which makes it around 33% of the world population and it is
predicted to grow up [3]. Smartphones have all necessary hardware to
carry AR features: processor, display, camera, GPS and accelerometer.
However, smartphone AR capabilities are still not broadly used
because of a lack of simple frameworks, which would help build or
integrate solutions in a reasonable time with the minimum price for
a business. Therefore, the goal of this thesis is to analyse and define
ways of AR opportunities for Android mobile platform along with
creating an AR solution as an example.
Measuring bags with AR can be taken as a proper example because
it fully utilises AR capabilities and brings value to the service. This
feature is going to be integrated into Kiwi.com [4] Android application
and should help avoid additional expenses during flight travel.
The thesis is divided into several chapters:
∙ Measure Bags with Augmented Reality. This chapter describes
the significance of travelling by airplanes and how attempts to
lower flight ticket prices can result in paying much more money
than it was expected to save, and how it can be resolved.
1∙ Augmented Reality Solutions. This chapter contains information
about competitors, which have introduced AR bag measuring
solutions in their mobile applications, and provides an overview
of them.
∙ Existing Augmented Reality SDKs. This chapter has information
about existing AR SDKs (Software Development Kit) and their
comparison, which should help identify the best candidate for
Kiwi.com AR feature.
∙ ARCore Specifics. ARCore is described in details in this chap-
ter, which explains how ARCore interacts with real and virtual
worlds.
∙ Bag Detection. This chapter provides information about how
to work with the cloud of points, obtained from ARCore. It de-
scribes steps to eliminate unnecessary data and analyse feature
points to construct a bounding box.
∙ Android Application Integration. This chapter consists of infor-
mation about Android ARCore specifics, instructions on how
to render a bounding box and provide users with a responsive
interface.
∙ Virtual and Real Results. This chapter provides a comparison of
real and measured sizes of luggage to identify a measuring error
and how it can be used for improving the AR bag measuring
tool.
21 Measure Bags with Augmented Reality
This chapter describes the significance of travelling by airplanes and
how attempts to lower flight ticket prices can result in paying much
more money than it was expected to save, and how it can be resolved.
1.1 Air Travelling
We live in a rapidly changing world, where globalisation is well un-
derway. It brings us to the point where borders between countries are
thinner, which opens more opportunities for travelling and exploring
the world.
What is the fastest and safest way to travel? It is using airplanes.
At first, airliners were introduced to carry passengers and cargo over
long distances, such as across the Atlantic ocean. Later, they took
place almost in all segments of the transportation market, including
domestic connections. Thus, for example, people living in Europe
have a great choice to use an airplane as the fastest way to move. Such
growth of popularity brought a demand for cheaper variants — low-
cost airlines, which can provide minimum service for a minimum
price.
However, the main issue was the absence of desire for cooperation
among low-cost airlines. Therefore, flight travel services come to life,
which should have introduced ways to find and connect offers from
different airline companies to make the best proposal for customers.
Kiwi.com is one of the services, which helps find the cheapest way to
travel from one city to another using low-cost flights. Despite the pros,
this approach has cons too. One of them is a luggage problem.
Low-cost carriers can provide very cheap flight tickets mostly be-
cause of minimising operating costs, removing traditional services
and providing fewer comfort. Therefore, it results in strict rules, which
could be bypassed by paying additional fares [5]. One of the most com-
monly used limitations is having a cabin bag only. Also, cabin bags are
checked by weight and dimensions strictly during onboarding, and
exceeding one of the constraints can result in a significant fine (almost
a price of the ticket). For example Ryanair and Wizz Air cabin bag fine:
"Non-Priority passengers will have to pay a e/£25 fee at the gate to bring
31. Measure Bags with Augmented Reality this on board, and it will be put in the cargo hold." [6] Consequently, an idea of preventing such troubles was born at Kiwi.com. 1.2 Mobile Application Kiwi.com provides service not only on web platforms, but it also covers the mobile area. Introducing the mobile application on Android helps customers to access Kiwi.com services much faster due to the native implementation, and also have unique functionality. One of the unique features is offline mode when passengers can check their bought tickets without an Internet connection. However, it is not enough to increase the mobile audience. There- fore, Kiwi.com mobile management had tried to find an idea that could attract more people. At the same time, the concept of reducing the number of luggage problems came up. It was considered as a perfect match because it could bring the unusual feature to mobile, and smartphones were capable of solving the luggage problem. 4
2 Augmented Reality Solutions
This chapter contains information about competitors, which have
introduced AR bag measuring solutions in their mobile applications,
and provides an overview of them.
     AR bag measuring solutions of KAYAK, KLM, easyJet are reviewed
and compared to identify their weaknesses and advantages. Also,
it is quite important to take into consideration their measurement
processes. It should help come up with an image of a proper AR
bag measuring tool by taking competitors advantages, avoiding their
weaknesses.

2.1 "Size Up Your Baggage" by KAYAK

One of the first services that introduced measuring bags with Aug-
mented Reality was KAYAK [7]. KAYAK says that required dimen-
sions of carry-on luggage can differ among airlines. Therefore, to make
the travel experience more comfortable and entertaining KAYAK has
developed "KAYAK Bag Measurement Tool" for its iOS application.

2.1.1 Measurement process

The process of measuring bags can be described in the following steps:
  1. Open the application screen with AR;
  2. Aim phone on floor;
  3. Wait for a grid to appear on the screen, which can indicate the
     found floor;
  4. Confirm the found plane that it is the floor by tapping on it;
  5. Point the camera at a bag;
  6. Press and hold the button on the screen to start measuring;
  7. Move the camera close to the bag and capture all its corners;
  8. Release the button to reveal gained results;
  9. Observe the results of measuring as it is shown in the Screen of
     KAYAK Bag Measurement tool.

                                                                     5
2. Augmented Reality Solutions
Source: kayak.com
Figure 1: Screen of KAYAK Bag Measurement tool.
2.1.2 Advantages
The first advantage is a well-developed user interface. There are hints
for each step of measuring, which helps users not to be lost, and
explains what needs to be done next. It is essential for unusual features,
which users very probably have never seen before.
The second advantage is sufficient precision, especially for stan-
dard cabin bags, and the accuracy helps identify a kind of measured
bag.
Also, the application interacts with users as much as possible by
showing animated progress. Animation comes to the aid of keeping
users attention and let them feel that the screen is not stuck.
2.1.3 Disadvantages
The main disadvantage that can affect users is supporting only the
iOS platform. It is not a healthy practice to focus solely on one mobile
operating system since it limits potential to reach more users.
62. Augmented Reality Solutions
Another disadvantage that can be noticed is a lack of connection
between flight tickets and the feature. It would be beneficial for the bag
measurement tool to check the results against airline requirements.
So, users would be able to see probable issues immediately.
Also, from a users experience point of view, the requirement to
hold the button to measure a bag is unnecessary and disturbing action
for the reason that a bag can require more than 5 seconds to measure.
2.2 "Hand baggage check" by KLM
As the KLM news article says [8], the company has developed a so-
lution for passengers with smartphones so they can check if their
hand baggage has the correct size. KLM wants to show that the needs
of their customers come first and it is crucial to use the potential of
augmented reality in their service in the future.
Source: news.klm.com
Figure 2: Screen of KLM Hand Baggage Check feature.
72. Augmented Reality Solutions
2.2.1 Measurement process
To perform a hand baggage check-in KLM’s application, it is necessary
to do these steps:
1. Access the hand baggage check screen;
2. Pick a kind of luggage to check ("Hand baggage" or "Accessory");
3. Read instructions about how it works;
4. Scan empty area on the floor;
5. Move or rotate the virtual bag to cover the real one with it as it
is shown in the Screen of KLM Hand Baggage Check feature;
6. Observe if some parts of the real bag stick out;
7. Decide whether the bag is small enough not to be checked-in.
2.2.2 Advantages
The main advantage of the KLM’s tool is a simple user interface. It
does not depend on real-time data gained from a camera, which makes
it lightweight and available on old devices without high-performance
hardware.
The transparent bag that emulates maximum allowed sizes pro-
vides a quick way to find if a real bag fits. It perfectly works with
standard cabin or hand luggage and does not make users go around
their bags at all.
After a month, the company integrated this feature with Facebook
Messenger [9]. This next step makes the baggage check much more
convinient without a need to open KLM’s iOS application.
2.2.3 Disadvantages
Despite the simplicity, this baggage check tool cannot be called an
accurate one. As mentioned above, it should work for standard bags,
but as soon as users try to check shapeless luggage, the tool becomes
useless.
Also, the feature requires more interaction from users during the
process. The transparent bag has to be placed manually, which de-
creases user experience dramatically. When a bag is very close to the
allowed sizes, it will be a challenge for users to decide if it fits.
It has only two options to check against. Since KLM is an airline
itself, it may not be a problem. However, once the airline decides to
82. Augmented Reality Solutions
Source: mirror.co.uk
Figure 3: Screen of easyJet Size Your Bag tool.
add new bag sizes combination, it will require updating the AR tool.
The approach can dramatically increase development time.
Finally, it does not provide any precise results in the end. So, the
final decision lays down on users shoulders.
2.3 "Size Your Bag" by easyJet
Using augmented reality technology, easyJet airline company has
decided to help its clients to check their hand luggage before they
leave home for a flight [10]. It tries to prevent any trouble with luggage
size requirements at airports as well.
2.3.1 Measurement process
To use the easyJet AR tool users need to perform the following steps:
1. Open "Cabin Bag Sizer" screen;
2. Read step-by-step usage instruction;
92. Augmented Reality Solutions
3. Aim camera at the ground to find floor;
4. Move the camera until the cage fits over a bag;
5. Rotate the cage using a button to adjust its position against the
bag;
6. Observe if any parts of the bag stick out as it is shown in the
Screen of easyJet Size Your Bag tool;
7. If the bag fits add hold luggage to the current booking.
2.3.2 Advantages
The first advantage is the interaction between a booking and the AR
feature. So, users can use needed requirements from the airline right
in the tool. Also, it allows adding hold luggage to the current booking
at the end of measuring.
Clear instructions and following-up hints are the next advantages.
They help update users with the necessary information to proceed
with the measuring flow.
The tool can find floor automatically, so users do not need to con-
firm it manually.
The bounding cage, which helps identify sizes, is drawn as soon
as the floor is found. It helps estimate roughly the difference between
the real and virtual bags much quicker.
2.3.3 Disadvantages
The main weakness of this feature is the absence of interaction with
a real bag. It means that users should manually place and adjust the
virtual cage to see results. It works well only with standard bags.
The quality of animation and virtual objects design is non-catching
and straightforward.
The last disadvantage is the availability of this feature only on iOS.
2.4 Overview
For the overview of the Table 1, it can be stated that autonomous floor
detection, supporting both mobile platforms, on-boarding instructions
along with follow-up hints are important for creating competitive and
attractive an AR bag measuring tool.
102. Augmented Reality Solutions
Table 1: Table of competitors AR features overview.
KAYAK KLM easyJet
Android support - - -
iOS support + + +
Autonomous floor detection - + +
Real object scanning + - -
On-boarding instructions - + +
Follow-up hints + - +
Attractive animations + - -
Connection with booking - - +
Third party integration - + -
Clear result + - -
Additionally, none of the mentioned companies has developed an
AR tool for Android OS. It provides a unique opportunity to be the
first on Android.
113 Existing Augmented Reality SDKs
This chapter has information about existing AR SDKs (Software De-
velopment Kit) and their comparison, which should help identify the
best candidate for Kiwi.com AR feature.
These SDKs should provide developers with high-level features:
3D rendering engine, object recognition, scene recognition and device
positioning. So, using these features, it will be enough to focus on the
business part of a designed AR tool, rather than on a technical aspect.
Essential items of a functional AR Android SDK for business are:
∙ A type of licence;
∙ Small threshold knowledge;
∙ Supported platforms (Android for this particular case);
∙ Trustful creators;
∙ Long-term viability of the SDK.
3.1 Wikitude
The Wikitude SDK [11] has a lot of high-level solutions for developers.
It can work with both types of environment — marker- and location-
based. It supports displaying virtual objects and binding them to
their specific point so they will maintain their position during device
movement. Wikitude has geolocation, which services location-based
needs. Also, developers can process obtained data locally using a
device or remotely by cloud recognition. Most importantly, it provides
object and scene recognition from the box.
3.1.1 Frameworks support
The Wikitude SDK is available on multiple platforms: Android SDK
(JavaScript & Native), iOS SDK (JavaScript & Native), Windows SDK,
Unity, Xamarin, Cordova and Vuzix smart glasses platform. The big
list of available frameworks can help a business to distribute its AR
133. Existing Augmented Reality SDKs
tool across multiple devices and reach more users along with reusing
the same implementation.
3.1.2 Pricing
Considering all the advantages of the Wikitude SDK, it is understand-
able why this tool is expensive. It has multiple variants of commercial
licences for one-time purchase or enterprise subscriptions. However,
a starter pack price is 1990 e. Although, developers have an option of
a free trial, which has limited functionality and no support.
3.2 ARToolKit
ARToolKit is an open source project. It is readily configurable and
provided with clear and easy-to-use documentation. Primarily, it was
designed in 1999 to operate with markers only. However, it received
support for SLAM technology in later releases [12]. ARToolKit [13]
SDK is capable of:
∙ tracking users’ position in the physical world by using computer
vision;
∙ tracking of planar images;
∙ camera tracking and calibration;
∙ location-based tracking;
∙ single or dual camera support.
3.2.1 Frameworks support
This SDK supports multiple platforms, including desktop operation
systems. The list consists of Linux, Windows, iOS, macOS, and An-
droid.
3.2.2 Pricing
ARToolKit is an open-source project which is available on its GitHub
repository [14]. It is distributed using GNU LGPLv3 [15] license, which
143. Existing Augmented Reality SDKs
allows copying, using and distributing licensed code, but requires to
make all modified version also available under this license. Therefore,
it can be stated that this SDK is entirely open-source and free.
3.3 ARCore
ARCore provides developers with helpful high-end AR capabilities:
∙ tracking position of the phone relative to the surroundings;
∙ surfaces distinguishing (vertical, horizontal and angled planes);
∙ light estimation for virtual objects;
∙ shared AR realm.
3.3.1 Frameworks support
Google’s AR library supports both mobile platforms — Android and
iOS. Despite the availability of the SDK on a platform, ARCore team
also performs certification of each Android or iOS device model to
make sure that it can handle AR seamlessly.
3.3.2 Pricing
ARCore SDK is free and can be used immediately without any needed
subscription or registration. Its code is available in its GitHub reposi-
tory [16].
3.4 The Best Choice
The best choice for implementing AR measuring baggage tool is AR-
Core. There are several reasons for it:
∙ It is a completely free SDK, and there are no signs so far that
Google will create paid options. Therefore, it makes ARCore
better solution than Wikitude, which is expensive. Also, it is
important to spend as less money as possible on AR measuring
feature, because it is not a core part of the Kiwi.com application
and it is not going to bring additional direct profit.
153. Existing Augmented Reality SDKs
∙ Google team is tightly related to developing Android OS. There-
fore, they know the best way how to build a tool for Android. It
also means that the team can affect the Android OS in favour of
improving ARCore stability and optimisation.
∙ It is also available on iOS, which makes future integration with
the platform much easier.
∙ ARCore project is under constant development, and it is ex-
pected that new features will come very soon. Therefore, com-
paring it with ARToolKit, it can be agreed that Google has more
human resources to keep the project alive and it can respond
to critical issues much faster, which makes it a more reliable
product.
164 ARCore Specifics
ARCore is described in details in this chapter, which explains how
ARCore interacts with real and virtual worlds.
4.1 Fundamental Concepts
ARCore [17] is a platform created by Google for helping mobile devel-
opers to use augmented reality experience in their applications. Using
ARCore SDK, it is possible to make a phone to explore surroundings
and communicate with them. To achieve it, a phone has to follow three
fundamental concepts [18][19, p.8–11]:
1. Motion tracking;
2. Environmental understanding;
3. Light estimation.
4.1.1 Motion tracking
ARCore uses COM technology for motion tracking of a device [20].
COM states as Concurrent Odometry and Mapping. This technology
aims to build a three-dimensional visual representation to estimate
the correct position and orientation of the device [19, p. 56–58].
Source: developers.google.com/ar
Figure 4: Illustrated example of motion tracking.
174. ARCore Specifics
A module that corresponds to motion tracking searches for uncom-
mon pattern parts of objects as in the Illustrated example of motion
tracking, which are currently visible to the camera, and stores their
details. As soon as the device is shifting, the module tries to compare
newly obtained objects with stored ones to identify the shifting direc-
tion. Also, it helps restore the device position from scratch after its
camera was blocked for some amount of time.
These specific details of objects are called feature points. However,
it is not enough to use only feature points for right device positioning.
It is essential to use a device’s IMU (Inertial Measurement Unit). Usu-
ally, smartphones are equipped with accelerometers. Using data from
accelerometers, the correct position can be obtained, because along
with positioning in space it is possible to determine device orientation.
The motion tracking is a crucial technology because it has a massive
impact on rendering. ARCore stores and computes the whole virtual
world even when the camera is not aiming at some parts of it. Therefore,
it is not needed to render virtual objects that are not visible to a user.
Also, it helps position virtual objects too. For example, when a user
goes around a virtual object, ARCore should rotate it with the same
speed to simulate the object rotation.
4.1.2 Environmental understanding
Feature points can provide much broader information rather than
just a device position. ARCore tries to combine feature points into
clusters with similar pattern to gain more data about surrounding
objects. The most straightforward recognisable pattern is horizontal
or vertical planes, as it can be observed in the Illustrated example of
environmental understanding. Feature points that lie on a possible
surface have almost the same vertical axis value and, during device
shifting, do not change position.
Detecting planes help place a virtual object according to the current
environment. Such planes can be surfaces of table, chairs, wall or floor.
ARCore is capable of determining their boundaries, so a smartphone
can see that some part of the floor is covered by a table and it can
indicate a case for object occlusion.
184. ARCore Specifics
Source: developers.google.com/ar
Figure 5: Illustrated example of environmental understanding.
4.1.3 Light estimation
Light estimation is one of the central unique ARCore’s technologies
that allows merging virtual objects into the real world with high-
level realism. This technology affects rendering of virtual objects. It
estimates the dominating colour and light gradient at the specific
point of the real world, where the object is located, and then it applies
obtained data on the object. After changing the virtual object, ARCore
determines its shadow. It perfectly works with floating objects too, so,
users can even see a shadow of an object, but do not see the object
itself.
4.2 Working with Virtual Realm
4.2.1 User actions
To use AR capabilities to the fullest, it is necessary to allow users
interactions with the virtual realm. It can be achieved by ray tests.
194. ARCore Specifics
Source: developers.google.com/ar
Figure 6: Illustrated example of light estimation.
When users tap on their smartphone’s screen, a ray is sent from the
corresponding (x, y) coordinate of the screen through the virtual space
to identify which virtual object is intersected by this ray. It helps
convert an action from the 2D dimensional (a phone’s screen) to the
3D dimensional world.
Also, ARCore is capable of calculating an angle of the intersected
object. This approach helps place a new virtual object with the same
angle as the angle of the selected plane to the floor.
4.2.2 Dynamic relationships
Detected planes and feature points can change their position and form
during smartphone movement. It happens because ARCore receives
more enriched data over time and it should respond to changes in the
environment. Therefore, it is important to place virtual objects using
anchors. An anchor allows making a connection between a virtual
object and a detected plane, which represents a part of the real world,
and such connection will ensure that the virtual object will be adjusted
according to changes of the detected plane.
205 Bag Detection
This chapter provides information about how to work with the cloud
of points, obtained from ARCore. It describes steps to eliminate un-
necessary data and analyse feature points to construct a bounding
box.
5.1 Point Cloud
The main source of data for detecting a bag is a point cloud (Photo of
received and rendered ARCore point cloud). A point cloud is a set of
points that lie on the surface of objects. Therefore, each point received
from ARCore represents a part of a real-world object. To work with
the point cloud, it is necessary to understand its data structure.
ARCore updates point cloud each frame and sends it to a called
function in the form of float array. Every four elements of this array
define one cloud point. Thus we can conclude that a cloud point is a
four-tuple ( x, y, z, p), where:
Figure 7: Photo of received and rendered ARCore point cloud.
215. Bag Detection
∙ x, y, z are axis coordinates of a system that starts from the first
obtained pose. It means that these values are not relative to the
current position of a smartphone, so, they can be considered as
global coordinates. The values are measured in meters.
∙ p is a probability of how accurate the obtained point is. It means
that the value range is from 0.00 to 1.00. It is defined by ARCore
itself and should stand for how probable the current position of
the point will remain the same.
5.2 Point Filters
Before analysing of a point cloud, simple filters can be applied to a
raw set of points. Such filter should significantly reduce the number of
points to be processed. Therefore, it decreases the computational time
of each frame and results in faster and smoother data visualisation.
5.2.1 Distance to camera
ARCore has no limitations for measuring distance. Therefore, it is
important to cut off points that are too far away from the user. First,
points at a big distance are much less accurate than points at a small
distance, and they also tend to change their position quickly. Second,
it helps push a user to be as close as possible to bags, which eliminates
excess surrounding objects.
5.2.2 Confidence
As mentioned earlier, each cloud point has an accuracy value. Thus,
this value can be used to determine which points are acceptable for
the next analysis. The simplest approach is to take as many accurate
points as possible.
However, it dramatically decreases the number of points, and the
following algorithms can stop working due to lack of data. Therefore,
the recommended value of the threshold can be in a range from 0.5 to
0.8. This range allows eliminating noise and objects in movement.
225. Bag Detection
5.2.3 Minimum height
Since ARCore detects real-world object points based on standing out
details, it can cause issues with an uneven floor. One of the good
examples can be a carpet. A carpet can have a changing pattern on
it, which can easily confuse ARCore algorithm and produce a lot of
noise points.
Figure 8: Example of noise points on uneven floor.
Therefore, it is necessary to avoid points that are too close to a floor.
10 cm threshold is taken as the best candidate, because of specifics
of luggage sizes. Usually, luggage has a minimum 10–15 cm height
despite its orientation. Thus, this filter helps reduce wrongly taken
points and does not allow measuring too small bags.
5.2.4 Point cloud storage and optimisation
As mentioned above, ARCore emits a point cloud for each frame. How-
ever, it does not persist results from previous frames. Therefore, after
a couple of seconds of user’s movement, the received point cloud can
contain completely different points due to the changing environment.
It is fundamental to store obtain points and reuse them for future
frames. Thus, after walking around a bag, points from each side of the
bag will be stored. One of the best data structure for persisting a point
cloud is Octree data structure, which was introduced specifically for
3D computer graphic processing in 1980 [21].
The main benefit of the structure for this case is the possibility
to merge a stored point with a recently received one to increase its
235. Bag Detection
Source: en.wikipedia.org/wiki/Octree
Figure 9: Octree data structure.
accuracy. It can happen that some region of a point cloud is starting
to gain more precise points (higher probability value). Therefore, it is
necessary to update the stored Octree, but it is needless to have two
points that are too close to each other, where one of them has lower
accuracy. If a new point is closer than 1cm to any stored point and has
higher accuracy, then this points replaces the old one.
5.3 Bounding Box
As soon as all redundant points are eliminated, the next step is to form
a bounding box. A box is taken as the main form of bags, because
the majority of them have similar form and airline companies treat
them as boxes too, providing only three dimension constraints: width,
height and length. A minimum bounding box is the smallest volume
which contains all provided points. Therefore, finding such a box is
enough to determine the relative sizes of a bag.
5.3.1 Convex hull
Assuming that a bag lies on a floor and is not hanging in the air, it is
possible to perform the first step towards a minimum bounding box.
245. Bag Detection
The first step should be projecting all gained points on the detected
floor. Using the projected points, it is possible to calculate a convex
hull.
Source: medium.com/@harshitsikchi/convex-hulls-explained-baab662c4e94
Figure 10: Example of convex hull detection.
A convex hull is a set of points that forms a polygon, which contains
other provided points inside. One of the simplest algorithms that can
be implemented is Graham’s Algorithm [22].
List < Point > convexHull ( List < Point > pointList ) {
if ( pointList is empty ) return empty list
var upperHull = new list of points
sort pointList by x
for each sorted point {
while ( upper hull size >= 2) {
// take next point
var q = upperHull [ upperHull . size - 1]
var r = upperHull [ upperHull . size - 2]
// if r point lies closer to the center
if (
( q . x - r . x )*( point . y - r . y )
>= ( q . y - r . y )*( point . x - r . x )
) {
remove it from upperHull
255. Bag Detection
} else break
}
add point to upperHull
}
// repeat the same for lowerHull
if ( upperHull has more than 1 point
&& upperHull != lowerHull ) {
add all points to upperHull from lowerHull
}
return upperHull
}
5.3.2 Minimum bounding rectangle
Forming an arbitrary polygon using the convex hull helps find a mini-
mum bounding rectangle. A minimum bounding rectangle is a rectan-
gle that contains all provided points inside and has a minimum area
for the set of points. In order to find the rectangle, it is necessary to
find all possible bounding rectangles at first, and then by comparing
their areas pick the minimum one.
Rect computeRect ( List < Point > points ) {
compute convexHull
center = centroid of convexHull
minRect = Rect ()
convexHull for each point {
take nextPoint
var rotation = Math . atan2 (
( nextPoint . y - point . y ) ,
( nextPoint . x - point . x )
)
var ( minX , minY , maxX , maxY ) =
265. Bag Detection
Figure 11: Example of a possible set of oriented bounding rectangles.
rotate convexHull along centre
var rect = Rect (
point at minX & minY ,
point at minX & maxY ,
point at maxX & maxY ,
point at maxX & minY
)
if ( rect . area < minRect . area ) {
minRect = rect
}
}
return minRect
}
275. Bag Detection
5.3.3 Minimum bounding box
After obtaining a minimum bounding rectangle, there is enough data
to transform it into a minimum bounding box. The minimum bound-
ing rectangle can be expanded to a box by finding the highest point of
the point cloud and setting the y axis value to it.
The resulting box can be used for the rendering process.
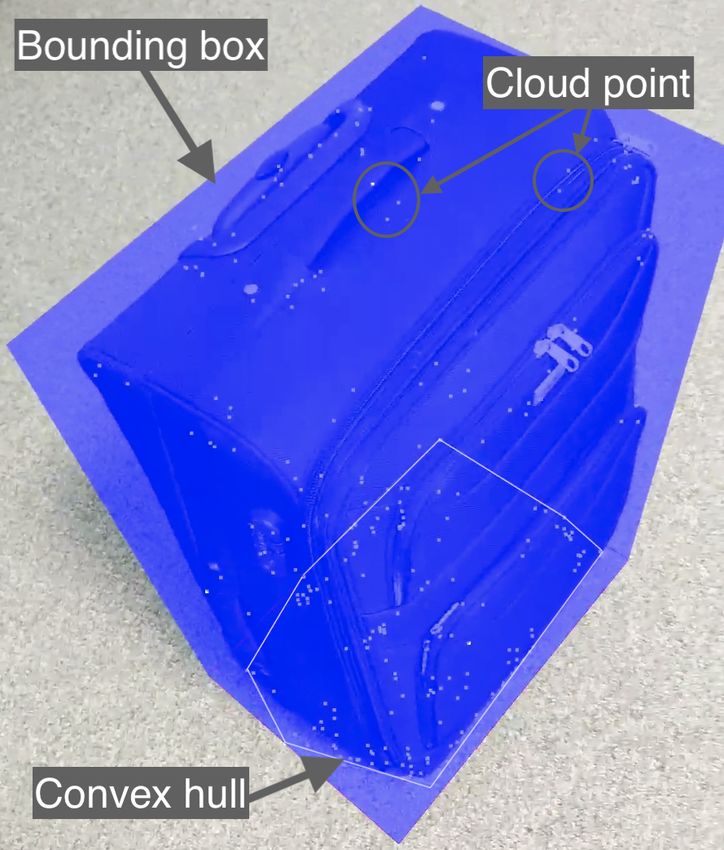
Figure 12: Photo of a point cloud, convex hull and bounding box
example.
286 Android Application Integration
This chapter consists of information about Android ARCore specifics,
instructions on how to render a bounding box and provide users with
a responsive interface.
6.1 Permissions
Since Android 6.0 Marshmallow version, all important permissions
must be asked on a site in the form of dialogue. Therefore, before
starting to use the AR measuring bag feature, users should intention-
ally approve permission to use a smartphone’s camera. Without it the
feature cannot be used properly and, thus, it is important to explain
why the permission has been asked.
Figure 13: Screenshots of Kiwi.com AR feature camera setup.
296. Android Application Integration
To show the system dialog, developers should add a special XML-
tag in AndroidMani f est.xml file:
< uses - permission
android:name = " android . permission . CAMERA "
/>
And then call an Android system method:
ActivityCompat . requestPermissions (
activity ,
new String [] { Manifest . CAMERA } ,
0
);
The more information about permissions management can be
found on Google Android developers website [23].
6.2 ARCore Support
6.2.1 Manifest tags
According to ARCore supported devices list [24], not all Android
devices can support AR technology. Therefore, it is required to check
the availability of ARCore for the current device. There are two ways
how to handle it.
The first way is to hide an application on a store from devices that
cannot support ARCore. It is possible by setting a special meta-data
flag into AndroidMani f est.xml:
< uses - feature
android:name = " android . hardware . camera . ar "
/>
< meta - data
android:name = " com . google . ar . core "
android:value = " required "
/>
However, there is a second way for cases like the Kiwi.com applica-
tion, when it is not beneficial for the company to avoid devices without
ARCore since the main purpose of the application does not rely on AR
technology. Therefore, the special meta-data flag has another value:
306. Android Application Integration
< meta - data
android:name = " com . google . ar . core "
android:value = " optional "
/>
Another difference between these two options is when ARCore is
required, then during the installation of an application, Android will
install ARCore automatically, if it is not present.
6.2.2 Runtime check
Since the Kiwi.com application does not require ARCore to be available
after installation, it is necessary to check its availability during runtime.
To perform this check, an application should use ARCore function:
ArCoreApk
. getInstance ()
. checkAvailability ( this )
The response of the method can have these possible states:
1. UNKNOWN_ERROR
2. UNSUPPORTED_DEVICE_NOT_CAPABLE — ARCore cannot
be run on this device;
3. SUPPORTED_NOT_INSTALLED — ARCore can be downloaded
and installed;
4. SUPPORTED_INSTALLED — ARCore is ready to be used.
In Kiwi.com this check is performed during initialization of the ap-
plication because based on a response it is possible to hide the AR
feature completely beforehand.
6.2.3 Installation of ARCore
ARCore can be installed during runtime of an application. It is prob-
able that most smartphones are not initially shipped with ARCore.
Therefore, a scenario when a device can run AR but does not have
ARCore, should be considered.
To install AR SDK it is necessary to call this SDK method:
ArCoreApk . requestInstall ()
316. Android Application Integration
Figure 14: Screenshot of ARCore installation dialogue.
6.3 OpenGL ES
ARCore has its own rendering tool — Sceneform [25]. The tool is
created to provide high-level scene API and to make 3D models man-
agement much easier. However, this tool is still under development
and lacks completed solutions. It is the main reason why Kiwi.com
bag measuring tool uses OpenGL ES instead of Sceneform.
Therefore, it is required to check the availability of OpenGL ES on
the current Android device before allowing users to access the AR
feature. This check can be done during runtime as well, and requires
the following system calls:
( ActivityManager ) context
. getSystemService ( ACTIVITY_SERVICE )
. getDeviceConfigurationInfo ()
. reqGlEsVersion >= 0 x20000
326. Android Application Integration
6.3.1 Rendering
To show users progress of measuring, it is crucial to visualise obtained
point cloud and computed bounding box the whole time. As long
as users can see the impact of their efforts, they will continue the
measuring process. Otherwise, frozen virtual objects indicate an error
that stuck the flow, or the program finished its work.
Since a point cloud is obtained each frame, then a bounding box
result is available each frame as well. The bounding box has a simple
structure of eight 3D points. However, it is not ready for sending to
OpenGL ES rendering engine. The first step is to convert these eight
points to a byte buffer. The byte buffer has to have an allocated memory
equal to:
Size f loat 32
Sizebu f f er = * Npoint = * Npoint = 4 * Npoint (6.1)
8 8
where Size f loat is a number of bits for representing float in Java. Also,
ByteOrder.LITTLE_ENDI AN should be set for the buffer [26]. Then
it is bound to OpenGL using:
GLES20 . glBindBuffer (
GL_ARRAY_BUFFER , byteBuffer
)
A smartphone screen is a 2D plane and the bounding box has 3D
coordinates. Therefore it is necessary to project the 3D scene onto the
screen as a 2D image. So, the second step is to get projection and view
matrices. The projection matrix is used to clip all vertices that are not
included in the current viewport, and then to transform the remaining
coordinates to the normalised device coordinates (NDC), as in the
Example of applying projection matrix onto virtual objects.
The view matrix is used to transform vertices from object-space
directly to view-space. Then the both matrices have to be multiplied
to get a view projection matrix, which is required to pass to OpenGL
ES along with vertices of the bounding box. Usually the both matrices
can be taken from the current frame camera:
var projectionM =
frame . getCamera (). getProjectionMatrix ()
var viewM =
336. Android Application Integration
Source: opengl-tutorial.org/beginners-tutorials
Figure 15: Example of applying projection matrix onto virtual objects.
frame . getCamera (). getViewMatrix ()
var viewProjectionM =
Matrix . multiplyMM ( projectionM , viewM )
GLES20 . glUniformMatrix4fv ( viewProjectionM )
To render the bounding box, it is sufficient to use standard func-
tions, which result in drawing each side of the box along with its
edges:
GLES20 . glDrawArrays (
GL_TRIANGLES ,
0,
pointsVertexBuffer
)
GLES20 . glDrawArrays (
GL_LINE_LOOP ,
0,
pointsVertexBuffer
)
The similar approach can be applied to drawing the point cloud. How-
ever, the main difference is to disable OpenGL’s depth test. It is neces-
sary to show the point cloud above any other virtual object, so users
can spot the difference when new points appear.
GLES20 . glDisable ( GL_DEPTH_TEST )
346. Android Application Integration
glDrawArrays (
GL_POINTS ,
0,
cloudPoints
)
GLES20 . glEnable ( GL_DEPTH_TEST )
To customise the look of the rendering bound box shaders can be
used. There are two applicable types – fragment (.frag) and vertex
(.vert) shaders. The first type handles sides of the bounding box, where
its colour and transparency can be modified:
precision mediump float ;
varying vec4 v_Color ;
void main () {
gl_FragColor = v_Color ;
gl_FragColor . a = 0.5;
}
Using the second type, it is possible to control a colour, position and
size of drawn edges of the bounding box:
uniform mat4 u_ViewProjection ;
uniform vec4 u_Color ;
uniform float u_PointSize ;
attribute vec4 a_Position ;
varying vec4 v_Color ;
void main () {
v_Color = u_Color ;
gl_Position =
u_ViewProjection
* vec4 ( a_Position . xyz , 1.0);
gl_PointSize = u_PointSize ;
}
All the uniform values are passed before drawing using glUni f orm
function family.
Due to the nature of computing convex hull algorithm, the bound-
ing box can twitch around its real-world bag and make the measuring
356. Android Application Integration
flow seemed unnatural. Therefore, to improve user experience ani-
mation of transition between two states of the bounding box should
be introduced. The transition is calculated based on the difference
between the initial and new states. This difference is represented by a
set of interim boxes. Size of the set can be static. However, it is recom-
mended to rely on the current frame rate. This approach helps to make
the animation for the same time on all devices. It is helpful especially
on old smartphones, where some amount of frames may drop due to
long computational time, what can delay an actual bounding box UI
update.
Each frame in ARCore has a timestamp. Therefore, it is enough
to compare two timestamps of the previous and current frames and
calculate FPS (frames per second) value. After running the Kiwi.com
AR feature, it is observed that on modern smartphones FPS is usually
around 45 − 50. However, on +3 years old devices it does not get higher
than 30 − 35. Accordingly, the animation should not take longer than
a half of the frames per second, what makes it smooth and fast enough
not to block actual progress.
Using the calculated number of necessary frames, it is possible
to define transition boxes by finding a difference of each point for
each axis between the initial and final states. Then it is divided by the
number of frames to find a delta box. This delta box helps to make
step-by-step transitions for each frame.
List < Box > animation ( Box initBox , Box endBox ) {
var states = new list of Box
var numOfSteps = FpsCounter . fps * 0.5
var deltaBox =
( endBox - initBox ) / numOfSteps
var tempBox = initBox
for each ( numOfSteps ) {
states . add ( tempBox )
tempBox += deltaBox
}
366. Android Application Integration
return states
}
As a result, a list of interim boxes is returned, where each box is used
for each next frame. As soon as all items from the list are taken out, the
current computed bounding box is used for creating the next transition
animation. However, it is important to set a threshold, which should
eliminate animations for insignificant changes in the bounding box.
6.4 Result
To show a result of the described work, a video is uploaded to the
Archive of Thesis of the Masaryk University1 . The video shows two
scenarios. During the first one, the user goes to a booking, observes
requirements for cabin luggage, opens the AR feature, measures a
backpack and gets a result, indicating that the backpack fits into the
requirements. During the second scenario, the user goes to the "Profile"
section of the application, opens the AR feature, measures a suitcase
and receives obtained sizes of the suitcase.
1. https://is.muni.cz/thesis/?lang=en
377 Virtual and Real Results
This chapter provides a comparison of real and measured sizes of
luggage to identify a measuring error and how it can be used for
improving the AR bag measuring tool.
ARCore does not provide developers with any statistical data re-
garding its measurement error. Therefore, it is crucial to calculate our
data error of AR bag measuring tool. This error should help under-
stand how accurate the AR tool is at this moment, and to track the
efficiency of future changes. If some change increases the data error,
then this change should not pass a quality assurance step.
7.1 Setup
Before collecting actual data from the Kiwi.com AR feature, setup
should be defined and prepared. Properties of the utilized setup are:
∙ Static room light.
∙ Non-reflective floor.
∙ Ndevice = 3 — number of smartphones with Android OS: One-
Plus 5T, LG Nexus 5X and Google Pixel 2.
∙ Nobject = 4 — number of different kinds of measurable objects:
a box, a common-sized suitcase, an uncommon-shaped bag and
a backpack.
∙ Ntry = 3 — number of tries with each smartphone for each kind
of measurable objects. The value for Ntry is picked because of
gained data from Kiwi.com analytic. It means that each user in
average tries three times to measure an object before he or she
leaves the AR screen. It results in 12 tries for each smartphone
and 36 tries in total.
∙ During experiments, the length, width and height of each mea-
surable object should be recorded.
∙ Only successful tries are recorded. A successful try is a try when
the bounding box covers the whole real object.
397. Virtual and Real Results
∙ A real object is located in the same position with the same ori-
entation during measuring with all kinds of smartphones.
∙ The suitcase has a vertical position as it is often used. The bag
has a horizontal position because it is the most stable one.
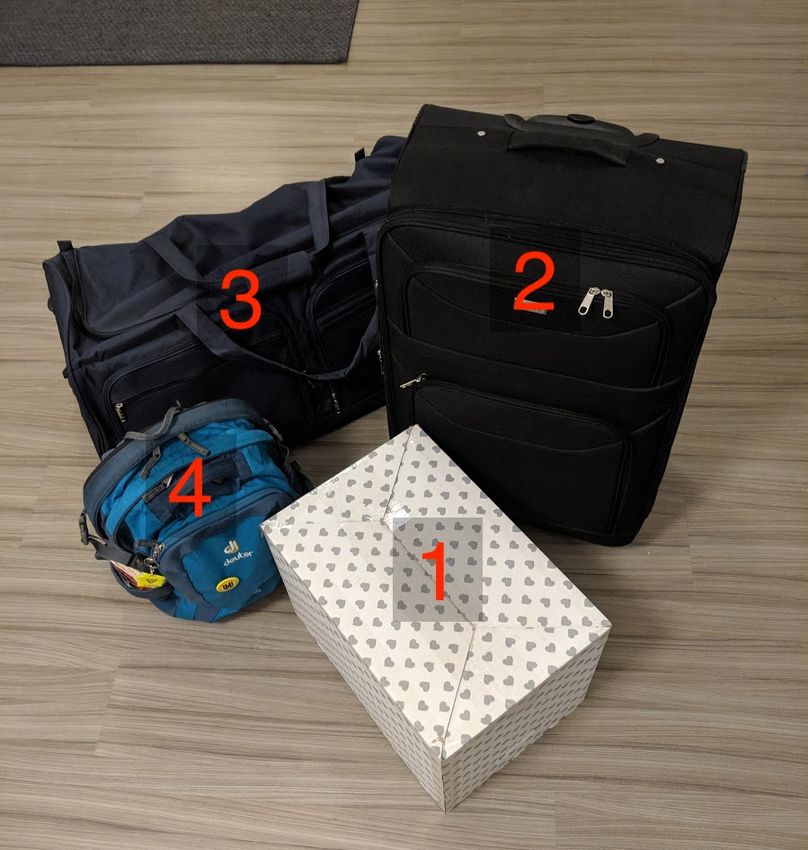
Figure 16: Photo of used measurable items. 1 — a box, 2 — a common-
sized suitcase, 3 — an uncommon-shaped bag, 4 — a backpack.
7.2 Data Acquisition
As it is stated above, 36 measures are performed to identify the error.
The results are recorded into the Table of measured data, where the
provided values are in cm and following abbreviations are used: w —
width, h — height, l — length.
Before proceeding with calculations of the error, it is necessary
to define the real sizes of the used objects. Since the objects have
been used multiple times, their manufacturer information cannot be
407. Virtual and Real Results
Table 2: Table of measured data.
Device Box Suitcase Bag Backpack
OnePlus w 31 32 33 33 31 33 40 40 41 29 28 30
5T h 34 33 34 77 74 74 43 43 46 47 46 48
l 48 44 47 52 48 48 83 84 81 34 31 33
LG w 32 30 32 31 28 29 38 42 45 28 30 29
Nexus 5X h 34 32 33 72 73 75 44 46 47 46 45 48
l 45 44 47 47 45 48 83 81 82 30 36 37
Google w 32 33 31 31 33 33 40 37 38 28 28 25
Pixel 2 h 34 34 32 74 74 72 45 43 44 46 48 44
l 47 48 45 50 52 50 86 84 83 30 31 30
applied due to inconsistency. Also, the sizes of the backpack and the
bag depend on their content. Therefore, the sizes should be taken
manually directly before experiments. A tape measure is used as a
measuring instrument.
The obtained dimensions are used as standards. The measured
dimensions are:
1. Box: wbox = 32cm, hbox = 34cm, lbox = 46cm
2. Suitcase: wsuitcase = 32cm, hsuitcase = 76cm, lsuitcase = 48cm
3. Bag: wbag = 40cm, hbag = 44cm, lbag = 85cm
4. Backpack: wbackpack = 30cm, hbackpack = 46cm, lbackpack = 32cm
7.3 Error Calculation
The first step of the error calculation is detecting measuring deviation.
An absolute deviation formula is not applied here to preserve a sign
of the difference, which can show the direction of the deviation. The
following formula can be applied for each measured dimension:
Di = S i − Mi (7.1)
417. Virtual and Real Results
where D is a deviation of a dimension, S is a dimension of a standard
and M is a measured dimension by the AR tool.
The result of the formula indicates the difference between a real
and measured size of an object. Using the provided formula, it is
possible to apply it to the measured data, which results in the Table 3:
Table 3: Table of experiments deviation.
Device Box Suitcase Bag Backpack
OnePlus w 1 0 -1 -1 1 -1 0 0 -1 1 2 0
5T h 0 1 0 -1 2 2 1 1 -2 -1 0 -2
l -2 2 -1 -4 0 0 2 1 4 -2 1 -1
LG w 0 2 0 1 4 3 2 -2 -5 2 0 1
Nexus 5X h 0 2 1 4 3 1 0 -2 -3 0 1 -2
l 1 2 -1 1 3 0 2 4 3 2 -4 -5
Google w 0 -1 1 1 -1 -1 0 3 2 2 2 5
Pixel 2 h 0 0 2 2 2 4 -1 1 0 0 -2 2
l -1 -2 1 -2 -4 -2 -1 1 2 2 1 2
7.4 Results Overview
Deviation can help identify the measuring error by using an arithmetic
mean formula:
Ntry 36
| Di | |D |
Eabs = ∑ Ntry
= ∑ i = 1.55cm
36
(7.2)
i =1 i =1
Eabs = 1.55cm means that the AR tool is likely to provide 1.55cm
error for each measured dimension despite its direction. The gained
value can be considered as acceptable because an allowed luggage
size tolerance among airlines is 2 − 3cm. Luggage should have enough
flexibility of the material to be able to fold for 2cm.
However, to use this calculation for improving the tool, it is essen-
tial to know to which direction the error happens on average. For this
427. Virtual and Real Results
case, it is enough to use the previous formula, but without applying
absolute value on measured deviations.
Ntry 36
Di D
Edirectional = ∑ Ntry
= ∑ i = 0.39cm
36
(7.3)
i =1 i =1
The positive sign of Edirectional value indicates that the AR tool prob-
ably provides bigger values than they should be. Therefore, during the
comparison of gained sizes from the tool and airline constraints, it is
preferable to introduce a tolerance. Although Eabs does not represent
the most probable error, to find it a statistical mode can be used:
Emode = Mode({ D1 , D2 , ..., D Ntry }) = 2cm (7.4)
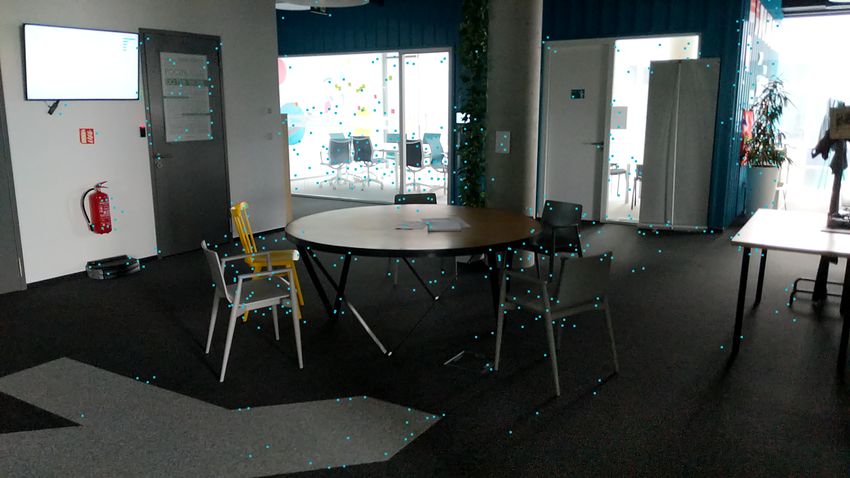
Using the value of Emode , it is possible to set a tolerance, which
should be equal at least to 2cm. So, when users try to make sure that
their baggage fits airline requirements and measured sizes have bigger
values than required, but not more than 2cm), then the baggage can
be marked as allowed in the final screen of the Kiwi.com AR feature.
437. Virtual and Real Results
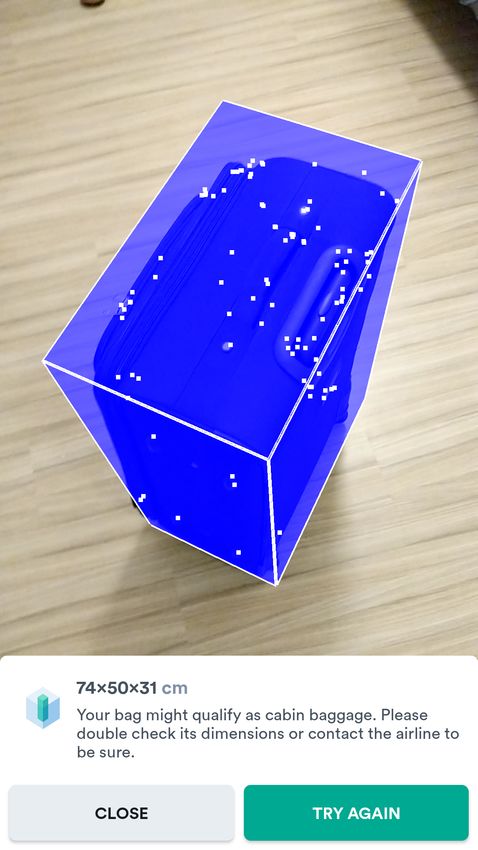
Figure 17: Screenshots of Kiwi.com AR experiments.
448 Conclusion
The aim of the thesis was to analyse and describe possibilities to
create an augmented reality (AR) application for the Android OS.
It can be stated that the aim has been reached by providing with
information of other similar AR applications, describing available AR
frameworks and analysing simple yet effective algorithm to create a
new AR solution.
The Kiwi.com bag measuring tool is a good proof of the provided
suggestions and approach. According to Kiwi.com analytics, the fea-
ture is used on Android by more than 10,000 unique customers per
day, which represents a proper interest in it. Therefore, it can be stated
that the tool is useful and able to help avoid additional fees for exces-
sive luggage. As evidence of the mentioned work, a video of example
usage is provided along with the thesis.
However, the Kiwi.com AR feature is not the perfect solution be-
cause there is room for improvements:
∙ Lowering the measured error under 1cm.
∙ Using Sceneform as the main source of rendering resources
because OpenGL is an old technology, and has been already
deprecated by some platforms, including iOS.
∙ Introducing automated tests to maintain the same measuring
quality level after changes in the source code.
∙ Providing users with a control panel, where it will be possible
to adjust measuring settings based on the current environment.
By following instructions for ARCore integration, it is shown that
an augmented reality module can be included in most projects, which
can broadly extend service possibilities.
The thesis states that Android devices are capable of modern AR
technologies and have sufficient resources for advanced features. What
introduces possibilities to make life, and travelling in particular, easier
and entertaining by integrating virtual and real worlds.
45You can also read