Michigan Ed-Fi 3.1 Setup Guide - Skyward Support Center
←
→
Page content transcription
If your browser does not render page correctly, please read the page content below
Michigan Ed-Fi 3.1 Setup Guide
MICHIGAN ED-FI 3.1 SETUP GUIDE

Michigan Ed-Fi 3.1 Setup Guide

Starting with the 2020-2021 School Year, MiDataHub is operating on the 3.1 platform for
Ed-Fi. Historical years were sent using a prior version. With the cutover to 3.1, the code
setup and cross walking as well as the configuration has been simplified and grouped into
the New Ed-Fi Configuration record.

This document, Michigan Ed-Fi 3.1 Setup, replaces all prior Skyward documentation for
Michigan Ed-Fi, as those guides were specific to a prior version. Please utilize this guide
going forward, along with the Ed-Fi 3.1 Data Elements document.

Initial Ed-Fi 3.1 Setup

Each of the following steps will need to be completed after the Student Management Year
End processes have been completed. Records in Ed-Fi build upon one another to create a
series of complexes. Failure to complete all setup prior to sending data to the Michigan Data
Hub may result in errors due to missing dependencies.
 ❑ Ed-Fi Configuration
 ❑ New Nightly Maintenance
 ❑ Mass Send to API – Initial Data Transfer
 ❑ Mass Send to API Task
Cloning Ed-Fi Setup

If at least one school year is configured in the New Ed-Fi Setup area, it can be cloned. If you
are cloning to the next school year, the Student Management Year End processes must be
completed prior to running the clone.
 ❑ Clone Ed-Fi Setup
Ongoing Maintenance
    •    Data by Subject
    •    Data Sent History
    •    Common Errors

Additional Integration Options
    •    UIC Services
    •    Portable Records Search
    •    MiLearn
    •    Other Integrations

Optional
    •    Disable ExComm / Plugin

Revised: 12/9/2021                         Page 1 of 32                       Version 05.21.10.00.06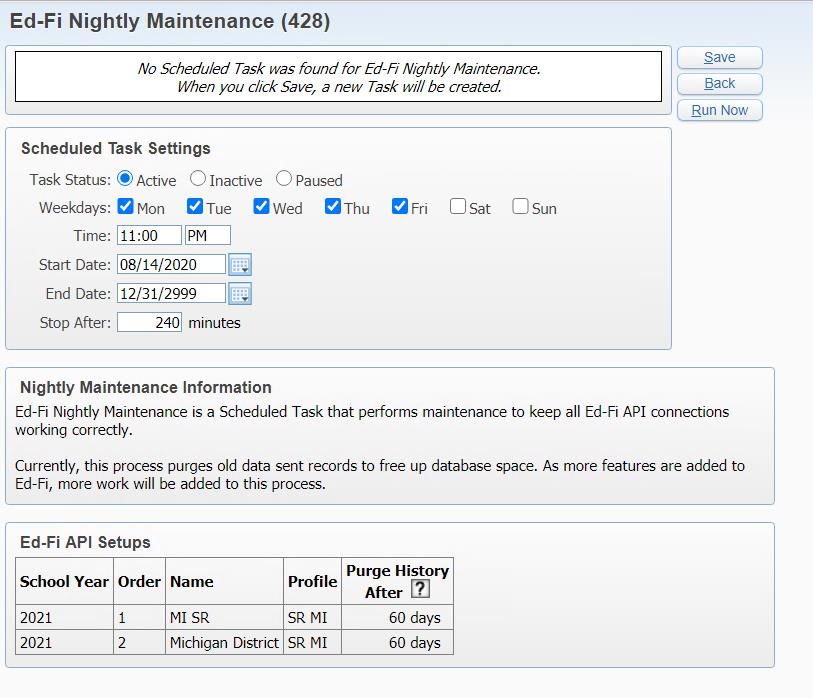
MICHIGAN ED-FI 3.1 SETUP GUIDE

Ed-Fi Configuration Setup

Web Student Management > Federal-State Reporting > Ed-Fi > Product Setup >
Configuration > New Ed-Fi Setup (000 Entity)

    1. Click Add and select the Michigan State Reporting Profile. Once you select the Profile,
       the screen will update with the corresponding fields.

    2. Enter the Name (this is for internal purposes only). If you have a cluster
       environment with multiple districts, this will help you differentiate the records, along
       with the Order.

    3. Under Connection to API, complete the Auth URL, API URL, Key and Secret. Your
       district Key and Secret can be found by logging in to your MiDataHub Cockpit
       (contact support@midatahub.org for assistance). Enter the URLs as shown below.
       Do not copy/paste URLs from the DataHub Cockpit:
           • Auth URL: https://apihub.midatahub.org:443/ODS
           • API URL: https://apihub.midatahub.org:443/ODS/data/v3

    4. Under Common Options, enter the Local Education Agency ID. This is the five-digit
       district ID assigned by the state (Auto-Fill available).

         Verify the School Year Begin and End Dates (dates default from the Calendar
         Master). It is recommended to use 7/1-6/30 to allow drops made before/after the
         school year to send to Ed-Fi.

         Assessment Namespace: uri://skyward.com (note, this is different than 20-21)

Revised: 12/9/2021                         Page 2 of 32                       Version 05.21.10.00.06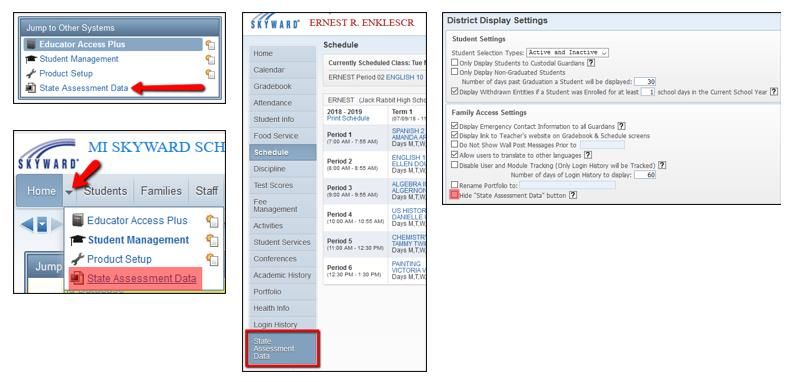
MICHIGAN ED-FI 3.1 SETUP GUIDE

    5. Select the desired settings under the remaining areas (Class Options, Grading
       Options, Other Options, and Student Classes in Schools Where Student is Not
       Enrolled). These settings are mostly district determined. Please consult MiDataHub
       for recommendations.

         Class Options

         Use Detailed Class Periods: This setting will append the Entity and Bell to the Class
         Period Name (i.e., 100R-1 vs. 1) as well as send the Start and End times for the
         period.

         Divide Classes Based on Credit-Earning Grades: This setting is a state requirement
         and cannot be deselected. When year-long courses award half the credit of the
         course to a Semester 1 grade and the other half of the credit to a Semester 2 grade,
         this setting will send up Semester 1 and Semester 2 as separate courses.

         Create Classes for School where the Class Meets: This setting will always create a
         course and tie it to the school where the class meets.

         Create Classes for Default School of the Entity: Because multiple schools can be
         grouped into an Entity if they share the same Scheduling, Grading, and Attendance
         setup, this setting will always tie a course to the default school of the Entity. This
         setting is useful when there is more than one school in an Entity. Usually, entities
         and schools are one to one, but it is not always the case.

Revised: 12/9/2021                          Page 3 of 32                       Version 05.21.10.00.06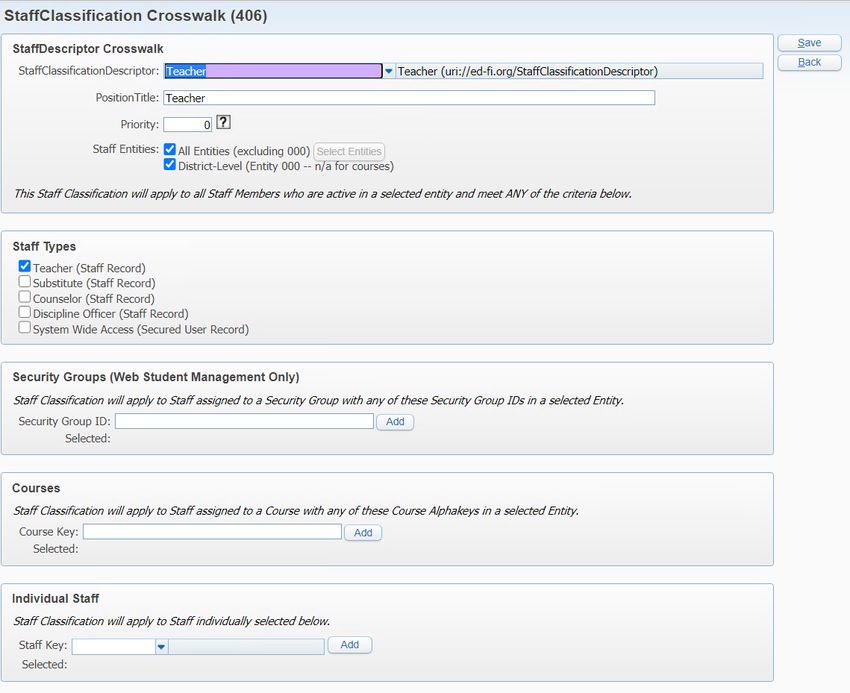
MICHIGAN ED-FI 3.1 SETUP GUIDE

         Grading Options

         Use Gradebook Grade if there is no Posted Grade: This option is recommended,
         especially if the district has any migrant students. It is important to note that any
         Gradebook grade that has transferred will be overwritten by any grade that is later
         posted.

         Discipline Options

         Send Discipline Offense Comments: Select this option if you wish to transfer Offense
         Comments to MiDataHub as the BehaviorDetailedDescription.

         Send Discipline Offense Victims and Witnesses: Select this option if you wish to send
         a Student Discipline Incident Association record for a victim(s) attached to an
         Offense (Student Participation Code Descriptor of ‘Victim’).

         Other Options

         Create Staff for School of Assigned Building: This option will report the Staff
         Association record through the school associated with the assigned building on the
         Meet Pattern.

         Create Staff for Default School of Staff-Entity: Because Entities can have multiple
         schools, this setting will always create Staff Association records for the staff member
         in the default school of the entity.

    6. Enter the number of days to keep historical records before they are purged (this will
       free up database space). Historical records are useful for troubleshooting but are not
       essential for Ed-Fi functionality. (You may disregard the red message regarding the
       Scheduled Task, as that will be configured in a later step).

Revised: 12/9/2021                          Page 4 of 32                      Version 05.21.10.00.06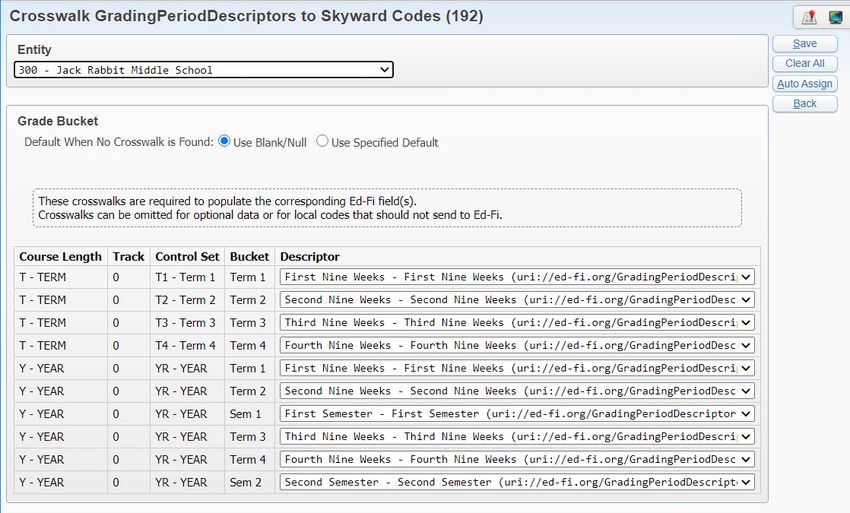
MICHIGAN ED-FI 3.1 SETUP GUIDE

    7. Configure the Local Education Agency (i.e. District) and Education Service Center
       (i.e. ISD/ESA/RESA) records. Once this is completed, Save.

                                                                  Local Education Agency:
                                                                  State Organization ID =
                                                                  Local Education Agency ID
                                                                  (i.e. five-digit state code)

                                                                   Education Service Center:
                                                                   If LEA, Education Service Center
                                                                   ID = ISD/ESA/RESA code

                                                                   If ISD/ESA/RESA, Education
                                                                   Service Center ID = 84000
                                                                   (State of Michigan)

                                                                   State Organization ID = 0

    8. On the prior screen, the Ed-Fi Configuration record will display. Expand it to
       view the setup areas below.

    9. Expand Ed-Fi Tables to Send. By Default, all tables are selected. In the event you do
       want to send a table to Ed-Fi, use the Select Ed-Fi Table link to unselect them.

Revised: 12/9/2021                        Page 5 of 32                     Version 05.21.10.00.06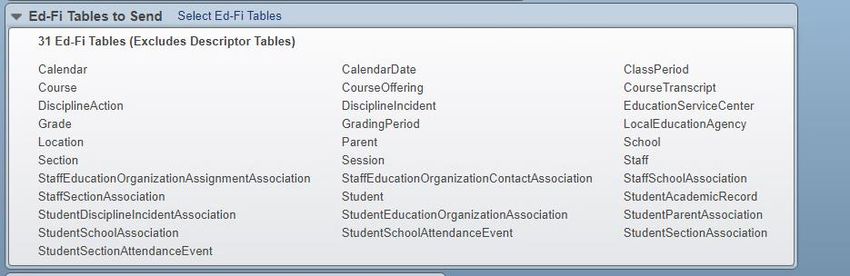
MICHIGAN ED-FI 3.1 SETUP GUIDE

    10. Expand Ed-Fi Schools. The Auto Create Schools option is recommended, as it will
        generate a record for every school. Schools can be modified or removed, once
        created. If using the Auto Create Schools option it is best practice to review each
        record generated for accuracy by selecting the Edit link.

    11. If creating a new record, click Add School.

    12. In the Ed-Fi School section, enter in the integer (cannot have alpha characters) that
        will send as the SchoolId on the Ed-Fi record. This field will become read only after
        the record is Saved. Be sure to enter the desired value correctly.

    13. Select the Primary Skyward School from the dropdown list. Core school information
        (i.e. address, phone, etc.) will be pulled from the selected school.

    14. The Ed Org Category, School Category, School Type and Charter Status can be left to
        ‘Use Default’ or set to a more specific value (after downloading descriptors from the
        state).

    15. Under Link Skyward Schools to Ed-Fi School, at least one School must be selected.
        You can select multiple, if more than one school code should tie to the same record
        for Ed-Fi. You cannot link a Skyward School to more than one Ed-Fi School.

Revised: 12/9/2021                         Page 6 of 32                      Version 05.21.10.00.06
MICHIGAN ED-FI 3.1 SETUP GUIDE

    16. Under Link Skyward Entities to Ed-Fi School, at least one entity must be selected.
        Entities can be linked to multiple Ed-Fi Schools. Generally, it is best to leave the
        Assign All Courses/Assign All Staff options unchecked unless they are needed. If
        records span across Entities/schools, the system will correctly pull the Entity/School
        the courses and staff are associated with (for Staff, they must have the Bldg ID
        populated on the Entity record). If these two options are checked, the system will
        only assign courses and staff to this specific Ed-Fi School ID. Save your changes.

    17. In the Descriptor and Code Setup section, select the Download All Descriptors link.
        This can be found in all three descriptor sub-sections. Regardless of which link you
        select you will be taken to the same screen and all descriptors will display.

    18. Select the Auto-All button to check the ‘Auto Crosswalk’ option for all available code
         tables, and then select Start Download. Do not leave this screen until the Download
         Status for each table is Complete. A pop-up window will display when the process
         has finished, after which you can click Back.

Revised: 12/9/2021                         Page 7 of 32                      Version 05.21.10.00.06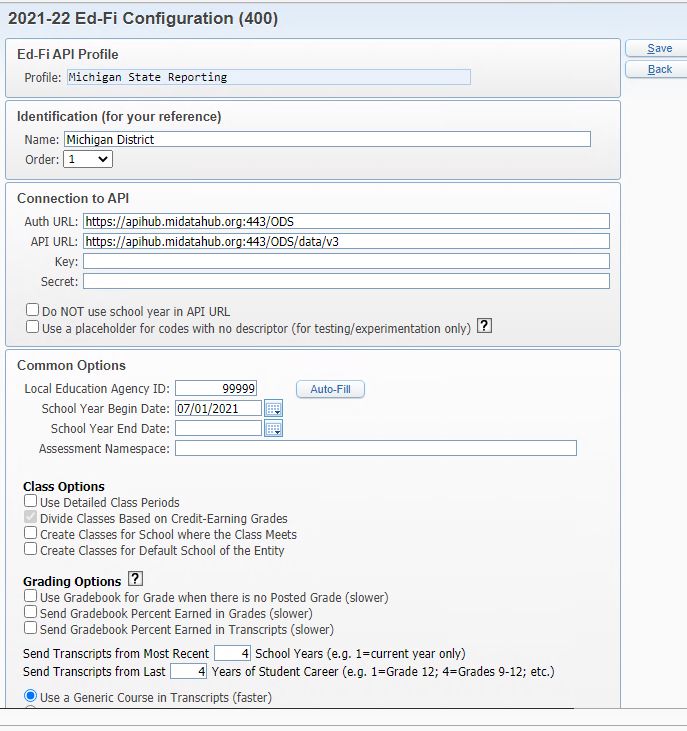
MICHIGAN ED-FI 3.1 SETUP GUIDE

    19. After all descriptors are downloaded, expand the area. To view the downloaded
        records for a table, click the Browse link. If you are not seeing any codes in the
        Browse, go back and review your API Connection (key, secret and URLs) for
        accuracy. If you are still unable to download the codes, ask your network
        administrator to check the firewall settings to ensure it is not blocking traffic from
        the API.

    20. The Descriptors are broken out into three sections: Required Crosswalk, Optional
        Crosswalk, and No Crosswalk. At minimum, each of the tables under Required
        Crosswalk must be completed using the ‘Crosswalk to’ link. MiDataHub is working to
        clean up the descriptor codes in the API as there are some duplicate values.
        Currently, they provide the following namespaces:

             •       uri://midatahub.org/ - This is the preferred namespace to use when cross
                     walking your codes. If there is an appropriate code available with this
                     namespace, you should select it.
             •       uri://ed-fi.org/ - This is the next best choice when cross walking your
                     descriptor codes. If there is a descriptor that does not have any codes
                     available for the midatahub.org namespace (i.e. Term Descriptors) you will
                     select the most appropriate code from the ed-fi.org codes.
             •       uri://michigan.gov/cepi - MiDataHub has asked districts not to use this
                     namespace at all when cross walking descriptors.

    21. In certain tables, such as Grade Buckets and Control Sets, the cross walks must be
        completed per entity using the Entity selection at the top of the screen. Once all
        cross walks are completed for the selected entity, Save. It is important to save
        before selecting another entity, otherwise your changes will be lost.

Revised: 12/9/2021                              Page 8 of 32                     Version 05.21.10.00.06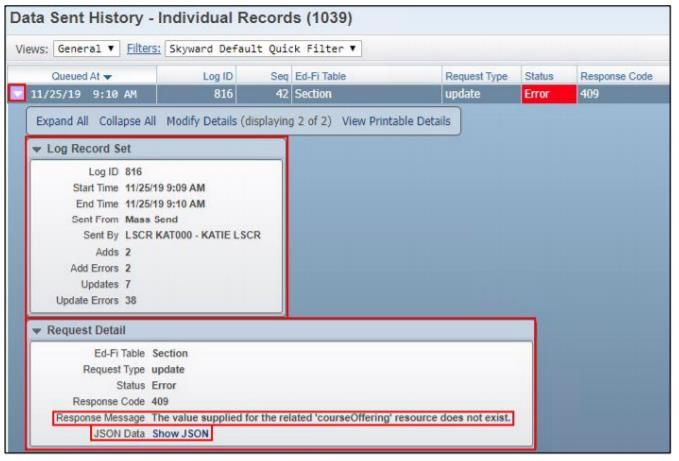
MICHIGAN ED-FI 3.1 SETUP GUIDE

    22. Continue cross walking until all Required tables are completed. Districts can choose
        whether to crosswalk the remaining Optional tables, however, it is strongly
        recommended to review Calendar Event Descriptors and Grade Level Descriptors.

    23. StaffClassificationDescriptor crosswalks are different than the other standard
        crosswalks. Here you will Add a record for each staff type that you will be sending to
        Ed-Fi. At minimum, Teachers and Discipline Officers should be cross walked in order
        for the dependent data (i.e. class and discipline offenses) to send without error.

    24. Under Staff Descriptor Crosswalk, select the Staff Classification and enter the
        Position Title to use for the StaffEducationOrganizationAssociation record. You can
        also set the record to be for specified or all entities.

         The following areas allow you to select which staff members you want to include for
         this classification, based on Staff Type, Security Group, Courses, or Individual Staff.
         Once you have made your selections, Save. Repeat for each Staff Classification
         needed.

Revised: 12/9/2021                          Page 9 of 32                       Version 05.21.10.00.06
MICHIGAN ED-FI 3.1 SETUP GUIDE Revised: 12/9/2021 Page 10 of 32 Version 05.21.10.00.06
MICHIGAN ED-FI 3.1 SETUP GUIDE

New Nightly Maintenance

Web Student Management > Federal-State Reporting > Ed-Fi > Configuration > New
Nightly Maintenance (000 Entity)

    1. The Ed-Fi Nightly Maintenance screen will create a Scheduled Task to purge data.
       The default settings are shown below and can be altered as needed. For cluster
       environments, this will include all your API configurations. Once you click Save, the
       system will create the Scheduled Task.

Revised: 12/9/2021                        Page 11 of 32                     Version 05.21.10.00.06
MICHIGAN ED-FI 3.1 SETUP GUIDE
Mass Send to API – Initial Data Transfer
Web Student Management > Federal-State Reporting > Ed-Fi > Ed-Fi > Mass Send to API
(000 Entity)
The next step is to send all data in all the entities to be reported. When data is sent initially
it can take many hours as hundreds of thousands of records may be sent, depending on the
size of the district. Therefore, it is recommended to break up the Mass Send into multiple
processes. The following grouping of tables is recommended for the initial send.
• All Descriptor tables (this is only needed if you are using Custom Descriptors)
• All District & School tables
• All Course tables
• All Staff tables
• All Student tables
Once data has been successfully sent for the district in the groupings above, the Mass Send
to API process can be used to update additional records, as needed.
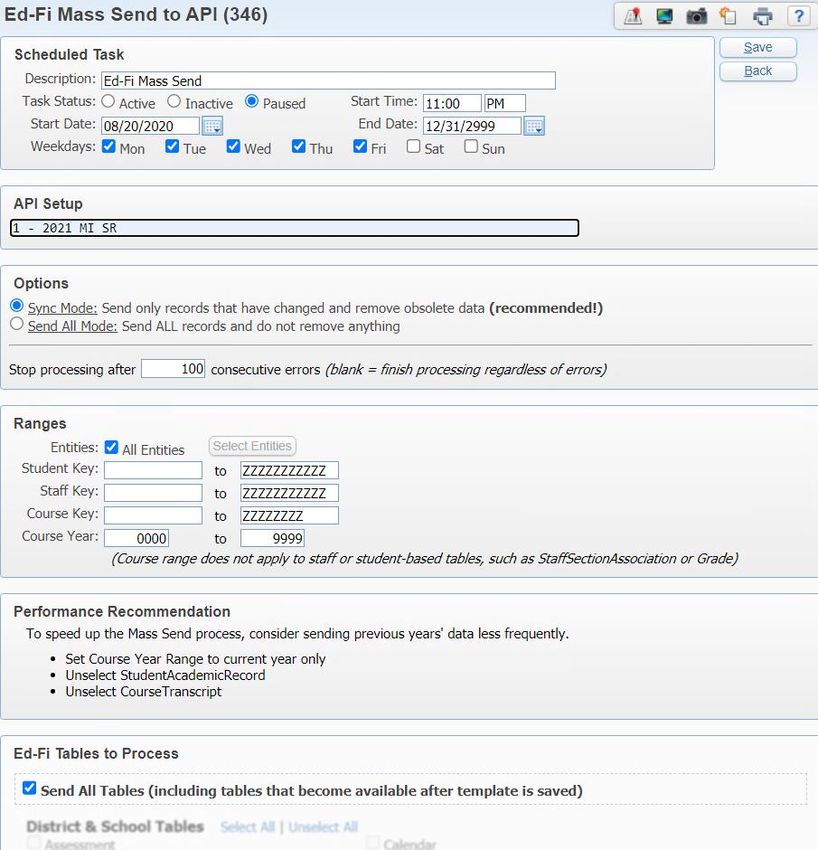
1. Click Add to create a new template and select the API Setup, then enter a Template
Description.
2. Under Options, select mode. Sync Mode is recommended, as it will only send
changed records and will run faster than Send All Mode.
3. Set your Ranges if you wish to narrow down the records that are sent. See the
Performance Recommendation section below, for suggestions on how to speed up
the Mass Send process.
Revised: 12/9/2021 Page 12 of 32 Version 05.21.10.00.06MICHIGAN ED-FI 3.1 SETUP GUIDE
4. Under Ed-Fi Tables, unselect Send All Tables to choose the specific tables for the
process you are completing (i.e. all District & School Tables).
5. Once the desired tables are selected, Save and Print.
6. Review for errors. Once a process is error-free, move on to the next set of tables
(Courses, Staff, Student) until they have all sent successfully.
Revised: 12/9/2021 Page 13 of 32 Version 05.21.10.00.06MICHIGAN ED-FI 3.1 SETUP GUIDE
Mass Send to API Tasks
Web Student Management > Federal-State Reporting > Ed-Fi > Ed-Fi > Mass Send to API
Tasks (000 Entity)
After all initial data has been sent to Ed-Fi, a Mass Send to API Task is needed to keep your
Ed-Fi data in sync with Skyward.
1. Click Add to create a new template and select the API Setup.
2. Adjust the Time and Days, if needed. By default, the task will run at 11:00 pm on
Weekdays only.
3. Sync Mode is recommended as it only processes updates and will run faster.
4. Ranges can be set, if needed.
5. Send All Tables is defaulted. Districts can manipulate the tables selected. For
example, Transcript data could be sent less frequently (via a separate Scheduled
Task) to speed up the regular nightly process.
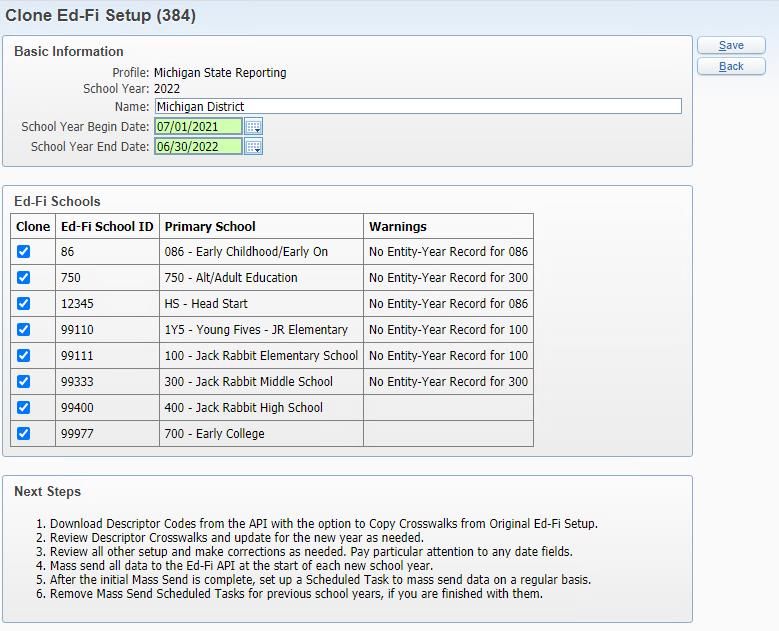
Revised: 12/9/2021 Page 14 of 32 Version 05.21.10.00.06MICHIGAN ED-FI 3.1 SETUP GUIDE Clone Ed-Fi Setup Web Student > Federal/State Reporting > Ed-Fi > Setup > Configuration > New Ed-Fi Setup Once a new Ed-Fi Setup record has been completed for a school year, it can be cloned. This includes cloning within a school year (i.e., districts with a cluster environment), or to another school year (i.e., after year-end rollover to setup the new school year). 1. Click the Clone button to begin the process. 2. Select the School Year to be created from the drop-down menu. Revised: 12/9/2021 Page 15 of 32 Version 05.21.10.00.06
MICHIGAN ED-FI 3.1 SETUP GUIDE

3. Enter the School Year Begin Date and School Year End Date for the selected School
   Year. If any schools from the prior setup should not be cloned over to the new year,
   uncheck them.

Revised: 12/9/2021                      Page 16 of 32                     Version 05.21.10.00.06
MICHIGAN ED-FI 3.1 SETUP GUIDE

4. Once you Save the record, the new Ed-Fi Setup record will generate for the selected
   School Year. To confirm, click on Filter Options and selecting the new School Year.

5. The screen below displays the steps to complete the setup after the clone has run.
   Before completing step 1 (download descriptor codes from the API), ensure the ODS is
   available for the school year in the Data Hub Cockpit.

    Follow   the steps below to create a new ODS, if it is not already available:
        A.   Log into MiDataHub and navigate to your district landing page.
        B.   Click on Utilities > ODS Management.
        C.   Select the option labeled “ODS Management.”
        D.   Select the option labeled “Create a New ODS for DISTRICT NAME.”
        E.   Enter in 202X-202X for the new school year and click Submit.
        F.   Your new ODS should be ready within 15 minutes. Once it shows in the “Current
             School Year” drop down in the district landing page, you should be able to begin
             sending data from your SIS.

6. Expand the Ed-Fi configuration for the new school year and select the Download All
   Descriptors link under Descriptor and Code Setup.

Revised: 12/9/2021                         Page 17 of 32                     Version 05.21.10.00.06
MICHIGAN ED-FI 3.1 SETUP GUIDE 7. Check the Copy Crosswalks from Original Ed-Fi Setup box, as well as any available Auto Crosswalk boxes. 8. Review the descriptors and update for the school year, if needed. Possible update could include new internal codes for the school year that did not have a crosswalk to clone over, or new descriptor values from the state that were not used in the prior year. Revised: 12/9/2021 Page 18 of 32 Version 05.21.10.00.06
MICHIGAN ED-FI 3.1 SETUP GUIDE

9. Review the Ed-Fi Configuration record and populate the key and secret. Update settings
   for the school year, if needed.

Revised: 12/9/2021                      Page 19 of 32                    Version 05.21.10.00.06
MICHIGAN ED-FI 3.1 SETUP GUIDE

10. Review the Ed-Fi Schools for the new year, and update if needed.

Revised: 12/9/2021                      Page 20 of 32                  Version 05.21.10.00.06
MICHIGAN ED-FI 3.1 SETUP GUIDE

11. See the Mass Send to API – Initial Data Transfer section of this guide to begin sending
    data for the new year.

12. Confirm the Mass Send to API Task(s) for the previous school year have ended and/or
    are inactive, and enable a task for the new school year.

Revised: 12/9/2021                       Page 21 of 32                      Version 05.21.10.00.06
MICHIGAN ED-FI 3.1 SETUP GUIDE
Data by Subject
Data by Subject is a dashboard view that allows users to look up and compare data in
Skyward with the data that has transferred to the API. Data can also be sent to or deleted
from the Ed-Fi API from this screen if discrepancies are identified.
API Setup: If there are multiple API connections or multiple years setup, verify the correct
record is selected.
Subject: Select the Subject to view. The Subject chosen in this field will determine the
selections available in the Ed-Fi Table field.
Ed-Fi Table: Once the Subject has been selected and the student, staff, or school have been
selected, the actual data within Skyward or the API will display once an Ed-Fi Table is
selected. The tables available in the Ed-Fi Table field are dependent on the chosen Subject.
If the Subject is Student, the Student Tables will be available in the Ed-Fi Table dropdown.
If School is selected for the Subject, the School Ed-Fi Tables will appear in the dropdown,
and so on. After a Subject, Student, School, or Entity have been selected, click the Refresh
button on the right-hand side to see the data for the Subject and Ed-Fi table to appear
below.
Left Side/Right Side: By default, the left side of the screen will display the live data in
Skyward, and the right side will display the live data in the API. Dropdowns are available to
allow the user to customize the views.
Data in Skyward Database: This displays the data currently pulling in from
Skyward. This will not always match what is listed for Live API Data if records in
Skyward have been updated and a mass send or sync has not been run.
Live API Data: This option requests the data from the API and displays exactly
what is in the API currently. If the data does not match what is in Skyward, the data
will be updated in the next mass send or it can be individually synced.
Log of All Data Sent to API: This displays a log of all the records sent to the API.
Changes in the data can be viewed by clicking on the individual records.
Log of Current API Data: This option displays the record in Skyward’s database of
what should be in the API. If all the data between Skyward and the API has been
synced, this screen should display the same as Live API Data. If it does not, a mass
send or individual sync is necessary to match up the data.
Once the Search Options are set to the desired selections, Refresh the screen to show the
selected record below. Within the record detail, a Send to API button (left side) or Delete
from API button (right side) display. These buttons will update the single record that is
showing on the screen.
Revised: 12/9/2021 Page 22 of 32 Version 05.21.10.00.06MICHIGAN ED-FI 3.1 SETUP GUIDE The Sync button in the top right can be used to send multiple records at a time, including other Ed-Fi table associated with the selected data type. For example, if selecting Sync from a Course record, the other course tables are available to select, as well. This helps to ensure dependent records are updated. A pop-up dialogue box will appear displaying how many records were added, updated, deleted, or errored during the sync. Revised: 12/9/2021 Page 23 of 32 Version 05.21.10.00.06
MICHIGAN ED-FI 3.1 SETUP GUIDE

Data Sent History

There are three options available for Data Sent History.

Record Sets

The Record Sets area under Data Sent History groups the records together based on
how/when they were sent. For example, if a Mass Send to API Task runs each night at
11:00 pm, all records from that send will be included within a record set. When a particular
record set is selected, the user can select View Records to display the individual records
within the set and the status (i.e. success/error).

If the district setup has multiple API Profiles, the Switch API button can be used to switch
the browse between API Record Sets.

         Start Time/End Time: This displays the date and timestamps the data was pushed to
         the API.

         Log ID: Each batch of data sent to the API is assigned a Log ID to differentiate
         between the records sent.

         Sent From: This column determines whether the data in this record was sent by
         Mass Send or by an individual sync in Data by Subject.

         Sent By: This displays the user who initiated the Mass Send or sync in Data by
         Subject.

         Adds: This column displays the number of Add records within the Record Set that
         successfully added to the API.

         Add Errors: This column displays the number of Add records within the Record Set
         that received an error when sending to the API.

         Updates: This column displays the number of Update records within the Record Set
         that successfully updated in the API.

         Update Errors: This column displays the number of Update records within the Record
         Set that received an error when sending to the API.

         Deletes: This column displays the number of Delete records within the Record Set
         that successfully deleted from the API.

         Delete Errors: This column displays the number of Delete records that received an
         error when sending to the API.

Revised: 12/9/2021                         Page 24 of 32                      Version 05.21.10.00.06
MICHIGAN ED-FI 3.1 SETUP GUIDE
Individual Records
The Individual Records area under Data Sent History shows each record as a separate
line/record. There is no grouping of records in this view. This view is most like the Data
Sent History view in legacy Ed-Fi. The screen options are identical to those found when
selecting View Records under Record Sets. Filter options are available.
Seq: This is the sequence order of the individual records.
Queued At: The date and timestamp of the record.
Log ID: This column displays the Log ID associated with the record.
Ed-Fi Table: This column displays the Ed-Fi Table the data contained within the
record is associated with.
Request Type: This column displays if the record was an Add, Delete, or Update. An
Add means the record did not exist in the API and the record was added. A Delete
means the record existed in the API but was deleted with the data push. An Update
means the record in the API was updated with new information.
Status: This column displays the status of the record and whether it successfully
updated in the API. Success means the record was successful, Error means there
was an issue with the record, and it did not update in the API.
Response Code: This code number is related to the Status and Response Message of
the record.
Subject: This column displays the subject of the data within the record. It
corresponds to the Subject field in Data by Subject- School, Course, Incident, Staff,
or Student.
Record Key: This column displays the actual data elements and values sent to the
API within the record.
Records can be expanded to see further detail using the arrow on the left.
Revised: 12/9/2021 Page 25 of 32 Version 05.21.10.00.06MICHIGAN ED-FI 3.1 SETUP GUIDE
Log Record Set: This area displays similar information to the browse screen, the Log
ID, the date, Start and End Time of when the record was processed, whether it was
sent in a mass send or in Data by Subject, who prompted the record to be sent, and
whether the record was successful or contains an error.
Request Detail: This area also contains similar information to the browse screen; it
contains the Ed-Fi Table the data is associated with, the Request Type that identifies
the record as an Add, Delete, or Update, the Status of the record, and the Response
Code. Here it also displays the Response Message. If there is an error on the record,
the Response Message displays the reason why the record contains an error.
Show JSON: The actual data sent to the API contained within the record can be
viewed by clicking Show JSON.
Current API Data
The last Data Sent History area displays the records that are currently held in the API. This
data is displayed by individual record and not by batch.
Ed-Fi Table: This column displays the Ed-Fi Table the data within the Key Fields is
associated with.
Revised: 12/9/2021 Page 26 of 32 Version 05.21.10.00.06MICHIGAN ED-FI 3.1 SETUP GUIDE
Key Fields: These fields display the data sent to the API associated with the Ed-Fi
Table and Subject of the record.
Subject: This column displays the subject of the data within the record. It
corresponds to the Subject field in Data by Subject- School, Course, Incident, Staff,
or Student.
Last Updated: This column displays the date and timestamp of when the data within
the record was sent or updated in the API.
Revised: 12/9/2021 Page 27 of 32 Version 05.21.10.00.06MICHIGAN ED-FI 3.1 SETUP GUIDE Common Errors Calendar Date: Validation of 'CalendarDate' failed. CalendarDateCalendarEvents requires at least one object in the collection. Solution: Add an Event to any Count As 0.00 days in the calendar(s). School: The value supplied for the related 'localEducationAgency' resource does not exist. Solution: The LocalEducationAgency must be sent successfully before sending the School complex. Session or Grading Period: Validation of 'SessionPost' failed. SessionGradingPeriods enumerable contains duplicate at index: 1. Solution: The same descriptor crosswalk cannot be assigned to more than one Bucket within a Course Length – Control Set. Verify no Grading Period or Term Descriptors have been attached to more than one record with the same course length – control set in the crosswalks (under New Ed-Fi Configuration). These are setup per entity. StudentParentAssociation: Validation of 'StudentParentAssociation' failed. Parent reference could not be resolved. Solution: Parent complex must be sent successfully before sending StudentParentAssociation. StudentSchoolAssociation: Validation of 'StudentSchoolAssociation' failed. Student reference could not be resolved. Solution: Student complex must be sent successfully before sending StudentSchoolAssociation. StudentSectionAssociation: The value supplied for the related 'section' resource does not exist. Solution: Section must be sent before sending StudentSectionAssociation. If getting errors on Section, verify CourseOffering and Course have sent successfully. Multiple complexes: The request cannot be authorized because the education organizations identifiers assigned to the claim did not exist in the underlying ODS. Solution: The EducationServiceCenter and LocalEducationAgency records must send successfully before sending any dependent records. Multiple Complexes: Validation of (insert complex name) failed. (xyz)DescriptorId is required. Solution: WS\SR\EF\PS\CF\EF – Download the appropriate descriptor table or Download All Descriptors from API. Revised: 12/9/2021 Page 28 of 32 Version 05.21.10.00.06
MICHIGAN ED-FI 3.1 SETUP GUIDE

UIC Services

The UIC Services integration provides a timely way to search for student unique
identification codes (UICs) from CEPI. The process allows users to automatically search,
resolve, link, and request UICs. Searches can be done individually or in bulk.

The Mass Assign UIC from API and Individual Assign UIC from API options are located under
Federal/State Reporting > Michigan State Reporting > Unique Identification Code. Please
see the Michigan State Reporting Training Manual for detailed instructions.

Portable Records Search

The portable student record service, also known as the “Snack-Pack,” provides a small set
of critical student data. The search returns the most recent data from the district prior to
the one they are enrolled in now, allowing staff to quickly identify which services the
student is eligible for upon enrollment. Please note the data is read only, it will not populate
any data fields in Skyward. Data currently available in the “Snack Pack” includes:

    •    As of Date
    •    CEP Status (prior district)
    •    Days attended
    •    District Exit Status
    •    Economically Disadvantaged
    •    EL Instructional Program
    •    English Learner Eligible
    •    Foster Care
    •    Grade
    •    Homeless
    •    Migrant
    •    Previous School District
    •    Program Participation
    •    Special Ed – IEP/Plan Date
    •    Special Ed – Primary Disability
    •    Special Ed – Program Service Code
    •    Total Possible Attendance

To utilize the Portable Records Search in Skyward, you must ensure the option has been
enabled in the Student Information System API Integration in the Data Hub Cockpit (see
screen shots below).

Revised: 12/9/2021                         Page 29 of 32                      Version 05.21.10.00.06
MICHIGAN ED-FI 3.1 SETUP GUIDE In Skyward, navigate to Federal/State Reporting > Ed-Fi > Ed-Fi, then select Portable Records Search. In the Portable Records Search, choose your API Setup and your search by method. Both Student Key and Student UIC will search the API using the UIC. The Student Key option will simply look up the UIC for you in the system. If the student UIC is not found, the search will return an error message. If the search is successful, it will return the available data fields for the selected student. Revised: 12/9/2021 Page 30 of 32 Version 05.21.10.00.06
MICHIGAN ED-FI 3.1 SETUP GUIDE

MiLearn

MiLearn is the term used for the connection to the state for State Assessment data. If your
district wishes to participate in this integration, Skyward provides a direct login option to
access State Assessment information. Staff and parents would not need to create or
maintain separate accounts and can simply click a link within Skyward to be taken to this
area.

To use this option, the district will need to set up some additional configuration, usually by
someone in the district’s Information Technology department or by someone at their local
ISD. Skyward provides a SkySTS/MiLearn Setup document that will walk that person
through the steps needed. Skyward can also be contacted to set this up as a billable
service for the district.

Once the setup is complete, staff members that should have access to this new login area
must be set up as a Staff member, assigned to any entity in the district and they will see
the new State Assessment Area link in the Jump to Other Systems menu on their main
Skyward page. Simply clicking that link, routes them to the state’s MiLearn integration site
automatically.

Parents logging in to Family Access will additionally then be able to see a new button at the
bottom of their left-side menu. Selecting it will likewise reroute them automatically to their
student’s Assessment information area. This button may be temporarily disabled (such as
during initial setup, before announcing the new feature) by navigating to Families > Family
Access > Setup > Configuration > District Display Settings and selecting the option to Hide
"State Assessment Data" button.

Other Integrations

The Michigan Data Hub team also provides many other integrations that will now allow
districts and ISDs to participate quickly and easily with Michigan Data Hub-compatible, 3rd
party vendors and services. A full Product Catalog is available on the MiDataHub.org web
site. Create a Support Ticket with the Michigan Data Hub support team, to learn more.

Revised: 12/9/2021                        Page 31 of 32                       Version 05.21.10.00.06
MICHIGAN ED-FI 3.1 SETUP GUIDE

Disable ExComm / Plugin

ExComm is not needed for Ed-Fi 3.1. For any districts who wish to disable ExComm,
instructions have been added to the ExComm Server Launch Kit.

Revision History

 Date                Update(s)
 08/14/2020          Guide created.
 08/25/2020          ExComm Server Launch Kit link added.
 09/15/2020          Added Additional Integration Options (UIC Services, Portable Records
                     Search, MiLearn, and Other).
 09/30/2020          Added Ongoing Maintenance section (Data by Subject, Data Sent History
                     and Common Errors).
 10/15/2020          Additional details added to Ed-Fi Configuration and Data Sent History
                     sections.
 01/11/2021          Custom Descriptor Namespace added to Ed-Fi Configuration Setup.
 03/01/2021          Added descriptor namespace explanations for cross walking codes.
 05/14/2021          Updated screen shots to reflect recent display changes
 06/18/2021          Added Clone Ed-Fi Setup section

Revised: 12/9/2021                         Page 32 of 32                    Version 05.21.10.00.06
You can also read