Near-Infrared Nikon Coolpix 990 Camera Conversion - Austin Richards, Ph.D. Oculus Photonics LLP
←
→
Page content transcription
If your browser does not render page correctly, please read the page content below
Near–Infrared Nikon Coolpix
990
      Camera Conversion

           Austin Richards, Ph.D.
           Oculus Photonics LLP
          6489 Calle Real, Suite A
          Goleta, California 93117
                    USA
805 - 284 - 5757
               Austin@uvcorder.com
Version 1.00
Introduction:

The Coolpix 990 is a digital camera that can be converted to take photograp h s
in the near - infrared (NIR) spectru m. The NIR spectrum is generally
considered to be 750nm to 3000nm. I do a special conversion that makes the
camera work in the 780 - 1100nm wavelength range, which extends farther out
into the IR band than conventional infrared film does. The camera sees light
that is just outside the limits of the human eye, which cuts off around 750nm.
The Nikon 990 is far superior to an infrared camera based on IR film in
almost every way.

NIR Photography with Film Cameras:
   Traditionally, photographers have used infrared film to record images in
the NIR band. There are some serious disadvantages to recording NIR images
this way:

   1) Taking NIR images with a film camera requires a NIR pass filter on the
      front of the lens, which blocks all visible light. If the camera is an SRL,
      this requirement makes it impossible to compose the shot easily with
      the filter in place. The photographer is forced to use a tripod so that
      the filter can be removed and replaced without disturbing the
      composition. A NIR pass filter also prevents precise focus of the
      camera, since no image can be seen through it. Even if the camera is
      focused prior to installation of the filter, focus errors can result from
      the fact that NIR light focuses differently. The solution is usually to
      stop down the lens to increase the depth of field. This makes longer
      exposure times necessary, which often forces the photographer to use a
      tripod.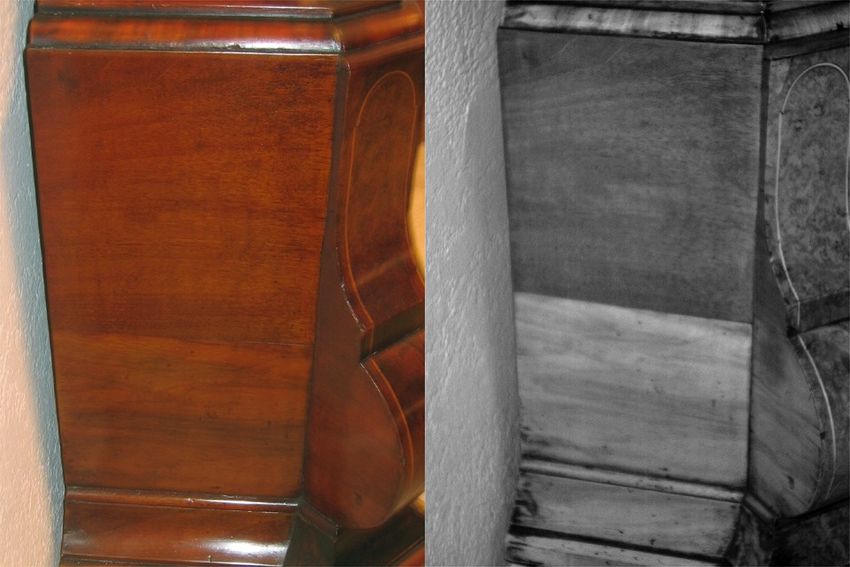
2) In addition, standar d commercial cameras have light meters that are
not calibrated for NIR light. Thus the photographer is forced to bracket
exposures, which is wasteful and expensive.
3) Infrared film is becoming increasingly expensive to buy and to process.
Kodak no longer produces 4”x5” IR film, for example.
The major advantage of film is the higher resolution available. 35mm
negatives can be digitized at about 9 megapixels, though in practice, IR
photographs taken with film are a bit soft and fuzzy due to diffraction effects
that become more pronounced with wavelength. Put another way, NIR
photographs are inherently fuzzier than visible- light photos because of the
wave nature of light. This reduces the advantage of film over a digital sensor.
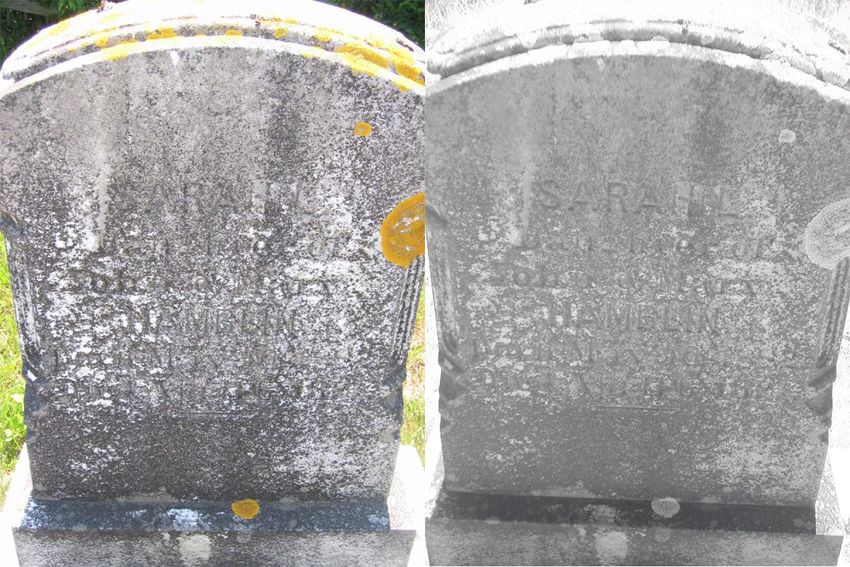
The results are excellent, as you can see below. The left- hand images are all
taken in visible light with a Canon S400 digital Elph. The right - hand images
were taken with the Nikon Coolpix 990 with the standar d 780nm longpass
filter.
Stallion Helicopter at Nellis Airforce Base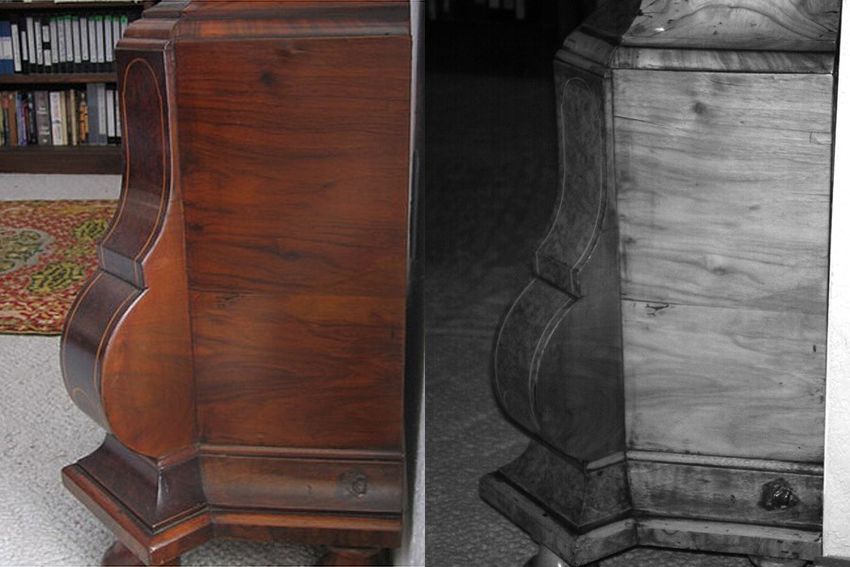
NIR- transmitting sunglasses

Moonrise over Nellis Airforce Base. The sky is much darker in the NIR band compared to the
            visible band, making it much easier to see moonrise during the day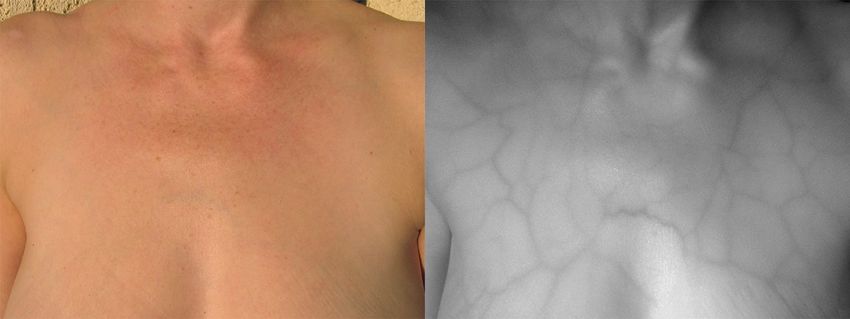
Business card. The aniline dyes used in ballpoint pen ink are transparent to NIR light.

Chest Veins. NIR light penetrates the skin deeper than visible light, and the hemoglobin in veins
                                       absorbs it readily.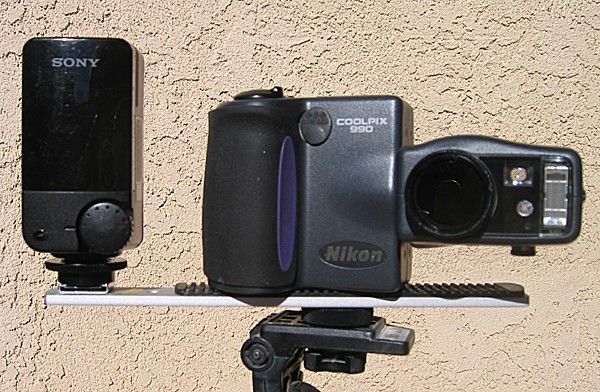
Lichen - encrusted tombstone. The stains and lichens on this tombstone make it difficult to
read the epitaph. NIR imaging tends to remove contrast from colored objects, making it easier
to see the underlying structure.

Longcase clock. This 18 th century longcase clock has had walnut veneers replaced recently.
 The replacement veneer appears much lighter in color, possibly because it contains more
                                          water.
Longcase clock. This 18 th century longcase clock has had walnut veneers replaced recently.
 The replacement veneer appears much lighter in color, possibly because it contains more
                                          water.

Mahogany test panel. This mahogany veneer has been repaired using a colored wax filler to
close the gap in the veneer. The wax has strong absorption in the NIR band, but the wood
                                         does not.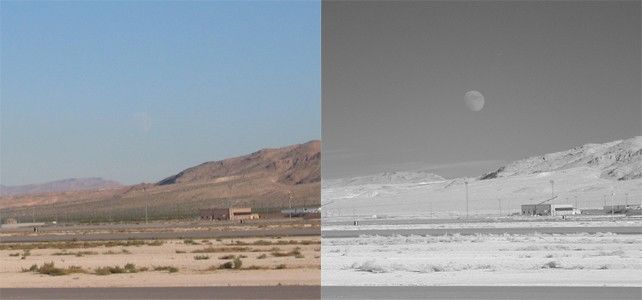
Other sample digital images can be furnished upon request. I will e- mail you
the raw JPEG files as they came out of the camera. Please e- mail me at
austinrichar ds@earthlink.net.

NIR Photography Applications:
The applications for a NIR camera are plentiful, and include the following:

Forensic imaging:
NIR light has the ability to penetrate ink, paint, varnish, and other thin
materials. Crime scene investigators as well as art conservationists use NIR
photography for these applications, to detect forgeries and obliterated text in
questioned documents and to see restorations, repainting and underdrawing.

Landscape and portrait photograph y:
Because the optical properties of materials are often different than in visible
light, NIR images are beautiful and interesting. For example, healthy green
plant leaves show very high reflectances in the NIR band, while the clear sky
appears very dark in the NIR band.

Covert photography:
Images can be taken with no visible illumination using a NIR light source such
as an LED array. Arrays that emit light at 940nm are available commercially,
and are completely invisible to the human eye.

Medical Imaging:
NIR imaging can be used to see veins and other features in the skin that are
not as apparent in the visible band.

Seeing Heat:
NIR cameras can detect hot objects, but they have to be 400C or above to be
detectable by infrared film or a digital NIR camera based on a silicon CCD or
CMOS sensor. A 400 C object will not be luminous to the human eye even
under darkened conditions. There is an erroneous belief that infrared film
detects heat emitted by people and animals. In fact, people and animals and
other warm objects do emit infrared light, but at a much longer wavelength
than what film or silicon sensors can detect. Taking images in total darkness
with the Nikon 990 conversion requires external illumination in the NIR band.

Why convert the Nikon 990?
Most digital cameras on the market today have NIR blocking filters and
coatings designed into the sensor package in the camera. NIR blocking is
important, because there is plenty of ambient NIR light that is detected by the
camera’s sensor. Unlike the human eye, which is insensitive to NIR light, the
silicon detector in a standar d digital camera sees NIR light better than visible
light. Cameras without a NIR filter will show images with strange color
renditions, because the NIR light is so strongly detected, yet has no
meaningful color information.
Figure 1. Nikon Coolpix 990

The sensor package on a digital camera contains a CCD or CMOS imaging
sensor that converts the image formed by the camera’s lens into an electronic
image that is processed by the camera electronics for display and storage. If
the sensor package window has NIR blocking coatings in it, then the camera
will not have much sensitivity to NIR light.

The Nikon 990, shown in Figure 1, happens to have a NIR blocking filter that
is not attached to the sensor package. It is one of the last digital cameras to be
made that way. The Nikon 990 was announced by Nikon in January of 2000.
More recent digital cameras have anti- IR coatings that cannot be easily
removed without damaging the sensor. The NIR blocking filter on the 990 is
removable. I have replaced this filter with a piece of optical glass that passes
NIR light. Then I fit the front of the camera with a NIR pass filter. This filter
appears black to the eye because virtually no visible light can pass through it.
There are SLR style digital cameras on the market that can be converted to
image in the NIR band. These cameras have higher pixel counts on the sensor.
They suffer from a disadvantage when used for NIR photography, whish is
that one cannot preview the IR image before taking the picture because of the
design which uses a mirror for the viewfinder. Once the picture is taken, it
will show up on the LCD screen, however, this does not allow for real- time
adjustmen t of the lighting. The Nikon 990 displays a live preview before and
after the picture is taken, making it much easier to check that the lighting is
sufficient. One often finds that the NIR lighting on a scene does not match
what the eye sees, thus this feature of the 990 is quite useful.

The NIR pass filter on the front of the camera can easily be removed by
unscrewing the 28mm ring that holds it. It is important to note that once the
conversion is done to the camera, it will no longer take color images with the
correct color rendition under standar d tungsten lighting, because if the filter
is removed, the camera will be sensitive to both NIR and visible. Black and
white images will have different tones to them, because of the NIR sensitivity.
If the camera needs repair, and I determine that it needs to go back to Nikon, I
will convert it back to the way it was originally by removing the optical glass
filter replacement and restoring the original NIR blocking filter.

The camera package:

My camera conversions come with the following items:

   1) Nikon Coolpix 990 with IR pass filter in 28mm ring. Note that the ring
      is marked UV, as it originally held a 2A UV haze filter. I have placed a
      label over the UV marking that says 780nm LP. This means that the
      filter passes light above 780nm in wavelength, with 780nm being the
      50% cut- on point.
2) 128 megabyte Compact Flash card with USB 2.0 Compact Flash card
reader. The cameras have been tested with cards up to 512 megabytes
in size, and should work with even bigger cards.
3) Nikon 990 user’s guide on CD
4) Nikon View 4.0 software for Windows and Mac
5) Fast Track Guide and Menu Guide
6) A set of 4 AA batteries
7) Nikon EH- 31 AC Power Adapter or equivalent to replace battery power.
The Nikon 990 camera is no longer manufactured, though Nikon will repair
them. I buy used cameras on the secondary market, disassemble them and
convert them to NIR operation. I also test the cameras by taking about 100
near - IR photos under varying conditions and examining the results in
Photoshop. It is not always possible to obtain all the original Nikon
accessories with every used camera I buy, but I find equivalent substitutes
that work just as well. I have a limited selection of other accessories for this
camera that I sell as well.
The Nikon 990 IR conversion can also be used with an LED illuminator
for covert illumination of close - up targets. This feature is very useful in
situations when there must be little or no light projected onto the scene.
Applications include covert photography of people in low light situations, art
conservation imaging in museum s, and in fluorescent lighting conditions
when little NIR light is present. I also sell the bracket and illuminator shown
in Figure 2 as an accessory to the Nikon 990 conversions.Figure 2. Nikon 990 with NIR LED illuminator Nikon 990 Features: These are the features of the Nikon 990 camera. I have stripped away all the marketing hype and given you “just the facts”. • Image resolution of 2048 x 1536 pixels (3.34- megapixels CCD) • Sensor Size: 7.18 x 5.32 mm • ISO Settings: Auto, 100, 200, 400 • LCD display: 1.8” Color TFT active matrix with live NIR preview
•   3x Zoom - Nikkor lens with 38- 115mm coverage (35mm equivalent)

•   Uses 4 AA batteries (rechargeable batteries work as well)

•   Compact Flash Card, tested up to 512 megabytes

•   Swivel design, Charcoal gray matte finish, All- metal magnesium chassis

•   Digital zoom up to 4x magnification for a total of 12x or 460mm
    telephoto.

•   Focus area selector and thumb - operable command dial.

•   USB interface

•   2 frames per second full resolution image capture

•   320 x 240 QVGA resolution at 30 frames per second for up to 80
    frames.

•   Movie mode that shoots 40 seconds QVGA Motion JPEG at 15 frames
    per second.

•   Multi- area autofocus and 50- step manual focus

•   256- element matrix metering and 256 - element matrix white balance

•   7- blade iris diaphragm, f/2.5 – f/7.0 (wide), f/4.0 – f/11 (telephoto)
• Shutter speed from 1/1000 second to 8 seconds
• Four exposure modes including:
Automatic, Shutter Priority, Aperture Priority and full manual
• Exposure compensation and auto bracketing capabilities
• Optional lenses and accessories available, including fisheye, wide- angle
and telephoto
• Camera dimensions (WxDxH): 14.9 cm x 3.8 cm x 7.9 cm, weight: 390
grams without batteries, 450 grams with 4 AA alkaline batteries
• Auto power save, date / ti me stamp
• Built- in flash with red - eye reduction
Appendix: Filter Transmission curve
The filter used on the front of the Nikon 990 conversion has a trans mission
curve like the one shown in Figure 3. The 50% cut - on point of the filter is at
780nm. The silicon detector itself cuts off at 1100nm, the point at which
silicon becomes transparent.Figure 3. Transmission curve of NIR pass filter on Nikon 990 conversion
Figure 4. NIR Pass filter transmis sion table.
Art’s Nikon Coolpix 990 Tips

The Nikon Coolpix 990 has been called one of the world’s most expensive
point and shoot cameras. In truth, the 990 has many of the same creative
features as the Nikon F5 and D 1 & 2 professional cameras. These tips will
allow you to go beyond the point and shoot mode and have creative control of
your camera. These tips will let you shoot sharper and faster and still use the
wonderful automation that is built into this camera.

 I’m going to offer some suggestions on setting your camera and then I’ll run
through the Coolpix menu screens line by line to show you how my camera is
set - up. These settings work for me and allow me to take sharp images. I
primarily print my pictures using Adobe PhotoShop and Genuine Fractals
Print Pro to prepare the photos and print them on an Epson 2200 Inkjet
Printer with Epson Paper. I started taking digital photos with a Nikon Coolpix
950 in 1999. These tips are a result of my experience with the 950 and 990
Coolpix Cameras.

The following tips apply to the Nikon Coolpix 990 Digital Camera used in the
M- Rec mode. The A- Rec mode is for the rank amateur with no experience.
My plan is to help you take wonderful photos by adjusting your Coolpix 990
to the max.

Start by turning on your camera to the M- Rec setting and touch the focus
button to cycle through the focus settings. When you see the mountain in the
LCD monitor or the control panel you are optimized for distances over 40 feet
to infinity. The flower appears when you are in the macro or close- up mode.
You will be able to focus up to 0.8 inches. Use the W and T buttons to cause
the flower to turn yellow in the LCD Monitor. When the flower is yellow you
are at the sweet spot for close - up photography. When you are taking macro
photos use the LCD monitor to line up your shot. Between the macro and
mountain settings is the normal setting which focus up to forty feet.

The balance of the tips will be set through the M- Rec menus. These tips are
followed by a complete lit of my personal camera settings for use in setting -
up your Coolpix 990. Each tips has to do with sharpness, speed or exposure,
also I have included Info on my wrist strap and camera plate.

For sharper photos turn off the digital zoom. I never use the digital zoom, as I
want detailed photos. Digital zoom manipulates the image to enlarge it
digitally and in the process loses some of the detail. Digital zoom = grainy
photos.
I take most of my photos in Fine/Jpeg mode. If you have a subject with lots of
detail such as a macro shot, the Hi/Tiff mode may be a better choice. If you
want to use Hi/Tiff mode you must turn off the continuous setting. I use the
Fine/Jpeg mode, as it is a good compromise between card space and picture
quality. The Fine/Jpeg mode allows 10 times the number of photos on the
card as Hi/Tiff mode. People photos are better in the Fine/Jpeg mode as lines
and wrinkles don’t need to be shown in great detail.

Set sharpening to Low. While I find that no sharpening just too soft, the Low
setting is a good compromise. Normal sharpening and higher cause digital
noise in the photos. If you are using Adobe PhotoShop, Adobe PhotoShop
Elements or Corel PHOTO PAINT, you will have better results sharpening in
the computer.
For fast shooting set the camera LCD monitor to Preview Only this allows you
to take another shot almost immediately. You loose the delete immediately
function, and the camera is limited by the small buffer to only two shots in
Fine mode. You will not miss the wait believe me. An added advantage of
preview only is longer battery life. The Preview only function is hidden away
in the menu system, it took me a while to find it. To set it, In M- Rec , go to the
setup menu, then monitor options, then Display mode, then you can pick
Preview only.

Set the sensitivity to 100 , which is roughly equivalent ISO 100 film. Don’t
leave it on auto or you will find that the camera will change sensitivity
settings at its whim. Most pictures can be taken at 100 but use 200 or 400
for low light. Choosing a higher sensitivity number may cause more grain in
the photos.

When photographing indoors, you should add +1 / 3 exposure compensation,
flash or no flash. When photographing outdoors on a cloudy or overcast day ,
you should add +1 / 3 exposure compensation. I use matrix metering for most
of my Coolpix 990 pictures, as I want to take advantage of all of the
automation that I can get. I shoot in the Aperture Priority Mode A so that I
can control the depth of field.

Use the Program Mode P for flash pictures. This will guarantee good flash
exposures in general. Experiment with varying the flash power. I find that
reducing the flash power to 2/3 gives a good picture in the fill flash mode.

The following are my settings for the Coolpix 990 as I have my camera
adjusted at this time:
Screen 1
White Balance - Auto
Metering - Matrix
Continuous - Continuous
BBS- Off
Lens- Normal
Image Adjustme nt - Normal

Screen 2
User Setting 1 (I use #2 for my wide angle lens) Each setting can be totally
different
Exposure Options - off
Focus - AF Area Mode- Manual/Auto Focus Mode- Continuous /AF /Focus
Confirmation - MF / Distance Units - ft
Zoom - Digital Tele- Off/ Startup Position - Last Position /Fixed Aperture - Off
Speedlight options - Variable Power 03/Speedlight Controls -
Reset All- No
Setup - Monitor Options - Display Mode- Preview Only/Controls - Memorize - All
checked
except + / -
Auto Off- 30S (to conserve power)
Seq. Numbers - On
Shutter Sound - On
Shot Confirm Lamp - Off
(I skipped a few very obvious choices in Screen 2)

As your experience level increases you may want to set the White Balance or
try spot metering. Also try exposure compensation when taking all white or
all black subjects. Read some books on photography, such as Arthur Morris
The Art of Bird Photography to learn about exposure compensation in the
Matrix Metering mode. Art is writing about the Canon EOS system but his
exposure recommen da tions apply to the Coolpix Matrix Metering system.
Moose Petersons Wildlife Research Website has excellent info on exposure.

Finally spend some time with the Nikon Coolpix 990’s excellent manual. This
manual is well written and concise. You should look it over more than once if
you are serious
about your photography.

Battery life is a serious issue if you are using conventional AA batteries. The
990 will chew them up in a short time. I recommen d using rechargeable AA
batteries and purchasing two sets of cells with your charger. A good
inexpensive place for high quality rechargeable batteries is Thomas
Distributing at www.thomas - distributing.com

Wrist Strap:
The 990 needs a wrist strap rather than the neck strap supplied with the
camera. Take the Nikon Neck Strap that comes with the camera and cut off
the long narrow piece of the strap. Fuse the end of the strap with a cigarette
lighter or flame to keep it from unraveling. Using the hardware that comes
with the strap fashion a wrist strap for your camera. I took the nylon strap
and the buckle to a shoemaker and had him stitch the strap around the
buckle. Then feed the strap through the camera and the through the buckle
and you have a wrist strap which is perfect for carrying the camera in the
woods or on the street.

Camera Plate:
On my Gitzo Tripod, I use a Kirk Ballhead with Really Right Stuff camera and
lens plates. In order to use my Coolpix 990 with my Kirk Ballhead I needed a
camera plate. RRS said they did not have a 990 plate. So I had to improvise. I
used a RRS plate designed for the Nikon FE/FE- 2. I had a friend mill 1/16 inch
off the side closest to and parallel to the bolt slot. The 1/16 - inch allows the
battery door to open and close. See the photo showing the plate and wrist
strap. This plate works great and fits the 990 with ease at
www.reallyrightstuff.com
You can also read