Online Testing Checklist for Science and Social Studies Administrations
←
→
Page content transcription
If your browser does not render page correctly, please read the page content below
Online Testing Checklist for Science and Social Studies Administrations
Test administrators must use this checklist when administering the online Science and Social Studies Tests. It includes step-by-step directions, the oral
script that test administrators must follow (information to be read aloud to students is printed in bold letters), and troubleshooting tips. This checklist
provides key information that test administrators need on test day; more detailed guidance is available in the additional resources listed below and
located on the Portal.
Step 1. Prepare for the Administration
Before Test Day (Do not wait until the day of the test to complete these activities.)
Read the Directions for Administration Manual for guidance on policies and preparations, including supplemental instructions for human read
aloud and oral translations (if applicable).
Review this checklist.
Review the Test Administrator User Guide, Test Administrator Tutorial/Certification Course, Student Testing Site tutorials and online practice
tests.
Confirm you have a supported internet browser available on the device you will use to access the Test Administrator Interface.
Confirm all devices that will be used for student testing have the secure browser (for desktops and laptops) or AIRSecureTest App (for
Chromebooks and tablets) installed.
Verify your user account and practice setting up test sessions using the Test Administrator Practice Site.
On Test Day
Have the student information (first name and SSID or Student ID) needed for student sign in available.
Have each student’s information on accommodations and accessibility features available.
Have two sheets of blank paper available for each student.
If students taking the physical science test wish to use handheld calculators, the calculators should be available to students on their desks,
tables or workspaces. You must confirm that the memory on all calculators has been cleared before and after each testing session. The
online Student Testing Site includes a scientific calculator; use of handheld calculators is at district/school discretion.
Prepare the test room.
If students are using tablets (i.e., iPads or Androids), refer to the “Mobile Requirements” section of the Technical Specifications Manual for
additional information on preparing the devices.
If a student will use text-to-speech, make sure the device’s sound is on. Additionally, if the student is not testing in a one-on-one setting, make
sure the student has a headset connected to his or her testing device.
Close all open applications on student devices and launch the secure browser or app.
PAGE 1 | Spring 2015 Science and Social Studies Online Testing Checklist | January 23, 2015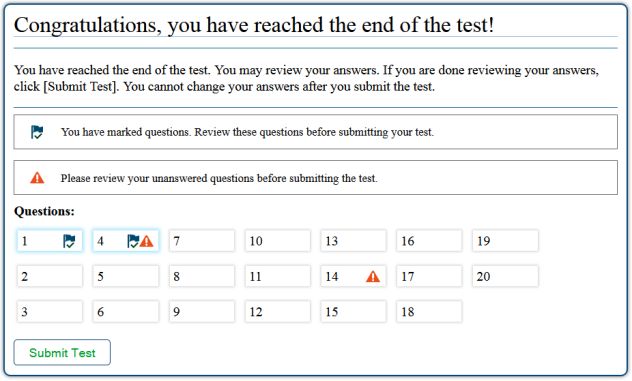
Step 2. Establish a Test Session
In order for students to test, they must sign into an active test session and be approved for testing by the test administrator. Test sessions can only be
established by test administrators on test day. Note that test administrators whose sessions are idle more than 20 minutes will be logged out of the TA
Interface and the test session. Therefore, test administrators should establish the test session within 20 minutes of when students will sign in.

2a. Navigate to the TA Interface on the Portal, then log in. Note that the TA Interface link for operational testing is active only during test windows.

2b. After logging in, navigate to the test selection box in the top left panel of    2c. Click the checkbox next to a test name to include it in the test
    the TA Interface.                                                                     session. Students in your session will only be able to take tests
                                                                                          you select for the session. Once you have selected at least one
                                                                                          test, the [Start Session] button will turn green and be active.

2d. Click the [Start Session] button. After doing so, the red [Stop Session]         2e. Locate the Session ID. The TA Interface will generate the Session
    button replaces the [Start Session] button.                                           ID after you click [Start Session]. It will appear below “Session ID”
                                                                                          in the top right panel (see example below). Write your Session ID
                                                                                          on the chalkboard or whiteboard so that all students can see it.

                                                                      PAGE 2 | Spring 2015 Science and Social Studies Online Testing Checklist | January 23, 2015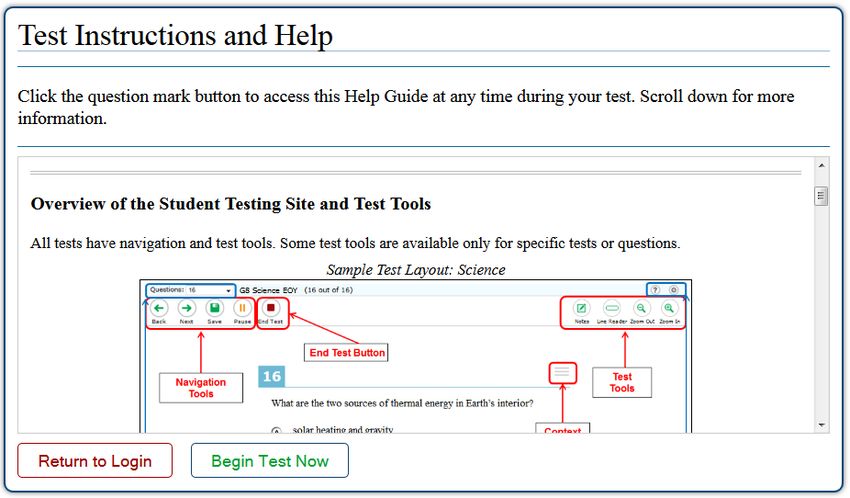
Step 3. Introduce Students to the Test Administration
Follow the script in the right column below to introduce the test administration to students. Use these directions for all students when starting the
performance-based assessment and the end-of-year tests.

 For this group of
                           Use this script to orient students to the administration
 students

                           SAY: Today you are taking an Ohio Online Test for (provide the test name(s) that will be completed by students during
                           the test session).

                           You will have (provide the correct testing time from Section 2 of the Directions for Administration Manual) to take this
                           test.

                           If you need a break during the test, raise your hand.

                           I am giving you two sheets of blank paper to use as scratch paper during the test. Please write your name on each
                           sheet of paper. You do not have to use this paper. Anything you write on this paper will not be scored. All your answers
                           must be marked in the online Student Testing Site. Distribute two sheets of blank paper to students.

                           Read each question carefully. Think about what is being asked. Look carefully at graphs or diagrams because they will
 For all students          help you understand the question.

                           If you do not know the answer to a question, skip it and go on to the next question. If you have time, go back to the
                           questions you skipped and try to answer them before submitting your test.

                           You do not have to save your response to each test question. As soon as you mark your answer, the system records it.
                           If you change an answer, the system saves your new answer.

                           If you are typing an answer and want to make sure it is saved, you can click the SAVE button. If you do not click the
                           SAVE button, the system will save your response for you when you move to the next question.

                           When you reach the last question on the test, click the END TEST button. The Student Testing Site will ask you if you want
                           to review your answers. Questions you have marked for review and questions you did not answer will be flagged.
                           When you are done reviewing your answers, you will click SUBMIT TEST.

                                                                      PAGE 3 | Spring 2015 Science and Social Studies Online Testing Checklist | January 23, 2015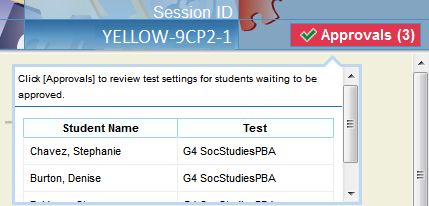
For this group of
                          Use this script to orient students to the administration
students
For students who will
be released               SAY: After you submit your test, please log off your computer. You will then (provide instructions to students who are
immediately after         released after testing).
they submit their tests

For students who will
                          SAY: After you submit your test, please log off your computer. You will work on (refer to the material(s) students should
not be released after
                          work on). Place your (material) where you can find it easily, but do not take it out at any time during the test.
they submit their tests

                          SAY: Does anyone have any questions?

                          Answer any questions.

For all students          SAY: I will now walk you through the steps for starting the test.

                          If someone is having trouble during the test, I will help that student. Students are not allowed to work together.

                          Proceed to the student sign-in step.

                                                                     PAGE 4 | Spring 2015 Science and Social Studies Online Testing Checklist | January 23, 2015
Step 4. Student Sign-In
In order to sign in and take a test, each student must enter his/her legal first name (as it appears in TIDE), his/her SSID or Student ID, and the Session
ID. Follow the script below to start the student sign-in process.
4a. SAY: You should see the test sign-in screen. If you do not see the test 4b. SAY: Before you can start the test, you must type in three things.
sign-in screen, raise your hand.
In the First Name box, type your first name only.
Launch the secure browser or app if needed. In the Student ID box, type your SSID or Student ID.
In the Session ID box, type the Session ID exactly as it appears on the
board. The Session ID is (provide Test Session ID from Step 2).
Once you have typed in your information, click [Sign In]. After you
sign in, you will see a page that says “Is This You?” Raise your hand if
you do not see a page that says “Is This You?”.
If a student is unable to sign in, a message describes the reason for
sign-in failure. Refer to the troubleshooting section for possible
resolutions.
4c. SAY: Read the “Is This You?” screen. 4d. SAY: The next screen shows
Make sure the information is correct. “Your Tests.” Click on the test
If the information is correct, click that you will be taking today.
[Yes]. If your information is not If you need help, raise your
correct, raise your hand. hand.
May 5, 2004
If a student’s information is not If the correct test is not
correct, contact your test available, see the
coordinator, who will need to update troubleshooting section for
the student’s demographic possible resolutions.
information in TIDE.
Students may continue if their name SAY: After you have clicked
is misspelled or their date of birth is incorrect. on your test, you will see a
Students may not continue if the school, SSID or enrolled grade is message that says you are
incorrect. waiting for approval.
PAGE 5 | Spring 2015 Science and Social Studies Online Testing Checklist | January 23, 2015Step 5. Approve Students for Testing
5a. Once students begin appearing in the approvals preview box of 5b. Confirm that the students listed in the “Approvals and Student Test
the TA Interface, click the red [Approvals (#)] button at the top Settings” window are the students who will be testing during the test
right to open the approvals pop-up window. session. Make sure each student is listed under the correct test. If a
student selected a test for which he or she is not eligible, click [Deny]
and tell the student which test to select.
5c. Click [See/Edit Details] to review a student’s accessibility features 5d. Click [Approve] for each individual student (recommended) or
and accommodations and edit them if necessary. (Accessibility [Approve All Students]. After doing so, each approved student will
features and accommodations are described in Section 6 of the advance to the “Is This Your Test?” screen.
Directions for Administration Manual.) Do not approve a student if
the correct features or accommodations are not marked. Click [Set
& Approve] to confirm the settings and approve a student’s test;
click [Set] to confirm the settings and return to the “Approvals and
Student Test Settings” box.
5e. SAY: Look at the information on the “Is This Your Test?” page. If any
information is wrong, raise your hand.
If one of the elements on the “Is This Your Test?” page is incorrect,
the student should click [No]. The test administrator must make the
necessary updates.
SAY: If the information is correct, click [Yes, Start My Test].
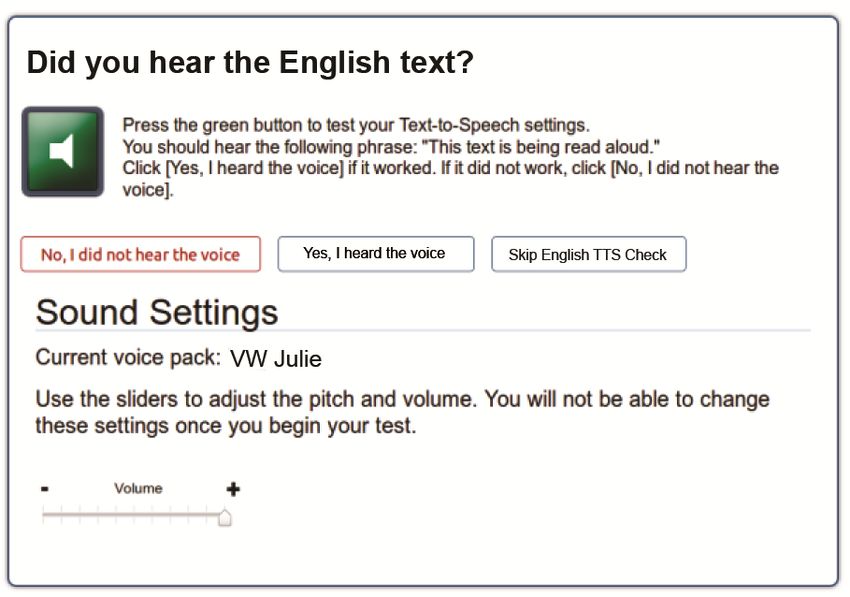
PAGE 6 | Spring 2015 Science and Social Studies Online Testing Checklist | January 23, 2015Step 6. Text-to-Speech Sound Check (if applicable)
Students who have text-to-speech turned “on” will see a sound check page.
The “Did you hear the English text?” page allows students to verify their audio for text-to-speech. When clicking the green button, students should
hear “This text is being read aloud.”
[No, I did not hear the voice] Make sure the computer’s sound is on.
[Yes, I heard the voice] Clicking this button moves the student to the Test Instructions and Help page.
[Skip English TTS Check] Clicking this button moves the student to the Test Instructions and Help page.
The sound settings display the voice pack that will be used for text-to-speech. If more than one voice pack is installed on the computer, a dropdown
will be available. Additionally, depending on the student’s device, three slider bars may be available to allow users to adjust volume, pitch and rate.
If students are taking the test in Spanish and have text-to-speech turned “on,” the audio check will be read in English, but the instructions on the
page will be in the Spanish.
Refer to the “Text-to-Speech Requirements” section of the Technical Specifications Manual for additional information on text-to-speech.
PAGE 7 | Spring 2015 Science and Social Studies Online Testing Checklist | January 23, 2015Step 7. Review the Test Instructions and Help Information
The availability of tools depends on whether certain accessibility features, such as masking or text-to-speech, are turned “on” and which test the
student is taking. Students taking the physical science test will have access to an online calculator, reference sheet and periodic table. More
detailed information on the Student Testing Site tools is available in Section VI of the Test Administrator User Guide.
SAY: The test instructions and help page lists the test tools and buttons that you can use while taking the test.
If you want to re-read this information during the test, click on the question mark in the top right corner. Please take a few minutes to read this
page. If you have questions about the instructions and help page, raise your hand.
Test administrators may prefer that all students start the test at the same time. Note, however, the bandwidth requirements of the test are greatest
when students click [Begin Test Now]. If all students click [Begin Test Now] at the same time, it may temporarily affect the speed of the network.
SAY: When you are ready to start your test, click [Begin Test Now].
When students click [Begin Test Now], the Student Testing Site will present the first question.
PAGE 8 | Spring 2015 Science and Social Studies Online Testing Checklist | January 23, 2015Step 8. Monitor the Administration
8a. Record the Test Start Time 8b. Monitor Testing and Ensure Test Security
Write down the time that students actually begin testing. Use the Test Administrator Interface to view the testing progress of any student. The site will
Use this as the starting point for determining when the not show test questions or scores but the student status column shows your students’
test session will end. Refer to Section 2 of the Directions testing progress.
for Administration Manual for the amount of time
permitted for each test.
Record the starting time below:
The Test Administrator Interface is designed to refresh automatically every minute. You
can manually refresh at any time by clicking the [Refresh Now] button at the top left of
the page. Do NOT click the Web browser’s refresh button.
Circulate through the room periodically. Make sure that all conditions of test security are
maintained. Assist students with test navigation, as needed, but do not answer questions
about test content.
8c. Pausing a Test (if needed) 8d. Transferring a Session (if needed)
It may be necessary to pause an individual student’s test If you have problems with your computer or Web browser or need to change computers
(e.g., the student needs a break). Students can pause during an active test session, you can transfer the session from one computer, mobile
their tests from the Student Testing Site or you can click device or browser to another without stopping the session or interrupting in-progress tests.
the [Pause] button in the pause test column to sign the To transfer a test session to a new device or browser:
student out of the test. If a student’s test is paused for
Do not stop or log out of the session you are currently in. If you do, you will end the test
more than 20 minutes, the student will not be able to
session and pause all students’ tests, signing students out of the test.
revisit items answered prior to the pause.
Log into the Test Administrator Interface on the new machine or in the new browser. A
If a situation requires all students to stop testing, you can Session ID prompt will appear.
pause all students’ tests by stopping the session. If you
Enter the active Session ID into the box and click [Enter]. When the Session ID is
stop the session, all in-progress tests will be paused and
validated, you will be able to continue your test administration activities.
students will be signed out of their tests. If a session is
stopped, it cannot be resumed. You will have to create The test session on the previous computer or browser will close automatically. This will not
a new session and give the new Session ID to students so stop the session or pause student tests.
that they can sign in and resume testing.
Remember to note any test pauses; the time a test is
paused does not reduce student testing time.
PAGE 9 | Spring 2015 Science and Social Studies Online Testing Checklist | January 23, 2015Step 9. Notify Students about the End of the Test Session
When there are approximately 10 minutes left for the test session, let students know they are nearing the end of the testing session.
SAY: There are 10 minutes left in the test session.
Step 10. End the Test Session
A student’s test session ends when he or she submits a test, or when the test administrator ends the test session.
Student Ends the Test
When the student clicks [End Test] in the online Student Testing Site then [yes] in the subsequent
pop-up window to continue, he or she will be presented with a screen similar to the one shown on
the right.
All items (marked and unmarked) are available for the student to review (with the exception of
items no longer available because a student’s test was paused for more than 20 minutes).
After a student clicks [Submit Test], there will be one last pop-up window: Are you sure you want to
submit the test? Once the student clicks [Yes], the student will not be able to review test questions or
responses.
Test Administrator Ends the Test Session
The test administrator must end the testing session after the prescribed testing time has elapsed. Remember to
account for any time that a test was paused. The test administrator should let students know that the test session
is ending.
SAY: I will now end the test session. All responses to the test questions you have answered have been saved
in the testing system.
Click the red [Stop Session] button at the top left of the TA Interface screen to end the test session. Any student tests that were not submitted by
students will be paused and students will be signed out of their tests. If a student’s science and social studies test was not submitted by the student, it
will be captured by the testing system when the test session ends.
Log out of the TA Interface by clicking the [Log Out] button at the top right. A confirmation message will appear, asking you to confirm that you want
to log out.
Immediately after testing, collect any used and unused scratch paper from students. Securely shred the paper.
If students taking the physical science test used handheld calculators, you must confirm that the memory on all calculators has been cleared.
PAGE 10 | Spring 2015 Science and Social Studies Online Testing Checklist | January 23, 2015Troubleshooting
Description What to Do
During student sign-in, the following message Verify that the student has entered the correct first name and SSID or Student ID. If
displays: Please check that your information is necessary, use the Student Lookup Tool located in the TA Interface to verify that the student
entered correctly. If you need help, ask your TA. has been pre-identified.
During student sign-in, the following message Verify that the student has entered the correct Session ID with no extra spaces or
displays: Session ID does not exist. characters.
During student sign-in, the following message Verify that the student entered the correct Session ID for the session that is active in the TA
displays: The testing session is closed. Interface. Verify that the Session ID is active in the TA Interface.
Verify that a test for which the student is eligible is selected in the TA Interface (e.g., if a
student’s enrolled grade in TIDE is 4, the test administrator must select the “G4 SocStudies”
option for inclusion in the test session). For high-school students, verify that the student’s Pre-
ID record in TIDE reflects the correct test eligibility.
Verify that the student has been identified as an online tester in his or her Pre-ID record in
There are no tests available for the student to select TIDE.
on the “Your Tests” screen.
Verify that the student has not already taken the test; students can only take each part of
A test is grayed out and cannot be selected. the test once.
If the student is resuming a test, he or she must do so on the day the test was started. See
the “Reopen a Test after Test Expiration” section of the Directions for Administration Manual,
if needed.
Verify that the student’s test eligibility was not set as “yes” for the alternate assessment.
An iPad message indicates Guided Access must be
turned on.
An Android message indicates a keyboard change is Refer to the Technical Specifications Manual for detailed instructions on setting up iPads,
needed. Android tablets and Chromebooks for testing.
A Chromebook message indicates that Kiosk Mode is
needed.
A session ends before the allowable testing time Log in and start a new session. Provide the students with the new Session ID.
elapses.
PAGE 11 | Spring 2015 Science and Social Studies Online Testing Checklist | January 23, 2015Description What to Do
A student gets signed out of a test while a session is If a student’s test is interrupted, the student should sign back in and rejoin the session.
still active
A message about forbidden applications running The secure browser will not allow the student to begin testing if forbidden applications are
pops up running. You will see messages advising you on which applications must be closed before
testing can begin. Close those applications then re-launch the secure browser.
A student receives an error message while taking the Write down the message ID (usually 5 digits) and the text of the error. If necessary, contact
operational administration the Ohio Help Desk at 1-877-231-7809.
A student’s test freezes Force quit the secure browser or app and re-launch it. Have the student sign back in. If
another device is available, the student can sign in on that device.
Windows: [Ctrl] + [Alt] + [Shift] + [F10]
Mac OS X: [Ctrl] + [Alt] + [Shift] + [F10]
Linux: [Ctrl] + [Alt] + [Shift] + [Esc]
Chromebooks: [Ctrl] + [W]
iOS (iPads): Triple-click the Home button to exit Guided Access, then close the app as
you would any other iOS app.
Android: Tap the [Exit] button in the upper right corner to close the secure browser.
PAGE 12 | Spring 2015 Science and Social Studies Online Testing Checklist | January 23, 2015You can also read