Sumérjete en la nube de 2ª Generación - Hands-on Lab 4 febrero 2021 - Oracle
←
→
Page content transcription
If your browser does not render page correctly, please read the page content below

Sumérjete en la nube de 2ª Generación
Hands-on Lab
4 febrero 2021

Table of Contents
1.       Disclaimer .................................................................................................................................... 3
2.       Introduction................................................................................................................................. 3
3.       Pre-Requisites ............................................................................................................................. 3
4.       Signing in to the OCI Console ................................................................................................... 9
5.       Creation of a compartment ...................................................................................................... 12
6.       Creation of a Virtual Cloud Network ...................................................................................... 14
7.       Creation of a Virtual Machine ................................................................................................. 17
8.       SSH Connection to the VM ...................................................................................................... 22

     Copyright © 2021, Oracle and/or its affiliates. All rights reserved. | Oracle Confidential | Page 2 of 26
1.                Disclaimer
The following is intended to outline our general product direction. It is intended for
information purposes only, and may not be incorporated into any contract. It is not a
commitment to deliver any material, code, or functionality, and should not be relied upon in
making purchasing decisions. The development, release, and timing of any features or
functionality described for Oracle’s products remains at the sole discretion of Oracle.
In the document, value of information such as user name, password etc. is shown as XXXX
or YYYY etc. Also if actual value is shown consider it as an example value.

     2.                Introduction
Background
Oracle Cloud Infrastructure (OCI) is a set of complementary cloud services that enable you to
build and run a wide range of applications and services in a highly available hosted
environment. Oracle Cloud Infrastructure offers high-performance compute capabilities (as
physical hardware instances) and storage capacity in a flexible overlay virtual network that is
securely accessible from your on-premises network.

     3.                Pre-Requisites
     •     To perform the steps in this tutorial, you must have an active subscription to Oracle
           Cloud Infrastructure or a Free Trial Account.
     •     PuTTY and PuTTYGen installed
To generate an SSH key pair using the PuTTY Key Generator,
     •     Find puttygen.exe in the PuTTY folder on your computer, for example, C:\Program
           Files (x86)\PuTTY. Double-click puttygen.exe to open it. Or you may download it from
           here.

Copyright © 2021, Oracle and/or its affiliates. All rights reserved. | Oracle Confidential | Page 3 of 26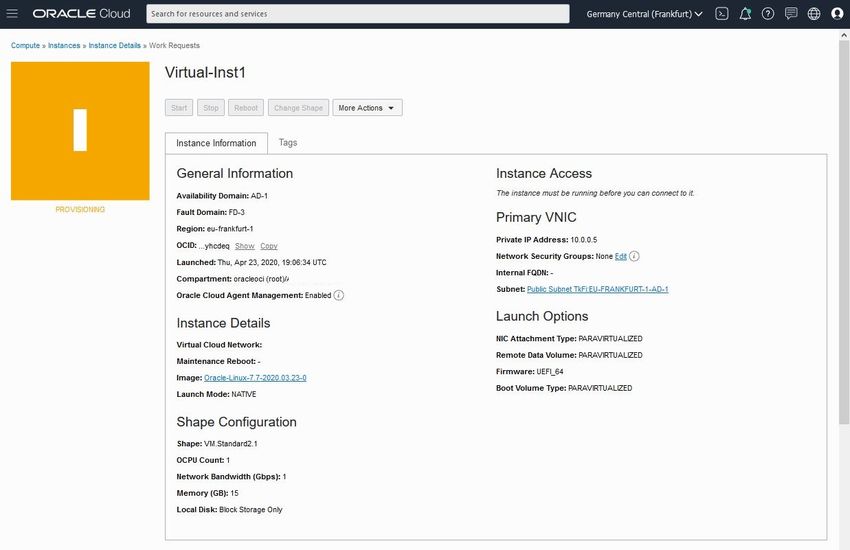
•     Accept the default key type, SSH-2 RSA.
SSH-2 is the most recent version of the SSH protocol (and is incompatible with SSH-
1). RSA and DSA are algorithms for computing digital signatures.

     •     Set the Number of bits in a generated key to 2048 bits, if it is not already set with
           that value.
This sets the size of your key and thus the security level. A minimum of 2048 bits is
recommended for SSH-2 RSA.

     •     Click Generate.

     •     Move your mouse around the blank area to generate randomness to the key.
Note: the dotted red line in the image below is for illustration purposes only. It does not
appear in the generator pane as you move the mouse.

Copyright © 2021, Oracle and/or its affiliates. All rights reserved. | Oracle Confidential | Page 4 of 26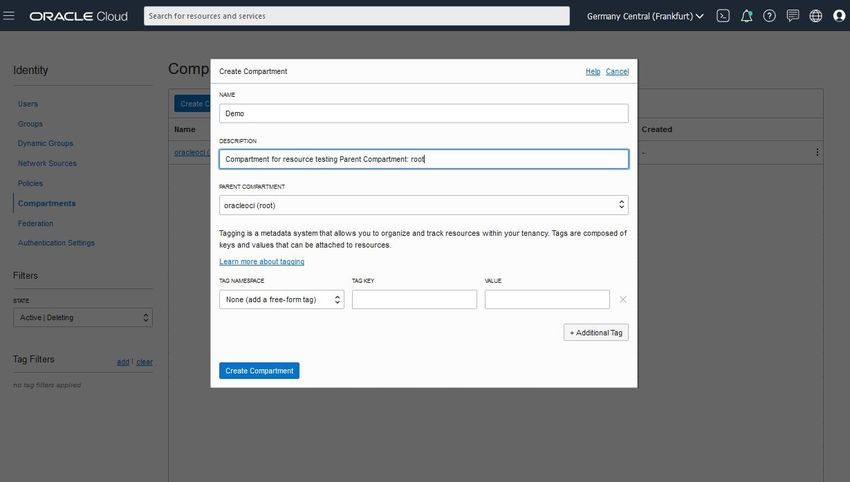
•     The generated key appears under Public key for pasting into OpenSSH
           authorized_keys file.

     •     The key comment is the name of the key that you will use to identify it. You can keep
           the generated key comment or create your own.

     •     If you want to password-protect your key, enter a Key passphrase and enter it again
           for Confirm passphrase. When you reload a saved private key, you will be asked for
           the passphrase, if one is set.
     •

While a passphrase is not required, you should specify one as a security measure to protect the
private key from unauthorized use.
There is no way to recover a passphrase if you forget it.
     •     Save the private key of the key pair. Depending how you work with the private key in
           the future, you may need one saved in the PuTTY PPK format and one saved in
           OpenSSH format. Let's do both.
                 o     To save the key in the PuTTY PPK format, click Save private key to save the
                       private key of the key pair.

You can name it anything you want, although you may want to use the same name as you used
for the key comment. The private key is saved in PuTTY's Private Key (PPK) format, which is
a proprietary format that works only with the PuTTY toolset.

Copyright © 2021, Oracle and/or its affiliates. All rights reserved. | Oracle Confidential | Page 5 of 26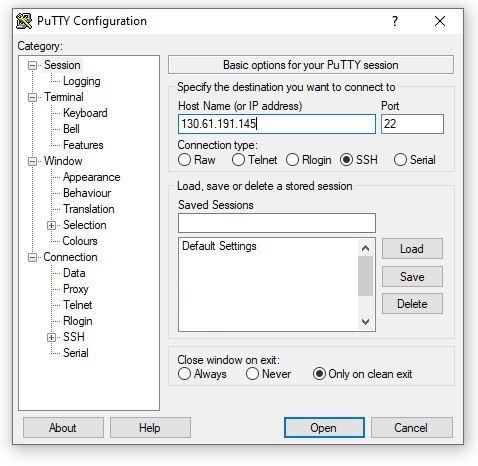
You can use this key whenever you use Putty to perform SSH actions.
     •     To save the key in OpenSSH format, open the Conversions menu and select Export
           SSH key. This will be the same key as above, just saved in a different format.

You can name it anything you want, but to keep track of your keys, you should give it the same
name as the key you saved in PPK format in the previous step. You can also use any extension
(or no extension), but let's use .ssh, to make it clear what format it is.

You can use this key whenever you use OpenSSH to perform SSH actions using ssh utitlities
that support OpenSSH, for example when using Linux in a command shell.
     •     Now you need to create the public key to be paired with the private key(s) you just
           created. However, clicking the Save public key button will create a public key that
           won't work with Oracle Cloud services in certain cases. So, for the purposes of this
           tutorial, there is no reason to save a public key using the Save public key button.

Instead, proceed as follows.
           •     In the PuTTY Key Generator, select all of the characters under Public key for
                 pasting into OpenSSH authorized_keys file.
Make sure you select all the characters, not just the ones you can see in the narrow window. If
a scroll bar is next to the characters, you aren't seeing all the characters.

Copyright © 2021, Oracle and/or its affiliates. All rights reserved. | Oracle Confidential | Page 6 of 26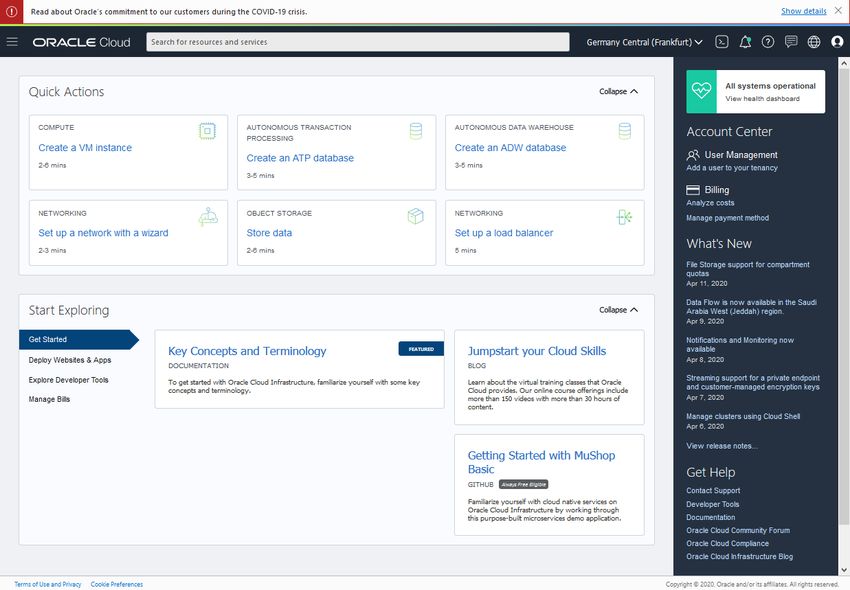
Right click somewhere in the selected text and select Copy from the menu.

     •     Open a text editor and paste the characters, just as you copied them. Start at the first
           character in the text editor, and do not insert any line breaks.

     •     Save the key as a text file, using the same root name as you used for the private key.
           Add a .pub extension. You can give it any extension you want, but .pub is a useful
           convention to indicate that this is a public key.

Write down the names of your public and private keys, and note where they are saved. You will
need the public key when creating service instances in, for example, Oracle Java Cloud Service
and Oracle Database Cloud - Database as a Service. You will need the private key when trying
to access a service instance's virtual machine via SSH.

Copyright © 2021, Oracle and/or its affiliates. All rights reserved. | Oracle Confidential | Page 7 of 26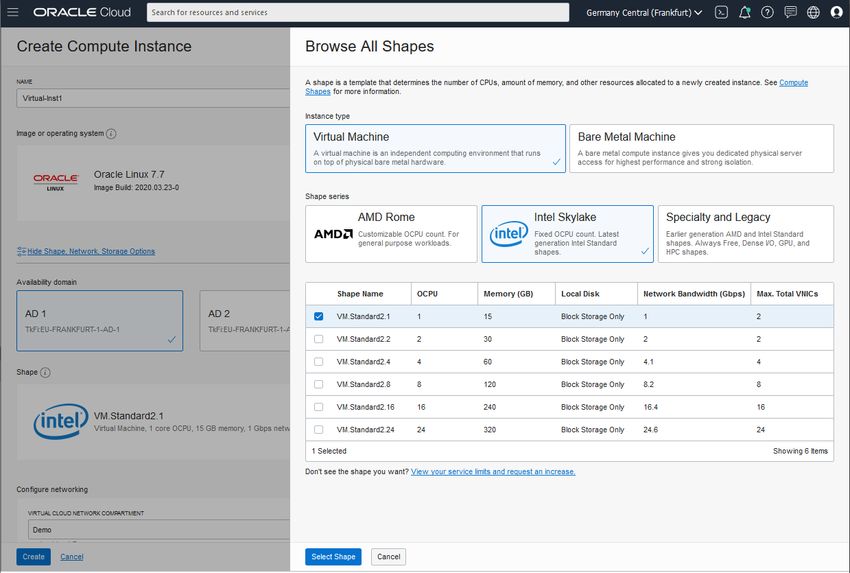
Let the   Fun
Begin!
4.              Signing in to the OCI Console
Oracle Cloud Infrastructure Identity and Access Management (IAM) Service lets you control
who has access to your cloud resources. You control the types of access a group of users has
and to which specific resources. The purpose of this lab is to give you an overview of the IAM
Service components and an example scenario to help you understand how they work together.
Pre-requisites:
   •    Oracle Cloud Infrastructure account credentials (User, Password, and Tenancy)
   •    To sign in to the Console, you need the following:
              o    Tenant, User name and Password
              o    URL for the Console: https://console.eu-frankfurt-1.oraclecloud.com/
              o    Oracle Cloud Infrastructure supports the latest versions of Google Chrome,
                   Firefox and Internet Explorer 11
In this Lab, you will sign in to the Oracle Cloud Infrastructure console using your credentials.
   1. Open a supported browser and go to the Console URL: https://console.eu-frankfurt-
      1.oraclecloud.com/.
   2. Enter your tenant name and click Continue

   3. Oracle Cloud Infrastructure is integrated with Identity Cloud Services, you will see a
      screen validating your Identity Provider. Click Continue.

       Copyright © 2021, Oracle and/or its affiliates. All rights reserved.| Page 9 of 26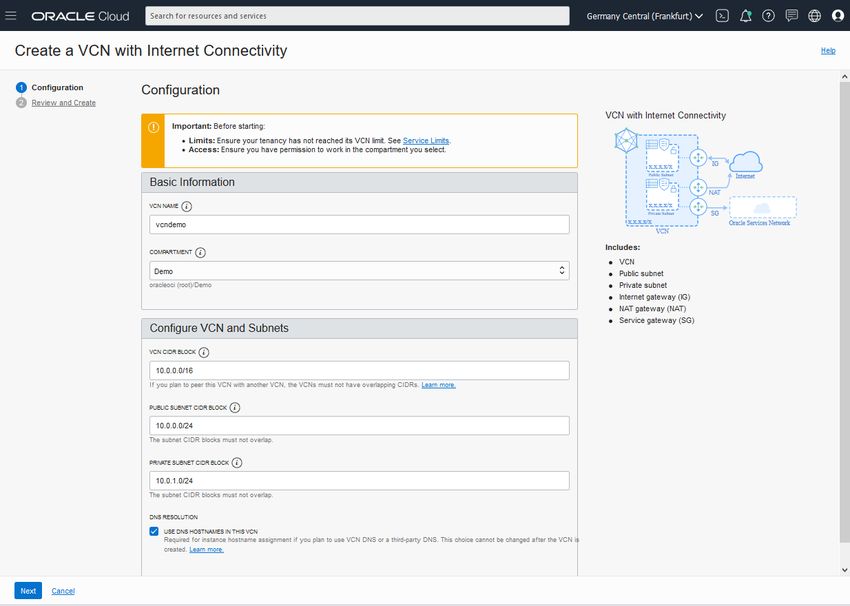
4. Enter your user name and password
    o    Username: instructor will provide username
    o    Password: instructor will provide password

  Copyright © 2021, Oracle and/or its affiliates. All rights reserved.| Page 10 of 26
5. When you sign in to the Console, the dashboard is displayed. Copyright © 2021, Oracle and/or its affiliates. All rights reserved.| Page 11 of 26
5.              Creation of a compartment
A compartment – is a collection of related resources that can be accessed only by certain
groups that have been given permission by an administrator in your organization. When you
first start working with Oracle Cloud Infrastructure, you need to think carefully about how you
want to use compartments to organize and isolate your cloud resources. Compartments are
fundamental to that process. Most resources can be moved between compartments.
In order to view and create a compartment in your tenancy, please navigate to Main Menu,
Governance and Administration section, Identity and select Compartments.

      Copyright © 2021, Oracle and/or its affiliates. All rights reserved.| Page 12 of 26
► Click on “Create Compartment” and fill the information:
Name: Demo
Description: Compartment for resource testing Parent Compartment: root
To learn more about compartments in OCI, please visit: https://docs.cloud.oracle.com/en-
us/iaas/Content/Identity/Tasks/managingcompartments.htm
Copyright © 2021, Oracle and/or its affiliates. All rights reserved.| Page 13 of 266. Creation of a Virtual Cloud Network
A Virtual Cloud Network (VCN) is a virtual version of a traditional network including subnets,
route tables, and gateways on which your compute instances run. Customers can bring their
network topology to the cloud with VCN. Creating a VCN involves a few key aspects such as:
• Allocate a private IP block for the VCN (CIDR range for the VCN).
• Customers can bring their own RFC1918 IP addresses.
• Create Subnets by partitioning the CIDR range into smaller networks (sub
networks for front end, back end, database)
• Create an optional Internet Gateway to connect VCN subnet with Internet.
Instances created in this subnet will have a public IP address.
• Create Route table with route rules for Internet access
• Create Security List to allow relevant ports for ingress and egress access
In order to view and create a VCN in your tenancy, navigate to Main Menu, Core
Infrastructure section, Networking and select Overview:
Copyright © 2021, Oracle and/or its affiliates. All rights reserved.| Page 14 of 26In the section“Create a VCN with Internet Connectivity” click on “Start VCN Wizard”
Enter the following information:
VCN Name : vcndemo, Compartment: Demo
VCN CIDR BLOCK: 10.0.0.0/16
PUBLIC SUBNET CIDR BLOCK: 10.0.0.0/24, PRIVATE SUBNET CIDR BLOCK:
10.0.1.0/24
Click on Next
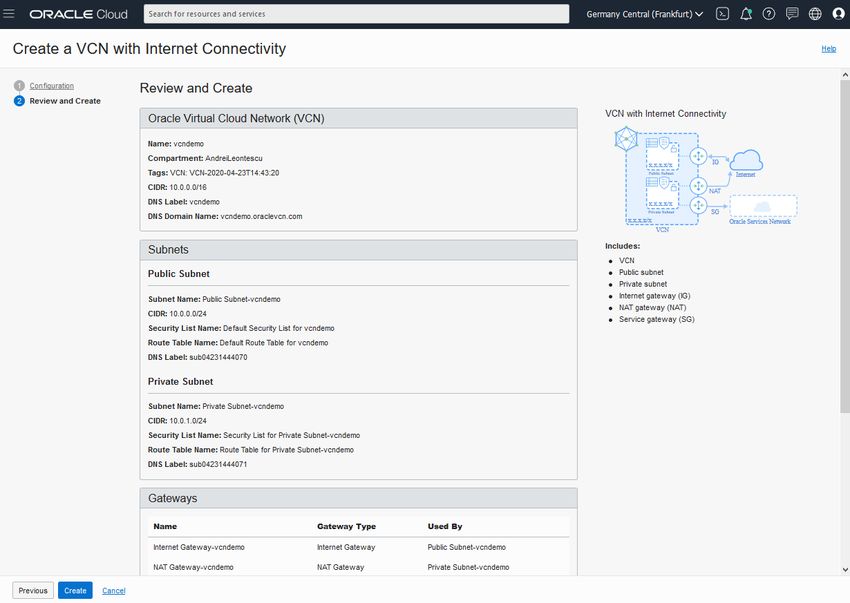
Copyright © 2021, Oracle and/or its affiliates. All rights reserved.| Page 15 of 26Review and press on Create
A confirmation page displays the details of the cloud network that you just created.
The Virtual Cloud Network above has the following resources and characteristics:
o CIDR block range of 10.0.0.0/16
o An Internet Gateway
o A route table with a default route rule to enable traffic between VCN and the
Internet Gateway
o A default security list that allows specific ingress traffic to and all egress traffic
from the instance
o A public subnet
o The VCN will automatically use the Internet and VCN Resolver for DNS
Check the details of your VCN and you will see all the resources created.
For more details about VCN and other networking constructs available in OCI, please visit:
https://docs.cloud.oracle.com/en-us/iaas/Content/Network/Concepts/overview.htm
Copyright © 2021, Oracle and/or its affiliates. All rights reserved.| Page 16 of 267. Creation of a Virtual Machine
Oracle Cloud Infrastructure Compute lets you provision and manage compute hosts, known
as instances . You can launch instances as needed to meet your compute and application
requirements. After you launch an instance, you can access it securely from your computer,
restart it, attach and detach volumes, and terminate it when you're done with it. Any changes
made to the instance's local drives are lost when you terminate it. Any saved changes to
volumes attached to the instance are retained.
Oracle Cloud Infrastructure offers both bare metal and virtual machine instances:
● Bare Metal: A bare metal compute instance gives you dedicated physical server access for
highest performance and strong isolation.
● Virtual Machine: A virtual machine (VM) is an independent computing environment that
runs on top of physical bare metal hardware. The virtualization makes it possible to run
multiple VMs that are isolated from each other. VMs are ideal for running applications that do
not require the performance and resources (CPU, memory, network bandwidth, storage) of an
entire physical machine. A VM compute instance runs on the same hardware as a bare metal
instance, leveraging the same cloud-optimized hardware, firmware, software stack, and
networking infrastructure.
In order to launch a VM please navigate to Menu, Core Infrastructure section and click
on “Instances” under the “Compute” tab, then click on Launch Instance:
Copyright © 2021, Oracle and/or its affiliates. All rights reserved.| Page 17 of 26In the pop up Enter the following values for your instance as shown below
NAME: Virtual-Inst1
Availability Domain: XXX:xxx-AD-1
IMAGE: Oracle Linux 7.7
INSTANCE Type: Virtual Machine
SHAPE series: Intel Skylake
SHAPE Name: VM.Standard2.1
CUSTOM Boot: No action
ADD SSH Key: Paste the SSH Public Key created before
COMPARTMENT: Demo
VCN: vcndemo
SUBNET COMPARTEMNT: Choose the same compartment chosen for the VCN
Subnet: Choose the public subnet created with the VCN wizard
Copyright © 2021, Oracle and/or its affiliates. All rights reserved.| Page 18 of 26Copyright © 2021, Oracle and/or its affiliates. All rights reserved.| Page 19 of 26
Click on Create

     Copyright © 2021, Oracle and/or its affiliates. All rights reserved.| Page 20 of 26
A pop-up window will appear in which the Instance will be provissioned
After a few minutes, the Instance will appear as running and can be used.
To learn more about provisioning compute instances, different available compute shapes
and their pricing please visit: https://www.oracle.com/cloud/compute/
Copyright © 2021, Oracle and/or its affiliates. All rights reserved.| Page 21 of 268. SSH Connection to the VM
Use the steps presented below in order to connect to the previously created virtual machine
(VM) Compute instance.
Copy the public IP Address of the Virtual-Inst1
Copyright © 2021, Oracle and/or its affiliates. All rights reserved.| Page 22 of 26Open PuTTy and enter the Public IP in the Hostname Field
Copyright © 2021, Oracle and/or its affiliates. All rights reserved.| Page 23 of 26Go to Connection > Data. Enter “opc” in “Auto-login username” field
Go to Connection > SSH > Auth. In the “Private key file for authentication field” browse and
select the “private.ppk” file created using puttygen
Copyright © 2021, Oracle and/or its affiliates. All rights reserved.| Page 24 of 26Click “Open” and select “Yes” in the PuTTY Security Alert message.
You will be then logged into “Virtual-Inst1” instance
More information about creating and launching a virtual machine in OCI can be found here:
https://docs.cloud.oracle.com/en-us/iaas/Content/Compute/Tasks/launchinginstance.htm
Copyright © 2021, Oracle and/or its affiliates. All rights reserved.| Page 25 of 26.
Copyright © 2021, Oracle and/or its affiliates. All rights reserved.| Page 26 of 26You can also read