OWNER'S MANUAL - GOLF CAR SERIES VERSION :20200129001 - PLUS Model PRO Model - Evolution Electric Vehicles
←
→
Page content transcription
If your browser does not render page correctly, please read the page content below
PLUS Model

                           PRO Model

OWNER’S MANUAL

       GOLF CAR SERIES
    VERSION :20200129001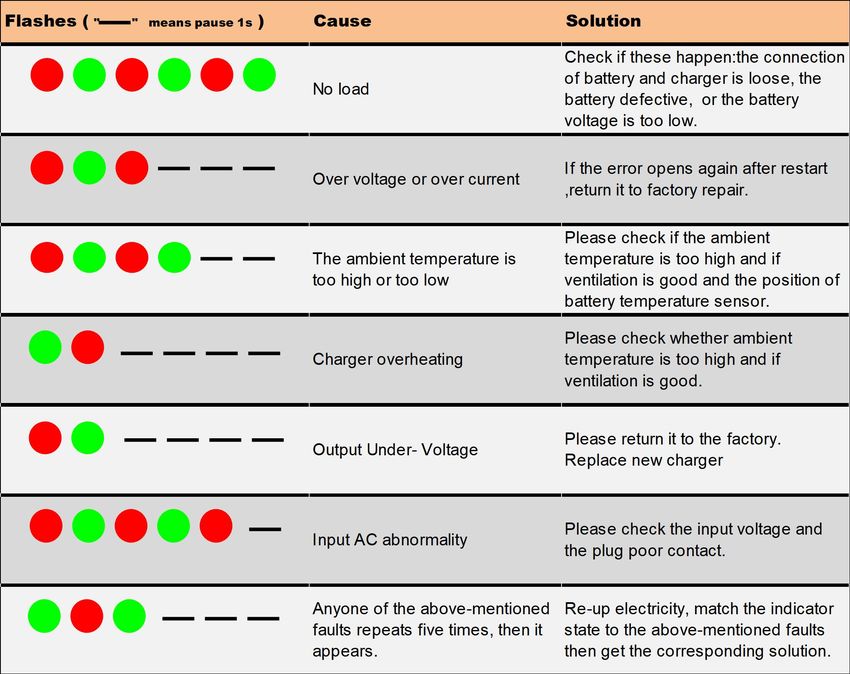
TABLES OF CONTENTS
   COLOUR OPTIONS………………………………………………………….1

    VEHICLE FEATURES……………………………………………………….2

   SAFTY INFORMATION…………………………………………………….4

 EVOLUTION DECLARATION…................……………………………….6

   IMPORTANT DECALS………………………………………………………7

    PRE-OPERATIONS………………………………………………………..10

  OPREATING INSTRUCSTION……………………………………………11

   Brake and accelerator …………………………………………………..12

  Key switch and indicators……………………………………………….13

     Dash board……………………………………………………………….16

    Speedometer……………………………………………………………...17

   Light and horn control…………………………………………………..18

  Rear flip-flop seat kit…………………………………………………..19

   ON BOARD CHARGER……………………………………………………20

    BATTERIES………………………………………………………………….23

     TIRES………………………………………………………………………...26

  VEHICLE MODIFICATIONS……………………………………………...27

     Controller………………………………………………………………...27

  Motor and rear axle……………………………………………………...27

     Headlights………………………………………………………………...27

       Tires………………………………………………………………………28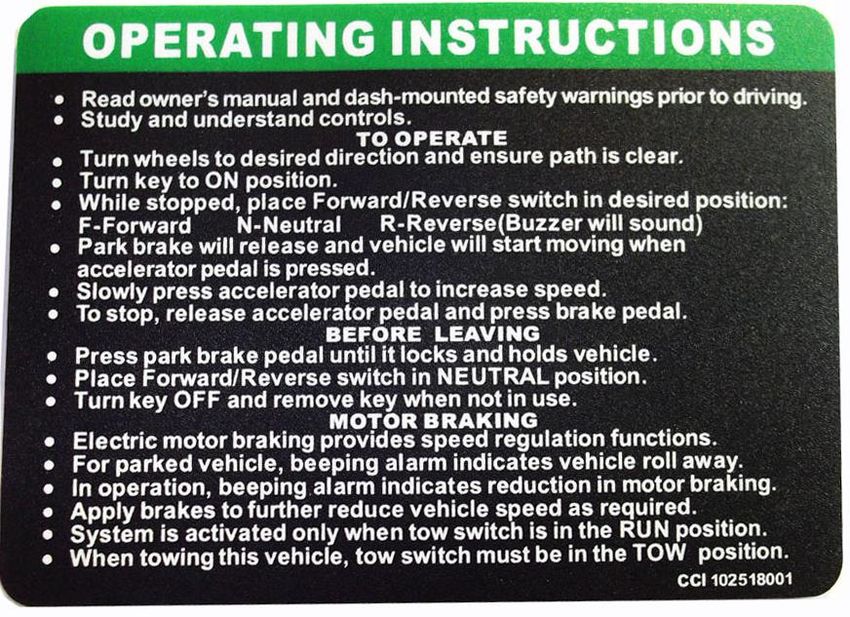
Golf cart accessories option……………………………………………..28

   VEHICLE MAINTENANCE……………………………………………….29

      Tools………………………………………………………………………29

  Vehicle maintenance……………………………………………………..31

  Chassis maintenance……………………………………………………..31

Electric components maintenance………………………………………33

    VEHICLE STORAGE………………………………………………………35

    SPECIFICATION……………………………………………………………37
COLOUR OPTION
                                                                 1

  EVOLUTION VEHICLE VARIES DOZENS OF COLOURS FOR YOU TO CHOOSE

     SPECIAL COLOURS REQUIRED , ALL WILL BE DONE BY EVOLUTION
VEHICLE FEATURES
                   2
VEHICLE FEATURES
                                                                                                  3
                                  COVER FOR STORAGE           REAR SEAT BACK
                                  COMPONENT

                                                                               ARM REST
                                                                               (PASSENGER SIDE)
CUP   HOLDER     &   CELL
PHONE SLOT

                                                                                   REAR
                                                                                   HAND HOLDER

                  ARM REST
                  (DRIVER SIDE)

                                                                    REAR FOOT STEP
                                             FLIP-FLOP SEAT
                                             CUSHION

      STORAGE COMPONENT
      (Open the cover and remove, there is
      Storage component for storing the tools or
      drinks or any other stuffs if you want.)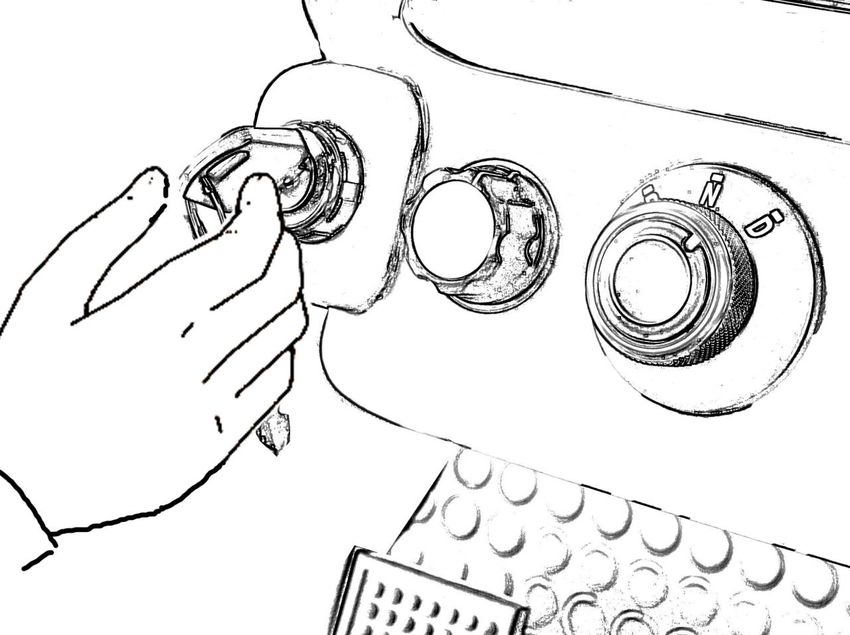
SAFETY INFORMATIONS
                                                         4
            NO CHILDREN ARE ALLOWED TO PLAY WITH THE
            VEHICLE

            DO NOT DRIVE THE VEHICLE OVER 25MPH/H
            OVER SPEED DRIVING MAY CAUSE SEVERE INJURY

            WHEN COMMIT SHARP LEFT TURN APPLY BRAKE TO
            LIMIT SPEED

            WHEN COMMIT SHARP RIGHT TURN APPLY BRAKE TO
            LIMIT SPEED

            APPLY BRAKE TO LIMIT SPEED WHILE DRIVE ON STEEP
            HILL

            DO NOT DRIVE VEHICLE ACROSS SLOPES IN EXCESS
            25%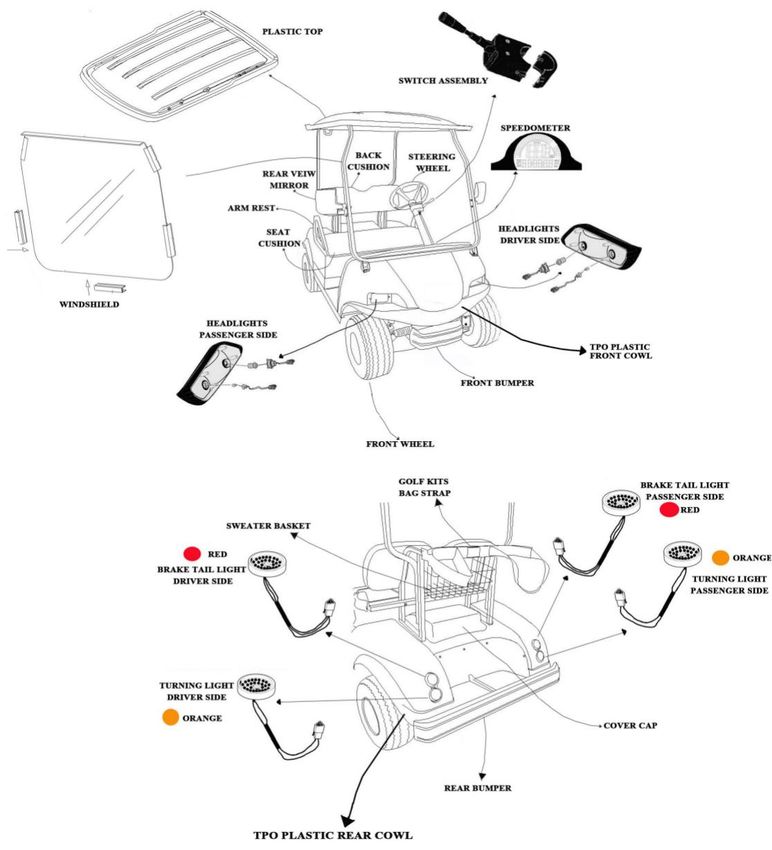
SAFETY INFORMATIONS
                                                                                                   5
                                    BATTERY        POSTS,        TERMINALS             AND     RELATED
                                    ACCESSORIES           CONTAIN          LEAD         AND      LEAD
                                    COMPOUNDS, CHEMICALS KNOWN CAUSING CANCER
                                    AND REPRODUCTIVE HARMS

                                    WASH HAND AFTER HANDLED BATTERY

                                    THE BATTERY WILL GENERATE HYDROGEN GAS IN
                                    CHARING        PROCESS       .KEEP     SMOKE         AND    STATIC
                                    ELECTRICITY AWAY FROM BATTERY

                                    USE ISOLATED WRENCH TO OPERATE ON THE BATTERY
                                    IN CASE BATTERY SHORT CIRCUIT . SHORT CIRCUIT
                                    GENERATE BIG CURRENT WILL CAUSE INJURY

                                Grand Safety information
Owner’s manual contains safety regarding information , when followed decals come up ,owner

should notice the safety statements.
                            Indicates the regarding situations , is very important .

                              Indicates the regarding situations ,may cause minor injury or other lose

                                    Indicates the regarding situations ,may cause death or serious

                                    injury.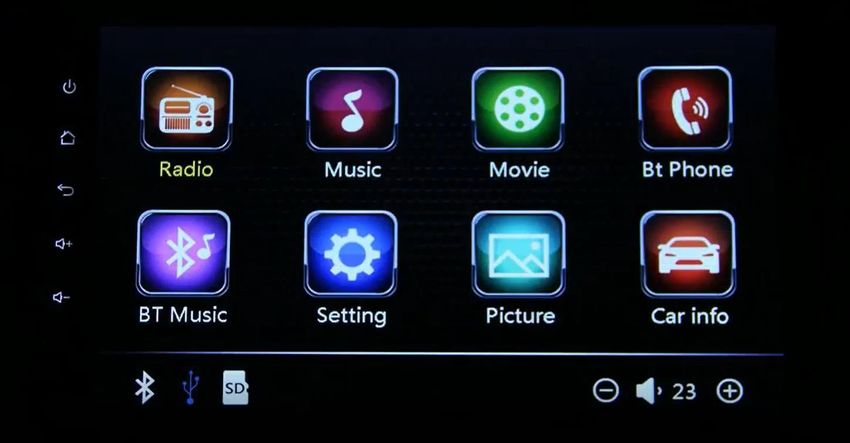
EVOLUTION DECLARATION
                                                                            6
EVOLUTION corporation mainly dealing with five types of the electric
vehicles, such as electric golf car, shuttle bus, utility cart, engineer and
transportation cart, and special electric car, among which DEL3022G series
are electric golf car. Our golf car is environment-friendly and suitable for
use in course, hotels and other business places .All the key components
are imported from well known companies .The whole car it is with new
fashion design. Stable performance ,flexible control, and comfortable
driving. Our golf car be used as people mover or utility car in vacation
villages ,villa areas , resort hotels private residential areas, tourist scenic
spots ,or any other place where this type of golf car is allowed .
   The warranty papers is to standardize the after-sale service for export
vehicle, settle the claims efficiently and improve our after-sale service. .
   EVOLUTION electric vehicle corporation dedicate in electric vehicles
manufacture since 2006,EVOLUTION customers scatter all over the world,
EVOLUTION electric vehicle corporation promise any client who bought
EVOLUTION vehicles ,EVOLUTION technicians will be always be ready for
fix problems for you. We provide splendid quality of after sale service .
   For more warranty information please see limited                  warranty
papers ,that customers receive while purchase EVOLUTION vehicles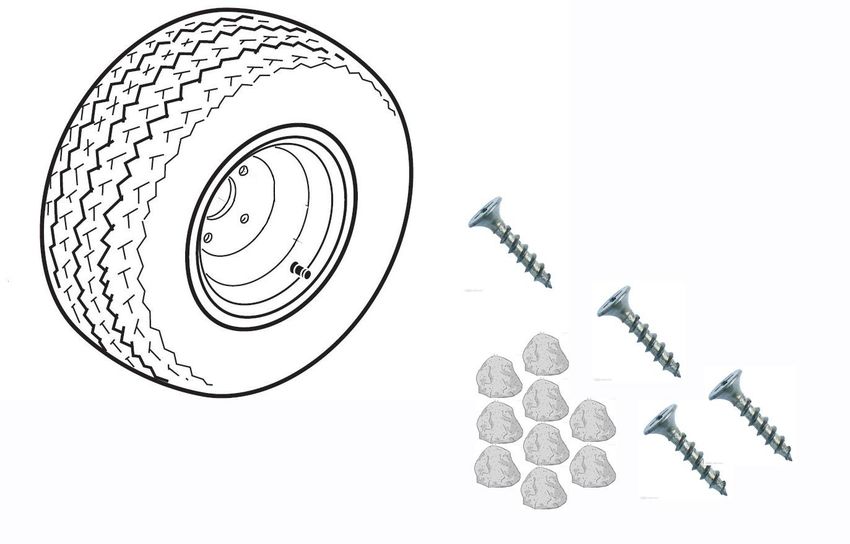
IMPORTANT DECALS
                                                                              7
*Vehicle’s serial number   Manufacturing year
                                                                        Vehicle’s serial
                                                                           number
                               Vehicles      manufactured       by     EVOLUTION
                               corporation,all have vehicle’s serial number on the
                               left side of the chassis frame . The front four
                               numbers are the manufacturing year of the
                               vehicle.the other five numbers are the vehicle’s
                               serial number given by EVOLUTION corporation .All
                               the vehicles are documented .After the vehicles
                               are sold out of the factory ,EVOLUTION corporation
                               will track the vehicles by using the vehicle’s serial
                               number as identity .Serial numbers are insurance
                               warranty of EVOLUTION corporation . Customers
                               should aware of the importance of the vehicle’s

                               serial numbers      ,   DON’T TEAR IT DOWN while
                               using the vehicles or in routine maintenance .

*Steering wheel decals

                                                                  ②

                           ①
 ③
                                  ①. Steering wheel
                                  ②. EVOLUTION decal
                                  ③.Vehicle operating
                                  instructions decal
IMPORTANT DECALS
8
*Charger’s decals
②
④
①
①
③
①.Charger
②.Charger’s indicating decal
③.Charger’s specification decal
⑤IMPORTANT DECALS
○
1
9
*Battery’s decals
Lithium battery
warning label
○
3 Lithium battery
Serial number
○
2 Lithium battery
nameplate
○
1 Lithium battery warning label
○
2 Lithium battery nameplatePRE-OPERATIONS
10
① Before initiate using vehicle , the batteries should be
fully charged . Charging hour should be more than 10
hours .
② Check the accelerator pedal ,when stepped and released
it should returns to its original position with full
flexibility .
③ Check the brake pedal , when stepped it should be
flexible and feels firm . And it returns to its original
position with flexibility when released
Check the tires’ pressure ,it should be inflated until the
internal pressure is around 20~23PSL(138kpa~159kpa)
④
Check the signal lights , the brake lights and turning
lights should be in proper working condition .
Check the reverse beeper ,when the direction selecting
switch be set at “REV”, it should beep soundlyPRE-OPERATIONS
11
Check the tires’ surface , remove any embedded objects
you can find . Be sure no cracks or other damages to the
tires ,defective tires may cause accident while driving .
Check the lubricant capacity the rear axle contains , use a
cleaned stick , stick it into the rear axle and it reach the
bottom , pull it out check the depth is should be more
than 13cm (1.3L).
Pull the steering wheel up and down ,check the tightness
of steering wheel .Rotate the steering wheel right and left.
Be sure no excessive free play and rattling sound .
Check the tightness of the battery wiring , make sure all
the nuts are solidly tight . Loose attached nuts on the
battery will cause big spark while operating .
Pre-operations are extremely important , the owners of the vehicle should aware all the required
operations need to be executed before initiate using the vehicle . The status of the vehicle is very
important to the safety of the passengers on board .OPERATING INSTRUCTION
12
*Brake and accelerator
①
※MECHANICAL
②
③
① Use the accelerator pedal to control the vehicle’s speed . ② Use the brake pedal
to decrease velocity . ③ use parking pedal to keep car in static .OPERATING INSTRUCTION
13
※HYDRAULIC
Ⅰ Ⅱ
Ⅰ.Accelerator pedal
Ⅲ
Ⅱ. Brake pedal
Ⅲ.Hand brake
(Functional as parking
pedal ).OPERATING INSTRUCTION
14
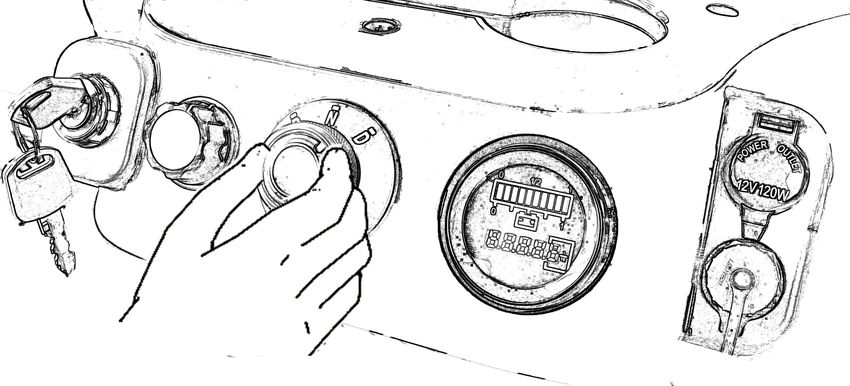
*Key switch and indicators
④
⑤
⑥
④ Use key switch to turn on the main power. ⑤ Use direction selecting switch to
change the vehicle’s moving direction. ⑥ Use the battery meter to show the power
of battery (for Lithium battery or Lead-acid battery)
○
7 12V 120W power adapter
○
7 socket
○
8 Dual 12V USB Charger socket
○
8OPERATING INSTRUCTION
15
*Key switch and indicators
Lithium battery meter Lead-acid battery meter
○
1 ○
2 ○
3 ○
4 ○
1 ○
2 ○
3 ○
4
○
5
○
6
Battery Meter for lithium battery and lead-acid battery:
Each LED light grid indicates 10% power of battery pack.
○
1 Blue LED light indicates 90%-100% battery power.
○
2 Four green LED lights indicate 60%~90% battery power.
○
3 Three Yellow LED lights mean 30%-50% battery power left.
○
4 Last two red LED Lights indicate only 0-20% battery power left, and the battery pack needs
to be charged immediately.
○
5 The LED digital in the below tablet indicate the SOC of lithium battery pack. (For lithium
battery only)
○
6 The LED digital in the below tablet indicate the total running time of the golf cart. (For
lead-acid battery only)OPERATING INSTRUCTION
16
*Dashboard functions
○
15
○
14
○
16
○
13
○
12
○
17
⑦ ⑧ ⑩ ○
11
⑨
7 Key switch
8 Wiper switch (Optional): When installing wiper motor only.
9 Direction switch: Forward & Neutral & Reverse knob switch
10 Battery meter: For lithium battery or lead-acid battery.
11 12v USB charge socket and cigarette lighter port
12 Storage box (left & right)
13 Cup holders (Four)
14 Golf ball holder
15 Golf tee holder
16 9 inch touchscreen (Optional): Please refer to Touchscreen Operation Manual
17 Speakers (left & right) (Optional) : When installing touchscreen only.OPERATING INSTRUCTION
17
*Touchscreen functions (Plus Models)
This touchscreen is kind of multi-functional device that includes different functions and
operations. All detailed operations refer to the “ Touchscreen Operation Manual”.
○
1
○
2
○
3
○
4
○
5
6 ○
○ 7 ○
8 ○
9 ○
10
Screen Buttons introduction:
Main Functions 1 Power Button: Turn off/on the touchscreen.
Home Button: Press this button to go back main interface
Radio 2
3 Upper Button: Press this button to go back upper level
Music Interface.
Movie 4 Volume Up Button: Press button to increase the volume
Volume Down Button: Press button to reduce the volume
Bt Phone 5
6 Bluetooth indicating: Icon will turn blue when connecting
Bt Music to blue-tooth
Setting 7 USB Drive indicating: Icon will turn blue when connecting
to USB drive disk
Picture
8 SD card indicating: Icon will turn blue when connecting to
Car info USB drive disk (The function is canceled on this model. )
Back-up camera 9 Volume Down Button: Same with ○
4
image 10 Volume Up Button: Same with ○
5OPERATING INSTRUCTION
17
*Speedometer ○
1 Motor Rotation Speed:
1 shows on the top of speedometer (for
example number times 1000. when
○
4 LED Indicators the speedometer shows 3 then the
Headlight Indicator
2 motor rotation speed is 3000rpm)
○
2 Vehicle running speed: Shows
Forward Indicator--- F 3 current running speed of vehicle, with
Reverse Indicator--- R 4 unit km/h or Mph.
Braking Indicator
○
3 TRIP (Single trip of distance):
Records the mileage for a single trip.
Left Turning Indicator ODO: Odometer, Records the mileage
for total trips.
Right Turning Indicator
○
5 RTT: Total driving time, car
operates total time.
Ⅰ
operation instructions
I. To change the display of “TRIP” or
“ODO” mode, press “Mode” button twice
to change to “TRIP”; Press “Mode” button
three time to change to “ODO” .
II. To change the unit from km/h to mph,
Ⅱ or from mph to km/h, first press the
“Mode” button three time to change to
“ODO” , and then press the “RESET”
button for 5 seconds, then the unit will be
changed.
III. To change the display to RTT, total
driving time, press “Mode” button one time
to change to “RTT”.OPERATING INSTRUCTION
18
*Lights and horn control
Ⅰ Ⅲ
Switch assembly
Ⅱ Ⅳ
Ⅰ. Turn on the right turning lights Ⅱ. Turn on the left turning lights
Ⅲ. Horn button Ⅳ. Turn on the headlights
Grand information of operation
Always use the vehicle in a responsible manner and maintain the vehicle in safe operating
condition.
Always read and observe all warnings and operation instruction labels affixed to the
vehicle.
Always follow all safety rules established in the area where the vehicle is being operated.
Always reduce speed to compensate for poor terrain or conditions.
Always apply service brake to control speed on steep grades.
Always maintain adequate distance between vehicles.
Always reduce speed in wet areas.
Always use extreme caution when approaching sharp or blind turns.
Always use extreme caution when driving over loose terrain.
Always use extreme caution in areas where pedestrians are present.OPERATING INSTRUCTION
19
*Rear Flip-Flop Seat Kit
○
3
○
1
○
4
○
2
EVOLUTION plastic rear flip-flop kit is a kind of multi-functional component.
When folding the seat cushion of rear set kit, it can seat two passengers on the seat cushion.
When flipping the rear seat cushion and make it as flat bed, it can be used as loading flat bed for
cargoes.
○
1 Grab the handle of cover of storage component, and lift up, it will open the cover.
○
2 After opening the cover, the user can put tools, drinks bottles and other stuffs into the
storage box for storing.
○
3 Cup holder attached to the armrest, both driver side and passenger side.
○
4 Cell phone holder attached to the armrest, both driver side and passenger side.ON-BOARD CHARGER
20
*On-board charger
This manual contains important safety and operating
instructions for EVOLUTION charger, please read this
information before using EVOLUTION charger for
lithium-ion battery and lead-acid battery.
EVOLUTION has two models of lithium-ion & lead acid
battery charger.
DANGER: TO REDUCE THE RISK OF FIRE OR ELECTRIC SHOCK, CAREFULLY READ
AND FOLLOW THESE IMPORTANT SAFETY AND OPERATING INSTRUCTIONS BEFORE
INSTALLING OR OPERATING THE CHARGER.
DANGER: RISK OF ELECTRIC SHOCK. DISCONNECT CHARGER FROM BATTERY AND
AC POWER BEFORE SERVICING. TURNING OFF THE CHARGER DOES NOT REDUCE
THIS RISK.
DANGER: TO PREVENT ELECTRICAL SHOCK, DO NOT TOUCH EITHER AC OR DC
UNINSULATED PARTS. MAKE SURE ALL ELECTRICAL CONNECTORS ARE IN GOOD
WORKING CONDITION. DO NOT USE CONNECTORS THAT ARE CRACKED,
CORRODED OR DO NOT MAKE ADEQUATE ELECTRICAL CONTACT. USE OF A
DAMAGED OR DEFECTIVE CONNECTOR MAY RESULT IN A RISK OF OVERHEATING
OR ELECTRIC SHOCK.
WARNING: TO REDUCE THE RISK OF FIRE, INSTALL THIS BATTERY CHARGER ON A
SURFACE OF NON-COMBUSTIBLE MATERIAL SUCH AS BRICK, CONCRETE, OR
METAL.ON-BOARD CHARGER
21
*On-board
charger operation instructions
Charger LED Display
Troubleshooting Instruction
If a fault occurs, count the number of red flashes between pauses and refer to the table below.
--RED --GREENON-BOARD CHARGER
22
ONLY PROFESSIONAL PERSON ARE ALLOWED TO CONDUCT THE ADJUSTING OR REPAIRS ON CHARGER . ANYONE WHO HAS NO
EXPERIENCE ON ELECTRONIC COMPONENTS MAINTENANCE ARE NOT ALLOWED TO OPERATE ON THE CHARGER . UNREQUIED
OPERATIONS ON THE CHARGER MAY CAUSE ELECTRIC SHOCK , MAY LEAD TO DEATH .
DO NOT OPEN UP THE CHARGER . ANY ATTEMPTIONS TRY TO REPAIR DEFECT CHARGER SHOULD UNDER THE GUIDANCE OF
DEALER OR MANUFACTURER’S TECHNICIAN .
USE THE CHARGER ONLY WITH AN ALGORITHM SELECTED THAT IS APPROPRIATE TO THE SPECIFIC BATTERY TYPE .OTHER
USEAGE MAY CAUSE PERSONAL INJURY AND DAMAGE..LEAD ACID BATTERIES MAY GENERATE EXPLOSIVE HYDROGEN GAS DURING
NORMAL OPERATION.KEEP SPARKS FLAMES, AND SMOKING MATERIALS AWAY BATTERIES.
PROVIDE ADEQUATE VENTLIATION DURING CHARGING. NEVER CHARGE A FROZEN BATTERY .BATTERIES’ CAPS SHOULD BE
REMOVED WHILE CHARGING .
RISK OF THE ELECTRIC SHOCK. CONNECT CHARGER POWER CORD TO AN OUTLET THAT HAS BEEN PROPERLY ISTALLED AND
GROUNDED IN ACCORDANCE WITH ALL LOCAL CODES AND ORDINANCES.A GROUND OUTLET IS REQUIRED TO REDUCE RISKOF THE
ELECTRIC SHOCK.. DO NOT USE GROUND ADAPTERS OR MODIFY PLUG. DO NOT TOUCH UNINSULATED PORTION OF THE OUTPUT
CONNECTOR OR UNINSULATED BATTERY TERIMALS
CHILDREN SHOULD BE SUPERVISED TO ENSURE THAT THEY DO NOT PLAY WITH THE APPLIANCE
※NOTES
EVOLUTION on-board charger is specially designed for EVOLUTION vehicles . The charger’s
working voltage range from 85V~264V ,working frequency range from 45HZ ~65HZ . Customers
from all over the world can use EVOLUTION on-board without any changes .
EVOLUTION on-board charger can be operated in the temperature -30℃~+50℃(-22℉~122℉) ,which
allows EVOLUTION on-board charger to be used in most circumstances .BATTERIES
23
*EVOLUTION vehicle batteries connection
Batteries loaded on EVOLUTION vehicles ,according to different configurations, customers who
purchase EVOLUTION vehicles can have two different batteries options: Trojan T875 (8V)/T105(6V),
and EVOLUTION lithium battery, which has the four models normally: L4860, L48110, L48130, L48165.
I. Lead acid battery (Trojan)
Trojan T875 x 6pc Trojan T105 x 8pc
II. EVOLUTION lithium battery
VOLTAGE CAPACITY
MODEL
(V) (AH)
L4860 48V 60Ah
L48110 48V 110Ah
L48130 48V 130Ah
L48165 48V 165AhBATTERIES
24
III. Lithium battery illustration
1. LiFePO4 Lithium-ion Batteries Pack with Aluminum Alloy Casing.
2. B+ : Battery Positive Terminal
3. B - : Battery Negative Terminal
4. RS485: Connector Port for Lithium Battery meter.
5. SW: Inspection Green Light & Button for alive BMS
6. Vent Valve for Lithium-ion Battery Pack
7. Lifting Handles for Lithium-ion Battery
8. Nameplate for Lithium-ion Battery
9. Battery Warning Label
10. Installation Base BracketBATTERIES
25
IV. Battery charging
Charging should be performed when ambient temperatures are between 32°F and 110°F (0°C and 45°C).
The battery pack should be charged or topped off after every use.
Charging steps:
Turn the key to the OFF position and remove it.
Inspect the charger cord for cracks, frayed wires or loose connections, if damaged replace it.
Inspect the vehicle charger receptacle and charger plug for dirt, debris or damage. Clean if necessary
and replace immediately if damage is found.
Connect the charger to a wall receptacle. Do not use a multi-plug adapter or power strip. Do not
connect anything else to the same receptacle.
When the battery pack is finished charging, disconnect the charger cord from the vehicle. If
disconnecting before the charge cycle is complete, it is recommended that the charger be
disconnected from the wall receptacle first, then unplug the charger from the vehicle receptacle.
ⅰ.the exterior of the battery ,the connection wires and bolts should be kept clean and dry .If there is electrolyte outside the battery, please clean with dry
cotton yarn firstly,then wash with water and finally wipe up .(while cleaning ,do not allow any cleaning solution ,or water to get inside the battery, to avoid
leakage and increasing self-discharge)
ⅱ. The connection of the battery should always be kept in good condition .please check if any battery cable terminal or nut has become loose periodically in
order to prevent any sparkle or damage to terminals .
ⅲ.Do not place any object on the battery and do not connect the positive pole to the negative pole .this may cause a short circuit ,damage to the battery or
injury to your body .
ⅳ.The battery should be recharged fully when not in use . any delay on the re-charging will cause negative effect on the battery .
ⅴThe evaporation and electrolyzing of the water will cause the density of electrolyte of the battery increased and the liquid surface decrease ,especially in
hot water.therefore,check the distilled water or the attenuated sulfuric acid for lead-acid battery with density of 1.40 to adjust the electrolyte to meet the
density of the 1.28,the surface should be flat with highest level then continue to charge0.5-1 hour in order to make the internal uniform .
ⅵ.Any impurities are not allowed to enter the battery. Keep the apparatus clean for adding water to avoid the impurities to be fallen into the battery.
ⅶ.When driving , the driver shall be always be aware of the drop level the battery power from the batteries’ capacity indicator .the driver shall estimate the
distance needed to be taken,and recharge the battery at a proper time in case that the car can not get back to the recharging station in time for recharging .
ⅷ. If the golf car is going to be kept unused for a period of time ,the battery shall be fully charged before put away. After that ,the battery fully recharged
every month ,until the charger turn off automatically
ⅸ.During charging ,the car shall be parked in a well-ventilated area with the fill caps open. Keep car far away from any frame and sparks and avoid any
explosion or fire that could cause physical injury or damage to the property. ⅹ.once charged the cap should be kept tightly covered.TIRES
26
*Vehicle Tires
Worn, improperly inflated, improper sized, or incorrectly installed tires will affect vehicle handling
and could cause an accident resulting in server injury or death.
Check the lug nuts for tightness at the intervals that the manufacturer requests, EVOLUTION advises the
end user check the lug nuts of tire for tightness or missing daily for safety inspection.
1 Front hub
2 brake drum
3 Dust cover
4 Tire
5 Lug nut CROSS-SEQUENCE
①
③
While fasten the wheel nuts , one should always keep fasten it
②
on in cross-sequence .To attach the perfect tight situation. ④
Tubeless tire cautions
1. Clean both tire beads to remove dirt or other object.
2. Where the tire beads seat,clean the wheel rim with a wire brush
3. Apply plenty of tire mounting lubricant(soap and solution)to both beads and
rim flanges
4. Install the tire on the rim from the valve stem side .if thre is no tire machine
available ,use a rubber mallet and tire iron
5. Remove the valve core and position tire so that both beads are on the rim
flange narrow bead seats
6. Quickly remove the air nozzle and install the valve core
7. Adjust the tire ,keep the air pressure between 3.5-4.0MP,immerse the tire into
water to make sure there are no leaksVEHICLE MODIFICATIONS
27
*VEHICLE PREFORMANCE REMODIFICATION
Ⅰ.Controller adjustment
For attaching different speed performance or regenerative brake effect ; The ramp climbing ability or
low speed cruising pattern performance remodification all can be done by change the controller’s
parameter setting .
ONLY TRAINED PERSON ALL ALLOWED TO REMODIFY CONTROLLER PARAMETERS SETTING . ANY INPROPER SETTING CHANGES MAY
CAUSE SEVERE DAMAGES TO THE VEHICLE OR JEOPARDISE PASSENGERS SAFTY
Ⅱ.Motor and rear axle
The motor and rear axle’s performance are fixed when the customer buy it from dealer . The rated
power and torque capability are limited due to the vehicle’s configuration.
For attaching different torque and power performances , customer can choose different motors or
ONLY PERSONS WHO HAVE REAR AXLE AND MOTOR MAINTENANCES ARE ALLOWED TO CONDUCT MODIFICATIONS .
Ⅲ.Headlights’ bulbs
For change the luminance of headlights , customer can
choose different rated power bulbs as options .
The maximum rated power for headlights bulbs are 60 W.
The maximum rated power for turning light bulbs are 15W.VEHICLE MODIFICATIONS
1.
28
Ⅲ.Vehicle tires
Ⅰ Ⅱ Ⅲ
I. Turf tire Ⅱ. Off road tire Ⅲ. Extra traction
1.Clean both tire beads to remove dirt or other object.
2.Where the tire beads seat,clean the wheel rim with a wire brush
3.Apply plenty of tire mounting lubricant(soap and solution)to both beads and rim flanges
4.Install the tire on the rim from the valve stem side .if thre is no tire machine available ,use a rubber mallet and tire iron
5.Remove the valve core and position tire so that both beads are on the rim flange narrow bead seats
6.Quickly remove the air nozzle and install the valve core
Ⅲ.Golf cart accessories option
c
Ⅳ. Cool box Ⅴ. Golf ball washer Ⅵ. Aluminum boxVEHICLE MAINTENANCE
29
Ⅰ.Tools
① ② ③ ④
⑤ ⑥ ⑦ ⑧ ⑨
⑩
1 Wrenches ② Retaining ring pliers ③ Battery fluid injection tool faucet
④ Tire air inflating tool ⑤ Hydrometer ⑥ Lubricant can
⑦ Charger’s calibration box ⑧ multimeter ⑨ Tape measure ⑩ Jack
※NOTES
All the maintenance tools are available from tool market , also customer can purchase all the
maintenance kits from EVOLUTION corporation or from local EVOLUTION dealer .VEHICLE MAINTENANCE
30
Ⅱ.Vehicle maintenance
Always:
• Maintain the vehicle in accordance with the manufacturer’s periodic service schedule.
• Ensure that repairs are performed by those that are trained and qualified to do so.
.
• Follow the manufacturer’s maintenance procedures for the vehicle. Be sure to disable the
vehicle before performing
any maintenance. Disabling includes removing the key from the key switch and removal of a
battery wire.
• Insulate any tools used within the battery area in order to prevent sparks or battery
explosion caused by shorting the
battery terminals or associated wiring. Remove the batteries or cover exposed terminals with
an insulating material.
• Check the polarity of each battery terminal and be sure to rewire the batteries correctly.
• Use specified replacement parts. Never use replacement parts of lesser quality.
• Use recommended tools.
• Determine that tools and procedures not specifically recommended by the manufacturer will
not compromise the
safety of personnel nor jeopardize the safe operation of the vehicle.
• Support the vehicle using wheel chocks and jack stands. Never get under a vehicle that is
supported by a jack. Lift
the vehicle in accordance with the manufacturer’s instructions.
• Maintain the vehicle in an area away from exposed flame or persons who are smoking.
• Be aware that a vehicle that is not performing as designed is a potential hazard and must not
be operated.
• Test drive the vehicle after any repairs or maintenance. All tests must be conducted in a safe
area that is free of both
vehicular and pedestrian traffic.
• Replace damaged or missing warning, caution or information labels.
• Keep complete records of the maintenance history of the vehicle.
The manufacturer cannot anticipate all situations, therefore people attempting to maintain or
repair the vehicle must
have the skill and experience to recognize and protect themselves from potential situations
that could result in severe
personal injury or death and damage to the vehicle. Use extreme caution and, if unsure as to
the potential for injury,
refer the repair or maintenance to a qualified mechanic.VEHICLE MAINTENANCE
31
ⅰ.Chassis maintenance
Check the dust-proof caps on steering gear box ,the
caps are supposed to be tight on the two terminal
ends .
Loose caps will let water and dust into the gear
box ,cause the gears rusting .
Add lubricant to mechanical joint parts , the vehicle
should be kept in good turning and operating
functions . To attach that one should add lubricant to
needed parts every one month .
Check the tires every time use the vehicle . the tires
should be inflated with enough air . The air pressure
should with normal level .
Check the tire chapter for more specific information
of tire inflation .
FLAT TIRE MAY CAUSE UNSTABLE STEERING
FUNCTION WHILE DRIVING .
Check the tires every time use the vehicle , remove
embedded objects or metal items away from tire
surface .If the tire have embedded objects on
surface ,it will lead to excessive noises from tire
while driving or tire internal air leaking .VEHICLE MAINTENANCE
32
Check the lubricant capacity of rear axle .
Low lubricant capacity may cause damages to rear axle
cams or excessive noises .
Clear the brake shoes surface , all the brake shoes shred
dust should be cleaned out in periodic time . Shred dust
may cause mechanical malfunctions of brake .
Use a compressed air to blow the dust out .
Check the brake shoes worn out conditions , if it is
extremely worn out(1/3 left) ,then the brake shoes need
to be replaced with a new one
DO NOT DRIVE THE VEHICLE WITH POOR BRAKE .
Check the bearings inside of front hub , the hubs should
have enough lubricated grease .VEHICLE MAINTENANCE
33
ⅱ.Electric components maintenance
Check the headlight back rubber caps , the caps should
always be kept on tightly . otherwise water or dust may
enter into the headlight chambers .
Cause halogen bulbs burn down easily and vague vision
of headlights .
Keep LED rear lights waterproof , keep the cover lid
tight ,keep dust and water out of LED light assembly .
Dense humidity or water may cause LED diodes to
burn down .
DO NOT LOAD LED LIGHTS WITH HIGH VOLTAGES .
Keep the controller from water , water may cause
circuitry short circuit . If water enter into controller , the
vehicle may run unintentionally after turn on the
power switch.
Check fluid level before and after charging , electrolyte
should be at least 1/2”(13mm)above the plates and
1/4” tp3/8”(6 to 10mm) below bottom of the vent .
NEVER CHARGE BATTEY WITH LITTLE ELECTROLYTE , IT
MAY CAUSE OVERHEATED OR EVEN EXPLOSIONVEHICLE MAINTENANCE
34
Use a hydrometer to check the specific gravity of the battery
fluid in each cell .
Fluid density ranges from different values in different period
of battery using
Maintenance period :One time per 10 months
Use a injection faucet to inject distilled water
into the battery when the battery don’t have
enough capacity of battery fluid .
Always remember to take
precautions while conduct any
operations on batteries or
handle battery .
Wear gloves to protect person
form acid corrosion .
Wear glass to protect person
from acid splash .VEHICLE STORAGE
35
If the vehicle is put away for storage for long time. certain things need to be done to
prevent vehicle from malfunctions or other lose. The recommended extended storage
temperature range is from14°F and 95°F (-10°C and 35°C)
Ⅰ
Ⅱ
Ⅰ. Keep vehicle in dry and ventilated place , keep it from rain
Ⅱ.Remember to charge the batteries fully before put away vehicle
※NOTES
INCORRECT STORAGE CAN CAUSE BATTERY DAMAGE, PERMANENT LOSS OF BATTERY
CAPACITY, OR CAUSE THE BATTERY TO BE UNSERVICEABLE. A FULLY DISCHARGED
BATTERY PUT IN STORAGE WILL MAKE THE BATTERY PERMANENTLY UNSERVICEABLE.
PUT THE BATTERY ON CHARGE DURING EXTENDED STORAGE. DO NOT EXCEED THE
STORAGE TEMPERATURE LIMITS. DO NOT PUT A FULLY DISCHARGED BATTERY IN
STORAGE. INCORRECT STORAGE WILL VOID THE BATTERY WARRANTY.VEHICLE STORAGE
36
Long Term Storage Tips & Operation
1. Turn off all electronic accessories.
2. Set the Forward / Neutral / Reverse control (FNR) to N.
3.If equipped, Set the Run/Tow switch to Tow. (Run/Tow switch is only equipped on DC
cart, AC cart has no Run/Tow switch)
4. Turn the key to OFF. Remove the key from the cart.
5. Put chocks against the wheels.
6. Remove all cargo and personal items.
7. Keep the vehicle in a cool and dry area.
8. Clean the vehicle.
9. Connect the battery charger.
Return to Service After Long Term Storage
1. Unplug the charger cord, wait 15 min at least, then re-plug.
2. Fully charge the battery.
3. Adjust the pressure in each tire to the recommended tire pressure.
4. Have a trained technician lubricate the vehicle.
5. Do a daily pre-operation safety checklist.
6. Do a vehicle performance inspection.SPECIFICATION
37
Specification
Item
CLASSIC 2 CLASSIC 4 CARRIER 6 CARRIER 8
Passenger capacities 2 person 4 person 6 person 8 person
Dimension (mm) (L×W×H) 2380×1400×1830 2860×1400×1830 3660×1400×1830 4460 x 1400 x 1930
Maximum speed 19-25mph 19-25mph 19-22mph 19mph
Lithium battery or Lithium battery or Lithium battery or Lithium battery or
Power source
Trojan battery Trojan battery Trojan battery Trojan battery
Curtis AC Controller Curtis AC Controller Curtis AC Controller Curtis AC Controller
Controller
1234E 300AMP 1234E 300AMP 1232SER 400AMP 1232SER 400AMP
Maximum grade ability 20%-30% 20%-30% 20%-30% 20%-30%
Minimum turning diameter (m) 3.2 3.2 4.3 4.8
Minimum distance from
110 110 110 110
floor(mm)
Brake System Mechanical Mechanical Mechanical MechanicalSPECIFICATION
38
Max slope accessing angle Max ramp angleNOTE
NOTE
NOTE
EVOLUTION ELECTRIC VEHICLES INC
Head Quarters: 15830 El Prado road, Unit D, Chino CA 91708

East Operations: 3420 SW 7th st., Suite#101, Ocala FL 34474

Tel: +1(909)-393-6800

Email: info@evolutionelectricvehicle.com

Website: www.evolutionelectricvehicle.com

                                                                            Copyrighted Material
                                               EVOLUTION ELECTRIC VEHICLES INC reserves
                                                        the right to change or improve the manual
                                               obeying to products and company policy alterations
                                                                       at any time without notice.
You can also read