Student accounts area created in multiple ways based on the instructional use, your instructor will provide more information as needed URL for ...
←
→
Page content transcription
If your browser does not render page correctly, please read the page content below
Page 1 of 9

                            Panopto: Recording a Narrated Power Point
                                        Presentation (Mac)
In Panopto it is easy to record a Narrated PowerPoint Presentation.
    •   Instructor accounts are created via Instructional Design and Technology Services (IDTS) at the School of
        Communication and Information (SC&I) - help@comminfo.rutgers.edu
    •   Student accounts area created in multiple ways based on the instructional use, your instructor will provide
        more information as needed

  Notes:
  URL of the Panopto Server: http://rutgers-sci.hosted.panopto.com
  URL for Panopto Documentation: http://comminfo.rutgers.edu/panopto

Recommended Tips (Especially for instructors)
Limit Length of Presentation / Lecture
It is highly recommended that you “chunk” your recorded presentation/lecture into one or more segments that are
approximately 15 minutes in length, rather than one long presentation that is 45-60+ minutes in length. This is
recommended for optimal retention and also to provide a smoother process of uploading, processing, and encoding
your presentation to the Panopto server. It will also make it easier to re-record a section of the presentation should you
find you are not satisfied with your voice recording and would like a “do over.”
Avoid Date / Semester References
Remove any verbal or written references to the course section, semester, year, or dates so you will not need to re-
record the presentation every semester (unless the content needs updating). Likewise, refrain from including
assignments in the presentation, as you may decide to modify assignments during the current semester - or subsequent
semesters - which would:
    •   Necessitate re-recording the presentation(s) or
    •   Create a discrepancy between what is shown in the recorded presentation and what is found in the course (or
        syllabus).
Use Text Transcripts
Consider adding a text transcript to accompany your video. Having a text transcript will ensure that the screencast
is ADA-compliant by accommodating students with special needs (e.g., students who are deaf)

Include Power Point Slide Titles and Notes
Add a title to each PowerPoint slide to aid Panopto in indexing the recording. Panopto creates a content index of
PowerPoint slide titles with timestamps to allow students to jump to selected slides in the recording.

                               Prepared by SC&I Instructional Design and Technology, Updated Summer 2017
                                   Help – SC&I IT Services: 848-932-5555 / help@comminfo.rutgers.edu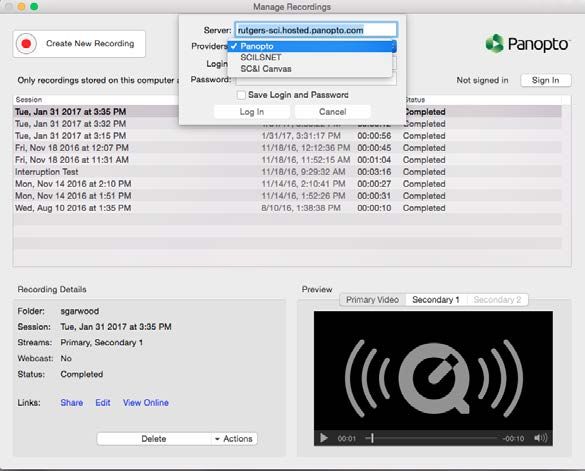
Page 2 of 9

Step by Step Directions:
       1. Log into Panopto
          Use Panopto site: http://rutgers-sci.hosted.panopto.com and log into Panopto server by entering your
          Username and Password.
          There are three authentication methods:
              •   Panopto – This is mainly used for instructors and administrators
              •   SCILSNET – Primary method for those courses taught with the Sakai course management system
              •   SC&I Canvas – Primary method for those courses taught with the Canvas course management
                  system
          Students – please make sure that you follow the instructions provided to you in Sakai or Canvas.
          If you have difficulty logging in or are unsure of what type of account you have, please contact SC&I IT
          Services at 848-932-5555 or help@comminfo.rutgers.edu

       2. Download the Panopto Recorder to Your Computer:

          Note: If you have already installed the Panopto Recorder on your computer, skip this step and go
          directly to next step

       After you have logged into Panopto, click the Download Recorder link located at the top right of your browser.

                             Prepared by SC&I Instructional Design and Technology, Updated Summer 2017
                                 Help – SC&I IT Services: 848-932-5555 / help@comminfo.rutgers.edu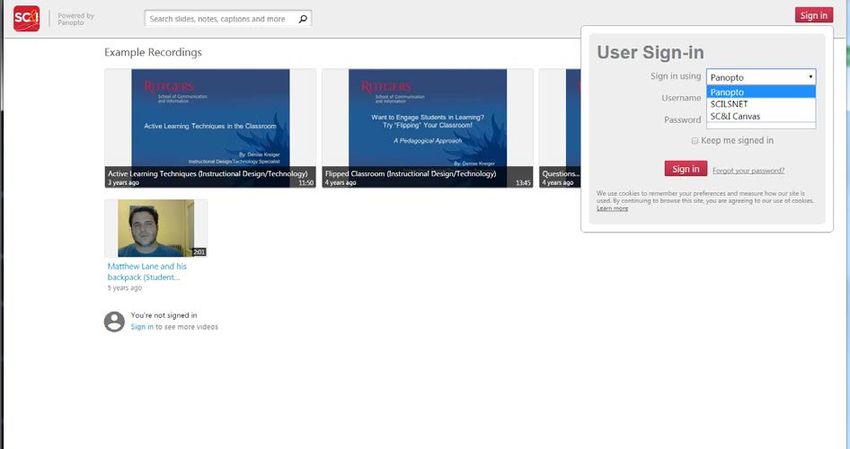
Page 3 of 9

   Select the Download for Mac button. Do not pick the “Remote Recorder” option. Then, download and install
   the Panopto Recorder on your computer.

3. Plug in Your Webcam and/or Headset (if applicable)

4. Open your Power Point Presentation on Your Monitor (the primary monitor if you have more than
   one) and leave it open in Normal Mode on your desktop with the first slide selected, as shown in the
   example below:

                     Prepared by SC&I Instructional Design and Technology, Updated Summer 2017
                         Help – SC&I IT Services: 848-932-5555 / help@comminfo.rutgers.edu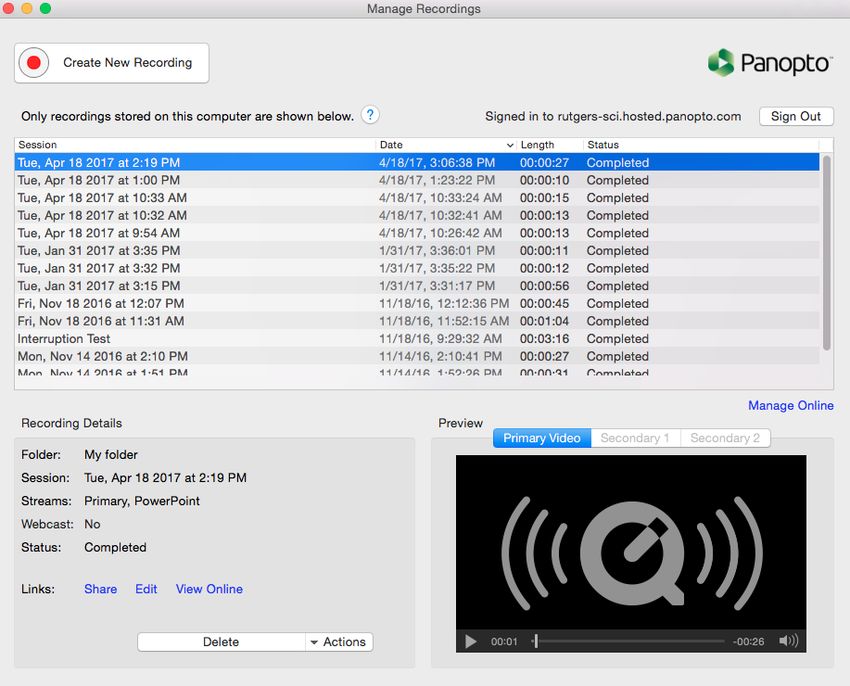
Page 4 of 9

5. Set up to Record in Panopto

      Open the Panopto Recorder by clicking on the Panopto icon on your desktop

      Note: If this is your first time logging in to Panopto you may need to “Get
      Providers for the Server”. Just click on “Get Providers…” and authentication
      methods will become available

      Log into Panopto using the correct authentication method (Panopto, SCILSNET,
      or Canvas), your username and password, and include the Panopto Server
      address: rutgers-sci.hosted.panopto.com

                    Prepared by SC&I Instructional Design and Technology, Updated Summer 2017
                        Help – SC&I IT Services: 848-932-5555 / help@comminfo.rutgers.edu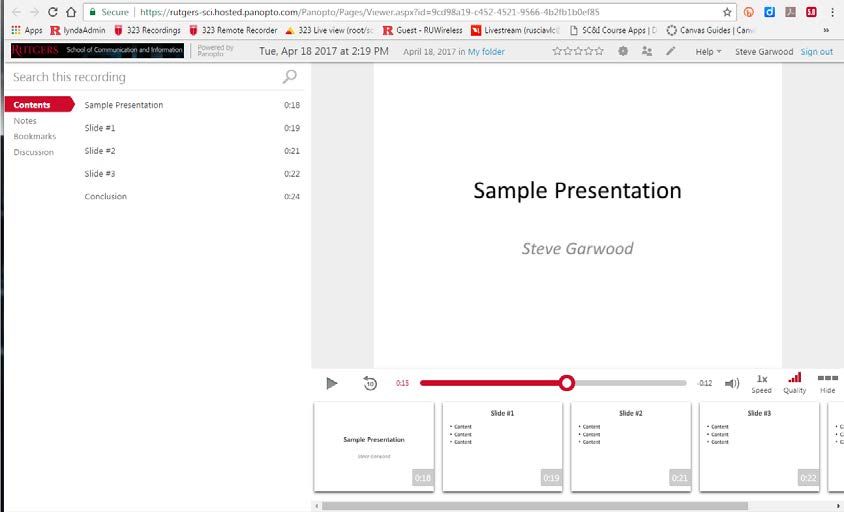
Page 5 of 9

           Arrange Power Point and Panopto windows. The PowerPoint should be open in
           Normal mode behind the Panopto Recorder window, the Panopto Recorder
           window will be in front. Both should be open on your primary monitor.

Power Point is
in the
background
                                                                                                      Panopto Recorder is
                                                                                                      in the foreground

                          Prepared by SC&I Instructional Design and Technology, Updated Summer 2017
                              Help – SC&I IT Services: 848-932-5555 / help@comminfo.rutgers.edu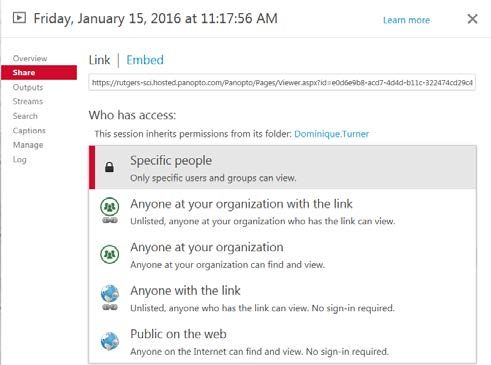
Page 6 of 9
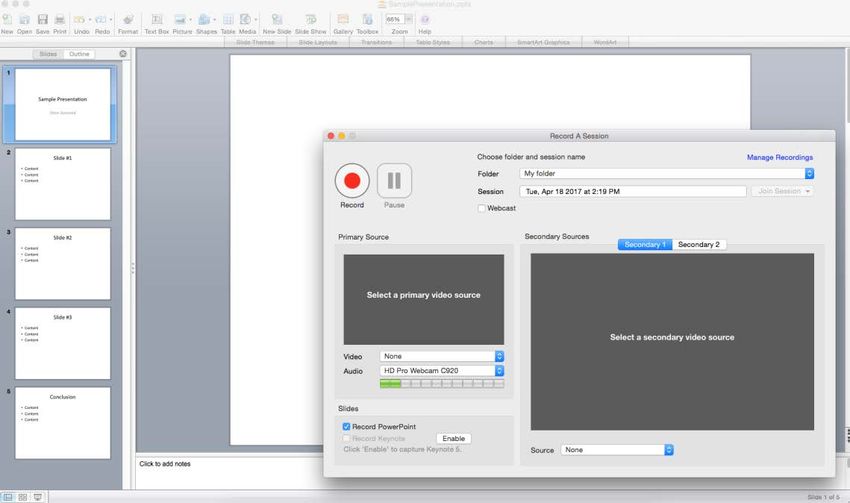
6. Create a Recording.
• Click the Create New Recording button in the Panopto Recorder
o Select your Folder from the drop-down menu, if not displayed.
o Rename your Session to give it context.
• Audio/Video
o Video Source = Select None.
o Audio Source = Select Audio source from the drop-down menu (e.g., USB headset, HD
Pro Webcam).
• Slides - Select Record Keynote/PowerPoint. (If your computer has separate check boxes
for Keynote and PowerPoint, check the appropriate box.)
• Secondary Source - Select: None
• Speak into your microphone. You should see the ‘green bar’ in the Panopto Recorder’s
Primary Source box moving as you speak
Create New
Recording
Select folder
Select Primary
Sources:
Video: none
Audio: your
headphone or
microphone
Check Record PowerPoint
• Start recording. When you are ready to begin recording, click the Start Recording
button (or CMD+Option+R keys), then click the PowerPoint window, and press the
Command + Return keys. This will put PowerPoint in Slide Show mode where you
can begin recording. Count to “2” slowly before speaking out loud
Prepared by SC&I Instructional Design and Technology, Updated Summer 2017
Help – SC&I IT Services: 848-932-5555 / help@comminfo.rutgers.edu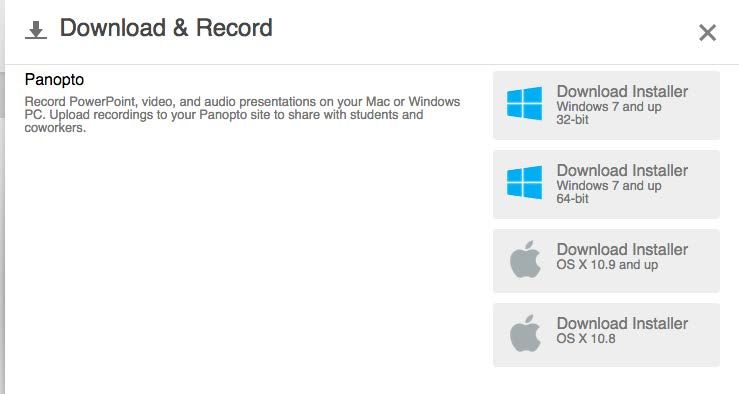
Page 7 of 9

Note: It is recommended that you do a “test recording” of your voice before recording the entire video. Do
the remaining steps for the test and then begin Step 6 again to do the “live recording.”

                                       Recording Short Keys (MAC)
                                    Start/Stop = Option + Command + R

                                    Pause = Option + Command + P

              •     Stop recording. When you are finished narrating the slides in your presentation,
                    press the Command + Tab key to return to the Panopto Recorder and then the
                    Stop Recording button in the Panopto Recorder to STOP recording or use Option +
                    Command + R to Stop.

 7. Process a Recording

              •     Process recording. When you have completed (i.e., stopped) recording, Panopto
                    Recorder begins processing your recording (i.e., uploading, processing, encoding,
                    etc. to the Panopto server). You can see the status of the recording as it is
                    processing.

          •       Complete recording. When the recording has fully processed on the Panopto server, the
                  Panopto Recorder will indicate “Completed” (see arrow) and display the View
                  Online and Share.

                          Prepared by SC&I Instructional Design and Technology, Updated Summer 2017
                              Help – SC&I IT Services: 848-932-5555 / help@comminfo.rutgers.edu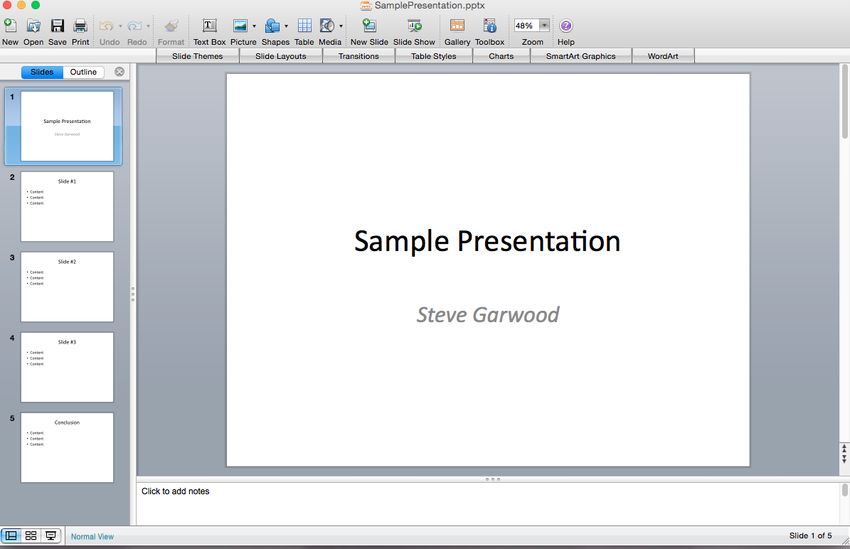
Page 8 of 9

       8. View Recording. Click the View Online link to view the video on the Panopto server.

The content index
above is created by
Panopto to match
your PowerPoint
slide titles.

       Controls for playing, rewinding, and adjusting the volume of the recording are at the bottom of your screen.

       Note: This is a good time to check your recording

                             Prepared by SC&I Instructional Design and Technology, Updated Summer 2017
                                 Help – SC&I IT Services: 848-932-5555 / help@comminfo.rutgers.edu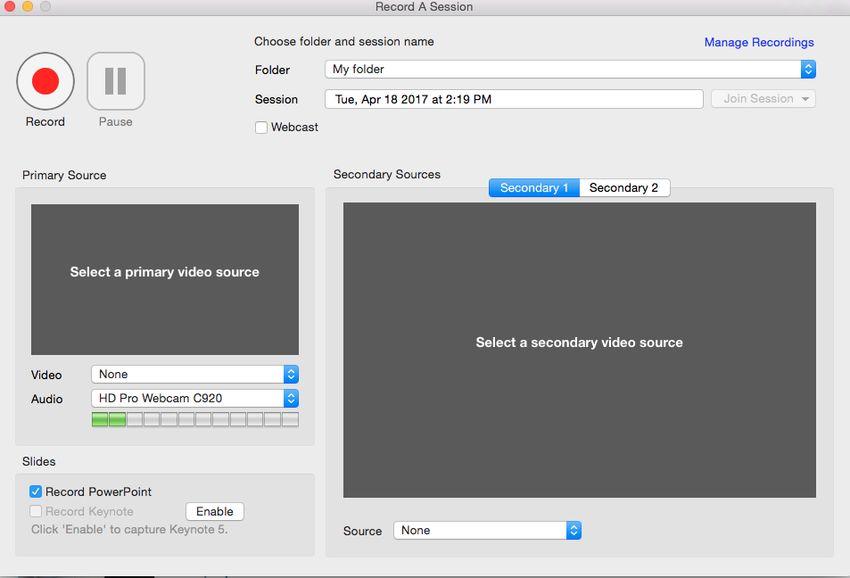
Page 9 of 9

9. Share Recording. To share your Panopto recording with your students, click on the Share link in the
   Manage Recordings Tab, or the share icon.

Access the direct URL for the video, which can be shared by email, or use Embed tab to copy code to be
inserted into HTML.

Use Who has access drop down menu to select Anyone with the link option. Anyone you send the link to
will be able to view your recording.

                      Prepared by SC&I Instructional Design and Technology, Updated Summer 2017
                          Help – SC&I IT Services: 848-932-5555 / help@comminfo.rutgers.edu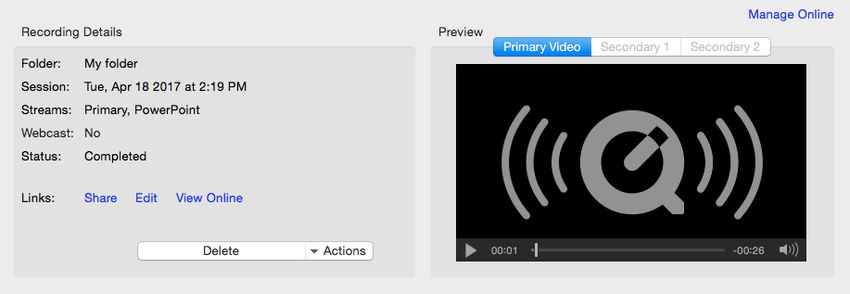
You can also read


