Guidelines for self record - Self Record Process
←
→
Page content transcription
If your browser does not render page correctly, please read the page content below
Guidelines for self record
6 tips for a successful
   video conference!
1. Best Camera
2. Sound Quality

                   We strongly recommend that you use a quality webcam.
                   Built-in camera do not typically deliver as good quality as
                   separate webcams.

                   Please use a headset, earbuds, or external USB micro to detect
                   unnecessary noises and sounds.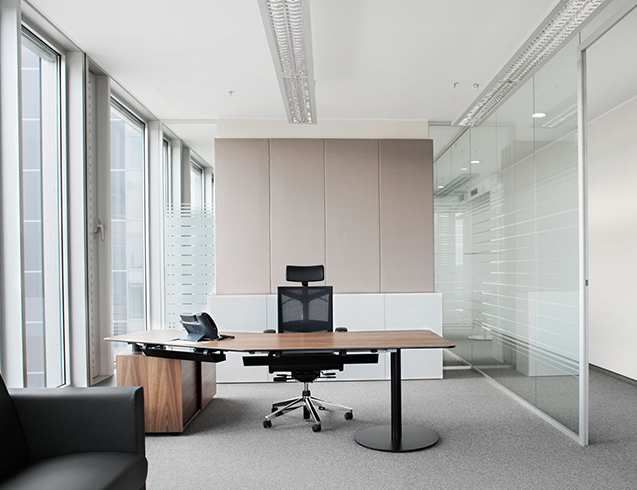
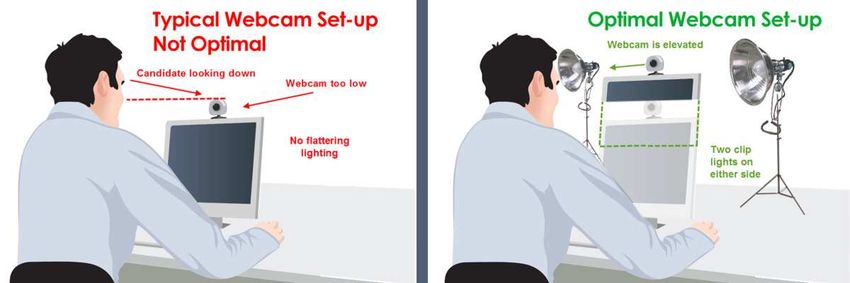
3. The Right Position

                        It is important to face the camera at eye level.
                        If you are using the camera on your laptop, you can stack a
                        few books under your computer to bring the camera at eye
                        level.

                        Always adjust the angle of the camera to place yourself both
                        horizontally and vertically in the center.

                        An ideal view would be from about mid chest to just above
                        your head.
4. The Perfect Lighting

                                    The lighting should be facing you and not coming from
                                    behind, as back lighting will make you appear dark.

                                    The easiest is to set up facing a window.

         If you cannot face a window, or if the window must be behind you, consider
         getting a small LED light or lamp to place on your desk facing you.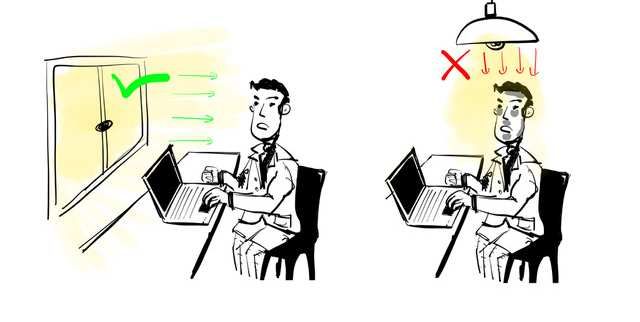
5. The Ideal Room Background

        Try to set up in a room that has the lowest chance of you being disturbed.

      It is also great to have some personal items behind you, but make sure that it
                             is not so much that it is distracting.

      When possible, give yourself some space between you and the wall behind you.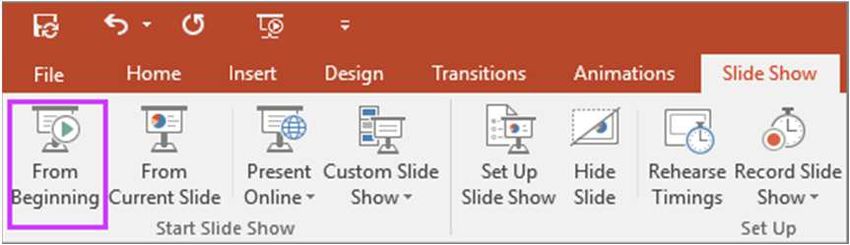
6. A stable internet connection
A good internet connexion is key.
Whenever possible, use a wired connection instead of WIFI
For the time of the record, close all programs opened on your computer (browsers,
softwares…) except the ones needed for the recording.
You can test your internet connexion on : http://speed.googlefiber.net/
Clic on the « play » button
Check the values for Download (minimum 1Mbps) and Upload (minimum 3Mbps)
If you don’t reach the minimum values please contact our technical assistance
7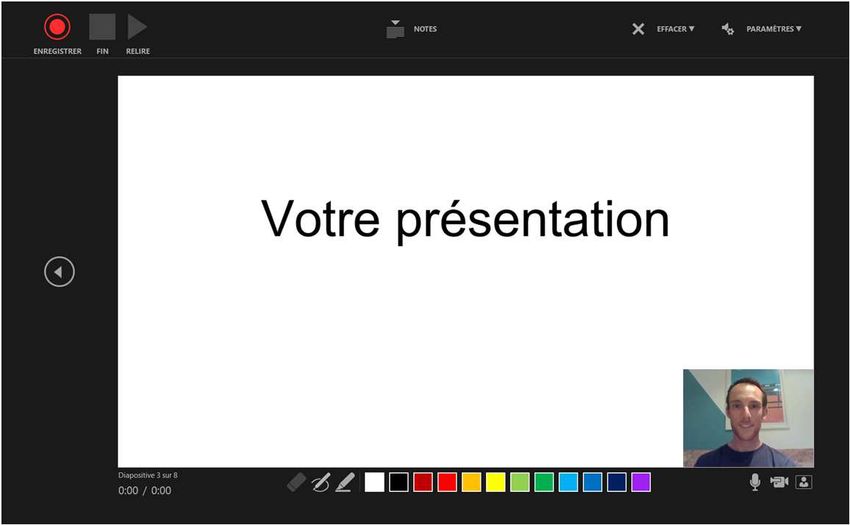
Record your presentation
Recording time (max)   Recommanded         Recommanded
12 minutes (regular)    format 16:9       type : mp4 | 720p
25 minutes (invited)
 3 minutes (poster)

     Please see different recording tools you can use
Google Meet

   ●   Follow the link to see the instructions

   ●   Direct link to the tutorial video (Youtube)

   Recordings include the active speaker and anything that’s presented. Recordings are
   saved to the organizer’s Meet Recordings folder in My Drive. An email with the recording
   link is sent to the meeting organizer and the person who started the recording. The link
   is added to the Calendar event.

                                                     9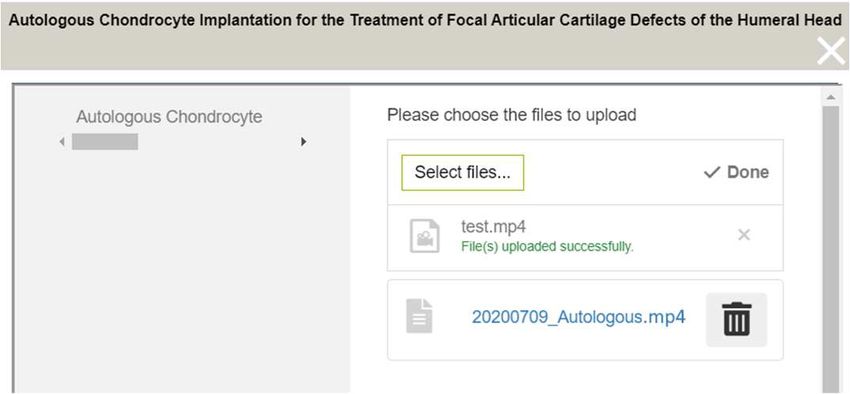
Zoom

  ●   Follow the link to see the instructions

  ●   Direct link to the tutorial video (Youtube)

  Local recording is available to free and paid subscribers.
  Local recording allows participants to record meeting video and audio locally to a computer.

  Local recording is not supported on mobile device

                                                    10
GoToMeeting
● Follow the link to see the instructions
● GoToMeeting website
11Teams
● Follow the link to see the instructions
Record any Teams meeting or call to capture audio, video, and screen sharing activity.
The recording happens in the cloud, and is saved to Microsoft Stream, so you can share it
securely across your organization.
12Loom
● Follow the link to see the instructions (Youtube)
● Loom website
13PowerPoint
• Open your file and select « Diaporama »
This process is compatible with
PowerPoint version 2019.
• Click on « Record diaporama » If you use an older version,
you can record but with your
voice only
A drop-down menu appears to either record from:
- the current slide (option 1) or
- from the beginning of the presentation (option 2).
Choose the option you prefer to start recording
The option « Clear » will be Option 1
available once recording.
! Be careful as if you click on it, it
will delete all previous recordings! Option 2
14PowerPoint - Record your presentation
This process is compatible with
When you click on « Record diaporama », your presentation will appear in PowerPoint version 2019.
a black window (similar to PPT Presenter mode). If you use an older version,
you can record but with your
voice only
You can find 3
buttons to start,
pause and stop
recording.
When you are
Your Presentation
ready, you can
click on the red
button to start
recording
A countdown of 3
seconds will be
launched once
your recording
starts.
15PowerPoint - Video Narration 1/2
• PowerPoint for Microsoft automatically records the time you
spend on each slide.
• You can record audio or video narration as you run through
your presentation.
You can move the
• The buttons at the lower-right corner of the window allow you location of the video
in your slide
to turn on or off the microphone, camera, and camera preview.
• Mouse movements are not recorded.
If you use the pen, highlighter, or eraser, PowerPoint records Without Without
those actions for playback also. camera preview
Be careful: if you re-record your presentation,
! previous versions will be deleted.
16PowerPoint - Video Narration 1/2
• To end your recording, select the square Stop button (or press S on your keyboard)
• When you finish recording your narration, a small picture appears in the lower-
right corner of the recorded slides. The picture is an audio icon, or, if the web
camera was on during the recording, a still image from the webcam.
This means the recording has been done.
• To check your recording, you can launch your presentation in Diaporama mode.
It will be displayed automatically with associated audio and video.
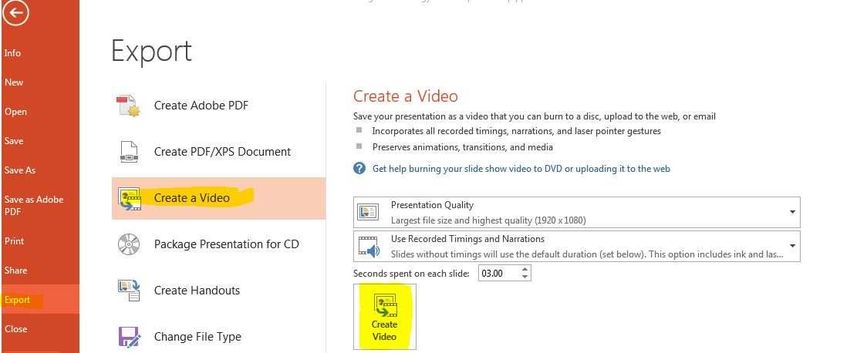
17PowerPoint - Export your file
To export your video from PowerPoint to standard video format (.mp4): Maximum size : 1Go
click on « File » on top left and follow the 5 steps below
3. Full HD Use Recorded
4. Timings and
Narrations
2.
1.
5.
18Upload your presentation
Upload - How to process? 1/2

 Please log-in to your personnal space (link sent by email)

                                                              No file uploaded

                                                         1. Click here

                                                        2. Select your
                                                           video file

                                            20
Upload - How to process? 2/2
3. When your video is uploaded,
click here to close the window
4. Your file is uploaded
21Thank you for your
collaboration!
For any technical question, please contact: emrs2021@key4events.comYou can also read