ORTAL USA Fireplace Trouble Shooting Guide
←
→
Page content transcription
If your browser does not render page correctly, please read the page content below
ORTAL USA
Fireplace Trouble
 Shooting Guide

                    1|Page
Table of Contents

   i.   Before you begin trouble shooting………………………..3
  ii.   Fireplace sequence of operation…………………………..4
 iii.   Pilot problems ………………...…………………………..5-6
 iv.    Thermocouple ………………..……………………………7-8
  v.    Main burner ……………….……………………………….9-10
 vi.    Appendix A: Glass Panel process .……………………..11-12
 vii.   Appendix B: Smart house connection …….……………..13-14
viii.   Appendix C: Mertix Maxitrol ………………...………….15-16

 Figure labeling standard for this manual is by page number and figure
        letter. For example, figure 3A would be page 3 figure A.

                                                              2|Page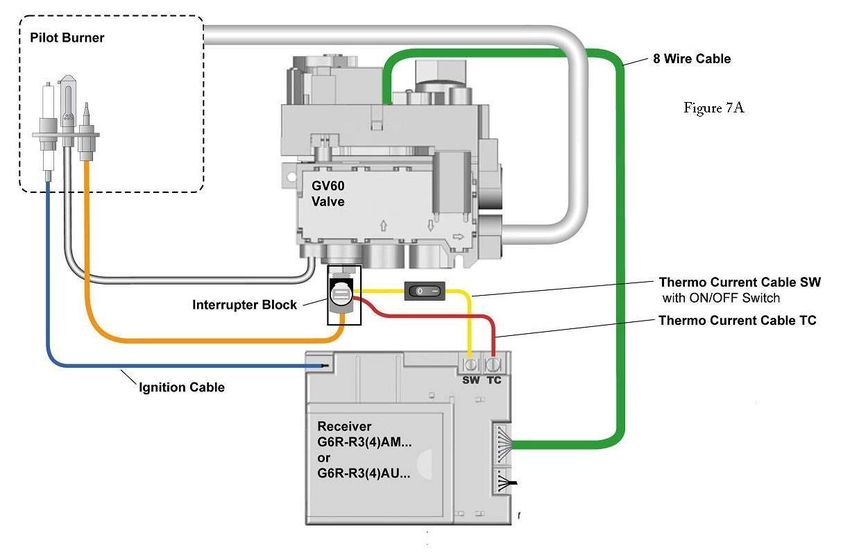
Before You Begin Trouble Shooting

Before you begin trouble shooting please go over the check list below.

   1. Replace batteries to new ones.
   2. Make sure the glass protective film is removed prior to operating the fireplace.
   3. Confirm the switch on the valve is on. ( see figure 3A)
   4. Confirm the gas is on.
   5. Purge the gas line of air up to the valve using purge port. ( see figure 3B)
   6. Confirm the pressure of inlet/ supply. Using purge port. (see figure 3B)
           a. Inlet pressure for NG should be 7” W.C
           b. Inlet pressure for LPG should be 11” W.C
   7. Valve and receiver wires are properly connected and tight and interrupter block is tight ( see
      figure 3C)
   8. Confirm the manual pilot valve operator is in the on position (see figure 3A)

                                                                                           3|Page
Fireplace Normal Sequence of Operation
1. Turn the fireplace on by pressing the off and flame up button simultaneously. (button
   1&2 of figure 4A)
2. System will check itself for any electrical trouble. This is accompanied by sequential
   beeps. (If there is a fault, weak batteries , the on/off switch is off, a single long beep
   will sound. See figure 3A for location of on/off switch)
3. Once the system check is ok it will initiate spark to the pilot and open gas to the pilot.
4. Once the pilot is on, the pilot will heat up the thermocouple.
5. When the thermocouple is heated to the specified temperature, it will allow the flow of
   the mill volt to the valve.
6. Once the mill volt is detected by the valve, the valve will turn the solenoid for the
   main burner on now the fireplace is fully on.

                                                                                  4|Page
Pilot Problems Trouble Shooting
                Make sure the glass protective film has been removed
a) Spark but no pilot
      (1) Review Before You Begin trouble shooting section. (Page 3)
      (2) Review Sequence of Operation section. ( Page 4)
      (3) Make sure the inlet line is purged and no air is present.
      (4) Make sure the valve is mounted horizontally unless it is a hanging Stand Alone
          unit.
      (5) Turn unit on 5-10 times after to purge the pilot tube of any air.
      (6) Make sure all wire connections are tight. Also make sure interrupter block is
          screwed in tight but not too tight (tightening the interrupter block too much
          will break it). Refer to Page 3 figure 3c.
      (7) Call ORTAL USA

b) No spark to the pilot
      (1) Review Before You Begin trouble shooting section. (Page 3)
      (2) Review Sequence of Operation section. (Page 4)
      (3) Locate the valve and receiver.
          (a) Once the receiver is located, pull from the holder.
          (b) Disconnect the wire for the spark wire ( see figure 3C)
          (c) Put a small wire on the receiver spark wire port and place the other side of
              the wire close to the metal body without touching (about 1/8”). While
              keeping an eye on the small wire turn unit on and see if there is a spark
              jumping from the wire to the body of the fireplace. If there is please
              proceed to step (4) if not call ORTAL USA.
      (4) Remove the glass; refer to Appendix A for glass removal.
      (5) Remove grill and burner.
      (6) Remove pilot assembly from burner.
      (7) Reconnect the spark wire and disconnect the wire from the spark plug.
          (a) Place the spark wire close to the metal body of the fireplace without
              touching (about 1/8”). If there is not spark or weak spark jumping from
              the wire replace the wire. If the spark is strong and jumping proceed to
              step (5).
      (8) Replace the spark plug. Call ORTAL USA if spark plug is need.

c) Pilot turns off after igniting but before burner turns on
       (1) Replace battery.
       (2) Review Sequence of Operation section. (Page 4)

                                                                                 5|Page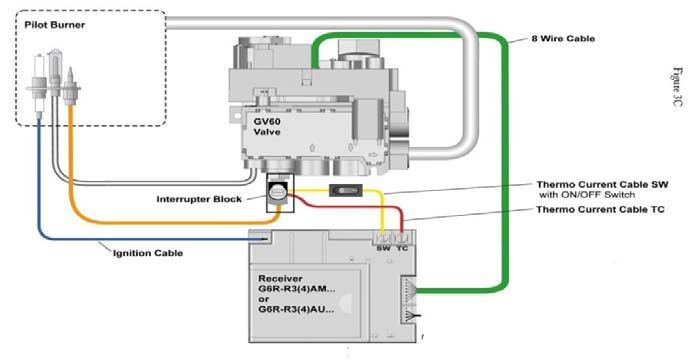
(3) Turn unit on; listen and look at the pilot section. Once the pilot is on, is the
          spark continuing to ignite the pilot? If so proceed to Section IV thermocouple
          trouble shooting. If not proceed to step (4)
      (4) Remove the glass and refer to appendix A.
      (5) Make sure the pilot assembly and pilot hood screw is tight and there is a
          gasket.
      (6) Call ORTAL USA.

d) Pilot turns off after igniting and after burner turns on
       (1) Review Sequence of Operation section.
       (2) Open glass; refer to appendix A for glass removal process.
       (3) Make sure the valve is mounted on horizontally. Except for hanging Stand
           Alone units.
       (4) Turn unit on and see if the pilot is still turning off after the burner turns on. If
           not go to step (4). If pilot turns off make sure the flame from the pilot is hitting
           the thermocouple.
       (5) Make sure the pilot assembly and pilot hood screw is tight and the pilot
           assembly gasket is present and in good condition.
       (6) Review restrictor table and make sure the right restrictor is in place.
       (7) Call ORTAL USA

                                                                                    6|Page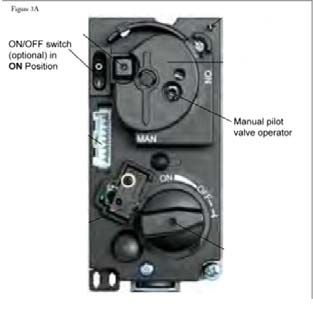
Thermocouple

Thermocouple check list Refer to figure 7A

1) Place new batteries in the receiver.
2) Check for any breakage to the thermocouple from pilot assembly to the valve.
3) Confirm the thermocouple is tight to the interrupter block and the thermo current cable is
   securely touching the end of the thermocouple.
4) Confirm that the interrupter block is screwed into the valve properly and finger tight.
5) Confirm thermo current cable TC is screwed into the receiver properly and tight.
6) Confirm thermo current cable SW is screwed into the receiver properly and tight.
7) Confirm the thermo current cable SW is securely placed in the interrupter block.

                                                                                   7|Page
Thermocouple Test

1) Only proceed to do this test after Thermocouple check list has been done. (Page 7)
2) Remove the glass. Refer to appendix A.
3) Turn gas off to the unit.
4) Turn unit on while the spark is sparking put a heat source to the thermocouple. Spark
   should stop once the thermocouple sense that there is heat. If the spark does not stop
   proceed to step (5)
5) Check that the thermocouple is screwed in properly in the interrupter block and the
   thermo current cable is screwed in tight at the receiver and the other end is touching the
   head of the thermocouple at the interrupter block.
6) If all the procedure above is preformed, thermocouple should be replaced. Complete part
   claim/replacement form and call ORTAL USA for replacement.

                                                                                    8|Page
Main Burner
a) Main burner not turning on and the pilot is on, valve on sequence is done.
i) Check that the manual pilot valve operation is on the on position.
b) Main burner turning off after a period of time.
i) When the main burner turns off, is the pilot still on? if not proceed to step (ii)
(1) Make use the remote thermostat is set to the desired temp or to the highest
temp allowed in the remote so the system does not turn the burner off.
ii) How does the flame look before the fireplace turns off? Proceed to flame problem
section
c) Main burner is turning on and off.
i) The pilot flame is being intermittently deflected off the thermocouple. Make sure
the pilot assembly screw is tight and the gasket is present and in good condition.
d) Flame problem.
(1) Feint or blue flame.
(a) Too much CO in the fireplace.
(i) Review the vent run and place the right size of restrictor in the unit if it
is the right restrictor, check the pipe for proper connection as there is
CO back feeding or the vent run is not approved.
(ii) The termination is block
(b) Too much O2 in the fireplace
(i) Review the vent run and place the right size of restrictor in the unit if it
is the wrong restrictor put in a bigger one
(2) Flame is jumping from burner.
(a) Too much draw in the fireplace
(i) Review the vent run and place the right size of restrictor in the unit if
it is the right restrictor put in a bigger one.
(3) Part of the burner is not turning on.
(a) Too much CO in the fireplace
(i) Review the vent run and place the right size of restrictor in the unit if it
is the right restrictor, check the pipe for proper connection as there is
CO back feeding or the vent run is not approved.
(ii) There is too much media; 20% non coverage was not followed.
(iii) Burner ports are clogged.
(4) Small flame
(a) The unit manifold pressure is not right; please refer to the chart 10A below
for the right pressure.
9|PageOrtal Fireplace Pressures
Burner size Gas Inlet pressure Manifold pressure
(cm) type (W.C.) (W.C.)
160 NG 7 4.5
Series 200 LP 11 10.6
130 NG 7 3.5
150&170 Series LP 11 10.7
100 NG 7 5
110&130 Series LP 11 10.8
45 NG 7 4.7
65&70 Series LP 11 10.9
30 NG 7 4.2
Series 40 LP 11 8.1
10 | P a g eAppendix A
Handling Glass Sketch A
1. Demonstration
2. Install / Re-Install
a. When installing, install glass Special wooden
base first and then top. supports or blanket(s)
b. Must use vacuum holder and
secure by using blanket.
c. When closing screw of the glass
trim, close gently with finger
Glass
force until it’s closed.
Vacuum glass
(No need to tighten)
holders
d. When installing the glass back,
make sure that bottom trim
screws are a little bit loose,
verify that the glass is lining on Keep anti slip angle
the bottom trim and not on the
screw.
e. Always close bottom glass trim
first (don’t tighten yet) and then
top. (Verify that the trim site is at the right place, levelled and not in an offset
position).
f. When you tighten the screw with finger force, you must do it from side to side
(not from the middle to the sides).
g. Use glass vacuum holder, 10mm key and make sure to secure glass when it is
out of the fireplace.
h. Please see figure 12A and 12B
3. Remove
a. When removing glass, always release top glass trim and then bottom.
b. Use glass vacuum holder, 10mm key and make sure to secure glass when it is
out of the fireplace
c. Please see Sketch A
4. Clean
Silicon
1. Demonstration
2. Application and Removal
3. Cure Time 24 hours and Operation Following Installation
4. Dry silicon method
11 | P a g eFigure 12A
Figure12B
12 | P a g eAppendix B
13 | P a g e14 | P a g e
15 | P a g e
16 | P a g e
You can also read