Quick Guide for Students Taking Smarter Balanced & NGSS Interim Assessments Remotely Fall Pilot - CT.gov
←
→
Page content transcription
If your browser does not render page correctly, please read the page content below

Quick Guide for Students
      Taking Smarter Balanced
               & NGSS Interim
       Assessments Remotely
                                                               Fall Pilot
                                                                            2020-2021
                                                                    Published November, 4 2020

                                                          Prepared by Cambium Assessment, Inc.

Descriptions of the operation of Cambium Assessment, Inc. (CAI) systems are property of
Cambium Assessment, Inc. and are used with the permission of CAI.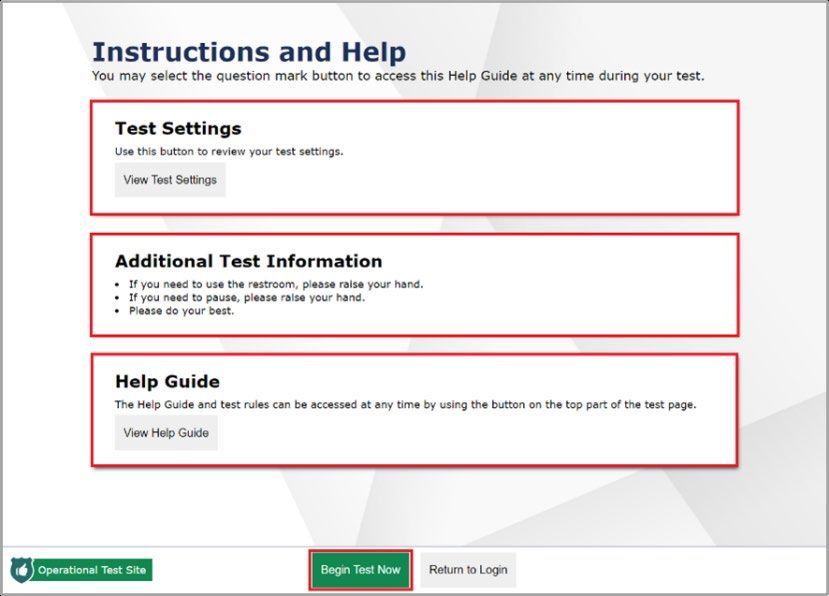
Table of Contents
Quick Guide for Students to Take Tests at Home ............................................................................ i
   Introduction ................................................................................................................................ 1
   How to Prepare before the Day of the Test ............................................................................... 1
      How to Prepare a Student's Computer to Take a Test at Home ............................................ 2
   Tasks to Complete on the Day of the Test .................................................................................. 9
      How to Sign In to Take a Test.................................................................................................. 9
      How to Ask Your Teacher for Help while you Take a Test at Home ..................................... 18
      How to Send Chat Messages to Your Teacher ...................................................................... 19
      How to Respond to Chat Messages from Your Teacher ....................................................... 20
      How to Submit Your Test after You Finish ............................................................................ 21
   Frequently Asked Questions ..................................................................................................... 23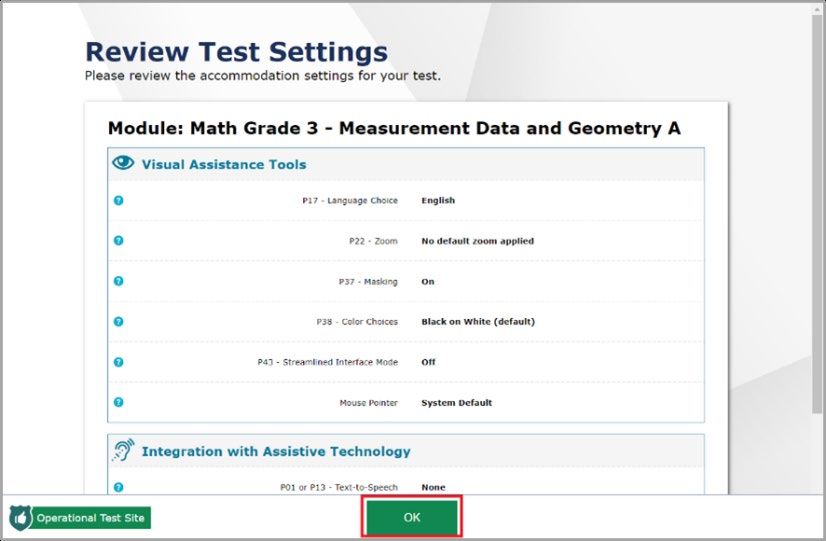
Introduction
This guide explains how students can take Smarter Balanced or NGSS Interim Assessments
remotely through distance learning.
• The same online testing system that teachers and students use to administer interim
assessments in the classroom has been upgraded to allow students to take tests at
home.
Teachers can broadcast chat messages to students during a test session and
students can respond by sending chat messages back to their teacher.
Students and teachers can communicate in real time with each other through
one-on-one video conference feature built into the online testing system.
• Teachers and students will not be asked to share any additional personally identifiable
information than they would share in an ordinary test session in a classroom.
This guide outlines the steps you and your child can take to
• Prepare for testing
• Sign in to take a Smarter Balanced or NGSS Interim assessment from home
• Communicate with the teacher during a remote test
• Submit a completed test
How to Prepare before the Day of the Test
There are a few things to do before students take a test at home. Your child’s teacher should
help you get ready. Below are important before considerations prior to testing:
• What technology students need to take an interim while the student is at home
• Ways to reach the teacher before, during, and after testing
Task Status
Work with your teacher to make sure that your testing device has a supported web
browser installed. If your computer is loaned to you by your school or school
district, use the Secure Browser. If you are using a personal computer, use a
conventional web browser like Chrome or Firefox. Students taking a remote test
without video conferencing can use either the Secure Browser or Safari. Students
testing on iPads must use the pre-installed Safari web browser. The Secure Browser
is not supported for video conferencing on iPads.
Work with your teacher to make sure your testing device has a built-in or plug-in
webcam, microphone, and speaker. This allows you and your teacher to see each
other and communicate while taking the test at home.
(If applicable) Work with your teacher to make sure that your testing device has any
necessary assistive technology like text-to-speech software or screen readers.
1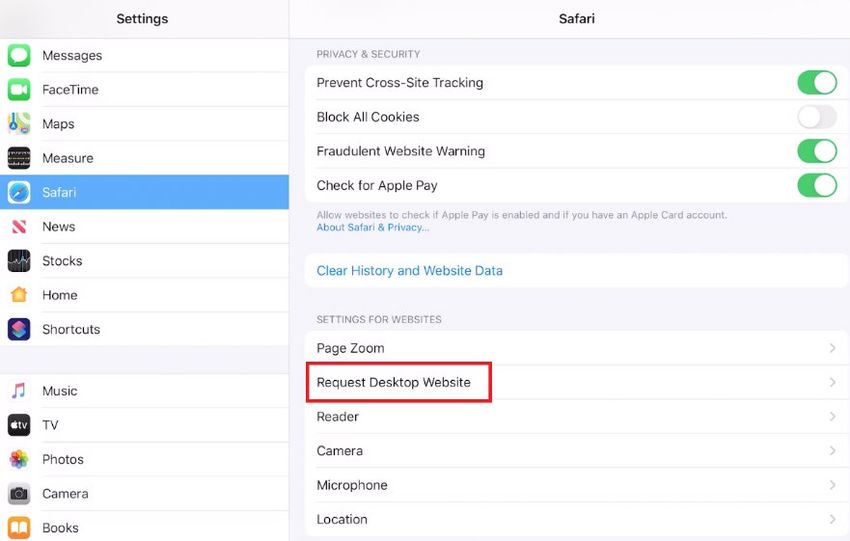
Use the diagnostic checker to make sure your webcam, microphone, and speaker is
 working properly.
 https://demo.tds.cambiumast.com/systemdiagnostic/pages/default.aspx?c=Connec
 ticut_PT
 (Optional) Make sure you are prepared to take a test by accessing the Connecticut
 Comprehensive Assessment Program Portal Practice Test site. Your teacher and
 technology coordinator can help you access this site so you can take a practice test
 and feel comfortable with the online test.

How to Prepare a Student's Computer to Take a Test at Home
To prepare the student’s computer to take a test remotely, students should have the proper
hardware and software and a strong internet connection.

What technology do students need?
The technology requirements to take a test remotely is almost exactly the same as those used
to take a test in a classroom, except students will also need a webcam, microphone, speaker—
all of which should be built-into the computer.

If your child does not have access to a computer or other accessories that meet the
requirements listed in the table below, contact your child’s teacher to determine how best to
proceed.

The chart below describes the hardware and software requirements for the student’s device.

Hardware Requirements for Students

 Type of Hardware        Required Hardware
 Desktop, laptop, or     Any supported desktop or laptop running any supported version of
 iPad                    Windows, macOS, Ubuntu, Fedora, or Chrome OS or any supported
                         iPad running any supported version of iPadOS. For a list of supported
                         desktops, laptops, iPads, and operating systems, please visit
                         Connecticut Comprehensive Assessment Program Portal.
 Webcam                  Students may need a webcam that is built into their computer or one
                         that plugs into their computer. This will allow the student’s teacher
                         to see the student during testing and during one-on-one video
                         conference sessions.
 Microphone              Students also need a microphone that is built into their computer or
                         one that plugs into the computer. This will allow the student to speak
                         to their teacher during one-on-one video conference sessions.
 Speaker                 Students also need a speaker that is built into their computer or one
                         that plugs into the computer. This will allow the student to hear their
                         teacher during one-on-one video conference sessions.

                                               2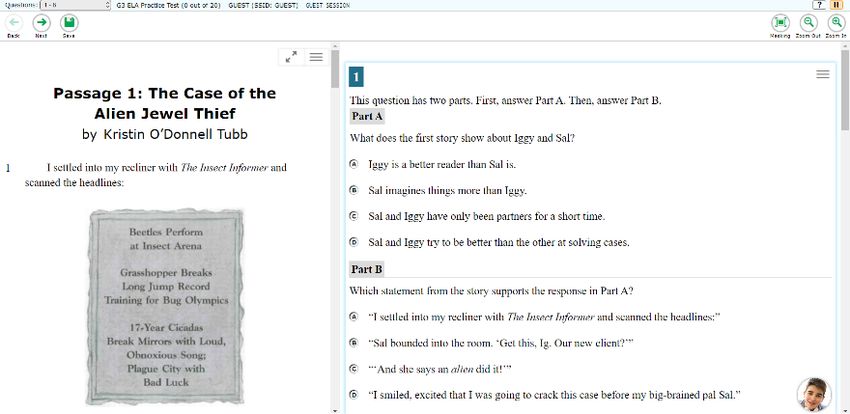
Assistive Technology   Students in need of certain supports and accommodation such as
                        text-to-speech software or screen readers need this as well. See the
                        section How to use Accommodations When you Complete your Test
                        for more information. Note: Accommodations and supports that are
                        embedded in the online testing system will be available with remote
                        testing. However, there may be circumstances for which students will
                        need to use their assistive technology to access the testing program.
                        In such instances, parents will need to communicate with the teacher
                        and school technology coordinator to make sure the technology
                        functions properly in conjunction with the testing platform.

Software Requirements for Students
Whether students are testing in a classroom or remotely, they need to use a web browser to
access the testing website to take an interim assessment. To access the site, each student’s
computer needs a compatible web browser.

Computers loaned to the student by their school district may have the Secure Browser installed
on them. The Secure Browser is a customized web browser that locks down the student’s
computer during the test, so the student cannot access anything except the testing website. A
shortcut for the Secure Browser appears on the desktop. Students double-click this shortcut to
launch the Secure Browser and are then taken right to the testing website where they sign in to
take a test or complete the assignment or quiz.

Here is an example of what the Secure Browser desktop icon looks like on your computer:

Students using personal desktops or laptops running Windows, macOS, Ubuntu, Fedora, or
Chrome OS should download and install either the Chrome or Firefox web browsers if one is not
already installed on the computer. This means that students can take a test without using the
Secure Browser. Technology coordinators from a student’s school can help with this if
necessary. Students taking a remote test without video conferencing can use either the Secure
Browser or Safari. When using video conferencing features, students testing on iPads must use
the pre-installed Safari web browser. The Secure Browser is not supported for video
conferencing on iPads.

To download the Chrome web browser, go here: https://www.google.com/chrome/

To download the Firefox web browser, go here: https://www.mozilla.org/en-US/firefox/new/

                                               3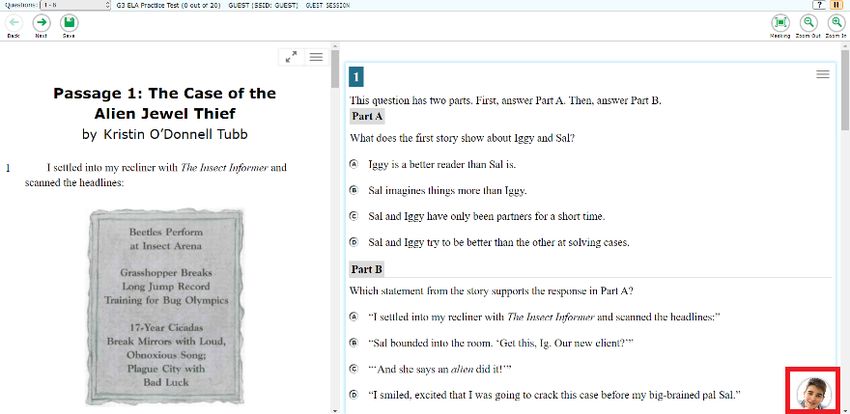
Students should also have access to any necessary assistive technologies like text-to-speech
software or screen readers they need to take a test. For more information, see the section How
to use Accommodations When you Complete your Test.

Before Testing Day: How to Check Your Technology prior to Testing
To ensure the student’s internet speed, webcam, microphone, and speaker meet the minimum
requirements necessary for remote testing, students and their families should work with the
student’s teacher or school’s technology coordinator to run the diagnostic checker available at
https://demo.tds.cambiumast.com/systemdiagnostic/pages/default.aspx?c=Connecticut_PT.
From this site, students and their families can test their internet speed to make sure it meets
the minimum recommended speed for taking a test from home and video conferencing with
your teacher. Internet speed is measured in two ways: download and upload. Download speed
is the speed in which data is transferred from the internet to your computer. Upload speed is
the speed in which data is transferred from your computer to the internet. Please see the chart
below for recommended download and upload speeds. If your internet speed does not meet
the minimum recommended speed as outlined in the chart below, video conferencing will still
work. Video quality will automatically scale down to a level your internet speed can handle.
                                      Without video conferencing      With video conferencing
                                      during the test:                during the test:
 Recommended Download Speed           150 kilobits per seconds        1.8 megabits per second
 Recommended Upload Speed             20 kilobits per second          1.8 megabits per second

Students can ensure their internet speed meets the minimum requirement for taking a test
from home by following the steps below:

1. From the Select Test drop-down list, select the test you will be taking. If you are unsure
   which test to select, check with your teacher. If you will be taking more than one test from
   home, you should run the speed test for each test you will be taking.

2. In the Enter the total number of students you would like to test at one time field, enter 1.

3. Select Run Network Diagnostics Tests.

4. The speed test will indicate if your internet speed is fast enough to take the test from home.
   If your speed is not fast enough, notify your teacher before the day of the test.

                                                4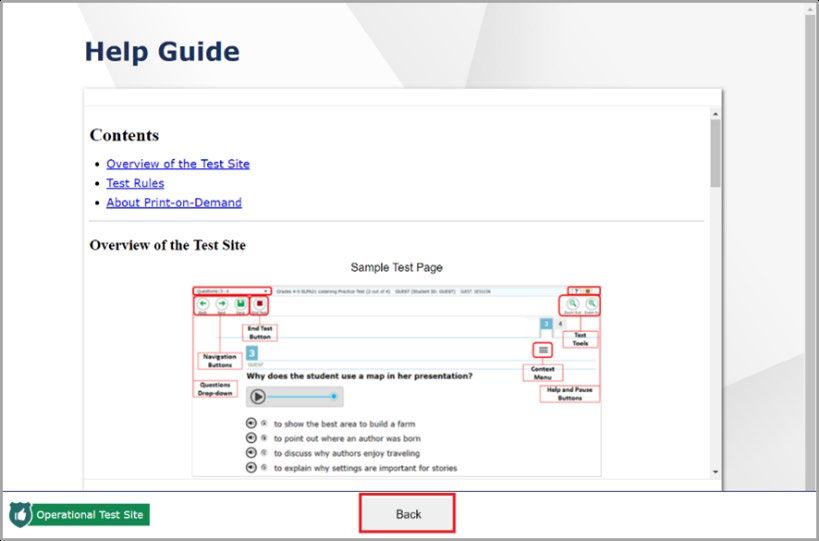
From the diagnostic site, students and their families can also test their webcam, microphone,
and speaker to make sure they are working properly. To test your webcam, microphone, and
speaker, select Audio and Video Checks to access audio and video checks for your device.

Students can ensure their webcam is working properly by following the steps below:

1. In the Camera Check field, mark the I agree to grant the browser permission to access the
   camera checkbox.

2. Select the Camera icon (     ).

3. A pop-up window appears in your web browser, requesting access to your camera. Select
   Allow. If you do not select Allow, the online testing system will not be able to access your
   camera and you may be unable to proceed.

4. Do one of the following:

   •   If live video from your webcam appears, select I see myself. A checkmark appears in the
       upper right corner of the Camera Check field. Your camera works.

   •   If live video from your webcam does not appear, select I cannot see myself and contact
       your teacher to troubleshoot the problem.

                                                5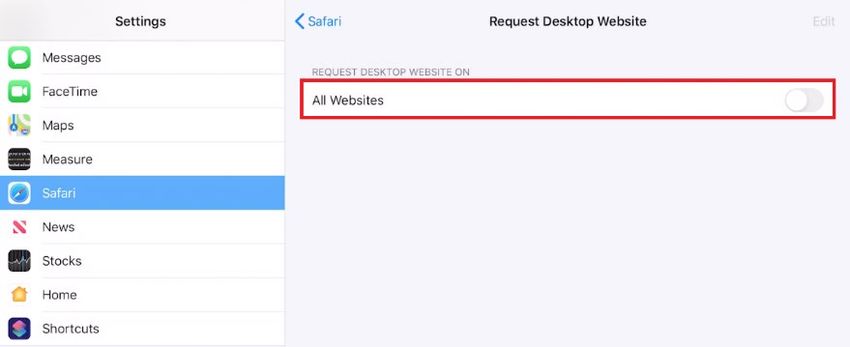
Students can ensure their microphone is working properly by following the steps below:

1. In the Microphone Device Check field, select the Microphone icon (         ).

2. A pop-up window appears in your web browser, requesting access to your microphone.
   Select Allow. If you do not select Allow, the online testing system will not be able to access
   your microphone and you may be unable to proceed.

3. Speak into your microphone.

4. When you are done speaking, select the Stop icon (         ) to stop recording.

5. To listen to your recording, select the Play icon (   ).

6. To stop listening to your recording, select the Stop icon (    ).

7. Do one of the following:

   •   If you hear the audio you recorded from your speaker, select I heard my recording. A
       checkmark appears in the upper right corner of the Microphone Device Check field. Your
       microphone works.

   •   If you do not hear the audio you recorded from your speaker, select I did not hear my
       recording and contact your teacher to troubleshoot the problem.

                                                 6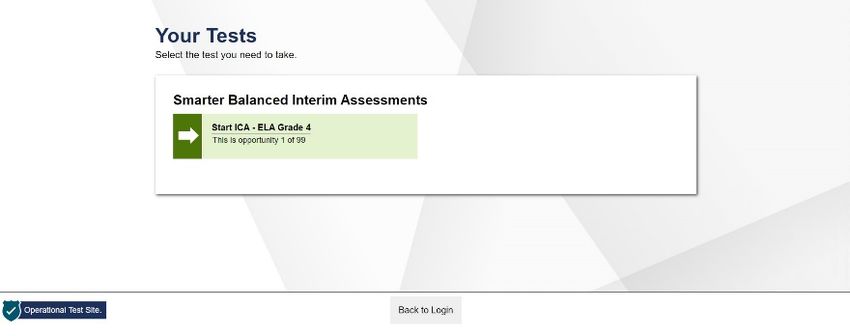
Students can ensure their speaker is working properly by following the steps below:

1. In the Audio Playback Check field, select the Play Audio icon (    ).

2. Do one of the following:

   •   If you hear the sound from your speaker, select I heard the sound. A checkmark appears
       in the upper right corner of the Audio Playback Check field. Your speaker works.

   •   If you do not hear the sound from your speaker, select I did not hear the sound and
       contact your teacher to troubleshoot the problem.

How to Communicate Session-Information Securely with Your Teacher
   •   Teachers will provide students with a link to the session or a session ID that students will
       use to access the test on their computers at home.
   •   Teachers will support students through the login process, including helping students
       securely find their student ID.
   •   Teachers and students should use whichever classroom management system they have
       in place to share secure information with students. You should check with your child’s
       teacher about how this information will be shared.

How to Use Accommodations during Your Test
Students who use supports and accommodations (i.e., bilingual dictionary, noise buffer,
magnification) during an in-school interim need the same access when they take a test
remotely.

                                                7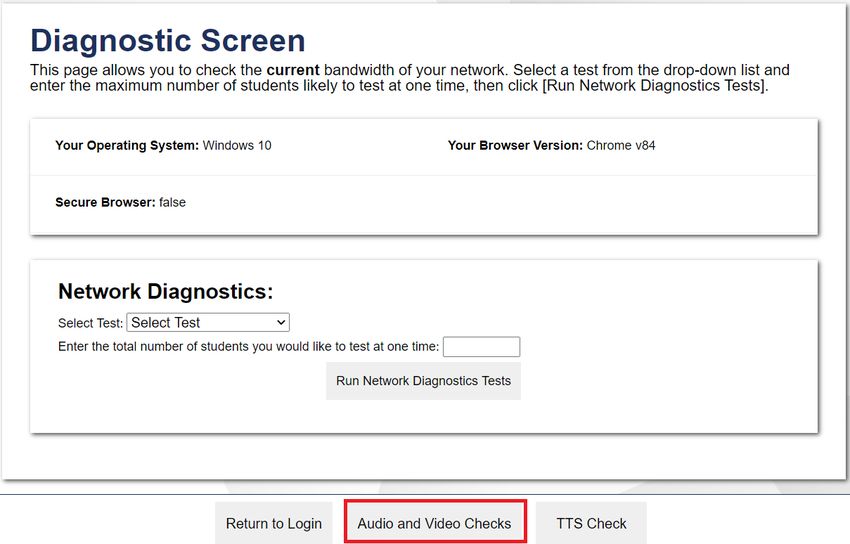
Parents and students should work with their teacher and their school’s technology coordinator
to set up any additional accommodations like text-to-speech software or screen readers that is
not provided directly from the testing system.
Most supports and accommodations are built into the online testing system and work the same
way at home as they do in the classroom. However, there are a few exceptions. Students taking
a test at home are unable to have items printed or embossed for them. If these
accommodations are necessary, students and their families should work with the student’s
teacher to determine other options for taking the test.

If students taking a test in a classroom use assistive technologies that are not built into the
online testing system, including screen readers, magnifiers, or switch devices, those
technologies will still work with the online testing system even if the student is taking a test
from home. For the best experience with third-party assistive technologies, students should use
either CAI’s Secure Browser or Firefox.

How to Prepare a Student’s iPad to Take a Test at Home
If your child is using an iPad to take a test from home, you will need to configure the iPad to
load the mobile version of the testing site using the instructions below.
Note that if you do not load the mobile version of the testing site to the iPad, by default, the
iPads will load the desktop version if Safari is used. This causes students trying to take a test on
Safari to see an Unsupported OS/Browser Combination error when they try to access the
testing site. To avoid this error, iPads must be configured to load the mobile version of the
testing site instead of the desktop version. This only needs to be done if a student is using an
iPad to take a test. If a student is using a desktop or laptop computer, this is not necessary.
Instructions for loading the mobile version of the testing site to your child’s iPad:
1. On the student’s iPad, open Settings.

2. Open Safari settings.

3. Select Request Desktop Website.

                                                 8
4. Turn All Websites off.
Tasks to Complete on the Day of the Test
This section lists and explains the tasks that students need to complete on the day they will
complete a test remotely. Students should be ready to join the remote test session twenty
minutes prior to the start time provided by their teacher. The sections below cover the
following topics:
• How to sign in to take a test
• How to ask the teacher for help while you take a test at home
• How to respond to chat messages sent by the teacher
• How to send chat messages to the teacher
• How to submit your test after you finish
How to Sign In to Take a Test
Before or on the day of the test, the teacher will provide a session ID and a link to the session.
Students using the Secure Browser need the session ID. When a student opens the Secure
Browser, they first see the sign in page, where they will enter their first name, student ID, and
the session ID provided by the teacher.
Students using Chrome or Firefox need the link to the test session. When a student selects the
link, the website that hosts the test opens in their web browser, and the session ID is
automatically populated. Students still need to enter their first name and student ID, which can
be provided by the teacher if needed.
For information about communicating sensitive information like session IDs and student IDs,
see the section How to Communicate Session Information Securely with Your Teacher.
Students can sign in to a take a test by following the steps below:
1. To access the Sign In page, do one of the following:
• If you are using the Secure Browser, double-click the shortcut on your desktop to launch
it.
9• If you are using a conventional browser like Chrome, Firefox, or Safari select the link to
the session provided by your teacher or copy it and paste it into the URL bar in your
browser.
2. The Sign In page appears. Do the following:
a. In the First Name field, enter your first name exactly as it appears in Cambium
Assessment systems. If you are unsure how your name appears in Cambium Assessment
systems, check with your teacher. You need to enter your first name whether you are
using the Secure Browser or a conventional browser like Chrome, Firefox, or Safari.
b. In the Student ID field, enter your student ID. If you do not know your student ID, your
teacher can provide it. You need to enter your student ID whether you are using the
Secure Browser or a conventional browser like Chrome, Firefox, or Safari.
c. In the Session ID field, if you are using the Secure Browser, enter the session ID provided
by your teacher. If you accessed the site by selecting the link provided by your teacher,
the session ID is automatically populated.
d. Select Sign In.
3. The Is This You? page appears. The information on this page includes your first name,
student ID, grade, and school. If all the information on the Is This You? page is correct,
select Yes. If any information on this page is incorrect, notify your teacher before selecting
No.
104. The Your Tests page appears. The test(s) included in the test session will be listed here.
Select the test as instructed by your teacher. If any of the information on this page is
incorrect, notify your teacher before proceeding.
5. The Waiting for Approval page appears. Your request to join the test session is sent to the
teacher. Your teacher must approve you into the session before you can proceed.
6. After your teacher approves you into the session, the Audio/Video Checks page appears.
Depending on the test, you are completing, some checks below may not appear. To
complete the checks that do appear, do the following:
a. In the Camera Check field, you will need to do the following:
i. Mark the I agree to grant the browser permission to access the camera checkbox.
ii. Select the Camera icon ( ).
11iii. A pop-up window appears in your web browser, requesting access to your camera.
Select Allow. If you do not select Allow, the online testing system will not be able to
access your camera and you may be unable to proceed.
iv. Next, you will need to do one of the following:
If live video from your webcam appears, select I see myself. A checkmark
appears in the upper right corner of the Camera Check field. Your camera works.
If live video from your webcam does not appear, select I cannot see myself and
contact your teacher to troubleshoot the problem.
b. To check the audio on your student’s device, you will need to do the following in the
Microphone Device Check field:
i. Select the Microphone icon ( ).
ii. A pop-up window appears in your web browser, requesting access to your
microphone. Select Allow. If you do not select Allow, the online testing system will
not be able to access your microphone and you may be unable to proceed.
iii. Speak into your microphone.
iv. When you are done speaking, select the Stop icon ( ) to stop recording.
v. To listen to your recording, select the Play icon ( ).
vi. To stop listening to your recording, select the Stop icon ( ).
vii. Do one of the following:
12 If you hear the audio you recorded from your speaker, select I heard my
recording. A checkmark appears in the upper right corner of the Recording
Device Check field. Your microphone works.
If you do not hear the audio you recorded from your speaker, select I did not
hear my recording and contact your teacher to troubleshoot the problem.
c. In the Audio Playback Check field, do the following:
i. Select the Play Sound icon ( ).
ii. Do one of the following:
If you hear the sound from your speaker, select I heard the sound. A checkmark
appears in the upper right corner of the Audio Playback Check field. Your speaker
works.
If you do not hear the sound from your speaker, select I did not hear the sound
and contact your teacher to troubleshoot the problem.
d. Select Continue.
7. Once you have completed the hardware checks, the Instructions and Help page appears. On
this page, you can do any of the following:
a. To contact your teacher, select the Student Video icon ( ). By default, this appears in
the lower right corner of your screen. To move it, use the arrow keys that appear when
you hover your cursor over your image. After you have selected your image, you can do
any of the following:
13i. To send a chat message to your teacher, do the following:
a. Select the Messages icon ( ).
b. In the Type a new message field, enter the message you wish to send to your
teacher.
c. Select the Send icon ( ).
A notification appears on your teacher’s screen. Your teacher can respond by
sending you a chat message.
ii. You can view a live feed from your webcam by doing the following:
a. Select the Video icon ( ).
b. A live feed from your webcam appears. You can do the following:
To turn off your webcam, select the Webcam icon ( ). To turn it back
on, select the icon again. With your webcam off, your teacher is unable to
see you.
14 To turn off your microphone, select the Microphone icon ( ). To turn it
back on, select the icon again. With your microphone off, your teacher is
unable to hear you during a video conference.
iii. To let your teacher know you need help by virtually “raising your hand,” select the
Raise Hand icon ( ).
15A notification appears your teacher’s screen. Your teacher can respond by sending
you a chat message or by starting a video conference with you.
iv. To close the widget, select X.
b. To review your test settings, select Review Test Settings. Your test settings and
accommodations for the test appear. If any of this information is incorrect, notify your
teacher. To return to the Instructions and Help page, select OK.
c. To view any additional test information, if applicable, see the Additional Test
Information field.
16d. To view the help guide, select View Help Guide. The help guide appears. You can also
view the help guide at any time during the test by selecting the Help button inside the
test. To return to the Instructions and Help page, select Back.
e. To start the test, select Begin Test Now.
Once you begin the test, test questions appear on the screen. You complete your test in the
same way as if you were in your classroom or school. Your teacher can monitor your progress
throughout the test even while you are taking the test from home. While you are allowed to
use blank scratch paper to take notes or problem solve, you may not use a phone or any other
device, or ask someone for answers to test items. If you have any questions about the test, use
the raise hand icon or chat feature for teacher assistance.
17How to Ask Your Teacher for Help while you Take a Test at Home
Students can request assistance from their teacher while they are taking a test from home
either by chat or by using the video feature. Students should follow the steps below to ask the
teacher for help:
1. While in the test, select the Student Video icon ( ).
2. The Video pop-up window opens. Select the Raise Hand icon ( ).
18Your teacher will see a message on their computer alerting them that you need help. Your
teacher can send you a chat message or start a video conference. Your teacher can also
lower your hand.
3. To lower your hand, select the Lower Hand icon ( ).
4. To close the window, select X.
How to Send Chat Messages to Your Teacher
Students can send chat messages to teachers through the online testing system while they are
taking a test at home.
Students can send chat messages to their teacher by following the steps below:
1. While in the test, select the Student Video icon ( ).
192. The Video pop-up window opens. Do the following:
a. Select the Messages icon ( ).
b. In the Type a new message field, enter the message you wish to send to your teacher.
c. Select the Send icon ( ).
3. To close the window, select X.
How to Respond to Chat Messages from Your Teacher
While students are taking tests remotely, teachers can send chat messages through the online
testing system to one student at a time or all students in a session. These messages appear on
the student’s screen while they are taking the test.
20Students can respond to chat messages from their teacher by following the steps below:
1. Messages sent by your teacher appear automatically on your screen.
2. To respond, do the following:
a. In the Type a new message field, enter the message you wish to send to your teacher.
b. Select the Send icon ( ).
3. To close the chat window, select X.
How to Submit Your Test after You Finish
When a student completes their remote test, they submit the test the same way they would in
a classroom by following the steps below:
1. Students select End Test in the upper-left corner, which appears after students respond to
the last test question.
2. A confirmation message appears. Students select Yes. The End Test page appears, allowing
21students to review answers and submit the test for scoring.
– A flag icon ( ) appears for any questions marked for review. A warning icon ( )
appears for any unanswered questions.
3. Optional: To review previous answers, students select a question number. When done
reviewing, they can return to the End Test page by selecting End Test again.
4. To submit the tests, students select Submit Test, then select Yes in the confirmation
message that appears.
5. The Your Results page appears displaying the student’s name, the test name, and the
completion date. To exit the Student Testing Site, students select Log Out, and then close
the web browser.
22Frequently Asked Questions
1. What happens if the student is unable to submit the test or if the student’s internet
connection is lost?
If a student completes a test but does not submit it, the test will automatically be submitted
after a period of time.
If a student loses their internet connection during a test, the test is paused and the teacher is
notified. The student’s responses are automatically saved up to the point the connection was
lost. When the connection resumes, the student should sign in again and follow the same steps
they completed the first time they signed in to continue taking the test.
For additional information and assistance please visit the Connecticut Comprehensive
Assessment Program Portal or contact the Connecticut Comprehensive Assessment Program
Help Desk.
Toll-Free Phone Support: 1-844-202-7583
Email Support: cthelpdesk@cambiumassessment.com
23You can also read