Quick Guide Getting Started with the baramundi Management Suite
←
→
Page content transcription
If your browser does not render page correctly, please read the page content below
baramundi Management Suite

                   Getting Started with the
Quick Guide        baramundi Management Suite

                                         IT management – simply clever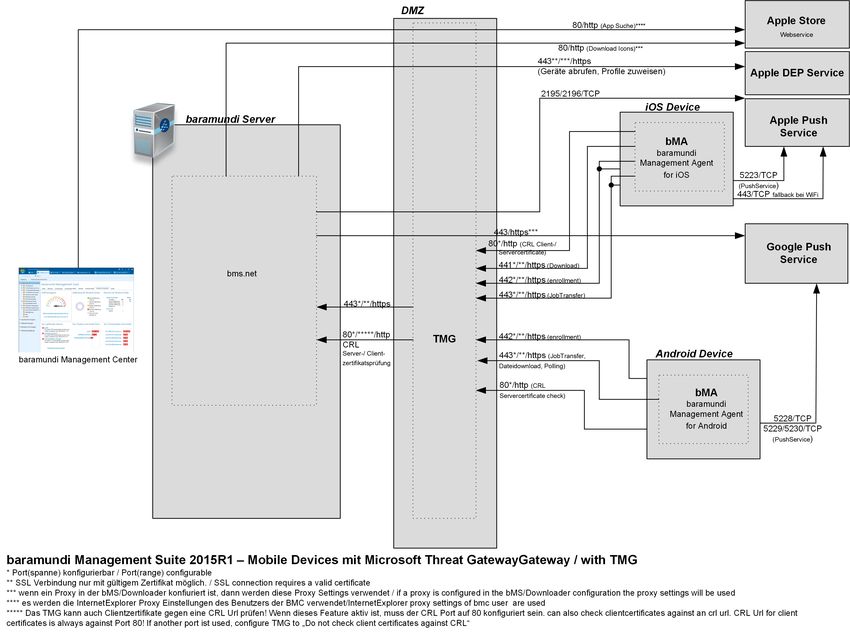
System Requirements
    •   Windows Server 2008 SP2 (64 bit), Windows Server 2008 R2 SP1,
        Windows Server 2012 or Windows Server 2012 R2
    •   .NET Framework 4.5.2
    •   Minimum 2 GB RAM
    •   Minimum 1 GB free Memory
    •   SQL Server 2008 SP3/2008 R2 SP3/2012 SP1 (SQL Server 2012 Express is
        included on our DVD and can be installed if necessary)
Installation in a virtual environment (VMWare, CitrixServer, HyperV) is
possible.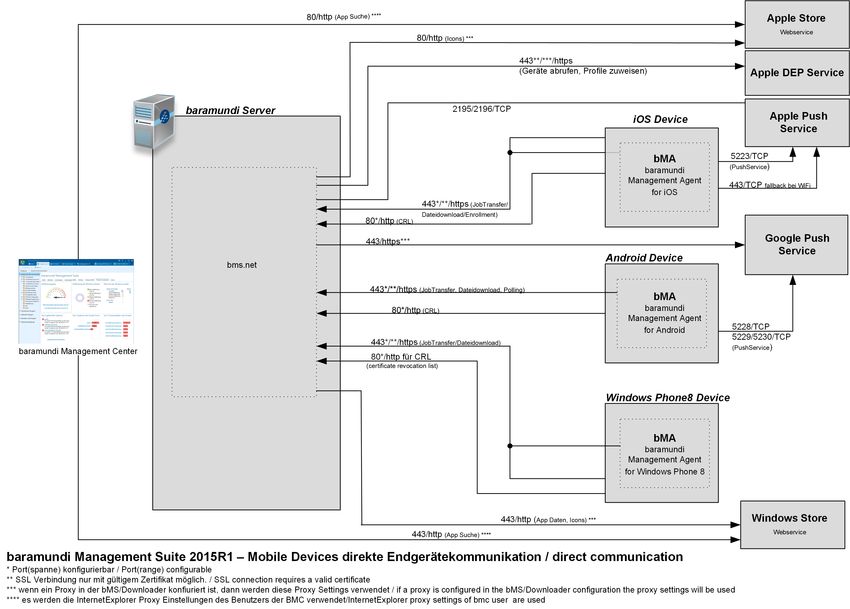
Content
   Installation of a Demo Project . . . . . . . . . . . . .        .   .   .   .   .   .   .   .   .   .    5
           Requirements Installation . . . . . . . . . . . .       .   .   .   .   .   .   .   .   .   .    5
           baramundi Management Suite Installation . .             .   .   .   .   .   .   .   .   .   .    5
           First Start . . . . . . . . . . . . . . . . . . . . .   .   .   .   .   .   .   .   .   .   .    7
   Getting Started . . . . . . . . . . . . . . . . . . . . .       .   .   .   .   .   .   .   .   .   .    8
           Creating a Client . . . . . . . . . . . . . . . . .     .   .   .   .   .   .   .   .   .   .    8
           Performing Software and Hardware Inventories            .   .   .   .   .   .   .   .   .   .    9
   Deploy an Application . . . . . . . . . . . . . . . . .         .   .   .   .   .   .   .   .   .   .   10
   Mobile Devices . . . . . . . . . . . . . . . . . . . . .        .   .   .   .   .   .   .   .   .   .   10
           Push Services . . . . . . . . . . . . . . . . . .       .   .   .   .   .   .   .   .   .   .   10
           MDM Server . . . . . . . . . . . . . . . . . . .        .   .   .   .   .   .   .   .   .   .   11
           Apple iOS . . . . . . . . . . . . . . . . . . . .       .   .   .   .   .   .   .   .   .   .   12
           Google Android. . . . . . . . . . . . . . . . . .       .   .   .   .   .   .   .   .   .   .   13
           Windows Phone . . . . . . . . . . . . . . . . .         .   .   .   .   .   .   .   .   .   .   14
   Device Enrollment . . . . . . . . . . . . . . . . . . . .       .   .   .   .   .   .   .   .   .   .   15
           iOS Device Enrollment . . . . . . . . . . . . . .       .   .   .   .   .   .   .   .   .   .   15
           Android Device Enrollment . . . . . . . . . . .         .   .   .   .   .   .   .   .   .   .   16
           Windows Phone Registration . . . . . . . . . .          .   .   .   .   .   .   .   .   .   .   17
           Deactivate/Remove Devices . . . . . . . . . .           .   .   .   .   .   .   .   .   .   .   17
   Jobs . . . . . . . . . . . . . . . . . . . . . . . . . . .      .   .   .   .   .   .   .   .   .   .   18
           Creating Jobs . . . . . . . . . . . . . . . . . .       .   .   .   .   .   .   .   .   .   .   18
   More Information . . . . . . . . . . . . . . . . . . . .        .   .   .   .   .   .   .   .   .   .   18
   Communication Schemes . . . . . . . . . . . . . . . .           .   .   .   .   .   .   .   .   .   .   19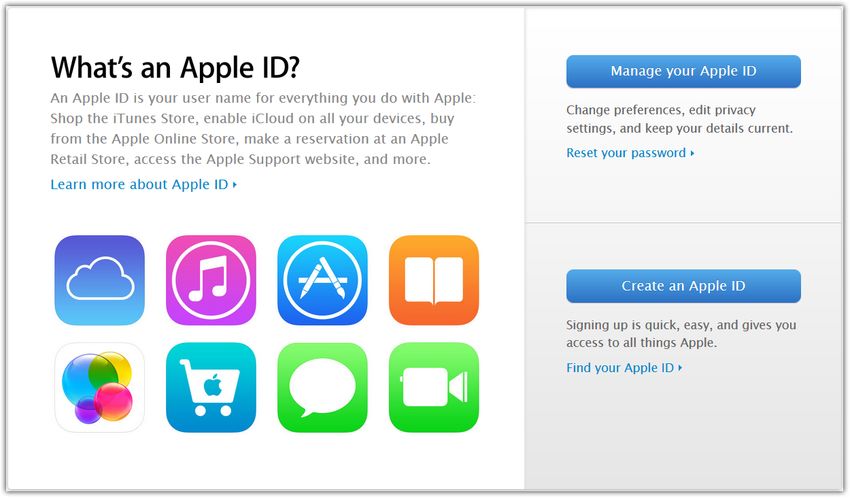
Welcome to the Clever IT-Management
We are pleased that you have decided to purchase our Management Suite and
would like to thank you for the confidence you have placed in the baramundi
software AG. Your queries, comments and suggestions are welcome—during the
first steps, as well as later in dealing with more complex projects.
         The following pages present step-by-step information about a first test
installation of the baramundi Management Suite. Should you have any further
questions regarding the handling of our Suite, please contact the baramundi
support team.
         You never worked with a client management system before or do not
know the baramundi Management Suite at all? In this case we recommend our
introductory workshop at your premises, held by our consultants. Afterwards, we
offer a four-days essentials course in order to use the baramundi Management
Suite in the best way.
         You already do have experiences in working with baramundi Manage-
ment Suite? Then keep your knowledge up to date. Our training staff is able to
offer you a broad range of technical training. Read more about the topics and
dates of the baramundi trainings on www.baramundi.com/training.
         You are going to automate a complex software project and looking for
support? We’ll gladly give you advice!

The fastest way to reach us is to call by phone or to send an e-mail:

         Training:   service@baramundi.com         +49 (821) 5 67 08 - 16
         Support:    support@baramundi.com         +49 (821) 5 67 08 - 500
         Sales:      sales@baramundi.com           +49 (821) 5 67 08 - 300

Welcome! We wish you every success with our baramundi Management Suite in
your company.

With kind regards, your
baramundi software AG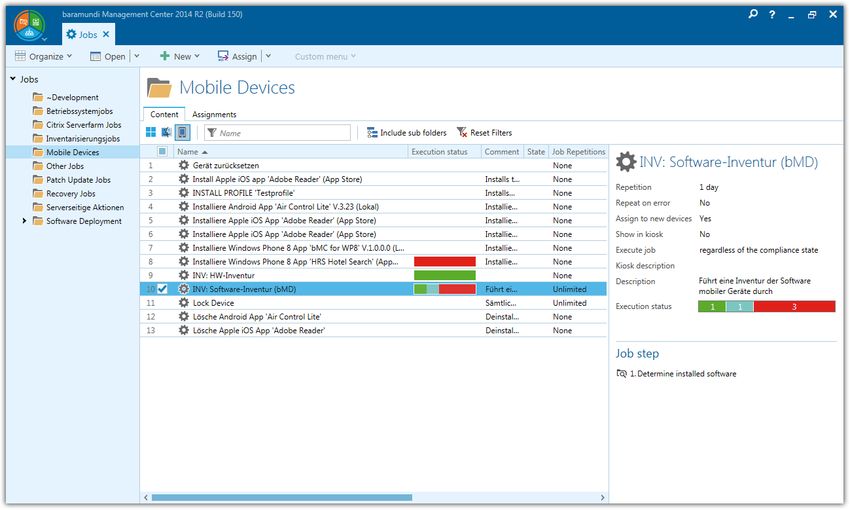
Installation of a Demo Project
For a first introduction to the world of baramundi, please follow the steps
described here. For a productive installation of baramundi Management Suite,
you should follow the steps in the manual.
    1. A Windows Server 2008 R2 SP1/2012 R2 system is prepared
       (Virtual system or physical hardware)
    2. .NET is prepared
       (Server Manager/Features/Enable .NET Framework)
    3. If a SQL Server is available, skip the next step.

Requirements Installation
   4. Call the StartCD.hta from installation disk.
   5. Start the installation of MS SQL server in the language you wish. All
      necessary settings are already pre-defined, therefore do not make any
      modifications.

baramundi Management Suite Installation
Go back in the HTA. Please, read the bMS installation instructions.
   6. Get the installation started via HTA.
   7. Select the standard installation within the Components dialog.
      (baramundi Management Suite is now installed on your system)
      Once installation is complete, the Start database manager dialog appears.
      Click Finish.
      (The baramundi Database Manager starts)
   8. Select Create new database.
   9. Enter the access data for SQL server:
          • Database Server: .\SQLExpress
          • Login ID: sa
          • Password: baramundi-2008
          • Database: mybaramundi

  10. The local SQL paths are specified in the next dialog. Create a folder
      C:/bMSDatabase and enter this path in the dialog:
          • Database Medium: C:\bMSDatabase
          • Log Medium: C:\bMSDatabase

                                                                        Quick Guide | 5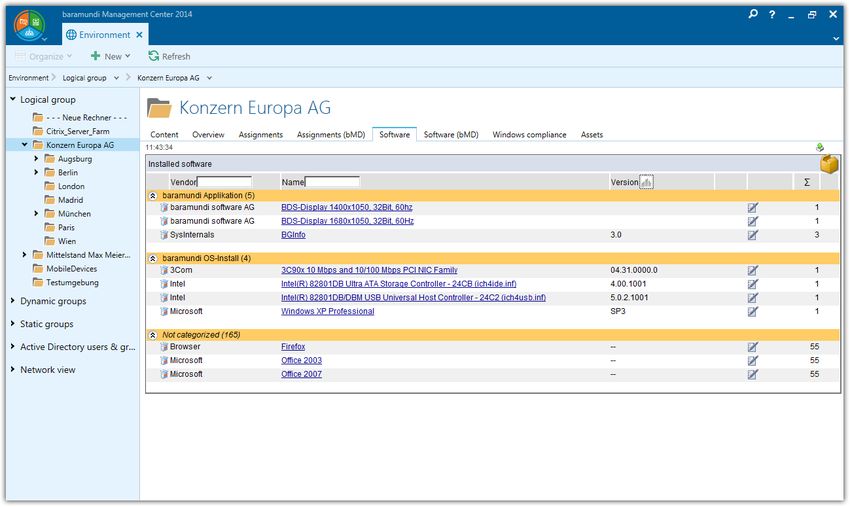
11. Enter under License Information your company’s name and click Next.
      If your bMS server has direct internet access, confirm the Internet
      Connectivity dialog with Next. Otherwise enter a proxy server, here. You can
      change these settings later on.
  12. In the Domain Configuration dialog, enter the users that will be used by the
      baramundi server and the baramundi agents.

       Important: Enter a Windows account that has administrative rights.                                   i
          Tip: If you are using a standalone server for the test, enter the server name
       under Name, enter Workgroup as the Type, and specify a local administrator
       account.

  13. Define a global unlock password.
       (Global Unlock Password: baramundi)
  14. Confirm the BMA configuration, Application Usage Tracking and Setup
       download jobs dialogs with Next.
  15. The Setup DIP dialog automatically creates an empty folder structure on
      your system and enables it for network access. Activate Create DIP Structure
      and confirm the dialog with Next.
  16. The subsequent dialogs are all confirmed with Next and Finish.
      (A DIP file structure and a database are created)

The setup is then complete and may require the system to be restarted.

  Fig. 1: License Informationen                        Fig. 2: BMA Configuration

                                                                                          Quick Guide | 6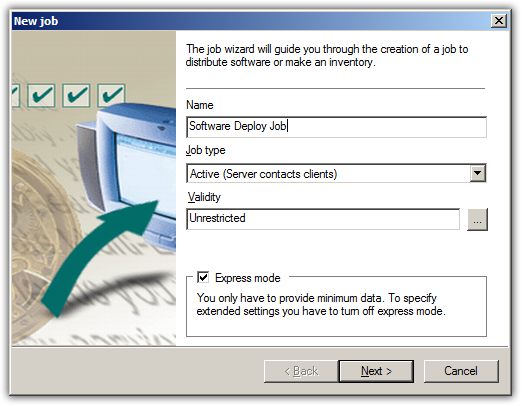
First Start
Time, to get into a new world of client management: The link to baramundi
Management Center is located on the desktop. Launch this and in the dialog that
appears, click Connect. The baramundi Management Center opens.
       A click on the suite’s logo (top-left) opens the start menu. There you
will have access to all bMS modules. Via Server State you will see the system
conditions.

baramundi Server Start. Select the State in the start menu. On the right hand you
will see the main server. If there is a yellow warn triangle to see, that means not
all server services are running. In this case extend the status view via a click on
the right arrow in front of the server name. As a result, you will see the bms and
bms.net services. Via the scroll menu behind the service names you are able to
start these services. After a successful server start the icon in frond of the server
will change to a green check. Your server is running, now.

                                   Fig. 3: Module States

                                                                            Quick Guide | 7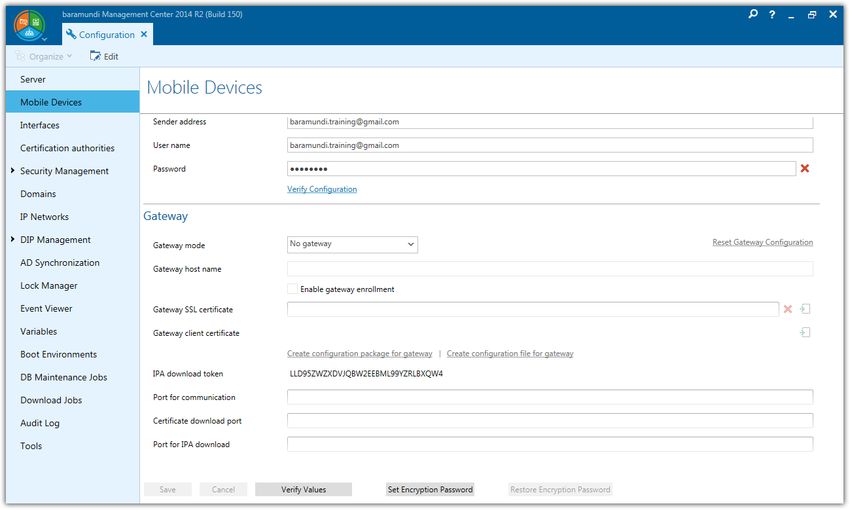
In case you have an internet connection, extend the state of your bMS service,
also. The service components Downloader and FileConnector will update
several inventory data. This fist time update could take some time. Please wait
until the FileConnector displays the Idle state.

      You’ll find a detailed description within the baramundi Managment Suite user                 i
      manual.

Getting Started
These pages briefly describe how quick and easy client management can be with
baramundi. Of course it is also possible to reproduce very complex requirements,
too. You can find more information about mobile devices in our user manual, the
online documentation (called up with the F1 key), the baramundi user forum
(only available to customers) and of course in our training courses.

Creating a Client
There are many options for adding computers, from ADSync to Excel tables.
This is just one: Open the start menu in the Environment module. Select the
Logical Groups node. Click on New—Windows Device within the action bar.

            Fig. 4: New Job                                 Fig. 5: Job Steps

                                                                                 Quick Guide | 8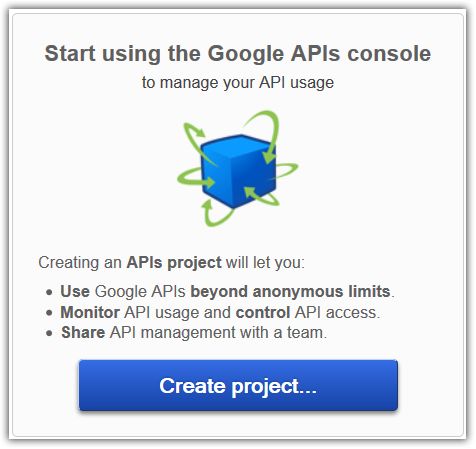
Performing Software and Hardware Inventories
Open the start screen in the Jobs module. Click on New—Jobs within the action
bar.
       The next dialog shows the different job steps. Select Perform inventory,
then Software Inventory Template and confirm with Next and Finish (Fig. 5).
       Select the just created job and click on Assign in the action bar. To keep it
simple, in the assignment assistant just select Logical Groups and click on Next.
Afterwards please check whether your server is shown as the single possible
selection. Then finalise your settings by clicking on Finish.
       To watch the job execution just double click on the job itself. The jobs own
view will open and you will see a list of all assignments for this job. Again, select
your server from this list. Within the detail field right-hand you are able to watch
the job execution. The Conditions informs you about the currently activity. The
Job Steps shows the progress of the complete job.
       Via the detail field you can directly change to your target system: Click on
the name behind the device. There you can watch the job execution, too. To do
so, change in the Assignments/Jobs view.

                                  Fig. 6: Software View

                                                                          Quick Guide | 9
Please, stay for another moment in the server tab: Change in the Inventory/-
Software view, now. Here, you will find under Not categorized the software
installed on this computer. Now you can familiarize yourself with the convenient
baramundi user interface by clicking through the individual tabs, using the link to
the job and back to the client. Try a hardware inventory job and a first software
deploy job.
Deploy an Application
baramundi is providing ready-made software packages. You can find these
packages under Software/Managed Software.
Select here Managed Software/Products/Windows Update/Root Certificates
and there the most current version. Edit this element and set in the Manged
Software tab the Release state to released. The package will be downloaded
automatically and ready to deploy. Create another job now and select Install
Software. Here, you can select from your released Managed Software and install it
on your clients. That’s the easy way of deploying software.
Mobile Devices
Smartphones and Tablets have long since become part of our everyday working
life. Currently, Android-, iOS- and Windows Phone-devices can be managed
by our suite. Such mobile devices do not have the same characteristics as
PC-Systems. Therefore, you will need to make a few preparations. To do so, open
the Configuration module in the baramundi Management Center and in there the
Mobile Devices view.
Push Services
Apple-Push-Services will be used in order to manage iOS-devices. To communi-
cate with these services (server) ports 2195/TCP and 2196/TCP as well as (device)
port 5223/TCP should be available. For Android Google Push Service is needed.
Here, ports 5528, 5529 and 5530/TCP can be used. Please configure your firewall
settings to allow those ports.
Quick Guide | 10Fig. 7: Configuration/Mobile Devices
MDM Server
Mobile devices issues an individual certificate to each managed device, during
registration. Via such a certificate, devices can be clearly identified later on. In
order to do so, a so called Certificate Authority (CA) is needed.
Certificate Authority. When using Mobile Devices, there have to be a Certificate
Authority. It can be created by clicking Create SSL Certificate Authority. For backup
purposes, a certificate can be exported by using the arrow-button. There is no
support for external Certificate Authorities.
Server FQDN (optional). In here, the SSL certificate for a secure communication
between devices and the Management Server has to be created or imported. This
certificate will be issued to the servers FQDN. If you do not want to use FQDN, an
alternative name or IP address has to be given into this field.
The steps described below are procedures for systems with IIS 7.0. i
Quick Guide | 111. Click Activate Verification of the Server Identity on the First Connection option.
2. Under Server FQDN click Create SSL certificate and save the certificate.
3. Open the IIS management console (inetmgr.exe).*.
4. Select your server and double the click Server Certificates.
5. Under Actions (right) Import.
6. Insert the path to the certificate, you saved before. (leave password blank).
7. Change to Sites/Default Website node and open action Bindings.
8. Edit here https-settings. If not available, yet: https Add.
• Type: https
• IP Address: All Unassigned
• Port: Give here the chosen port (default: 443).
• Host Name: Select bMD SSL Server [SERVER] and confirm.
If you are using an internal CA: Ignore any errors about not verifiable certificate i
chains which occur.
Parallel operation with other applications: Standard ports for http (80) and https i
(443) used by bMD can be adapted if needed by other applications on the same
server. Call our service in such case.
SSL Communication: During establishing a standard SSL connection, an exchange !
of a list of so-called «Trusted Root Certification Authorities» takes place, usually.
Because of a bug in Windows Server, that list will be transmitted uncomplete.
In order to negotiate that problem, the following registry value has to be set (if
necessary created before):
HKEY_LOCAL_MACHINE\SYSTEM\CurrentControlSet\Control
\SecurityProviders\SCHANNEL”SendTrustedIssuerList”=dword:00000000
Apple iOS
Apple Push Certificate. To get a certificate, follow the next steps (An Apple Push
Certificate is valid for 12 month, per default. After the expiry of that period, the
certificate has to be renewed):
1. Create a new certificate with a click on Create APN CSR.
2. Save the created bCert-file.
3. Send this file to: bmd@baramundi.com
* The IIS Management Console is not part of a standard installation. Please add the
IIS role with IIS Management Console component. No further components are needed
for the following steps.
Quick Guide | 12Fig. 8: Apple ID
Your file will be signed by baramundi (as MDM vendor) and sent back to you. The
signed file is to be used for further processing on Apple’s website. In order to get
into that procedure you’ll need to have an Apple ID (go to 6 if you have an ID):
4. Browse to https://appleid.apple.com
5. Please fill out the fields and confirm your account details and if you have
an Apple ID (Fig. 8),
6. Browse to https://identity.apple.com/pushcert and
7. Log on at the website.
8. Click on Create a Certificate.
9. Accept the «Terms of Use» and
10. Upload your baramundi-signed file to the Apple server.
11. Then, download the certificate.
12. Adopt information via Import APN certificate at Apple Push Certificate.
13. Save your settings and restart the MDM server.
Google Android.
To create Android functionalities you’ll need a Google code account. With
this account it should be possible to get all the information for reaching the
API-console.
Quick Guide | 13Fig. 9: Google’s API Console Fig. 10: Server Key
Google Projekt ID & Google API-Key. The following settings are about Google’s push
services. Therefore, you’ll need a Google code account to use it.
1. Browse to https://code.google.com/apis/console
2. If you do not have a Goolge Code Account already, register with any e-mail
address at this website.
3. Log on.
4. Click Create Project if you did not create a project, already.
5. Open the Overview side. Copy the Project Number.
6. Paste that number into the bMC Configuration tab under Mobile Devices in
the Google Project ID field and click Save.
7. Select APIs & auth in your browser. More sub listings will be shown; you are
now under API.
8. Activate Google Cloud Messaging for Android and confirm the terms of use.
9. Now click Credentials within the APIs & auth area.
10. Click Create New Key under Public Access Key. Then, select a Server Key and
click in the following dialog on Create.
11. Copy the API Key and paste it into the bMC Configuration tab under Mobile
Devices in the Google API Key filed.
12. Save your settings and restart the bMS-Server-Service.
Windows Phone
To manage Windows Phone devices, an Active Directory Synchronization has to
be done in the Configuration module under Active Directory Synchronization.
Quick Guide | 14Device Enrollment
Platforms differs substantially from one to another. That’s why acquisition and
registering have to be done differently, too.
iOS Device Enrollment
In getting iOS devices* managed by the baramundi Management Suite, proceed
as follows:
1. Open the Environment module and select the Logical Group there.
2. Click in the action bar on New—Mobile Device.
3. Give your new device a Name.
4. Choose the appropriate Platform (here Apple iOS)
5. Save your settings and leave the dialog open.
Once you have saved your settings, the device will be visible within the
Management Center. But it can not be managed, yet (to see by the statement
* and modern iPod-devices, too
Fig. 11: Enrollment
Quick Guide | 15Unmanaged within the row). The following settings need to be done on your
mobile device, directly.
1. Start up the mobile device.
2. Get connected with the Internet.
3. Browse* to the address, given under the Info field.
4. Install the profile.
After a successful installation the Unmanaged state within the Management
Center changes to Managed. Your mobile device can be managed by baramundis
Management Suite, now.
Android Device Enrollment
To get Android devices bMS-managed, proceed as follows:
1. Open the Environment module and select the Logical Group there.
2. Click in the action bar on New—Mobile Device.
3. Give your new device a Name.
4. Choose the appropriate Platform (here Android)
5. Save your settings.
Once you have saved your settings, the device will be visible within the bMC. But
it can not be managed, yet (clearly to see by the Unmanaged statement within
the row). The following settings needs to be done on your mobile device, directly.
1. Install the baramundi Mobile Agent from Play Store.
2. Start the agent and begin registering.
3. Edit the server- and code settings and confirm with Enroll.
4. The Browser opens and the management profile will be shown.
5. Install the profile.
6. Now, close the Add-dialog within the Management Center.
7. Open the App.
In this case, it is important to ensure that an installation from unknown source is i
enabled in your device settings.
8. Activate the device administrator and
9. Register the baramundi Agent to the Management Server.
* As far as your mobile device has an e-mail address, just send this link via e-mail.
Quick Guide | 16To get registered give the server name and the registration code (you found both
information in the Add Device dialog). After that procedure your Android device
will be ready to be managed. You will see it under Environment/Logical Groups.
Windows Phone Registration
To enroll Windows Phone based devices, an Active Directory synchronisation
has to be done. An AD user needs to be assigned as the device owner. The user
password will be used for authentication during the enrollment process. In
getting Windows Phone devices managed, please register the company app first.
1. Within the device settings, select Company Apps.
2. Here, select Add Account.
3. Give the E-mail Address of an AD user. (or: DOMAIN\USER@DOMAIN.LOCAL)
4. Give the User Password and select sign in.
Additional input field will be displayed. The name of the bMS-server* (…/IP/URL)
has to be given under Server. Now, if you sign in again, the process may complete.
Then install the baramundi Management Agent from the Windows Live Store and
go on with these steps:
5. Start the baramundi Management Agent..
6. Indicate the necessary information† for Server and Token.
7. Finally Activate your device.
A successful registration will be displayed by a message within the app and a
change of state within the Management Center.
Deactivate/Remove Devices
No longer needed enrolled mobile devices can be deactivated or deleted. In
either case: such devices have to be enrolled again before re-using. However,
while deleted devices will be completely removed; deactivated devices will keep
their data base information, but cannot execute jobs any longer.
To clear all bMS-entries on mobile devices itself, the profile has to be
removed. Deleting profiles of iOS devices means, all deployed apps, settings,
* This information you’ll find within the Add-dialog of your mobile device.
† Either manually or via the integrated QR scanner.
Quick Guide | 17WiFi-connections and so on will be deleted.
If you wish to delete the baramundi Agent, you must deactivate the
device administrator, first. As long as the administrator stays active, it will prevent
all attempts to remove the Agent. Under Windows Phone it is neccessary to
delete the account within the settings (Company App).
Jobs
The idea of enrolling mobile devices is, deploying jobs via bMS to smart phones
and tablets to install/deinstall apps or profiles, read out hard- and software
information or lock/unlock/wipe mobile devices. This is — similar to bMS — by
using jobs.
Creating Jobs
A mobile device inventory job shall be given as an example:
1. Go to Jobs/Mobile Devices (see Fig. 12) node.
2. Select New—Job for Mobile Device action.
3. Give the job an unique name and select Perform Software Inventory job
step and finish the job.
4. Select Assign Device action.
5. Add the device to the right side list.
Stay in the job. In the Assignments/Devices node you can watch the job execution.
Once, the inventory has been finished the result will be displayed under
Environment within the Installed apps* view.
More Information
More information about baramundi Mobile Devices, e.g.
• App Deployment
• Profile Configuration
• Compliance Management
* There are no iOS devices system apps shown
Quick Guide | 18Fig. 12: Jobs for Mobile Devices
you will find in our user manual, within the Start Menu under baramundi
Management Suite/Documentation.
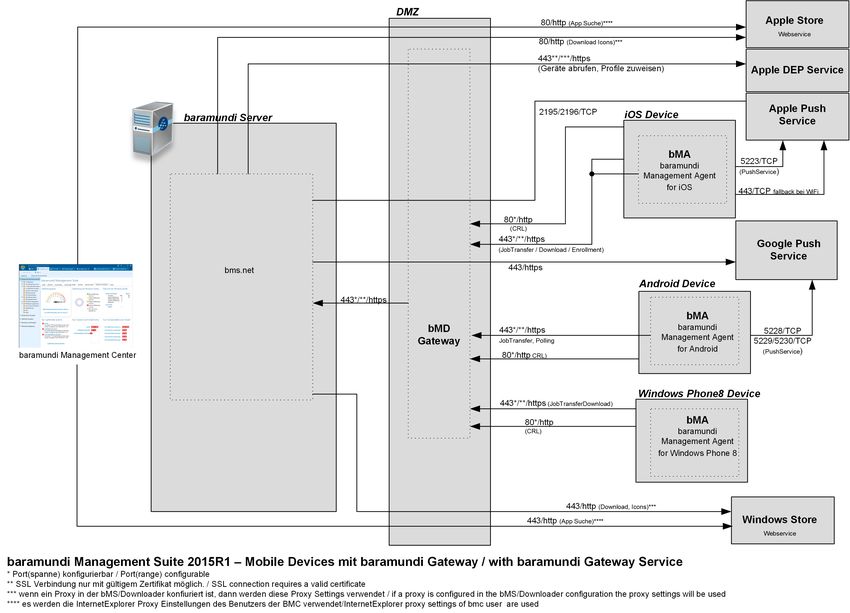
Communication Schemes
The following schemes illustrates used ports of the baramundi components.
Figure 13: Basic Communication
Figure 14: Gateway Communication
Figure 15: TMG Communication
Quick Guide | 19Fig. 13: Communication Scheme (Basic)
Quick Guide | 20Fig. 14: Communication Scheme (Gateway)
Quick Guide | 21Fig. 15: Communication Scheme (TMG)
Quick Guide | 22Legal Information Copyright © 2015 baramundi software AG. Beim Glaspalast 1 • 86153 Augsburg, Germany Tel: +49 (821) 5 67 08 - 0 • Fax: +49 (821) 5 67 08 - 19 www.baramundi.com • info@baramundi.com All rights reserved. The software and manual have been created with the greatest care. However, we make no guarantee that the software, supplied data or manual is free from errors. Because modifications have been made to the software since the manual went to print, situations and procedures described in the manual may differ from the software. No part of the manual may be reproduced in any form (printout, photocopy, microfilm or any other procedure) or processed, duplicated or distributed using electronic systems without our prior written permission. Note that the designations and brand names used in the manual are the property of their respective owners and are, generally speaking, subject to trademark, brand-name and patent laws. baramundi Support We are always happy to answer any questions you may have about baramundi Management Suite: Tel: +49 (821) 5 67 08 - 500 Fax: +49 (821) 5 67 08 - 19 E-mail: support@baramundi.com Our support team is available Monday to Friday, from 8.30 to 17.00 Central European Time ( UTC+1). During a test installation, baramundi support is available free of charge.
baramundi software AG
Beim Glaspalast 1
86153 Augsburg, Germany

Tel: +49 (821) 5 67 08 - 500
Fax: +49 (821) 5 67 08 - 19
Email: support@baramundi.com
www.baramundi.com

                               IT management – simply clever
You can also read