Quick Start Guide - Enfocus
←
→
Page content transcription
If your browser does not render page correctly, please read the page content below
Quick Start Guide
Switch

Contents
1. Copyrights............................................................................................................................................... 4

2. About this Quick Start Guide................................................................................................................... 5

3. Understanding Switch............................................................................................................................. 6
      3.1 About Switch...........................................................................................................................................6
      3.2 About working with Switch.....................................................................................................................7
           3.2.1 Flows.............................................................................................................................................7
           3.2.2 Input..............................................................................................................................................8
           3.2.3 Processes: standard processes................................................................................................... 9
           3.2.4 Processes: Configurators...........................................................................................................10
           3.2.5 Processes: Apps......................................................................................................................... 12
           3.2.6 Processes: connections..............................................................................................................12
           3.2.7 Output......................................................................................................................................... 14

4. Getting started...................................................................................................................................... 15
    4.1 Installing, activating and opening Switch............................................................................................ 15
         4.1.1 Installing Switch......................................................................................................................... 15
         4.1.2 Activating Switch........................................................................................................................ 15
         4.1.3 Opening Switch...........................................................................................................................16
    4.2 The Switch workspace..........................................................................................................................17
    4.3 Before you start.................................................................................................................................... 19
    4.4 Creating your first flow.........................................................................................................................19
         4.4.1 Step 1: Creating your flow......................................................................................................... 19
         4.4.2 Step 2: Designing your flow....................................................................................................... 20
         4.4.3 Step 3: Running your flow......................................................................................................... 32
    4.5 Exercise 1: Sorting files by file type.....................................................................................................36
         4.5.1 Exercise 1: Solution....................................................................................................................36
    4.6 Exercise 2: Sorting by file name pattern............................................................................................. 40
         4.6.1 Exercise 2: Solution....................................................................................................................40

5. Working with Switch..............................................................................................................................42
    5.1 Using embedded metadata and file information................................................................................. 42
         5.1.1 About sample jobs......................................................................................................................43
         5.1.2 Creating a sample job................................................................................................................45
         5.1.3 Defining a condition with variables............................................................................................45
         5.1.4 Defining text with variables........................................................................................................46
         5.1.5 Checking variables for a particular sample job........................................................................ 47
         5.1.6 Exercise 3: Sorting files by information contained within the PDF file......................................48
    5.2 Working with job folders and subfolders............................................................................................. 50
         5.2.1 The Ungroup flow element........................................................................................................ 50

                                                                                                                                                              ii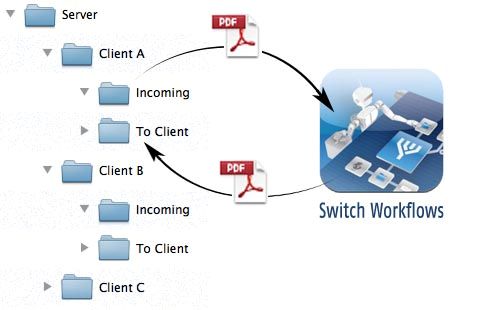
Contents

     5.2.2 The Submit hierarchy flow element...........................................................................................54
     5.2.3 The Archive hierarchy flow element.......................................................................................... 56
     5.2.4 The Set hierarchy path flow element........................................................................................ 57
     5.2.5 Exercise 5: Receiving jobs from within a server hierarchy........................................................58
5.3 Connecting flows and retaining hierarchy information........................................................................61
     5.3.1 Exercise 6: Passing hierarchy info to another flow................................................................... 62

                                                                                                                                  iii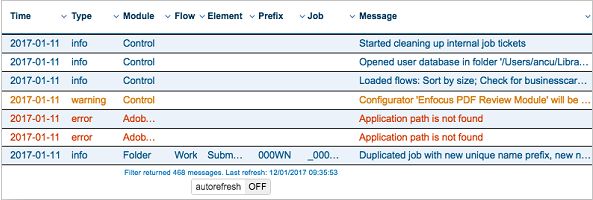
Switch

1. Copyrights
     © 2018 Enfocus BVBA all rights reserved. Enfocus is an Esko company.

     Certified PDF is a registered trademark of Enfocus BVBA.
     Enfocus PitStop Pro, Enfocus PitStop Workgroup Manager, Enfocus PitStop Server, Enfocus
     Connect YOU, Enfocus Connect ALL, Enfocus Connect SEND, Enfocus StatusCheck, Enfocus
     CertifiedPDF.net, Enfocus PDF Workflow Suite, Enfocus Switch, Enfocus SwitchClient, Enfocus
     SwitchScripter and Enfocus Browser are product names of Enfocus BVBA.
     Adobe, Acrobat, Distiller, InDesign, Illustrator, Photoshop, FrameMaker, PDFWriter, PageMaker,
     Adobe PDF Library™, the Adobe logo, the Acrobat logo and PostScript are trademarks of Adobe
     Systems Incorporated.
     Datalogics, the Datalogics logo, PDF2IMG™ and DLE™ are trademarks of Datalogics, Inc.
     Apple, Mac, Mac OS, Macintosh, iPad and ColorSync are trademarks of Apple Computer, Inc.
     registered in the U.S. and other countries.
     Windows, Windows 2000, Windows 7, Windows 8, Windows 8.1, Windows 10, Windows 2008
     Server, Windows 2008 Server R2, Windows Server 2012, Windows Server 2012 R2 and Windows
     Server 2016 are registered trademarks of Microsoft Corporation.
     PANTONE® Colors displayed here may not match PANTONE-identified standards. Consult
     current PANTONE Color Publications for accurate color. PANTONE® and other Pantone, Inc.
     trademarks are the property of Pantone, Inc. ©Pantone, Inc., 2006.
     OPI is a trademark of Aldus Corporation.
     Monotype is a trademark of Monotype Imaging Inc. registered in the U.S. Patent and Trademark
     Office and may be registered in certain jurisdictions. Monotype Baseline is a trademark of
     Monotype Imaging Inc.
     Quark, QuarkXPress, QuarkXTensions, XTensions and the XTensions logo among others, are
     trademarks of Quark, Inc. and all applicable affiliated companies, Reg. U.S. Pat. & Tm. Off. and in
     many other countries.
     This product and use of this product is under license from Markzware under U.S.Patent No.
     5,963,641.
     Other brand and product names may be trademarks or registered trademarks of their respective
     holders. All specifications, terms and descriptions of products and services are subject to
     change without notice or recourse.

                                                                                                  4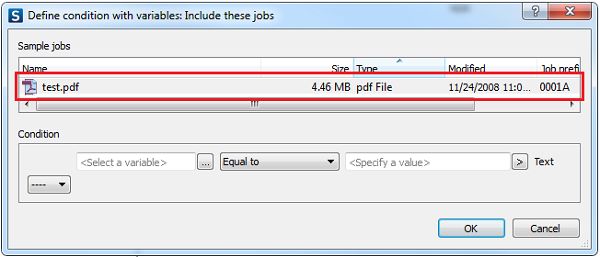
Switch

2. About this Quick Start Guide
     The Switch Quick Start Guide explains the basic concepts of Switch and helps you to get started
     with Switch.
     The Guide consists of three parts:
     • Understanding Switch on page 6 explains what Switch is and how it works, without going
       into detail. Read this part if you’re new to Switch.

     • Getting started on page 15 guides you through installation and activation and explains how
       to set up your first flow.

     • Working with Switch on page 42 elaborates on some specific topics, such as using sample
       jobs, working with folders and connecting different flows.
     This Quick Start Guide contains a number of exercises. Try to make them yourself, before
     checking the example solution.

     Do you want to know more?
     Please refer to the Switch Reference Guide, available on the Enfocus website.

            Tip: You can also access the help files from within Switch: press F1 or select Help >
            Switch help .

                                                                                                   5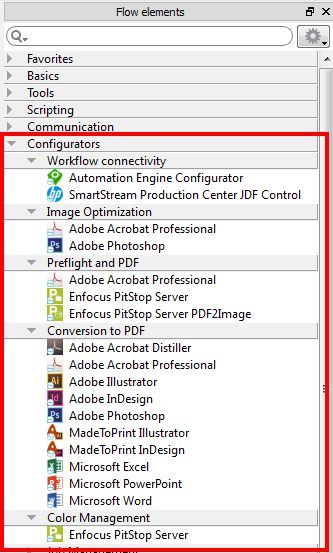
Switch

3. Understanding Switch
      Read this part if you want to know what kind of application Switch is, and how it works.

3.1 About Switch
      Switch is an application that allows you to automate a number of tasks and processes, such as
      sorting and renaming files, converting files to PDF, preflighting PDFs, and so on.
      Every aspect of the process can be automated:
      • Switch can pick up input files wherever you stored them.
      • The tasks are executed without any manual intervention.
      • Processed files are automatically placed in the appropriate location.
      Working with Switch can save you a lot of time.

      Modules
      Switch is a modular application. It consists of:
      • A core engine module, which offers the basic functionalities (sorting, renaming, splitting,
        merging, ... files).

      • A number of additional modules, which you can purchase if you need more advanced
        functionalities.
      For example, if you want to use Switch to automate tasks performed by third party applications
      (such as the Adobe Creative Suite), you need a license for the Switch Configurator module; if you
      want to use database information in Switch, you need the Database Module.
      For a complete overview, refer to the Switch Reference Guide.

      Components
      Switch consists of the following components:
      • Switch Server is the core engine; it runs in the background, executing all processes. It has no
        user interface and it is started and terminated by the Switch Designer.

      • Switch Designer is the user interface of Switch; the component you’re using when working
        with Switch.

      • Switch Web Portal allows you to connect to the Switch Server through a web browser
        interface, for example to view log messages or to submit and check jobs without having to
        use a Switch Designer.

      • Switch Web Services takes care of all data communication between Switch and its client
        applications (the Switch Web Portal, our customers' own clients etc.). It's part of the default
        Switch installation.

      • SwitchScripter is a separate application for use with Switch: it allows you to create and
        test scripts for Switch. Note that you can only use SwitchScripter if you have licensed the
        Scripting Module.

                                                                                                      6
Switch
3.2 About working with Switch
Switch provides you with a workspace with a canvas and a number of tools (called flow elements)
to design your own workflows (called flows).
To create such a flow, you must select the flow elements you need from the right pane, and drag
and drop them onto the canvas.
3.2.1 Flows
A flow (in its basic form) consists of the following elements:
• Some kind of input (can be files or folders) submitted to Switch
• One or more processes to be executed or tasks to be performed (e.g. renaming files,
converting images, preflighting PDFs ...)
• Some kind of output (=processed files and/or folders)
7Switch
Each of these elements is represented by a flow element, and the flow elements are
interconnected via so called Connections (arrows). The direction indicates how the files will
move (in this example from left to right).
3.2.2 Input
Switch allows you to process both single input files and file folders.
• Examples of input files: PDF files, MS Word files, all types of images …
• Example of input folders: InDesign folders, a page layout with all images and fonts ...
Files and file folders that enter Switch and have to be treated as one entity are in Switch referred
to as "jobs".
Ways to provide input
There are several ways to submit input to Switch:
• Manually: You can drag and drop your input files or folders onto an input folder element
on the canvas. This is handy to test flows.
• Automated: You can configure Switch to download the input from a server (an FTP server, an
e-mail server, or a network server), or to receive it via the Switch Web Portal.
Depending on the way you want to provide your input, you must select the appropriate flow
element:
If you want to submit files ... Use the following flow element
By dropping them onto the canvas
(manually) Folder
Note: Switch will take care of the
physical location of the submitted
files. This location is not editable,
as indicated by the small lock that
appears on the Folder icon.
Via a location on a local computer or a
network server Folder (you will have to specify the
location)
Submit hierarchy
This is a special type which remembers the
folder structure. See The Submit hierarchy
flow element on page 54.
Via FTP
FTP receive
Via e-mail
Mail receive
8Switch
If you want to submit files ... Use the following flow element
Via the Switch Web Portal
Submit point
Job data
Switch allows you to send extra data along with your input files, called Job data. This can be
metadata, the file name, information about the user, or data from other systems, such as MIS
systems, asset management systems… The format of the job data can be XML, JDF, Metadata…
Job data can be used to decide how files must be processed.
Example:
The paper type (coated versus uncoated) often determines whether or not a file must be sent to
an ink optimizer. If this information is available in your MIS system, you can attach it to your files
as job data. If the files arrives in Switch, Switch can use this information to sort the input files
and only send them to an ink optimizer application if required.
3.2.3 Processes: standard processes
Switch provides you with a lot of flow elements for processing the files that are submitted to
Switch.
Some flow elements are always available, because they are included in the Switch Core Engine.
They allow you to perform a number of standard tasks/processes, such as the ones listed in the
table below.
Processes Flow element
Renaming a job or the files included in a job folder (e.g.
to add a prefix or a suffix, replace part of the name with
some other string, …) Rename job
Sorting files in a job folder (for example renaming them so
that they are sorted alphabetically)
Sort files in jobs
Combining multiple PDF files into one file for processing,
or splitting one file into different PDF files.
Merge PDF
9Switch
Processes Flow element
Split PDF
Moving files into a ZIP package, or extracting files from a
ZIP file.
Archive
Unarchive
Just like other flow elements, you can select these elements from the Flow elements pane.
Note: You can combine several processes in one flow. In the example below, the input is
first unzipped (using the Unarchive flow element) and afterwards merged into one PDF
file (using the Merge PDF flow element).
3.2.4 Processes: Configurators
If you have licensed the Configurator Module, a number of additional processes can be
performed, i.e. by 3rd party applications (Adobe Creative Suite, Adobe Acrobat Professional,
Automation Engine… ) integrated in Switch.
This is possible thanks to the Configurators, which allow you to connect to these applications
from within a Switch flow.
Configurators are available in the Configurators Category of the Flow elements pane, and must
be dropped onto the canvas, just like the other flow elements.
10Switch
Note: You can only use Configurators for applications that you have installed and
licensed. Configurators for applications that are not available are hidden or displayed
in gray (depending on your settings - to change these settings, click in the upper
right corner of the pane).
How it works
Configurators allow you to send files to 3rd party applications from within a Switch workflow. The
sent files are processed by this application, and once processed, they are returned to Switch, so
that Switch can further process the resulting files as required.
In the example below, the input files are first sent to Photoshop for converting the images to
PDF; afterwards the resulting PDFs are sent to PitStop Server to be preflighted. The result of the
preflight (OK or not OK) is used to sort the output files.
11Switch
3.2.5 Processes: Apps
In Switch 13 update 1 the Switch apps were introduced: small applications that can be used as
flow elements in Switch, just like the Configurators, but without the need of a license for the
Configurator Module.
These apps are developed by Enfocus or 3rd party providers and can be purchased through the
Enfocus Appstore.
The purchased apps can be found in the Flow elements pane in a separate category, under
"Apps", as shown below.
How it works
Once purchased and installed, apps are used just like other flow elements.
Note that you will receive notifications in Switch to inform you about your apps, for example if a
new version is available or if your subscription is about to expire. More information can be found
in the Switch Reference Guide, available on the Enfocus website.
3.2.6 Processes: connections
Whereas the flow elements are used to perform processes, the connections (= the lines between
flow elements) allow you to control the flow, i.e. to decide which files go where.
The connections can be configured to:
12Switch
• Hold files, or pass files through.
• Sort files by file type (for example PDF versus JPEG ), file size, file pattern or by condition
(author, color mode, and so on).
Example:
In the example below, the connections are configured to move the input files (based on their file
type) to the correct Configurator element. Input that does not comply with one of the configured
file types is moved to the “Other” folder and is (in this example) not processed.
Traffic light icons
If flow elements generate a report or log, i.e. indicate whether or not the input was processed
successfully (with or without warnings), this information can be used to sort the resulting output.
For example, if PitStop Server (=a Configurator element) preflights PDF files, you can configure
the outgoing Connections in such a way that they include or exclude files based on their preflight
status. The color of the traffic light indicates which files are passed through:
• Green is used for files that are processed successfully.
• Yellow is used for files that generate a warning.
• Red is used for files that generate an error.
Example:
In the following example, the first connection moves files that were preflighted successfully
(green) or with warnings (yellow) to the Ok files folder, whereas the second connection moves
erroneous files (red) to the Nok files folder.
13Switch
3.2.7 Output
Once the files have been processed, they are moved to an output folder. This can be a physical
folder somewhere on the network, a folder that's connected to another Switch workflow, or an
input folder for a RIP or print controller. You can also upload the output to an FTP or mail server.
Depending on how you want to receive the output files, you can use one of the following flow
elements:
If you want to receive the processed output Use the following flow element
files...
In a folder on the network, or on your own
local computer Folder
Archive hierarchy
This is a special type, which places the
output in a folder structure. See The Archive
hierarchy flow element on page 56.
Via an FTP server
FTP send
Via an e-mail server
Mail send
14Switch
4. Getting started
Read this part if you are new to Switch. You will learn:
• How to install and activate Switch.
• What the GUI looks like.
• How to create your first, basic flow.
4.1 Installing, activating and opening Switch
Before you can start working with Switch, you must first install Switch and activate the modules
for which you have a license.
Note that in this Quick Start Guide, only the main procedures are explained:
• We assume that you install Switch Server and Switch Designer on the same computer.
• We assume that this computer has internet access.
If this is not the case, for the appropriate procedures, refer to the Switch Reference Guide on the
Enfocus website.
4.1.1 Installing Switch
Prerequisites: You must have administrator rights on your local computer to install Switch.
To install Switch
1. Do one of the following:
• Insert the Enfocus Product CD-ROM or DVD into your CD-ROM/DVD-ROM drive.
• Use the link you received from your local reseller to download Switch.
Switch is only sold via local resellers. Different from other Enfocus products, you cannot
download it directly from the Enfocus website.
2. If necessary, double-click the Switch installer.
3. Follow the on-screen installation instructions.
Make sure to install all Switch components (default installation).
You have installed Switch. Next, you have to activate your Switch license(s).
4.1.2 Activating Switch
Once you have installed Switch, you must activate the modules for which you have a license.
Note: You need at least a license for the Switch Core Engine. Other modules are optional
(and not required for the exercises in this Quick Start Guide).
15Switch
This procedure describes how to activate Switch on a computer with internet access.
Note: It is also possible to install Switch on a computer without internet access (but
you need to have another computer available to connect to the internet). For the offline
procedure, refer to the Switch Reference Guide.
To activate Switch
1. Locate the application (Switch.exe or Switch.app) and double-click to start Switch.
Switch is installed by default in the following directory:
• Windows: C:\Program Files (x86)\Enfocus\Enfocus Switch
• Mac OS: /Applications/Enfocus/Enfocus Switch
2. In the Connect to Switch Server dialog, select Connect to local Switch Server.
It is also possible to connect to a Switch Server installed on another computer (on which
Switch has been installed as well), but activation is only possible on a local Switch Server.
For more information, refer to the Switch Reference Guide.
3. Click OK.
The Switch Designer is opened and the Software Activation dialog appears.
4. Make sure the Off-Line Mode checkbox (in the top right corner) is cleared.
5. Enter your Enfocus ID and password.
If you don't have an Enfocus ID yet, click the Create Enfocus ID link and enter the required
information. Your account is created immediately, so you can proceed with the activation
procedure.
6. To supply your product key(s), do one of the following:
• Enter the product keys in the text area.
• Drop the product key file into the text area.
• Click Browse to select the product file from a location on your local system.
A green check mark next to the product key indicates that the key is valid.
7. Click Activate.
In the right part of the dialog, a green checkmark appears next to the activated module(s).
8. Click Close.
4.1.3 Opening Switch
This procedure assumes you are connecting to a local Switch Server.
To open Switch
1. Locate the application (Switch.exe or Switch.app) and double-click to start Switch.
Switch is installed by default in the following directory:
• Windows: C:\Program Files (x86)\Enfocus\Enfocus Switch
16Switch
• Mac OS: /Applications/Enfocus/Enfocus Switch
2. If the Connect to Switch Server dialog pops up:
a. Select Connect to local Switch Server.
b. Clear the Show dialog at startup checkbox.
Next time you open Switch, the selected connection (in this case: local connection)
is considered the default. You can afterwards still change the connection from within
Switch, by selecting File > Connect to Switch Server .
c. Click OK.
You have opened Switch.
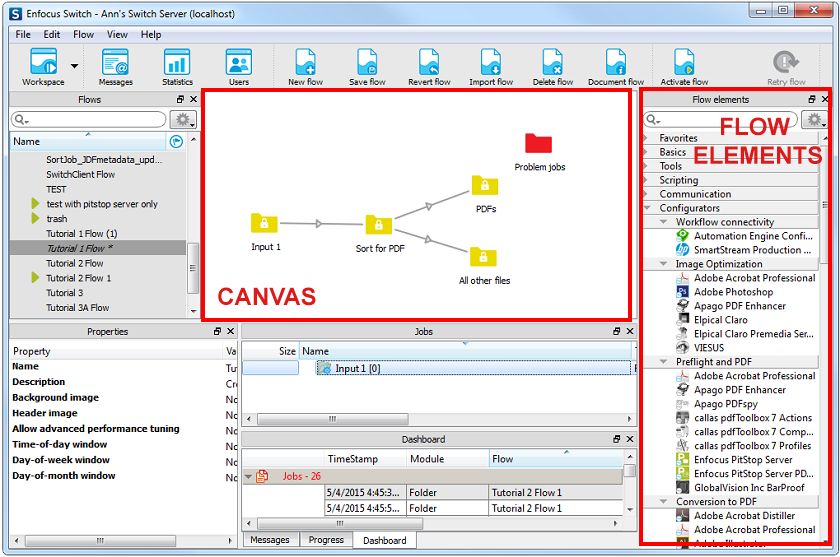
4.2 The Switch workspace
When Switch Designer is launched for the first time, the following window (ie. the workspace) is
displayed.
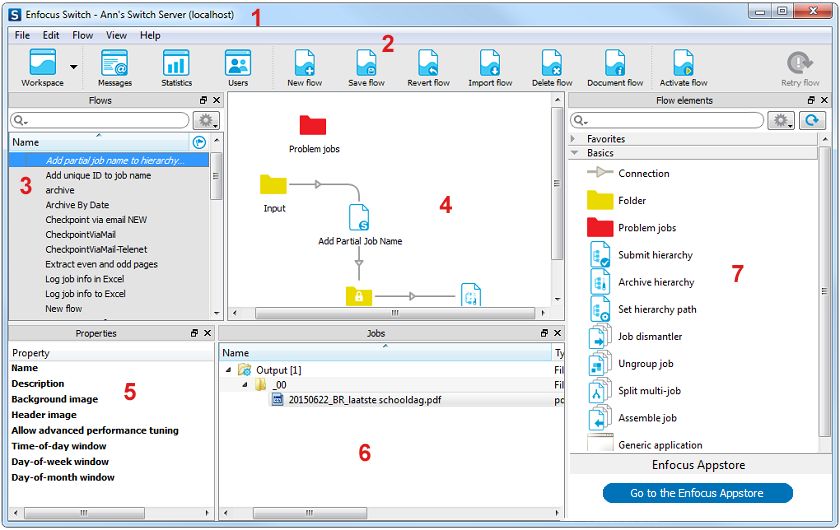
It consists of a title bar and a menu/toolbar (#1 en #2) at the top, and a number of panes
(#3,#5,#6,#7) surrounding a central area, the canvas (#4). The table below gives a brief
description of each of these screen parts.
Screen part Function
1 Title bar Indicates whether or not you are connected locally or remotely. E.g.
Ann’s Switch Server (localhost) indicates that the Switch Server (in this
example called Ann’s Switch Server) is launched locally. The name of the
17Switch
Screen part Function
Switch Server can be changed by selecting Edit > Preferences > Internal
Communication > Switch Server Name (Windows) or Enfocus Switch >
Preferences > Internal Communication > Switch Server Name (Mac OS).
2 Menu/ The menu bar gives access to the different panes and functions of Switch;
Toolbar for some of the main functions a shortcut, i.e. a button is available in the
toolbar:
• The Workspace button allows you to switch between different
workspace views (i.e. combinations of panes). There are three
preconfigured views (Design - which is the default -, Run and Test), but
you can change the content of these views as required, by displaying/
hiding pane(s) via the file menu View > Show panes .
• The Messages, Statistics, and Users button allow you to switch to the
corresponding screens:
• Click Messages, to check the log messages. They will be shown in a
browser.
• Click Statistics, to learn more about the time needed for processing
the input files in a particular folder. Note that only folders for which
the property Show in statistics is enabled are shown in this pane.
(See About flow element properties on page 24)
• Click Users to determine which users are allowed to use Remote
Designer or have access to certain Checkpoints and Submit points
via the Switch Web Portal.
• The other buttons are used to work with flows (e.g. to save, activate,
document,... a flow)
Note: Not all buttons are available in all views. The above
described buttons are displayed in the default Workspace - Design
view.
3 Flows pane Gives an overview of the flows in your workspace. The selected flow is
shown on the canvas (#4).
The properties of the selected flow are shown in the Properties pane (#5).
4 Canvas Gives a visual representation of your flow and allows you to design flows.
5 Properties Gives an overview of the properties of the flow selected in the Flows pane
pane (#3) or the flow element selected on the Canvas (#4).
6 Jobs pane Shows the content of the backing folder of a selected flow element. This
allows you to see which files are where in the flow.
7 Flow Contains all flow elements (including built-in tools, installed apps and
elements configurators) that can be used for designing flows.
pane
18Switch
Screen part Function
Note: The number of flow elements depends on the modules you
have licensed. For example, the Configurator elements are only
available if you have licensed the Configurator module.
When using the search function, matching results in the Enfocus Appstore
are displayed at the bottom of the pane.
4.3 Before you start
If you want to automate a process, we recommend analyzing the process in detail first.
Think about:
• Where the files/jobs come from (the input).
• What you want to do with them (processes).
• Where you want them to go (output).
Tip:
• Use diagrams to visualize your flows, before actually configuring them in Switch!
• Try to break down your workflows into smaller flows, focused on one task: it’s much
easier to work with small flows than with large and complex flows, which are difficult
to debug.
4.4 Creating your first flow
Working with flows always requires the following steps:
1. Create a new flow for the process you want to automate. You can start from a blank flow (and
design it from scratch) or start from a sample flow.
2. Design your flow, by dragging the required flow elements onto the canvas. You must
configure the properties of all flow elements and connections on the canvas.
3. Run your flow: i.e. save, activate and test the flow using test files, until you are happy with
the result.
4.4.1 Step 1: Creating your flow
Although you could also start from a sample flow, for your first flow(s), we recommend starting
from scratch (blank flow).
To create a blank flow
1. Do one of the following:
19Switch
•
In the toolbar at the top of the screen, click .
• From the menu, select Flow > New Flow... .
• In the Flows pane, right-click and select New Flow.
A new flow is created. By default it is called "New flow" (followed by a number if it's not your
first "New flow").
2. Enter a meaningful new name for your flow.
Your cursor will automatically focus on the flow name in the Flows pane, so you can
immediately type a new name. If you click outside the name field, the name will be displayed
in italics and it will have an asterisk next to it, to indicate that the flow hasn't been saved yet.
You can now add flow elements as required.
4.4.2 Step 2: Designing your flow
You are now ready to design your flow:
1. Add flow elements to the canvas.
2. Connect them through Connections.
3. Configure the flow element properties.
4.4.2.1 About flow elements
Flow element types
Remember the difference between the flow elements available in the Flow elements pane:
• The Connection flow element is a special type, connecting other flow elements and
determining how jobs (i.e. files and file folders) can move from one flow element to another.
• The Folder flow element can be used to deliver input files and to store the processed files,
but it is also used to (temporarily) store or modify jobs in between processes.
• Various other flow elements allow you to handle jobs.
For more information about the flow elements, refer to About working with Switch on page 7.
Search field
To find the flow element you need, you can use the Search field at the top of the Flow elements
pane.
Just enter a keyword, and the associated flow elements will be shown. For example, if you enter
the word preflight, you will see all flow elements that can be used to preflight jobs (Enfocus
PitStop Server, callas pdf Toolbox configurators) or to deal with preflighted jobs (Sort by preflight
state).
20Switch
Tooltips
Switch provides you with tooltips for every field or element in the GUI.
So, if you are not sure about the meaning of a flow element, move your cursor over it and a
tooltip will appear.
Furthermore, to learn more about the Configurators and what they are used for, you can right-
click the Configurator and select Info on third-party application or Documentation.
21Switch
Problem jobs
The Problem jobs folder element is a special element that keeps track of jobs that cannot be
processed. This is the case if a job matches none of the filters set on a Connection, if an invalid
file format is sent to a third party application configurator, and so on.
Always add this element to your flow; otherwise you may not be aware of the fact that there are
problems with your flow...
Note: The Problem jobs folder element does not require any connections. It can have an
outgoing connection that handles failed jobs, but if there is no outgoing connection, the
failed jobs stay in the folder until a user handles them manually.
22Switch
4.4.2.2 Adding flow elements to your flow
You need at least one flow element for the input and one for the output; additional elements may
be required depending on the processes you want to automate.
Input and output: The most basic flow consists of two Folder elements, one for the input and
one the output (see example below), but depending on the way you want to deliver your input and
receive the output, you can select other elements, such as FTP Receive… (See Input on page 8
and Output on page 14).
Processes: A number of flow elements allow you to perform processes, such as Merge PDF,
Compress, ... See Processes: standard processes on page 9 and Processes: Configurators on page
10).
To add a flow element to your flow
Do one of the following:
• Drag the icon for the desired flow element from the Flow elements pane onto the canvas
in the desired location.
• Right-click a blank area of the canvas and select Add > > .
4.4.2.3 Warning when adding flow elements
If you drop a flow element on the canvas, a warning icon may appear. To see what the problem is,
move your cursor over the icon and check the tooltip.
Note that in some cases additional information (warnings or errors) is available in the log
messages in the Log messages overview (See further: Troubleshooting problems when running a
flow on page 35).
4.4.2.4 Connecting flow elements
Next step is connecting the flow elements on the canvas, using the Connection flow element.
23Switch
To connect two flow elements that are already present on the canvas
Do one of the following:
• Drag the Connection icon from the Flow elements pane and drop it onto the first flow
element; then click the second flow element.
• Double-click the first flow element; then click the second flow element.
• Right-click the first flow element and select Start connection; then click the second flow
element.
A connection line connects the two flow elements.
4.4.2.5 About flow element properties
After you have placed the required flow elements on the canvas, and connected them as
required, you must configure each flow element's properties.
Properties pane
The Properties pane displays the properties of the selected flow element.
Each flow element type has its own specific properties.
For example, FTP receive has properties to identify the FTP server, whereas the Folder element
has a property for the file path.
Properties may also be different, depending on the flow element(s) the selected element is
connected to.
Example of the properties of an FTP receive flow element:
24Switch
Example of the properties of a Folder flow element:
Tip: Remember that you can display a tooltip for each of the property fields.
25Switch
Default values
Switch fills the properties with meaningful/default values; you only have to specify values
that Switch cannot know (e.g. FTP/e-mail server address, user names and passwords, e-mail
addresses for notifications…) and values that are different from the default values.
Filters
Example of the properties of a Connection flow element:
The Connection properties allow you to filter, i.e. exclude or include particular files (or file
folders, depending on the connected elements) moving along the connection. Filter properties
can be used to sort files, based on file types, file patterns … (see image below).
Example of a flow with filtering via the Connection properties
26Switch
In this example, only PDF files will be sent to the output folder; all other files will be sent to a
Problem jobs element. Alternatively, you could add a second output folder, to take care of the
non-PDF files. The connection to this second output folder should have the property Include
these jobs set to All other jobs.
To see which file types are defined, you must click the Include these jobs property, select File
types defined and check the dialog that pops up.
Tip: It's handy to mention the sorting method in the name of your Connection.
Hold jobs allows you to stop files from being routed to the next folder; the files remain in the
source folder, and you can check their properties via the Jobs pane. See About sample jobs on
page 43.
This also allows Switch to use the input as an example when defining variable parameters. For a
use case, see exercise 3.
Note: If a connection is set “on hold”, the connection is shown as an orange dashed line.
27Switch
4.4.2.6 Configuring flow element properties
To change the properties of a flow element
1. Select the flow element of which you want to change the properties.
Note: If you select multiple (similar) flow elements at the same time, you can
change the common properties.
The properties of the selected flow element(s) are displayed in the Properties pane.
2. Click the property you want to change.
Depending on the selected property, a text box, a button, or a drop-down menu appears.
3. Make the required changes:
If ... Do the following:
appears
A text box Type the text in the displayed text field.
A drop- Select the appropriate option.
down
menu
1. In the the property editor dialog that pops up, update the field(s)
as required.
2. Click OK.
1. From the pop-up list, select one of the options.
Depending on the selected option, an inline editor or a dialog
appears.
2. Configure the desired values.
Your changes are applied immediately.
4.4.2.7 Adjusting the layout of your flow design
If you have designed a flow with many flow elements, it is important to keep it clear and well-
arranged. Switch provides you with a number of tools to do this:
• You can align your flow elements (place them all on one line, horizontally or vertically).
• You can adjust the layout of the connections.
28Switch
• You can change the color of the connections and folders, for example to distinguish between
local and network folders.
Tip: For a better overview, we recommend using meaningful names for flow elements
and connections.
Example:
Before: Disorganized and sloppy...
After: A neat and well-arranged layout:
In the above example, the green color is used to indicate how the files should move if nothing
goes wrong.
Aligning flow elements horizontally
To align flow elements horizontally
1. Select the flow elements to be aligned.
2. Do one of the following:
• On Windows OS:
Select Edit > Align Horizontally , or press Ctrl + Shift + H.
• On Mac OS:
Select Enfocus Switch > Align Horizontally , or press Command + Shift + H.
29Switch
Aligning flow elements vertically
To align flow elements vertically
1. Select the flow elements to be aligned.
2. Do one of the following:
• On Windows OS:
Select Edit > Align Vertically , or press Ctrl + Shift + V.
• On Mac OS:
Select Enfocus Switch > Align Vertically , or press Command + Shift + V.
Adjusting the layout of a connection
By default, connections are drawn as straight lines between two flow elements. You can however
adjust these lines to make a well-arranged design.
1. To draw the connection along the sides of a rectangle (with a rounded corner)
a. Select the connection.
b. Do one of the following:
• Right-click the connection and select Vertical, then horizontal or Horizontal, then
vertical.
• In the Properties pane, set the connection's Corner angle to -90 or +90.
2. To draw the connection along a route somewhere in between these extremes
a. Select the connection.
b. Do one of the following:
• Move your cursor over the connections's corner until a drag handle (blue circle)
appears, and drag the handle to the desired direction.
• In the Properties pane, set the connection's Corner angle to a value between -90 or
+90.
30Switch
Adjusting the colors of folders and connections
To make it easy to distinguish between different folder or connection types, for example between
network and input folders, you can change the default color for folders (yellow) and connections
(gray).
To adjust the colors of folders and connections
1. Select one or more connections or folders.
Note: You cannot combine connections and folders in one selection.
2. Right-click to open the context menu.
3. Click Choose color and select the appropriate color from the list of predefined colors.
You can choose one of the following colors:
• Gray (default), Yellow, Green, Cyan, Blue, Magenta for connections.
• Yellow (default), Orange, Green, Cyan, Blue, Magenta for folders.
• Or click "Custom" and select the color of your choice using the color picker.
Alternatively, you can set the color via the Properties pane.
Keep in mind that "conditional" colors (e.g. orange for connections on hold) will take priority
over custom colors.
31Switch
For example, even if you have chosen green for a particular connection, its color will change to
orange when the connection is set on hold. When the connection is released, the chosen color
(green) will be restored.
4.4.3 Step 3: Running your flow
Once you have configured the flow elements, you can save, activate and test the flow, to see if it
does what you expect it to do. If this is not the case, Switch offers a couple of tools to investigate
what's going on, so you can solve the problems.
4.4.3.1 Saving a flow
In the Flows pane, unsaved flows are displayed in italics, followed by an asterisk.
To save a flow
1. In the Flows pane, select the flow you want to save.
Optionally, you can select several flows, to save them all in one go.
2. Do one of the following:
•
In the toolbar at the top of the screen, click .
• In the Flows pane, right-click and select Save Flow(s).
• From the menu, select Flow > Save Flow(s) .
In the Flows pane, the flow name is no longer displayed in italics and the asterisk has
disappeared.
Note: As soon as you start making changes to the saved flow, the name is again
displayed in italics, followed by an asterisk. Note that you can always go back to the
last saved version, by clicking the Revert Flow button in the toolbar.
4.4.3.2 Activating a flow
If you want a flow to start processing jobs, you must activate it.
To activate a flow
1. In the Flows pane, select the (inactive) flow you want to start.
2. Do one of the following:
•
In the toolbar at the top of the screen, click .
•
In the Flows pane, click and select Activate Flow.
• In the Flows pane, right-click and select Activate Flow.
32Switch
• In the Flows pane, double-click the selected flow (only possible in case of a single flow).
• From the menu, select Flow > Activate Flow .
If you haven't saved your flow yet and you haven't enabled automatic flow saving in the
Switch preferences, a warning pops up. Note that clicking Save, will save all flows with
unsaved changes. If you do not want to save all unsaved flows, click Cancel and manually
save the flows as required.
The background of the flow is darkened. In the Flows pane, you can see an icon next to
the name of the flow. The flow is now active and waits for input jobs to appear.
4.4.3.3 Testing a flow
Input for testing
To test the flow, make sure to provide Switch with some meaningful input:
• If you have chosen a Folder element for your input:
• If you have entered a file path in the Folder element property Path, make sure it contains
some appropriate input files or folders.
• If you haven’t configured a path in the Folder element property Path, drag and drop the
input from your local computer onto the input element on the canvas.
Note: In that case, the value of Path is Auto-managed (which is the default value).
Auto-managed folders are folders that are created automatically (by Switch) in
the application data root folder. Note that the the path to the application data root
folder can be found in the Preferences > Application data > Application data root
.
• If you have chosen a Mail receive or an FTP receive flow element, make sure that some input
is available on the configured mail or FTP server.
• If you have selected a Submit point, you must provide your input using the Switch Web Portal.
For more information, refer to the Switch Reference Guide.
Switch will process the input as soon as the flow is activated.
Information while processing
While the flow is running, Switch gives you information about the jobs being handled and their
progress:
• The number of jobs being present in a folder is indicated on the canvas. This allows you to
see how files move along a flow and where they are being hold.
If more than 100 jobs are present in a particular folder, Switch doesn't display the number,
but instead displays the symbol for infinity.
33Switch
• Problem jobs and problem processes are marked with an error mark icon.
If the icon appears next to a Problem jobs folder, the Problem jobs folder contains at least one
file or file folder. This may be due to the fact that the job does not match the filters set on a
Connection element.
If the icon appears next to a flow element for processes, there may be a problem with this
element, for example a network error (so jobs can no longer be transported), or an invalid
property.
If the icon appears next to a folder element, probably the backing folder is not accessible
anymore, for example because it does not exist anymore, or because the local network
connection is broken.
Output
Carefully check the output.
In case of problems:
1.
Stop the flow, by clicking the button.
2. Review the properties of the flow elements.
3. Activate the flow again, to see the result of your changes.
34Switch
Tip: Not clear what the problem is? Have a look at Troubleshooting problems when
running a flow on page 35.
4.4.3.4 Troubleshooting problems when running a flow
In case of problems, have a look at the following panes.
The Log messages overview
The Log messages overview is actually not a pane, but a web page. It gives an overview of
all messages issued by the Switch Server. There are different types of messages, e.g. info
messages, warning messages and error messages. Warnings are shown in orange and errors in
red.
You can customize the overview as required. You can for example only show the messages that
are relevant to you, or you can sort the list based on a particular column. To see the filter and
sort options, simply click the column headers.
How to display the Log messages overview?
Do one of the following:
•
Click , or
• Click View > Messages .
The Progress pane
This pane displays progress information for tasks currently being executed by the Switch Server,
for example downloading files from FTP or distilling a PostScript file.
35Switch
How to display this pane?
From the menu, select View > Show panes > Progress .
The Dashboard pane
The Dashboard pane displays an overview of current problems with the flow (opposed to the
Messages pane, which gives an overview of problems in the past).
How to display this pane?
From the menu, select View > Show panes > Dashboard .
4.5 Exercise 1: Sorting files by file type
Instruction
Create a flow where files can be placed manually in an input folder. Switch should sort the input
into two categories: PDFs and non-PDFs.
Test files
Download the test files: http://www.enfocus.com/manuals/Extra/Switch/Switchtutorial.zip
Solution
• Review the step-by-step solution.
• Check the result in your own copy of Switch. To do so, import Tutorial 1 Flow.sflow (included
in the zip package, under Tutorial Flows) by selecting Flows > Import Flows .
• Have a look at the video explaining how to build this flow: http://youtu.be/u8BT8llg3RI.
4.5.1 Exercise 1: Solution
This topic explains how to create a basic flow, which sends all input files first to an intermediate
folder and then sorts them into two categories (PDFs versus all other files).
1. Open Switch.
36Switch
2. Create a new blank flow and rename it to Tutorial 1 Flow.
a. Create a new blank flow.
b. Make sure the flow is selected and in the Properties pane, click the Name field.
c. Replace New flow 1 with Tutorial 1 Flow.
3. Add a Folder flow element (for the input), and configure the properties as required.
In this exercise, the input folder should be named Input1 and linked to a physical folder on
your desktop.
a. From the Flow elements pane, select the Folder flow element and drag it onto the blank
flow canvas.
As you drag the item onto the flow canvas, you should see it drag with your cursor. You
should place it on the left side of the canvas.
b. Select the folder on the canvas.
c. Change the name in the Properties pane to Input 1.
d. Link the Folder element to a physical folder on your desktop.
1. Make sure that the new folder is still selected.
2. In the Properties pane, click Path.
3.
Click .
4. Select Choose folder.
5. Select Create new and create a new folder on your desktop called Input flow 1.
6. Click Select folder.
Note: With a production workflow, the folder being linked to can be anywhere on the
network. As long as the Switch Server can access the shared volume, it can link to
the folder.
4. Add a second folder.
Name this folder Sort for PDF. This will remain an Auto-managed folder. We recommend
using auto-managed folders for intermediate folders within a workflow, so files are not
moved unnecessarily over the network.
5. Add two more folders to the upper right and lower right of the Sort for PDF folder.
Name the top folder PDFs and the bottom folder All other files.
6. To take care of files that (for any reason) cannot be processed, add a Problem jobs flow
element.
Your flow now looks like this:
37Switch
7. Connect your Folder elements (but not the Problem jobs element!).
a. Double-click the Input 1 folder.
A connection appears.
b. Move your cursor to the Sort for PDF folder and click that folder.
A connection is made between the two folders.
c. Make a similar connection from Sort for PDF to the PDFs folder and the All other files
folder.
Note: Always start a connection with the folder from where the files will "flow from"
and then connect to the folder they will move to. Connections have a direction of flow
noted by the arrow in the middle of the connection.
Your flow now looks like this:
38Switch
8. Now change the connection settings, to make sure that PDF files are moved to the PDFs
folder, and all other files to the All other files folder.
a. Click the connection between the Sort for PDF and PDFs folder.
The connection highlights in dark gray.
b. In the Properties pane, select the Include these jobs property.
c.
Click and select Define file types from the pop-up menu.
1. In the Define file types: Include these jobs dialog, select Adobe PDF (*.pdf).
2. To add it to the include list (right side), click Add.
3. Click OK.
d. Click the connection between the Sort for PDF and All other jobs folder.
e. In the Properties pane, select the Include these jobs property.
f.
Click and select All other jobs from the pop-up menu.
Now your flow is complete.
9. Save the flow.
To do so, click the Save Flow button at the top of the design window.
10. Activate the flow.
To do so, click the Activate Flow button at the top of the design window.
The design window with the flow should turn gray with numbers showing "0" for each folder
in the flow. The numbers tell you how many files are in that folder at any given time.
Your flow now looks like this:
11. Drop your test files in the flow input folder on your desktop.
You can use your own files (PDF and non-PDF) or you can use the sample files found in
"Tutorial Job Folder" folder.
39Switch
Switch will recognize these files within 10 seconds (which is the default scanning time for
an input folder) and you will see the counter change to match the number of files in the
folder. Shortly after, the end folder counters will increment with the proper number of files
depending on the sorting.
12. To check the results, click the PDFs folder or the All other files folder.
In the Jobs pane you can view what files are in these folders. PDFs should be in the PDFs
folder and all other file types should be in the All other files folder. If they are not, then
double-check the Connection settings (see step 7) and try the flow again.
Note: You can delete files from the output folders by clicking the file name in the
Jobs pane and pressing the Delete key.
4.6 Exercise 2: Sorting by file name pattern
Instruction
Duplicate the flow you created in exercise 1 and change the sorting method; instead of sorting
based on file type, now the input should be sorted on file name pattern:
• If the file name contains Part1 (e.g. JobsPart1.pdf or Part1_jobs.pdf), it should be moved to
the PDFs folder.
• All other files should be moved to a folder named All other files.
Note: This type of flows can be useful when receiving files from a Web to Print system,
or for any workflow where the file name can contain file name patterns to identify job
type, color model or other characteristics that are important to your workflow.
Test files
Download the test files: http://www.enfocus.com/manuals/Extra/Switch/Switchtutorial.zip
Solution
• Review the step-by-step solution.
• Check the result in your own copy of Switch. To do so, import Tutorial 1B Flow.sflow (included
in the zip package, under Tutorial Flows) by selecting Flows > Import Flows .
• Have a look at the video explaining how to build this flow http://youtu.be/GIwDS8kvnvw.
4.6.1 Exercise 2: Solution
This topic explains how to duplicate a flow and change the sorting method from sorting based on
file type to sorting based on file name pattern.
In this example, if the file name contains Part1 (or part1), it should be moved to the PDFs folder;
all other files should be moved to All other files.
1. Duplicate Tutorial 1 Flow.
a. In the Flows pane, click Tutorial 1 Flow.
40Switch
b. Right-click and select Duplicate flow.
2. Rename the flow.
a. In the Properties pane, select Name.
b. Replace Tutorial 1 Flow [Copy] with Tutorial 1B flow.
3. Define the new settings for sorting.
a. Select the connection between Sort for PDF and PDFs.
b. In the Properties pane, click the Include these jobs field.
c.
Click and select Define file patterns from the pop-up menu.
d. In the Define file patterns: Include these jobs dialog, type *part1* and click OK.
The asterisk (*) is a wild card character. The case of the characters is not taken into
account; *part1* will match Part1, part1, PART1 and so on.
4. Check your results.
a. Save and activate the flow.
b. Add relevant input files, for example the two tutorial 1 PDF files.
c. Check the content of the PDFs and All other files folder (in the Jobs pane).
Job_Part1.pdf should be routed to the PDFs folder; Job_Part2.pdf should be routed to the All
other files folder.
41Switch
5. Working with Switch
This part of the QuickStart explains some more advanced topics, such as working with sample
jobs, submitting job folders and passing data from one flow to another.
5.1 Using embedded metadata and file information
Switch allows you to use job information that is embedded inside a job, as part of the file, for
example within XMP metadata, EXIF or IPTC tags. You can use this information to sort jobs, or
use it as a reference in e-mail messages.
Note: Switch also supports metadata datasets stored as external files associated with
the job. If this is XML, XMP or JDF metadata, then Switch offers convenient access to the
metadata file content. For other file types (TXT etc.), script expressions can be used to
access the file content.
Some examples of embedded metadata
• Number of pages
• Author
• Creation date
• Paper type
• ...
Example use cases
To decide whether or not a job must be sent to an ink optimizer, you can use the information
about the paper type (coated versus uncoated) embedded inside the job; to sort jobs based on
quantity, you can use the information about the number of copies...
If you want to send an e-mail notification to the customer, you can either manually enter the
customer's e-mail address, or you can extract the customer's e-mail address from the job. You
can also refer to the customer's reference number, or other relevant metadata.
Note: If the job was submitted via e-mail, the sender's e-mail address is automatically
stored in the metadata dataset, associated with the job. So you can later extract this
address to send e-mail notifications.
Variables
In Switch, metadata can be accessed by means of variables.
There are two types of variables:
• Switch variables, which are not related to a particular job, such as [Swich.FlowName],
[Switch.Language], [Switch.ServerName] ...
• Job-related variables, such as [Job.Size], [Job.EmailAddress]...
When jobs are being processed, these variables are replaced with actual values. To see these
variable values, you should run a "sample" or trial job. Refer to About sample jobs on page 43.
42Switch
How to use embedded metadata in Switch
• If you want to use metadata to sort jobs, you must select a Connection flow element and
exclude or include jobs using Conditions with variables.
Defining a condition with variables on page 45
• If you want to use metadata in e-mail notifications, you must select a flow element that
supports attaching e-mail notifications to the job (e.g. Folder element) and select Define
multi-line or single-line text with variables. The attached e-mail information (addresses,
body text) can later be used by the Mail send tool to send the e-mail notifications.
Defining text with variables on page 46
5.1.1 About sample jobs
Sample jobs are trial jobs.
If you have used variables to configure conditions (for example to sort or rename jobs) or to
define text (for example to customize e-mail notifications), sample jobs allow you to check the
actual values of these variables for a particular job.
Note: Switch can only display variable values if the flow contains at least one valid
sample job.
Sample jobs are also useful to check what's going on at each step of the flow.
How does it work?
Once you have designed a flow, you must set one of the connections, before the end of the flow,
on hold. When you activate the flow and input a job to the flow, the job will remain in the folder
just before the “on hold” connection, and you will see it appear in the Jobs pane.
43You can also read