SHOPIFY SETUP INTEGRATION GUIDE - CLASSWALLET NEWS
←
→
Page content transcription
If your browser does not render page correctly, please read the page content below
Shopify Setup
Integration Guide
Setting up ClassWallet as a payment method on Shopify is quick and can be easily performed in
conjunction with your customer service representative.

You can use our APIs directly, however, we recommend that you use our middleware which
takes much of the heavy lifting off your shoulders. Should you wish to use our direct integration
APIs, please ask your Client Services representative for additional direction.
Vendors are welcome to integrate on their own, however should you need support, we have
some trusted partners that are skilled in both ClassWallet and Shopify and are more than happy
to assist in your integration onboarding.

Getting started:
Integration with ClassWallet payment is a simple three step process: Setup, Install and
Customization. Typically, this takes no more than a few hours to complete and test once all
prerequisites are completed

Step 1. Setup
ClassWallet will:
   1. Need the domain of your Shopify store. This will be used to configure the app in our partner
      account and in our middleware
   2. Create the application in our Shopify partner account. This will enable us to create the install link
      and with some other prerequisites, you will be able to install the app.
   3. We will need the “Shipping Handle” to configure on our middle where. This is from your Shopify
      admin panel (See Figure 1 & 2)
   4. Create the install link and provide it to you

                                                    1                               Shopify Setup V 1.4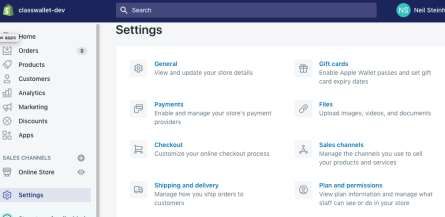
Figure 1.

Under the column header "Rate name" is the “handle”

Figure 2.

Shipping Handle Modification:
You my, need to set customize the shipping handle, this can be done to enable plug-ins You will
need to set the handle and too do so, please follow the below instructions:
To get the shipping handle, create a draft order and click add shipping.

                                                 2                            Shopify Setup V 1.5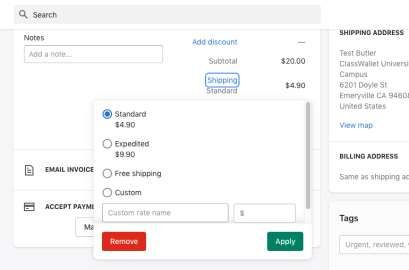
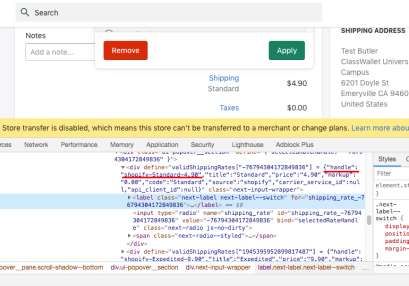
Inspect the radio button of the method you wish to use. Find the JSON which
contains the "handle" key.

Step 2. Install
Vendor installation and configuration
The vendor will need to
   1.   Login on as admin to their Shopify Account
   2.   Allow “Accounts are optional” (Look under customers tab in the Shopify Admin ( Figure 3 )
   3.   Click on the install link – Shopify will then prompt the user to accept the installation
   4.   Approve the installation

                                                   3                              Shopify Setup V 1.5
Figure 3
After installation, the vendor will need to configure the Shopify account to display the
ClassWallet payment method using provided code snippet. Please see the Step 3 for
instructions on template modification.
Step 3. Customize
TEMPLATE CUSTOMIZATION
The below code will override the standard checkout button and redirect the user to the custom
ClassWallet checkout template that is served up by the Middleware app. Note only
authenticated users that enter your Shopify store from the ClassWallet application, will see the
check out by ClassWallet payment button.
Instructions:
Once you are logged in to the Shopify store as admin: From the dashboard, go to Online store.
Under Themes, select the “Actions” dropdown and “Edit code.” Choose Layout -> theme.liquid.
Insert before tag please add the following code snippet:
{% if customer.metafields.classwallet.cw_vars %}
var c = document.getElementsByClassName('cart__checkout-button');
if(c.length) {
c.namedItem('checkout').onclick = function() {
window.location = '/apps/proxy/cw_checkout';
return false;
};
}
var b = document.getElementsByClassName('btn');
if(b.length) {
b.namedItem('checkout').onclick = function() {
window.location = '/apps/proxy/cw_checkout';
return false;
};
}
4 Shopify Setup V 1.5{% endif %}
The most recent version of this code can be found here: Code Snippet
Note!! This code may need to be modified to accommodate the Shopify store’s particular
theme configuration. Use this as a starting point for integration into a store’s theme template.
Order Workflow:
Flow
The user will be directed to your store from the ClassWallet app. From there, they will be
signed into your store. The code snippet detects the User clicking any of the site's checkout
buttons and will redirect them to the Checkout with ClassWallet page. When the Users
clicks checkout from this page, will be directed back to ClassWallet to complete the
transaction.
Approval and settlement of purchases may not be in real-time. The speed with which an
“purchase” is approved depends on the payor in question. In some cases, there may be an
approval needed on the payor’s side before a purchase can be considered complete.
Checkout
This will create an open draft order. Note this draft may remain in this status for some time.
Do not ship any order that is not completed.
5 Shopify Setup V 1.5Approve/Reject
After payment has been approved, an actual order will be created from the draft and will be
marked as paid with an invoice Id in the notes. At this point the draft order will be marked as
completed and you can fulfill or otherwise ship product with the knowledge the payment is
done.
If the order is cancelled or rejected by an approver, no actual order is created, and the draft
order will be removed. Do not ship any draft order it must be marked as complete and mover
to the order queue.
Certification:
After you have completed the set up and integration, ClassWallet will certify the integration to
ensure that all is as it should be and that the vendor can begin to accept traffic from
ClassWallet. This is a simple process:
1. ClassWallet will login as a test user and make a purchase on the Vendor site
2. The Vendor should look to see that the status is marked as completed in Shopify and that
shipping is correct
6 Shopify Setup V 1.53. ClassWallet will then look and ensure that the transaction is correct in our Admin
4. Vendor should cancel the order
5. ClassWallet will then mark the sale as canceled
6. ClassWallet will enable the merchant in the marketplace
7. Vendor is certified
QUESTIONS?
Should you have any questions on integration, please contact your Client Services
representative for help and direction.
7 Shopify Setup V 1.5You can also read