SMARTractor - owner's manual - Acoustical Systems
←
→
Page content transcription
If your browser does not render page correctly, please read the page content below
acoustical systems
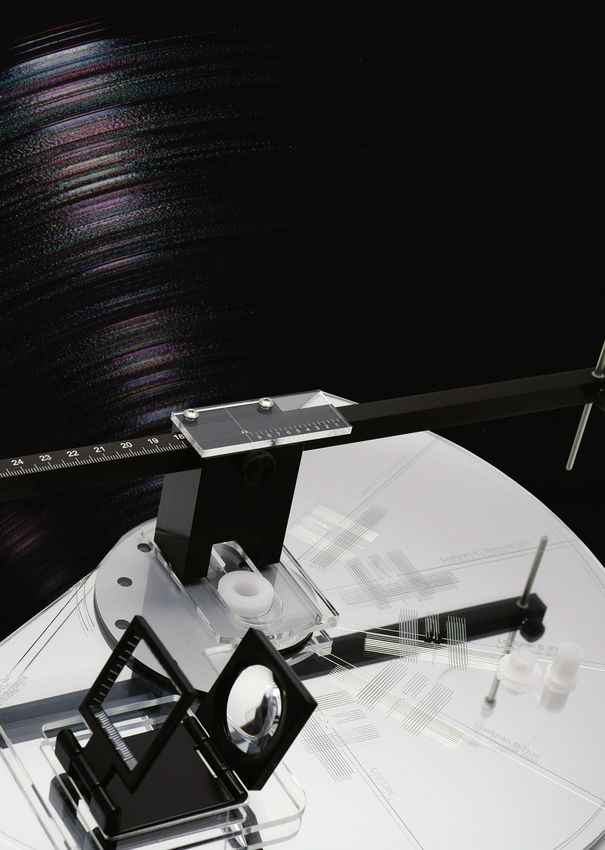
SMARTractor
©
Universal high-precision triangular positioning &
alignment instrument for optimized analog phono
tonearm alignment & true one-point cartridge set-up
owner’s manual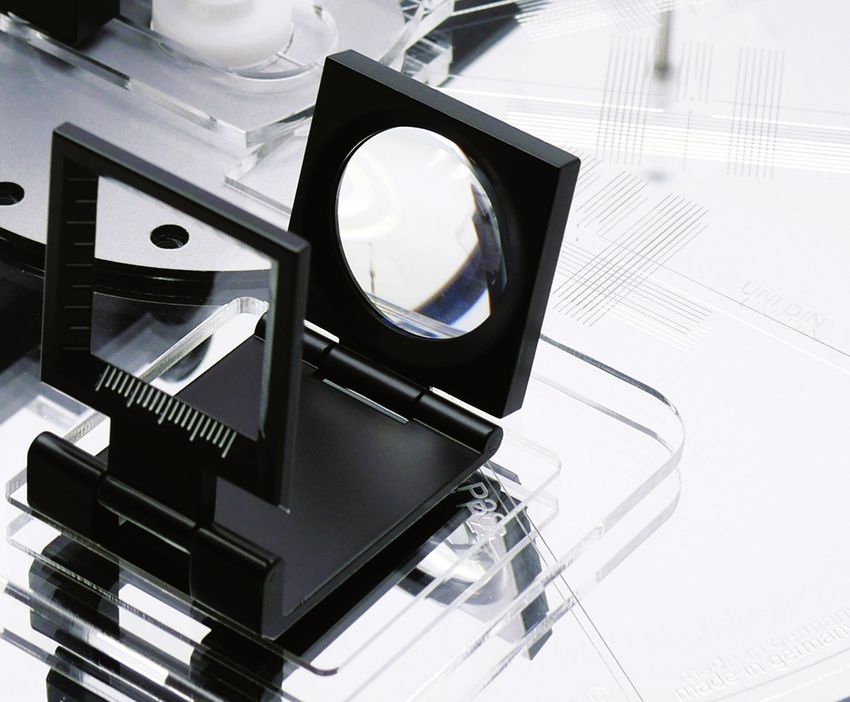
A brief                                                   Most important:

introduction                                              Please study the step-by-step illustrated
                                                          instruction to learn how to use and
                                                          set-up the SMARTractor correctly.

The SMARTractor is a versatile high-precision             To get access to all features of the SMARTractor
positioning and measuring instrument for use with         it is inevitable to read this manual.
phono tonearms and turntables.
It covers all areas of the geometric tonearm
alignment with high precision mechanical
accuracy.
It also allows for precise measurement of
Pivot-to-Spindle (P2S) mounting distance -                DISCLAIMER
of any given tonearm.
                                                          Please use all parts with care and attention!

SMARTractor offers true 1-point cartridge                 The use of the SMARTractor is on your own
alignment to the tonearm, with a selection of             risk.
5 different tangential curves to choose from.
                                                          Keep out of reach of children.
As the SMARTractor operates with true
tri-angular positioning, it applies to all pivot          The SMARTractor set contains small parts
tonearms, regardless of the effective length,             that can be swallowed!!
mounting distance or specific geometry a given
tonearm may ask for.                                      The SMARTractor’s locator pin has a very
                                                          sharp point and could easily penetrate human
To ensure highly precise measurement, the                 skin.
SMARTractor comes with a special designed
vernier scale.
This SMARTractor’s vernier scale provides                 The manufacturer and the designer do not
accuracy in read-out of 5/100 mm.                         take any responsibility for possible damage
                                                          or injury due to operation or handling of
Precise analog tonearm alignment is impossible            the SMARTractor or any of its parts.
without precise centering.
                                                          The SMARTractor is made from materials
The SMARTractor is supplied with an universal             that are particulary sensible to heat and bright
3-part spindle-adapter to ensure precise fitting on       sunlight.
the platter spindle and perfect centering without
play.                                                     Please use the SMARTractor with the same
                                                          care as with the proper handling of analog
Please check your SMARTractor package to                  records.
ensure that all contents are included.
All the above parts must be included to provide           Please clean the mirrored surface of the
perfect function under all circumstances.
                                                          SMARTractor using only a wet soft cloth!
Each SMARTractor was carefully checked and                We find the best fabric to use is a wet
tested prior to shipment.                                 microfiber cloth like those used to clean
                                                          eyeglasses.
Please do get yourself familiar to the handling and
use of the SMARTractor.                                   The manufacturer precisely calibrates the
                                                          SMARTractor.
While it is a mechanical positioning instrument, it
needs a minimum of attention to detail by the user        DO NOT LOOSEN the screws fixing the
to obtain the maximum precise results it ensures if       Vernier scale on top of the black POM block
handled correctly.                                        guiding the measurement scale.

                                                      2
Unpacking the                                              Selecting the
SMARTractor                                                tangential curve

The SMARTractor set contents the following                 The SMARTractor offers a total of
parts:                                                     5 different tangential curves with which
                                                           to align a given cartridge and tonearm
* the SMARTractor - completely assembled
		                  and calibrated                         combination.

* (1) white universal 3-part spindle-adapter:
     (1) POM spindle ring 20 mm, (1) 12 mm
     and (1) 6 mm insert for spindle ring

* (1) long stainless steel locator pin with round
      reticule w/ white engraved crosshair guide                                                               (5)

* (1) metal frame glass magnifier

* (6) small self-adhesive “feet”                                                                               (4)

* (2) M3 20 mm distance bolts

* (1) printed manual
                                                              (1)                  (2)                 (3)

The (6) small self-adhesive feet are only needed           You have the option to align the cartridge using
                                                           any of these five tangential curves:
if the turntable features an convex or concave
platter.                                                   - UNI DIN (1)
In those rare events (Simon Yorke tt or Goldmund           - Loefgren B DIN (2)
Studio TT or Goldmund Relief mat) do use
these small feet - 3 at a time - to equalize the           - Loefgren B IEC (3)
SMARTractor relative to the non-flat platter               - Loefgren A / Baerwald DIN (4)
surface.
                                                           - Loefgren A / Baerwald IEC (5)
The (2) 20 mm M3 distance bolts are used ONLY
when aligning a tonearm with unusual tall
bearing housing. The 2 distance bolts will give            The selection of the tangential curve depends on
                                                           your personal preference and on your record
the SMARTractor an additional 20 mm of height              collection.
for the positioning arm in those instance where
required (for illustration see page 8).                    If the majority of your records are rather
                                                           recent vintage, with production past 1985, we
                                                           suggest you align to either Loefgren A /
                                                           Baerwald IEC or Loefgren B IEC
                                                           If your record collection contains a lot of older
                                                           records from the beginning of the stereo era to
                                                           the early 1980ies we strongly recommend
                                                           aligning to Loefgren A / Baerwald DIN or
                                                           UNI DIN
                                                           If your collection features a majority of
                                                           records with classical music and / or human voic-
                                                           es I strongly recommend aligning to UNI DIN.

                                                       3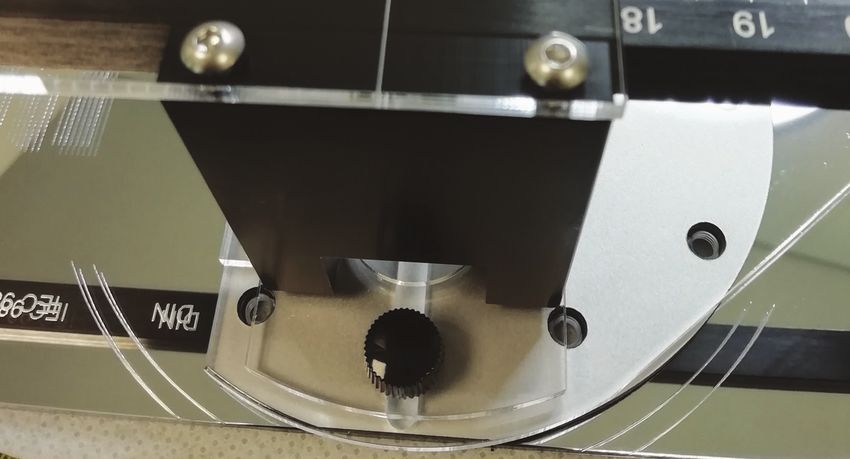
Setting up the                                                                Measuring P2S
SMARTractor
                                                                              Step 3

           20 mm spindle ring
           and 12 mm insert

Step 1
The SMARTractor is already pre-assembled                                      If you want to measure the arm mounting
with the 20 mm POM spindle ring (part of the                                  distance or P2S, rotate the central block to the
universal 3-part spindle-adapter) sitting in the                              UNI P2S position, loosen the locking screw
center of the SMARTractor.                                                    fixing the positioning arm in the black POM
First place the SMARTractor - with the 20 mm
POM spindle ring - on the spindle.                                            block.

                                                                              The engraved line on the center piece will meet
Step 2                                                                        the line at “UNI P2S”.

Now take the 12 mm (tall) or 6 mm (short                                      Slide the central assembly back or forth so that
and wide collar) spindle ring insert** . Now                                  the hole for the thumbscrew is aligned with the
SLOWLY and CAREFULLY place it on the top                                      locking thread for the selected curve - there is
of the spindle and ever so slightly press down.                               only 1 possible thread hole to move to in each
                                                                              position.
                                                                              Fix the assembly in place by re-installing and
                                                                              tightening the thumbscrew. The thumbscrew need
                                                                              only be very snug by hand tension.

IMPORTANT - be carefull!
** 12 mm or 6 mm spindle insert ??
The 12 mm (tall) insert will work with small diameter spindles (smaller
then 7.15 mm diameter). The 6 mm (wide) insert will work with 7.2 and
wider diameter.

Do not press down the spindle adapter too hard or too deep. On some
spindle it will only be 2-3 mm or less. If you press too hard, you will
have a very hard time getting the white 20 mm POM ring off your
spindle again.

The 12 mm and / or 6 mm spindle adapter insert allows the precise
centering of the SMARTractor on a wide range of spindle diameters.

Remember - Please be careful and do not use any excessive force.
Pushing down realy hard creates a VERY tight lock which you will                                      UNI P2S
have big problems loosening up again.

                                                                          4
Step 4
Mount the long stainless steel locator pin with the
reticule either on top or pointing downward into
the 3mm-hole at the end of the aluminum
positioning arm. Handle with care, as the tip is
quite sharp and may cause injuries.

Loosen the front screw on the POM-block. Slide
the positioning arm with the locator pin toward
the center of the tonearm body.

                                                           Step 6
                                                           When the pivot point is determined and is
                                                           directly underneath the pin-point of the locator
                                                           pin, tighten thumb screw holding the positioning
                                                           arm in place.
                                                           Take care to NOT move the SMARTractor in
Now carefully pull the positioning arm towards             any way until the measurement of P2S valve is
the pivot of the tonearm and place locator pin or          finished.
reticule right on the pivot of your tonearm. Many
                                                           The pinpoint has to be located precisely over the
tonearms have a small indentation indicating               pivot at all times during alignment.
where the exact pivot point is located.
                                                           You can fix the SMARTractor in place with clear
This is ideal for precise positioning of the locator       or painters blue tape by placing tape from the
pin on the pivot point.                                    SMARTractor to the side of the platter.

                                                           You can now read out the exact value on the
                                                           Vernier scale.

                                                           If unsure, please see page 6 for a short tutorial
Step 5                                                     how to read the Vernier scale correctly.

If you can spot the tonearm pivot, put the pinpoint
of the locator pin here. Many tonearms have a
small indentation indicating where the exact pivot         With page 7 we start now
point is located. This is ideal for precise
positioning of the locator pin on the pivot point.         with the actual aligning to the
                                                           tangential curve.
If there is no indication of the tonearm pivot
point, attempt to locate pin exactly over the
tonearm pivot center.
If unsure of pivot center, use the reticule to
visually determine tonearm pivot point by finding
symmetrical outer lines on the tonearm body.

                                                       5
Side-kicks:
Reading the
Vernier scale
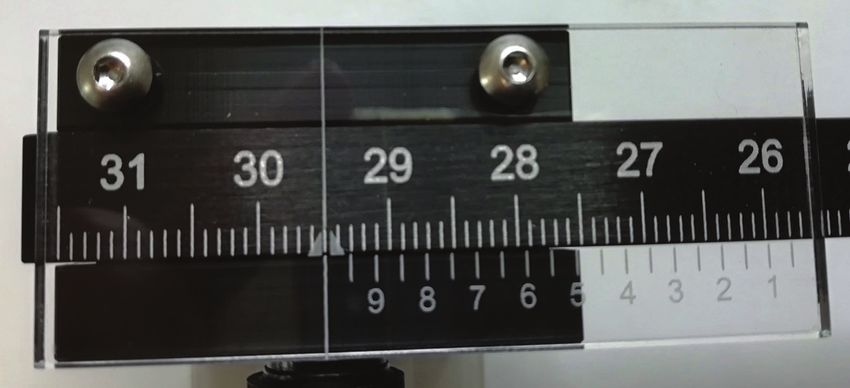
The SMARTractor features a Vernier scale to
allow precise read-out of the P2S with an
accuracy of 5/100 mm.
This Vernier scale runs right to left - as does the This is 231.5 mm P2S - the white “5” being in
metric scale with increasing distance of P2S. line.
If you are unfamiliar with a Vernier scale, please BTW: This is the perfect mounting distance for
get accustomed to its operation. the FR-64s.
The white numbers 1- 9 over the black back-
The magnifier
ground are 1/10 of a mm each. The white lines
between numbers are 0.5/10 mm each - or
5/100 mm each.
Using the glass magnifier greatly increases the
Whenever any of the white lines is absolutely visibility of the stylus when trying to align on
in-line with a black line on the aluminum scale, the single spot. It further also allows with most
then it denominates the 5/100 value which has to modern cartridges to get a fairly good view of the
be added to the full mm value given between the cantilever.
2 white “leaves” centered by the full vertical
white line on the left of the scale just before the Place the magnifier in the cut-out frame on the
half-circle end. clear acrylic positioning arm and pull it all the
way forward so that it seats squarely against the
To illustrate the read-out procedure, here are a clear acrylic.
few examples of mounting distances for common
tonearms. It is automatically in a position to optimize focus
when viewing through the glass lens on the
One will become accustom quite quickly to this alignment spot for the selected tangential curve.
way of reading the scale.
The cutout for the glass magnifier in the
The Vernier scale is an international standard in acrylic positioning arm allows for adjusting the
industrial precision analog measuring. side-to-side position of the glass magnifier to
accommodate all different positions of the 5
tangential curves on the SMARTractor.
.
This is 295,00 mm P2S - suitable for a FR-66s.
6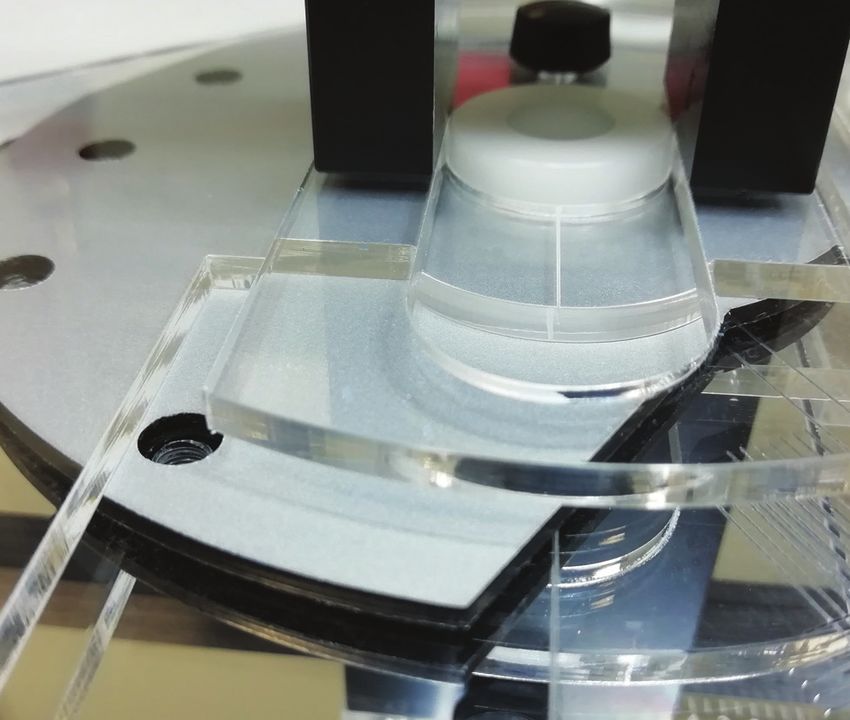
Aligning the tonearm                                         Slide the tonearm with the mounted cartridge
                                                             towards the single alignment spot of the selected
and cartridge                                                tangential curve. It is surrounded by lines to ease
                                                             adjustment and precise view.

You can now align your mounted cartridge
to your choice of tangential curve (picture see
page 3).

Make sure the tracking force on your tonearm
is set to an appropriate value for the mounted
cartridge.

IMPORTANT NOTE Disengage the                                 Step 8
anti-skating on your tonearm while aligning
the cartridge.                                               Now guide the head of the tonearm with the
                                                             mounted cartridge over the „sweet spot“ of the
                                                             tangential curve. That sweet spot is surrounded
                                                             by supporting lines as well as lines „behind“ the
Step 7                                                       sweet spot to ease alignment of the cantilever.

Remove the locking screw behind the central
POM block (as pictured on page 4 / Step 3) and               Step 9
rotate the complete central assembly to the
desired tangential curve.                                    By carefully undoing the mounting screws just
                                                             a little bit and then shifting the cartridge’s body
Slight in position and fix again with the                    ever so gently you ensure that the stylus is
thumbscrew with normal hand tension.                         directly ABOVE the sweet spot.
Make sure your tonearm is parallel to the platter            Now you can cue down the arm lift and lower the
surface.                                                     stylus onto the sweet spot.
Now please undo the front screw on the central               IMPORTANT Any shifting or twisting of the
POM block (as pictured on page 5 / Step 4),                  cartridge’s body in the headshell should be done
so the positioning arm is free to move back and              ONLY when the tonearm is lifted up with the
forth.                                                       cueing device.
Please position the steel pin / or the reticule direct       NEVER make any changes to the position while
above the pivot of your tonearm (as pictured on              the stylus is lowered onto the SMARTractor!
page 5 / Step 5).
                                                             When the stylus is precisely sitting on the single
Please do fasten again – light finger force is fine –        spot, use the helping lines to ensure that the
the thumbscrew on the center block.                          cantilever is perpendicular to the SMARTractor
                                                             surface when viewed from the front.
IMPORTANT NOTE                                               Adjust the cartridge accordingly until the
From now on please ignore any value on the                   cantilever is visually in this position.
positioning beam. Whatever it „shows“ now                    If you have a Uni-Pivot design tonearm, it is
will differ from what you read out before in the             critical that the table is level before carry out
„UNI-P2S“ position when measuring the pivot to               this step.
spindle distance.
                                                             Using the glass magnifier will dramatically
That „difference in value“ is correct.                       increase visibility of the alignment.
The positioning beam now is just that:
a positioning beam. We no longer „read “ the P2S             IMPORTANT NOTE Don’t forget to
value now, as the positioning arm is no longer               retighten the mounting screws after final
above the spindle.                                           position is obtained.

                                                         7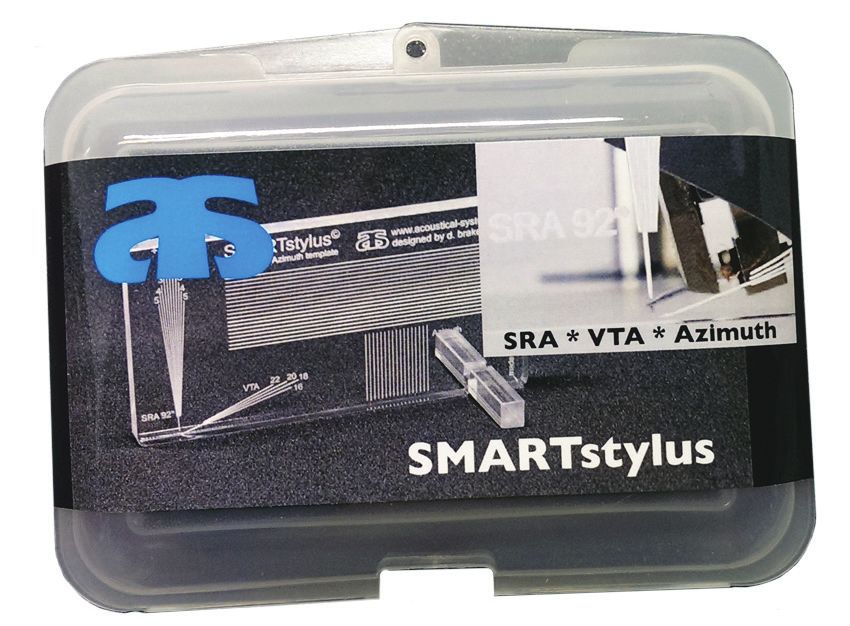
Step 10                                                   In the rare event that you have to align a tonearm
                                                          featuring by design an unusual height of the
Make sure that the stylus is precisely located on         tonearm body, you can simply use the (2) M3
the spot with the helping lines straight with the         distance bolts supplied with the SMARTractor and
cantilever – making sure that the locator pin is          mount them between the POM block and the clear
still exactly positioned over the pivot.                  acrylic sliding plate.
When you are sure that the stylus is precisely            You won’t need any additional tools for this and it
located on the spot with the helping lines in line        is just a 1- minute routine, which is reversible at
with the cantilever the tangential alignment to the       any time.
selected tangential curve is finished.
Please demount the SMARTractor and carefully
place it back in it’s package.
Do engage antiskating again and continue with
aligning azimuth, tracking force and SRA / VTA.
Here the SMARTstylus tool is most helpful to
get accourate settings very quick.

                                                          General note:
                                                          Technical data and specifications are subject
                                                          to change without prior notice.
                                                          Designed, manufactured and assembled in
                                                          Germany
                                                          acoustical systems,
                                                          Axinia Schäfer
For further information please ask your dealer.           Am Büchele 2
                                                          86928 Hofstetten
                                                          Germany

                                                          www.acoustical-systems.com
                                                          info@acoustical-systems.com

**October 2020

                                                      8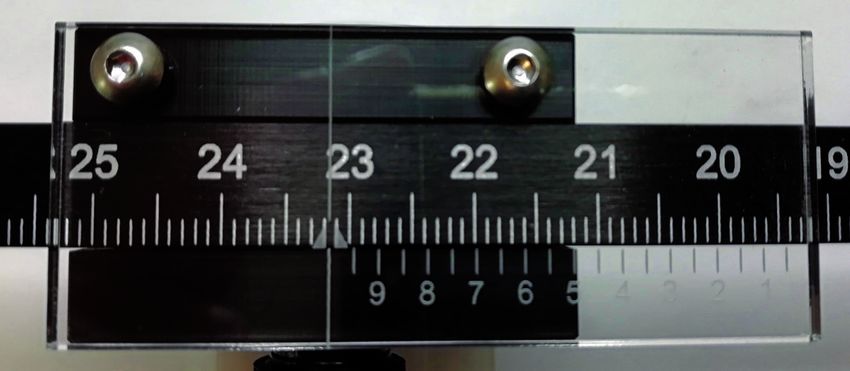
You can also read