SPECIALIZED MISSION CONTROL APP - USER GUIDE - Start
←
→
Page content transcription
If your browser does not render page correctly, please read the page content below
SPECIALIZED MISSION CONTROL APP
           USER GUIDE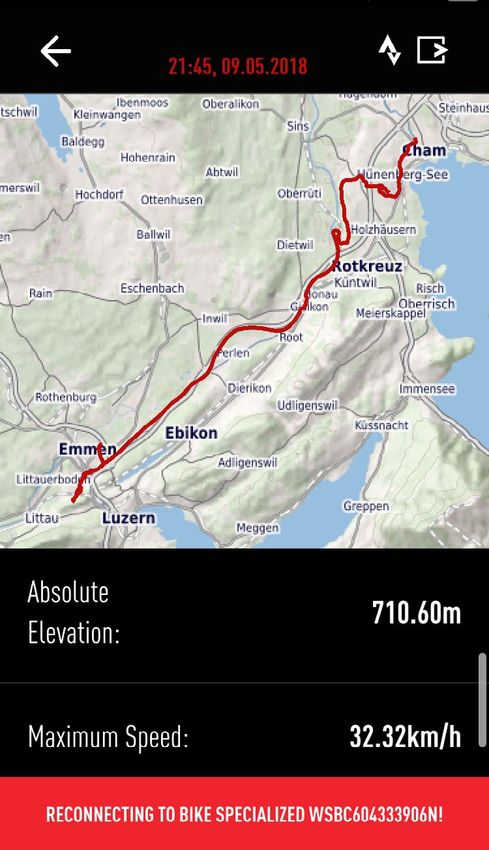
SPECIALIZED MISSION CONTROL APP

C U S TO M I Z E , C O N T R O L , A N D D I A G N O S E Y O U R
SPECIALIZED TURBO WITH MISSION CONTROL.

1.                    TUNE THE RIDE
                      Customize your motor characteristics with Support, Peak
                      Power, and more tunable features.

2.                    DIAGNOSE
                      Get immediate feedback and overviews of motor, battery,
                      and system health.

3.                    RECORD RIDES
                      Have a detailed overview of your fitness and ride history at
                      your fingertips.

4.                    SMART CONTROL
                      Adjust the motor and battery output based on how far, or
                      how long, you want to ride.

5.                    CONNECTIVITY
                      Integrate and automatically upload your rides to STRAVA’s
                      dedicated e-bike segment.

6.                    F I R M WA R E U P D AT E S
                      Be notified about firmware updates and install them on
                      your bike (may vary according to model).

Mission Control is compatible with all Turbo Levo, Kenevo, Creo SL, Vado, Como bikes
with TCD-w, some Turbo S/X models (Model Year 2016/17) and future Turbo bikes.

                                                                                       2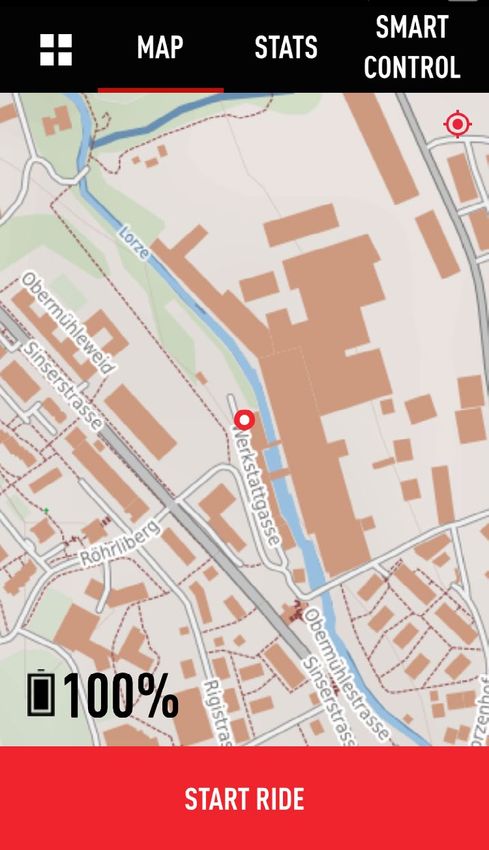
INSTALLING THE APP

DOWNLOAD

To download Mission Control, go to the App Store (iOS devices) or the Google
Play Store (Android devices), search for “Specialized Mission Control” and
install the application. See below for information on how to create an account
and connect to your Turbo.

CREATE YOUR ACCOUNT

Download, install, and follow the instructions in the app to create an account
with your email address. We’ll automatically create a Specialized Rider
Account for you, and once you’ve registered and logged-in for the first time,
the app will remember your credentials.

                                                                                 3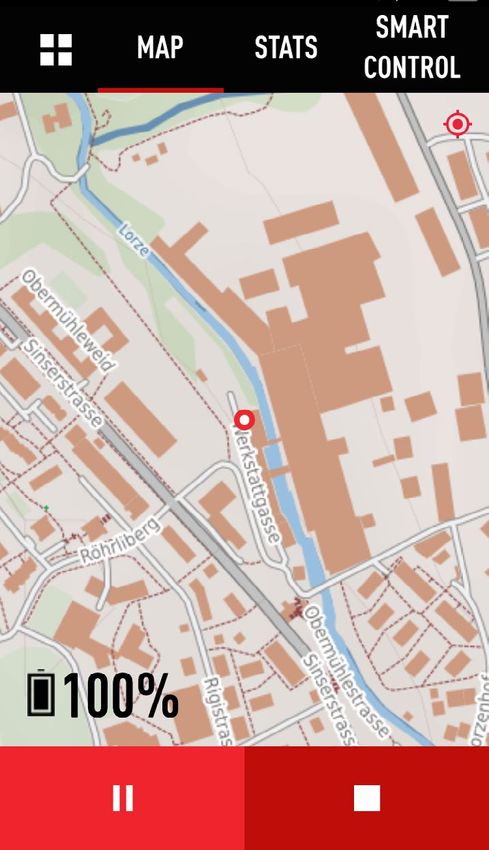
CONNECT YOUR TURBO - OVERVIEW

STEPS

1.   Go to SETTINGS > MY BIKES: Tap on the “+” symbol in the upper-right of the
     screen to search for available bikes.
•    Alternatively, tap on “DISCONNECTED” on the start screen to enter MY BIKES.

2.   Tap on the bike you want to connect with.

•    If you’re asked for a pairing code, enter the 6-digit code that comes
     with your bike.

•    The connected bike is marked with a green check.

                                                                                   4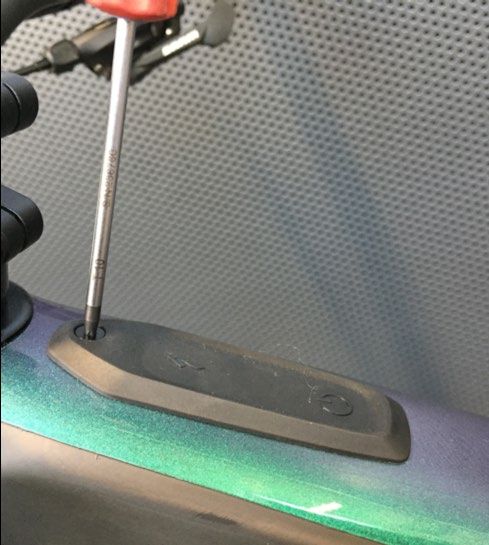
CONNECT YOUR TURBO

CONNECT TO A TURBO WITH TCU IN TOP TUBE

1. For easy identification, available and/or connected TCU equipped bikes show with
   WSBC bike serial number in App menu MY BIKES (under SETTINGS)

2. To connect bike and App, you once need to enter a pairing code PIN as requested
   by Mission Control App. This 6-digit-code can be found on the TCU itself and the
   yellow Peel Me Sticker (should be kept on last page of User Manual)

•   If you have to remove/reinstall the TCU to read the code, make sure you
    do not overtighten the Torx 10 screw that holds it (max. 0.8 Nm)

                                                                                      5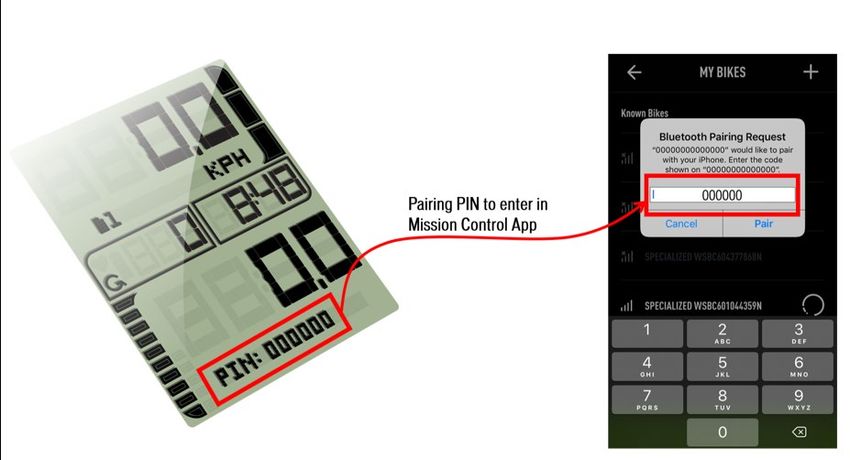
CONNECT YOUR TURBO

CONNECT TO A TURBO WITH A TCD-w

1. For easy identification, available and/or connected TCD-w equipped bikes show
   with WSBC bike serial number in App menu MY BIKES (under SETTINGS)

2. To connect bike and App, you once need to enter a pairing code PIN as requested
   by Mission Control App.

3. The PIN appears on the TCD-w for about 20 seconds; if that PIN is not entered, a
   new one will be issued at next attempted connection.

4. Once you have entered the PIN, the App automatically reconnects to a powered
   bike when you open the App.

                                                                                      6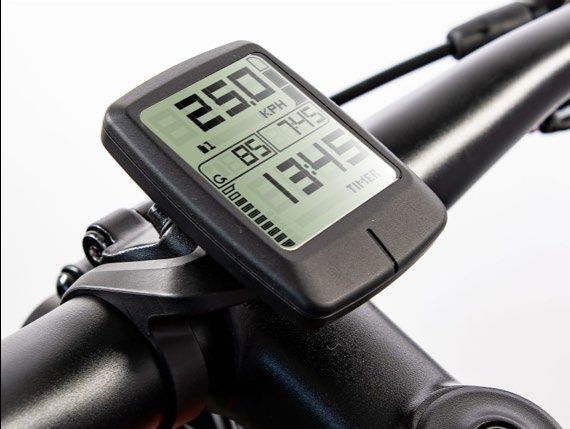
MANAGE YOUR BIKES

BIKES

In the MY BIKES menu, you can see:

A. Connected bike, green check, and mentioned in the
   green status bar.

B. Once connected and available bike(s), marked with
   proximity bars.

C. Once connected, but unavailable bike(s), marked with
   cross-over proximity bars.

DELETE BIKES

Carry out a long tap on connected bike to confirm deletion.

                                                              7
LET’S RIDE

MAP                                                 IMPORTANT

A. Show current position if you moved cached map.   To show your location on the map, you
                                                    need to allow Mission Control to access
B. Current position on map.                         your device’s location. You’re asked for
                                                    permission during the set up, and you
C. Bike battery state of charge.                    can also change permissions in the App
                                                    settings on your device.
D. Record ride.

                               A

               B

C

                                                    Once you’ve started tracking a ride,
           D                                        you’ll see symbols for pausing
                                                    and finishing your ride recording.
                                                    Finishing saves the ride.

MAP ZOOMING

To zoom in and out of maps, use the
pinch-to-zoom gesture with moving
two fingers on screen closer or apart.

                                                                                           8
LET’S RIDE

RIDE STATS

To customize a data field, perform a long tap on the desired field and choose
the content you want to see in this field from the drop down menu.

NOTE ON POWER

Only Turbo Levo & Kenevo bike models can show motor power AND rider
power. Turbos with rear-hub motors only show the motor power’s mechanical
vs. electric output. Due to some inevitable loss, mechanical power is slightly
lower than electric power. The app shows electric power.

                                                                                 9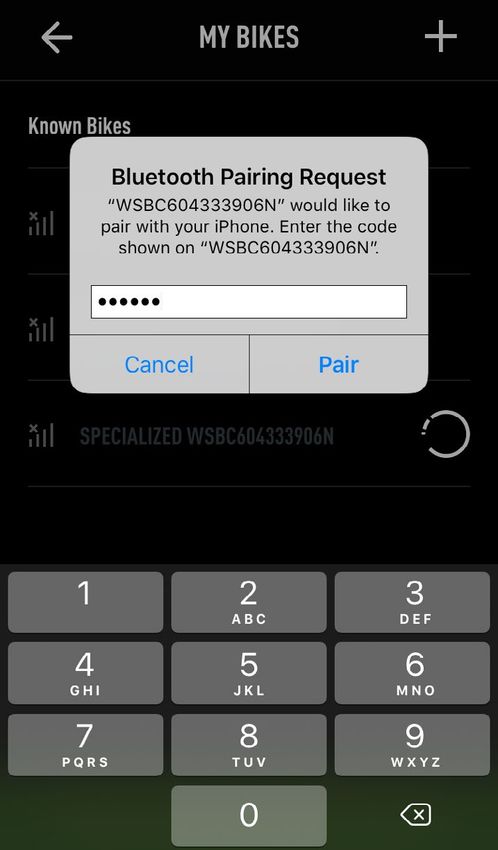
SMART CONTROL

OVERVIEW

Smart Control is an algorithm based on tons of ride data. Activating Smart
Control, based on ride time or distance, controls the motor ouput, so you don’t
have to worry about the mode setting or battery capacity for your ride. Every 10
seconds, the system calculates multiple parameters, like energy consumed,
time/distance absolved and ahead, etc. Based on that calculation, the motor
output is adjusted as needed. You ride—Smart Control does the rest.

ACTIVATION

LET’S RIDE > SMART CONTROL > Toggle ON/OFF.

After defining the settings, the current SMART CONTROL support level is shown.

TIPS

Smart Control works especially well
on the time-based setting, and we
strive to constantly improve it. The
system doesn’t know the route profile
ahead, so do not set the remaining
capacity lower than 10%. This will
give you a safety margin on your ride.

                                                                                   10
CREO SL SPECIFIC FEATURES
TURBO CREO SL AND RANGE EXTENDER BATTERY
There are some unique Mission Control features when
using a Range Extender Battery with the system.
START SCREEN
Here you see the state of charge for either the internal
battery only (100% max) or the soc for both batteries,
in case a Range Extender battery is used (150% max).
The underlying logic is that the RE battery adds half the
capacity of the internal battery (160 Wh on top of 320 Wh).
The same logic is applied when you view the soc in the Map
screen or when setting Smart Control.
DIAGNOSE
In the Diagnose menu, both batteries can be viewed
separately. Each battery will be shown with an soc of
100% max.
Battery details, such as the health status, can be viewed
separately as well.
11MY RIDES
OVERVIEW STRAVA SYNC
All of your tracked rides are stored here Tap on the STRAVA® symbol to
to either view in detail or to be exported upload the desired ride to STRAVA®.
as a .fit file.
Note: If you activated AUTO UPLOAD
for STRAVA® in SETTINGS, all of
your traked rides are uploaded
to the STRAVA® e-Bike category
automatically.
EXPORT RIDE
Tap on the export symbol (b) to send
your track via mail (.fit format). This
allows you to use them in other devices
or programs. There are also free
programs available to convert .fit to .gpx,
if needed.
DELETE RIDE
To delete a ride, perform a long tap on
the desired ride. You have to confirm
deletion in the following dialogue box.
VIEW RIDE DETAILS
Tap on a listed ride to see details.
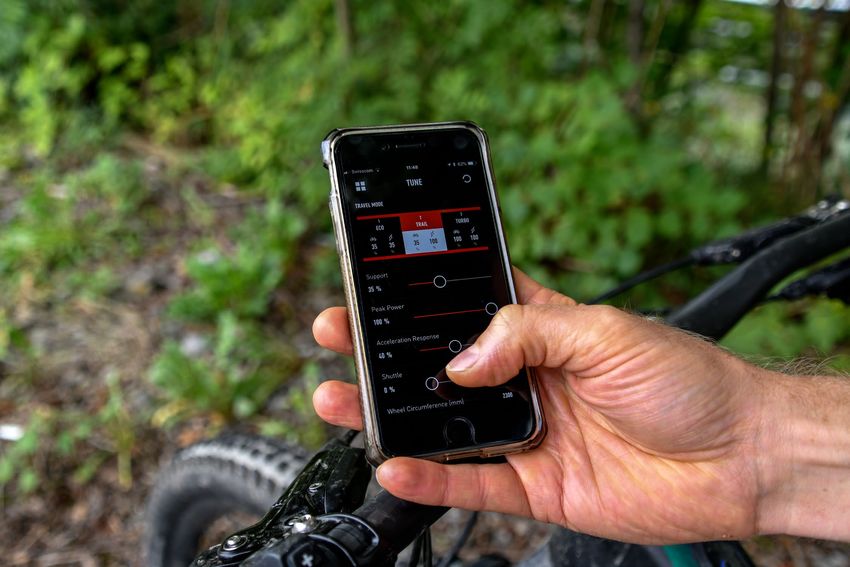
12TUNE - DEFINITIONS
FUNCTIONS
Adjust Motor Support and Peak Power, customize Acceleration Response, set Shuttle, activate the
Fake Channel, turn on Stealth Mode, deactivate/activate the Beeper sounds of the battery or display,
and restore Default Settings.
TUNE
You have the freedom to change the default Support and Peak Power settings for each mode to
customize the motor characteristics based on your needs and preferences.
SUPPORT
Support defines the proportion of assistance for rider input in each mode. Generally, more Support
provides faster acceleration and easier climbing at the expense of shorter range and a greater chance
of wheel-spin. Less Support results in longer range and more control in situations where traction is
limited. A Suppor level lower than 100% can be compensated by the rider. For example, pedaling in Trail
Mode with Support set at 50% will require approximately double the effort to get the same motor assist
as compared to pedaling in Turbo Mode with Support set at 100% (given identical Peak Power settings).
PEAK POWER
This refers to the power output by the motor for each Support Mode. This can be set up to 100% for all
Support Modes. If Peak Power is set to 100% for all Support Modes, the harder you pedal, the more
assist you’ll get in each Support Mode. For example, if a Support Mode is set at 35%, with Peak Power
set at 100%, you can still achieve 100% motor output by pedaling with more effort and a higher rider
torque. If Peak Power is set at less than 100%, you’ll limit the amount of power that the motor delivers,
and this will create an artificial ceiling that cannot be compensated for by leg power. Lower Peak Power
will improve range, and it allows for a greater differentiation between the Support Modes.
ACCELERATION RESPONSE
This setting determines how quickly/slowly the motor responds to your rider input. Usually, a slower
response setting results in more traction and control during off-road use.
• The default setting ensures a good balance of control and direct motor response.
• Setting the response to 0% results in the slowest response, whereas 100% provides the
fastest response.
• The best setting will depend on the terrain, your riding style, and personal preference.
SHUTTLE
With Shuttle activated, you easily get full motor support when pedaling in a higher cadence with less
torque (equals leg power). Generally speaking, the motor delivers high power in the most typical
riding cadences above 50 RPM when Shuttle is on. So, if you’re someone that prefers to spin a high
cadence with less leg power, you’re now able to get maximum motor support. Additionally, Shuttle
gives you full support with less leg power when starting from a standstill, like at a traffic light.
• 0% means that Shuttle is off.
• 100% results in the greatest effect of Shuttle.
13TUNE - SETTINGS
SETTINGS
1. Tape here to reset all settings to their default values.
1
2. The selected mode is highlighted. The Support and Peak
Power settings always show for the selected mode. Tap on 2
any mode to see and change its settings.
3. Change sliders to customize the proportion of assist
for rider input.
4. Change sliders to select the maximum amount of 3
power the motor will deliver in each mode.
5. Change the default setting to make the motor respond 4
quicker or slower to rider input. We recommend
leaving it on a lower level for enhanced control and
5
smoother shifting.
6. Activate Shuttle by setting the slider to a value greater
6
than 0%. The higher the setting, the more support
you get when pedaling with less torque and higher
cadence. A higher setting results in more battery 7
consumption.
8
7. See the default value here. Adapting wheel
circumfrence to tire changes can only be performed by
an authorized Specialized retailer. 9
8. Activate an unused ANT+ channel to connect any 10
ANT+ device to the bike in order to see additional
information (see next page for details).
9. When turned on, the LEDs of the display, used in
certain modes, turn dark shortly after you press a
button. This does not apply to all Turbo models.
10. Turn the battery or display beeper on or off. A restart
of the bike is required to save the setting.
NOTE: This is a list of all potential Tune options. The scope
of functions depends on the bike you connect to.
14TUNE - EXTENDER BATTERY
SETTINGS
You can change the default parallel discharging logic to
activate the option “Fully Discharge Extender Battery
First” (requires system restart to activate).
Overall, activating “Extender Battery First” only makes
sense if you have the need to remove the RE battery
during your ride to have a lighter bike or if you want to use
the bottle cage for hydration.
NOTES
• We generally recommend parallel discharging
• Discharging the RE first means that you will more
quickly notice less motor output because of a quicker
drop in voltage.
• In normal cell operating temperature (0 to +50°C), the
power output is reduced when reaching a certain state
of charge. This ensures uninterrupted motor support
till motor shut-off. The point of power reduction
not only depends on cell temperature, but also on
batteries used and the applied discharging logic.
• Excessive use of this option may impact long term
battery health as the RE cells experience more strain.
15FAKE CHANNEL (ANT+)
OVERVIEW
Using the Fake Channel, you can display the battery state of charge (SoC) of
a Turbo Levo/Kenevo battery on any ANT+ device (wearables, GPS devices,
bicycle computers, etc.).
For this example, a Garmin® Fenix 3 GPS watch was used.
1. Activate the Fake Channel in the TUNE menu (choose e.g. CADENCE).
2. Restart bike to activate Fake Channel.
3. Search for sensors in ANT+ device and choose faked sensor (if necessary,
make needed data field for sensor visible).
4. See the battery’s State of Charge in the chosen menu of the ANT+ device.
Here, the connected Turbo Levo battery has a charge level of 86%.
If you use a Garmin® device and select the “Heart Rate” channel, valuees
below 30 will not be displayed. Choose another channel, like cadence.
16DIAGNOSE
START PAGE
In Diagnose, you can see the system health status and
view detailed information on the battery and motor.
System Status
Should the staus of your bike not be “Healthy,” see your
authorized Specialized Retailer for diagnostics and servicing.
Odometer
The data is saved in the motor, but it’s sent to the App
through either the battery or display.
Serial Number
This is the bike’s serial number that’s also stated on the
frame itself.
Battery
Tap the red arrow to view battery details.
Battery Charging Status
Shows the current SoC for the bike battery. if you don’t
use a display option to see the exact charge status, you
can see it here as a percentage figure.
Battery Health
Shows the percentage of remaining battery capacity.
Motor
Tap the red arrow to view motor details.
Display
Tap the red arrow to view display details. Only shows for
bikes with a dedicated display.
17DIAGNOSE
BATTERY
Battery Health
Specialized guarantees that the battery holds at least 75%
capacity after 300 charge cycles, or alternatively, after two
years. It is not uncommon for batteries to drop a few %
within 20 cycles, but to hold that for a year or more.
See your Turbo manual for more battery details.
Charge Cycles
The Battery Management System counts the amount of
full charge cycles. One charge cycle is added when, for
example, 500 Wh have been recharged into a 500 Wh
battery. Battery aging over an estimated lifetime is taken
into account for counting the cycles.
Firmware
The installed battery firmware is shown here. Please make
sure that you always run the latest firmware for the best
performance and the full scope of functions.
MOTOR
Serial Number
Displays the motor’s serial number to reference type and
manufacturing details. This is not relevant to most riders.
Hardware
Identifies the motor in detail. This information is not relevant
to most riders.
Firmware
The installed motor firmware is displayed here. Please be
sure that you always run the latest firmware for the best
performance and the full scope of functions.
Temperature
Overheating issues with motors are extremely rare. In the
event of overheating, the system activates a protection
mechanism by reducing power, or in extreme cases, by
shutting off the system. Temperatures up to 90 degrees
Celsius are considered normal.
18DIAGNOSE
DISPLAY
Serial Number
Shows the display serial number to reference type and
manufacturing details. This information is not relevant to
most riders.
Hardware
Identifies the motor in detail. This information is not
relevant to most riders.
Firmware
The installed display firmware is shown here. Please make
sure that you always run the latest firmware to ensure the
best performance and the full scope of functions.
SETTINGS
My Bikes
Add a new bike, or manage bikes you’re already connected
to, here.
My Profile
Define personal data, like date of birth, sex, height, and
weight. This allows you to log out of the App.
Auto Start Active
If turned on, Mission Control records your rides
automatically once you are moving (with connection to bike).
Unit system
Choose between Metric (km/h and km) and Imperial (mph
and mi) units.
STRAVA®
You can choose to automatically upload your rides to your
STRAVA® account here. Once on STRAVA®, they’ll be saved
in a dedicated e-Bike category.
Contact
Refer to this section to read Mission Control FAQs and to
reach out to our customer support team.
Legal Information
Read our Terms of Use and Privacy Policy here.
19NOTES
TIPS
• Note your password somewhere safe after registering.
• Instead of logging out, close the App after use.
• To show your location on the App, you need to allow
Mission Control to access your device’s location. You’re
asked for permission during set up, and you can also
change permissions in the App settings on your device.
• Do not mount your smartphone to the handlebars, as
the majority of mobile devices are not made for usage
on a bike. Physical impacts can damage your phone.
If you really feel the need to mount your phone to your
handlebars, use a robust and reliable mounting system
that offers adequate protection for your device.
SAFETY NOTICE
• For your own safety and that of others, never look on
your phone or use touchscreen/buttons while moving. If
you need to use the phone and/or Mission Control App,
stop in a safe place and stow away the phone before you
continue your ride.
20You can also read