Stork Release 1.1.0 Internet Systems Consortium - Stork ...
←
→
Page content transcription
If your browser does not render page correctly, please read the page content below
Stork
              Release 1.1.0

Internet Systems Consortium

                   Feb 08, 2022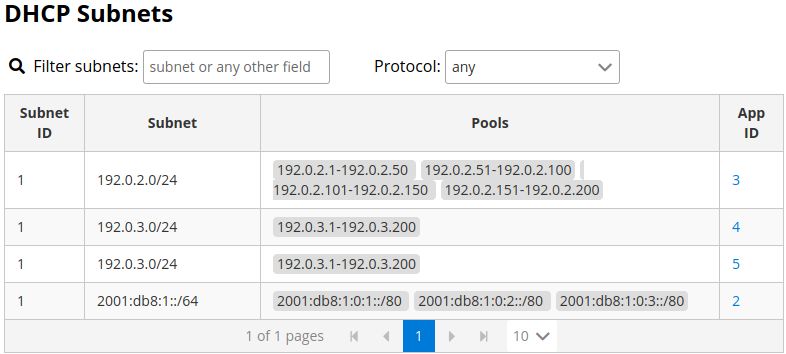
CONTENTS

1   Overview                                                                                                                      3
    1.1 Goals . . . . . . . . . . . . . . . . . . . . . . . . . . . . . . . . . . . . . . . . . . . . . . . . . . .               3
    1.2 Architecture . . . . . . . . . . . . . . . . . . . . . . . . . . . . . . . . . . . . . . . . . . . . . . .                3

2   Installation                                                                                                                  5
    2.1 Supported Systems . . . . . . . . . . . . . . . . . . . . . . . . . . . . . . . . . . . . . . .      .   .   .   .   .    5
    2.2 Installation Prerequisites . . . . . . . . . . . . . . . . . . . . . . . . . . . . . . . . . . . .   .   .   .   .   .    5
    2.3 Stork Tool . . . . . . . . . . . . . . . . . . . . . . . . . . . . . . . . . . . . . . . . . . .     .   .   .   .   .    6
    2.4 Preparing Stork Server Database . . . . . . . . . . . . . . . . . . . . . . . . . . . . . . . .      .   .   .   .   .    6
    2.5 Installing From Packages . . . . . . . . . . . . . . . . . . . . . . . . . . . . . . . . . . . .     .   .   .   .   .    8
           2.5.1  Installing the Stork Server . . . . . . . . . . . . . . . . . . . . . . . . . . . . . .    .   .   .   .   .    8
                 2.5.1.1 Installing on Debian/Ubuntu . . . . . . . . . . . . . . . . . . . . . . . .         .   .   .   .   .    8
                 2.5.1.2 Installing on CentOS/RHEL/Fedora . . . . . . . . . . . . . . . . . . . . .          .   .   .   .   .    8
                 2.5.1.3 Setup . . . . . . . . . . . . . . . . . . . . . . . . . . . . . . . . . . . . .     .   .   .   .   .    9
                 2.5.1.4 Securing the Database Connection . . . . . . . . . . . . . . . . . . . . .          .   .   .   .   .   10
           2.5.2  Installing the Stork Agent . . . . . . . . . . . . . . . . . . . . . . . . . . . . . . .   .   .   .   .   .   10
                 2.5.2.1 Agent Configuration Settings . . . . . . . . . . . . . . . . . . . . . . . .        .   .   .   .   .   11
                 2.5.2.2 Securing Connections Between the Stork Server and a Stork Agent . . . .             .   .   .   .   .   12
                 2.5.2.3 Securing Connections Between stork-agent and the Kea Control Agent                  .   .   .   .   .   12
                 2.5.2.4 Installation From Cloudsmith and Registration With an Agent Token . . .             .   .   .   .   .   13
                 2.5.2.5 Installation With a Script and Registration With a Server Token . . . . . .         .   .   .   .   .   14
                 2.5.2.6 Installation With a Script and Registration With an Agent Token . . . . . .         .   .   .   .   .   15
                 2.5.2.7 Installation From Cloudsmith and Registration With a Server Token . . . .           .   .   .   .   .   16
                 2.5.2.8 Registration Methods Summary . . . . . . . . . . . . . . . . . . . . . . .          .   .   .   .   .   16
                 2.5.2.9 Agent Setup Summary . . . . . . . . . . . . . . . . . . . . . . . . . . . .         .   .   .   .   .   17
                 2.5.2.10 Inspecting Keys and Certificates . . . . . . . . . . . . . . . . . . . . . .       .   .   .   .   .   17
                 2.5.2.11 Using External Keys and Certificates . . . . . . . . . . . . . . . . . . . .       .   .   .   .   .   17
           2.5.3  Upgrading . . . . . . . . . . . . . . . . . . . . . . . . . . . . . . . . . . . . . . .    .   .   .   .   .   18
    2.6 Installing From Sources . . . . . . . . . . . . . . . . . . . . . . . . . . . . . . . . . . . .      .   .   .   .   .   18
           2.6.1  Compilation Prerequisites . . . . . . . . . . . . . . . . . . . . . . . . . . . . . .      .   .   .   .   .   18
           2.6.2  Download Sources . . . . . . . . . . . . . . . . . . . . . . . . . . . . . . . . . .       .   .   .   .   .   18
           2.6.3  Building . . . . . . . . . . . . . . . . . . . . . . . . . . . . . . . . . . . . . . . .   .   .   .   .   .   18
    2.7 Integration With Prometheus and Grafana . . . . . . . . . . . . . . . . . . . . . . . . . . .        .   .   .   .   .   19
           2.7.1  Prometheus Integration . . . . . . . . . . . . . . . . . . . . . . . . . . . . . . . .     .   .   .   .   .   19
           2.7.2  Alerting in Prometheus . . . . . . . . . . . . . . . . . . . . . . . . . . . . . . . .     .   .   .   .   .   20
           2.7.3  Grafana Integration . . . . . . . . . . . . . . . . . . . . . . . . . . . . . . . . . .    .   .   .   .   .   20
           2.7.4  Subnet Identification . . . . . . . . . . . . . . . . . . . . . . . . . . . . . . . . .    .   .   .   .   .   21
           2.7.5  Alerting in Grafana . . . . . . . . . . . . . . . . . . . . . . . . . . . . . . . . . .    .   .   .   .   .   21

3   Using Stork                                                                                                                  23

                                                                                                                                  i
3.1 Managing Users . . . . . . . . . . . . . . . . . . . . . . . . . . . . . . . . . . . . . . . . . . . . . 23
3.2 Changing a User Password . . . . . . . . . . . . . . . . . . . . . . . . . . . . . . . . . . . . . . . . 23
3.3 Configuration Settings . . . . . . . . . . . . . . . . . . . . . . . . . . . . . . . . . . . . . . . . . . 24
3.4 Connecting and Monitoring Machines . . . . . . . . . . . . . . . . . . . . . . . . . . . . . . . . . . 24
3.4.1 Monitoring a Machine . . . . . . . . . . . . . . . . . . . . . . . . . . . . . . . . . . . . . 24
3.4.2 Disconnecting From a Machine . . . . . . . . . . . . . . . . . . . . . . . . . . . . . . . . . 24
3.4.3 Dumping Diagnostic Information Into a File . . . . . . . . . . . . . . . . . . . . . . . . . . 25
3.5 Monitoring Applications . . . . . . . . . . . . . . . . . . . . . . . . . . . . . . . . . . . . . . . . . 25
3.5.1 Application Status . . . . . . . . . . . . . . . . . . . . . . . . . . . . . . . . . . . . . . . . 25
3.5.2 Friendly App Names . . . . . . . . . . . . . . . . . . . . . . . . . . . . . . . . . . . . . . 25
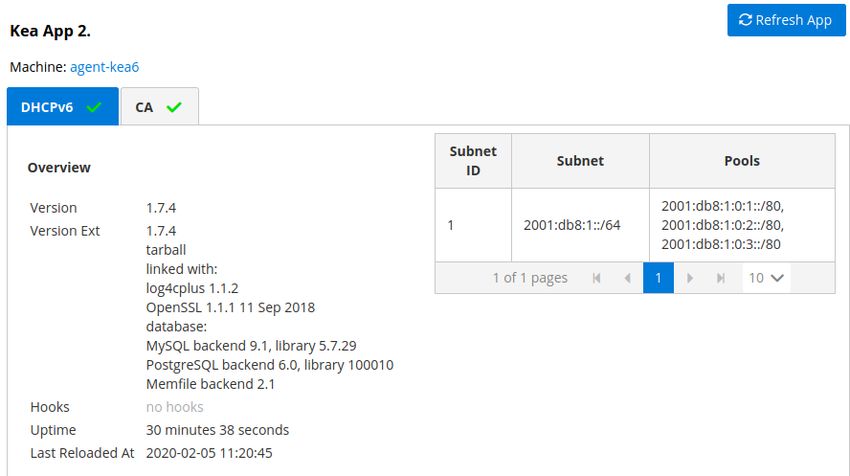
3.5.3 IPv4 and IPv6 Subnets per Kea Application . . . . . . . . . . . . . . . . . . . . . . . . . . 26
3.5.4 IPv4 and IPv6 Subnets in the Whole Network . . . . . . . . . . . . . . . . . . . . . . . . . 26
3.5.5 IPv4 and IPv6 Networks . . . . . . . . . . . . . . . . . . . . . . . . . . . . . . . . . . . . 27
3.5.6 Host Reservations . . . . . . . . . . . . . . . . . . . . . . . . . . . . . . . . . . . . . . . . 27
3.5.6.1 Listing Host Reservations . . . . . . . . . . . . . . . . . . . . . . . . . . . . . . . 27
3.5.6.2 Host Reservation Usage Status . . . . . . . . . . . . . . . . . . . . . . . . . . . . 28
3.5.6.3 Sources of Host Reservations . . . . . . . . . . . . . . . . . . . . . . . . . . . . . 28
3.5.7 Leases Search . . . . . . . . . . . . . . . . . . . . . . . . . . . . . . . . . . . . . . . . . . 29
3.5.8 Kea High Availability Status . . . . . . . . . . . . . . . . . . . . . . . . . . . . . . . . . . 30
3.5.9 Viewing the Kea Log . . . . . . . . . . . . . . . . . . . . . . . . . . . . . . . . . . . . . . 31
3.5.10 Viewing the Kea Configuration as a JSON Tree . . . . . . . . . . . . . . . . . . . . . . . . 31
3.6 Dashboard . . . . . . . . . . . . . . . . . . . . . . . . . . . . . . . . . . . . . . . . . . . . . . . . 32
3.6.1 DHCP Panel . . . . . . . . . . . . . . . . . . . . . . . . . . . . . . . . . . . . . . . . . . . 32
3.6.2 Events Panel . . . . . . . . . . . . . . . . . . . . . . . . . . . . . . . . . . . . . . . . . . . 32
3.7 Events Page . . . . . . . . . . . . . . . . . . . . . . . . . . . . . . . . . . . . . . . . . . . . . . . . 32
4 Troubleshooting 33
4.1 stork-agent . . . . . . . . . . . . . . . . . . . . . . . . . . . . . . . . . . . . . . . . . . . . . . 33
5 Backend API 37
6 Developer’s Guide 39
6.1 Rakefile . . . . . . . . . . . . . . . . . . . . . . . . . . . . . . . . . . . . . . . . . . . . . . . . . . 39
6.2 Generating Documentation . . . . . . . . . . . . . . . . . . . . . . . . . . . . . . . . . . . . . . . . 39
6.3 Setting Up the Development Environment . . . . . . . . . . . . . . . . . . . . . . . . . . . . . . . . 39
6.3.1 Installing Git Hooks . . . . . . . . . . . . . . . . . . . . . . . . . . . . . . . . . . . . . . 40
6.4 Agent API . . . . . . . . . . . . . . . . . . . . . . . . . . . . . . . . . . . . . . . . . . . . . . . . 40
6.5 RESTful API . . . . . . . . . . . . . . . . . . . . . . . . . . . . . . . . . . . . . . . . . . . . . . . 41
6.6 Backend Unit Tests . . . . . . . . . . . . . . . . . . . . . . . . . . . . . . . . . . . . . . . . . . . . 41
6.6.1 Unit Tests Database . . . . . . . . . . . . . . . . . . . . . . . . . . . . . . . . . . . . . . . 41
6.6.2 Unit Tests Coverage . . . . . . . . . . . . . . . . . . . . . . . . . . . . . . . . . . . . . . . 42
6.6.3 Benchmarks . . . . . . . . . . . . . . . . . . . . . . . . . . . . . . . . . . . . . . . . . . . 42
6.6.4 Short Testing Mode . . . . . . . . . . . . . . . . . . . . . . . . . . . . . . . . . . . . . . . 42
6.7 Web UI Unit Tests . . . . . . . . . . . . . . . . . . . . . . . . . . . . . . . . . . . . . . . . . . . . 42
6.8 System Tests . . . . . . . . . . . . . . . . . . . . . . . . . . . . . . . . . . . . . . . . . . . . . . . 43
6.8.1 Dependencies . . . . . . . . . . . . . . . . . . . . . . . . . . . . . . . . . . . . . . . . . . 43
6.8.2 LXD Installation . . . . . . . . . . . . . . . . . . . . . . . . . . . . . . . . . . . . . . . . 44
6.8.2.1 LXD Troubleshooting on Arch . . . . . . . . . . . . . . . . . . . . . . . . . . . . 45
6.8.3 Running System Tests . . . . . . . . . . . . . . . . . . . . . . . . . . . . . . . . . . . . . . 45
6.8.4 Developing System Tests . . . . . . . . . . . . . . . . . . . . . . . . . . . . . . . . . . . . 46
6.9 Docker Containers for Development . . . . . . . . . . . . . . . . . . . . . . . . . . . . . . . . . . . 48
6.10 Packaging . . . . . . . . . . . . . . . . . . . . . . . . . . . . . . . . . . . . . . . . . . . . . . . . . 49
6.11 Implementation details . . . . . . . . . . . . . . . . . . . . . . . . . . . . . . . . . . . . . . . . . . 49
6.11.1 Agent Registration Process . . . . . . . . . . . . . . . . . . . . . . . . . . . . . . . . . . . 49
ii7 Demo 51
7.1 Requirements . . . . . . . . . . . . . . . . . . . . . . . . . . . . . . . . . . . . . . . . . . . . . . . 51
7.2 Setup Steps . . . . . . . . . . . . . . . . . . . . . . . . . . . . . . . . . . . . . . . . . . . . . . . . 52
7.2.1 Premium Features . . . . . . . . . . . . . . . . . . . . . . . . . . . . . . . . . . . . . . . . 52
7.3 Demo Containers . . . . . . . . . . . . . . . . . . . . . . . . . . . . . . . . . . . . . . . . . . . . . 52
7.4 Initialization . . . . . . . . . . . . . . . . . . . . . . . . . . . . . . . . . . . . . . . . . . . . . . . 53
7.5 Stork Environment Simulator . . . . . . . . . . . . . . . . . . . . . . . . . . . . . . . . . . . . . . 53
7.6 Prometheus . . . . . . . . . . . . . . . . . . . . . . . . . . . . . . . . . . . . . . . . . . . . . . . . 54
7.7 Grafana . . . . . . . . . . . . . . . . . . . . . . . . . . . . . . . . . . . . . . . . . . . . . . . . . . 54
8 Manual Pages 55
8.1 stork-server - Main Stork Server . . . . . . . . . . . . . . . . . . . . . . . . . . . . . . . . . . . 55
8.1.1 Synopsis . . . . . . . . . . . . . . . . . . . . . . . . . . . . . . . . . . . . . . . . . . . . . 55
8.1.2 Description . . . . . . . . . . . . . . . . . . . . . . . . . . . . . . . . . . . . . . . . . . . 55
8.1.3 Arguments . . . . . . . . . . . . . . . . . . . . . . . . . . . . . . . . . . . . . . . . . . . 55
8.1.4 Mailing Lists and Support . . . . . . . . . . . . . . . . . . . . . . . . . . . . . . . . . . . 57
8.1.5 History . . . . . . . . . . . . . . . . . . . . . . . . . . . . . . . . . . . . . . . . . . . . . 57
8.1.6 See Also . . . . . . . . . . . . . . . . . . . . . . . . . . . . . . . . . . . . . . . . . . . . . 57
8.2 stork-agent - Stork Agent to Monitor BIND 9 and Kea services . . . . . . . . . . . . . . . . . . . 57
8.2.1 Synopsis . . . . . . . . . . . . . . . . . . . . . . . . . . . . . . . . . . . . . . . . . . . . . 57
8.2.2 Description . . . . . . . . . . . . . . . . . . . . . . . . . . . . . . . . . . . . . . . . . . . 57
8.2.3 Arguments . . . . . . . . . . . . . . . . . . . . . . . . . . . . . . . . . . . . . . . . . . . 57
8.2.4 Mailing Lists and Support . . . . . . . . . . . . . . . . . . . . . . . . . . . . . . . . . . . 58
8.2.5 History . . . . . . . . . . . . . . . . . . . . . . . . . . . . . . . . . . . . . . . . . . . . . 58
8.2.6 See Also . . . . . . . . . . . . . . . . . . . . . . . . . . . . . . . . . . . . . . . . . . . . . 58
8.3 stork-tool - A Tool for Managing Stork Server . . . . . . . . . . . . . . . . . . . . . . . . . . . . 59
8.3.1 Synopsis . . . . . . . . . . . . . . . . . . . . . . . . . . . . . . . . . . . . . . . . . . . . . 59
8.3.2 Description . . . . . . . . . . . . . . . . . . . . . . . . . . . . . . . . . . . . . . . . . . . 59
8.3.3 Certificate Management . . . . . . . . . . . . . . . . . . . . . . . . . . . . . . . . . . . . . 59
8.3.4 Database Creation . . . . . . . . . . . . . . . . . . . . . . . . . . . . . . . . . . . . . . . . 60
8.3.4.1 Examples . . . . . . . . . . . . . . . . . . . . . . . . . . . . . . . . . . . . . . . 60
8.3.5 Database Migration . . . . . . . . . . . . . . . . . . . . . . . . . . . . . . . . . . . . . . . 61
8.3.6 Common Options . . . . . . . . . . . . . . . . . . . . . . . . . . . . . . . . . . . . . . . . 61
8.3.7 Mailing Lists and Support . . . . . . . . . . . . . . . . . . . . . . . . . . . . . . . . . . . 62
8.3.8 History . . . . . . . . . . . . . . . . . . . . . . . . . . . . . . . . . . . . . . . . . . . . . 62
8.3.9 See Also . . . . . . . . . . . . . . . . . . . . . . . . . . . . . . . . . . . . . . . . . . . . . 62
iiiiv
Stork, Release 1.1.0

Stork is an open source monitoring application and dashboard for ISC’s Kea DHCP, and eventually for
ISC’s BIND 9. It is the spiritual successor of the earlier projects Kittiwake and Anterius.
This is the reference guide for Stork version 1.1.0. Links to the most up-to-date version of this document,
along with other documents for Stork, can be found on ISC’s Stork project homepage or at Read the Docs
.

CONTENTS                                                                                                           1
Stork, Release 1.1.0

2                      CONTENTS
CHAPTER

                                                                                                               ONE

                                                                                                   OVERVIEW

1.1 Goals

The goals of the ISC Stork project are:
    • To provide monitoring and insight into Kea DHCP operations.
    • To provide alerting mechanisms that indicate failures, fault conditions, and other unwanted events in Kea DHCP
      services.
    • To permit easier troubleshooting of these services.
Although Stork currently only offers monitoring, insight, and alerts for Kea DHCP, we plan to add similar capabilities
for BIND 9 in future versions.

1.2 Architecture

Stork is comprised of two components: the Stork server (stork-server) and the Stork agent (stork-agent).
The Stork server is installed on a stand-alone machine. It connects to any indicated agents and indirectly (via those
agents) interacts with the Kea DHCP services. It provides an integrated, centralized front end for these services. Only
one Stork server is deployed in a network.
The Stork agent is installed along with Kea DHCP and interacts directly with those services. There may be many agents
deployed in a network, one per machine.

                                                                                                                     3
Stork, Release 1.1.0 4 Chapter 1. Overview
CHAPTER

                                                                                                              TWO

                                                                                             INSTALLATION

Stork can be installed from pre-built packages or from sources; the following sections describe both methods. Unless
there is a good reason to compile from sources, installing from native deb or RPM packages is easier and faster.

2.1 Supported Systems

Stork is tested on the following systems:
    • Ubuntu 18.04 and 20.04
    • Fedora 31 and 32
    • CentOS 8
    • MacOS 11.3*
* MacOS is not and will not be officially supported. However, many developers on ISC’s team use Macs, so the intention
is to keep Stork buildable on this platform.
stork-server and stork-agent are written in the Go language; the server uses a PostgreSQL database. In principle,
the software can be run on any POSIX system that has a Go compiler and PostgreSQL. It is likely the software can also
be built on other modern systems, but ISC’s testing capabilities are modest. We encourage users to try running Stork
on other OSes not on this list and report their findings to ISC.

2.2 Installation Prerequisites

The Stork agent does not require any specific dependencies to run. It can be run immediately after installation.
Stork uses the status-get command to communicate with Kea.
Stork requires the premium Host Commands (host_cmds) hook library to be loaded by the Kea instance to retrieve
host reservations stored in an external database. Stork works without the Host Commands hook library, but is not able
to display host reservations. Stork can retrieve host reservations stored locally in the Kea configuration without any
additional hook libraries.
Stork requires the open source Statistics Commands (stat_cmds) hook library to be loaded by the Kea instance to
retrieve lease statistics. Stork works without the Stat Commands hook library, but is not able to show pool utilization
and other statistics.
Stork uses Go implementation to handle TLS connections, certificates, and keys. The secrets are stored in the Post-
greSQL database, in the secret table.
For the Stork server, a PostgreSQL database (https://www.postgresql.org/) version 10 or later is required. Stork will
attempt to run with older versions, but may not work correctly. The general installation procedure for PostgreSQL is

                                                                                                                     5
Stork, Release 1.1.0 OS-specific and is not included here. However, please note that Stork uses pgcrypto extensions, which often come in a separate package. For example, a postgresql-crypto package is required on Fedora and postgresql12-contrib is needed on RHEL and CentOS. 2.3 Stork Tool The Stork Tool is a program installed with the Stork Server, providing commands to set up server’s database and manage TLS certificates. Using this tool is facultative because the server runs the database migrations and creates suitable certificates at startup on its own. However, the tool provides useful commands for inspecting the current database schema version and downgrading to one of the previous versions. In addition, in the Preparing Stork Server Database section it is described how the tool can be conveniently used to create a new database and its credentials without a need to run SQL commands directly using the psql program. The Inspecting Keys and Certificates section describes how to use the tool for TLS certificates management. Further sections describe different methods for installing the Stork Server from packages. See: Installing on De- bian/Ubuntu and Installing on CentOS/RHEL/Fedora. The stork-tool program is installed from the packages to- gether with the server. Alternatively, the tool can be built from sources: $ rake build_tool Please refer to the manual page for usage details: stork-tool - A Tool for Managing Stork Server. 2.4 Preparing Stork Server Database Before running Stork Server, a PostgreSQL database and the user with suitable privileges must be created. Using the stork-tool is the most convenient way to set up the database. The following command creates a new database stork and a user stork with all privileges in this database. It also installs the pgcrypto extension required by the Stork Server. $ stork-tool db-create --db-name stork --db-user stork created database and user for the server with the following credentials database_ ˓→name=stork password=L82B+kJEOyhDoMnZf9qPAGyKjH5Qo/Xb user=stork By default, stork-tool connects to the database as user postgres, a default admin role in many PostgreSQL instal- lations. If an installation uses a different administrator name, it can be specified with the --db-maintenance-user option. For example: $ stork-tool db-create --db-maintenance-user thomson --db-name stork --db-user stork created database and user for the server with the following credentials database_ ˓→name=stork password=L82B+kJEOyhDoMnZf9qPAGyKjH5Qo/Xb user=stork Similarly, a postgres database should often exist in a PostgreSQL installation. However, a different maintenance database can be selected with the --db-maintenance-name option. The stork-tool generates a random password to the created database. This password needs to be copied into the server environment file or used in the stork-server command line to configure the server to use this password while connecting to the database. Use the --db-password option with the db-create command to create a user with a specified password. It is also possible to create the database manually (i.e., using the psql tool). 6 Chapter 2. Installation
Stork, Release 1.1.0

First, connect to PostgreSQL using psql and the postgres administration user. Depending on the system’s configu-
ration, it may require switching to the user postgres first, using the su postgres command.

$ psql postgres
psql (11.5)
Type "help" for help.
postgres=#

Then, prepare the database:

postgres=# CREATE USER stork WITH PASSWORD 'stork';
CREATE ROLE
postgres=# CREATE DATABASE stork;
CREATE DATABASE
postgres=# GRANT ALL PRIVILEGES ON DATABASE stork TO stork;
GRANT
postgres=# \c stork
You are now connected to database "stork" as user "postgres".
stork=# create extension pgcrypto;
CREATE EXTENSION

Note: Make sure the actual password is stronger than “stork”, which is trivial to guess. Using default passwords is
a security risk. Stork puts no restrictions on the characters used in the database passwords, nor on their length. In
particular, it accepts passwords containing spaces, quotes, double quotes, and other special characters. Please also
consider using the stork-tool to generate a random password.

To generate a random password run:

$ stork-tool db-password-gen
generated new database password                             password=1qWVzmLKy/j40/FVsvjM2ylcFdaFfNxh

The newly created database is not ready for use until necessary database migrations are executed. The migrations
create tables, indexes, triggers, and functions required by the Stork Server. As mentioned above, the server can
automatically run the migrations at startup, bringing up the database schema to the latest version. However, if a user
wants to run the migrations before starting the server, they can use the stork-tool:

$ stork-tool db-init
$ stork-tool db-up

The up and down commands have an optional -t parameter that specifies the desired schema version. It is useful when
debugging database migrations or downgrading to one of the earlier Stork versions.

$   # migrate up version 25
$   stork-tool db-up -t 25
$   # migrate down back to version 17
$   stork-tool db-down -t 17

The server requires the latest database version to run, always runs the migration on its own, and refuses to start if
the migration fails for any reason. The migration tool is mostly useful for debugging problems with migration, or for
migrating the database without actually running the service. For the complete manual page, please see stork-tool - A
Tool for Managing Stork Server.
To debug migrations, another useful feature is SQL tracing using the --db-trace-queries parameter. The options
are either “all” (trace all SQL operations, including migrations and runtime) or “run” (only trace runtime operations

2.4. Preparing Stork Server Database                                                                                7
Stork, Release 1.1.0

and skip migrations). If specified without any parameters, “all” is assumed. With it enabled, stork-tool prints out
all its SQL queries on stderr. For example, these commands can be used to generate an SQL script that updates the
schema. Note that for some migrations, the steps are dependent on the contents of the database, so this is not a universal
Stork schema. This parameter is also supported by the Stork Server.

$ stork-tool db-down -t 0
$ stork-tool db-up --db-trace-queries 2> stork-schema.txt

2.5 Installing From Packages

Stork packages are stored in repositories located on the Cloudsmith service: https://cloudsmith.io/~isc/repos/stork/
packages/. Both Debian/Ubuntu and RPM packages may be found there.
Detailed instructions for setting up the operating system to use this repository are available under the Set Me Up button
on the Cloudsmith repository page.
It is possible to install both stork-agent and stork-server on the same machine. It is useful in small deployments
with a single monitored machine, to avoid setting up a dedicated system for the Stork server. In those cases, however,
an operator must consider the potential impact of the stork-server on other services running on the same machine.

2.5.1 Installing the Stork Server

2.5.1.1 Installing on Debian/Ubuntu

The first step for both Debian and Ubuntu is:

$ curl -1sLf 'https://dl.cloudsmith.io/public/isc/stork/cfg/setup/bash.deb.sh' | sudo␣
 ˓→bash

Next, install the Stork server package:

$ sudo apt install isc-stork-server

2.5.1.2 Installing on CentOS/RHEL/Fedora

The first step for RPM-based distributions is:

$ curl -1sLf 'https://dl.cloudsmith.io/public/isc/stork/cfg/setup/bash.rpm.sh' | sudo␣
 ˓→bash

Next, install the Stork server package:

$ sudo dnf install isc-stork-server

If dnf is not available, yum can be used instead:

$ sudo yum install isc-stork-server

8                                                                                            Chapter 2. Installation
Stork, Release 1.1.0

2.5.1.3 Setup

The following steps are common for Debian-based and RPM-based distributions using systemd.
Configure the Stork server settings in /etc/stork/server.env. The following settings are required for the database
connection (they have a common STORK_DATABASE_ prefix):
    • STORK_DATABASE_HOST - the address of a PostgreSQL database; the default is localhost
    • STORK_DATABASE_PORT - the port of a PostgreSQL database; the default is 5432
    • STORK_DATABASE_NAME - the name of a database; the default is stork
    • STORK_DATABASE_USER_NAME - the username for connecting to the database; the default is stork
    • STORK_DATABASE_PASSWORD - the password for the username connecting to the database

Note: All of the database connection settings have default values, but we strongly recommend protecting the database
with a non-default and hard-to-guess password in the production environment. The STORK_DATABASE_PASSWORD
setting must be adjusted accordingly.

The remaining settings pertain to the server’s RESTful API configuration (the STORK_REST_ prefix):
    • STORK_REST_HOST - the IP address on which the server listens
    • STORK_REST_PORT - the port number on which the server listens; the default is 8080
    • STORK_REST_TLS_CERTIFICATE - a file with a certificate to use for secure connections
    • STORK_REST_TLS_PRIVATE_KEY - a file with a private key to use for secure connections
    • STORK_REST_TLS_CA_CERTIFICATE - a certificate authority file used for mutual TLS authentication
    • STORK_REST_STATIC_FILES_DIR - a directory with static files served in the user interface
The remaining settings pertain to the server’s Prometheus /metrics endpoint configuration (the STORK_SERVER_
prefix is for general purposes):
    • STORK_SERVER_ENABLE_METRICS - enable the Prometheus metrics collector and /metrics HTTP endpoint

 Warning: The Prometheus /metrics endpoint does not require authentication. Therefore, securing this endpoint
 from external access is highly recommended to prevent unauthorized parties from gathering the server’s metrics.
 One way to restrict endpoint access is by using an appropriate HTTP proxy configuration to allow only local access
 or access from the Prometheus host. Please consult the NGINX example configuration file shipped with Stork.

With the settings in place, the Stork server service can now be enabled and started:

$ sudo systemctl enable isc-stork-server
$ sudo systemctl start isc-stork-server

To check the status:

$ sudo systemctl status isc-stork-server

Note: By default, the Stork server web service is exposed on port 8080 and can be tested using a web browser
at http://localhost:8080. To use a different IP address or port, set the STORK_REST_HOST and STORK_REST_PORT
variables in the /etc/stork/stork.env file.

2.5. Installing From Packages                                                                                         9
Stork, Release 1.1.0
The Stork server can be configured to run behind an HTTP reverse proxy using Nginx or Apache. The Stork server
package contains an example configuration file for Nginx, in /usr/share/stork/examples/nginx-stork.conf.
2.5.1.4 Securing the Database Connection
The PostgreSQL server can be configured to encrypt communications between the clients and the server. Detailed
information on how to enable encryption on the database server, and how to create the suitable certificate and key files,
is available in the PostgreSQL documentation.
The Stork server supports secure communications with the database. The following configuration settings in the
server.env file enable and configure communication encryption with the database server. They correspond with
the SSL settings provided by libpq - the native PostgreSQL client library written in C:
• STORK_DATABASE_SSLMODE - the SSL mode for connecting to the database (i.e., disable, require,
verify-ca, or verify-full); the default is disable
• STORK_DATABASE_SSLCERT - the location of the SSL certificate used by the server to connect to the database
• STORK_DATABASE_SSLKEY - the location of the SSL key used by the server to connect to the database
• STORK_DATABASE_SSLROOTCERT - the location of the root certificate file used to verify the database server’s
certificate
The default SSL mode setting, disable, configures the server to use unencrypted communication with the database.
Other settings have the following meanings:
• require - use secure communication but do not verify the server’s identity unless the root certificate location is
specified and that certificate exists. If the root certificate exists, the behavior is the same as in case of verify-ca
mode.
• verify-ca - use secure communication and verify the server’s identity by checking it against the root certificate
stored on the Stork server machine.
• verify-full - use secure communication and verify the server’s identity against the root certificate. In addition,
check that the server hostname matches the name stored in the certificate.
Specifying the SSL certificate and key location is optional. If they are not specified, the Stork server uses the ones from
the current user’s home directory: ~/.postgresql/postgresql.crt and ~/.postgresql/postgresql.key. If
they are not present, Stork tries to find suitable keys in common system locations.
Please consult the libpq documentation for similar libpq configuration details.
2.5.2 Installing the Stork Agent
There are two ways to install the packaged Stork agent on a monitored machine. The first method is to use the Cloud-
smith repository, as with the Stork server installation. The second method, supported since Stork 0.15.0, is to use an
installation script provided by the Stork server, which downloads the agent packages embedded in the server package.
The preferred installation method depends on the selected agent registration type. Supported registration methods are
described in Securing Connections Between the Stork Server and a Stork Agent.
10 Chapter 2. InstallationStork, Release 1.1.0
2.5.2.1 Agent Configuration Settings
The following are the Stork agent configuration settings available in the /etc/stork/agent.env file after installing
the package. All these settings use the STORK_AGENT_ prefix to indicate that they configure the Stork agent.
The general settings:
• STORK_AGENT_HOST - the IP address of the network interface or DNS name which stork-agent should use to
receive connections from the server; the default is 0.0.0.0 (i.e. listen on all interfaces)
• STORK_AGENT_PORT - the port number the agent should use to receive connections from the server; the default
is 8080
• STORK_AGENT_LISTEN_STORK_ONLY - this enables Stork functionality only, i.e. disables Prometheus exporters;
the default is false
• STORK_AGENT_LISTEN_PROMETHEUS_ONLY - this enables the Prometheus exporters only, i.e. disables Stork
functionality; the default is false
• STORK_AGENT_SKIP_TLS_CERT_VERIFICATION - this skips TLS certificate verification when stork-agent
connects to Kea over TLS and Kea uses self-signed certificates; the default is false
The following settings are specific to the Prometheus exporters:
• STORK_AGENT_PROMETHEUS_KEA_EXPORTER_ADDRESS - the IP address or hostname the agent should use to
receive the connections from Prometheus fetching Kea statistics; default is 0.0.0.0
• STORK_AGENT_PROMETHEUS_KEA_EXPORTER_PORT - the port the agent should use to receive connections from
Prometheus when fetching Kea statistics; the default is 9547
• STORK_AGENT_PROMETHEUS_KEA_EXPORTER_INTERVAL - specifies how often the agent collects stats from Kea,
in seconds; default is 10
• STORK_AGENT_PROMETHEUS_KEA_EXPORTER_PER_SUBNET_STATS - enable or disable collecting per subnet
stats from Kea; default is true (collecting enabled). You can use this option to limit the data passed to
Prometheus/Grafana in large networks.
• STORK_AGENT_PROMETHEUS_BIND9_EXPORTER_ADDRESS - the IP address or hostname the agent should use to
receive the connections from Prometheus fetching BIND9 statistics; default is 0.0.0.0 to listen on for incoming
Prometheus connection; default is 0.0.0.0
• STORK_AGENT_PROMETHEUS_BIND9_EXPORTER_PORT - the port the agent should use to receive the connections
from Prometheus fetching BIND9 statistics; default is 9119
• STORK_AGENT_PROMETHEUS_BIND9_EXPORTER_INTERVAL - specifies how often the agent collects stats from
BIND9, in seconds; default is 10
The last setting is used only when Stork agents register in the Stork server using an agent token:
• STORK_AGENT_SERVER_URL - the stork-server URL used by the agent to send REST commands to the server
during agent registration
Warning: stork-server does not currently support communication with stork-agent via an IPv6 link-local
address with zone ID (e.g., fe80::%eth0). This means that the STORK_AGENT_HOST variable must be set to a DNS
name, an IPv4 address, or a non-link-local IPv6 address.
2.5. Installing From Packages 11Stork, Release 1.1.0
2.5.2.2 Securing Connections Between the Stork Server and a Stork Agent
Connections between the server and the agents are secured using standard cryptography solutions, i.e. PKI and TLS.
The server generates the required keys and certificates during its first startup. They are used to establish safe, encrypted
connections between the server and the agents with authentication at both ends of these connections. The agents use
the keys and certificates generated by the server to create agent-side keys and certificates, during the agents’ registration
procedure described in the next sections. The private key and CSR certificate generated by an agent and signed by the
server are used for authentication and connection encryption.
An agent can be registered in the server using one of the two supported methods:
1. using an agent token
2. using a server token
In the first case, an agent generates a token and passes it to the server requesting registration. The server associates
the token with the particular agent. A Stork super administrator must approve the registration request in the web UI,
ensuring that the token displayed in the UI matches the agent’s token in the logs. The Stork agent is typically installed
from the Cloudsmith repository when this registration method is used.
In the second registration method, a server generates a common token for all new registrations. The super admin must
copy the token from the UI and paste it into the agent’s terminal during the interactive agent registration procedure.
This registration method does not require any additional approval of the agent’s registration request in the web UI. If
the pasted server token is correct, the agent should be authorized in the UI when the interactive registration completes.
When this registration method is used, the Stork agent is typically installed using a script that downloads the agent
packages embedded in the server.
The applicability of the two methods is described in Registration Methods Summary.
The installation and registration processes using each method are described in the subsequent sections.
2.5.2.3 Securing Connections Between stork-agent and the Kea Control Agent
The Kea Control Agent (CA) may be configured to accept connections only over TLS. It requires specifying
trust-anchor, cert-file and key-file values in the kea-ctrl-agent.conf file. For details, see the Kea Ad-
ministrator Reference Manual.
The Stork agent can communicate with Kea over TLS, via the same certificates that it uses in communication with the
Stork server.
The Stork agent by default requires that the Kea Control Agent provide a trusted TLS certificate. If Kea uses
a self-signed certificate, the Stork agent can be launched with the --skip-tls-cert-verification flag or
STORK_AGENT_SKIP_TLS_CERT_VERIFICATION environment variable set to 1, to disable Kea certificate verification.
The Kea CA accepts only requests signed with a trusted certificate, when the cert-required parameter is set to true
in the Kea CA configuration file. In this case, the Stork agent must use valid certificates; it cannot use self-signed
certificates created during Stork agent registration.
Kea 1.9.0 added support for basic HTTP authentication to control access for incoming REST commands over HTTP.
If the Kea CA is configured to use Basic Auth, valid credentials must be provided in the Stork agent credentials file:
/etc/stork/agent-credentials.json.
By default, this file does not exist, but the /etc/stork/agent-credentials.json.template file provides example
data. The template file can be renamed by removing the .template suffix; then the file can be edited and valid
credentials can be provided. The chown and chmod commands should be used to set the proper permissions; this file
contains the secrets, and should be readable/writable only by the user running the Stork agent and any administrators.
12 Chapter 2. InstallationStork, Release 1.1.0
Warning: Basic HTTP authentication is weak on its own as there are known dictionary attacks, but those attacks
require a “man in the middle” to get access to the HTTP traffic. That can be eliminated by using basic HTTP
authentication exclusively over TLS. In fact, if possible, using client certificates for TLS is better than using basic
HTTP authentication.
For example:
{
"basic_auth": [
{
"ip": "127.0.0.1",
"port": 8000,
"user": "foo",
"password": "bar"
}
]
}
It contains a single object with a single “basic” key. The “basic” value is a list of the Basic Auth credentials. All
credentials must contain the values for four keys:
• ip - the IPv4 or IPv6 address of the Kea CA. It supports IPv6 abbreviations (e.g. “FF:0000::” is the same as
“ff::”).
• port - the Kea Control Agent port number.
• user - the Basic Auth user ID to use in connection with a specific Kea CA.
• password - the Basic Auth password to use in connection with a specific Kea CA.
To apply changes in the credentials file, the stork-agent daemon must be restarted.
If the credentials file is invalid, the Stork agent will run but without Basic Auth support. The notice will be indicated
with a specific message in the log.
2.5.2.4 Installation From Cloudsmith and Registration With an Agent Token
This section describes how to install an agent from the Cloudsmith repository and perform the agent’s registration using
an agent token.
The Stork agent installation steps are similar to the Stork server installation steps described in Installing on De-
bian/Ubuntu and Installing on CentOS/RHEL/Fedora. Use one of the following commands depending on the local
Linux distribution:
$ sudo apt install isc-stork-agent
$ sudo dnf install isc-stork-agent
instead of the server installation commands.
Next, specify the required settings in the /etc/stork/agent.env file. The STORK_AGENT_SERVER_URL should be
the URL on which the server receives the REST connections, e.g. http://stork-server.example.org:8080.
The STORK_AGENT_HOST should point to the agent’s address (or name), e.g. stork-agent.example.org. Finally, a
non-default agent port can be specified with the STORK_AGENT_PORT.
2.5. Installing From Packages 13Stork, Release 1.1.0 Note: Even though the examples provided in this documentation use the http scheme, we highly recommend using secure protocols in production environments. We use http in the examples because it usually makes it easier to start testing the software and eliminate all issues unrelated to the use of https before it is enabled. Start the agent service: $ sudo systemctl enable isc-stork-agent $ sudo systemctl start isc-stork-agent To check the status: $ sudo systemctl status isc-stork-agent The following log messages should be returned when the agent successfully sends the registration request to the server: machine registered stored agent signed cert and CA cert registration completed successfully A server administrator must approve the registration request via the web UI before a machine can be monitored. Visit the Services -> Machines page in the Stork UI, and click the Unauthorized button located above the list of ma- chines on the right side. This list contains all machines pending registration approval. Before authorizing a machine, ensure that the agent token displayed on this list is the same as the agent token in the agent’s logs or the /var/lib/ stork-agent/tokens/agent-token.txt file. If they match, click on the Action button and select Authorize. The machine should now be visible on the list of authorized machines. 2.5.2.5 Installation With a Script and Registration With a Server Token This section describes how to install an agent using a script and packages downloaded from the Stork server and register the agent using a server token. Open Stork in the web browser and log in as a user from the “super admin” group. Select Services and then Machines from the menu. Click on the How to Install Agent on New Machine button to display the agent installation instructions. Copy and paste the commands from the displayed window into the terminal on the machine where the agent is installed. These commands are also provided here for convenience: $ wget http://stork.example.org:8080/stork-install-agent.sh $ chmod a+x stork-install-agent.sh $ sudo ./stork-install-agent.sh stork.example.org is an example URL for the Stork server; it must be replaced with the real server URL used in the deployment. The script downloads an OS-specific agent package from the Stork server (deb or RPM), installs the package, and starts the agent’s registration procedure. In the agent machine’s terminal, a prompt for a server token is presented: >>>> Server access token (optional): The server token is available for a super admin user after clicking on the How to Install Agent on New Machine button in the Services -> Machines page. Copy the server token from the dialog box and paste it in at the prompt displayed on the agent machine. The following prompt appears next: 14 Chapter 2. Installation
Stork, Release 1.1.0

>>>> IP address or FQDN of the host with Stork Agent (the Stork Server will use it to␣
 ˓→connect to the Stork Agent):

Specify an IP address or fully qualified domain name (FQDN) that the server should use to reach out to an agent via
the secure gRPC channel.
When asked for the port:

>>>> Port number that Stork Agent will use to listen on [8080]:

specify the port number for the gRPC connections, or hit Enter if the default port 8080 matches the local settings.
If the registration is successful, the following messages are displayed:

machine ping over TLS: OK
registration completed successfully

Unlike with Installation From Cloudsmith and Registration With an Agent Token, this registration method does not
require approval via the web UI. The machine should already be listed among the authorized machines.

2.5.2.6 Installation With a Script and Registration With an Agent Token

This section describes how to install an agent using a script and packages downloaded from the Stork server and perform
the agent’s registration using an agent token. It is an interactive alternative to the procedure described in Installation
From Cloudsmith and Registration With an Agent Token.
Start the interactive registration procedure following the steps in the Installation With a Script and Registration With a
Server Token section.
In the agent machine’s terminal, a prompt for a server token is presented:

>>>> Server access token (optional):

Because this registration method does not use the server token, do not type anything in this prompt. Hit Enter to move
on.
The following prompt appears next:

>>>> IP address or FQDN of the host with Stork Agent (the Stork Server will use it to␣
 ˓→connect to the Stork Agent):

Specify an IP address or FQDN that the server should use to reach out to an agent via the secure gRPC channel.
When asked for the port:

>>>> Port number that Stork Agent will use to listen on [8080]:

specify the port number for the gRPC connections, or hit Enter if the default port 8080 matches the local settings.
The following log messages should be returned when the agent successfully sends the registration request to the server:

machine registered
stored agent signed cert and CA cert
registration completed successfully

As with Installation From Cloudsmith and Registration With an Agent Token, the agent’s registration request must be
approved in the UI to start monitoring the newly registered machine.

2.5. Installing From Packages                                                                                          15
Stork, Release 1.1.0

2.5.2.7 Installation From Cloudsmith and Registration With a Server Token

This section describes how to install an agent from the Cloudsmith repository and perform the agent’s registration
using a server token. It is an alternative to the procedure described in Installation With a Script and Registration With
a Server Token.
The Stork agent installation steps are similar to the Stork server installation steps described in Installing on De-
bian/Ubuntu and Installing on CentOS/RHEL/Fedora. Use one of the following commands, depending on the Linux
distribution:

$ sudo apt install isc-stork-agent

$ sudo dnf install isc-stork-agent

Start the agent service:

$ sudo systemctl enable isc-stork-agent
$ sudo systemctl start isc-stork-agent

To check the status:

$ sudo systemctl status isc-stork-agent

Start the interactive registration procedure with the following command:

$ su stork-agent -s /bin/sh -c 'stork-agent register -u http://stork.example.org:8080'

The last parameter should be the appropriate Stork server URL.
Follow the same registration steps described in Installation With a Script and Registration With a Server Token.

2.5.2.8 Registration Methods Summary

Stork supports two different agent-registration methods, described above. Both methods can be used interchangeably,
and it is often a matter of preference which one the administrator selects. However, the agent token registration may
be more suitable in some situations. This method requires a server URL, agent address (or name), and agent port as
registration settings. If they are known upfront, it is possible to prepare a system (or container) image with the agent
offline. After starting the image, the agent sends the registration request to the server and awaits authorization in the
web UI.
The agent registration with the server token is always manual. It requires copying the token from the web UI, logging
into the agent, and pasting the token. Therefore, the registration using the server token is not appropriate when it is
impossible or awkward to access the machine’s terminal, e.g. in Docker. On the other hand, the registration using the
server token is more straightforward because it does not require unauthorized agents’ approval via the web UI.
If the server token leaks, it poses a risk that rogue agents might register. In that case, the administrator should regenerate
the token to prevent the uncontrolled registration of new agents. Regeneration of the token does not affect already-
registered agents. The new token must be used for any new registrations.
The server token can be regenerated in the How to Install Agent on New Machine dialog box available after
navigating to the Services -> Machines page.

16                                                                                              Chapter 2. Installation
Stork, Release 1.1.0

2.5.2.9 Agent Setup Summary

After successful agent setup, the agent periodically tries to detect installed Kea DHCP or BIND9 services on the system.
If it finds them, they are reported to the Stork server when it connects to the agent.
Further configuration and usage of the Stork server and the Stork agent are described in the Using Stork chapter.

2.5.2.10 Inspecting Keys and Certificates

The Stork server maintains TLS keys and certificates internally to secure the communication between stork-server
and any agents. They can be inspected and exported using stork-tool, with a command such as:

$ stork-tool cert-export --db-url postgresql://user:pass@localhost/dbname -f srvcert -o␣
 ˓→srv-cert.pem

The above command may fail if the database password contains any characters requiring URL encoding. In this case,
a command line with multiple switches can be used instead:

$ stork-tool cert-export --db-user user --db-password pass --db-host localhost --db-name␣
 ˓→dbname -f srvcert -o srv-cert.pem

The certificates and secret keys can be inspected using OpenSSL, using commands such as openssl x509 -noout
-text -in srv-cert.pem (for the certificates) and openssl ec -noout -text -in cakey (for the keys).
There are five secrets that can be exported or imported: the Certificate Authority secret key (cakey), the Certificate
Authority certificate (cacert), the Stork server private key (srvkey), the Stork server certificate (srvcert), and a
server token (srvtkn).
For more details, please see stork-tool - A Tool for Managing Stork Server.

2.5.2.11 Using External Keys and Certificates

It is possible to use external TLS keys and certificates. They can be imported to the Stork server using stork-tool:

$ stork-tool cert-import --db-url postgresql://user:pass@localhost/dbname -f srvcert -i␣
 ˓→srv-cert.pem

The above command may fail if the database password contains any characters requiring URL encoding. In this case,
a command line with multiple switches can be used instead:

$ stork-tool cert-import --db-user user --db-password pass --db-host localhost --db-name␣
 ˓→dbname -f srvcert -i srv-cert.pem

Both the Certificate Authority key and the Certificate Authority certificate must be changed at the same time, as the
certificate depends on the key. If they are changed, then the server key and certificate must also be changed.
The ability to use external certificates and keys is considered experimental.
For more details, please see stork-tool - A Tool for Managing Stork Server.

2.5. Installing From Packages                                                                                        17
Stork, Release 1.1.0

2.5.3 Upgrading

Due to the new security model introduced with TLS in Stork 0.15.0, upgrades from versions 0.14.0 and earlier require
the agents to be re-registered.
The server upgrade procedure is the same as the initial installation procedure.
Install the new packages on the server. Installation scripts in the deb/RPM package will perform the required database
and other migrations.

2.6 Installing From Sources

2.6.1 Compilation Prerequisites

Usually, it is more convenient to install Stork using native packages. See Supported Systems and Installing From
Packages for details regarding supported systems. However, the sources can also be built separately.
The dependencies that need to be installed to build the Stork sources are:
     • Rake
     • Java Runtime Environment (only if building natively, not using Docker)
     • Docker (only if running in containers; this is needed to build the demo)
Other dependencies are installed automatically in a local directory by Rake tasks, which does not require root privileges.
If the demo environment will be run, Docker is needed but not Java; Docker installs Java within a container.
For details about the environment, please see the Stork wiki at https://gitlab.isc.org/isc-projects/stork/-/wikis/Install .

2.6.2 Download Sources

The Stork sources are available in ISC’s GitLab instance: https://gitlab.isc.org/isc-projects/stork.
To get the latest sources invoke:

$ git clone https://gitlab.isc.org/isc-projects/stork

2.6.3 Building

There are two Stork components:
     • stork-agent - this is a binary, written in Go
     • stork-server - this is comprised of two parts: - backend service - a binary, written in Go - frontend - an
       Angular application written in Typescript
All components can be built using the following command:

$ rake build_all

The agent component is installed using this command:

$ rake install_agent

and the server component with this command:

18                                                                                            Chapter 2. Installation
Stork, Release 1.1.0
$ rake install_server
By default, all components are installed in the root folder in the current directory; however, this is not useful for
installation in a production environment. It can be customized via the DESTDIR variable, e.g.:
$ sudo rake install_server DESTDIR=/usr
2.7 Integration With Prometheus and Grafana
Stork can optionally be integrated with Prometheus, an open source monitoring and alerting toolkit, and Grafana,
an easy-to-view analytics platform for querying, visualization, and alerting. Grafana requires external data storage.
Prometheus is currently the only environment supported by both Stork and Grafana. It is possible to use Prometheus
without Grafana, but using Grafana requires Prometheus.
2.7.1 Prometheus Integration
The Stork agent, by default, makes Kea statistics, as well as some BIND 9 statistics, available in a format understandable
by Prometheus. In Prometheus nomenclature, the Stork Agent works as a Prometheus “exporter.” If the Prometheus
server is available, it can be configured to monitor Stork agents. To enable stork-agent monitoring, the prometheus.
yml file (which is typically stored in /etc/prometheus/, but this may vary depending on the installation) must be
edited to add the following entries:
# statistics from Kea
- job_name: 'kea'
static_configs:
- targets: ['agent-kea.example.org:9547', 'agent-kea6.example.org:9547', ... ]
# statistics from bind9
- job_name: 'bind9'
static_configs:
- targets: ['agent-bind9.example.org:9119', 'another-bind9.example.org:9119', ... ]
By default, the Stork agent exports Kea data on TCP port 9547 and BIND 9 data on TCP port 9119. This can be
configured using command-line parameters, or the Prometheus export can be disabled altogether. For details, see the
Stork agent manual page at stork-agent - Stork Agent to Monitor BIND 9 and Kea services.
The Stork server can also be optionally integrated, but Prometheus support for it is disabled by default. To enable it, run
the server with the -m or --metrics flag or set the STORK_SERVER_ENABLE_METRICS environment variable. Next,
update the prometheus.yml file:
# statistics from Stork Server
- job_name: 'storkserver'
static_configs:
- targets: ['server.example.org:8080']
The Stork server exports metrics on the assigned HTTP/HTTPS port (defined via the --rest-port flag).
Note: The Prometheus client periodically collects metrics from the clients (stork-server or stork-agent, for
example), via an HTTP call. By convention, the endpoint that shares the metrics has the /metrics path. This endpoint
returns data in Prometheus-specific format.
2.7. Integration With Prometheus and Grafana 19Stork, Release 1.1.0
Warning: The Prometheus /metrics endpoint does not require authentication. Therefore, securing this endpoint
from external access is highly recommended to prevent unauthorized parties from gathering the server’s metrics.
One way to restrict endpoint access is by using an appropriate HTTP proxy configuration to allow only local access
or access from the Prometheus host. Please consult the NGINX example configuration file shipped with Stork.
After restarting, the Prometheus web interface can be used to inspect whether the statistics have been exported properly.
Kea statistics use the kea_ prefix (e.g. kea_dhcp4_addresses_assigned_total); BIND 9 statistics will eventually
use the bind_ prefix (e.g. bind_incoming_queries_tcp); and Stork server statistics use the storkserver_ prefix.
2.7.2 Alerting in Prometheus
Prometheus provides the ability to configure alerting. A good starting point is the Prometheus documentation on alert-
ing. Briefly, the three main steps are: configure the Alertmanager; configure Prometheus to talk to the Alertmanager;
and define the alerting rules in Prometheus. There are no specific requirements or recommendations, as these are very
deployment-dependent. The following is an incomplete list of ideas that could be considered:
• The storkserver_auth_unreachable_machine_total metric is reported by stork-server and shows the
number of unreachable machines. Its value under normal circumstances should be zero. Configuring an alert
for non-zero values may be the best indicator of a large-scale problem, such as a whole VM or server becoming
unavailable.
• The storkserver_auth_authorized_machine_total and storkserver_auth_unauthorized_machine_total
metrics may be used to monitor situations when new machines (e.g. by automated VM cloning) may appear in
the network or existing machines may disappear.
• The kea_dhcp4_addresses_assigned_total metric, along with kea_dhcp4_addresses_total, can be
used to calculate pool utilization. If the server allocates all available addresses, it will not be able to handle new
devices, which is one of the most common failure cases of the DHCPv4 server. Depending on the deployment
specifics, a threshold alert when the pool utilization approaches 100% should be seriously considered.
• Contrary to popular belief, DHCPv6 can also run out of resources, in particular with prefix delegation (PD). The
kea_dhcp6_pd_assigned_total metric divided by kea_dhcp6_pd_total can be considered an indicator of
PD pool utilization. It is an important metric if PD is being used.
The alerting mechanism configured in Prometheus has the relative advantage of not requiring an additional component
(Grafana). The alerting rules are defined in a text file using simple YAML syntax. For details, see the Prometheus
documentation on alerting rules. One potentially important feature is Prometheus’ ability to automatically discover
available Alertmanager instances, which may be helpful in various redundancy considerations. The Alertmanager
provides a rich list of receivers, which are the actual notification mechanisms used: email, PagerDuty, Pushover, Slack,
Opsgenie, webhook, WeChat, and more.
ISC makes no specific recommendations between Prometheus or Grafana. This is a deployment consideration.
2.7.3 Grafana Integration
Stork provides several Grafana templates that can easily be imported, available in the grafana/ directory of the Stork
source code. The currently available templates are bind9-resolver.json, kea-dhcp4.json, and kea-dhcp6.
json. Grafana integration requires three steps:
1. Prometheus must be added as a data source. This can be done in several ways, including using the user interface
to edit the Grafana configuration files. This is the easiest method; for details, see the Grafana documentation about
Prometheus integration. Using the Grafana user interface, select Configuration, select Data Sources, click “Add data
source,” and choose Prometheus; then specify the necessary parameters to connect to the Prometheus instance. In
20 Chapter 2. InstallationStork, Release 1.1.0 test environments, the only necessary parameter is the URL, but authentication is also desirable in most production deployments. 2. Import the existing dashboard. In the Grafana UI, click Dashboards, then Manage, then Import, and select one of the templates, e.g. kea-dhcp4.json. Make sure to select the Prometheus data source added in the previous step. Once imported, the dashboard can be tweaked as needed. 3. Once Grafana is configured, go to the Stork user interface, log in as “super admin”, click Settings in the Configuration menu, and then add the URLs for Grafana and Prometheus that point to the installations. Once this is done, Stork will be able to show links for subnets leading to specific subnets. Alternatively, a Prometheus data source can be added by editing datasource.yaml (typically stored in /etc/ grafana, but this may vary depending on the installation) and adding entries similar to this one: datasources: - name: Stork-Prometheus instance type: prometheus access: proxy url: http://prometheus.example.org:9090 isDefault: true editable: false The Grafana dashboard files can also be copied to /var/lib/grafana/dashboards/ (again, the exact location may vary depending on the installation). Example dashboards with some live data can be seen in the Stork screenshots gallery . 2.7.4 Subnet Identification The Kea Control Agent shares subnet statistics labeled with the internal Kea IDs. The Prometheus/Grafana subnet labels depend on the installed Kea hooks. By default, the internal, numeric Kea IDs are used. However, if the subnet_cmds hook is installed, then the numeric IDs are resolved to subnet prefixes. This makes the Grafana dashboard more human- friendly and descriptive. 2.7.5 Alerting in Grafana Grafana offers multiple alerting mechanism options that can be used with Stork; users are encouraged to see the Grafana page on alerting. The list of notification channels (i.e. the delivery mechanisms) is extensive, as it supports email, webhook, Prometheus’ Alertmanager, PagerDuty, Slack, Telegram, Discord, Google Hangouts, Kafka REST Proxy, Microsoft Teams, Opsge- nie, Pushover, and more. Existing dashboards provided by Stork can be modified and new dashboards can be created. Grafana first requires a notification channel to be configured (Alerting -> Notifications Channel menu). Once con- figured, existing panels can be edited with alert rules. One caveat is that most panels in the Stork dashboards use template variables, which are not supported in alerting. This stackoverflow thread discusses several ways to overcome this limitation. Compared to Prometheus alerting, Grafana alerting is a bit more user-friendly. The alerts are set using a web interface, with a flexible approach that allows custom notification messages, such as instructions on what to do when receiving an alert, information on how to treat situations where received data is null or there is a timeout, etc. The defined alerts are considered an integral part of a dashboard. This may be a factor in a deployment configuration, e.g. the dashboard can be tweaked to specific needs and then deployed to multiple sites. 2.7. Integration With Prometheus and Grafana 21
You can also read