The Monochome Rewritable Card Printer - User Guide - The Tattoo Rewrite User Guide - Reference KU07E, Rev. A1
←
→
Page content transcription
If your browser does not render page correctly, please read the page content below
User Guide

The Monochome Rewritable
      Card Printer

   The Tattoo Rewrite User Guide – Reference KU07E, Rev. A1
                June 2006 © Evolis Card Printer

                              1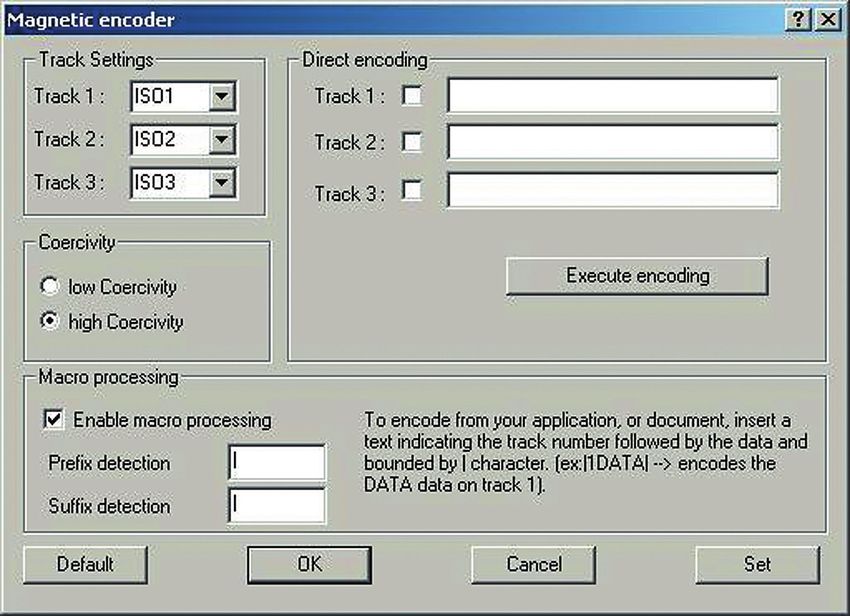
Copyright
Evolis Card Printer © June 2006. All rights reserved.

Copyright Notice
Users must comply with any copyright law applicable in their country. This manual must not be photocopied, translated,
reproduced or transmitted in whole or in part for any reason and means that might be, albeit electronic or mechanical,
without the express and written permission of Evolis Card Printer.
All information contained herein may be subject to modification without prior notice.
Evolis Card Printer accepts no liability for any errors herein, nor for any damage or accident caused by the disclosure or use
of this manual.

Trademarks
Evolis Tattoo and Tattoo Rewrite are registered trademarks of Evolis Card Printer. Microsoft is a registered trademark of
Microsoft. Corp in North America. Windows is a registered trademark of Microsoft Corp

Icons
Different icons draw attention to key information throughout this manual, as depicted below:
                Note
                Indicates information that emphasizes or supplements important data from the main text.

                Important
                Advises you on key information needed to perform a task, or stresses specific information in the text.

               Caution
               Advises you that failure to comply with a specific rule could result in body injuries or hardware damages.

Warranty
Refer to the enclosed Warranty booklet for terms and conditions

Return Materials Authorization (RMA)
Please contact your Evolis Reseller for warranty claims. Packaging, delivery costs and insurance fees are born by the buyer
when the printer is shipped from the site of operation to the Evolis Reseller. The Evolis Reseller will bear the shipping and
insurance costs for sending back the printer from the repair location to the client site.
All Products must be shipped back to Evolis with a RMA ID number, which should be obtained beforehand by contacting
your Evolis Reseller or any authorized Evolis Repair Center (ERC)
Please note that when returning a product, The Evolis Reseller or authorized ERC might ask you for a proof of purchase.
You are liable of any damage incurred by improper packaging when returning your equipment. In such a case, Evolis Card
Printer might refuse to accept these products.
Further information about the RMA policy and the Evolis warranty terms is available in the Warranty booklet enclosed with
your Evolis printer.

Product disposal
                       About Product disposal • Do not dispose of this product through traditional non-sorted waste
                       processing. This product is recyclable and should be recycled in compliance with local laws and
                       regulations. Visit our website www.evolis.com for further details or send us an email at
                       info@evolis.com.

                                                             2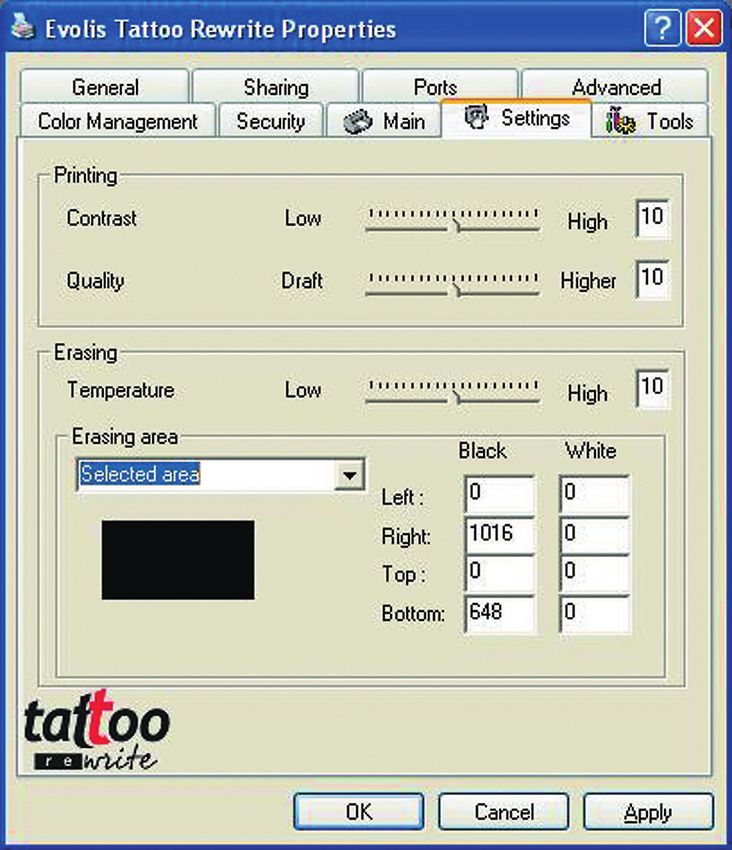
Contents
Introduction             . . . . . . . . . . . . . . . . . . . . . . . . . . . . . . . . . . . . . . . . . . . . . . . . . . . . . . . . . . . . . . . . . .    4

Chapter I • Starting up                                                                                                                   5
                                                             . . . . . . . . . . . . . . . . . . . . . . . . . . . . . . . . . . . . . . . . . . . . . . . .

    Choosing a location . . . . . . . . . . . . . . . . . . . . . . . . . . . . . . . . . . . . . . . . . . . . . . . . . . . . 5
    Unpacking the printer . . . . . . . . . . . . . . . . . . . . . . . . . . . . . . . . . . . . . . . . . . . . . . . . . . . . 5
    Overview of the printer and features . . . . . . . . . . . . . . . . . . . . . . . . . . . . . . . . . . 6
    Installing the interface cable and power supply . . . . . . . . . . . . . . . . . . . . . . 7
    Stand by mode . . . . . . . . . . . . . . . . . . . . . . . . . . . . . . . . . . . . . . . . . . . . . . . . . . . . . . . . . . . . 8
    Managing Cards ............................................................................ 9
    Other installation steps..................................................................10

Chapter II • Printing               . . . . . . . . . . . . . . . . . . . . . . . . . . . . . . . . . . . . . . . . . . . . . . . . . 11

    Installing the printer’s driver. . . . . . . . . . . . . . . . . . . . . . . . . . . . . . . . . . . . . . . . . . . . 11
         For Windows users. . . . . . . . . . . . . . . . . . . . . . . . . . . . . . . . . . . . . . . . . . . . . . . . . 12
         For Windows users with USB interface . . . . . . . . . . . . . . . . . . . . . . . . . 12
    Configuring printer’s settings ........................................................13
    Printing ........................................................................................16

Chapter III • Maintenance                                              . . . . . . . . . . . . . . . . . . . . . . . . . . . . . . . . . . . . . . . . .       19
    Cleaning the inside part of the printer . . . . . . . . . . . . . . . . . . . . . . . . . . . . . .                                                        19
    Cleaning the print head . . . . . . . . . . . . . . . . . . . . . . . . . . . . . . . . . . . . . . . . . . . . . . . .                                    22
    Maintenance of the cleaning roller . . . . . . . . . . . . . . . . . . . . . . . . . . . . . . . . . .                                                     23

Chapter IV • Support                                       . . . . . . . . . . . . . . . . . . . . . . . . . . . . . . . . . . . . . . . . . . . . . . .       24
    Understanding the Printer Control Panel . . . . . . . . . . . . . . . . . . . . . . . . . . . .                                                            24
    Printing and understanding a test card. . . . . . . . . . . . . . . . . . . . . . . . . . . . . . .                                                        27
    Printing quality issues . . . . . . . . . . . . . . . . . . . . . . . . . . . . . . . . . . . . . . . . . . . . . . . . . .                                28
    Dealing with card jamming . . . . . . . . . . . . . . . . . . . . . . . . . . . . . . . . . . . . . . . . . . .                                            30
    Replacing a print head . . . . . . . . . . . . . . . . . . . . . . . . . . . . . . . . . . . . . . . . . . . . . . . . . .                                 30
    Customer Service . . . . . . . . . . . . . . . . . . . . . . . . . . . . . . . . . . . . . . . . . . . . . . . . . . . . . . . .                           33

Chapitre V • Technical datasheet                                                              . . . . . . . . . . . . . . . . . . . . . . . . . . . . . .      34

Chapitre VI • Supplies                                       . . . . . . . . . . . . . . . . . . . . . . . . . . . . . . . . . . . . . . . . . . . . . .       35

Appendix A • Magnetic encoding                                                                   . . . . . . . . . . . . . . . . . . . . . . . . . . . .       36

                                                                   3
Introduction
Congratulations for choosing a Tattoo Rewrite printer!
The Tattoo Rewrite printer is the ultimate solution for printing your multi-purpose rewritable plastic cards:
visitor badges, business cards, loyalty cards, temporary cards, membership cards and many more.

This product comes with a wide range of custom-designed support services to help you efficiently and
professionally. They are available from Evolis and its partners.

                                                   4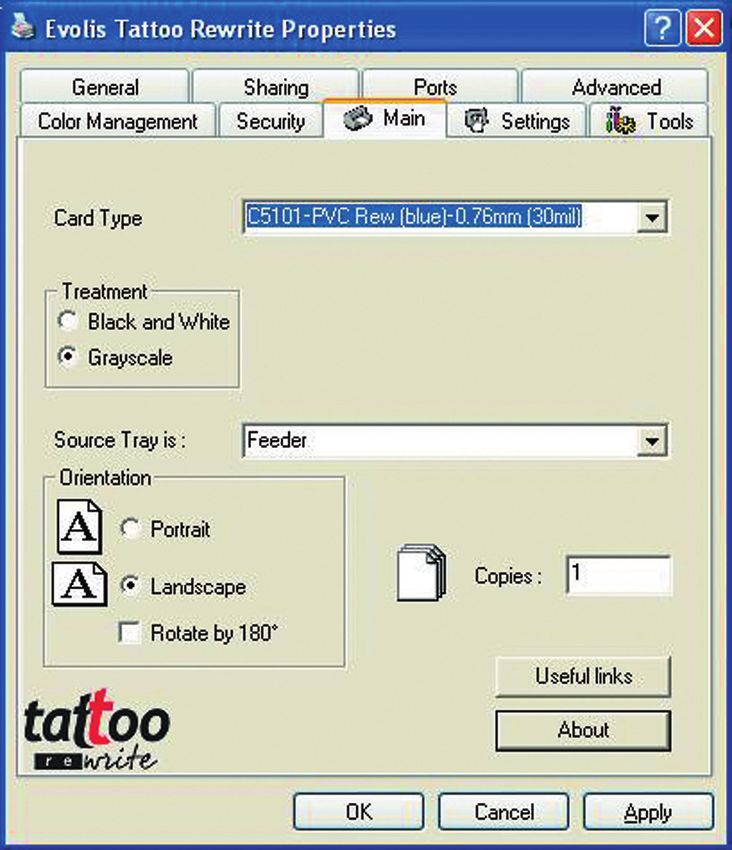
Chap.1
Starting up
Choosing a location
 Place the Tattoo Rewrite printer on a dust-free flat surface that can bear the combined weight of the
 printer and accessories (maxi. load of cards). Make sure the printer can be reached from all directions
 during setup and operation.

Unpacking the printer
 Unpack the printer through the following steps:

 1. Remove the upper protection foam.
 2. Lift the printer out of its box, remove the protection wrap and set it in the chosen location.
 3 Remove any adhesive material from the printer body.

          Please keep all packing materials in the event the printer is moved or returned.

 The Tattoo Rewrite printer comes with the following components:
 ■ Power supply and a power cable

 ■ USB and Centronics parallel cables

 ■ Tattoo Rewrite Instructions leaflet

 ■ User Guide (this guide)

 ■ Tattoo CD (Drivers & Documentation)

 ■ Cleaning kit

 ■ Warranty booklet

 ■ Certificate of compliance with the EC and FCC safety standards

 Please contact your Evolis reseller if any of these components is missing from your package.

                                                 5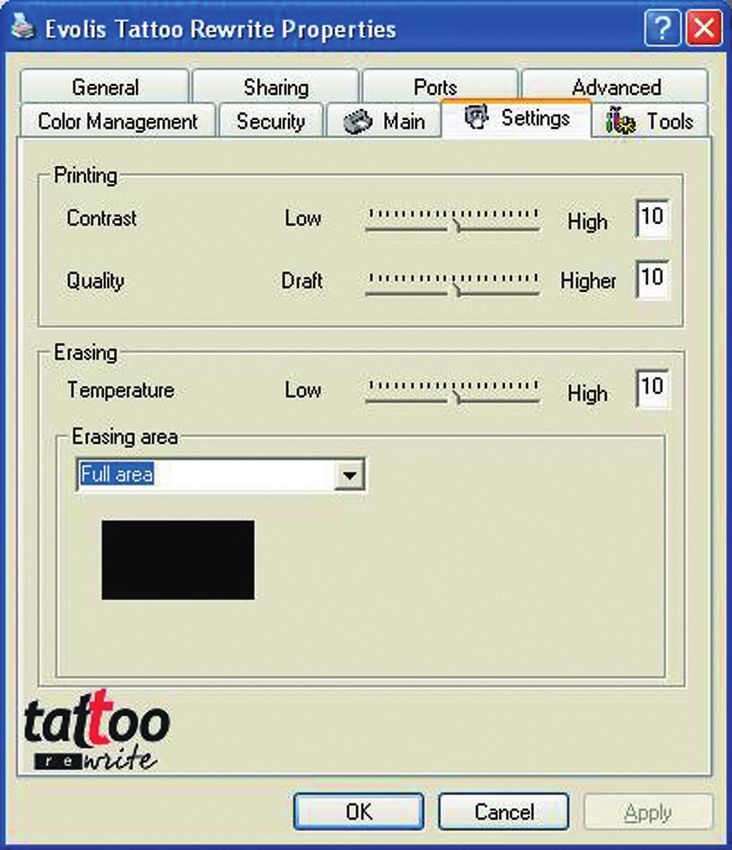
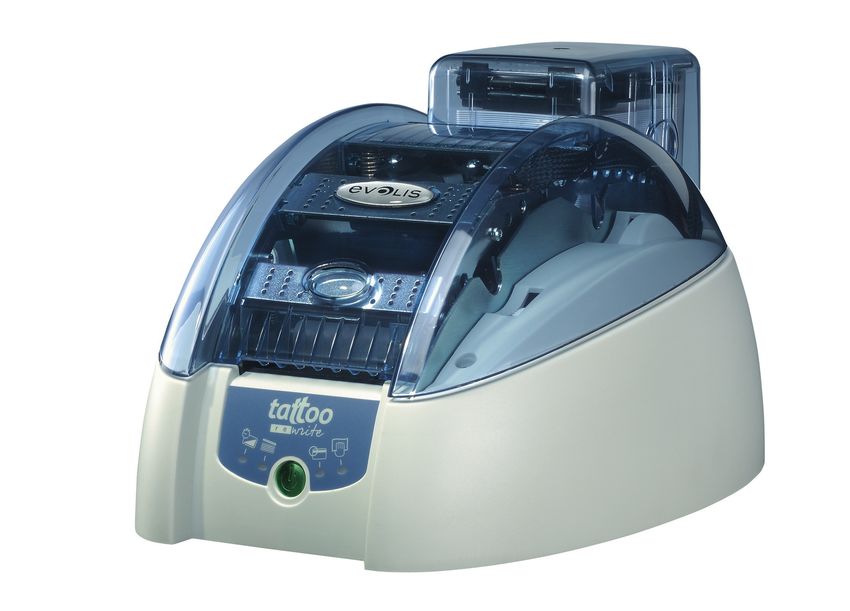
Overview of the printer and features
     The following drawings display all components on your printer for you to be acquainted with them.
     We will often refer to them in this guide.

                  E

         A

                                                                                            F

                                                                      G

                                                     B

                                                            H

                                                                  I                  K
                      D
                                                 C                        J

 A      Thermal print head            Allows card printing in 300 dpi.
 B      Control Panel                 Provides details on the printer operation.
 C      Push button                   Shows if the printer is powered ON or OFF.
 D      Cleaning roller               Removes dust before cards are printed.
 E      Cover Lever                   Enables the printer cover to be opened and closed.
 F      Cover button                  Enables the printer cover to be opened and closed.
 G      Card feeder                   Hosts all cards to be printed.
 H      Power outlet                  Connects the printer and the power supply.
 I      Centronics port (STD)         Sends and receives data to and from the computer.
 J      USB port (STD)                Sends and receives data to and from the computer.
 K      DB-9 connector (option)       Sends and receives data to and from the computer,
                                      or connects to a keyboard or to a smart card coupler.

                                                     6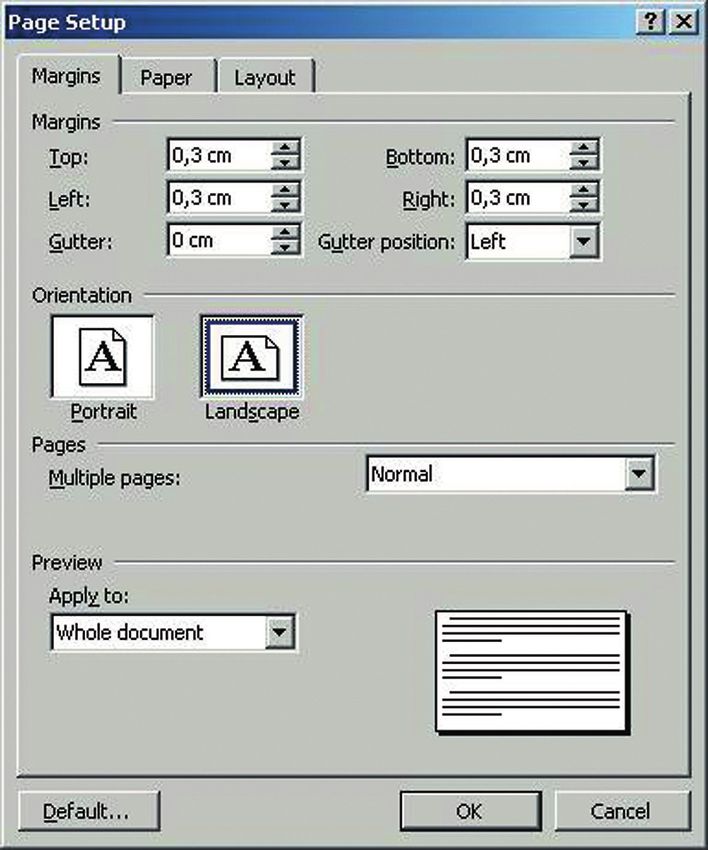
Control Panel of the printer
  The printer has a control panel on its front side, which features four LEDs with self-explanatory sym-
  bols describing the printer’s operating status.
  These LEDs are as follow:

           Card       Card is        Push      Magnetic enco-    Cleaning
           delay      missing       Button       ding error        alert

           Refer to chapter 4 of this manual for further information on how to interpret messages from
           the control panel.

Installing the interface cable and power
supply
           For using your Tattoo Rewrite printer via the USB port, install the Windows driver first, then
           connect to this port.

  1. Connect the supplied interface cable as shown below
  2. Connect the other end of the cable to the appropriate port on your computer
  3. Plug the power cable to the power supply and then connect it to the printer

                                                 7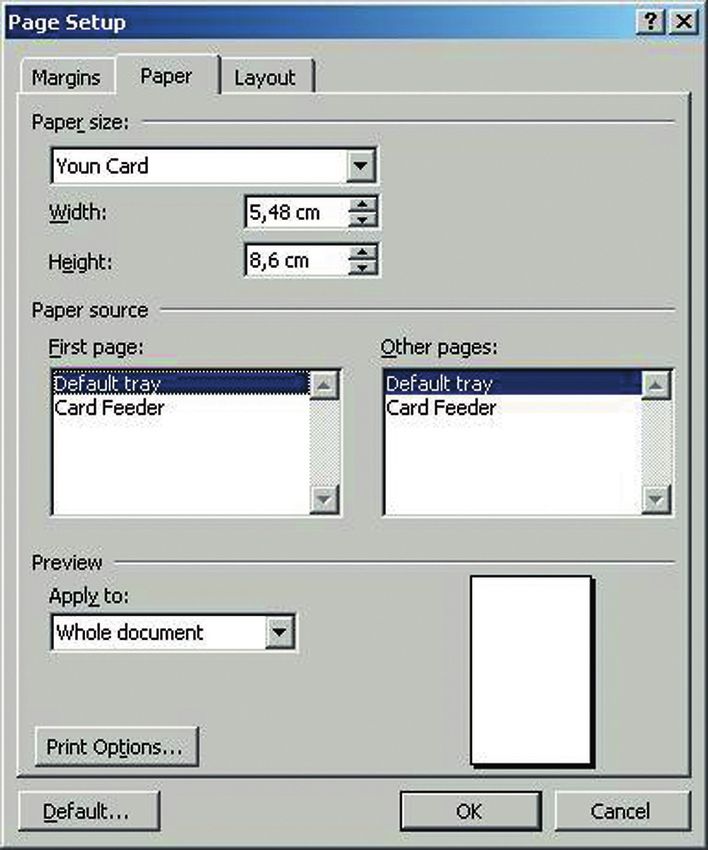
4. Connect the cable power plug to a grounded power socket
 5. The printer is powered on. The control panel LED turns on while the print head rises and lowers to indi-
 cate that the printer is operating as expected from a mechanical standpoint. A dull LED signals that the
 installation has most probably failed or that the printer is not operating as expected. Double-check the
 setup.

           You must pull the plug off from the socket to totally power off this printer, which means
           that the plug must always be reachable.
           This product must be plugged to a safe and grounded electrical outlet.

Stand by mode

                    The Tattoo Rewrite can be set to a stand-by mode on demand by simply pressing
                    the push button for three seconds. The push button green LED goes off.

                    Press the push button for a second to switch the prin-
                    ter on. The push button green LED comes on.

           The printer automatically turns to stand-by when idle for ten minutes.

                                                   8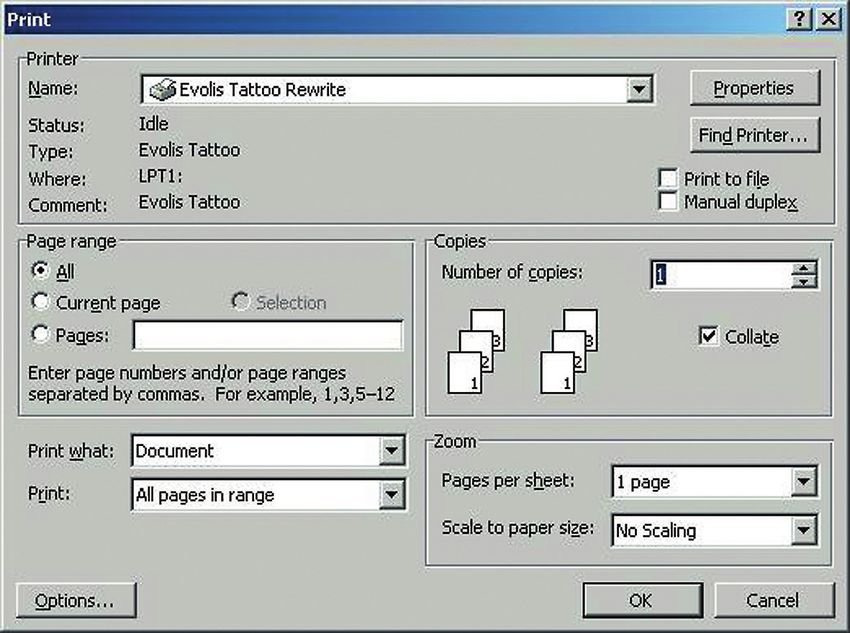
Managing Cards
 Operating guidelines

 Rewritable cards do not require ribbons. The card itself contains a thermosensitive material that becomes
 visible when heated and vanishes when submitted to a lower temperature. This printing process can be
 reversed and the same card can thus be printed and erased up to 500 times.
 The thermal printing process requires the card to cool off before it is reprinted. Otherwise, the previous print
 might be partially erased. Cooling down is just a matter of a few seconds. Similarly, the expected contrast
 shows up within seconds after the card is printed.

 Warped cards can result in a slightly reduced printing area. This is more likely to happen with thick cards.
 In this case, reprinting the card several times will generally solve the issue. However heavily bent cards might
 prove impossible to print.
 New cards should be kept in a safe and clean environment, for instance in the standard card feeder. Dusty
 of dirty cards might cause uneven or incomplete printing, and the print head to wear out prematurely. It is
 recommended to clean the printer on a regular basis. Refer to the « Maintenance » chapter for further
 information.

       The Tattoo Rewrite printer offers three ways for loading cards. These different modes can be selected
       from the “Main” Tab of the printing driver interface:

       ■ Feeder: cards are automatically ejected from the feeder
       ■ Manual Feed: cards are manually inserted, one at a time in the printer’s front feeding mouth

       ■ Automatic selection: cards are either automatically sourced from the feeder or manually loaded from

       the tray, whichever cards are loaded first

 Loading the card feeder

max.                 1. Remove the feeder as shown.

                                    2. Push down the spring and load up to 100
                                    cards with a thickness of 0,76mm (30mil).

                                                             3. Place the feeder back in its slot. Then press the
                                                             upper part on the feeder until it clicks.

              Manufacturing tolerances might bring card thickness to be slightly above 0,76mm
              (30mil), which means the feeder will not fully fit in its slot. In such case, withdraw a few
              cards and set the feeder back.
                                                       9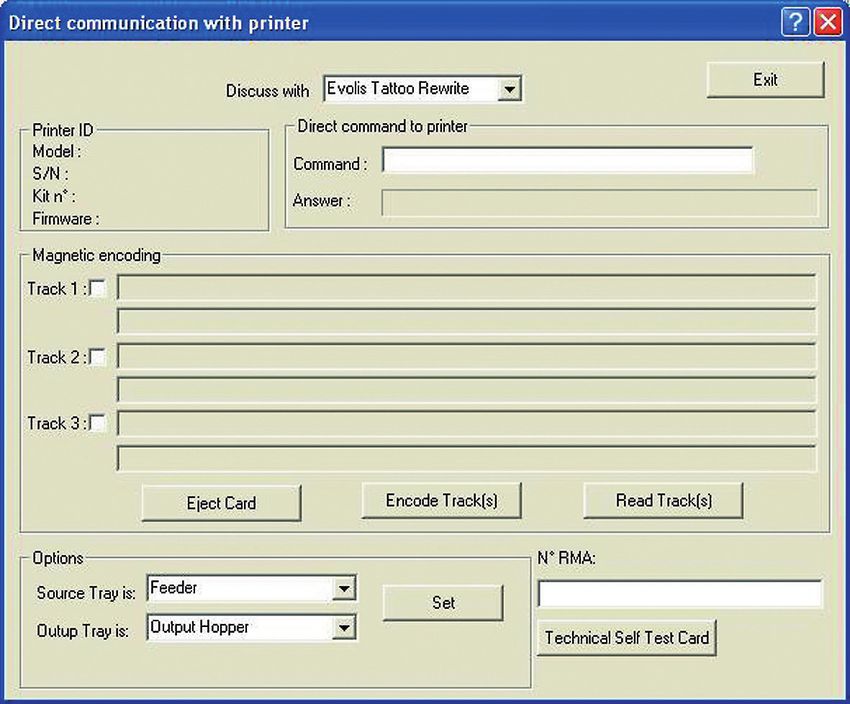
Loading manually a card from the feeding mouth

   The Tattoo Rewrite printer comes with a manual feeding mouth for inserting one card at a time.

 1. Insert a card manually as shown in the feeding
 mouth. The card will be automatically ejected
 when printed.

Selecting the appropriate thickness of the card

   The Tattoo Rewrite printer benefits from an automated system that gauges card thickness whithin a
   rage from 0,25mm to 0,76mm (10 to 30mil).

               Tips – How to select appropriate cards:
               ■ Do not use other cards than those indicated in the Technical Data Sheet of this manual

               ■ Do not use damaged, folded or embossed cards

               ■ Make sure you store your blank cards in a clean and dust-proof area

               ■ Avoid inserting foul or dusty cards in the printer

Setup - Next steps
   You are now done with the hardware setup of your Tattoo Rewrite printer. Yet, carry on with reading
   this guide, as two extra steps will to make your Tattoo Rewrite printer fully operational:

   ■ Installing the printer’s driver
   ■ Maintenance of the printer

                                                     10
Chap. 2
Printing
Installing the printing driver
You must install the driver for your Tattoo Rewrite printer before using it.
Reminder: The driver and the Tattoo Rewrite printer are compatible with Windows NT 4.0, 2000 and XP.
The CD includes a wizard that automatically installs the driver that is most relevant to your
personal settings.
• Insert the DRIVERS & DOCUMENTATION CD-Rom in your CD drive
• Wait a few seconds until the CD homepage lets you select your language
• Click of the flag that depicts your language
• A new menu pops up and invites you to install the printer driver. Follow the instructions below to confi-
gure your Evolis printer
You use Windows, your printer is connected to the mains, the Parallel cable or USB is not connected.
■ Click on Driver Installation
■ A setup screen appears suggesting that you save any previous installations
All boxes are checked by default and the setup shield will delete previous settings.
■ Click on Install to launch the process
■ When told to do so, choose the connection method to your Evolis printer: USB or Parallel
The installation program asks you to connect the printer.
Please stick to the following guidelines:
■ Connect the USB or Parallel cable between the PC and the printer
■ The system automatically detects your peripheral and starts the Add Printer wizard after a few
seconds
■ Select the Tattoo Rewrite option in the dialog box that appears on your screen
■ Click Next, then Finish
■ Click OK in the window
■ The setup is complete, click on End
■ Click on Quit to close the setup program
Your Evolis printer is now ready to customize your cards.
If an error occurs during the installation, please refer to the Windows Users - Manual Installation
section.
Installing a driver with Windows NT, 2000 and XP might require appropriate authorization from
your systems administrator. If required, contact your admin to get full information on installation
methods and related access rights.
11Windows Users – Manual Installation
■ Close any opened application before installing the driver
■ Do not connect the USB or Parallel cable before the installation is completed
■ Insert the DRIVERS & DOCUMENTATION CR-Rom in your CD drive
■ In the Windows menu bar, choose Start, Settings and then Printers (or Start, Control panel,
Printers and faxes)
■ Double-click on Add printers
■ Select Local Printer
■ Choose the LPTx port for printers (even if you connect the printer via USB)
■ Click on Have Disk when the wizard displays a list of manufacturers and printers.
■ Select the CD-Rom drive ID and click on Browse
■ Open the Drivers folder in the CD-Rom
■ Select the folder that is relevant to your Windows OS :
Windows 2000 and Windows Xp: 2000XP
Windows NT4: NT4.0
■ Select Youn.inf (or Younbw.inf) then click on Open, then OK
■ The Evolis printer appears on a grey background. Click on Next
■ Choose to replace the existing driver, and then click on Next
■ State whether you wish to use the Evolis printer as your default printer
■ Click on Next
■ Do not share and then click on Next
■ Do not print out a test page and click on Next
■ Click on Finish to install the driver.
To operate the printer on the Parallel port, link it to the PC. Setup is completed.
For an USB link, please follow these steps:
■ Connect your USB cable between the printer and the PC
■ Windows detects a new printer and launches the Add Printer wizard
■ Click on Next
■ The system looks for the Youngi.dll (Youbwgi.dll) file
■ Open the Drivers folder in the CD-Rom.
■ Select the folder that is relevant to your Windows OS :
Windows 2000 and Windows Xp : 2000XP
Windows NT4: NT4.0
■ Select the Youn.inf (or Younbwgi.inf) then click on Open , then OK
■ Click on Finish
A new Evolis driver (Copy1) is created for the USB printer. Setup is completed.
12Configuring printer’s settings
Before you start using your Tattoo Rewrite printer, make sure to check/update all default settings of the
driver. Any installed option needs to be stated within the driver.
You printer comes with multiples features that can be configured via the printing manager interface.
You can access these printing options:
■ From the Windows start menu in, choose Settings then Printers (or Control panel then
Printers and faxes)
• Select Evolis Tattoo Rewrite
• In File (windows menu), select Default Document
■ From your Windows software:
• In the File menu of your application, select Print or Print Setup
Procedures can differ according to the software and Operating System that you use.
Make sure that the printer is selected as default printer before using it.
Setting the Tattoo Rewrite printer as default printer
Set your Tattoo Rewrite printer as default printer by following these steps:
■ Click Start, Settings, then Printers (or Start, Control Panel then Printers and faxes)
■ Click of the Evolis Tattoo Rewrite printer, then open the File menu
■ Choose Set As Default Printer, then close the window
Properties of your Tattoo Rewrite printer
Several dialog boxes will help you:
■ Set printing attributes such as layout and printing quality
■ Manage the printing mode and the use of suitable cards
■ Select the printing port
■ Start the maintenance, cleaning and monitoring features of the printer
Using the online help
A help file supports you when defining each setting of the printing manager, depending on the prin-
ting modes and criteria. Please refer to this help to better understand these settings and before any
attempt to alter them.
13« Main » dialog box.
This dialog box enables you to set the following features:
■ Card Type: the Evolis part number of the rewritable card
■ Treatment: printing effects (trace mode: black and white,
grey effect: grey scale)
■ Source tray: helps you choose how you insert cards (via
the feeder, from the printer’s front feeding mouth in manual
or automatic mode)
■ Orientation: for printing the card in landscape or portrait
mode
■ Copies : number of required copies
« Settings » dialog box.
This dialog box enables you to set the following
features:
Contrast: stronger or lighter according to the print
temperature
Quality: from Draft to Higher depending on the
printing speed
Temperature: stronger or weaker erasing depen-
ding on the temperature
Erasing area: when an area of the card needs to be
preserved. This menu has several options : select the
full card surface, no erasing, ISO smartcards, AFNOR
smartcards, cards with a magnetic strip, selected
areas and to download a picture.
The area to be erased appears in black while the area
to be preserved appears in white. Click on Apply to
confirm your choice.
“Selected area” menu
This menu lets you set an area to be erased (Black) or to be
preserved (White). Choose the number of pixels starting from
the upper left corner of the card.
The area to be erased appears in black while the area to be
preserved appears in white. Click on Apply to confirm your
choice.
14“Tools” dialog box
This dialog box provides first level help
for your Tattoo Rewrite.
If your Tattoo Rewrite printer comes with
a magnetic encoder option, click on the
Encoding Definition button to set your
configuration.
Refer to Appendix A for further informa-
tion on encoding.
We also suggest that you print and save
a Test Card when you first use your prin-
ter. This card displays all information that
is required when you call the customer
service.
The Erase Card button erases the next inserted card. The full area of the card is erased.
The Dialog with the Printer option is
available only if the driver has been
installed through the CD-Rom setup
wizard.
This Dialog box makes it possible to send
command scripts directly to the printer,
to encode/read magnetic strips.
“General” dialog box
This Windows dialog box allows to test print a page and make sure that the printer
and the computer are seamlessly communicating.
“Details” dialog box
This dialog box is a monitoring window for selecting the printing port and the appro-
priate driver. Advanced proficiency is required for altering these settings.
“Color Management” dialog box
This dialog box makes it possible to link printing to a defined color management profile.
15Printing
Multiple Windows applications (Word - Access - Excel, for instance) come with a printing feature. The follo-
wing example depicts card layout and configuration issues.
Microsoft® Word
Once the Tattoo Rewrite Printer is defined as a
default printer:
1. Start Word and go to File, then Page Setup
2. The Page Setup dialog box offers to choose
the Paper Size: select Youn Card
3. In the Margins tab, scroll to 0,3 cm
for all margins, then select Landscape
as the Orientation.
4. Close the window by clicking OK.
16Your Word window should now look like this:
You are ready to custo-
mize your card by
laying out all design
components:
■ Logo and pictures
■ ID photo
■ Fixed and variable
texts
■ Barcode, etc
Example :
Please note that this example
is not meant to teach a user
how to use Microsoft Word.
The only purpose is to
explain the relationship bet-
ween card design and set-
tings of the Tattoo Rewrite
printing manager.
17Configuring the Tattoo Rewrite printing driver
To access the settings from the Word window:
1. In the menu, click on File, then Print.
2. The dialog box shows that the Evolis Tattoo Rewrite is selected.
3. Click on Properties. The Evolis Tattoo Rewrite Printer dialog box comes up.
The printing settings for this example are the following:
1. « Main » dialog box
■ Card Type: according to the type of Evolis card used (See the “Supplies” chapter)
■ Treatment: Gray scale
■ Orientation: Landscape
■ Copies: sets the required number of copies
2. « Settings » dialog box
■ (Printing) Contrast: value of 10
■ (Printing) Quality: value of 0
■ (Erasing) Temperature: value of 10
3. Click OK to close each dialog box.
4. When back to the main window, click OK to start printing.
WARNING !
The printing settings are optimized for Evolis-approved cards. These settings can be adjusted in a given
range. When using other cards, please test print a few cards for validation purposes or contact Evolis
if required.
Help is available for all dialog boxes. See the above “Using the online help” section for
more details
18Chap. 3
Maintenance
Make sure you do not waive your warranty!
Failure to observe the maintenance guidelines as detailed in this chapter compromises the
warranty of your Tattoo Rewrite printer/print head. Evolis cannot be held liable if the printer
faces unapproved maintenance conditions.
Evolis provides the following cleaning product (item reference A5011 – UltraClean cleaning
kit) that contains:
■ 5 cleaning cards pre-saturated with isopropyl alcohol 99%
■ 5 cotton swabs with isopropyl alcohol 99%
■ 1 dispenser with 40 pre-saturated cleaning clothes
Cleaning the inside part of the
printer
When to clean: every 500 cards processed
How to clean: Use pre-saturated cards
A LED comes on to indicate that the inside of the printer requires clea-
ning (every 500 cards inserted) as explained below:
Printer status after processing 500 cards
19A printer that does not get cleaned despite the cleaning LED notice will start blinking when an addi-
tional 100 cards are inserted. The LED starts blinking in the following way:
Printer status after processing 600 cards
A blinking LED indicates that the printer needs immediate cleaning (within the next 5 cards).
Else, the print head warranty is waived.
Cleaning the inside of the printer
Cleaning is rather simple, as it only requires pre-saturated cleaning cards that are custom-designed for
the printer. Your Tattoo Rewrite printer is shipped with a cleaning kit containing samples of these cards.
Cleaning cards that are repeatedly passed through the printer clean the transport rolls, the cleaning
rolls, the print head and the magnetic head (when applicable).
1. Open the cover and withdraw any card lying insi-
de the printer. Close the cover.
2. Remove the feeder as shown
203. Remove all remaining cards
from the feeder.
4 Take a new cleaning card and load it into
the feeder.
5. Place the feeder back in its slot and press
the upper part on the feeder until it clicks.
6. Press the control panel push button for a second
to start cleaning.
7. The used cleaning card is ejected from the front side of the printer.
Wait a couple of minutes after cleaning and before using the printer to let the clea-
ning product evaporate completely.
The printer will operate even if the cleaning alert is triggered.
On the other hand, you can decide to run a cleaning process even when the rele-
vant LED is off. In this case, press the control panel push button for a few seconds.
Make sure you fully observe all cleaning steps.
21Cleaning the Print Head
When to clean: once a day
How to clean: use cleaning swabs
The print head is in direct contact with the cards and is cleaned when the inside of the prin-
ter is cleaned. Meanwhile, you should clean it once a day using cotton swabs from the
UltraClean kit. This will help uphold the original printing quality and prevent any damage or
failure caused by a foul or dusty print head.
Important: make sure that the print head and related components are safe from electrostatic dis-
charges.
The print head is a fragile element. To avoid damages:
■ Comply with the cleaning cycles
■ Keep the print head away from sharp or metal objects
■ Do not touch the print head surface with your bare fingers. This might result in poor prin-
ting quality or permanent damages to the print head.
Cleaning the print head:
1. Open the printer cover and locate the print head.
2. Take a new swab and press
on the stick to let the liquid
out (clic)
3. Then, gently rub the swab along and over the
print head during several seconds.
Wait a couple of minutes after cleaning and before using the printer to let the clea-
ning product evaporate completely.
22Maintenance of the cleaning roller
When to clean: once a day
How to clean: use cleaning wipes
Your Tattoo printer has a built-in cleaning roller with a sticky surface that captures dust when
cards are passed through. This roller is automatically cleaned when the inside of the printer is clea-
ned. Yet, you should clean it once a day to guarantee that the card surface is perfectly clean. Use
a cloth from the cleaning kit.
Cleaning the cleaning roller:
1. Open the cover of the printer. Spot the cleaning rol-
ler and remove it from the printer.
2. Clean the roller with a wipe from your cleaning kit. Remove
dust by gently rubbing the wipe on the roller’s surface.
3. When dry, put the roller back in the
printer and close the cover.
If you are using the card feeder, make sure you also clean the cleaning roller, which
is located at the feeder way out.
Wait a couple of minutes after cleaning and before using the printer to let the clea-
ning product evaporate completely.
23Chap. 4
Technical Support
Evolis wishes to serve its customers in the best possible manner and has issued a comprehensive range
of technical support services that can be found in this guide and on www.evolis.com.
This section provides first level troubleshooting help for the Tattoo Rewrite printer.
Understanding messages from Control Panel
Evolis has enforced reliability when designing the Tattoo Rewrite. Meanwhile, some issues may arise.
The following chapter will help you spot and troubleshoot any potential issue during installation or
operation.
Overview of the Printer Control Panel
The printer has a control panel on its top, which features four LEDs with self-explanatory symbols des-
cribing the printer operating status.
These LEDs are as follow:
Card delay Cleaning alert
Card is missing Magnetic encoding error
Push button
24The control panel LEDs have different status:
OFF ON BLINKING
Press the push button to roll back the control panel to its initial status, after dealing with the following issues:
■ CARD IS MISSING or PRINTER INTERNAL ISSUE
■ MAGNETIC ENCODING ERROR
■ CARD EJECTED
You can also use the push button to:
■ Set the printer to stand-by
■ Print a test card
■ Run the cleaning feature
The status of the LEDs depicts the Tattoo Rewrite operation or the nature of a problem:
LED status Meaning Solution or details
PRINTER READY The printer is ready to receive data
DATA The printer is processing data via one or more of its
PROCESSING interfaces
■ The printed card is hot.
CARD ■ The required level of contrast is not yet achieved
DELAY
■ Wait before reprinting the card
Reprinting a card when still hot might result in partial
erasing. Wait for a few seconds for the LED to turn off.
In the mean time, you can print or reprint another card
CARD OR FEEDER IS ■ The feeder is empty
■ Card thickness is not properly configured
MISSING ■ Cards are embossed
■ Cards are stuck together
■ The feeder is missing or not properly installed.
Check the cards in the feeder or make sure that the fee-
der is properly inserted. Then press the push button for a
second to resume printing.
25LED status Meaning Solution or details
WAITING FOR A CARD TO BE ■ The printer is waiting for a card to be inserted
INSERTED Insert a card in the front feeding mouth
WAITING FOR A CARD TO BE ■ The printer is waiting for a card to be removed
Remove the card from the front side of the printer
REMOVED
PRINTER CLEANING ALERT ■ The printer needs to be cleaned
Refer to chapter 3 “Maintenance”
(AFTER PROCESSING 500 CARDS)
PRINTER CLEANING ALERT ■ The printer needs to be cleaned
Refer to chapter 3 “Maintenance”
(AFTER PROCESSING 600 CARDS)
PRINTER COVER ■ The printer cover is open
IS OPEN Close the cover and any printing in progress will
resume
MECHANICAL ■ Card jamming
FAILURE ■ A mechanical part is damaged
Press the push button for a second. Call Your Evolis reseller
for assistance if the issue remains.
MAGNETIC ENCODING ERROR ■ The magnetic strip is not properly oriented in the
feeder
■ The encoding method (HICO or LOCO) is inappro-
priate.
Please refer to Appendix A for further information
■ Encoded data is not compliant with the ISO 7811
standard or with the driver properties settings. infor-
mation.
Press the push button for a second. The printer resu-
mes encoding with a new card. Call Your Evolis resel-
ler for assistance in case the issue cannot be solved.
COOLING SYSTEM ■ The print head cooling system is operating.
The printer stops for a few seconds, and resumes as
soon as the print head reaches a standard operating
temperature.
26Printing and understanding a test card
Printing a test card provides technical details about your printer and confirms it is operating as
expected.
We advise you to print it after installing your printer is installed and to keep it at hand.
Printing a test card
1. Insert a card using your favorite feeding mode
2. Press the push button for three seconds. All LEDs go off.
3. Press the push button once again and hold it down
4. The push button green LED comes on
5. Release the push button when the green light starts blinking
6. The test card will be printed in a few seconds
7. The printed card is ejected from the printer’s front mouth
Understanding a test card
A printed test card provides the following details:
■ A correct quality of printing
■ The use of suitable cards
■ The model of the printer
■ The printer serial number
■ The version of the firmware
27Printing quality issues
The following data will help you troubleshoot any quality issue when using your printer. Please contact
your Evolis Reseller, should you still experience those problems despite going through this help.
The printer does not print
1. Check the Power Supply
Make sure that:
■ The power supply cable is connected to the printer and to a power socket that works.
■ The printer is powered on. The green light on the control panel is on.
■ You use the power supply that comes with the printer.
2. Check the card feeder and the card in the printer
■ Make sure the feeder is loaded
■ Make sure the rewritable side is oriented as per the icon on the feeder
■ Make sure there is no jamming
See previous details in this chapter
3. Check the cards
■ Make sure that you are using rewritable cards
4. Print a test card
Refer to the “Printing and understanding a test card” section of this chapter.
5. Check the printer’s interface cable
■ Check the link between the printer and the computer
■ Try to use another cable of the same type
6. Check the driver
■ Make sure that the Tattoo Rewrite printer driver is selected in the Windows settings
7. Check the computer printing settings
■ Make sure the Tattoo Rewrite printer is defined as the default printer.
Refer to the « Configuring printing settings » section in the "Printing” chapter
8. Check the network configuration
■ Make sure the Tattoo Rewrite printer can be accessed from your desktop.
Printer ejects a blank card
1. Check the card
■ Make sure the card is rewritable and oriented as expected.
2. Check the printer interface cable
■ Check the printer interface cable
■ Check the link between the printer and the computer
■ Try to use another cable of the same type
283. Some components of the print head might be damaged
■ Print a test card
Refer to the “Printing and understanding a test card” section in this chapter.
If no cards can be printed, contact your Evolis reseller for replacing the print head.
Printing quality is lower than expected
1. The printing and erasing settings must be updated
■ Low contrast: increase the contrast level in the printer’s driver settings
■ Partial erasing: change the temperature in the printer’s driver settings
■ Poor quality: increase the quality of printing in the printer’s driver settings. Please note that this
affects the printing speed. It should be updated only if the first two adjustments have proven unsa-
tisfactory.
2. The type of rewritable cards used may not be suitable
■ Check whether the rewritable cards that are used comply with specifications.
See the”Technical Specifications” and “Supplies” chapters in this manual for further information.
3. The surface of the card is rough or embossed
■ Try switching to another type of cards
WARNING!
Due to this thermal printing process, the card must cool off before it is reprinted. Otherwise, the
previous graphics might only be partially erased. Cooling down is just a matter of a few seconds.
Similarly, the expected contrast shows up within seconds after the card is printed. When a card is
printed, wait until the CARD DELAY LED turns off before reprinting the card and/or change the
printer settings. In the mean time, you can print or reprint another card.
Partial or biased printing
1. Check the printing settings
■ Make sure that your page setup remains within printing margins
■ Check the document layout set for the driver (Landscape or Portrait)
2. Check the printer’s interface cable.
■ If funny characters are printed, make sure you are using the appropriate interface cable for
your printer
■ Check the link between the printer and the computer
■ Try to use another cable of the same type
3. Make sure the printer is dust-free
■ Clean the inside of the printer, the cleaning rollers and the print head
See the «Maintenance” chapter in this manual
294. Make sure that all cards are clean and flat
■ Cards should be always stored in a dust-free environment
■ Check that the cards are not warped or bent
5. Check that the print head is clean
Refer to the print head cleaning procedure in the “Maintenance” chapter of this manual
6. Check the Print Head
■ Printed cards showing white lines might suggest that the print head is dirty or even damaged
■ Clean the print head
Refer to the « Maintenance » chapter for further information
■ If the problem lingers after cleaning, contact your Evolis reseller for a new print head
Dealing with card jamming
Remove the card in the following way:
1. Open the cover of the printer
2. Remove the card by pressing the push button and/or manually pushing it towards the printer out-
let. Always push the top card first when dealing with several cards
3. Close the cover
4. Press the control panel push button for a second
Preventing card jamming:
1. Make sure that all cards are properly loaded and have the suitable thickness
2. Make sure that card thickness complies with required specifications as mentioned in the “Technical
Datasheet” section of this manual.
3. Check that the cards are not warped
4. Find out if cards are stuck together.
30Replacing a print head
Replacing the print head of a Tattoo Rewrite Printer is a straightforward task that does not
require specific tools or fine-tuning.
Switch off the printer before replacing the print head.
Step 1 – Removing the damaged print head
1. Open the printer cover and look for
the print head.
2. With one hand, push the rear metal
part under the cover and with the other
turn the two forks to remove the print
head from its arm.
3. Detach the cable from behind the print head.
Step 2 – Installing a new print head
1. Take the new print head and set the cable in its
location.
312. Insert the head vertically on the two guiding forks.
3. Turn the printing head to “clip” it in the metal
part.
4. Close the cover
That’s it! The print head is installed.
Step 3 – Configuring the new print head
1. Switch the printer on and connect it to a printer that has a Tattoo Rewrite driver installed
2. Click on the “Tools” dialogue box in the driver properties
3. In “Direct Command to printer”, enter the following string : Pkn;x
x is the print head ID displayed on a transparent label on the print head..
Example: if the print head ID is 179-004-00048, key in the following command string :
Pkn;179-004-00048
Please note that entering an inappropriate/wrong kit number may bring the printer to mal-
function.
Two control panel LEDs blink simultaneously. They indicate that the printer needs to
be cleaned from the inside. Printing is suspended until cleaning is done.
See chapter “Maintenance - Cleaning the inside of the printer” to proceed with clea-
ning when a print head has been replaced.
Once you are done, clean the cleaning roller, then put the cards back.
Your Evolis printer is once more ready to customize your cards.
32Customer Service
When issues remain despite guidance provided, please connect to evolis.com for further information
or contact your Evolis reseller.
The Evolis website
For extra technical help on operating and troubleshooting the Evolis printers, go to the Support &
Services menu on the Evolis website.
You will be able to download updated versions of the firmware, drivers and user’s guides, videos for
operating and maintaining Evolis printers, as well as a FAQ* that provides answers to frequently asked
questions.
*FAQ :: Frequently Asked Questions
Contacting an Evolis reseller
Please contact an Evolis reseller when you cannot solve a problem on your own. If you do not know
any Evolis Reseller, connect to www.evolis.com and send us your request.
Evolis will provide you with the contact details of your nearest reseller.
Stay near your computer when calling an Evolis reseller and make sure you have the following data
handy.
■ Type and serial number of your printer
■ Your configuration and Operating System
■ An explanation of your problem
■ Details of what has been done to solve the problem
33Chap. 5
Technical Data Sheet
Print mode
■ Monochrome direct thermal printing
■ Texts, bar codes, graphics and logos are printed in Trace mode. Pictures are printed in diffusion mode
Printer features
■ Automatic card thickness adjustment
Printing speed
■ Erasing/printing cycle: 8 seconds
Resolution
■ 300 dpi (11.8 dots/mm)
Windows™ drivers
■ Windows™ NT 4.0, 2000 and XP.
Warranty
■ Printer: 1 year
■ Print head: 1 year1
Loading cards
■ Automated feeder or manual feed
Optional features
■ Serial port (available upon study)
■ 100 cards additional feeder
■ Cleaning kit
Other models
■ Tattoo Rewrite Mag Printer with HICO/LOCO magnetic stripe encoder - ISO 7811 or JIS2 compliant
■ Tattoo Rewrite Contactless Printer with contactless smart card coupler - ISO 14443A / Mifare
1 – Clause governing the use of Evolis-approved supplies
Subject to observance of maintenance procedures
Card types: ISO CR-80 - ISO 7810 (53,98mm x 85,60mm - 3.375" x 2.125") – Maximum printing surface : 48mm x
80mm (1.9” x 3.15”) - Card thickness: from 0,25mm to 0,76mm (10 to 30mil) - Card feeder capacity: 300 cards (10mil)
or 100 cards (30 mil) - Resident barcodes: Code 39, Code 2/5 interlaced - Resident fonts: Arial normal 100, Arial bold
100 - Printer size: Height: 166mm (6.52") - Length: 290mm (11.42") - Width: 187mm (7.36") - Printer weight: 2.5 Kg (5.5
Lbs) - Connections: USB and parallel Centronics ports (cables supplied) – Power supply: 110~230 Volts CA, 60~50 Hertz -
Environment: Min / max operating temperature: 15° / 30° C (59° / 86° F) - Humidity: 20% to 65% non-condensing - Min
/ max storage temperature: -5° / +70° C (23° / 158° F) – Storage humidity: 20% to 70% non-condensing - Operating ven-
tilation: free air.
34Chap. 6
Supplies
Evolis offers a large choice of cards and accessories The following supplies are available from any
Evolis reseller.
Rewritable plastic cards
P/N: C5101 Blank PVC rewritable cards (blue) – 30mil
1 pack of 100 cards
P/N: C5103 Blank PVC rewritable cards (blue) with HICO magnetic strip – 30mil
1 pack of 100 cards
P/N: C6103 Blank PET rewritable cards (black) with HICO magnetic strip – 10mil
1 pack of 100 cards
Cleaning Accessories
P/N: A5011 UltraClean Cleaning Kit (for complete cleaning of the printer)
5 pre-saturated cleaning cards, 5 swabs, 1 box of 40 pre-saturated wipes
P/N : A5002 PrinterClean Cleaning kit (for cleaning of transport rollers)
50 pre-saturated cleaning cards
P/N: A5003 HeadClean Cleaning kit (for cleaning the print head)
25 swabs
P/N: A5004 DustClean Cleaning kit (for cleaning the cleaning roller)
1 box of 40 pre-saturated clothes
Printing accessories
P/N: S2204 Additional Card Feeder with load capacity of 100 cards (0.76 mm - 30 mil)
P/N: A5007 Centronics parallel interface cable
P/N: A5017 USB interface cable
P/N : A5008Power supply
P/N : A5009Power cord, 220V
P/N : A5010Power cord, 110V
P/N : A5019Power cord, UK
35Appendix A
Magnetic encoding
Introduction
Tattoo Rewrite Mag printers are Tattoo Rewrite printers that are fitted with a magnetic stripe card enco-
der. The Tattoo Rewrite Mag operates similarly to the Tattoo Rewrite.
The magnetic encoder encodes ISO 1, 2 and 3 tracks in a single pass and then checks the data.
The Tattoo Mag encoder can be configured in high coercivity (HICO) or in low coercivity (LOCO) mode
via the Windows driver interface. However, encoders of the Tattoo Rewrite Mag are shipped with a
HICO default setting, unless specifically requested when ordering.
Location of the magnetic encoder
The magnetic encoder is a factory-installed module for all Tattoo
Rewrite Mag printers. The write/read head is located under the card-
passing path and after the print head.
max.
max.
Card encoding is always carried out before printing.
Card orientation
Magnetic cards must be installed in the feeder so that the magne-
tic stripe faces downwards:
1. Remove the feeder as shown.
36max.
2. Push down the spring and load up to
100 cards with a thickness of 0,76mm (30mil).
3. Place the feeder back in its slot. Then press the
top of the feeder until it clicks.
Configuring the Windows Driver
The magnetic encoder features must be configured during the Windows driver’s initial setup. The
features can be configured from the Tools dialog of the driver by clicking the Encoding Definition
button.
“Magnetic Encoder” dialog box
The Magnetic Encoder dialog box opens when
clicking on the Encoding Definition button.
Track settings make it possible to set an ISO stan-
dard for each track. Refer to the ISO 7811 table in
this appendix for further information.
Coercivity sets the magnetic encoder in high
(HICO) or low (LOCO) coercivity. A HICO-encoded
magnetic track is more resistant to external distur-
bances than a LOCO-encoded magnetic track.
Direct encoding allows the encoding of one or more magnetic tracks: just select them and enter the
data to be encoded. Click on Execute encoding button to start encoding.
Macro Processing allows cards with magnetic tracks to be encoded from Windows applications (such
as Word for example). A text field set in between the characters”|” and ”|” (or any other user-defined
character ) may be considered as an encoding command by the driver.
37Use cards with magnetic stripes that are compliant to the ISO 7810 and ISO 7811 stan-
dards.
The magnetic stripe must be molded in the card to guarantee proper operation.
Never use cards that come with a glued magnetic stripe
Cleaning the magnetic encoder
The magnetic encoder head must be cleaned on a regular basis to ensure that data are properly enco-
ded on the cards.
The magnetic encoder is cleaned when the printer is cleaned using pre-saturated cards (refer to the
“Maintenance” chapter of this manual for details).
Cleaning cards that are repeatedly passed inside the printer clean the transport rolls, the cleaning roll,
the print head and the print/read head of the magnetic encoder.
If between two cleaning sessions (every 500 cards), the read/write process fails with more than one card,
it is recommended to manually clean the printer (refer to the « Maintenance » chapter of this manual
for the appropriate procedure).
ISO 7811 magnetic encoding standards
1
Bit(s) per inch
2
Except for the “?” character
3
Includes the Start, Stop and LRC character The encoder automatically manages these characters.
Track # Field Track density Types of character Number of characters
separator
Track 1 ^ 210 bpi1 Alphanumeric 793
(ASCII 20- 95)2
Track 2 = 75 bpi1 Numerical 403
(ASCII 48-62) 2
Track 3 = 210 bpi1 Numerical 1073
(ASCII 78-62) 2
38Compliance Statements
With regards to safety and electromagnetic rules
Name of manufacturer: Evolis Card Printer
Address of manufacturer: 29, avenue de la Fontaine
Z.I. Angers Beaucouzé
49070 Beaucouzé, France
Name of Hardware: Tattoo/Tattoo Rewrite
Year of Manufacture: 2006
I, the undersigned, Serge Oliver,
state that the above-mentioned hardware is used and installed in compliance with the notice and essential requirements of
the 73/23/EC and 89/336/EC directives, updated by the 92/31/EC and 93/68/EC directives through the enforcement of the
following standards:
EN 60950-1 of 2001
EN 55022 Classe B oof 1998
EN 55024 of 1998
EN 61000-3-2 of 2000
EN 61000-3-3 of 2000 +A1 of 2001
EUROPE: Norway Only : This product is designed for IT power system with a phase-to-phase voltage of 230V. Earth groun-
ding is via a polarized, 3-wire power cord.
FI: “Laite on liitettävä suojamaadoitus koskettimilla varustettuun pistorasiaan”
SE: “Apparaten skall anslutas till jordat uttag”
NO: “Apparatet må tilkoples jordet stikkontakt”
Full Name: Serge Olivier Signature:
Title: Directeur Technique
Date: June 2006
Interferences with radio frequencies in the USA
Federal Communications Commission Statement
The Tattoo Rewrite complies with the following specification: FCC Part 15, Subpart A, Section 15.107(a)
and Section 15.109(a) Class B digital device.
Supplemental information:
This equipment has been tested to FCC requirements and found compliant with the limits for a Class B
digital device, pursuant to part 15 of the FCC Rules. These limits are designed to provide reasonable protection against
harmful interference in a residential installation. This equipment generates, uses and can radiate radio frequency energy
and, if not installed and used in accordance with the instructions, may cause harmful interference to radio communications.
However, there is no guarantee that interference will not occur in a particular installation. If this equipment does cause
harmful interference to radio or television broadcasting, which can be determined by turning the equipment off and on,
the user is encouraged to try to solve this issue by one or more of the following actions:
- Change the receiving antenna’s orientation or location.
- Move away the equipment from TVs and radios.
- Connect the equipment to a circuit that is different from that of the receiver.
- Consult the dealer or an experienced radio/TV technician for help.
Properly shielded and twisted cables must be used to comply within Class B limits of Part 15 of FCC Rules.
Pursuant to Part 15.21 of the FCC Rules, any changes or modifications to this equipment not expressly approved by Evolis
Card Printer may cause, harmful interference and void the FCC authorization to operate this equipment.
Interference with radio frequencies in Japan (VCCI)
This equipment complies with the Class B category for information technology equipment based on the rules of the
Voluntary Control Council for Interferences by Information Technology Equipment (VCCI). Operation in a residential area
may cause radio interference may be caused. In this case, the user may be required to take appropriate remedial actions.You can also read