The Original Egg-Bot by Evil Mad Scientist Laboratories - EggBot Pro User Guide
←
→
Page content transcription
If your browser does not render page correctly, please read the page content below
The Original Egg-Bot
                 by Evil Mad Scientist Laboratories

               EggBot Pro User Guide

Rev A, August 2014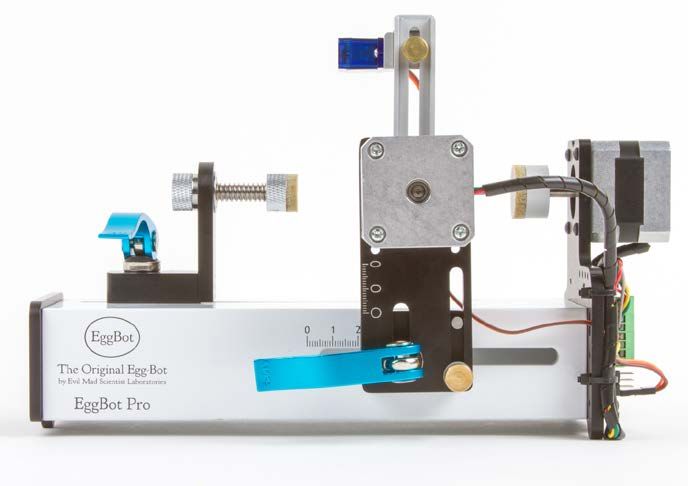
Introduction: The History of the EggBot

An EggBot is a compact, easy to use art robot that uses two precise stepping motors to draw on the
surface of spherical and egg-shaped objects.

Motion control artist Bruce Shapiro (taomc.com) cre-
ated the original EggBot in the Spring of 1990 when he
first became fascinated with controlling stepper motors
from his computer, and needed some way of demonstrat-
ing just how powerful and interesting this capability can be.

The original design was motivated by simplicity: drawing on a
round object can be done with relatively simple mechanics.
And, since Easter was coming up, the obvious canvas was eggs.
The success of his experimental “eggbot” spurred him to build
                                                                         An early EggBot.
bigger and more precise two-axis machines, which gradually
evolved into an educational tool.

                                    In 2009, Bruce worked with his son Ben Trombley and Bri-
                                    an Schmalz to turn the EggBot into a kit for home assembly,
                                    which they showed off at that year’s Maker Faire. Brian, an
                                    embedded-systems engineer, created the EggBotBoard (lat-
                                    er, EiBotBoard) which connects the eggbot to the computer
                                    over USB. Ben was then a recent Stanford computer science
                                    graduate, and created the first version of our EggBot interface
                                    for Inkscape.
         EggBot kit, 2009

In 2010 the EggBot team joined forces with Windell
Oskay and Lenore Edman of Evil Mad Scientist Laboratories
to introduce a new “EggBot 2.0.” This kit featured a number
of design and material changes that made it more reliable and
easier to use.

Gradual refinements over the next couple of years yielded
the Deluxe EggBot kit. And, new accessories were introduced
such as a diamond engraving attachment and a kistka hot wax
dispenser.                                                          EggBot “2.0” kit, 2010

                                     In 2014, the team drew upon the lessons learned over several
                                     years of making EggBot kits to make the finest EggBot ever:
                                     The EggBot Pro. The Pro is built from CNC machined alumi-
                                     num, with quick release adjustments, a ball-bearing tailstock
                                     and a new, open geometry, for easier adjustments and better
                                     visibility while printing.

         EggBot Pro, 2014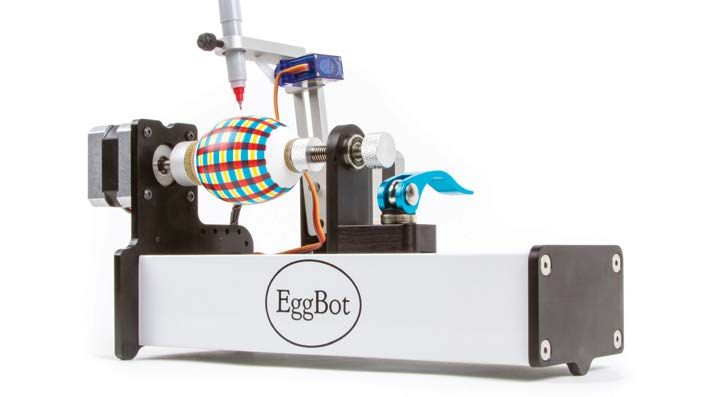
Part 1: Checking out your EggBot
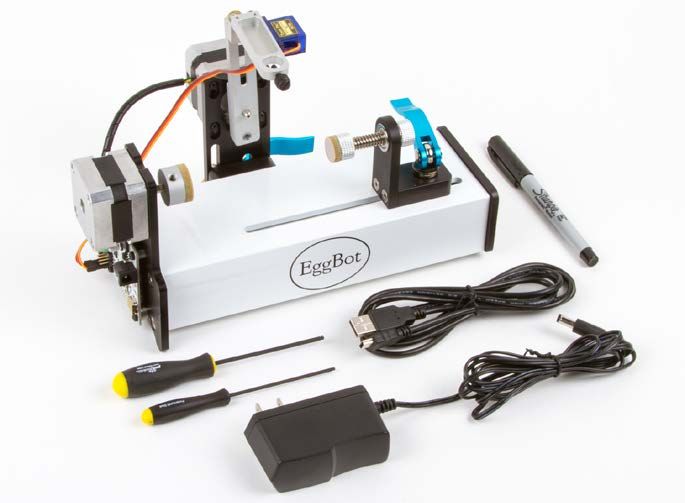
1. EggBot Pro
2. Sharpie marker
3. USB cable
3/32”
5/64”
4. Power supply
5. Hex ball drivers
1.1 EggBot kit contents
Here are the parts that come with the EggBot Pro: 7. Rubber Washer
1. The EggBot Pro itself, fitted with EBB driver board,
8. 5/8” Screw
two stepper motors, and the pen arm. w/ washer
2. One black Sharpie marker, ultra-fine point
3. USB cable
4. Plug-in power supply. (9 V, 1.5 A, universal input)
5. Hex ball drivers, 5/64” & 3/32” 6. 3/8” Screw
6. Button socket cap screw, 8-32 × 3/8”
7. Rubber washer
8. 10-32 × 5/8 cap screw w/ washer
Pen Arm Pen-holding
thumbscrew
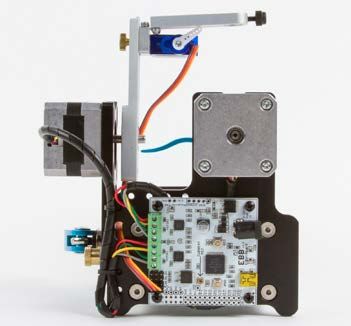
1.2 EggBot Anatomy
Egg motor
(Motor 2)
Let’s also look at what the different parts
of the machine are called. We’ll be refer-
ring to these parts by name later.
Pen motor Power jack
(Motor 1)
USB
port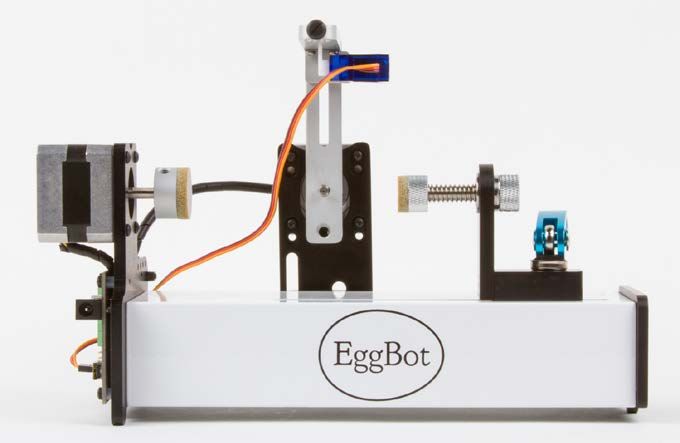
§1.2, EggBot anatomy, continued:

                      Distal pen arm
                                                         Servo (pen lift) motor
                      Pen arm bracket

     Headstock        Proximal pen arm                              Tailstock
                                                     Tail coupler
                                                                        Ball bearings
                     Egg coupler
                                                                                             Draw knob

                                                                                             Tailstock
                                                                                             quick release

                                                          Spring
                             Pen motor
                             support

 EBB driver
   board
                               Central Strut
                                                                                  Tail Cap

EggBot anatomy, front view

                                                                     Pen height
                                                                    thumbscrew

                                    Vertical scale
                                   (for pen motor)

                              Horizontal
                                scale

                            Pen motor
                            quick release

                                                                         Vertical lock
                                                                         thumbscrew

EggBot anatomy, rear view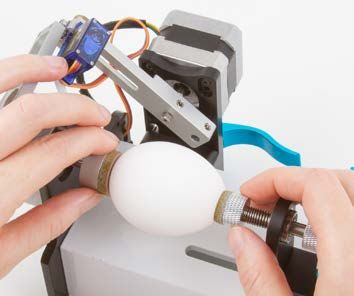
Part 2: Quick Start / Overview
In brief, here are the steps to getting started with the EggBot Pro:

   1) Install the software.
   2) Plug in power & USB, and check the pen up & pen down heights.
   3) Moving the tailstock into place, center the object that you will print upon between the
   egg and tail couplers.
   4) Center the pen motor horizontally on the widest part of the object.
   5) Set the pen motor vertical position: Full up for spheres, halfway down for eggs, etc.
   6) Insert a pen, and check that it rides just above the object’s surface when the pen is up.
   7) Open or create the artwork that you would like to print, and begin plotting from the
   EggBot interface.

   Part 3 of this guide goes through the first items on the list: installing the software and
   setting up the pen heights. Part 4 explains, in detail, how to physically adjust the EggBot
   Pro for different types of objects. Part 5 is about the process of actually plotting, and is
   followed by a section of tips and tricks for using your EggBot.

Part 3: Software Setup
3.1 Installation
You will need to install software on your computer to operate the EggBot.
Please begin at the main documentation page: http://wiki.evilmadscientist.com/ebp

From there, click on “Installing software” and follow the directions specific to your operating
system. These directions are updated regularly as operating systems change.
The software that you will install includes Inkscape, the superb (and free) drawing program, and
a set of extensions that operate the EggBot from within Inkscape. There is also a set of EggBot
example files (including a template) that you may wish to download.

3.2 Inkscape and the extensions
Once installed, the EggBot software may be
found in the Extensions > Eggbot submenu
of Inkscape. All machine control is per-
formed from within the “Eggbot Control”
panel. A number of helper extensions are
also included.

3.3 Setting the “pen up” and “pen down” heights
In this step you will configure the servo motor set-
points.                                                      A

1) Rotate the pen arm to its upright position. Loos-
en the pen height thumbscrew, raise it (and the at-
tached parts) to the top of the slot and tighten it in
place (A).
2) Connect the EggBot to power with its 9V power
supply, and to your computer with the USB cable.
§3.3, Setting the pen heights, continued:

 3) Open Eggbot Control, and click through to the Set-
 up tab (B). There, enter the factory calibration values            B
 for the EggBot Pro, which are good starting points:
           65 for the pen up position, and
           50 for the pen down position.
 4) Select the “Toggle pen up/down” action, and click the
 “Apply” button. If everything works correctly, the pen
 lift motor will alternately move to the up or down posi-
 tions each time that you press Apply.

  C                               D

 5) Use the control panel to fine-tune the positions. The “Up” position should be several degrees
 above horizontal (C), and the “Down” position several below (D). You may find it helpful to insert
 a pen to weight down the arm.
 When printing on an object, the distal pen arm does not normally go below horizontal. Either, it
 should be almost perfectly horizontal (with the pen tip riding on the object’s surface) or lifted up
 just a little, as in (C), when the pen is up during gaps in the drawing.

Part 4: Preparing to print with the EggBot Pro
 4.1 Using the Quick Releases
 There are two quick releases on the EggBot Pro, at the tailstock and pen motor support.

                         A                                B                                       C

Move the handle of a quick release to the vertical position (A)                                   D
to release (loosen) it or to the directly horizontal position (B)
to tighten it. Avoid going past horizontal to “flush” (C), as the
quick release is neither fully loose nor tight there.
Always use two hands when adjusting quick releases:
one for the handle, and one to hold the chassis steady (D).

If a quick release feels too loose or too tight, you can adjust                                   E
its tension. First, open the handle to the vertical (released)
position. Then, on the inside of the chassis (E) turn the blue
nut with respect to the handle, no more than ⅛ of a turn at
a time. Then, close the handle to test the new tension level.
4.2 Inserting an object to print upon: Setting the tailstock position & centering the object

                                                 A                                                 B

When preparing to print upon an object (a literal or figurative
“egg”), the tailstock needs to be in the right position to hold it                                 C
in place.
Loosen the quick release, so that the tailstock can move (A).
Observe the positions indicated by the two arrows: the abrasive
surface of the egg coupler and the back side of the tail coupler.
Using your object (“egg”) for reference, move the tailstock so
that the distance between these two positions is equal to the
length of the object (B). Set aside the object, and lock the tail-
stock in place (C).

                                     D                                                         E

The tailstock should point in a straight line towards the headstock. There is some “play” in the
slot, so sight from the tailstock to the headstock (D) and correct the tailstock angle if neces-
sary.
With the tailstock in position, you can now insert the object. Pull back on draw knob to make
room, and then center the object so that it is gripped between the egg and tail couplers.
For best results, objects to draw upon should be clean, dry, and at room temperature. (See end
notes 1 and 2.) And for eggs, we generally prefer to orient the “wide” end towards the egg
coupler. (See end note 3.)
Rotate the tail and egg couplers to manually spin the object once or twice (E), and see how it
wobbles in place when you do so. At this point you can fine-tune its centering; an “egg” that is
well centered between the couplers will wobble very little as it turns. (If the couplers do not turn
freely, double check that the motors are not powered on.)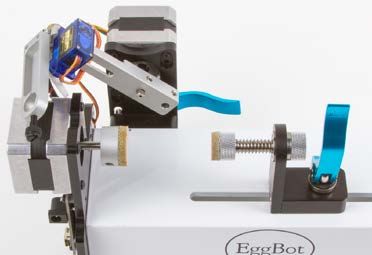
4.3 Centering the Pen Motor
                                            A

                                                                                                B

The pen motor quick release is located on the rear side
of the EggBot. Release it, and slide the pen motor as-
sembly until the shaft of the motor shaft points directly
at the widest part of the “egg” (A). Lock the quick re-
lease in place (B).
For various reasons, it can be helpful to know the hori-
zontal position of the pen motor. To read the horizontal
scale, sight along the left edge of the pen motor support.
                                                               C
The example shown (C) currently reads 3.8.

4.4 Setting the vertical pen motor position

                                            A                                                       B

In order to compensate for the curvature of spheres versus egg-shaped objects, the vertical po-
sition of the pen motor can be adjusted. Its position is indicated by the vertical scale on the pen
motor support. To read the scale, sight along to the top edge of the white central strut.
With spherical objects like golf balls or glass ornaments, the pen motor should be in the topmost
position (A), indicated by the circle on the scale. Lower positions are for ellipsoids of various as-
pect ratios. For chicken eggs, a good starting point is indicated by the middle egg-like oval on the
scale (B). More elongated objects such as turkey eggs may require lower-yet motor positions.
Two elements lock the pen motor support in place: the vertical lock thumbscrew (the brass
screw on the pen motor support) and the pen motor quick release.
To change the vertical position of the pen motor:
 1) Note the pen motor support horizontal position (e.g., the “3.8” value from §4.3 )
 2) Open the pen motor quick release.
 3) Loosen the vertical lock thumbscrew, just enough that the pen motor support can slide.
 4) Move the pen motor support to the desired vertical position.
 5) Tighten the thumbscrew to lock the vertical position.
 6) Move the pen motor back to the noted horizontal position.
 7) Tighten the quick release.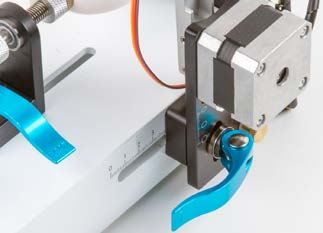
4.5 Inserting a pen, and checking alignment                                                 A
Bring the EggBot into the “Pen up” state, with the other
motors (egg and pen) off. The best way to do this is by
using Eggbot Control, from the “Setup” tab (as in §3.3),
but with the “Raise pen, turn off motors” action selected.
(Another method is from the “Manual” tab, where the
pop-up menu has a “Raise the pen” option.)
Insert a pen into the holder, and lock it in place with the
nylon thumbscrew. Lower the pen until it is just above                                      B
the surface. You can do so with the nylon thumbscrew
that holds the pen, with the brass Pen height thumb-
screw, or with some combination of the two (A,B).
Again, the goal is that when the pen arm lowers, and the
egg is drawing on the egg, that the arm is dead horizontal.
Viewed from the tailstock end, the tip of the pen should
point directly down towards the center line when the pen
is down. If necessary, you can move the pen arm towards
or away from the pen motor by loosening the set screw
                                                                                        C
on the pen motor shaft (C).

The final “preflight” check is to manually
move the pen arm over the entire range of
the printable surface (D).
As you do so, check for several things:
1) Make sure that the pen arm has unimped-
ed movement over the full range.
2) Make sure that the servo cable moves                                                 D
freely over the full range.
3) Make sure that the pen tip has a fairly
consistent height above the surface, over
the entire range of travel, like so (E):

                   E

If it does not, you may need to fine tune the alignment:

Move pen arm closer       Move pen arm closer         Lower pen motor    Raise pen motor
 to tailstock §4.3         to headstock §4.3           vertically §4.4    vertically §4.4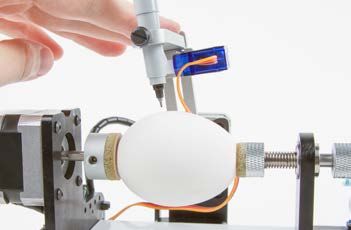
Part 5: Using the EggBot Pro
5.1 Making your first plot

A

                                                              B

To make a plot, you should begin with an object in the
EggBot, a pen in the holder, and the machine in the
“pen up” configuration. (For your very first, you may
want to leave the pen out on the first try, just to watch
and make sure that everything looks good.)
Next, you’ll need some example artwork. From the set
of EggBot example files, open up the “Hello World”
(helloworld.svg) example (A). Or, use a different file or
start from scratch; see the next section.
                                                              C
Raise the pen arm upright, such that the pen points
at the middle of the object. From the Plot (first) tab
of Eggbot Control (B), press “Apply,” and the EggBot
should print the entire drawing (C). It may be helpful
to “bleed” some ink out of the tip onto a piece of pa-
per before you begin plotting. That can prevent a blank
spot when it starts.

5.2 Preparing artwork for the EggBot
Within Inkscape, it is convenient to start with a document that
is 800 pixels tall by 3200 pixels wide. The width corresponds
to one full turn of the egg motor, and 800 pixels tall is the
approximate travel of the pen motor. (See end note 4.) A tem-
plate of this size is available as part of the EggBot example set.
An EggBot is designed to draws paths – continuous lines – not
bitmap images, and not solid filled regions. Certain object types
are automatically treated as paths, for example circles and
rectangles. Other types of objects that are made of lines – like
outlined text – may need to be converted to paths (Path menu
> Object to path) before plotting.
To use multiple colors of pens, use layers within your Inkscape
drawing. If you give each layer a name that starts with a num-
ber, for example, 1-red, or 2-black, then the Layers tab can plot
one layer at a time, so that you may change the pen between
layers. The “Smiley face tutorial” in the online documentation
walks through this process.
There are many methods for creating filled solid areas that will
print well. Use the “Hatch fill” extension (under the Eggbot
Contributed extension menu), or see the extended notes on
creating filled regions in our online documentation.
One other interesting method is to use StippleGen software
to create EggBot-printable stipple drawings from photographs:
http://wiki.evilmadscientist.com/StippleGen
5.3 Hex Driver Storage There are two small holes drilled in the right, rear corner of the (white) central strut, to provide an easy-access storage point for the two hex drivers. 5.4 High-strength fastener option Brass thumbscrews are used to adjust the pen height and to lock the vertical position of the pen motor. Alternatives are provided if you desire more holding strength, or if it is simply easier for you. Use the 8-32 × 3/8” screw, with the origi- nal nylon washer, for the pen height screw. Use the 10-32 × 5/8 cap screw w/ washer in place of the vertical lock screw, leaving the original nylon washer in place. 5.5 Extended-range vertical position If you have a long, skinny object, such that the maximum range of vertical adjustment in §4.4 is not sufficient, there is an extended range available. Remove the four screws that hold the pen motor in place. Slide the motor down ¼” in the big slot, and put the four screws back in, through the lower set of four holes. The same range of vertical adjustment is still available, but is now shifted, so that it does not start at (and cannot get to) spherical, but rather at egg-shaped. When using the ex- tended range, it is usually also necessary to remove the pen arm from the pen motor shaft, and to re-attach it through the secondary hole near the bottom of the proximal pen arm. (If you do not, the pen arm may bump against the central strut.) The secondary hole is normally used only with the extended range. 5.6 If your cables or wires should become disconnected... If your servo motor cable or stepper motor wires should become dis- connected at some point, here is where they go. Egg motor: Motor 2, red, yellow, green, gray (from top to bottom). Pen motor: Motor 1 (same order). Servo cable: B1 (lowest three pins on left hand side), with brown wire towards pen motor. 5.7 Attaching attachments (Kistka & Diamond Engraver) Besides the pen holder, there are two other attachments available for the EggBot Pro: a kistka (hot wax tool) and a diamond engraving tool. To attach either, first remove the two indicated hex screws that hold the distal pen arm. They hold down a steel “hinge washer” that clamps the plastic hinge in place. Use those same three com- ponents (the two screws and hinge washer) to attach the kistka or engraver tool in place. If you have an older kistka or engraver that does not attach this way, please consult Evil Mad Scientist about upgrading it.
End Notes (EggBot Tips and Tricks):
1. When working with eggs, leave them out the night before or warm them up in lukewarm water
    and dry them before drawing. Surface condensation will interfere with most pens.
2. When decorating eggs, we recommend working with whole raw eggs. If they come out poorly,
    you can just crack them and make an omelet. If they come out well, you can blow the eggs
    (see http://wiki.evilmadscientist.com/blow for tips), and still make an omelet. But if you hard
    boil an egg first, there’s no viable way to keep the shell.
3. The “traditional” EggBot coordinate system is such that when you print a drawing, the top of
    the drawing is oriented towards the headstock, and the bottom edge is towards the tailstock.
    Over time, we have generally found it best to reverse that, by checking both “Reverse motion
    of Motor 1 (pen)” and “Reverse motion of Motor 2 (egg)” in the Options tab of Eggbot Con-
    trol. That way, it is more natural to put the “fat” end of an egg (or the base of a glass ornament)
    towards the larger egg coupler, where it performs better.
4. The motors each turn 3200 steps per revolution, and move one physical step for each pixel
    on the screen. Thus 3200 pixels wide gives exactly one full rotation of the egg motor. The
    vertical value of 800 steps corresponds to 90°, or ¼ turn of the pen motor. The actual vertical
    area available to print on depends on the shape and size of both your object and pen. The 800
    step figure is an excellent starting point.
5. Once the EggBot is set up for a given type of object (golf balls, large chicken eggs, 3” glass
    ornaments, etc.), very little setup is required for each individual object. That said, it is helpful
    to manually spin an object in place a couple of times to ensure that it is well centered between
    the couplers.
6. If the motors do not move but (1) everything looks correct, and (2) your computer doesn’t
    report any errors, triple check that the 9 V power supply is plugged into a working outlet.
7. For reasons of geometry, text and graphics may look “stretched” when drawn on an egg, as
    opposed to on a sphere. You may wish to stretch graphics horizontally to compensate. A good
    starting value for chicken eggs is 150% horizontal stretch.
8. To pause a plot while plotting, press the “PRG” button on the EBB driver board, and wait a
    moment for it to finish the current stroke. You can resume your plot using the “Resume” tab
    in EggBot Control. (Pressing “RST” to reboot the EBB will halt immediately, but much less
    gracefully. It does not allow resuming.) Sadly, the “Cancel” button shown while Eggbot Con-
    trol is executing has no effect, due to a known issue within Inkscape.
9. Almost any pen, pencil, crayon, stylus, or other marking tool that fits in the holder can be used
    in the EggBot. See additional notes at: http://wiki.evilmadscientist.com/pens
10. The EggBot Pro can normally fit objects up to 4.5 inches long. But, with a trick, one may be
    able to fit objects up to 6.25 inches long: Loosen up the nut below the tailstock quick release
    by several turns; you can actually reverse the tailstock, so that it faces the other way. You
    can then unscrew the draw knob, and reverse the “spring plunger” assembly so that it faces
    towards the egg motor again. (The quick release cannot be operated when the plunger is
    backwards, so lock the quick release before re-attaching the draw knob.)
11. A rubber washer is included. The abrasive surface of the egg coupler works well for most
    surfaces, but is less good on others, such as smooth glass. If you have trouble gripping a given
    object, try putting the rubber washer between the object and the egg coupler.
12. Clean the EggBot pro only with a soft, clean cloth. The non-electronic metal parts may be
    cleaned with a cloth moistened with soap and water if needed. Avoid other cleaners and sol-
    vents. The tailstock bearings and quick release pins are greased, and may be susceptible to
    corrosion if the grease is removed. Do not wet the motors, cables, or controller board.

        Extensive online documentation & resources for EggBot Pro:
                       wiki.evilmadscientist.com/ebp
                           Blog: www.evilmadscientist.com       Support: forum.evilmadscientist.com
                           Store: shop.evilmadscientist.com     Humans: contact@evilmadscientist.com
You can also read