Updated 21 May 2021, version 1.1 by Megan Murray and Toni Iaseto - University of Otago
←
→
Page content transcription
If your browser does not render page correctly, please read the page content below
Updated 21 May 2021, version 1.1 by Megan Murray and Toni Iaseto

Hiring Manager

     Table of Contents
     Red Section: Process Guide ................................................................................. 1

     Getting Started .................................................................................................. 1

        I have a vacancy to fill. How do I do that? ..................................................... 1

        Is there any process / system specific language I should know? ...................... 1

       How do I log in? .......................................................................................... 3

       I’ve never used the recruiting system before. What should I know about
       navigating the software? ............................................................................. 3

       Is there any initial setup I should do in the online system? ............................. 4

     Requisition Creation .......................................................................................... 5

        What information will I need in order to fill in a requisition? ........................... 5

        Do I have to complete the requisition all at once? .......................................... 5

        How do I complete a requisition online? ....................................................... 6

        What are pre-screening questions and how do I use them? ............................ 8

        Can I duplicate a previous requisition to speed the process? .......................... 8
     Requisition Approval ......................................................................................... 9

        What is the approval process for requisitions? .............................................. 9
     Position Post and Source (Advertising) ................................................................ 10

        Who arranges the advertising? .................................................................. 10
     Candidate Management .................................................................................... 11

        Can the panel members or other contributors view the candidates online? ... 13

        Comments and Documentation (Important notes) ...................................... 14
     Candidate Screening and Interviewing ................................................................ 15

     Offer Management ........................................................................................... 16

        How do I make an offer once I have found my ideal candidate? .................... 16

        What information will I need in order to create an offer? ............................. 16

        How do I enter the details of an offer? ........................................................ 17

        How do I get the offer details approved? .................................................... 17

        What happens after HR takes over the offer process? .................................. 17
     Candidate Hire ................................................................................................. 18
ii
Process Guide

  What happens once the offer has been accepted? ..................................... 18
Blue Section: Reference Guide ............................................................................. 1

1: Recruiting Centre and My Setup....................................................................... 1

  Logging into the Recruiting Area .................................................................. 1

  Navigating the Recruiting Home Page ........................................................ 2

  Selector Buttons ........................................................................................ 5

  TIP: Entry Shortcut ..................................................................................... 7
2: Requisition Creation and Approval ................................................................ 8

  Creating a Requisition ............................................................................... 8

  Attaching a Job Description (or other document) ...................................... 16

  Duplicating a Requisition ......................................................................... 18

  Getting a Requisition Approved ............................................................... 20
4: Prescreening Questions .............................................................................. 22

  Adding Prescreening Questions ............................................................... 22
5: Candidate Management .............................................................................. 24

  Viewing and Filtering Candidate Lists ....................................................... 24

  Viewing Candidate Files ........................................................................... 28

  Adding Comments (from list view) ........................................................... 31

  Adding Comments (from candidate file view)............................................ 32

  Attaching Files (from candidate file view) ................................................. 33
6: Candidate Selection Workflow ..................................................................... 35

  Moving Candidates in the CSW (from list view) .......................................... 35

  Moving Candidates in the CSW (from candidate file view) .......................... 40

  Moving Candidates in the CSW (using shortcut buttons) ............................ 42

  Undo a Step/Status change ...................................................................... 44

  Rejecting a Candidate .............................................................................. 46

7: Offer Management ...................................................................................... 48

  Creating an Offer..................................................................................... 48

  Getting an Offer Approved ....................................................................... 48

  Direct-to-Offer (DTO) Getting an Offer Approved ..................................... 59

          Page 1
Hiring Manager

     Red Section: Process Guide
     Getting Started
     I have a vacancy to fill. How do I do that?
     The recruiting process at the University can be broken down into eight distinct
     stages. As you can see, the process has support from Human Resources throughout.

     From creating the initial requisition to viewing and managing candidates online and
     even submitting the details of the offer - the process is designed to be streamlined
     and user friendly.

     Please remember that, in addition to this printed material, there are also a host of
     resources available online within the Human Resources Tool Kit:
     https://www.otago.ac.nz/humanresources/toolkit/

     Is there any process / system specific language I should know?
     Any system or process will come complete with new language to describe it and the
     recruiting process is no exception. Below is some of the language you may see or
     hear throughout the recruiting process.

Page 2
Process Guide

Term                     Definition
Candidate Selection      The method of moving candidates through the stages of
Workflow (CSW)           the recruitment process e.g. to be reviewed, short listed,
                         interviewed, rejected, offered.

Collaborator             Any staff member who requires access to the vacancy
                         and candidates. For example, selection panel members
                         and approvers.

Direct to Offer          Where an offer is to be made to a specific individual,
                         without advertising through our recruitment system.

eShare                   A tool enabling approvers to quickly review information,
                         any relevant documentation and approve online.

Hiring Manager           The decision maker for the vacancy, normally the Chair
                         of the selection panel.

Hiring Manager’s         A staff member who is providing administrative support
Assistant                to the Hiring Manager.

Job Family               The type of position available, for example Academic-
                         Research-Postdoctoral Fellow.

Job Submission           The candidate’s online application.

Offer Grid               The form within the recruitment system which includes
                         all information about the offer.

Pre-Screening Question   Selection questions, which candidates complete during
                         their application. They are specific to the vacancy
                         requirements and assist in short listing.

Recruiter                The member of the Human Resources team who is
                         providing support to the vacancy.

Requisition              The form within the recruitment system which includes
                         all information about the vacancy.

Requisition Owner        The staff responsible for managing and administering
                         the recruitment process (Recruiter, Hiring Manager,
                         Recruiter’s Assistant and Hiring Manager’s Assistant).

         Page 3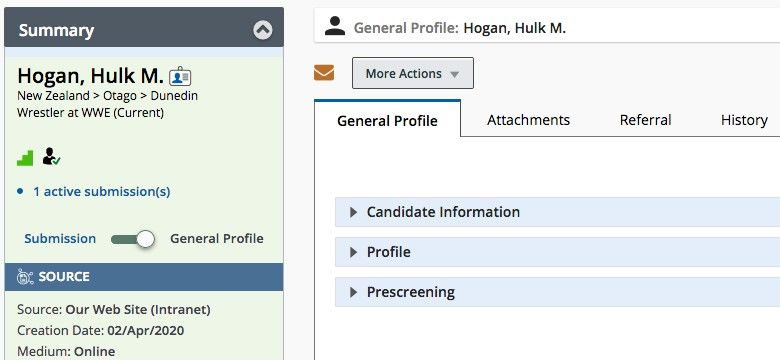
Hiring Manager
How do I log in?
The recruiting system uses your University username and password. That is the
same username and password you use to sign on to your computer or to access
your email.
If in doubt, it should look similar to this: bonja07p
For more information on the university username:
https://www.otago.ac.nz/its/services/help/otago022891.html
Reference: Blue pg 1
I’ve never used the recruiting system before. What should I
know about navigating the software?
The recruiting system is very powerful and also extremely user friendly. If you have
spent time on the internet, the intuitive layout will quickly become second nature for
you. That said there are some things you should remember.
1. Avoid your browser buttons
Back. Forward. Refresh. It can be very difficult to overcome this habit. The software
runs inside your web browser so using the Back button may almost be a reflex.
Unfortunately, you can sometimes accidentally lose data if you use the browsers
navigation buttons - and that will mean re-entry. There is always a way to navigate
within the application, so take some time to get familiar with the navigation tools.
2. Single click
Items within the online recruiting application will only ever need a single click.
3. List individual views tabbed information
Whether looking at candidates or requisitions, you will always first access a list view
and then have the option to view individuals as required. Within individual records,
information will be tabbed to give you access to just the information you need.
4. Left and right panels
The right-hand panel contains help and support information that you can access at
any time. The left-hand panel will hold either additional summary information or
filters to help you find what you are looking for.
5. Candidate Files
By default, when you view candidate details you will see the candidates submission
for your vacancy. Be aware you can also view the candidate’s general profile.
Page 4
Process Guide

6. Done vs Save

There are two options when in edit mode - Save or Done. We recommend using
Done as this will save your progress and take you out of edit mode which will
prevent unintended changes.

Reference: Blue pg 28

Is there any initial setup I should do in the online system?
Taking some time to complete the following details will save you time in the long run.

 •   Confirm that the default recruiter is: Recruitment Team

NOTE: You should always add your Head of Department, Divisional Head and any
other approvers as collaborators on each requisition.

Your Division may also normally add the relevant Client Services Administrator and
Cost Centre Administrator as collaborators to most requisitions. You can confirm
how your Division is approaching this by referring to the appropriate business rules
(Talk to a Client Services Administrator or contact the Recruitment Team for more
information).

If any of these positions are already owners of the requisition you don’t need to add
them as collaborators as well.

If you forget to add these staff when creating the requisition, the Recruitment Team
may add them at any time.

Owners vs. Collaborators

Basically this is the difference between someone who can make changes within a
requisition and someone who can only view the details of a requisition.

Within the online recruiting system there are four positions marked as owners:

 •   Hiring Manager
 •   Hiring Manager’s Assistant
 •   Recruiter
 •   Recruiter’s Assistant

Users added to the collaborator’s section will be able to view the requisition and add
comments, but will not have editing rights. These normally include:

 •   Panel Members
 •   Approvers

        Page 5
Hiring Manager

     Requisition Creation
     What information will I need in order to fill in a requisition?
     You can make the requisition creation process a little faster if you gather together
     some of the key information before you login to the online application.

     I know:

         •   Who the hiring manager and assistant hiring manager (owners) are (i.e. who
             will manage and administer the recruitment process)
         •   Who the collaborators are (i.e. panel members, approvers or anyone else who
             will need to see the vacancy/candidate information)
         •   The position title (for advertising)
         •   If it is a new or replacement position
         •   If it is a professional or academic position
         •   If it is full time, part time or variable
         •   If it is permanent or fixed term
         •   If fixed term, why
         •   The salary level and range
         •   If it has been evaluated (where applicable)
         •   If there are any pertinent allowances
         •   The cost code for advertising
         •   Draft advertisement text
         •   A list of preferred advertising channels
         •   Preferred advertising start date and duration of advertisement
         •   Any required credential checks
         •   An up-to-date job description or information statement

     Do I have to complete the requisition all at once?
     No. There are only a handful of fields that you must fill in to be able to save your
     requisition as a draft. Once saved you can access and edit your requisition as often
     as needed. Once you have completed all fields required for approval and saved the
     requisition you will then unlock the approval option.

Page 6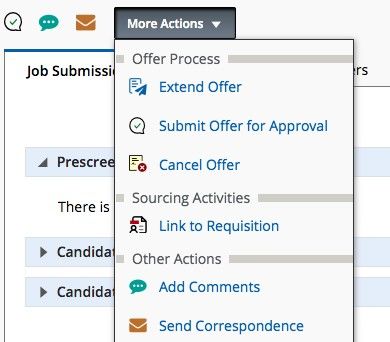
Process Guide

How do I complete a requisition online?
Login to the online recruiting application and click “Requisitions” from the main task
bar at the top of the window. From this screen, you will see a “Create Requisition”
button in the top right corner.

From there you will be guided though a short wizard to help you identify the
University structure information (e.g. department, location and job family). Next you
will be asked to complete the remainder of the requisition details based on your
specific vacancy.

Reference: Blue pg 8

Salary Levels Selection

When you are completing the requisition choose the appropriate salary level and
range from the selection list. This selection will be directly reflected in the advert
on the University website.

The salary level and range for different types of positions are determined by the
relevant employment agreement. The current pay scales are available on the pay
scales webpage. (https://www.otago.ac.nz/humanresources/working-at-
otago/salaries-and-payments/pay-scales/index.html) The salary levels and ranges
within the recruitment system will be updated following any changes to the collective
employment agreements.

Evaluation

The majority of professional staff positions are evaluated to determine the
appropriate salary level. Information on requesting a job evaluation can be found
on the job evaluation webpage.
(https://www.otago.ac.nz/humanresources/toolkit/job-evaluation/index.html)

Cases where the salary is not stated

For some senior vacancies, including management roles, where we do not wish to
display the salary information, select “The University is offering a remuneration level
commensurate with the responsibilities of the position.”

If you would like further guidance, please contact the Recruitment Team on ext. 8275
or yourcareer@otago.ac.nz

Funding and Budget Information

This field is available for you to communicate with your approvers and HR about any
financial information related to this role. This may include:

 •    how salary will be covered (and salary account code, if known)
 •    salary level and range for management band positions, and any other vacancy
      where a salary level and range has not been selected
 •    any other allowances or benefits approvers should be aware of
        Page 7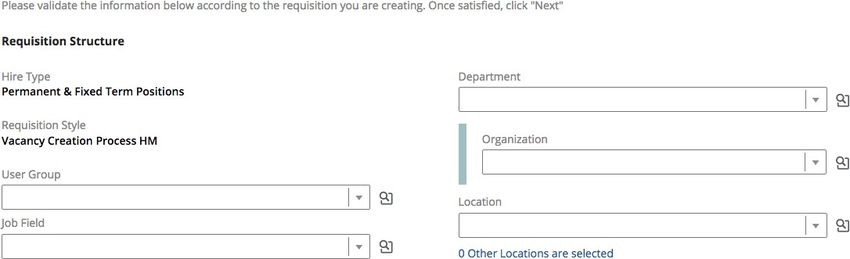
Hiring Manager

         •   any recruitment, relocation/set up costs your approvers should be aware of
         •   whether the vacancy would be filled on a research funded permanent basis
         •   the FTE/hours for part time positions

     Please note you will also have the option of attaching relevant documents if more
     detailed information would be useful.

     Once all the information required for approval has been added and saved, you will
     send the requisition for approval.

     Finally, after approval, the Recruitment Team will review the details, make any
     necessary additions or corrections and initiate the advertising process.

     Credential Checking

     There is a section of the requisition where you can indicate your desire to have a
     credential check performed. While that decision is often based on the scenarios
     highlighted below, we understand there may be unique circumstances surrounding
     your position. This selection box is your opportunity to bring that to our attention.

     Credential checks can include any number of Qualification, Criminal History,
     Professional Membership and Credit History checks. Letters of offer can be held until
     the credential check result is known, or can be made ‘subject to’ the credential check.

     As mentioned above, your client-group HR Administrator will automatically review
     the requisition, offer grid and appointment information to ascertain if a credential
     check might be required. Some of the common scenarios are as follows:

         •   Academic appointments to Lecturer / Senior Lecturer / Associate Professor /
             Professor will have their highest claimed qualification checked.
         •   Professional staff appointments to roles with an essential qualification
             requirement will have the claimed qualification checked.
         •   Senior management roles and other roles of significant trust (including those
             listed above) may have any number of credentials checked, subject to strong
             justification and formal agreement with HR.

     Time frames are largely dependent on the organisation and country that needs to be
     contacted. Your HR Administrator will undertake this and keep you informed of
     progress.

     Credential check results are strictly confidential.

Page 8
Process Guide
What are pre-screening questions and how do I use them?
Do you ever have too many candidates and not enough time? Do you receive many
applications from candidates who do not meet the basic selection criteria? You may
find it useful to include pre-screening questions as part of the application process for
your vacancy.
In effect pre-screening questions are a series of questions that candidates must
answer when applying for your vacancy. The answers they provide can help you
sort, long-list and shortlist your candidates efficiently and objectively. For example,
you can view candidates who best match your requirements at the top of the
candidate list. You will still have access to all candidates if you wish, this is merely
meant as a time-saving tool.
Reference: Pre-screening questions fact sheet
Reference: Blue pg 22
Can I duplicate a previous requisition to speed the process?
Yes. If you have had a similar vacancy in the past, you can follow a simple procedure
to duplicate that previous requisition and then edit only the necessary information.
This can save a lot of time if you advertise similar vacancies often.
Reference: Blue pg 18
Page 9Hiring Manager
Requisition Approval
What is the approval process for requisitions?
Once you have added all the required information to the requisition, you can access
the ‘request approval’ function. You may need to add, edit or reorder the approvers
based on the specific requirements of your requisition.
An approver will recieve an email with a link to all key information for their
consideration.
Approval options are: APPROVE; PASS; DECLINE.
Approvers in an approval chain can add notes as they go, so the next approver can
receive information with the previous approvers' comments attached. If any changes
need to be made, an approver would decline and be able to add a note for the Hiring
Manager to action the change.
1. Approvals for all Requisitions
Work within your area to ascertain who within the management chain is required for
your approvals (e.g. Supervisor / HoD, etc.).
In addition to those approvals, all requisitions require the approval of the Divisional
head, unless the Divisional head has formally delegated that decision elsewhere.
Health Sciences for example have some aspects delegated to Deans.
All other areas of the University require the Divisional head (this could be a Service
Div Director, COO, PVC, DVC, or VC).
Without this top-level approval HR cannot take any action on your request.
2. Extra Approval Sometimes Required
The above online approvals are always required before a requisition reaches HR. In
certain situations HR may require further approval but we will manage that process.
You do not need to take additional action in these situations but be aware that this is
part of the process and may add slightly to the processing time:
• Chair and Professorial positions also require Vice Chancellor approval
• Direct to Offer permanent positions also require:
o HR Director for: professional staff, and academic staff (excluding Lecturer,
Senior Lecturer, Associate Professors & Professors)
o Vice Chancellor or Staffing Advisory Committee for: Lecturer, Senior
Lecturer, Associate Professors & Professors
o Direct to Offer fixed term >12 months require Senior Manager HR Services.
Page 10Process Guide
Position Post and Source (Advertising)
Who arranges the advertising?
Once the approval process is complete the Recruitment Team will work with you to
get your advertisement out to the world. As a rule, advertised positions are
always posted on the University Careers website and within the Staff Bulletin, but
there are a host of other options available depending on the level of the
expected difficulty filling the position. To find out more about the national and
international options available contact a member of the Recruitment Team.
If you would like advice or have any queries please contact the Recruitment Team on
ext. 8275 or hr.advertising@otago.ac.nz.
Once the Recruitment Team has this information
We will place the advertisement on your behalf. This involves:
• Obtaining media options (upon request) for hiring managers.
• Formatting and proofreading the advertisement and the job description or
information statement.
• Providing quotations (upon request) for hiring managers.
• Obtaining authorisation of the final cost quotes and proof.
• Our recruitment advertising agency places the advert in the chosen
publications and websites.
• Placing the advert on the University’s career website. These adverts include
links to departmental websites and other relevant information on living and
working in Wellington, Christchurch or Dunedin.
• Notifying candidates who have expressed an interest in this type of role
• Sending you a confirmation email, with a link to our website, and confirmation
of where your advert has been placed.
• Charging your nominated cost centre for 3rd party advertising costs. The
recruitment team processes invoices in Finance One on a monthly basis.
Page 11Hiring Manager
Candidate Management
Sorting and filtering
There are several features in the system to help you manage large numbers of
candidates easily. There are different ways of sorting candidates - for example you
can have all internal candidates appear at the top of a list. You can also limit the size
of the list you are viewing using filters - for example if you have rejected a number of
candidates because they did not meet the essential requirements, you can use a
filter to remove them from your view.
Reference: Blue pg 24
Late Applications
An application can be accepted after the closing date for the position at the selection
panels discretion, however the candidate must still go through the same process and
apply online.
Please contact the Recruitment Team for a late application link to be sent to
the candidate.
Candidate Selection Workflow
There are also a series of steps that you will walk all candidates through as they
progress through the hiring process. This makes both a valuable record of each
candidate’s journey and allows you to easily see where each candidate is in the
process and what action you might need to take next.
Reference: Blue pg 35
Page 12Process Guide
1. General Candidate Selection Workflow (CSW)
There are seven steps in the general staff workflow.
Pre-
Skills Reference
Short Listing Interview employment Offer Hire
Assessment Checks
(Mandatory) (Optional) Checks (Mandatory) (Mandatory)
(Optional) (Mandatory)
(Optional)
Within each of these steps there are a number of statuses available that will help you
keep track of exactly where each candidate is in the process. For example, you can
mark a candidate in the Interview step with a status of ‘To be scheduled’. Then once
you have made the proper arrangements, you can change that status to ‘Scheduled’.
Though the labels are a little different at each Step, there are three basic types of
status you will see:
• In progress (review or schedule)
• Step completed
• Process ending (rejected or withdrew)
You must always mark a Step as complete before you can move to the next step.
Finally remember that some actions are dependent on the candidate being in a Step
/ Status before you can gain access to the feature. For example, you cannot create
an offer until you have one candidate in the Offer step.
Page 13Hiring Manager
2. Academic Candidate Selection Workflow (CSW)
There are some slight differences in the academic staff workflow, but still seven
steps.
Pre-
Initial Interview Reference
Shortlisting employment Offer Hire
Review Programme Checks
(Optional) Checks (Mandatory) (Mandatory)
(Mandatory) (Mandatory) (Mandatory)
(Optional)
See the explanation above (General Candidate Selection Workflow) for more
information on step/status.
Can the panel members or other contributors view the
candidates online?
Yes. Anyone you have set up as a collaborator for that requisition will have full
viewing rights online - including attachments. They will be able to add comments but
will not be able to make any changes to the requisition.
Page 14Process Guide
Comments and Documentation (Important notes)
Please be aware that applicants may raise dissatisfaction with the recruitment
process, either directly with the University or with the Human Rights
Commission (depending on the gravity of their concerns). Keeping good
comments means having appropriate records available if the applicant
challenges any part of the recruitment process. This will enhance the integrity
and credibility of the process.
Therefore, we strongly recommended you keep written records of both the
process and decisions. Be aware that any information held in the recruitment
system is transparent and discoverable. In other words, we may be required to
share all comments and records publicly in the event of a challenge to the
recruitment process.
In addition to information held in the recruitment system, any other records of
recruitment decisions, including shortlisting and interview notes, should be
stored securely for 12 months then confidentially destroyed.
Page 15Hiring Manager
Candidate Screening and Interviewing
Skills Testing
We have a wide variety of Skills testing options available which can be useful with
some vacancies to support and help lend objectivity to the candidate
evaluation process. Please contact the Recruitment Team to discuss this in
further detail.
Interview questions
The Recruitment Team can help with preparing interview questions as
required, please contact the Recruitment Team on ext. 8275 or
yourcareer@otago.ac.nz.
Page 16Process Guide
Offer Management
How do I make an offer once I have found my ideal candidate?
Once you have advanced the preferred candidate through to Offer/Offer to be Made
step/status of the applicable Candidate Selection Workflow, you will gain access to
the Create Offer function.
The entry form that follows is called the Offer Grid and is found in the Offer tab on
the candidate record. See below for the type of information required to complete
the offer grid.
What information will I need in order to create an offer?
You can make the offer creation process a little faster if you gather some of the key
information before you begin.
I know:
• The position title as it should appear on the Letter of offer
• The primary location
• If it is a confirmation path position
• Who the position reports to
• If the preferred candidate is new to the University or an existing staff member
• If an existing staff member, department/position information for the job they
are leaving
• Start date
• If fixed term, the end date
• Position type (full-time, part-time, etc.)
• Hours per week (or FTE for academic)
• Schedule details if not standard (e.g. 8:30 - 2 Monday to Thursday)
• Student status (are they enrolled)
• Employment agreement
• Salary information
• Information on which account(s) the salary will be paid from
• Information on any applicable allowances (relocation, establishment grant,
recruitment and retention etc.)
Page 17Hiring Manager
How do I enter the details of an offer?
Fill in the Offer Grid with information pertinent to your position. As with the
requisition, there is no need to finish the Offer Grid in one sitting. It will be
considered Draft until it has been approved.
Reference: Offer Grid Fact Sheet
Reference: Blue pg 48
How do I get the offer details approved?
Once you have captured all the relevant offer details, you must send the offer for
approval within the recruiting system.
Reference: Blue pg 48
Work within your area to ascertain who within the management chain is required for
your approvals (e.g. supervisor / HoD, etc.).
In addition to those approvals, all offers require the approval of the Divisional head
(this could be a Service Division Director, COO, PVC, DVC, or VC). In some areas
approval for certain roles has been delegated so checking the correct approval chain
for the area you cover is advisable.
Note*: Without this top level approval HR cannot take any action on your request.
Note**: Approval levels/delegations can change.
What happens after HR takes over the offer process?
Once approved, your client-group HR Administrator will review the Offer Grid and
appointment information, and will contact you if there are any questions. If a
VCA/Police check is required your HR Administrator will undertake this and keep you
informed of progress.
Your HR Administrator will then prepare and issue the letter of offer, providing you
with a copy.
Page 18Process Guide
Candidate Hire
What happens once the offer has been accepted?
Once the formal acceptance is received, you will be advised.
The Payroll team will then ensure the appointee is set up for salary payments and
web kiosk access.
Finally, if required, the Relocation Coordinator will make any relocation
arrangements and keep you informed of progress.
Informing Unsuccessful Candidates
Interviewed Candidates
We recommend that all interviewed candidates are verbally advised of the outcome
by someone from the panel. This gives the candidate a chance to ask for feedback
and is important part of University of Otago candidate experience.
Once the candidates have been verbally advised of the outcome, you need to let the
Recruitment Team know on your.career@otago.ac.nz and the system will be
updated appropriately. Please note - verbally rejected candidates will not receive
additional rejection correspondence from the University.
Candidates who are not shortlisted
Email the Recruitment Team on your.career@otago.ac.nz once you have moved
these candidates to the rejected step in the recruitment system and you are ready
for formal rejection correspondence to be sent. Please note – this correspondence
can be sent at any stage after the advertising has closed.
Page 19Hiring Manager
Online Recruiting
Advertised Vacancies
Hiring Manager Reference Guide
Page 20Reference Guide: Copied fro
Blue Section: Reference Guide
1: Recruiting Centre and My Setup
Logging into the Recruiting Area
Accessing the Recruiting Area is simple. You need to provide a
username and password at the Sign in page.
Step Action
To sign into online recruiting system, enter the following URL into your
1 Internet Explorer address bar:
http://tas-otago.taleo.net/enterprise/fluid?lang=en
NOTE: this link is to the live recruiting system. If you would like to
login to the training system to practice, contact one of the Recruitment
Team for assistance.
Enter your Username. Your University username is the same
2 username you use to sign on to your computer.
Enter your Password (your University password - the same password
3 you use to sign on to your computer).
Click the Login button.
4
End of Example. Cross Reference: Red pg 3
5
Page 1Hiring Manager
Navigating the Recruiting Home Page
In order to familiarize you with navigating through the system, this section
introduces the main areas of the Recruiting Home page.
Recruiting Home Page
Step Action
Always use the navigation options within the recruitment system.
1
NOTE: Using the browser buttons (back, forward, refresh, etc.) can
cause issues that may lead to you re-entering information.
Return to the Recruiting Home page at any time by clicking on the
2 Recruiting option in the Top Navigation Menu.
Page 2Reference Guide: Copied fro
The Home option currently has no function assigned. It will loop you
3 back to the Recruiting System Home Page.
Please use the Recruiting button or Requisition button instead.
The majority of tasks in the online recruiting system will be started
4 from the Top Navigation Menu.
‘Tasks’ Launches the list view of your tasks to complete. An example of
a ‘task’ could be: ‘complete requisition’
‘Requisitions’ launches the list view of all your vacancies. This view
gives a quick look at the number of applicants for each requisition as
well as detail on the current status of the requisition. Click on the title
of any of the listed requisitions to launch the individual view of that
vacancy.
From the Requisitions screen, you can also create a new requisition by
clicking ‘Create Requisition’ in the top right corner.
This launches the vacancy requisition wizard where you can enter the
details of your vacancy. This is the starting point if you have a new
vacancy to fill.
‘Submissions’ launches the list view of all your candidates grouped by
requisition. This view gives a quick look at some applicant details such
as available attachments, internal candidates, and details on where a
candidate is in the overall process. Click on a candidate’s name to
launch the individual view of that candidate.
‘Offers’ Launches the list view for offers.
‘Candidate Pools’ Launches the view of your personal candidate pools
and candidate pools that have been shared with you.
Page 3Hiring Manager
The Log Out option is found in the top right of the application window.
5 It is best practice to always log out before closing your browser
window.
Page 4Reference Guide: Copied fro
Selector Buttons
Throughout the software many fields have a Selector button that will launch a
lookup tool to help you identify appropriate responses. The following example
demonstrates using the Selector button with the Location field but this technique
can be used on any field with a Selector button.
Step Action
Locate the Location field and click the Selector button to the right.
1
Identify the correct choice from the provided list and click the
2 corresponding Select button.
NOTE: The filters on the left can be very helpful with longer lists.
Page 5Hiring Manager
Step Action
With longer lists, you can add details to any of the Filters and click the
3 Apply Filters button below the fields.
With this filter in place only locations on
the South Island will display.
NOTE: To clear a Filter, click the small x
in the right of the entry field. If you
would like to clear all filters there click
the Clear All button.
End of Example. Cross Reference: Red pg 3
4
Page 6Reference Guide: Copied fro
TIP: Entry Shortcut
The Selector button can be very helpful, but there is a faster way. The following
example uses Location but this technique can be used in any field with a Selector
button.
Step Action
Click inside Location field to add text.
1
Type at least two letters of the Location (i.e. Du for Dunedin). You
2 should see the location appear.
Press Enter to accept the choice, or use the mouse to select the
3 appropriate entry if there is more than one result.
End of Example.
4
Page 7Hiring Manager
2: Requisition Creation and Approval
Creating a Requisition
This example walks you through creating a requisition. The Entry
Shortcut outlined in the Navigation section can be substituted for any
Step which uses the Selector button.
Step Action
From the Recruiting Home page click on the Create a Requisition button.
1
Choose to Use a Template or Start from the beginning.
2
NOTE: This example will start from the beginning with a blank requisition
form.
Click the Next button.
3
The Create a Requisition Wizard will launch. Keep the default. We are
4 currently only using the Permanent & Fixed Term option.
Page 8Reference Guide: Copied fro
Step Action
Click the Next button.
5
You will be asked to enter some information about the role and the location in
6 the Requisition Structure window.
Locate your User Group and click the corresponding Select button.
7
Locate your Job Field and click the corresponding Select button.
8
The Job Field is used for reporting purposes and helps to identify your role to
interested candidates via a Job Seeker Alert email notification.
HINT: Be sure to select only those entries with all three levels defined. See
the Job Family fact sheet for more information.
Locate your Department and click the corresponding Select button.
9
NOTE: Selecting your Department may autofill information for Organization
and Location.
Page 9Hiring Manager
Step Action
Locate your Organization and click the corresponding Select button.
10
Locate your Location and click the corresponding Select button.
11
Click the Next button.
12
Next, review and complete the remaining details for the requisition.
You should now see the full requisition form which is broken up in to 5
13 sections: Structure Information, Vacancy Management Information,
Remuneration and Budget Information, Sourcing/Advertising Information, and
Credentials.
Review the list of fields required for completion, in the Left-hand panel.
14
There are different levels of information required for an initial draft save, to
request approval and for posting. You do not have to fill in all details at once.
Collapse the right-hand panel by clicking on the arrow.
15
NOTE: You can open it again at any time by clicking on the arrow again.
Page 10Reference Guide: Copied fro
Step Action
Different levels of information are required in order to Save, Request
16 Approval, or Advertise (Post) the requisition.
Complete the remaining details for your Requisition, ensuring that all the
mandatory fields (indicated by * ) are filled in.
Locate and click the Show Fields Required To button to change.
Review the Structure Information. If there are any corrections, click the
17 Modify Structure button at the top of that section and make the needed
adjustments.
Locate the Department field.
18
Confirm it is correct based on your division. If not, contact the Recruitment
Team for assistance.
Locate the Recruiter and Hiring Manager fields.
19
(Optional) Locate the Hiring Manager Assistant and Recruiter Assistant field.
20
Add the name of anyone who will assist you with the vacancy, to whom you
would like to give full rights (e.g. they can make changes).
Page 11Hiring Manager
Step Action
Locate the Collaborators section.
21
Modify the Number of Openings if needed.
22
Locate the Position Title field.
23
Add the position title as it will appear on the Internet Career portals and in
advertisements.
Locate the Your Quick Reference field.
24
Add a name that will have significance for you (e.g. Sam’s replacement)
Identify if the position is New or Replacement.
25
Locate the Nature of Employment section and make the appropriate choices
26 for your position.
Page 12Reference Guide: Copied fro
Step Action
Locate the Salary Level and Range field and choose the appropriate option.
27
Locate the Job Evaluation section and choose the appropriate option.
28
Locate the Cost Code section and enter the appropriate cost code.
29
Complete the remainder of the Remuneration and Budget section as per the
30 details of your position.
In the Sourcing/Advertising Section indicate how you want to fill the
31 vacancy.
NOTE: This is a required field so you must change the selection from ‘Not
Specified’ in order to save.
Page 13Hiring Manager
Step Action
Locate the Preferred Date for the Commencement of Advertising field.
32
Use the date selector to pick your preferred date.
Locate the Draft Advertisement Text (External) field. Enter text as required.
33
If Pasting content from Microsoft Word, use the Paste from Word button to
retain your formatting.
Locate the Text for Advertisement (Internal) field. If the internal advertising
34 text is going to be the same as the external text you can use the Copy From
button to copy the text from the External field.
Complete the remainder of the Sourcing/Advertising section as per the
35 details of your position.
Indicate your preference in the Credentials area.
36
NOTE: There are rules surrounding the use of credential checks. You can
request the use of credential checks in this form, but they will only be done if
approved.
Indicate your preferences in the Prescreening area.
37
Page 14Reference Guide: Copied fro
Step Action
Once all the relevant fields have been completed click on the Done button in
38 the top right-hand corner.
After clicking Done ‘Requisitions Successfully saved’ should appear.
39
Review the Summary on the left panel. Notice the Status for this requisition
40 is Draft (until approved).
If you need to attach anything such as: advertisement, additional approval
41 forms, IFC do this in the attachments tab.
Return to the Recruiting Home Page by clicking on the Recruiting option on
42 the Top Navigation Menu.
End of Example. Cross Reference: Red pg 5, 6
43
Page 15Hiring Manager
Attaching a Job Description (or other document)
This example assumes that you are already viewing the individual requisition that
you would like to attach a document to. If not, from the Requisition Home Page
choose View Requisitions then click the Title of the appropriate Requisition.
Step Action
Click on the Attachments tab and click Upload Attachment.
1
Locate and click on the Browse button.
2
Locate and select the file on your computer. Then click the Open
3 button.
Page 16Reference Guide: Copied fro
Step Action
Click the Upload button to upload the file.
4
You should see the file appear in the attachments list.
If you need to delete a document from the attachments list it is
5 possible.
Move your mouse over the document you would like to remove. You
will see a red trash can to the right of the document name. Click the
red trash can to remove it from your list.
End of Example.
6
Page 17Hiring Manager
Duplicating a Requisition
The Duplicate button is located on the Action Bar when viewing an individual
Requisition File. The example assumes you are in an individual Requisition File.
Step Action
Locate the Requisition you would like to duplicate
1
Click on the title of the requisition you would like to duplicate to open
2 it.
Click the Duplicate button to duplicate this requisition.
3
Page 18Reference Guide: Copied fro
Step Action
You now have a copy of the requisition.
4
You will automatically be taken to the Requisition detail page. The
details will be identical to the original Requisition. You can verify it is a
duplicate by confirming the page title is Create New Requisition –
Duplicate an existing requisition, and there is no Requisition number
yet generated.
Review the requisitions details and make amendments as necessary.
5
When the requisition has been fully reviewed, click the Done button.
6
End of Example. Cross Reference: Red pg 8
7
Page 19Hiring Manager
Getting a Requisition Approved
When you are ready to change your requisition status from Draft to Open, you must
get approval first. This example assumes that you are already viewing the individual
requisition that you would like to have approved. If not, from the Requisition Home
Page choose View Requisitions then click the Title of the Requisition in question.
Step Action
Locate the More Actions menu in the action bar and click to reveal the
1 drop-down menu.
Click Submit for Approval.
2
In the dialogue box that appears, confirm that the correct approvers
3 are listed and that they are in the correct order (1= first approver).
Page 20Reference Guide: Copied fro
Step Action
If you need to add another approver, locate the Add Approvers button
4 and add as necessary.
Enter relevant Comments.
5
Click the Submit for Approval button.
6
Review the Summary on the left panel. Notice the Status for this
7 requisition is now Pending/To Be Approved.
When the approval is complete the Status will update to
8 Open/Approved.
End of Example. Cross Reference: Red pg 9
9
Page 21Hiring Manager
4: Prescreening Questions
Adding Prescreening Questions
The Prescreening section is found at the bottom of the
Requisition. You will need to be in Edit mode to add questions to your
requisition. This exercise will walk you through adding questions to
include in your Prescreening questionnaire.
Step Action
Open the requisition you would like to add Prescreening questions to
1 and make sure you are in edit mode on the requisition tab.
Scroll to the Credentials section.
2
Locate the Prescreening toolbar and click the Add option.
3
Within the question library, locate and select appropriate questions.
4
We usually recommend between 5 and 10 questions depending on the
position - see the Prescreening Question fact sheet for more detail.
Click the Add Questions button.
5
Adjust the order of the questions as necessary. To do so, adjust the
6 number at the left of each question.
Click the button to make the adjustment.
Page 22Reference Guide: Copied fro
Step Action
Set each response as Required, Asset or Not Applicable.
7
NOTE: HR will review these choices to ensure they are configured
correctly, so if you are unsure how to configure these, contact
the Recruitment Team for support.
When you are finished click the Done button.
8
End of Example. Cross Reference: Red pg 8
9
Page 23Hiring Manager
5: Candidate Management
Viewing and Filtering Candidate Lists
You have several options available to view and filter the Candidate List;
these actions assist you in managing candidates as efficiently as
possible.
NOTE: The following examples highlight some of the options available,
but do not represent a complete procedure.
Step Action
From the Requisition Home page click on the number of candidates
1 on your requisition.
Review the list of Candidates who have applied or been matched to
2 your requisition.
Review the summary information. Hover your mouse over any of the
available icons to see a definition of its meaning.
Within this page you can see summary education information and
identify submissions from internal candidates, those requiring
attention and those with available attachments.
Page 24Reference Guide: Copied fro
Step Action
Click on any of the column headers to sort candidates by that
3 criterion.
OR
4
Use the Filters panel on the left to limit the number or type of
candidates that will appear in your list.
Click on the Candidates option in the quick filters area to reveal your
5 available filter choices.
Page 25Hiring Manager
Step Action
Click the Checkbox next to the type of candidate you would like to see
6 (more than one tick is okay).
In this example you now only see the Internal candidates who are new
in the selection process.
Spend some time reviewing the options in the Filter lists.
Click the selected Checkbox(s) again to deselect the Quick Filter and
7 reveal the full list once more.
If you have set multiple quick filters and you would like to clear them all
8 quickly, click the Clear All button.
Page 26Reference Guide: Copied fro
Step Action
Hover your mouse over the candidate you would like to see more
9 information about. You will see more information appear.
Click on the candidate’s name to see full information.
Select one or more candidates and apply any of the options in the
10 More Actions menu or any of the quick Action Icons.
End of Example. Cross Reference: Red pg 11
11
Page 27Hiring Manager
Viewing Candidate Files
To view a Candidate File, click the name of the candidate from the Candidate
List. This example walks you through viewing a Candidate File.
Be aware that you can see two slightly different views of each candidate. There is a
General Profile view, and a specific Submission view related to just that requisition.
NOTE: The following examples highlight some of the options available, but do not
represent a complete procedure.
Step Action
To access a candidate record, click on their Name on the candidate list.
1
The record will default to the Job Submission tab. Review the details.
2
To expand each section, click the Expand icon.
3
Click the icon a second time to minimize the section again.
Review the remaining tabs.
4
Page 28Reference Guide: Copied fro
Step Action
Click on the File Name of any attachments to view the document
5
The left-hand panel shows summary details of the candidate's job
6 submission.
To view the candidate's General Profile, click on the General Profile
7 button in the candidate summary.
This view doesn’t provide any additional details and you should not
need to access it. If, however, you accidentally in the general profile
view, the next step will show you how to return to the submission view.
Page 29Hiring Manager
Step Action
Review the tabs that hold the details within the General Profile view.
8
To return to the Candidate Submission view, click on the Submission
9 button in the candidate summary.
To return to the candidate list, click on the Back to Submission List
10 button.
End of Example.
11
Page 30Reference Guide: Copied fro
Adding Comments (from list view)
Access the Add Comments action from the action bar on the Candidate List or on the
Candidate File.
This example will walk you using the Add Comments action in list view.
Step Action
Select the checkbox next to any candidate on the list.
1
Click the Add Comments option on the Action Bar.
2
Enter an appropriate Comment.
3
Click the Apply button.
4
End of Example.
5
Page 31Hiring Manager
Adding Comments (from candidate file view)
This example will walk you using the Add Comments action from a candidate file.
Step Action
Confirm you are in the Candidate Submission view.
1
NOTE: If you are on the General Profile view - refer to the section on
Viewing Candidate files for instruction on switching between the
Candidate Submission view and the General Profile view.
Click the Add Comments option on the Action Bar.
2
Enter an appropriate Comment.
3
Click the Apply button.
4
End of Example.
5
Page 32Reference Guide: Copied fro
Attaching Files (from candidate file view)
This example will walk you through using the Attach File action from a candidate
file.
Step Action
Confirm you are view the Candidate Submission view.
1
NOTE: If you are on the General Profile view - refer to the section on
Viewing Candidate files for more information on the differences
between the Candidate Submission view and the General Profile view.
Click Attachments on the Action Bar.
2
Click on the relevant Upload Attachment (there are 3 options).
3
Page 33Hiring Manager
Step Action
Click the Browse button and select the required file.
4
Add a Comment in the Description box as necessary.
5
Chose the appropriate Visibility option.
Click the Upload button.
6
End of Example.
7
Page 34Reference Guide: Copied fro
6: Candidate Selection Workflow
Moving Candidates in the CSW (from list view)
Use the Change Step/status action to move candidates through the
hiring process. This action can be accessed from the Candidate list
view for one or more candidates or from the Candidate File.
This example will walk you through using the Change Step/status
action from the Candidate list view.
Step Action
Click the Requisitions link.
1
Click the Candidate Number link on the Requisition List
2
Notice the Candidate's Step and Status are Short Listing - To Be
3 Reviewed.
Select the checkbox next to the candidate you wish to process.
Click the More Actions button on the Action Bar and select the Change
4 Step/Status option.
Page 35Hiring Manager
Step Action
Review the default settings.
5
Click the New Status drop down menu and review the possible Status
6 settings. You should apply the most applicable to your situation. In
this example we will choose ‘Move to Next Step’.
NOTE: In this example, the ‘Move to Next Step’ status will mark the
Short Listing Step as complete and (upon save) allow you to access the
next step. Completion of steps will always be indicated by an ‘*’.
Click the Apply and Close button.
7
NOTE: Use the Apply and Continue button if you would like to make
another change to the same candidate’s Step/Status before closing this
window.
Page 36Reference Guide: Copied fro
Step Action
Notice the candidate's Step and Status is now showing as Short Listing
8 - Move to Next Step in the candidate list view.
Select the candidate's checkbox again.
9
Choose Change Step/Status from the More Actions button again.
10
Review the default settings. Because the Skills Assessment step is
11 optional you can jump directly to the next Step you will require.
In this example we don’t have additional skills assessments, but we
12 would like to schedule an interview with this individual.
Click the New Step drop down menu and choose Interview
Review the default Status. In this example the default is what we need
13 - To Be Scheduled
Page 37Hiring Manager
Step Action
Click the Apply and Close button.
14
Notice the candidate's current Step and Status.
15
FILTER HINT
16
Review the Selection Workflow panel on the left. You can see that
there are 2 candidates in the Short Listing step and 1 candidate in the
offer step.
For example, to view only the candidate in the offer step, click the offer
link.
Page 38Reference Guide: Copied fro
Step Action
The list will refresh, and you will see only that single candidate record.
17 If you had a number of candidates in the Interview step you could
further filter by status.
To clear the filter simply click the x as indicated above.
End of Example. Cross Reference: Red pg 11
18
Page 39Hiring Manager
Moving Candidates in the CSW (from candidate file view)
This example will walk you through using the Change Step/status action from the
individual Candidate file view.
Step Action
Click the Requisitions link.
1
Click the Candidate Number link on the Requisition List
2
To access a candidate record, click on their Name on the candidate list.
3
The following will appear:
Page 40You can also read