User Guide LUXXOR PORTABLE VIDEO CAMERA - Gradient Lens Corporation
←
→
Page content transcription
If your browser does not render page correctly, please read the page content below
User Guide
                                                                          PORTABLE CAMERA

                                                                          LUXXOR PORTABLE   ®

                                                                          VIDEO CAMERA

                 207 Tremont Street, Rochester, New York 14608
                               800.536.0790
                              Fax: 585.235.6645

                                                                                                   gradientlens.com

REV. 721

Phone: 800.536.0790 585.235.2620 gradientlens.com info@gradientlens.com
Luxxor® Portable Video Camera User Guide   Luxxor® Portable Video Camera User Guide                                warnings

               PORTABLE CAMERA

               Luxxor® Portable Video Camera
               The Luxxor Portable Video Camera (LPC) easily connects
               to ANY Hawkeye® Rigid or Flexible Borescope! When
               connected, the LPC delivers sharp, bright video and
               still images. Borescope inspection images can then be
               viewed “live,” and captured, documented, and e-mailed!
                                                                                                                                                  WARNING:

                                                                                                                         • Not for medical use.
                                                                                                                         • Do not attempt to disassemble the product. You will break the
                                                                                                                            camera. Disassembly will void your warranty.

                                                                                                                         If you have purchased the Computer Ready viewing option
                                                                                                                         (VC-USB2), INSTALL THE SOFTWARE BEFORE CONNECTING THE
                                                                                                                         VC-USB2 TO YOUR COMPUTER’S USB PORT!
                                                                                                                         (Otherwise your computer is likely to automatically install
                                                                                                                         incorrect drivers which will NOT work)

                                            Table of Contents

               Warnings....................................................................... Page 3
               Set Up............................................................................. Page 4
               PVM Operation ........................................................... Page 10
               Troubleshooting........................................................... Page 17
               Specifications.............................................................. Page 18
               Notices........................................................................... Page 19
               Warranty / Customer Service................................... Page 20

2   Phone: 800.536.0790 585.235.2620 gradientlens.com info@gradientlens.com                                         Phone: 800.536.0790 585.235.2620 gradientlens.com info@gradientlens.com   3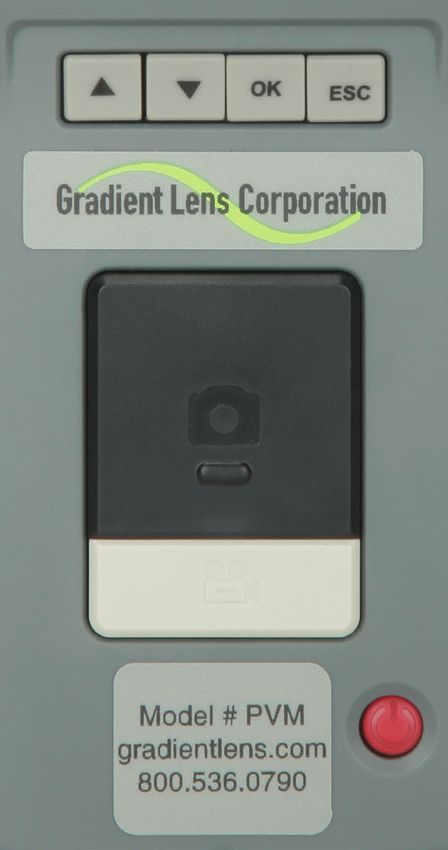
Setup                                            Luxxor® Portable Video Camera User Guide        Luxxor® Portable Video Camera User Guide                                             setup

Luxxor® Portable Camera                                   6-Pin            Y-cable               Normally this is an RCA phono jack, usually colored yellow, and labeled Video,
The Luxxor Portable Camera is shipped with
           ®                                                                                     Video In, Composite In, or just Input.
a Y-cable, which allows it to be connected                                                       Note: The larger the video screen, the poorer the image resolution will appear at a particular
to any video monitor with a composite input                                                      viewing distance.
(NTSC format).
                                                                                                 The composite video output connector may also be connected to a monitor with an S-Video
The Y-cable has a 6-pin circular connector
                                                                                                 Input or BNC Input with an appropriate adapter (sold separately).
at one end. The other end splits into two: an
RCA phono plug providing composite video
output and a power supply.
                                                                                     Composite
                                                                                     Video Out
                                                            Power Supply

                                                                                                                            S-Video (Y/C)            BNC

                                                                                                 Plug the power supply into a 100-240 VAC, 50-60 Hz outlet.
Attach the 6-pin connector to the
                                                                                                 Adapters for a few common power outlets are included.
Luxxor® Portable Video Camera.
                                                                                                 (UK, EU, etc.)
                                                                                                 The Luxxor® Portable Camera is powered ON when the
                                                                                                 cable is connected and the power supply is plugged in.
                                                                                                 There is no power switch.

                                                                                                 Attach the Camera to Your Borescope
                                                                                                 To attach the Luxxor® Portable Camera to your Hawkeye® Pro series borescope:
                                                                                                 1. Pull back the grooved ring at the head of the camera.
                                                                                                 2. Insert the borescope eyecup fully into the camera head.
                                                                                                 3. Release the grooved ring.

                                                                                                                      Pull back                                    Release
Connect the composite video output connector to your monitor’s composite input.

                                                                                                                       Insert

4     Phone: 800.536.0790 585.235.2620 gradientlens.com info@gradientlens.com                         Phone: 800.536.0790 585.235.2620 gradientlens.com info@gradientlens.com                5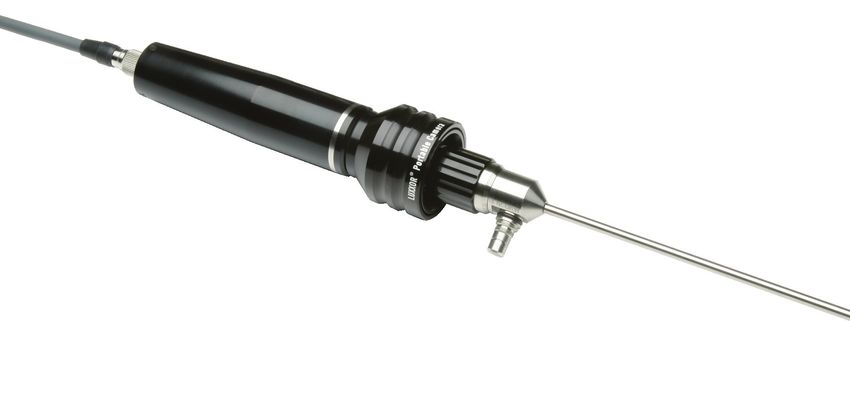
SETUP Luxxor® Portable Video Camera User Guide Luxxor® Portable Video Camera User Guide SETUP
Focus the image on your monitor by rotating the 6. After the Video ToolBox software has been installed you will see the window below.
focus ring of the Hawkeye® Pro series borescope. Press the INSTALL button to install the USB2.0 adapter drivers. If the drivers were already
Focus Ring
installed then press the SKIP button to continue.
The Luxxor® Portable Camera is designed to be
used with Hawkeye® Pro series borescopes. It
may be used with other borescopes, but their
focusing controls may not be easily accessible.
Computer Ready Option (Optional Accessory)
W
ARNING: The included software drivers MUST be
installed BEFORE the VC-USB2 is connected to your
computer’s USB port.
Install the Software
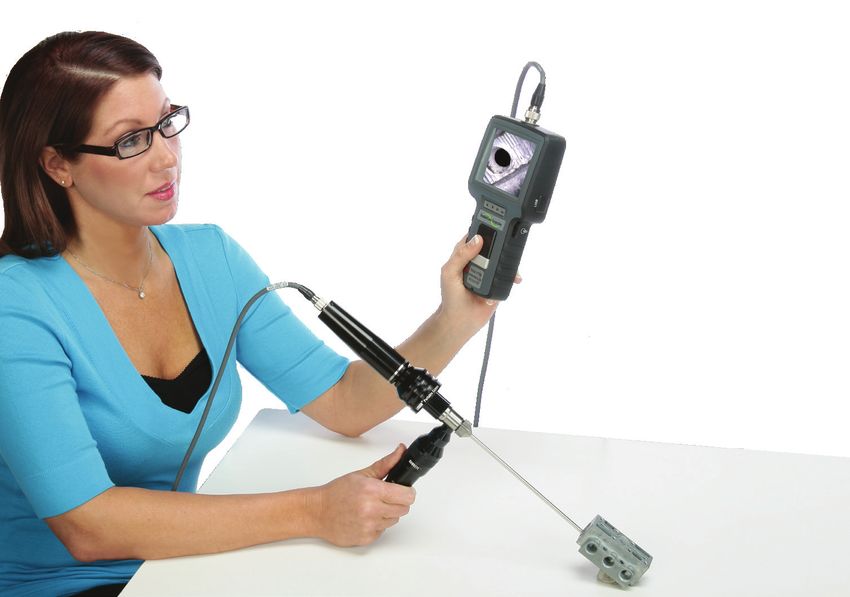
1. Download and install the Video ToolBox Pro software from this link:
www.zarbeco.us/fas/download/vtb2155.exe Note: There may be a delay after you press the Install button, but before the Windows
If the installer asks for a password, use “windows 10” (without the quotes) Installer window opens. Wait for the InstallShield window to open.
2. Open the My Computer window and double-click on the CD-ROM icon.
3. Double-click on the installer program – Video ToolBox Installer USB2b.exe.
4. The program will display the following window:
Click NEXT and then FINISH in the next window. Do not plug the VC-USB2 capture device
into the computer until the driver installation is completed.
If you are not sure that DirectX 9.0 or later is already installed, press the INSTALL button.
The software will not load if a newer version already exists on your computer.
5. The installer will now move to the Install Video ToolBox step. Click INSTALL to install
the Video ToolBox software.
6 Phone: 800.536.0790 585.235.2620 gradientlens.com info@gradientlens.com Phone: 800.536.0790 585.235.2620 gradientlens.com info@gradientlens.com 7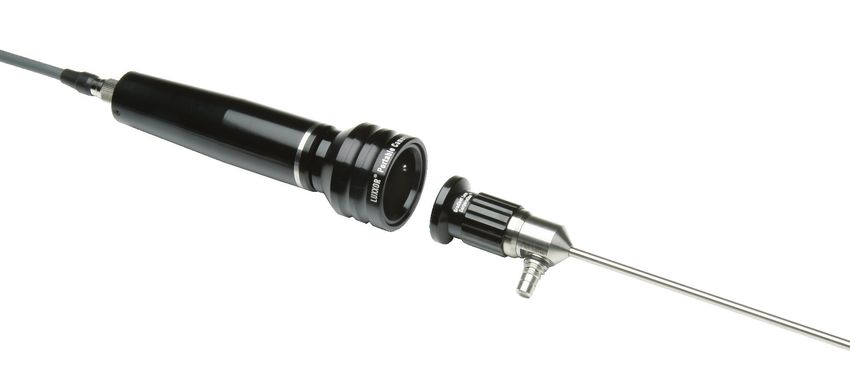
SETUP                                              Luxxor® Portable Video Camera User Guide     Luxxor® Portable Video Camera User Guide                                               setup

7.	When the driver installation has completed, you will see the following window:              Plug the power supply into a 100-240 VAC, 50-60 Hz outlet. Adapters
                                                                                                for a few common power outlets are included. (UK, EU, etc.)
                                                                                                The Luxxor® Portable Camera is powered on when the cable is
                                                                                                connected and the power supply plugged in.
                                                                                                There is no power switch.

                                                                                                Now plug the USB connector of the VC-USB2 capture device into the
                                                                                                USB port you plan to use. Note: If you later plug the VC-USB2 into a different USB
                                                                                                port on your computer, the Found New Hardware Wizard will run again. In some
                                                                                                versions of Windows you will see a warning screen that the device driver has not
                                                                                                passed Windows Logo testing. If this appears, click Continue Anyway.
                                                                                                Installation is now complete. Double-click the Video ToolBox icon on your desktop
                                                                                                to start the program. When the program starts up, you should have a live image on
                                                                                                your screen.
                                                                                                If you have no live image, click the Settings button and choose Video Device in the
                                                                                                left-hand column of the window that appears. Make sure that the Video Source
The Computer Ready (VC-USB2) viewing option includes
                                                                                      VC-USB2   box is set to Video Composite as shown below.
the VC-USB2 image capture interface.
The VC-USB2 image capture interface connects to the
Y-cable of the Luxxor® Portable Camera and converts the
analog composite video signal from the camera to a digital
signal for input to your computer’s USB port.

                                                                        USB Connector

After the software has been properly installed, connect the
composite output from the Y-cable to the composite input
(yellow) of the VC-USB2.

                                                                    Composite Input
If not already done, connect the 6-pin
circular connector of the Y-cable to
                                                                                                Also check to make sure there is no protective cap on the end of the scope’s insertion tube.
the Luxxor® Portable Camera.
                                                                                                The Video ToolBox Help file has a complete description of all the features of the
                                                                                                program as well as hints on how to capture the best quality images and videos.
                                                                                                Refer to the included Video ToolBox manual to learn how to capture and store images
                                                                                                and videos, as well as how to annotate and label images and more.

8     Phone: 800.536.0790 585.235.2620 gradientlens.com info@gradientlens.com                         Phone: 800.536.0790 585.235.2620 gradientlens.com info@gradientlens.com                  9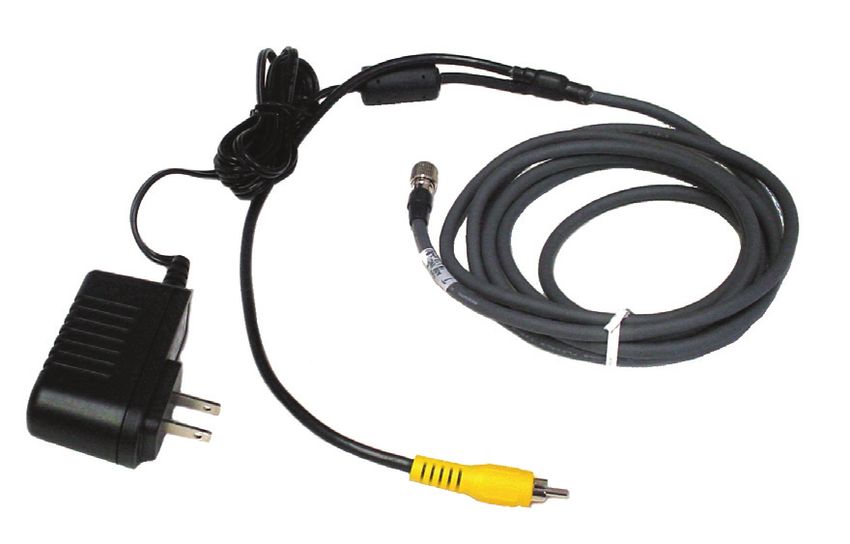
PVM OPERATION                                      Luxxor® Portable Video Camera User Guide      Luxxor® Portable Video Camera User Guide                                   PVM OPERATION

Portable Video Monitor Option (Optional Accessory)                                                                                        Main Controls
If the Portable Video (PVM-DV) viewing option is chosen,                                                                                               OK    ESC
the included cable will have a circular connector at each                                          10
end, one 6-pin and one 12-pin.

                                                               12-Pin                  6-Pin

Connect the 6-pin end to the Luxxor®
                                                                                      12
Portable Camera and the 12-pin end
                                              6
to the PVM. The camera is powered
from the PVM’s battery for completely
portable use.

                                                    LPC
                                                                                           PVM

Charging the PVM
                                                                                                                                                                             Power
To charge the PVM, connect the
charger lead to the jack labeled DCIN
on the PVM. Then plug the charger
into a 100-240 V, 50/60 Hz outlet. Full
charge takes about 2 hours. The PVM
will not operate with the charger
                                                                                                 Power ON / OFF
plugged in when the battery is nearly
fully charged.                                                                                   Turn the PVM’s power on by pressing and holding the power button for 2-5 seconds. The
                                                                                                 Gradient Lens logo will appear. Then the word CAMERA and the battery and memory status
Note: There is no charging indicator                                                             indicators will appear for a few seconds.
light. The battery status indicator
will appear in the display when                                                                  When these indicators disappear the unit is in Normal Mode, displaying a live image from the
booting up.                                                                                      camera.
                                                                                                 To turn the unit off, push and hold the power button for 1-2 seconds until it turns off.
The PVM displays live video and captured still or video images on its built in LCD display. It
can output live video to an external monitor via a composite signal connector and the included
cable. Stored images can be downloaded to a computer via the USB port and included cable,
or through the removable SD memory card. (Details are on page 16.)

10   Phone: 800.536.0790 585.235.2620 gradientlens.com info@gradientlens.com                            Phone: 800.536.0790 585.235.2620 gradientlens.com info@gradientlens.com             11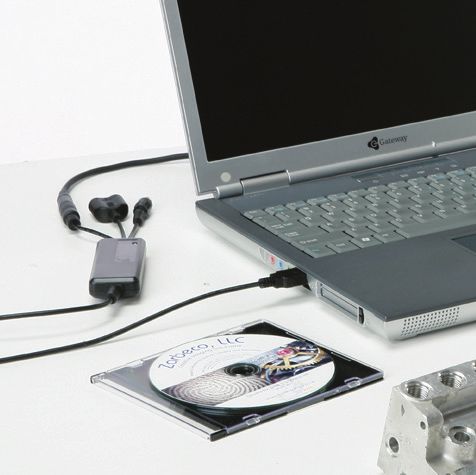
PVM OPERATION                                       Luxxor® Portable Video Camera User Guide   Luxxor® Portable Video Camera User Guide                                     PVM OPERATION

Installing the SD Memory Card                                                                  Capture a Video Clip
Take care to insert the SD card with the correct orientation                                   In Normal Mode, press the gray         button to start recording. The elapsed
– contacts should be visible when inserting the card with                                      time display will be visible in the lower left of the image to indicate that you
the video display screen facing you.                                                           are recording. Press the        button again to stop recording and save the clip.
                                                                                               Pressing the   button will also stop the recording and save the clip. Video
                                                                                               files are saved as .ASF.
       CAUTION: Do not remove the SD memory card
during capture operations, data will be lost and the memory
card may be damaged.
                                                                                               Memory & Battery Charge Indicators
                                                                                               In Normal Mode, press ESC to display the memory and battery indicators. Memory capacity
                                                                                               remaining is displayed as a percentage. Low battery power is indicated by the battery status
Operating Modes
                                                                                               indicator depicting a less than full charge and turning yellow.
There are three operating modes:

Normal Mode
                                                                                                                                                                            Battery Status
Displays current camera input and date/time. From this mode still pictures and video
are captured.
                                                                                                                                                                            Memory Remaining
Image Review Mode
Displays captured still pictures and video.

Menu Mode                                                                                      Image Review Mode:
File maintenance, system settings, etc.                                                        View Captured Photos or Video Clips
                                                                                               Push the or        button to enter Image Review Mode. You can scroll forward or
The unit powers up in Normal Mode.                                                             back through the photos and videos using the        or buttons. Video files may be
From Normal Mode                                                                               played, paused, and resumed by pressing the  button. While a still or video file is
                                                                                               displayed (video not playing), pressing the OK button will bring up the DELETE menu.
      Enter Image Review Mode by pressing         or                                           Select YES and press OK to delete the file. To exit Image Review Mode, press ESC.
      Enter Menu Mode by pressing OK.
Return to Normal Mode from any other mode by pressing ESC.
                                                                                               Delete a Single File
Normal Mode
                                                                                               Press or         to enter Image Review Mode. Scroll to
                                                                                                                                                                                DELETE
Capture a Still Photo                                                                          the required file using the or        buttons. When the
                                                                                               required photo or video file is displayed, press OK.                   YES          NO
In Normal Mode, press the large black    button. If you hold the button down,
                                                                                               A frame will be displayed to confirm the delete function.
the captured image will remain displayed until the button is released.
                                                                                               Select YES with     or    and press OK to confirm.
Still photo files are saved as .JPG.

12    Phone: 800.536.0790 585.235.2620 gradientlens.com info@gradientlens.com                        Phone: 800.536.0790 585.235.2620 gradientlens.com info@gradientlens.com                  13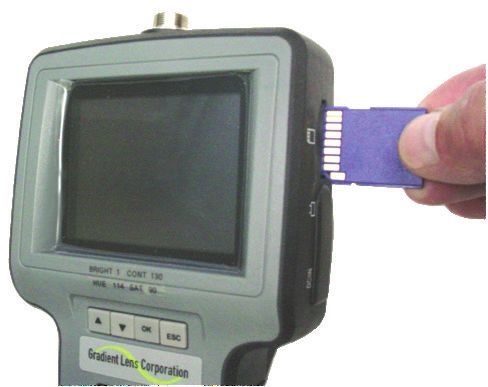
PVM operation                                       Luxxor® Portable Video Camera User Guide   Luxxor® Portable Video Camera User Guide                                     PVM operation

Menu Mode:                                                                                     Menu Mode:
                                                                                               Language
Display Main Menu
                                                                                               If your unit is supplied with a language option this function will allow you to select English or
In Normal Mode:
                                                                                               the optional language.
Press the OK button to display the Main Menu as follows:                 MENU
                                                                  DELETE ALL                   Video Format                                                  MENU      TV OUTPUT
DELETE ALL
                                                                  VIDEO OUTPUT                 This function allows you to choose the                 DELETE ALL      NTSC
VIDEO OUTPUT                                                      DATE / TIME SETUP            format of the output video signal for an               VIDEO OUTPUT PAL
DATE/TIME SETUP                                                   LANGUAGE                     auxiliary display. The options are NTSC and            DATE / TIME SETUP
LANGUAGE                                                          VIDEO FORMAT                 PAL. Use the       and     to select and press         LANGUAGE
                                                                                               OK to confirm.
VIDEO FORMAT                                                                                                                                          VIDEO FORMAT
AUTO POWER OFF
You can scroll through the functions on this menu using the
   and buttons, and select the function using the OK button.                                   While the TV OUTPUT options are displayed, pressing the
                                                                                                                                                                           MENU
                                                                                                button will display the FACTORY SETUP menu. Here
Delete All                                                                                                                                                           BRIGHTNESS        128
                                                                                               the factory settings for the video display may be changed
Deletes all saved files, video and still photos. When this              ERASE ALL                                                                                    CONTRAST          120
                                                                                               or reset. Use and and press OK to select the property
function is selected, the unit displays a frame which includes         YES     NO              to be changed. Then use        and to change the setting              HUE               114
two options. Use and to select Yes or No and press OK                                          and OK to confirm. Holding the or buttons down for a                  SATURATION        90
to confirm.                                                                                    couple of seconds will cause the settings to change more              DEFAULT
                                                                                               rapidly. Default restores the original factory settings.
Video Output
This function transfers the video signal to and from an
auxiliary display using the supplied cable. The unit will
                                                                         MENU
automatically switch to the auxiliary display when the cable      DELETE ALL
                                                                                               Auto Power Off
is connected and will revert to the built in display when the     VIDEO OUTPUT                                                                              MENU
cable is disconnected. This function will allow you to toggle     DATE / TIME SETUP            Select this function by pressing the OK                                   AUTO OFF
                                                                                               button and use the and buttons to                     VIDEO OUTPUT
between displays if both are connected. Simply press OK           LANGUAGE                                                                                             DISABLE
while this function is selected to toggle between displays.                                    select time for auto power off or to disable          DATE / TIME SETUP
                                                                  VIDEO FORMAT                                                                                          5 MIN
                                                                                               the auto power off function. Press OK to              LANGUAGE
Date / Time Setup                                                                                                                                                      10 MIN
                                                                                               confirm.                                              VIDEO FORMAT
                                                                                                                                                                       15 MIN
Sets the date and time. Select this function                                                                                                         AUTO POWER OFF
                                                                                                                                                                       30 MIN
and use the and buttons to select year/
month/day or hour/minute/second fields, then                MENU        TIME SET
press the      and/or     buttons to scroll
                                                     DELETE ALL       2008 / 01 / 01
through the numbers to set the date and time.
If DISPLAY indicates ON status, the date and         VIDEO OUTPUT 00 : 00 : 00
time will be displayed on the screen. Captured       DATE / TIME SETUPDISPLAY ON
images will always include a time/                   LANGUAGE
date stamp. Confirm changes by pressing OK.          VIDEO FORMAT

14    Phone: 800.536.0790 585.235.2620 gradientlens.com info@gradientlens.com                        Phone: 800.536.0790 585.235.2620 gradientlens.com info@gradientlens.com                       15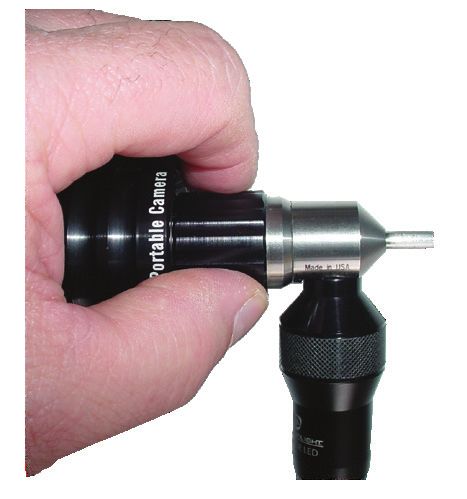
PVM operation                                      Luxxor® Portable Video Camera User Guide       Luxxor® Portable Video Camera User Guide       PVM operation / TROUBLESHOOTIUNG

Connecting to an Auxiliary Display                                                                Tripod Stand
Use the included AV cable to connect your auxiliary display to the jack on the side of the PVM.   A compact tripod stand for the PVM is included to enable
Note: The display must accept a composite input. The unit will automatically switch to the        one-handed operation of the Rigid Video Borescope.
auxiliary display when the cable is connected. You may switch between the displays by using
the VIDEO OUTPUT function on the main menu. The PVM display and the external display
cannot be viewed at the same time.                                                                Attach the tripod stand to the threaded socket on the back
                                                                       Video Out
                                                                                                  of the PVM.

             AV Cable

                                                                                                  Adjust the tripod head and legs to allow the PVM to stand on
                                                                                                  a firm surface.

The video output format to the auxiliary display may be switched between NTSC and PAL by
using the VIDEO FORMAT function on the main menu.

Transferring Image Files to a PC
The PVM can download saved images through its USB port. Plug in the Mini USB 1.1
connector of the included USB cable into the USB port on the PVM. Then plug the other end         PVM Troubleshooting Tips
into a USB port on your PC and open the drive associated with the chosen port. The stored
images are contained in the location X:\DCIM\100MEDIA where X is the drive letter. JPGs can       Nothing on LCD screen: Battery power too low.
be viewed with Windows Picture Viewer, and .ASF video files play in Windows Media Player.         Recharge the battery.
                                                                                                  No image – but words and status symbols on LCD
                                                                                                  display: Insertion tube is not connected securely.
                                                                                                  Reattach the insertion tube.

                         USB Cable                                                                Cannot capture photos or video: No SD Card inserted.
                                                                                                  Shut down: Battery has discharged below operating
                                                                                                  threshold. Recharge battery.
                                                                                                                                                                           Reset
                                                                                                  !!! No functions working!!! If all functions freeze or fail,
                                                                                                  first try to power the unit off and restart. If the unit does
                                                                                                  not recover, insert a non-conducting probe, such as a
                                                                                                  toothpick, into the hole on the back of the PVM and use it
Alternatively, the SD memory card may be removed from the PVM and inserted into                   to press the internal reset button to perform a
your computer’s card reader.                                                                      system reset.

16    Phone: 800.536.0790 585.235.2620 gradientlens.com info@gradientlens.com                           Phone: 800.536.0790 585.235.2620 gradientlens.com info@gradientlens.com    17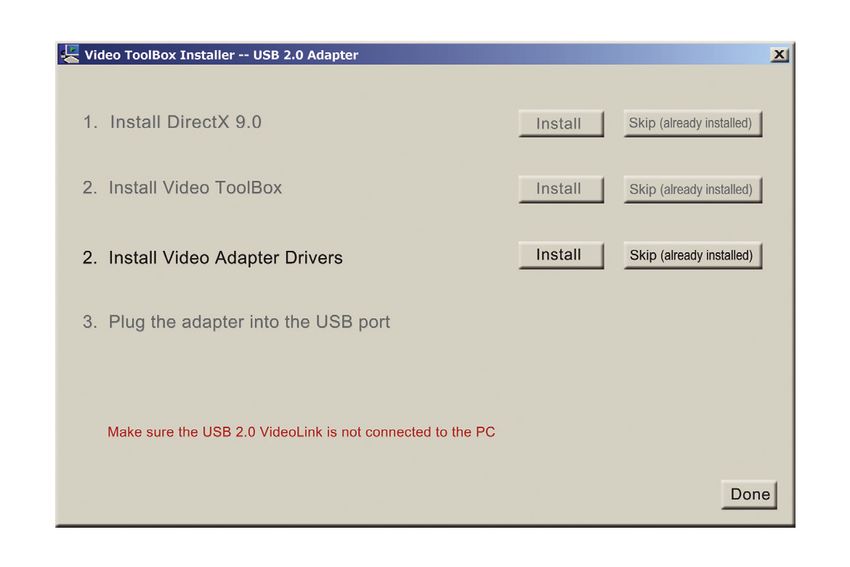
SPECIFICATIONS / NOTICES                                      Luxxor® Portable Video Camera User Guide   Luxxor® Portable Video Camera User Guide                 warRANTY / CUSTOMER SERVICE

                                         LPC Specifications                                              Warranty
                                                                                                         Gradient Lens Corporation warrants the Luxxor® Portable Camera to be free of defects
                    Sensor................................................ 1/4” CCD                      in material and workmanship and to perform in accordance with the manufacturer’s
                    Effective Pixels................................. 768 x 494                          specifications when subject to normal use and service for a period of one year from the date
                                                                                                         of purchase. Gradient Lens Corporation will either repair or replace components found to be
                    Scanning............................................ 2 : 1 Interlace                 defective or at variance from the manufacturer’s specifications within this time at no cost to the
                    Resolution.......................................... 520 TV Lines                    customer. It shall be the purchaser’s responsibility to return the instrument to the authorized
                                                                                                         service center.
                    Output................................................. Composite
                    Output Format................................... NTSC                                This warranty does not cover breakage or failure due to tampering, misuse, neglect, accidents,
                                                                                                         improper installation, modification, shipping, or to improper maintenance, service and cleaning
                    Length................................................. 6.25” (159 mm)               procedures. This warranty is also void if the instrument is not used in accordance with the
                    Max Diameter................................... 1.74” (44.2 mm)                      manufacturer’s recommendations, or if required service is performed by anyone other than a
                                                                                                         Gradient Lens Corporation authorized agent. No other express or implied warranty is given.
                    Weight................................................ 6.3 oz. (178.6 gm)

                                                                                                         Contact Customer Service:
Notices
USA                                                                                                      Should service of the equipment be required: Call Gradient Lens Corporation to obtain a
                                                                                                         return material authorization (RMA) number and shipping directions.
This device has been tested to be in compliance with part 15, Class A of the FCC Rules.
Operation is subject to the following two conditions: (1) This device may not cause harmful                     Telephone................585.235.2620
interference, and (2) this device must accept any interference received, including interference
                                                                                                                Fax.............................585.235.6645
that may cause undesired operation.
                                                                                                                E-mail........................service@gradientlens.com
Canada                                                                                                          Toll Free....................800.536.0790 (in US only)
This Class A digital apparatus complies with Canadian ICES-003.
Cet appareil numérique de la classe A est conforme à la norme NMB-003 du Canada.

18    Phone: 800.536.0790 585.235.2620 gradientlens.com info@gradientlens.com                                 Phone: 800.536.0790 585.235.2620 gradientlens.com info@gradientlens.com                   19
You can also read