User Manual Eagle / US6100 Steam Cleaner - US Steam Corporate Office 7940 Rodeo Trail, Ste 360 Mansfield, TX 76063 (817) 297-7745
←
→
Page content transcription
If your browser does not render page correctly, please read the page content below
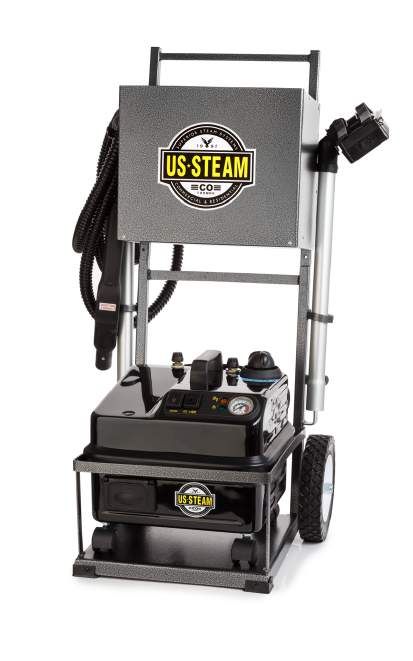
User Manual
Eagle / US6100 Steam Cleaner

 US Steam Corporate Office
 7940 Rodeo Trail, Ste 360
   Mansfield, TX 76063
      (817) 297-7745

                               1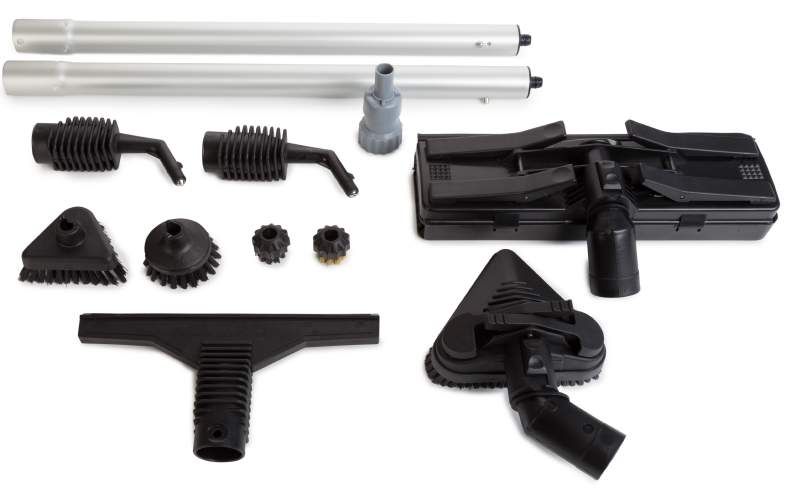
(1)
(5)                          (6)
                                                              (2)
                      (8)   (9) (10)
(7)

                                                     (3)
                (4)

 All Parts can be ordered on-line at www.ussteam.net
       (1) Extension wands             (6) 3-Hole Nozzle
       (2) Large Floor Brush           (7) Small Triangle Brush
      (1) Extension Wands:              Part # ACC0006
       (3) Large Triangle Brush        (8) 3” Round Nylon Brush
      (2) Large Floor Brush:            Part # ACC0042
       (4) Squeegee                    (9) 1” Nylon Brush
      (3) Large Triangle Brush:         Part # ACC0047
       (5)Squeegee:
      (4)  Single Hole Nozzle          (10)
                                        Part1”# Brass Brush
                                                ACC0055
      (5)   Single Hole Nozzle:        Part # ACC0028
      (6)   3-Hole Nozzle:             Part # ACC0097
      (7)   3” Round Brush:            Sold as 3/PK
      (8)   1” Nylon Brush:            Sold as 5/PK
      (9)   1” Brass Brushes:          Sold as 5PK

                                                                    2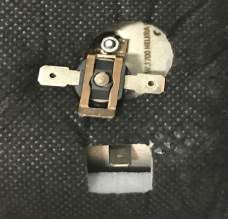
Table of Contents
 Quick Start Guide      ______________________________________________   4
 Refilling              ______________________________________________   4
 Shutting Down          ______________________________________________   4
 Descaling              ______________________________________________   6
 Parts Schematic        ______________________________________________   6
 Troubleshooting        ______________________________________________   7
 How to Clean           ______________________________________________

    Bed Bugs            ______________________________________________   8
    Tile & Grout        ______________________________________________   8
    Carpet              ______________________________________________   9
    Carpet Stains       ______________________________________________   9
    Kitchen             ______________________________________________   9
    Counter Tops        ______________________________________________   9
    Refrigerator        ______________________________________________   9
    Bathroom            ______________________________________________   10
    Walls               ______________________________________________   10
    Wallpaper Removal   ______________________________________________   10
    Windows             ______________________________________________   10
    Upholstery          ______________________________________________   11
    Autos               ______________________________________________   11
 Notices & Returns      ______________________________________________   12

STEAM GENERATED BY THIS MACHINE IS EXTREMLY HOT AND WILL
CAUSE INJURY IF IT COMES IN CONTACT WITH THE SKIN OR EYES.
Ø Use only as directed in the user manual (download at www.ussteam.net/manuals)
Ø Never place any body part in front of the steam gun.
Ø Only aim the steam gun at the cleaning area.
Ø Never unscrew drain plug while steamer is hot.
Ø Use only a 12 gauge / 15AMP rated or higher extension cord.
Ø Only add tap water to the tank – NO CHEMICALS.
Ø Do not operate or leave unattended around children.
Ø Always turn OFF when not in use.
                                                                                  3
Quick Start Guide
                                                                                         Tank Cap
1) FILL TANK WITH WATER
  Ø Remove the cap and pour tap water into the steamer.
  Ø Do NOT put cleaning fluids in the steamer.

2) CONNECT HOSE
  ØLift the socket cover on the front of the steam cleaner.
  ØInsert the square end of the hose into the socket until you hear a click.

PLUG INTO ELECTRICAL OUTLET
  ØPlug the power cord into an outlet.
  ØThe steam cleaner should be the only appliance plugged into the outlet.
  ØUse only a 12 gauge 15AMP extension cord with maximum length of 25ft.

4) POWER ON THE STEAM CLEANER
  ØPress the POWER AND STEAM buttons.
  ØIt will take 10 minutes before your steamer is ready to use.
  ØPressure gauge will read greater than 4.

 During use, the Steam Ready light may blink indicating the boiler is heating.

                                                      ON/OFF STEAM READY
5) BLEED THE HOSE BEFORE USING:
  Ø Squeeze the gray trigger on the hose handle to shoot excess water from the hose into a towel
    for about 10 seconds.
  Ø Select Cleaning Attachment.

 LOW WATER ALERT & REFILLING
 During start-up or use, the steamer may run low on water causing the orange light to blink and
 the alarm to sound. The Eagle steamer has a separate fill tank so there is no cool down
 requirements.
 ØRemove cap, add water and restart the steamer by turning OFF and ON the Power and Steam
   buttons.

6) STEAM CONTROL DIAL is used to control the amount of steam released.
  ØIncrease steam pressure by turning the dial counter-clockwise - toward the “+” sign on the dial
  ØDecrease the steam pressure by turning dial clockwise toward the “–” sign on the dial).
  ØDo NOT turn the dial all the way clockwise. This is the lowest possible setting and no steam
   will come out when pulling the trigger.

7) SHUT DOWN PROCEDURE
  ØTurn off Power and Steam buttons.
                                                                                                     4
Accessory Cleaning and Descaling
ACCESSORY CLEANING – AFTER EACH USE
Always wash accessory brushes with warm, mild soapy water after each use. Get in the good
habit of cleaning brushes before the dirt dries on them. All accessories can also be cleaned in the
dishwasher, except for the flexible hose. Accessories can be sanitized by steaming them with the
steam hose and the 1-hole nozzle.
DESCLAILING
Ø Every 6 months or
Ø When the steamer takes longer than 10 minutes to heat.
Do NOT empty boiler when steamer is hot.
① Turn steamer over and unscrew (by hand) the drain plug.
② Drain all water in the steamer and replace the drain plug.
③ Pour 2 cups of vinegar and 4 cups of water into the holding tank.
④ Push Power and Steam Release buttons to run mixture into the boiler.
Ø After 1 minute, turn off Power button and let unit set for 30 minutes.
ØRemove drain plug and completely empty boiler tank. Replace drain plug when finished
draining.
ØNote: O-Ring is required to make a water tight seal.
Rinse the Boiler Tank
① Refill steamer with tap water.
② Turn ON by pushing the Power and Steam Release Buttons allowing water to move from the
reservoir tank to the boiler.
Ø Run for 1 minute.
③ Remove drain plug and drain until empty.
④ Steamer is ready for use when there is no sediments coming from the water draining from the
boiler.
Ø This step may need to be repeated.
NEVER ADD CHEMICALS INTO THE TANK! Adding any form of chemicals or
fragrance to the tank will void the warranty and could result in malfunction or damage to the
system.
5US Steam
7940 Rodeo Trail, Ste 360
Mansfield, TX 76063
(817) 297-7745
Steam Control Valve
Lights
Safety Cap
Rubber Seal
Switch
Pressure Gauge
Boiler
Thermostat Power Cord
(next to boiler)
Water Pump
Fill Tank
Wheel
Circuit Board Low Water Sensor
(side of fill tank)
Brass Fitting
(comes as a kit)
Drain Plug (includes black cap and O-ring)
Brass Fitting Kit HDW9196 Pressure Gauge EAG7468
Boiler EAG0034 Pressure Transducer EAG0952
Circuit Board EAG5086 Safety cap EAG0787
Drain Plug Kit EAG0060 Safety Cap – Rubber Seal EAG2912
(includes black cap and O-Ring)
Steam Control Valve EAG6457
Fill Tank EAG2429 (includes knob)
Low Water Sensor EAG5175 Switch (Power and Steam) EAG1410
Power Cord EAG0501 Thermostat (next to boiler) EAG7630
Light: Orange EAG1450 Water Pump EAG4150
Light: Green EAG1451 Wheel EAG0045Troubleshooting
PROBLEM SOLUTION
Push Power Button and Check electrical panel for tripped breaker:
steamer does not turn ON ØThe steam cleaner should be the only appliance plugged into an outlet.
(No Lights) Ø Use only a 12 gauge / 15AMP extension cord with maximum length of 25ft.
No response from the Check hose connection:
trigger button on the ØDisconnect and reconnect.
hose handle ØYou should hear a “click” when connecting hose to the steamer.
Power but no steam The steamer is vapor locked and needs to be drained.
①Check hose connection.
②Is the Release valve Vapor lock: Air is trapped in the water pump:
closed? (some steamers ① Turn OFF let the steamer cool for at least;10 minutes.
do NOT have release ② Remove drain plug (by hand) located on bottom of the steamer.
valves) ③ Drain water and replace drain plug.
③Is the pressure dial ④ Close steam release valve.
⑤ Refill reservoir tank and restart.
reading less than 3?
Possible problems: Damaged circuit board and /or low water
sensor.
Push Power Button
and the steamer does How to diagnose:
① Unplug the steamer from the electrical outlet.
not turn ON
② Remove top cover and look for damage on either component.
(After checking circuit breaker)
Circuit Board is green and mounted to the frame.
Ø If damaged, there will be corrosion on the bottom.
Repair video located on
our website Low Water Sensor is located on the side of the fill tank.
https://ussteam.net/home Ø If damaged, there will be corrosion on the edges.
-depot/
How to repair or replace:
① Call US Steam (817) 297-7745 and open a repair ticket or email to
cs@ussteam.net
② Order components and replace.
ØCircuit Board Part # EAG5086
ØLow Water Sensor Part # EAG5175
Problem: Thermostat needs to be reset or replaced.
Steamer Powers ON How to Reset the Thermostat:
but does NOT Build ① Take off cover and locate the reset button
Pressure on the thermostat.
② Thermostat is located on the left side of the
Steamer should be heated and steamer next to the boiler where the power cord
ready to use after enters the steamer.
10 minutes ③ Push the reset button and steamer should
begin to heat.
Repair video located on
our website If the steamer does NOT heat:
https://ussteam.net/home ① Call US Steam (817) 297-7745 and open a repair ticket to cs@ussteam.net
② Order component and replace.
-depot/ ØThermostat Part # EAG7630
7Work Techniques
The temperature of the steam at the tip of the nozzle is between 312ºF - 285ºF, it
cools to 245ºF 4” from the nozzle tip and 185ºF 8” inches from the nozzle tip.
Most bacteria begins to die when exposed to temperatures of 245ºF so keeping the
tip of the handle close to the work area is key to successful cleaning.
Bed Bugs & Dust Mites
Bed bugs and dust mites live close to their food source. Steam will kill bed bugs on
contact.
To eliminate, you must kill the bugs and their larva.
Ø Use large triangle brush with bonnet.
Ø Steam mattresses, areas around bed, and all base boards.
Ø Bugs will die on contact so you will need to vacuum over treated areas.
Ø Mattress will be damp so let it air dry before putting on linens.
Ø It may take more than one cleaning to kill all bugs and larva.
CLEANING: Grout CLEANING: Tile
① Connect the silver extensions wands and ① Attach large floor brush.
nozzle to hose handle. ② Steam pressure: Medium
② Attach 1”nylon brush to nozzle. ③ Move slowly over tile allowing steam to
③ Steam pressure: Medium penetrate the pores in the tile.
④ Apply gentle pressure to the brush during ④ It may be necessary to wrap the brush
cleaning. with a towel for deeper cleaning.
ØLet the steam do the work.
ØSteam will push the dirt out of the grout.
Use a towel to wipe.
ØAngle the brush to clean the edges of
grout line.
Floors
ØMarble Floors - Use the same techniques as used for wood floors, keeping heat and moisture off
the surface as much as possible. Always use Marble conditioner after cleaning. SOME MARBLE
SURFACES CAN DISCOLOR.
ØVinyl or Wood – Use the large floor brush with a bonnet at low steam volume.
WHEN STEAMING A WOOD FLOOR, NEVER LET BRUSH STAND IN ONE
PLACE WHILE STEAM TRIGGER IS ON. ALWAYS KEEP BRUSH MOVING. GO
OVER AREA TWO OR THREE TIMES AS NEEDED.
8Cleaning
Carpets
We do not recommend this steam cleaner for cleaning large carpeted areas but rather for spot
cleaning. Carpet fibers melt at temperatures 300ºF and above. The heat from the vapor
system should not melt the fibers, but it can change their shape or color at temperatures
185ºF-250ºF.
Treating Carpet Stains
If the stain is only on the surface of the carpet, it can be removed by shooting the steam against the
spot from the side, 1-2 inches above surface. Hold a towel on the other side to catch the residue.
This prevents driving the particles deeper into the fibers.
Kitchen
ØSink Use the 3-inch nylon round brush or small triangular brush with the 3-hole nozzle on
medium steam.
ØStovetop: Use the 3-inch round brush or small triangular brush with the 3-hole nozzle at
low/medium steam.
ØBurners: Use the 1-inch round brush attached to the 1-hole nozzle for cleaning burners.
ØOven Interior: Use the 1-inch brass round brush (with the 1-hole nozzle.
Countertops
ØMethod 1 - Use 3-inch round brush with 3-hole nozzle in slow, back and forth movements to
cover area being cleaned at low or medium steam. Wipe with clean cotton towel.
ØMethod 2 - Use the large triangular brush with a bonnet. Pre-heat towel 3 to 5 seconds. Clean
surface using back and forth movements.
Corners/Crevices
Use the 1-hole nozzle attached to the hose handle at low or medium steam to blow out dirt. Catch
dirt with a spare cotton towel to prevent it from spraying everywhere.
Refrigerator: Please remove food, bins and shelves from the refrigerator before cleaning
ØExterior Surfaces – Use the large triangular brush with a bonnet on low or medium steam.
ØInterior Surfaces – Use the 3-inch round brush or small triangular brush with the 1-hole nozzle
on low or medium steam. Use separate towel to wipe up loosened dirt. Never use hot steam on
cold glass.
ØDoor Moldings – Use the 1-inch nylon bristle round brush with the 1-hole nozzle. Use separate
towel to mop up loosened dirt.
ØDefrosting Freezer – Use the 1-inch nylon bristle round brush with the 1-hole nozzle on low or
medium steam. Use separate towel to mop up water.
Dishwasher
Use the 1-hole nozzle on low or medium steam to clean out corners and edges. For light scrubbing,
add the 1-inch round nylon brush.
9Cleaning
Bathroom
Ø Mirrors/Glass/Windows Use the squeegee tool on the LOW steam setting.
CAUTION! ALWAYS PREHEAT GLASS WITH THE SQUEEGEE 2-3 INCHES FROM
SURFACE BEFORE CLEANING! DO NOT CLEAN GLASS WHEN TEMPERATURES
ARE BELOW FREEZING POINT! NEVER CLEAN A GLASS THAT HAS A CRACK!
Toilets - DO NOT PUT THE BRUSH OR HOSE HANDLE UNDER WATER
ØExterior cleaning uses the small triangular brush with the 3-hole nozzle on low or medium
steam.
ØInterior cleaning use the 1” nylon round brush with the 1-hole nozzle for cleaning on low or
medium steam. Start from the top of the toilet and work down to the base.
ØFaucets Use the 1-inch nylon round brush or small triangular brush on low steam.
Bathtub/Shower
ØFiberglass –For crevices use the 1” nylon brush with the 1-hole nozzle. Use large triangle brush
with bonnet on walls.
ØCeramic – Use the large triangular brush with a bonnet on low steam setting to avoid
scratching surface.
ØShower door – Use the large triangle brush with a bonnet on the low steam setting
Walls
ØWalls, painted trim or molding
Use the large floor brush with a bonnet on the low steam. Pretest an area to be cleaned for paint
thickness since it is easy to take paint off walls.
Ø Oil Paint - Use large triangle brush on low steam. Do not stay on one spot too long
ØLatex Paint - Use large triangle brush with a towel on the low steam setting. Do not apply
pressure. Move quickly with smooth strokes or use nozzle about 5-inch off.
Wallpaper Removing
Use wallpaper remover attachment (sold separately) or use the large triangle brush with bonnet.
Start in one corner hold in one spot for 5 to 10 seconds. Pull corner out start peeling back while
moving wallpaper remover or triangle brush slowly back and forth.
Windows
ØWindow Sills and Thresholds Use the 1” nylon brush with 1-hole nozzle on medium steam.
ØWindow Frame Use 1” inch brass brush directly on the surface to remove dirt and to polish.
Wipe with towel.
ØWindow Screens Use the large triangular brush with bonnet or the window squeegee tool on a
low steam.
10Cleaning
Upholstery
Use the large floor or triangle brush with bonnet. Pretest an inconspicuous area and work quickly
and lightly especially if fabric has Scotch Guard. If material seems to be getting too wet, cut
steam off.
Leather - DO NOT CLEAN INTERIOR LEATHER FURNITURE WITH STEAM.
Vinyl – Blow out cracks and crevasses using only the 1-hole nozzle.
Auto
ØWheels
Use triangular brush on medium steam and vigorously brush dirt away. Use 1” nylon brush for
crevices.
ØCarpets and Upholstery
Pretest area and work quickly and lightly especially if fabric has Scotch Guard.
Use the large triangle brush with a bonnet on low steam setting. Pre-steam bonnet 3 to 5 seconds
at low steam. Clean using back and forth movement and do not stay in area for too long.
ØAir Conditioning Vents
Put a large towel under the vents on the floor and cover the seats. Use the 1-hole nozzle (no
brush) attached to the hose handle and insert nozzle tip into the vent on low steam.
ØDash
Use the small triangular brush with the 3-hole nozzle. Wipe immediately with a microfiber cloth.
11Notices
Read all instructions before using this steam cleaner.
STEAM GENERATED BY THIS MACHINE IS EXTREMLY HOT AND WILL CAUSE
INJURY IF IT COMES IN CONTACT WITH THE SKIN OR EYES. USE AS DIRECTED BY
THE MANUAL AND ONLY AIM THE STEAM HANDLE AT THE CLEANING AREA.
Ø DO NOT leave the steam cleaner unattended while plugged in. Turn off all controls and unplug the
electrical cord when not in use, when moving to another location and before servicing.
Ø DO NOT use with a damaged cord or plug. If the steam cleaner is not working as it should, has
been dropped, damaged, left outdoors or dropped into water, call for service before using.
Ø NEVER attempt to disassemble this product in a way not instructed in this manual.
Ø DO NOT handle the electrical plug with wet hands.
Ø DO NOT use near children.
Ø DO NOT pull or carry by cord. Keep cord away from heated surfaces.
Ø Keep body, hands, and feet away from nozzle or brush steam. Steam can cause burns.
Ø ALWAYS set safety switch on hose handle to the locked position when not in use.
Ø Not setting safety switch to locked position could result in an injury.
Ø ALWAYS test a small area before cleaning a large area on any type of surface to endure no damage
will occur.
Ø DO NOT expose machine to freezing temperatures while not in use.
Ø DO NOT store gasoline or other flammable vapors and liquids in the vicinity of this or any other
appliance.
ELECTRICAL CONNECTIONS
The steam cleaner uses 110 Volts and will pull 13.1 Amps. It should be the only appliance plugged
into an outlet.
Ø Use only a 12 gauge / 15AMP rated or higher extension cord.
Ø Any alteration of electrical cord supply on this steam cleaner will void all warranties.
Ø Once electrical hook-up meets requirements, make sure all switches on front of unit are in the off
position before plugging unit into electrical outlet. For circuit breaker protection, if possible plug the
unit into an outlet isolated from other equipment, or turn the other equipment off while using the
steam cleaner — the combined electrical amperage of other equipment and the steam cleaner
together may cause a circuit breaker to trip.
Ø Always press the power button to OFF before you unplug the unit.
Ø Removing the ground prongs from the power cord will void any and all warranties and can cause
risk of shock or injury
KEEP FOR YOUR RECORDS. THIS MANUAL MUST BE RETAINED FOR
FUTURE REFERENCE. PLEASE READ, UNDERSTAND AND FOLLOW THE
INSTRUCTIONS AND WARNINGS CONTAINED IN THIS MANUAL BEFORE
USING THIS VAPOR STEAM CLEANER.
In order to reduce the risk of fire, electric shock, personal injury or damage to property, follow these
instructions carefully. When using electrical appliances, basic safety precautions should be followed.
12Terms and Conditions / Returns
Your steamer comes with a one year limited warranty which becomes effective on the date of shipment from
US Steam and is granted to the initial customer and is nontransferable. Any claims under this warranty must
be made before the end of the applicable warranty period. During such period if US Steam determines that a
part or system is defective in material or workmanship, US Steam, at its option, will provide you with a
repaired part or replace any part that is covered by the limited warranty. US Steam reserves the right to
substitute functionally equivalent new or serviceable reconditioned parts or systems. US Steam’s
responsibility is limited to repair, replacement, credit or refund, any of which may be selected by US Steam at
its sole discretion. The Warranty does not cover defects or damage arising from the disassembly or attempted
disassembly of your steamer.
The limited warranty covers only defects arising from normal use and does not include malfunctions or
failures arising from: misuse, abuse, neglect, alteration, usage not in accordance with user manual and
instructions, depletion of consumables, acts of nature or damage caused by repairs where such repairs were
made without US Steam’s express approval.
SERVICE AND SUPPORT
Before you ship your steam cleaner for service, you must call 1-800-613-3874 (M-F 9am-4:30pm Central
Time) or contact us through the web at www.ussteam.net our customer service representative will explain
how you must package and ship your Steamer to prevent further damage.
RETURN PROCEDURES
Prior to returning the product(s) you must call or office (817) 297-7745 or email to cs@ussteam.net.
When packing the Steamer, you must use the original packing material to prevent damage in shipping. Make
sure you drain the water and include all items and accessories. You will be responsible for all shipping cost.
Send returns to
US Steam
7940 Rodeo Trail, Ste 360
Mansfield, TX 76063
LIMITATIONS
EXCEPT AS SET FORTH HEREIN, US STEAM MAKES NO WARRANTIES, EXPRESSED OR
IMPLIED, AND DISCLAIM AND NEGATE ALL OTHER WARRANTIES, INCLUDING WITHOUT
LIMITATIONS, IMPLIED WARRANTIES OF MERCHANTABILITY, FITNESS FOR THE
PARTICULAR PURPOSE AND CONFORMITY TO MODELS OR SAMPLES. SOME JURISDICTIONS
DO NOT ALLOW LIMITATIONS ON IMPLIED WARRANTIES, SO THESE LIMITATIONS MAY
NOT APPLY TO YOU.
GOVERNING LAW, JURISDICTION AND COSTS
THESE LIMITED WARRANTIES ARE INCORPORATED INTO AND ARE ESSENTIAL AND
MATERIAL PROVISIONS OF THE TERMS AND CONDITIONS OF SALE OR SELLER PRODUCTS
TO YOU. ALL DISPUTES ARISING OUT OF OR RELATED TO THE LIMITED WARRANTY SET
FORTH HEREIN (CUSTOMER DISPUTES) SHALL BE GOVERNED BY THE LAWS OF THE STATE
OF TEXAS. THE CUSTOMER HEREBY CONSENTS TO THE JURISDICTION AND VENUE OF THE
STATE COURTS OF TEXAS TO RESOLVE ANY AND ALL CUSTOMERS DISPUTES WITH
BOSTON GREEN GOODS, INC., AND THE CUSTOMER WAIVES ALL DEFENSES TO SUCH
JURISDICITON AND VENUE INCLUDING, BUT NOT LIMITED TO, ANY DEFENSE BASED ON
INCONVENIENT FORUM. IN THE EVENT THE CUSTOMER AND BOSTON GREEN GOODS, INC.
ARE UNABLE TO RESOLVE ANY CUSTOMER DISPUTE, AND ANY COLLECTION ACTION, SUIT
OR OTHER JUDICIAL PROCEEDING IS COMMENCED; THE PREVAILING PARTY IN ANY SUCH
ACTION, SUIT OR PROCEEDING SHALL BE ENTITLED TO RECOVER ITS COSTS AND
REASONABLE ATTORNEY’S FEES INCURRED.
13Floors, Kitchen, Grills & Bathrooms
Restaurant Chemical free cleaning in all food prep and storage areas. A Better Way to clean
floors and bathrooms.
Patient Beds, Wheel Chairs & Curtains
Hospital
Steam is a proven killer of virus and infection causing germs. Steam can
sanitize areas too difficult to treat with chemicals.
Delis, Freezers & Butcher Areas
Grocery
Chemical free cleaning in areas of food storage and preparation.
Desk, Tables & Partitions
Office Cleaning with steam guarantees a clean, germ-free work environment increasing
productivity, employee retention and reducing sick days.
High Touch Areas, Bathrooms, Locker Rooms, and Gym Mats
School
Steam kills on contact, no dwell time.
Equipment, Lockers and Saunas
Gym Kill viruses and germs found on workout equipment and gym floors.
Toys, Playgrounds & Beds
Day Care Steam clean high touch areas where kids pass germs. Extreme cleaning with
steam can reduce sick days for kids and employees.
Seats and Floors
Automotive Combine steam and extraction into one system for more efficient detailing.
A Better Way to Clean
Corporate Office
7940 Rodeo Trail
Ste 360
Mansfield, TX 76063
(817) 297-7745You can also read