User Manual ENG DE FR - Red Sea
←
→
Page content transcription
If your browser does not render page correctly, please read the page content below
User Manual ENG DE FR

Red Sea ReefMat®

                                          ENG

Smart– Plug&Play®– Efficient

        User Manual

                                              3
Red Sea ReefMat®
Contents
Introduction................................................................................................5
ReefMat Components...............................................................................6
Safety ........................................................................................................7
Overview.....................................................................................................8
Features of the ReefMat smart fleece-mat roller filter........................ 8
Benefits of roller filters over static mechanical filters...........................9
Preparations before installing the ReefMat roller filter.........................9
Installation of the ReefMat....................................................................12
LED Indicators..........................................................................................16
Settings Button - Function.....................................................................17
Wind / Unwind Buttons.........................................................................17
Connection and initial Setup..................................................................18
Inserting a new fleece-mat roll............................................................18
Activating a new fleece-mat roll..........................................................22
Operation.................................................................................................22
Other Settings......................................................................................... 24
ReefMat Data..........................................................................................25
Partial Roll............................................................................................... 26
Removing used fleece-mat from the Take-up shaft...........................26
Device Maintenance...............................................................................27
Troubleshooting...................................................................................... 28
Warranty...................................................................................................30
4Red Sea ReefMat®
Introduction ENG
Congratulations on your purchase of Red Sea’s ReefMat®.
The ReefMat is a plug & play, fully automated, smart fleece roller filter
that keeps your aquarium water crystal clear for weeks at a time.
Designed with the hobbyist in mind, the ReefMat features an easy
fleece-mat replacement system that allows you to switch rolls without
having to remove the filter from the sump or turn off the pumps.
ReefMat includes a smart drive unit that controls and monitors the exact
length of fleece-mat that is used as well as many other unique features.
ReefMat is part of Red Sea’s suite of smart devices that are operated
via Wi-Fi by Red Sea’s ReefBeat® App, which needs to be installed on a
smart mobile device with internet connectivity.
Welcome to Red Sea’s smart reef-keeping.
Sincerely,
The Red Sea Team
5Red Sea ReefMat®
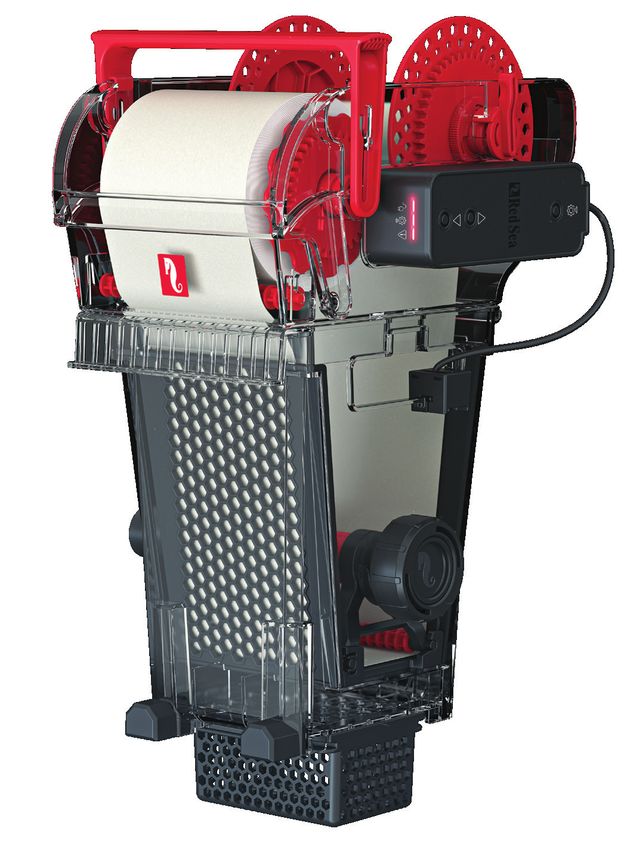
ReefMat Components
Take up shaft Dispensing shaft
R35450 (RM 500) R35449 (RM 500)
R35461 (RM 1200) R35460 (RM 1200)
Clip kit
R35446 Front guide roller
R35456 (RM 500)
PSU Drive-unit R35467 (RM 1200)
R35447 AUS R35444
R35447 CHN Front flap
R35447 EUR
R35447 GBR Level sensor
R35445 Hose connector
R35447 USA
R35459 (RM 500)
R35447 JPN
Mat retainer R35470 (RM 1200)
R35455 (RM 500)
R35466 (RM 1200) Inlet hose
R35458 (RM 500)
Filter grids
R35469 (RM 1200)
R35454 (RM 500)
R35465 (RM 1200)
Filter chamber
R35452 (RM 500)
Inlet ports (x2) R35463 (RM 1200)
Port plug kit Media basket
R35457 (RM 500) R35451 (RM 500)
R35468 (RM 1200) R35462 (RM 1200)
Legs/Bumpers kit
R35448
6Red Sea ReefMat®
Safety ENG
PLEASE READ AND FOLLOW ALL SAFETY INSTRUCTIONS. putting on or taking off parts, and before cleaning. Never pull the cord itself
THIS DEVICE IS INTENDED FOR HOUSEHOLD AND INDOOR USE ONLY. to remove the plug from the outlet. Grasp the plug and pull to disconnect.
Do not use an appliance for anything other than its intended use.
DANGER: To avoid possible electric shock, special care should be taken
when handling a wet aquarium. For each of the following The use of attachments not recommended or sold by the appliance
situations, do not attempt repairs yourself; return the appliance manufacturer may cause unsafe conditions.
to an authorized service facility for service or discard the Do not install or store the appliance where it will be exposed to the
appliance. weather or to temperatures below freezing point.
WARNING: To guard against injury, basic safety precautions should be Make sure an appliance is securely installed before operating it.
observed, including the following: Read and observe all the important notices on the appliance.
Do not operate any appliance if it has a damaged cord or plug, if it is
malfunctioning, or if it is dropped or damaged in any manner. Note: A cord rated for less amperes or watts than the appliance rating
may overheat. Care should be taken to arrange the cord so that it
This appliance can be used by children aged from 8 years and above
cannot be tripped over or pulled accidentally.
and persons with reduced physical, sensory or mental capabilities or lack
of experience and knowledge if they have been given supervision or Do not use if cord is damaged. In case of need, do not attempt to
instruction concerning use of the appliance in a safe way and understand replace or repair yourself; return the appliance to an authorized
the hazards involved. Children shall not play with the appliance. service facility for service or discard the appliance.
Cleaning and user maintenance shall not be made by children without
supervision.
Rating info:
The appliance is only to be used with the power supply unit provided
Operating Temperature: 5 to 45°C
with the appliance.
Relative Humidity: 15~85%RH
Close supervision is necessary
Supply voltage: 100-240V 50/60Hz
when any appliance is used by or
Rating: 1A, @10W Max.
near children.
Operating Voltage 12 Vdc
To avoid injury, do not contact Operating Frequency: 2402 - 2480 MHz
moving parts. Max. Power: 32.43 mW
Always unplug an appliance from
an outlet when not in use, before
Figure 1: Drip Loop
7Red Sea ReefMat®
Overview Features of the ReefMat smart fleece-mat roller
filter
The ReefMat is a mechanical filter that removes particulate matter from Designed with the hobbyist in mind, the ReefMat features an easy mat
aquarium water by passing the water through a fleece filter material replacement system that allows rolls to be replaced without having to
(fleece-mat) that physically traps the particles that are larger than the remove the filter from the sump or even turn off the pumps.
mesh of the filter material. ReefMat includes a dual, solid-state water level sensor and an
The ReefMat is designed to be located under an aquarium inside the unprecedented smart drive unit that drives, controls and monitors the
sump and is either gravity fed with water directly from the aquarium or exact length of mat that is used. ReefMat is Wi-Fi connected to Red Sea’s
by a dedicated pump that is also located in the sump. ReefBeat smart aquarium eco-system and will give you a head’s up a
The fleece-mat is supplied in the form of a continuous roll that passes few days before the fleece-mat needs replacing or let you know if it
over a series of filter grids inside the filter chamber. needs your attention. The system provides you with a daily and hourly
The ReefMat filter chamber is open at the bottom and when the fleece- usage log so that you can monitor the performance of your current roll
mat is new the water level inside the chamber will be at the same level and even keeps track of your previous rolls.
as the water in the sump. As the fleece-mat traps more and more waste The patent-pending drive-unit, drives the used material take-up shaft
particles, the water level inside the filter chamber slowly rises. while recording the rotation of the new material dispensing shaft. This
A water level sensor that is located near the top of the filter body detects arrangement enables the unit to immediately turn off the motor if it
the rising water level and at a predefined point will trigger an automatic identifies that the fleece-mat has become blocked or torn as well as
advancement of the fleece-mat thereby introducing a preset length sending a notification to the ReefBeat App.
of clean material, reducing the water level inside unit. This process The dual water level sensor is mounted at the top of the filter chamber
continues automatically for the full length of the roll which then needs with one sensor inside the chamber and one outside. The internal sensor
to be replaced. is for the regular operation of the ReefMat while the external sensor will
detect if there is a high-water level in the sump (such as when the main
return pump is off) and prevent continuous dispensing of new fleece-
mat.
The built-in media basket at the ReefMat outlet will improve the
performance of all filtration media by ensuring only pre-filtered water
flows through them.
8Red Sea ReefMat®
Benefits of roller filters over static mechanical Preparations before installing the ReefMat ENG
filters roller filter
Static mechanical filters such as micron socks, floss, pads etc. do a Hang-on Installation
good job of trapping filter particles. However until these static filters For ease of maintenance, it is recommended to hang the ReefMat on the
are removed and washed, the trapped particles remain in the water front wall of the sump. For this installation insert the rubber spacers to
and gradually decompose adding nutrients (nitrate and phosphate) to the bottom front of the filter chamber
the system. Using a correctly rated roller filter will physically remove
all collected particles within about a day, significantly reducing their
decomposition. Due to the efficiency of the ReefMat, especially with
carbon in the built-in media basket, you may well notice a drop in
nutrient levels shortly after it is added to an established aquarium.
Red Sea systems
If you are retrofitting the ReefMat to a Red Sea REEFER or MAX
aquarium system, check out the recommended installation options
on the web-site:
https://www.redseafish.com/reefmat-installation-options
9Red Sea ReefMat®
Freestanding installation Media Basket
Attach the 4 legs to the bottom of the filter chamber and make sure that If you plan on using the media basket, make sure that there is enough
there is enough room in front of the ReefMat to fully open the front flap. room to slide the basket completely out from one side of the filter
chamber. If this is not possible the media basket (without cover
assembled) can be accessed through the filter chamber, however this is
less convenient to operate.
ReefMat 500 15cm / 6”
ReefMat 1200 20cm / 8”
ReefMat 500 ReefMat 1200
D1 20.5cm / 8.1” 22cm / 8.7”
D2 7cm / 2.8” 8cm / 3.2”
D2 D3
D1
D3 15cm / 5.9” 16cm / 6.3”
10Red Sea ReefMat®
ENG
Inlet Hose Cut the free end of the hose to the required length according to your
The kink-resistant corrugated inlet hose is supplied with one end ready installation. Using the finger-cover provided spread a small amount of
for connection to one of the inlet ports that are on either side of the the liquid sealant on the first 2cm / 0.8” of the internal surface of the
filter chamber. hose and screw in the hose connector until it is tight. Remove the excess
sealant from inside the hose.
2cm / 0.8”
11Red Sea ReefMat®
Installation of the ReefMat
Rotate the Take-up Shaft Locks to the open
Note: This part has a left-hand thread. The pipe can be used before the position and remove the take up shaft
sealant is dry. The other side of the universal connector can be from the ReefMat Head. Open the front
glued to standard 32mm or 1” PVC piping. flap by raising the handle and rotating it
forwards to its horizontal position, remove
the dispensing shaft, remove the front
guide roller, close the flap and secure in
position by lowering the handle.
32mm
Remove the ReefMat Head
from the Filter Chamber by
pressing on the side latches
while lifting it up.
Alternatively, the free end of the corrugated hose can also be attached
directly to standard 32mm diameter PVC tubing as used in most Red
Sea Reefer series systems. This join is not under any water pressure,
however it is advisable to use the liquid sealant and secure the
corrugated hose in place with a cable tie.
12Red Sea ReefMat®
ENG
Remove the mat-retainer from the bottom Connect the DC power-supply to the 2-pin power inlet port at the rear of the
of the filter chamber by rotating the center drive-unit.
tube 180 degrees (water outlet slits facing Connect the water level sensor to the 4-pin inlet port at the rear of the
upwards) and lift. drive-unit.
Mount the drive-unit on
either the left or right
side of the ReefMat
Head and secure it in
position with the clip
provided. Make sure
that you have enough
Place the filter chamber into
room by the side of the
the chosen location inside
drive-unit to operate the
the sump and connect the
Wi-Fi setting and Wind/
inlet hose to the inlet port on
Unwind buttons.
either the left or right side of
the filter chamber.
Make sure that the front and
rear filter grids are in position
inside the chamber and click
the ReefMat Head unit into
place.
13Red Sea ReefMat®
Mount the level sensor to its operating position on the filter chamber.
A B
C D
14Red Sea ReefMat®
LED Indicators ENG
Thread the power-supply out the rear of the cabinet and insert it into the Power Indicator:
wall outlet or other suitable power center. Check that the indicator LED on • Solid Red light – DC power is available.
front of the drive-unit is on.
• No Red light – DC power is not available.
Onboard the drive-unit to the ReefBeat App and complete the initial setup
before installing the fleece-mat.
Settings Indicator:
• Solid Red light – ReefMat is connected to the Home network.
• Blinking Red light – ReefMat is in Wi-Fi Access Point (AP) mode
(can be discovered by Wi-Fi devices).
• No Red light – ReefMat Wi-Fi is off.
• Double blink – indicates change of status / end of process.
Status Indicator:
• No Red light – ReefMat is operating normally.
• Blinking Red light – indicates that the Auto-Advance mode has
been suspended for one of the following conditions: High-
Water, Level sensor disconnected, Jammed-Mat, End-of Roll.
Simultaneous pressing of the wind/unwind buttons resets
the ReefMat to Auto-Advance mode.
15Red Sea ReefMat®
Settings Button - Function Wind / Unwind Buttons
If indicator LED is off (ReefMat Wi-Fi is off): Pressing button for 5 Pressing the wind button will manually advance material from the
seconds (until double blink) activates Wi-Fi AP mode. dispensing roll and wind ( ) it on to the take-up roll.
If indicator LED is blinking (ReefMat Wi-Fi is in AP mode): Pressing Pressing the unwind ( ) button will manually dispense used material
from the take-up roll however it is not automatically wound back to
button for 5 seconds (until double blink) switches Wi-Fi off. the dispensing roll. This action is primarily to release the tension on the
If indicator LED is on (ReefMat Wi-Fi is connected to a Wi-Fi take-up roll so that it can be easily removed from its normal operating
network): Pressing button for 5 seconds (until double blink) disconnects position.
the ReefMat from the network and switches it to Wi-Fi AP mode. (Note: Note: The direction of rotation of the wind/unwind buttons are set when
before disconnecting a ReefMat from a network, delete the ReefMat selecting the right/left installation of the drive-unit. The default setting
from the ReefBeat App via the Device Manager.) Note: All settings are is for right side installation where the buttons will work correctly even
retained and can be restored when reconnected to the ReefBeat. before onboarding to ReefBeat. For left side installation the buttons will
Clear Settings: Pressing the button for 15 seconds (until double blink) work in the opposite direction until onboarded to ReefBeat.
deletes all user settings and switches off the Wi-Fi. Complete the reset
process by disconnecting and reconnecting the DC power.
Settings Wind Unwind
16Red Sea ReefMat®
Connection and initial setup Inserting a new fleece-mat roll ENG
Download and install the ReefBeat-App from the app Store or Google Remove all of the packaging material and assemble the new mat onto
Play as appropriate for your Smart Mobile Device (SMD). the dispensing shaft as follows:
If this is your first ReefBeat device you will need to set up an account Disassemble shaft.
and add some details of your aquarium. If you do not have a permanent
internet connection set the aquarium to “Offline”.
Set your ReefMat to AP mode by pressing the settings button for 5
seconds (until double blink). The indicator LED should be blinking.
Tap the Add Device button from the Device Manager page, select the
icon and follow the instructions in the app. This may take a few seconds.
If no devices appear on the list, check that the ReefMat is in AP mode
and/or refresh the page.
ReefBeat-App will now display a list of Wi-Fi networks and signal Insert the shaft into the cardboard core of the new roll.
strengths that are available to the ReefMat from its current location.
Select your preferred network and wait a few moments while the
ReefMat connects to it. The indicator LED will now be a solid red. Follow
the instructions on the app for initial settings.
If you have set the aquarium to Offline, select the “Direct Mode” option
at the top of the screen to skip the network connection. The indicator LED
will continue to blink as the ReefMat WI-Fi remains in AP mode.
Follow the instructions in the app for connecting the ReefMat to the
ReefBeat App and cloud. Then select the appropriate ReefMat model 500 Insert the chuck on the shaft and screw the side plate firmly into
or 1200 and select on which side of the ReefMat (Left or Right) you have position.
installed the drive-unit. It is best to come back to the App and confirm
that the fleece-mat roll has been installed after it has actually been
installed to avoid triggering any of the warning notifications.
17Red Sea ReefMat®
Open the flap and place the dispensing shaft into the recesses in the Note: Disassemble and reassemble the take-up shaft to familiarize
flap, with the free end of the material hanging down on the outside. yourself with how this is done. This will make it easier when you need
to remove the first full used roll.
18Red Sea ReefMat®
ENG
Thread the free edge of the fleece-mat into the slot in the take-up shaft To insert the fleece-mat into the mat-retainer, slide the top assembly out
and rotate the top side forwards (so that the new material comes from of the lower grid.
the bottom rear of the shaft) for a few turns to firmly attach the material
to the shaft. Lower the shaft to its operating position in the Head and
rotate slightly as the gears on the shaft engage with the gears on the
drive-unit. Close the side locks to hold the shaft in position.
Place the grid under the fleece-mat with the openings for the guide
rollers facing forwards and slide the top assembly back into position.
Then rotate the tube so that the slots are facing upwards.
19Red Sea ReefMat®
Lower the retainer inside the chamber until it is firmly seated at the Return the front guide roller to the Head and click it into its operating
bottom and rotate the tube 180 degrees so that the side connectors position.
engage and the slots are facing downwards. The mat will naturally
unwind from the new roll while lowering the retainer as the take-up
shaft cannot rotate freely.
20Red Sea ReefMat®
ENG
Move the new roll to its operating position in the Head and rotate Return the flap to the upright position and lock in position by lowering
slightly until the fleece is taught. Alternatively, pressing the wind button the handle.
on the drive-unit will wind any loose material on to the take-up roll.
21Red Sea ReefMat®
Activating a new fleece-mat roll Operation
• Open the App and go to the “New roll installation” from the settings Auto-Advance
page and select the “Full roll” option. This will activate the unit in the The ReefMat is designed to automatically advance the fleece-mat by a
normal operating “Auto-Advance” mode. If you are not installing a full preset length each time the water level inside the filter rises to the level
roll, see the “partial roll” instructions below. of the internal water sensor. The auto-advance function can be disabled/
enabled as required from: Homepage>settings page>Auto Advance
• When installing a new roll, the entire filter chamber is lined with
When activated the auto-advance function will continue for the entire
clean fleece-mat and therefore it could take quite some time before length of the roll unless one of the following situations occur. In such
the initial fleece-mat gets blocked enough for it to be advanced. The cases the appropriate notification will be sent to the ReefBeat App, the
ReefBeat homepage will present the initial length (RM500 – 40cm / status indicator LED on the drive-unit will blink and the ReefMat will wait
15.7” RM1200 - 48cm / 18.9”) in the usage progress bar included in for your intervention to resolve the issue.
the “today” and “total usage” counters. If there is no Auto-Advance for a period of 6 hours the drive-unit will
perform an automatic self-test of approximately 0.5cm / 0.2” that will
• If you wish to ensure that you have installed the new roll correctly,
detect if the fleece-mat is torn.
use the “Manual Advance” option from the settings page to advance
the fleece-mat by the preset default length of 2 – 2.5cm / 0.8”-1”.
Jammed-Mat
In the event that the fleece-mat cannot advance due to a mechanical
blockage (the take-up shaft is stuck or is rotating without advancing the
fleece-mat) or the fleece-mat gets torn, the drive-unit will stop trying
to advance the fleece-mat and wait for your intervention to resolve the
issue. The status indicator LED on the drive-unit will blink. The ReefBeat
App will receive a notification and the status in the homepage will be
shown as “Jammed-Mat”.
If the fleece-mat is blocked, it is most likely that an animal such as a
snail has got wedged between the fleece-mat and one of the rollers on
the retainer. To resolve the blockage, do the following:
• Press on the unwind button until about 2.5cm/1” of fleece-mat has
been released from the take-up roll.
22Red Sea ReefMat®
ENG
• Rotate the dispensing roll by hand to take up the released fleece-mat. End of Roll
This may dislodge whatever is causing the blockage without having to When a roll ends, the drive-unit will stop trying to advance the fleece-
remove the mat retainer. mat and wait for you to install a new roll. The status indicator LED on the
• Press on the wind button until the fleece-mat advances about 5cm or drive unit will blink. The ReefBeat App will receive a notification and the
2”. If this does not resolve the blockage then do the following: status in the homepage will be shown as “End of Roll”.
• Open the front flap and move the dispensing roll from the head to Once the new roll has been installed, open the ReefBeat App and select
the flap. the “New roll installation” from the settings page. If you are installing a
• Raise the mat-retainer and remove it from the fleece-mat. partially used roll instead of a full new roll, see the instructions below.
• Wash the mat-retainer and ensure that the guide rollers can rotate
freely. No Level sensor
• Return the mat-retainer to the fleece-mat and lock it back into If the level sensor is not connected to the drive-unit, the ReefMat
position inside the filter chamber. cannot function. The status indicator LED on the drive-unit will blink. The
• Return the dispensing roll to the head, close the flap and press the ReefBeat App will receive a notification and the status in the homepage
wind button until the dispensing roll begins to rotate. will be shown as “No sensor”.
If the take up shaft is still rotating without advancing the fleece-mat or Once the sensor has been connected the drive-unit will return
the fleece-mat has torn, remove the used fleece-mat from the take-up automatically to Auto-Advance.
shaft (cut the fleece-mat if required) and reinsert the fleece. Note:
The usage counters will continue as normal as they are not affected by High-Water
removing material from the take-up roll.
If the water level in the sump rises to the operating water level inside
Once the jam has been resolved, restart the unit either from ReefBeat by the ReefMat filter chamber (such as when the main return pump has
pressing the “Resume” button or directly from the drive-unit by pressing been switched off) the drive-unit will stop trying to advance the fleece-
on the wind/unwind buttons at the same time for 2 seconds. mat until the water level in the sump drops (such as when the main
Note: If the Jammed-Mat notification occurs within the first day of return pump has been switched on again). While the High-Water state is
onboarding ReefMat to the ReefBeat, check that the Left/Right setting detected the status indicator LED will blink and the status in the ReefBeat
for the drive unit is correct. The wrong drive unit position setting will App will be shown as “High-Water”.
cause the “Jammed-Mat” state as soon as the first mat advance occurs.
Homepage>settings page>more settings>Drive-unit position
23Red Sea ReefMat®
Other Settings
Manual Operation Scheduled Advance
The fleece-mat can be manually advance by pressing the “wind” button The scheduled advance feature enables you to preset a long fleece-
on the side of the drive-unit. The length of fleece-mat advanced will be mat advance at a specific time every day. For example, if the average
according to how long the button is pressed, however the actual length daily usage is 36cm and you set a scheduled advance of 12cm you can
is recorded and is included in the hourly dispensing log. assume that the ReefMat will not need to advance the flee-mat again
A manual advance of the same length as the pre-set auto-advance can for about 8 hours. This is useful if you want to ensure a specific period
be given at any time by selecting the manual advance option from the without any noise, such as during the night for a tank located in a
head settings page. (Homepage>settings page>manual advance) This bedroom. This feature is only available once the daily average has been
can be used to as a test to confirm the proper functioning of the unit. established. To activate the Scheduled Advance: Homepage>settings
page>more settings>Scheduled advance. Remember to press the
“Save” button to implement your changes.
Mat Advance (length)
The drive-unit can be set to auto-advance the fleece-mat from a End of Roll monitor
minimum of 0.5cm – 1.0cm / 0.2 – 0.4” up to the full length of the filter
chamber. The end of roll monitor lets you know a preset number of days before
the roll is due to run out, based on the daily average consumption.
The default preset is for 2.0 – 2.5cm / 0.8 – 1.0”. It is recommended to The default value is set at 5 days. This can be changed from:
leave this default setting for the first few days of operation, until the Homepage>settings page>more settings>End of Roll monitor.
average daily usage settles down to a regular value. Once the daily Remember to press the “Save” button to implement your changes.
average is established the mat advance length can be customized to
give the desired frequency of advances.
Editing ReefMat Model & Drive-unit position
To customize the Mat advance length: Homepage>settings page>more
If during initial setup of the ReefMat and/or installation of the fleece-
settings>Mat advance. Remember to press the “Save” button to
mat the wrong model/mat was selected, these settings can be changed
implement your changes.
from Homepage>settings page>more settings>Drive-unit position or
Change Model. Remember to press the “Save” button to implement
your changes.
24Red Sea ReefMat®
ReefMat Data ENG
Clear settings The ReefBeat provides a daily and hourly log of fleece mat usage for the
To permanently remove all user settings from the memory of the previous 30 days (7 days for offline aquariums). The log for the full roll
ReefMat and return it to its initial default state, perform the following can be exported as a .csv file.
steps. In addition, ReefBeat maintains a roll log history showing the number of
If the device is connected to the ReefBeat, trigger the hard-reset option days previous rolls were used for.
from the Device-Manager: Device Manager>Hard-Reset
If the device is not connected to the ReefBeat, press the Settings button
for about 15 seconds (until the Wi-Fi indicator LED shows a double blink),
release the button and wait for about 1 minute for the device to reboot.
The unit will restart without any user settings and with the Wi-Fi
switched on, exactly as shipped from the factory. The unit will retain the
latest installed version of the firmware.
25Red Sea ReefMat®
Partial Roll Removing used fleece-mat from the Take-up shaft
In the event that you have removed a partially used roll of fleece-mat Remove the retaining nuts by
and wish to use it at a later time you should select the “Partial roll” rotating counter-clockwise.
option when installing it as a new roll.
To get full functionality, it is best to measure
the external diameter of the roll before
installing it on the dispensing shaft and enter
this value in the ReefBeat App.
As a guide the diameter of the side disk is Remove the side disks by pushing
98mm 3.9”. the 2 halves of the shaft through
the disk.
Slide the 2 halves of the
shaft out from the used
fleece-mat, one at a time.
If you choose not to enter the diameter, the ReefMat will continue
filtering the aquarium correctly however the system will not be able to
monitor the exact usage and the end-of-roll notification will be disabled.
Reassemble the take-up shaft ready
for next use.
26Red Sea ReefMat®
Device Maintenance ENG
Drive-unit
For continued smooth running of the Drive-unit, we recommended
making sure that it is kept clean, dry and free of any buildup of salt
deposits on a regular basis.
The unit is not waterproof. Do not submerge in water or other solutions.
Do not open, there are no user serviceable parts inside the Drive-unit.
Water level sensor
We recommended making sure that the sensor is kept free of any
buildup of algae growth or salt deposits on a regular basis. The sensor is
waterproof and can be safely washed under running water. The titanium
tips can be brushed to remove any hard deposits.
Filter chamber components
It is recommended to rinse the mat-retainer and filter grids each time
the fleece-mat is replaced to prevent the buildup of bacteria, algae or
marine fauna that could cause blockages or tears.
27Red Sea ReefMat®
Troubleshooting
A full and up to date FAQ for the ReefMat and the ReefBeat app is Q. I keep getting notifications that my ReefMat is not connected.
available in the app (Homepage Main Menu> Help> FAQ) and on our A. If your network router is not permanently connected to the internet,
website. set your Aquarium as “Offline” My Aquariums> Device Line Menu>
Offline. If your network router is meant to be permanently connected,
Q. I am having trouble installing the ReefBeat App or it crashes or does
check the quality of the Wi-Fi connection between the ReefMat and
not seem to be working as described in the manual.
your router or the stability of your internet connection.
A. Check that your specific mobile device is on the list of supported
devices on our website. Q. I have just set up the ReefMat for the first time or just re-onboarded it
to the ReefBeat App and the Wind/Unwind buttons on the drive-unit
Q. My mobile is on the list of supported devices but keeps crashing. seem to be working in the opposite direction.
A. Uninstall and reinstall the app and sign in again with your username A. Check that the Left/Right setting for the drive unit is correct.
and password. If this does not help, contact customer support. The wrong setting will cause the take-up shaft to rotate in the
opposite direction. If not corrected the first manual or auto-
Q. I’m having difficulty connecting the ReefMat to my home network. advance will stop the unit from working and you will receive the
A. Check that the ReefMat Wi-Fi is working correctly by using the “Offline “Jammed-Mat” notification. To check/reset the drive unit position:
Direct Mode” option. If it does, try connecting to the hot-spot of a Homepage>settings page>more settings>Drive-unit position.
mobile phone in the same room: Device Manager> Device Line
menu> About > Connect. Q. Water is flowing out the top of the filter chamber and the fleece-mat
If neither of these options work, contact customer support. If they is not advancing
do work, the problem is likely with the router signal strength or its A. Please check the following:
configuration, or it may be overloaded with devices. • The ReefMat sensor is correctly installed in its operating position on
• Check that the signal strength of your router is sufficient for a stable the filter chamber.
connection exactly where the ReefMat is located. You may need to • The titanium pins on the bottom of the ReefMat sensor are clean
install a suitable Wi-Fi extender closer to the aquarium. free of any obstruction of organic/mineral build-up.
• The router may have too many devices already connected to it. • The Auto-Advance in the ReefBeat App settings page has been
• Your router may be configured not to allow devices like the ReefMat switched on and you pressed the save button at the top of the page.
to be connected. This situation is common in an office environment- • You have a saltwater system. The ReefMat sensor will not detect
contact your IT professional. freshwater or low salinity brackish water.
28Red Sea ReefMat®
ENG
Q. The water level inside the filter chamber does not seem to be rising
and the fleece-mat is not advancing.
A. If this is a newly installed unit, it could take about a day for the initial
fleece-mat lining the filter chamber to get blocked enough to cause
an advance. In an established system check that the Mat-Advance-
length setting is at a reasonable length to cause regular advances
in the time frame you are expecting. Also check that that a long
“Scheduled-Advance” is not implemented. If all of the settings are
correct check for one the following issues that is causing the water to
completely or partially bypass the fleece-mat:
• The inlet hose is not firmly connected to the inlet port or is missing
the silicone seal.
• The inlet port plug is not correctly sealing the unused inlet port.
• The mat-retainer is not seated correctly inside the filter chamber.
• The fleece-mat inside the filter chamber has been perforated or
twisted.
29Red Sea ReefMat®
Warranty
Red Sea Products Limited Warranty. USA
The limited warranty sets forth all of Red Sea Aquatics Ltd (Red Sea) Some states do not allow the exclusion or limitation of incidental or
responsibilities regarding this product. There are no other express or consequential damages, or limitations on how long an implied warranty
implied warranties from Red Sea. lasts, so the above exclusion or limitations may not apply.
Red Sea warrants your product against defects in materials and
workmanship for a period of 24 months, valid from the date of original European Union – Disposal Information:
purchase and will repair this product free of charge (not including This symbol means that, according to local laws and regulations, your
shipping costs) with new/rebuilt parts. The precondition for the warranty product should be disposed of separately from household waste.
is that the stipulated set-up routine is observed. In the event that a When this product reaches its end of life, take it to a collection point
problem develops with this product during or after the warranty period, designated by local authorities. Some collection points accept products
contact your local dealer or Red Sea (at the company address indicated) for free. The separate collection and recycling of your product at the
for details of your nearest authorized service center. time of disposal will help conserve natural resources and ensure that it is
The warranty is extended only to the original purchaser. Proof of date of recycled in a manner that protects human health and the environment.
purchase will be required before warranty performance is rendered. This FCC Compliance Statement:
warranty only covers failures due to defects in materials or workmanship
which occur during normal use. It does not cover damage which occurs This device complies with part 15 of the FCC rules. Operation is subject
during shipment or failures which result from misuse, abuse, neglect, to the following two conditions: (1) This device may not cause harmful
improper installation, operation, mishandling, misapplication, alteration, interference, and (2) this device must accept any interference received
modification or service by anyone other than an authorized Red Sea including interference that may cause undesired operation. Any changes
service center. Red Sea shall not be liable for incidental or consequential or modifications not expressly approved by Red Sea could void the user’s
damages resulting from the use of this product, or arising out of any authority to operate the RF Module and/or the product that incorporates
breach of this warranty. All express and implied warranties, including the the RF Module. The user is cautioned to maintain a 20 cm (8 inch)
warranties of saleability and fitness for particular purpose, are limited to spacing from the product to ensure compliance with FCC regulations.
the applicable warranty period set forth above.
CE Declaration of Conformity:
These statements do not affect the statutory rights of the consumer.
The equipment complies with the RF Exposure Requirement 2014/53/
EU, Council Recommendation on the limitation of exposure of the
general public to electromagnetic fields (0-300 GHz). This equipment
meets the following conformance standards:
EN 300 328, EN 301 489-17.
30Red Sea ReefMat®
ENG
DISPOSAL: Do not dispose this product as unsorted
municipal waste. Collection of such waste separately for
special treatment is necessary.
This product must not be disposed together with the
domestic waste. This product has to be disposed at an
authorized place for recycling of electrical and electronic
appliances.
By collecting and recycling waste, you help save natural resources, and
make sure the product is disposed in an environmental friendly and
healthy way.
Red Sea Aquatics (GZ) Ltd.
Block A3, No.33 Hongmian Road, Xinhua Industrial Park, Huadu
District, Guangzhou City, China, Postal code 510800
31Red Sea ReefMat® 32
Red Sea ReefMat®

                                            DE

Smart – Plug&Play®– Effizient

     Benutzerhandbuch

                                             33
Red Sea ReefMat®
Inhalte
Einführung.................................................................................................................35
ReefMat Bestandteile..............................................................................................36
Sicherheit ................................................................................................................37
Übersicht....................................................................................................................38
Merkmale des ReefMat Smart Vliesmatten-Rollenfilters....................................38
Vorteile von Rollenfiltern gegenüber statischen mechanischen Filtern............39
Vorbereitungen vor der Installation des ReefMat-Rollenfilters.......................... 39
Installation des ReefMat........................................................................................42
LED-Anzeigen...........................................................................................................45
Einstellungstaste - Funktion...................................................................................46
Auf-/Abspulen-Tasten.............................................................................................46
Anschluss und Ersteinrichtung................................................................................47
Einlegen einer neuen Vliesmattenrolle.................................................................47
Aktivierung einer neuen Vliesmattenrolle............................................................52
Betrieb......................................................................................................................52
Andere Einstellungen..............................................................................................54
ReefMat Daten.........................................................................................................56
Teilrolle.....................................................................................................................56
Benutzte Vliesmatte von der Aufwickelwelle entfernen....................................57
Gerätewartung.........................................................................................................57
Fehlersuche..............................................................................................................58
Garantie....................................................................................................................60
34Red Sea ReefMat®
Einführung
DE
Herzlichen Glückwunsch zum Kauf des ReefMat von Red Sea.
®
Der ReefMat ist ein Plug & Play, vollautomatischer, intelligenter Vlies-
Rollenfilter, der Ihr Aquarienwasser wochenlang kristallklar hält. Der
ReefMat wurde speziell für Hobbyisten entwickelt und verfügt über
ein einfaches Vliesmatten-Austauschsystem, mit dem Sie die Rollen
wechseln können, ohne den Filter aus dem Technikbecken entfernen
oder die Pumpen ausschalten zu müssen.
ReefMat enthält eine intelligente Antriebseinheit, die die genaue Länge
der verwendeten Vliesmatte, sowie viele andere einzigartige Funktionen
steuert und überwacht.
ReefMat ist Teil von Red Seas Reihe intelligenter Geräte, die über Wi-Fi
von der ReefBeat®-App von Red Sea betrieben werden, die auf einem
Smartphone mit Internetverbindung installiert werden muss.
Willkommen bei der intelligenten Riffaquaristik von Red Sea.
Mit freundlichen Grüßen,
Das Red Sea Team
35Red Sea ReefMat®
ReefMat Bestandteile
Aufwickelwelle Spendewelle
R35450 (RM 500) R35449 (RM 500)
R35461 (RM 1200) R35460 (RM 1200)
Clip-Kit
R35446 Vordere Führungsrolle
R35456 (RM 500)
Netzteil Antriebseinheit R35467 (RM 1200)
R35447 AUS R35444
R35447 CHN Frontklappe
R35447 EUR
R35447 GBR Füllstandssensor
R35447 USA R35445 Schlauchverbinder
R35447 JPN R35459 (RM 500)
Mattenhalten R35470 (RM 1200)
R35455 (RM 500)
R35466 (RM 1200) Einlassschlauch
R35458 (RM 500)
Filtergitter
R35469 (RM 1200)
R35454 (RM 500)
R35465 (RM 1200)
Filterkammer
R35452 (RM 500)
Einlassöffnungen (x2) R35463 (RM 1200)
Anschlussstecker-Kit Medienkorb
R35457 (RM 500) R35451 (RM 500)
R35468 (RM 1200) R35462 (RM 1200)
Beine/Stoßfänger-Kit
R35448
36Red Sea ReefMat®
Sicherheit
DE
BITTE LESEN UND BEFOLGEN SIE ALLE SICHERHEITSHINWEISE. Trennen Sie ein Gerät immer von der Steckdose, wenn es nicht
verwendet wird, bevor Sie Teile anbringen oder abnehmen und bevor
DIESES GERÄT IST NUR FÜR DEN GEBRAUCH IM HAUSHALT UND IM Sie es reinigen. Ziehen Sie niemals am Kabel selbst, um den Stecker aus
INNENBEREICH BESTIMMT. der Steckdose zu ziehen. Fassen Sie den Stecker und ziehen Sie, um ihn
GEFAHR: Um einen möglichen Stromschlag zu vermeiden, ist beim zu trennen.
Umgang mit einem nassen Aquarium besondere Vorsicht Verwenden Sie ein Gerät nicht zweckentfremdet. Die Verwendung von
geboten. Versuchen Sie in den folgenden Situationen nicht, Zubehör, das nicht vom Gerätehersteller empfohlen oder verkauft wird,
Reparaturen selbst durchzuführen; Bringen Sie das Gerät zur kann zu unsicheren Bedingungen führen.
Wartung zu einer autorisierten Servicestelle oder entsorgen Sie Installieren oder lagern Sie das Gerät nicht an Orten, an denen es
das Gerät. Witterungseinflüssen oder Temperaturen unter dem Gefrierpunkt
ausgesetzt ist.
WARNUNG: Um Verletzungen vorzubeugen, sollten grundlegende
Sicherheitsvorkehrungen beachtet werden, einschließlich der Stellen Sie sicher, dass ein Gerät sicher installiert ist, bevor Sie es in
folgenden: Betrieb nehmen.
Betreiben Sie kein Gerät, wenn das Kabel oder der Stecker beschädigt Lesen und beachten Sie alle wichtigen Hinweise auf dem Gerät.
ist, wenn es nicht richtig funktioniert oder wenn es fallen gelassen oder Hinweis: Ein Kabel, das für weniger Ampere oder Watt als die
in irgendeiner Weise beschädigt wurde.
Geräteleistung ausgelegt ist, kann überhitzen. Achten Sie
Dieses Gerät kann von Kindern ab 8 Jahren und Personen mit darauf, das Kabel so zu verlegen, dass man nicht darüber
eingeschränkten körperlichen, sensorischen oder geistigen Fähigkeiten stolpern oder versehentlich daran ziehen kann.
oder Mangel an Erfahrung und Wissen verwendet werden, wenn sie
beaufsichtigt oder bezüglich der sicheren Verwendung des Geräts Nicht verwenden, wenn das Kabel beschädigt ist. Versuchen
unterwiesen wurden und die beinhalteten Gefahren verstehen . Kinder Sie im Bedarfsfall nicht, es selbst zu ersetzen oder zu
dürfen nicht mit dem Gerät spielen. Reinigung und Benutzerwartung reparieren; Bringen Sie das Gerät zur Wartung zu einer
dürfen nicht von Kindern ohne Aufsicht durchgeführt werden. autorisierten Servicestelle oder entsorgen Sie das Gerät.
Das Gerät darf nur mit dem
mitgelieferten Netzteil betrieben Betriebsinformationen:
werden. Betriebstemperatur 5 bis 45°C
Eine genaue Überwachung ist Relative Luftfeuchtigkeit: 15~85%RL
erforderlich, wenn ein Gerät von Versorgungsspannung: 100-240V 50/50Hz
oder in der Nähe von Kindern
verwendet wird. Leistungsangabe:1A, @10W Max.
Berühren Sie keine beweglichen Betriebsspannung: 12 Vdc
Teile, um Verletzungen zu Betriebsfrequenz: 2402-2480 Mhz
vermeiden. Abbildung 1: Tropfschleife Max. Leistung: 32.43 mW
37Red Sea ReefMat®
Übersicht Merkmale des ReefMat Smart Vliesmatten-
Rollenfilters
Der ReefMat ist ein mechanischer Filter, der Partikel aus Aquarienwasser Der ReefMat wurde speziell für Hobbyisten entwickelt und verfügt über
entfernt, indem das Wasser durch ein Vliesfiltermaterial (Vliesmatte) ein einfaches Mattenaustauschsystem, mit dem die Rollen ausgetauscht
geleitet wird, das die Partikel physikalisch einfängt, die größer als die werden können, ohne den Filter aus dem Sumpf entfernen oder sogar
Maschenweite des Filtermaterials sind. die Pumpen ausschalten zu müssen.
Der ReefMat ist für die Platzierung unter einem Aquarium im ReefMat umfasst einen doppelten Festkörper-Wasserstandssensor und
Technikbecken konzipiert und wird entweder durch Schwerkraft direkt eine beispiellose intelligente Antriebseinheit, die die genaue Länge
aus dem Aquarium oder durch eine spezielle Pumpe, die sich ebenfalls der verwendeten Matte antreibt, steuert und überwacht. ReefMat
im Technikbecken befindet, mit Wasser gespeist. ist über WLAN mit dem intelligenten Aquarien-Ökosystem ReefBeat
Die Vliesmatte wird in Form einer endlosen Rolle geliefert, die über eine von Red Sea verbunden und informiert Sie einige Tage bevor die
Reihe von Filtergittern innerhalb der Filterkammer läuft. Vliesmatte ausgetauscht werden muss, oder informiert Sie, wenn Ihre
Die Filterkammer des ReefMat ist unten offen und im Neuzustand der Aufmerksamkeit erforderlich ist. Das System bietet Ihnen ein tägliches
Vliesmatte befindet sich der Wasserspiegel in der Kammer auf dem und stündliches Nutzungsprotokoll, sodass Sie die Leistung Ihrer aktuellen
gleichen Niveau wie das Wasser im Technikbecken. Da die Vliesmatte Rolle überwachen und sogar Ihre vorherigen Rollen verfolgen können.
immer mehr Schmutzpartikel zurückhält, steigt der Wasserstand in der Die zum Patent angemeldete Antriebseinheit treibt die Aufnahmewelle
Filterkammer langsam an. für gebrauchtes Material an, während sie die Drehung der Ausgabewelle
Ein Wasserstandssensor, der sich in der Nähe der Oberseite des für neues Material aufzeichnet. Diese Anordnung ermöglicht es dem
Filterkörpers befindet, erkennt den steigenden Wasserstand und löst Gerät, den Motor sofort abzuschalten, wenn es feststellt, dass die
an einem vordefinierten Punkt einen automatischen Vorschub der Vliesmatte blockiert oder gerissen ist, und eine Benachrichtigung an die
Vliesmatte aus, wodurch eine voreingestellte Länge sauberen Materials ReefBeat App zu senden.
eingeführt wird, wodurch der Wasserstand im Gerät reduziert wird. Der doppelte Wasserstandssensor ist oben an der Filterkammer montiert,
Dieser Vorgang wird automatisch über die gesamte Länge der Rolle wobei sich ein Sensor innerhalb der Kammer und einer außerhalb
fortgesetzt, die dann ersetzt werden muss. befindet. Der interne Sensor dient dem regulären Betrieb der ReefMat,
während der externe Sensor einen hohen Wasserstand im Technikbecken
erkennt (z. B. wenn die Hauptrückförderpumpe ausgeschaltet ist) und die
kontinuierliche Ausgabe neuer Vliesmatten verhindert.
Der eingebaute Medienkorb am ReefMat-Auslass verbessert die Leistung
aller Filtermedien, indem sichergestellt wird, dass nur vorgefiltertes
Wasser durch sie fließt.
38Red Sea ReefMat®
Vorteile von Rollenfiltern gegenüber statischen Vorbereitungen vor der Installation des ReefMat-
mechanischen Filtern Rollenfilters
DE
Statische mechanische Filter wie Micron-Socken, Watte, Pads usw. Hang-On-Installation
leisten gute Arbeit beim Einfangen von Filterpartikeln. Bis diese Zur Erleichterung der Wartung wird empfohlen, die ReefMat an der
statischen Filter jedoch entfernt und gewaschen werden, bleiben Vorderwand des Technikbeckens aufzuhängen, für diese Installation
die eingefangenen Partikel im Wasser und zersetzen sich allmählich, stecken Sie die Gummi-Abstandshalter an der unteren Vorderseite der
wodurch sie dem System Nährstoffe (Nitrat und Phosphat) hinzufügen. Filterkammer ein.
Die Verwendung eines korrekt ausgelegten Rollenfilters entfernt alle
gesammelten Partikel innerhalb von etwa einem Tag, wodurch ihre
Zersetzung erheblich reduziert wird. Aufgrund der Effizienz der ReefMat,
insbesondere mit Kohlenstoff im eingebauten Medienkorb, können
Sie kurz nach dem Hinzufügen zu einem etablierten Aquarium einen
Rückgang des Nährstoffgehalts feststellen.
Red Sea Systeme
Wenn Sie den ReefMat in ein Red Sea REEFER- oder MAX-
Aquariumsystem nachrüsten, sehen Sie sich die empfohlenen
Installationsoptionen auf der Website an:
https://www.redseafish.com/reefmat-installation-options
39Red Sea ReefMat®
Freistehende Installation Medienkorb
Befestigen Sie die 4 Beine am Boden der Filterkammer und stellen Wenn Sie den Medienkorb verwenden möchten, stellen Sie sicher,
Sie sicher, dass vor der ReefMat genug Platz ist, um die Frontklappe dass genügend Platz vorhanden ist, um den Korb vollständig aus einer
vollständig zu öffnen. Seite der Filterkammer herauszuziehen. Wenn dies nicht möglich ist,
kann der Medienkorb (ohne montierten Deckel) durch die Filterkammer
erreicht werden, dies ist jedoch weniger bequem zu bedienen.
ReefMat 500 15cm / 6”
ReefMat 1200 20cm / 8”
ReefMat 500 ReefMat 1200
D1 20.5cm / 8.1” 22cm / 8.7”
D2 7cm / 2.8” 8cm / 3.2”
D2 D3
D1 D3 15cm / 5.9” 16cm / 6.3”
40Red Sea ReefMat®
DE
Einlassschlauch Schneiden Sie das freie Ende des Schlauchs entsprechend Ihrer
Der knickfeste gewellte Zulaufschlauch wird mit einem Ende fertig zum Installation auf die erforderliche Länge. Verwenden Sie die mitgelieferte
Anschluss an die Zulaufstutzen auf beiden Seiten der Filterkammer Fingerabdeckung, verteilen Sie eine kleine Menge des flüssigen
geliefert. Dichtmittels auf den ersten 2 cm / 0,8 Zoll der Innenfläche des Schlauchs
und schrauben Sie den Schlauchanschluss ein, bis es fest ist. Entfernen
Sie überschüssiges Dichtmittel aus dem Inneren des Schlauchs.
2cm / 0.8”
41Red Sea ReefMat®
Installation des ReefMat
Hinweis: Dieses Teil hat ein Linksgewinde. Das Rohr kann verwendet Drehen Sie die Verriegelungen der
werden, bevor das Dichtmittel trocken ist. Die andere Seite Aufwickelwelle in die geöffnete Position
des Universalverbinders kann an ein standardmäßiges 32- und entfernen Sie die Aufwickelwelle
mm- oder 1-Zoll-PVC-Rohr geklebt werden. vom ReefMat-Kopf. Öffnen Sie die
Frontklappe, indem Sie den Griff anheben
und nach vorne in die horizontale Position
drehen, die Ausgabewelle entfernen,
die vordere Umlenkrolle entfernen, die
Klappe schließen und durch Absenken
des Griffs sichern.
32mm
Entfernen Sie den ReefMat-
Kopf von der Filterkammer,
indem Sie auf die seitlichen
Riegel drücken, während
Sie ihn anheben.
Alternativ kann das freie Ende des verstärkten Schlauch auch direkt an
einen Standard-PVC-Schlauch mit 32 mm Durchmesser angeschlossen
werden, wie er in den meisten Systemen der Red Sea Reefer-Serie
verwendet wird. Da diese Verbindung nicht unter Wasserdruck steht,
empfiehlt es sich, Flüssigdichtmittel zu verwenden und den verstärkten
Schlauch mit einem Kabelbinder zu fixieren.
42Red Sea ReefMat®
DE
Entfernen Sie die Mattenhalterung vom Boden Schließen Sie das DC-Netzteil an den 2-poligen Stromanschluss an der
der Filterkammer, indem Sie das Mittelrohr Rückseite der Antriebseinheit an.
um 180 Grad drehen (Wasserauslassschlitze
Verbinden Sie den Wasserstandssensor mit dem 4-poligen Einlassanschluss
zeigen nach oben) und anheben.
auf der Rückseite der Antriebseinheit.
Montieren Sie die
Antriebseinheit
entweder auf der
linken oder rechten
Seite des ReefMat-
Kopfes und sichern
Platzieren Sie die Sie sie mit dem
Filterkammer an der mitgelieferten Clip in
ausgewählten Stelle im Position. Stellen Sie
Sumpf und verbinden Sie sicher, dass Sie neben
den Einlassschlauch mit dem der Antriebseinheit
Einlassanschluss auf der genügend Platz
linken oder rechten Seite der haben, um die Wi-
Filterkammer. Fi-Einstellung
und die Auf-/
Abwickeltasten
zu bedienen.
Stellen Sie sicher, dass die
vorderen und hinteren
Filtergitter in der Kammer
positioniert sind und klicken Sie
die ReefMat Kopf-Einheit ein.
43Red Sea ReefMat®
Montieren Sie den Niveausensor an seiner Betriebsposition an der Filterkammer.
A B
C D
44Red Sea ReefMat®
LED-Anzeigen
DE
Führen Sie das Netzteil aus der Rückseite des Gehäuses und stecken Sie Stromanzeige:
es in die Wandsteckdose oder ein anderes geeignetes Stromzentrum. • Rotes Dauerlicht - DC ist verfügbar.
Überprüfen Sie, ob die Anzeige-LED an der Vorderseite der Antriebseinheit
leuchtet. • Kein rotes Licht - DC ist nicht verfügbar.
Integrieren Sie die Antriebseinheit in die ReefBeat App und schließen Sie die
Ersteinrichtung ab, bevor Sie die Vliesmatte installieren. Einstellungsanzeige:
• Rotes Dauerlicht – ReefMat ist mit dem Heimnetzwerk
verbunden.
• Blinkendes rotes Licht – ReefMat befindet sich im Wi-Fi Access
Point (AP)-Modus (kann von Wi-Fi-Geräten erkannt werden).
• Kein rotes Licht – ReefMat Wi-Fi ist ausgeschaltet.
• Doppeltes Blinken – zeigt Statusänderung / Prozessende an.
Statusanzeige:
• Kein rotes Licht – ReefMat funktioniert normal.
• Blinkendes rotes Licht – zeigt an, dass der Auto-Advance-Modus
aufgrund einer der folgenden Bedingungen ausgesetzt wurde:
Hochwasser, Füllstandssensor getrennt, Matte verklemmt,
Rollenende. Gleichzeitiges Drücken der Auf-/Abwickeltasten
setzt die ReefMat in den Auto-Advance-Modus zurück.
45You can also read