USER MANUAL - www.orbea.com
←
→
Page content transcription
If your browser does not render page correctly, please read the page content below
USER MANUAL

www.orbea.com
INTRODUCTION
This user manual contains information needed to          For any other question not answered through
ride your Orbea bicycle safely and get the most          the channels mentioned above, please contact us
out of it. The failure to follow the instructions        directly.
or warnings contained in this manual is the
responsibility of the rider or the corresponding         Orbea S.Coop.
guardian, in the case of a minor.                        Poligono I. Goitondo 48269 Mallabia
                                                         Phone: +34 943171950
In any case, safety also depends on factors that go      e-mail: Orbea@orbea.com
beyond the bicycle, which are not covered in this
user manual. E.g.: The skill of the user, knowing
and obeying traffic regulations, the conditions          This manual meets the requirements of standards
of the route, personal conditions, etc. all have an      EN 14764, 14766 and 14781 and its contents
influence. Controlling these factors reduces the         are the property of Orbea S.Coop. Its partial or
danger, but you must be aware that the likelihood        total reproduction is prohibited without express
of falling or suffering other types of injuries cannot   authorization.
be completely eliminated. In other words, the risk
of an accident is part of the sport of cycling. Always
obey the traffic regulations in force, and always
wear a helmet and protective glasses when riding
a bicycle.

For more information aimed at getting the most
                                                                       SYMBOLS
out of each model of ORBEA bicycle, visit the web
support section at http://www.orbea.com/es-es/           Pay attention when you see the following symbols
soporte/                                                 in this manual.
and our YouTube channel https://www.youtube.
com/user/OrbeaBicycles.                                             They are used for additional non-safety
                                                                    related information that might be
We recommend visiting an ORBEA dealer if you do                     useful.
not clearly understand anything in this manual or
if you lack the proper tools. At http://www.orbea.
com/es-es/distribuidores you will find the ORBEA
dealer nearest you.                                                 Indicates required measures to prevent
                                                                    a potential hazard that could result in
For issues related to purchases made on our                         property damage.
website,
www.orbea.com, please call 902 04 29 29 (available
Monday-Friday).                                                     Indicates actions that must be taken to
                                                                    prevent a potential hazard that could
                                                                    jeopardize the physical wellbeing and
                                                                    even the life of the rider, in addition to
                                                                    property damage.

                                                                                                          2
CONTENTS
INTRODUCTION �����������������������������������������������������������������������������������������������������������������������������������������������������������������������������2

SYMBOLS�������������������������������������������������������������������������������������������������������������������������������������������������������������������������������������������2

CONTENTS�����������������������������������������������������������������������������������������������������������������������������������������������������������������������������������������3

EXPLODED VIEW�����������������������������������������������������������������������������������������������������������������������������������������������������������������������������4
ROAD (Rim Brake)���������������������������������������������������������������������������������������������������������������������������������������������������������������������������4
ROAD (Disc Brake)��������������������������������������������������������������������������������������������������������������������������������������������������������������������������5
MTB������������������������������������������������������������������������������������������������������������������������������������������������������������������������������������������������������6
ALL-USE����������������������������������������������������������������������������������������������������������������������������������������������������������������������������������������������7
TRI��������������������������������������������������������������������������������������������������������������������������������������������������������������������������������������������������������8

TERMS OF USE ��������������������������������������������������������������������������������������������������������������������������������������������������������������������������������9
SERVICE LIFE���������������������������������������������������������������������������������������������������������������������������������������������������������������������������������� 10

BEFORE FIRST USE ���������������������������������������������������������������������������������������������������������������������������������������������������������������������� 11
SIZE CHECK������������������������������������������������������������������������������������������������������������������������������������������������������������������������������������ 11
SEAT ADJUSTMENT��������������������������������������������������������������������������������������������������������������������������������������������������������������������� 11
HANDLEBAR ADJUSTMENT����������������������������������������������������������������������������������������������������������������������������������������������������� 12
BRAKE LEVER ADJUSTMENT �������������������������������������������������������������������������������������������������������������������������������������������������� 15
SUSPENSION ADJUSTMENTS ������������������������������������������������������������������������������������������������������������������������������������������������ 15
ADAPTATION��������������������������������������������������������������������������������������������������������������������������������������������������������������������������������� 16

SAFETY CHECKS �������������������������������������������������������������������������������������������������������������������������������������������������������������������������� 17
WHEELS������������������������������������������������������������������������������������������������������������������������������������������������������������������������������������������� 17
BRAKES�������������������������������������������������������������������������������������������������������������������������������������������������������������������������������������������� 18
SEAT�������������������������������������������������������������������������������������������������������������������������������������������������������������������������������������������������� 21
HANDLEBAR AND STEM������������������������������������������������������������������������������������������������������������������������������������������������������������ 21
HEADSET����������������������������������������������������������������������������������������������������������������������������������������������������������������������������������������� 22
FRONT SUSPENSION������������������������������������������������������������������������������������������������������������������������������������������������������������������� 23
REAR SUSPENSION���������������������������������������������������������������������������������������������������������������������������������������������������������������������� 23
PEDALS�������������������������������������������������������������������������������������������������������������������������������������������������������������������������������������������� 24

SAFETY EQUIPMENT ������������������������������������������������������������������������������������������������������������������������������������������������������������������ 26

MAINTENANCE ���������������������������������������������������������������������������������������������������������������������������������������������������������������������������� 27
CLEANING�������������������������������������������������������������������������������������������������������������������������������������������������������������������������������������� 27
LUBRICATION�������������������������������������������������������������������������������������������������������������������������������������������������������������������������������� 27
STORING THE BICYCLE FOR A PROLONGED PERIOD OF TIME������������������������������������������������������������������������������������� 29

WARRANTY ����������������������������������������������������������������������������������������������������������������������������������������������������������������������������������� 30

DECLARATION OF CONFORMITY����������������������������������������������������������������������������������������������������������������������������������������� 32

SUPPLEMENTARY NOTES���������������������������������������������������������������������������������������������������������������������������������������������������������� 34

ADDITIONAL INFORMATION���������������������������������������������������������������������������������������������������������������������������������������������������� 36

                                                                                                                                                                                                      3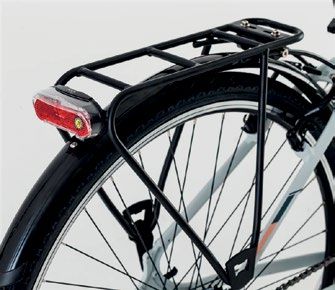
EXPLODED VIEW

ROAD (Rim Brake)
The diagram below shows the position of each of the components of an ORBEA road bike with caliper or
rim brakes. Even though the bicycle model shown in the diagram may not exactly match the bicycle you
purchased, the main components indicated are the same for both.

                                                                           3   4       5

                       20
                            19                                 22                          6
                                                    1
                   7
                             21
               8
                                 18                                                   18       2
                                                                                                    10
          9                                                                                                  7

                                               15                                                                8

                                                                                                         9
 10

17

     11
                                                              12                                    11
          16                                  14         13

1. Frame

2. Fork                          8. Rim                 14. Chain                  20. Saddle
3. Stem                          9. Spoke               15. Front Derailleur       21. Seat latch
4. Handlebar                     10. Hub                16. Rear Derailleur        22. Head tube
5. Brake lever                   11. Skewer             17. Cogs
6. Gear change                   12. Pedal              18. Brakes
7. Tire                          13. Cranks             19. Seatpost

                                                                                                             4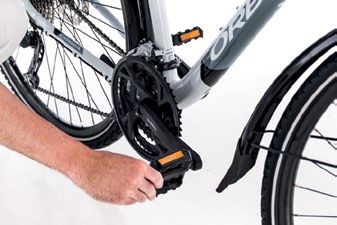
ROAD (Disc Brake)
The diagram below shows the position of each of the components of an ORBEA road bike with disc brakes.
Even though the bicycle model shown in the diagram may not exactly match the bicycle you purchased,
the main components indicated are the same for both.

                                                                                3   4       5

                       20
                            19                                      22                          6
                                                         1
                   7
                             21
               8
                                                                                                    2
                                                                                                         10
          9                                                                                                       7
     18                                                                                                           8
                                                    15

                                                                                                              9
 10

17

     11
                                                                   12                                    11
          16                                       14         13         18

1. Frame

2. Fork                          8. Rim                      14. Chain                  20. Saddle
3. Stem                          9. Spoke                    15. Front Derailleur       21. Seat latch
4. Handlebar                     10. Hub                     16. Rear Derailleur        22. Head tube
5. Brake lever                   11. Wheel latch             17. Cogs
6. Gear change                   12. Pedal                   18. Brakes
7. Tire                          13. Cranks                  19. Seatpost

                                                                                                                  5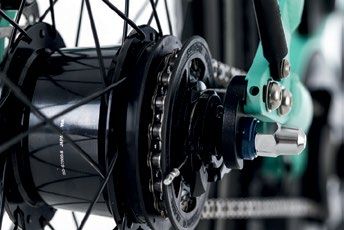
MTB
The diagram below shows the position of each of the components of an ORBEA mountain bike. Even
though the bicycle model shown in the diagram may not exactly match the bicycle you purchased, the
main components indicated are the same for both.

                                                                                   4
                                                                               3       5
                                                                                           6
                        20                                                22
                             19                            1
                    7
                                                     23                                               2
                8       18        21

                                                                                                                 7
           9
                                                                                                                 8

                                                15                                                                   9

     10
                                                                     18

17
                                                                                                                     10
                                                                12
      11
                                           14              13                                               11
           16

1. Frame

2. Fork                      8. Rim                       14. Chain                        20. Saddle
3. Stem                      9. Spoke                     15. Front Derailleur             21. Seat latch
4. Handlebar                 10. Hub                      16. Rear Derailleur              22. Head tube
5. Brake lever               11. Skewer                   17. Cogs                         23. Rear
6. Gear change               12. Pedal                    18. Brakes                          suspension
7. Tire                      13. Cranks                   19. Seatpost

                                                                                                                 6
ALL-USE
The diagram below shows the position of each of the components of an ORBEA general use bike. Even
though the bicycle model shown in the diagram may not exactly match the bicycle you purchased, the
main components indicated are the same for both.

                                                                     4   5
                                                                             6
                                                           3

                                                           22
                       20
                   7                              1
                              19
                                                                                     18     2
               8       18          21
                                                                                                  10
          9
                                                                                                       7

                                             15                                                            8
 10                                                                                                    9

17

     11
                                                                12
                                                                                                  11
          16                                14        13

1. Frame

2. Fork                     8. Rim                14. Chain                      20. Saddle
3. Stem                     9. Spoke              15. Front Derailleur           21. Seat latch
4. Handlebar                10. Hub               16. Rear Derailleur            22. Head tube
5. Brake lever              11. Skewer            17. Cogs
6. Gear change              12. Pedal             18. Brakes
7. Tire                     13. Cranks            19. Seatpost

                                                                                                       7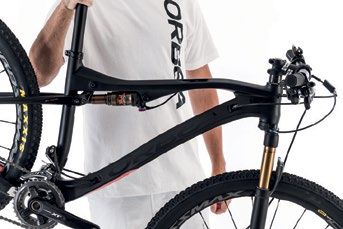
TRI
The diagram below shows the position of each of the components of an ORBEA triathlon bike. Even
though the bicycle model shown in the diagram may not exactly match the bicycle you purchased, the
main components indicated are the same for both.

                                                                                                     6
                                                                              3   4
                           20
                                19                     1                                        5
                                                                      22
                                21
                       7

                   8                                                                             2
                                     18                                                   18
                                                                                                         10
               9                                                                                                  7

                                                  15                                                                  8

                                                                                                              9
 10

17

     11
                                                                 12                                      11

          16                                 14             13

1. Frame

2. Fork                         8. Rim                     14. Chain                  20. Saddle
3. Stem                         9. Spoke                   15. Front Derailleur       21. Seat latch
4. Handlebar                    10. Hub                    16. Rear Derailleur        22. Head tube
5. Brake lever                  11. Skewer                 17. Cogs
6. Gear change                  12. Pedal                  18. Brakes
7. Tire                         13. Cranks                 19. Seatpost

                                                                                                              8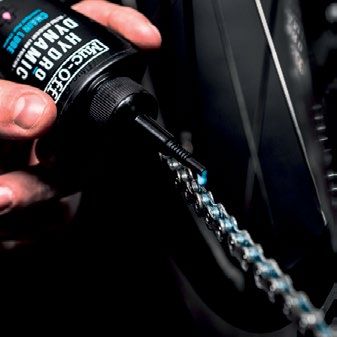
TERMS OF USE
                                                       CONDITION 3
         Each model of bicycle is designed and
                                                                         Riding on irregular and rough
manufactured for a specific use. Using a bicycle for
                                                                         terrain, with jumps of less than
a use other than the one it was designed for can be
                                                                         61cm (condition 3 of ASTM
dangerous for several reasons.
                                                                         standard F-2043-13, in addition
Contact an ORBEA dealer to identify or confirm the
                                                                         to the conditions indicated in

                                                        3
model of bicycle appropriate for a specific use.
                                                                         conditions 1 and 2).
The standard F-2043-13 from ASTM International
                                                                          Not designed for use with
specifies five levels of terms of use. Below are the
                                                       luggage carriers, child seats or trailers.
characteristics of each level and the correlation
with each ORBEA family.
                                                       Maximum cyclist weight: 115 kg
                                                       ORBEA bicycle models: Mx and Sport.

CONDITION 1
                   Riding limited to paved roads
                   with tires in constant contact
                                                       CONDITION 4
                   with the road surface. (condition                     Riding on technically difficult
                   1 of ASTM standard F-2043-13).                        terrain, with jumps and
                                                                         extremely      rough      terrain

 1                                                                       (condition 4 of ASTM standard
                                                                         F-2043-13, in addition to the

                                                        4
                   Not designed for use with
                   luggage carriers, child seats or                      conditions      indicated      in
trailers.                                                                conditions 1, 2 and 3).

                                                       Not designed for use with luggage carriers, child
Maximum cyclist weight: 115 kg                         seats or trailers.
ORBEA bicycle models: Orca, Avant and Ordu.
                                                       Maximum cyclist weight: 115 kg
                                                       ORBEA bicycle models: Alma, Oiz, Loki and
CONDITION 2                                            OccamTR.

                   Riding on paved or gravel roads
                   or on unasphalted trails in good
                   condition, as well as bike lanes    CONDITION 5
                   (condition 2 of ASTM standard                         Riding on extreme terrain at
                   F-2043-13, in addition to the                         high speed; extreme caution is

 2                 conditions
                   condition 1).
                                  indicated       in                     recommended (This bicycle is
                                                                         no excuse to try just anything!).

                                                        5
                   Not designed for use with
                   luggage carriers, child seats or
trailers.                                                                Not designed for use with
                                                                         luggage carriers, child seats or
Maximum cyclist weight: 115 kg                         trailers.
ORBEA bicycle models: Katu, Carpe, Urban, Folding
and Comfort.                                           Maximum cyclist weight: 115 kg
                                                       ORBEA bicycle models: Rallon and OccamAM.

                                                                                                      9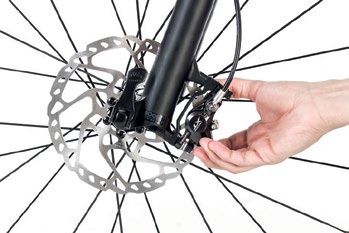
The failure to use the bicycle under these specified
terms of use would represent restrictions in the
warranty.
Regardless of the terms of use corresponding to
each type of bicycle, it is recommended to always
obey current traffic laws, wear a helmet and
protective goggles and check the brakes, wheels
and steering, etc., beforehand, as indicated in the
Chapter “Safety Checks”.

         With regard to children’s bicycles, the
terms of use require the supervision of an adult
who accompanies the child at all times, preventing
them from riding near slopes, curbs, stairs,
swimming pools or areas with motor vehicle traffic.

         If the bicycle is made from composite
materials (carbon) it cannot be exposed to
temperatures above 50 ºC, either in use or while
at rest.

SERVICE LIFE
Like all mechanical components, the bicycle is
subject to wear and mechanical stress that limits
its service life. The service life will depend on the
design, material and manufacturing, as well as
the conditions of use, such as the cyclist’s weight,
the frequency of use, the aggressiveness of
riding, cleaning and maintenance, environmental
conditions, etc. and so its limit cannot be calculated
prior to use. Therefore, and given that exceeding
the service life of the bicycle could result in an
accident that causes injury to the cyclist, it is
recommended to periodically inspect your bicycle
and consult an ORBEA dealer whenever you have
any doubts in this regard. Excessive bending,
anomalous operation, cracks or change in color
in high mechanical stress areas may be symptoms
that the bicycle or a specific component have
reached the end of their service life and must be
replaced.

                                                         10
BEFORE FIRST USE
It is extremely important to perform the If you wish to get the best performance
following checks and adjustments and go through from your bicycle fit, we recommend having a
a process of adaption before using the bicycle for complete fitting with experts.
the first time. The following guidelines also apply
to those cases in which you intend to use a bike
with an unknown condition.
SEAT ADJUSTMENT
The seat adjustment is the most important in terms
Before the first use, in addition to the following
of performance and comfort.
instructions, perform all the checks indicated in the
chapter “Safety checks”.
Seat height: To adjust the height of the seat, use a
person or a roller to hold the bicycle while the rider
Ergonomic adjustments affect the control, mounts it. Once mounted and seated on the seat,
comfort and performance of the cyclist-bicycle rest your heels on the pedals and pedal backwards.
system. Its correct adjustment can vary the factors The recommended seat height is that required to
significantly, increasing or reducing the safety and completely extend the knee to reach the pedal at
enjoyment to a large extent. its lowest point. If you need to balance with your
hips to reach the pedal at its lowest point, then the
The following adjustment instructions consist of seat is too high.
a series of basic notions that aim to cover all the
minimal requirements in this regard. For more
information in this regard, please consult an ORBEA
dealer or a biomechanical specialist.
When performing the adjustments, there
is a specific risk of entrapment.
SIZE CHECK
Having a bicycle that matches the measurements
of each cyclist is essential for obtaining the
greatest comfort, performance and safety when
riding a bicycle. For this reason, the website
http://www.orbea.com/es-es/calcula-talla/tipo/
recommends the most appropriate size in terms of
the measurements of each cyclist, according to the
basic data on the cyclist.
If when pedaling with great intensity, you
notice an improvement when sliding back on the
seat, it is likely that the seat is too low. If, on the
other hand, the need is detected to move towards
the tip of the seat to pedal, it is likely that the seat
is too high.
11To release and lock the seat, use the quick latch
(instructions can be found in “Safety checks /
This adjustment is used to position
Wheels”), or otherwise, use the corresponding
yourself correctly on the bike and ensure a
screws), applying the recommended tightening
comfortable, efficient pedaling. For this reason,
torque.
it is recommended to visit an ORBEA dealer for a
precise adjustment.
HANDLEBAR ADJUSTMENT
The height of the handlebar and its angle are
adjustable for greater comfort, efficiency and
better balance of the rider on the bicycle.
To change both the height and the angle of the
When raising the seat post from the handlebar, adjust the stem.
minimum level, it should always remain hidden
within the frame. There are two types of stems:
- Traditional stem: has a tube that is attached inside
If it were necessary to raise the seat post beyond the fork by means of a cone and a stem tightening
the minimum insertion mark, it would b necessary bolt.
to review the size of the frame or replace the seat - Ahead stem: attached to the outside of the head
post with a longer model, under the supervision of tube.
an ORBEA dealer.
It is also possible to replace the stem and handlebar
with components with different geometries that
help adapt the bicycle to the cyclist.
Seat angle: To adjust the seat angle, adjust the
tightening mechanism located on the top of the
seat post. Consult the user’s manual from the seat
provider and follow the instructions to adjust it.
A seat that is not adjusted horizontally
(parallel to the ground) causes the rider to have a
very unrelaxed pedaling position. The seat should
never be tilted backwards.
Moving the seat forward/backwards: To adjust the
forward/backward position of the seat, adjust the
tightening mechanism located on the top of the
seat post. Consult the user’s manual from the seat
provider and follow the instructions to adjust it.
12Height of the handlebar on the traditional stem:
Do not overtighten the bolt; it could break
and seriously jeopardize your safety.
Tornillo de
apriete de la
To make sure that the entire assembly has been
potencia completed correctly, please see the chapter “Safety
checks”.
Angle of the handlebar on the traditional stem:
Tornillo de Loosen the tightening bolt on the handlebar
apriete del
manillar
located on the stem until the handlebars can be
turned.
Position the handlebar at the desired angle and
Marca de
inserción
center the handlebar with regard to the stem
Cono mínima before retightening the tightening bolt on the
handlebar, located on the stem.
Loosen the tightening bolt, turning it twice in a Do not overtighten the bolt; it could break
counterclockwise direction. and seriously jeopardize your safety.
Strike the bolt gently with a wooden or plastic
mallet to unblock the steering cone. Then position
the stem at the desired height.
When raising the stem, the minimum In the case that the stem has an angle
insertion mark should always remain hidden adjustment bolt, the position of the handlebar can
within the frame. be adjusted more precisely; this can be done with
the angle adjustment bolt.
If it were necessary to raise the seat post beyond
the minimum insertion mark, it would b necessary To make sure that the entire assembly has been
to review the size of the frame or replace the stem completed correctly, please see the chapter “Safety
with a longer model, under the supervision of an checks”.
ORBEA dealer.
Retighten the bolt, making sure that the handlebar Height of the handlebar on the ahead stem: To
are perpendicular to the front wheel. adjust the height of the handlebar, in this case the
stem can be inverted or we can move the headset
spacers.
13Tornillo de
tapa superior
Tapa frontal
Make sure that the top cover never touches
Tapa the head tube, so the spacer should extend at least
superior
3 mm above the end of the head tube.
Tubo de
dirección
Tapa
superior
Tornillo de
apriete de
dirección
Tornillo de
apriete del
manillar
Anillas de
dirección
To invert the stem, separate the handlebar from
the stem, removing the front cover from the stem.
Cuadro
Then remove the top cover from the stem and and
remove the screws from the stem that fasten it to
the head tube.
Pull up on the stem to separate it from the head If all the spacers are below the stem, it must
tube, turning it on its own axis and reinsert it extend 3 to 4 mm above the end of the head tube.
once again in the head tube, keeping the headset
spacers in their original position.
Tubo de
dirección
Finally, reattach the stem and the handlebar in the
following order. 1.-Mount the top cover and turn
Tapa
the screw until eliminating any play in the steering. superior
2.-Attach the centered handlebar in the stem and
at the desired angle. 3.-Position the handlebar Anillas de
dirección
perpendicular to the front wheel. 4.-Attach the
stem in the head tube.
To raise or lower the handlebar moving the spacers,
first remove the top cover and loosen the bolts on
the stem that fasten it to the head tube and then
separate the stem from the head tube. If we want
to lower the handlebar, move the headset spacers
from below the step to above it. And the other way
Cuadro
around, if we want to raise the handlebar, move the
headset spacers from above the stem to below it.
Unless the head tube is cut, we should always keep
all the spacer included in the initial assembly.
Do not overtighten the bolts; they could
break and seriously jeopardize your safety.
14If more spacers are mounted under the stem to a screw to regulate the position of the brake lever.
raise it and it extends more than 3-4 mm beyond If necessary, consult the user manual for the brake
the end of the head tube, it would be necessary lever model in question or consult an ORBEA
to review the size of the frame or replace the dealer.
stem with a model with a greater angle, under the
supervision of an ORBEA dealer.
By increasing the spacer distance, we
increase the bending of the head tube, which
means a loss of performance and an increased
chance of fatigue-related breaking. The greater the
bending in a part, the shorter its service life will be.
For this reason, NEVER exceed 30 mm of headset
spacers between the stem and the frame.
To make sure that the entire assembly has been
completed correctly, please see the chapter “Safety
checks”.
Angle of the handlebar on the ahead stem:
Loosen the tightening bolts on the handlebar,
located on the stem, until the handlebar can be
turned.
Position the handlebar at the desired angle and
center the handlebar with regard to the stem
before retightening the tightening bolts on the
handlebar, located on the stem.
SUSPENSION ADJUSTMENTS
All suspensions, regardless of their technology or
Do not overtighten the bolts; they could whether it is a front or rear suspension, are made
break and seriously jeopardize your safety. up by a mechanism resisting compression (blue)
and a rebound mechanism (red) that are intended
to maintain the greatest possible contact between
To make sure that the entire assembly has been the tire and the ground.
completed correctly, please see the chapter “Safety
checks”. The compression mechanism is in charge of
absorbing the impact. If its adjustment is too rigid,
the suspension will not absorb the irregularities of
the terrain, and just the opposite, if the adjustment
BRAKE LEVER ADJUSTMENT is too soft, the suspension will reach the end
of its stroke too soon, thus losing part of the
The positioning of the front and rear effectiveness of the suspension.
brake levers on the handlebar can change side,
depending on the country. It is important to Its rebound is the mechanism that is responsible
identify each brake lever before first use. for returning the suspension to its original
position. If the rebound adjustment is too slow, the
For safety reasons, the index fingers have to be suspension cannot reach its original position after
able to reach the brake levers easily. For this a bump on the terrain, and as a result, it would not
purpose, many brake lever manufacturers include have its full stroke available for the next one. If,
on the other hand, the rebound were set too fast,
15the wheels could “jump,” losing contact with the
ground.
For more information on these adjustments,
consult the user manual for the model of
suspension in question or consult an ORBEA dealer.
ADAPTATION
Before using the bike for the purpose for which it
has been purchased, it is recommended to allow
yourself a period of adaptation, testing out all the
adjustments that have been made. Select an open
space, free of obstacles and any sort of external
factor that might pose a hazard. Ride the bicycle
and test the steering, the effectiveness of the
brakes, the gear operation and the suspensions
(if any). Perform the tests progressively, gradually
increasing the speed and the difficulty of the ride.
If the bicycle adaptation test is less than
satisfactory, or if you do not know how to resolve
the situation, please contact an ORBEA dealer.
16SAFETY CHECKS
Before each ride, it is necessary to do a quick check to be sufficient when the lever remains marked in
of the safety systems and latches on the bicycle. your hand after closing it). The lever should never
These may have become loose on the previous ride remain loosely tightened, not should it be screwed
or were not properly fastened when the bicycle on as if it were a simple nut/screw mechanism.
was remounted.
Each of the bolts and nuts on the bicycle has
a specific tightening torque, so we cannot use
a generic value for all of them. Normally, the
tightening torque for each thread is found indicated
on the component in question. If this were not the
case, consult the user manual of the component in
question or the chapter on “Tightening torques” for
torques pertaining to the frame.
If during the inspection, any of the parts
is found not to meet operating requirements, do
not ride the bicycle until said malfunction has been
repaired or replaced by an ORBEA dealer.
WHEELS
Fastening: (Frequency: Before each use)Before
anything else, check that the wheel has been
properly mounted.
Most bicycles use quick latches on both wheels.
If the bicycle is not equipped with quick latches,
the wheel must be fastened by tightening both
sides of the nut/bolt system in a clockwise
direction.
Tuerca
The tightening torque for the front and
Palanca rear wheel with the nut/bolt fastener must be 12-
15 Nm
The quick latches have a nut on the opposite side
of the lever. This nut may be a separate element
or part of the frame/fork and it is used to give
the initial tension to the system. To so this, before
closing the lever that completely fastens the wheel,
the shaft must be screwed in said nut, or vice versa.
Screw it in until the lever can be closed with a
certain amount of force (the force is considered
17conventional or tubular tire must be the lowest
value from among the maximum pressures
recommended on the rim and tire. Exceeding the
maximum recommended pressure can cause the
tire to come out of the rim.
Tire condition: (Frequency: Before each use)
The tires must be inspected to check for wear or
damage. They must be free of any type of cuts or
tears and the tire cloth under the layer of rubber
must not be visible.
Rim wear: (Frequency: Twice a year) To check
for rim wear, look at the wear indicators
located on both sides of the rim. When these
indicators in the form of an intermittent or
linear depression are left with little depth, it
means that the rim in question has reached
the end of its service life and must be replaced.
In both cases, it is important to make sure
that the wheel axle is well seated on the frame
before attaching the wheel and that the latches
are completely closed, since they are responsible
for fastening the wheel to the frame and the fork..
Alignment: (Frequency: Before each use)The
wheel alignment is checked by lifting the bicycle
and turning each wheel by hand. Check that the For composite (carbon) rims, wear is more
wheel maintains a uniform circular movement difficult to assess. Visit an ORBEA dealer to correctly
and does not make any lateral or vertical evaluate the conditions of your rims.
movements. It is also very important to check
by feel the tension of the spokes, and make sure
that there are no broken, bent or loose spokes.
Clearance: (Frequency: Before each use)
Shaking both wheels hard in a crosswise
direction to the direction of travel, check
for any type of clearance around the hub.
Pressure: (Frequency: Before each use)Check
whether the pressure of the tires is ideal.
This is indicated on the side of each tire.
The maximum inflation pressure of a
18Bicycles in the ORBEA catalog do not have Check the condition of the brakes on a
the option to mount tubular tires. If tubular tires regular basis, as it is vitally important.
are mounted, we recommend visiting an ORBEA
dealer for their care.
BRAKE CALIPERS
Jackets, cables and their tightening mechanism:
BRAKES (Frequency: Twice a year) The brake cables and
jackets must not be scratched, bent, cut or worn.
For road bikes with aerodynamic The brake cables must be fastened in the groove
extensions on the handlebar, cyclists must bear provided for this purpose and completely
in mind that the effectiveness in braking can be surrounding the cable.
slowed down and negatively affected by the use
of this type of aerodynamic extension on the
handlebars.
To check the condition of the braking system:
(Frequency: Before each use) Both brake levers
must be activated as far as possible while the
bicycle is stopped. Once this is done, it must be
observed that in this position, the shortest distance
between the brake lever and the handlebar must
be greater than 25 mm.
Correct mounting of the braking system:
(Frequency: Twice a year) Check to see if they are
mounted correctly, pulling by hand on the brake
from in front of the front brake and from behind
the rear brake.
The brakes must not move and the mounting point
should not show any play.
Position of the brake shoes: (Frequency: Every
time the brake shoe is replaced) Brake shoes must
be aligned in the center of the flank of the rim,
Try to move the bicycle while the brakes are approximately 1-2 mm from the top edge of the
activated. Both wheels must remain locked. wheel.
19Symmetry between both brake shoes: (Twice a
year)The brake shoes must have the same distance
from the rim on both sides.
DISC BRAKES
The brake shoes must not ever touch the
tire, not even when the brake is not activated. If the With disc brakes, you have to be careful
brake shoes scrape the tire, this could tire, this could not to damage the disc, calipers and pads when
pop them as the result of wear or overheating. mounting/removing the wheel. In the case of
hydraulic brakes, never activate the brake lever
The brake shoe must be slightly at an angle, in the without the wheel mounted on the bike.
direction of rotation of the wheel. Otherwise, the
braking would be deficient and could produce
annoying noises when the brakes are pressed. Correct mounting of the braking system:
(Frequency: Twice a year) Pull on the brake caliper
in all directions; it should not move.
Jackets, cables and their tightening mechanism:
(Frequency: Twice a year) The brake cables and
jackets must not be scratched, bent, cut or worn.
The brake cables must be fastened in the groove
Brake shoe wear: (Frequency: Once a month) The provided for this purpose and completely
brake shoes have grooves on them that must surrounding the cable.
always be visible.
20Airtightness of the hydraulic system: (Frequency:
Before each use) While the bicycle is stopped, the
brake lever is operated and keeping it pressed,
check that no brake liquid comes out anywhere
along the hydraulic circuit, from the brake lever,
through the jackets, to the brake calipers and that
the jacket is not broken or twisted.
Condition of the brake pads: (Frequency: Once a
month) When turning the wheel without operating
the brake levers, the pads must slow down the
wheel.
The brake pads must be replaced when
they have a thickness of less than 1 mm.
For more information on the operation of
the quick latch system, see the chapter on “Safety
Condition of the brake disc: (Frequency: Before checks/Wheels”.
each use)For the brake disc to operate properly, it
must not have any marks, breaks, deep scratches or
other mechanical damage on the disc.
Mounting of the seat on the seatpost: (Frequency:
Dirty brake discs (with oil, grease or dirt) can
Once a year) Also check that the seat is correctly
considerably reduce the braking power and even
attached to the seatpost. To do this, try to move
irreversibly damage the brake pads.
the tip of the seat up and down with your hand,
making sure that the attachment mechanism
under the seat does not move.
To clean them properly, remove the wheel
to clean the dirt, using a degreasing cleanser. Rinse
with plenty of water and dry.
SEAT
The bicycle seat is mounted on the top of the
seatpost, which is attached on the bottom to the
frame of the bicycle.
Mounting of the seatpost on the frame: (Frequency:
Once a year) The seatpost attachment mechanism
must be checked to make sure it is properly closed,
either with a quick latch system or a bolt.
To see if the seatpost is well fastened, try to turn
the seat with your hand. The seat and the seatpost If the seat moves with respect to the seatpost,
must not turn as compared to the frame. follow the instructions on the corresponding
seatpost manual to attach it correctly.
ORBEA does not use seats with springs
and recommends that users not use them is they
are going to use child seats, as they pose a finger
entrapment hazard.
21HANDLEBAR AND STEM
The handlebar and the stem are the most important
set of components in terms of safety, since control
over the bicycle depends entirely on them.
It is vitally important for them to be
properly mounted and for them to be free of any
dents, cracks or signs of fatigue.
The stem must be positioned parallel to the front
wheel rim and the handlebar must be centered as
compared to the stem.
Mounting of the stem on the head tube. It is a good idea to also check that the
(Frequency: Twice a year) To do this, hold the front components mounted on the handlebar, such
wheel between your legs, grasp the handlebar as the brake levers, gear shits, jackets, horns or
on both ends and try to pull and push the ends triathlon attachments are firmly fastened.
forwards and backwards, checking that the stem
does not move with respect to the head tube and
that you do not hear any sort of noise or clicking
sounds as you do it. HEADSET
The correct assembly and operation of the headset
is almost as critical as the correct arrangement of
the handlebar-stem set.
The handlebar must turn both ways without the
headset providing any resistance and without
there being any clearance.
Clearance: (Frequency: Twice a year) To check that
there is no clearance of any type in the headset
assembly, grasp the bicycle by the handlebar with
both hands and applying the brake to the front
wheel, move the bicycle with sharp forward and
backward movements. The headset must not show
Mounting of the handlebar on the stem:
any clearance or play between the fork and the
(Frequency: Twice a year) To do this, hold the front
stem, nor should you hear or notice any type of
wheel between your legs, grasp the handlebar on
clicking, cracking or scraping.
both ends and try to turn the handlebar on their
own axis in both directions, making sure that the
handlebar do not turn with respect to the stem,
If after performing this check, you identify
and that you do not hear any sort of noise or
clearance in the front suspension bars, visit an
clicking sounds as you do it.
ORBEA dealer.
22FRONT SUSPENSION
For the system to operate properly, it is very
important for the different components to be
properly mounted and the suspension fork to be
adjusted according to the weight of the cyclist, the
way of riding and the type of terrain where you
normally ride.
For more information on the adjustment,
see the chapter on “Suspension adjustments” or
consult the user manual for the suspension in
Excessive tightening: (Frequency: Twice a year) To
question.
check that the headset is not fastened too tight,
suspend the bicycle so that the rear wheel is higher
than the front one. Move the handlebar back and
forth and then release them to check that the rear
wheel and the handlebar return to their initial
position without providing any sort of resistance. Sliding: (Frequency: Once a month)To check that
the suspension fork retracts and expands correctly,
keep the front brake activated and rest your weight
on the handlebar so that the suspension fork
contracts and expands. The fork must move up and
down smoothly, without any clicking or cracking
noises.
Clearance: (Frequency: Once a month) Holding the
front wheel between your legs and try to lift the
bicycle by the handlebar. The vertical bars must not
move or come loose (apart from the contraction
and expansion movement) from the insert bars or
the fork plate.
If the headset has any clearance or is too
tight, visit an ORBEA dealer.
23the bicycle also depend on the stability of the
contact between the foot and the pedal.
Orbea bicycles can use different types of pedals.
They can be divided into two large families:
Automatic pedals, that mechanically fasten to
the cleats on the bottom of a cycling shoe and
conventional pedals with no type of fastener.
Check the condition of the pedals: (Frequency:
Twice a year) Make sure that the pedals are firmly
fastened to the cranks, i.e., totally screwed onto
If the suspension fork shows any clearance, them.
does not slide well or has any other anomaly, see
an ORBEA dealer.
The right pedal has a right thread
(conventional) and the left pedal has a left thread
REAR SUSPENSION (in the opposite direction, counterclockwise).
For the system to operate properly, it is very
To check that the pedals turn without any
important for the different components to be
problems, check the condition of the internal
properly mounted and the rear shock to be
bearings. To do this, turn the pedal as if pedaling
adjusted according to the weight of the cyclist, the
backwards and observe that nothing seems loose
way of riding and the type of terrain where you
or too rigid. Otherwise, see and ORBEA dealer.
normally ride.
For more information on the adjustment, There is the risk of entrapment with
see the chapter on “Suspension adjustments” or the transmission system during the check,
consult the user manual for the suspension in maintenance or normal use of the bicycle.
question.
Clearance: (Frequency: Once a month)Sitting on
the bicycle and pressing down on the rear part
of the bicycle with sharp movements, the rear
suspension must contract and expand easily, and
without any clicking or cracking noises in the shock
area or on the rear triangle pivots of the bike.
If the rear suspension or the rear triangle
pivots have excess clearance, or any other problem, Regularly check that the reflectors on the pedals
consult the manual from the rear suspension are clean and correctly positioned.
provider or an ORBEA dealer.
Automatic pedals: Before use, it is a good idea to
clean both the cleats and the pedals, since dirt
can interfere with the correct functioning of the
PEDALS mechanism.
The pedals are the point of contact on the bicycle
that bear the most weight; control and safety on
24Given the wear they are subjected to,
the automatic pedal cleats have a relatively short
service life. Therefore, their condition should be
checked on a regular basis. To do this, consult
the user manual for your specific pedal model
or consult an ORBEA dealer. A cleat that is used
beyond its service life can cause the total loss of
control over the bicycle.
On road bicycles, caution must be taken
when modifying the cleats, tires and cranks, since
they can interfere between the wheel and the
user's foot.
25SAFETY EQUIPMENT
must be ensured that the strap is properly closed.
The cyclist is responsible for knowing
current laws and regulations regarding bicycle use.
The rider must obey them and must be aware of Helmet use reduces serious injuries and
the penalties that are levied for their violation. even death.
Goggles: The use of glasses is recommended when
Reflectors: The reflectors on the bicycle reflect the riding a bicycle. The cyclist’s eyes are exposed
light, which illuminates them, making the cyclist to air, which can cause discomfort and even
visible to other vehicles in conditions of poor loss of visibility at moderate speeds. In addition,
visibility. They are therefore a crucial part of the glasses will protect us from possible impacts from
safety system and must not be removed. insects or solid particles in suspension, which
can cause an accident with fatal consequences.
Regularly check that all the reflectors (front, rear,
on the pedals and on the wheels) are correctly
positioned and attached. Missing reflectors must
be replaced as soon as possible.
Lights: Reflectors are not to be considered
substitutes for lights, but rather complements to
them. Riding at night, in the fog, rain or in any other
situation with poor visibility is dangerous, and
therefore both lights and reflectors must be used.
Helmet: All cyclists are recommended to wear
a helmet, regardless of the type of cycling they
do. The helmet is the most important safety
accessory. The helmet must worn correctly and it
26MAINTENANCE
The preventive maintenance of our bicycle is key
to achieving better performance and durability of
In the case of disc brakes, special care must
the bicycle.
be taken so that the detergent, degreasing agent
or oils do not reach either the discs or inside the
brake caliper, since they can considerably reduce
Improper maintenance could lead to the braking power.
malfunctions or imperfections in the bicycle For the chain, cogs and gears, a liquid degreaser
components, with serious consequences. can be used to facilitate the removal of built-up
grease.
The details indicated below are based on normal
use. If the bicycle is used in extreme conditions of Rinse the bicycle with a gently stream of water and
rain, snow, salinity or you ride on irregular terrain, let it dry.
maintenance must be performed more regularly.
In any case, it is recommended to bring the bicycle The rinsing and drying of the components
in to an ORBEA dealer for inspection once a year. is key to improving the effect and the duration of
the lubricant.
In the case that any component needs to
be replaced, always use the spare parts indicated Do not use pressurized water and prevent
in this manual. water from entering areas like the headset, hubs
or bottom bracket box, thus preventing the water
from removing the grease deposited inside these
Consumables such as inner tubes, brake components.
pads, etc. must be appropriate for the specific
bicycle model in question.
LUBRICATION
For the effect of the lubricant to be the most
CLEANING effective, it is recommended to always clean the
bicycle before lubricating it. Likewise, every time
There are many methods to clean a bicycle. Below
is a suggested cleaning method, proven to work for you clean your bicycle, it is recommended to
a very dirty bicycle. lubricate it once it has dried. If it is not possible to
Remove the most caked dirt, such as soil, gravel, clean the bicycle, it is preferable to lubricate it than
sand, mud, etc. with s gentle stream of water. not to do so.
Spray the entire bicycle with a suitable detergent The lubrication must be proportional to the
and rub with a sponge. frequency of use, the need for cleaning and the
salinity of the environment, It is important to pay
special attention to the lubrication and cleaning in
coastal areas or in conditions with a lot of sweat.
The lubrication of the following components is key
Some cleaning products can be too harsh to:
and can even damage the bicycle (paint, rubber, - Prolonging the service life.
plastic or metal parts). For this reason, it is very - Ensuring proper working condition.
important to follow the instructions provided by - Ensuring maximum performance.
the manufacturer of the cleaning product and only
use those products that are expressly suitable for For greater details on the type of lubricant
bicycles. recommended, consult the manual provided by
the manufacturer of the component in question.
For internal bearings that require specific wrenches
27and skilled labor, please visit an ORBEA dealer. manual from the manufacturer of the suspension
in question.
In order of most to least frequency of lubrication:
Chain: This is the element that requires the greatest
frequency of lubrication. It is recommended to use
lubricating oils.
Using a rag to ensure that the oil does not get on
other components, move the pedals and apply oil
along the entire chain. Finally, use wrap the same
rag around the chain and continue to move the
pedals so that the chain deposits the excess oil on
the rag.
Front Derailleur: At least once a year, it is
recommended to lubricate the pivots of the front
derailleur, applying a few drops of lubricating oil
on each of the pivots and cleaning the excess oil
with a rag.
Seatpost and stem: At least once a year, to prevent
seizing and to increase the friction between the
components, it is recommended to use friction
paste on the contact point between the seatpost
and the frame, the stem and the handlebar and
the stem and the head tube. This is especially
important for carbon components, since friction
paste makes it possible to use lower tightening
torques that do not damage the carbon parts.
A chain with too much oil will accumulate
more dirt and could get the other bicycle
components, such as the brake pads, dirty and
even damage them.
Suspensions: The surface of the bars on both
the fork and the rear suspension must always be
kept clean and lubricated. It is recommended to
lubricate whenever you clean the bike, applying
Cranks: Every time they are dismounted, it is
a few drops of oil on the bars and using a rag to
recommended to apply some type of anti-seizing
extend it over the entire surface. The bars must be
grease on both the point where the bottom
lubricated, but be careful not to apply too much
bracket is attached, as well as where the pedal is
lubricant, as this contributes to dust and dirt
screwed on, to prevent them from locking up.
deposits.
Pedals: The pedal lubrication depends on the
model. Certain models require it and it is NOT
For more information on lubrication and recommended for others. It is recommended to
maintenance of the suspensions, consult the consult the manual from the manufacturer of the
28model in question.
STORING THE BICYCLE FOR A PROLONGED
PERIOD OF TIME
When you are not using the bicycle, it must be
protected from the rain, snow, sun or any adverse
weather conditions.
Snow and rain can damage the metal parts
of the bicycle and the sun can deteriorate the
plastic parts, paint and even components made of
composite materials, such as carbon.
To store the bicycle for a long period of time, it is
recommended to lubricate it and cover it, with the
tires at half their normal pressure.
29WARRANTY
Orbea develops new services so our customers
feel safe and know that they can count on us. The
SERVICE CONDITIONS
activation of the warranty will provide customers • The replacement under the extended warranty or
quick and easy access to Orbea. purchase option pertains to a frame that is similar
or equivalent to the broken frame.
• The user is responsible for the labor costs
EXTENDED WARRANTY associated with the assembly of the frame or fork
on the bicycle.
Orbea offers its extended warranty on the frames
and rigid forks we mount on our bicycles (3 years • Orbea will be responsible for transporting the
for painting defects), once the country’s warranty frame. • If the dealer is not the original dealer,
period has ended. Orbea reserves the right not to cover transport
costs.
This warranty will be subject to registration of the
bicycle serial number within a period of 30 days • The purchase option will be made available after
after the date of purchase and the presentation of the broken frame has been returned.
the purchase invoice.
• Peripheral components are not included.
To register and see more details, visit: www.orbea.
com/warranties • The term of the accident policy will always be as
of the date of purchase of the first frame. Orbea
offers this service for a maximum of 2 times for the
same original frame purchased.
NEW ACCIDENT POLICY • The term of coverage will always be as of the
In the case of a broken or cracked frame or rigid date of purchase of the first frame. Orbea offers
fork resulting from an accident unrelated to this service for a maximum of 2 times for the same
manufacturing defects, we offer a discount on original frame purchased.
a new, similar frame, according to the following
conditions: • To opt for the new extended coverage, payment
can only be made online at www.orbea.
• 0-12 months: 50% discount off the RRP in the com.
country.

• 13-24 months: 40% discount off the RRP in
the country. All ORBEA bicycles have a serial number or
reference code so they can be identified if stolen.
• 25-36 months: 30% discount off the RRP in
the country.
This service is provided on models with OME, OMP
and OMR-quality frames and Rallon models.
This warranty will be subject to registration of the
bicycle serial number within a period of 30 days
after the date of purchase and the presentation of
the purchase invoice.
Orbea bicycles meet the following safety standards:
ISO 4210-2 for bicycles:
To register and see more details, visit: www.orbea.
com/warranties • touring
• young adults
30• mountain
• road
EN 15194, for assisted pedaling bicycles. EPAC
bicycle.
Since 1995, Orbea has complied with Quality
assurance standard ISO 9001 and IQNET.
Since March 2004, Orbea has complied with
environmental standard ISO 14001.
For more information on the warranty conditions,
consult the corresponding section on the website
at www.orbea.com/es-es/garantía or contact an
ORBEA dealer.
31DECLARATION OF CONFORMITY
The manufacturer: The following national standards and other specifi-
Orbea S. Coop. Ltda cations (or parts thereof) have been applied:
Polígono Industrial Goitiondo s/n - EN 15194
48269, Mallabia (Bizkaia) - Spain - EN 14764
Declares that the following products: Person authorized to draft the technical file:
Descripción / Description Name: Aitor Juaristi (Quality Manager)
Marca/ Make: ORBEA Address: Polígono Industrial Goitiondo s/n
Modelos / Mode/s: GAIN, KATU, KERAM, OPTIMA 48269, Mallabia (Bizkaia) - Spain
and WILD
Año de construcción / Year of manufacture
EPAC: 2017 and 2018
Comply with the following European Directives: Orbea S. Coop. Ltda
- Directiva 2006/42/CE / Directive 2006142/EC 11/30/2017
- Directiva 2004/108/CE / Directive 2004/108/EC
- Directiva 2011/65/CE / Directive 2011/65/EC
The following harmonized standards have been
applied in full:
De acuerdo con la Directiva 2006/42/CE / According to
Directive 2006142/EC Aitor Juaristi
Quality Manager
- EN 12100
De acuerdo con la Directiva 2004/108/CE / According to
Directive 20041108/EC
- EN 61000-3-2
- EN 61000-3-3
- EN 61000-6-1
- EN 61000-6-3
- 61000-4-2
32The manufacturer: Complies with the following international stan-
Orbea S. Coop. Ltda dards:
Polígono Industrial Goitiondo s/n - EN ISO 4210 (1-9):2014
48269, Mallabia (Bizkaia) - Spain
Declares that the following products: Person authorized to draft the technical file:
Description: Bicycle Name: Aitor Juaristi
Address: Polígono Industrial Goitiondo s/n
Brand: ORBEA 48269, Mallabia (Bizkaia) - Spain
Models: ALMA, AVANT, CARPE, COMFORT, DUDE,
GROW, KATU, LOKI, MX, 012, ORCA, ORDU,
OCCAM,
RALLON and SPORT.
Year of manufacture: 2017 and 2018 Orbea S. Coop. Ltda
11/30/2017
Comply with the following European Directives:
- Directive 2001/95/CE
- Decision of the European Commission 2015/681/EC
Complies with the requirements of French Decree
No. 0 95-937 of 1995/08/24
Complies with the requirements of Spanish Decree Aitor Juaristi
No. 339/2014 of 2014/05/09 Quality Manager
33SUPPLEMENTARY NOTES
1. Lubrication. Every 1,000 km of use or every six
months (if it has less than 1,000 km of use), it is recom-
mended to grease the chain, the chainwheel hub and the
cogs. The use of lubricants specifically for bicycles
or motorbikes is recommended.
2. Spare Parts. Only use original spare parts iden-
tical to those on your bicycle. The replacement of com-
ponents with other similar components can jeopardize
the rider’s safety. These spare parts must be replaced by
staff who have been trained to do so.
3. The use of a seatpost with a sprint is not permit-
ted on these bicycles. The use of seatposts with springs
poses the risk of pinching children’s fingers if they ride in
child seats on the rear of the bicycle.
4. Racks, saddlebag supports and child carriers
must be mounted according to the instructions provided
by the manufacturer of said component and must never
bear a weight of more than 15 kg on each of them. If
more than one of these components is mounted on the
bicycle, for example, a luggage rack and another rack,
the maximum weight of the load on each component
will be 7.5 kg.
5. The manual must be read and understood before
using the bicycle. Any doubts must be clarified at the
bicycle’s point of sale or Orbea’s network of stores. The
rider must not modify the bicycle or replace parts with
other similar parts, as this may jeopardize safety.
6. Orbea accepts no responsibility for modifications
that the rider may make to the bicycle.
7. The weighted emission sound pressure level in the
rider’s ears is less than 70 dB (A).
8. Follow the instructions for the battery chargers.
3435
ADDITIONAL INFORMATION
ORBEA actively participates on Facebook and
Twitter, along with our fantastic global community
                                                     YOUR ORBEA DEALER
of cyclists. Looking for places to ride or cycling   Find your nearest ORBEA dealer who can provide
vacations? Somebody will have the answer:            all the ORBEA solutions you need at:
                                                     www.orbea.com/distribuidores

    FACEBOOK
www.facebook.com/OrbeaBicycles                       AFTER-SALES SERVICE
                                                     Our technical service is ready to answer any
                                                     question you might have about your ORBEA
    TWITTER                                          bicycle:
www.twitter.com/Orbea                                mailto:Orbea@Orbea.com

    YOUTUBE
Visit our ORBEA YouTube channel to see a wide
variety of useful videos on adjustments and
techniques.
www.youtube.com/user/OrbeaBicycles

    INSTAGRAM
www.instagram.com/orbeabicycles

ORBEA CONTENT
See and download photos, videos and documents.
http://content.orbea.com

                                                                                               36
You can also read