Using Eclipse to develop for Embedded Linux on a Windows Host
←
→
Page content transcription
If your browser does not render page correctly, please read the page content below
Using Eclipse to develop for Embedded Linux on a Windows
                            Host

                                           Dr Peter Schojer
                            Applied Informatics Software Engineering GmbH

                                               St. Peter 33
                                       9184 St. Jakob im Rosental
                                               AUSTRIA
                               Tel: +43 4253 32596 Fax: +43 4253 32096
                                       peter.schojer@appinf.com
                                            www.appinf.com

                Design & Elektronik Entwicklerforum “Embedded Linux” 2007

                                               Abstract
Today, the majority of software is written for Windows operating systems, i.e. most software developers
are used to the comfort of GUI aided coding and debugging. Also the operating system of choice for
development is thus Windows. Most larger companies actually only allow Windows as primary desktop
operating system. Developers that need to develop for other platforms typically end up installing a virtual
machine where they have to write/test their code, or they connect remotely to a development server.
Anyway, changes are high that they will not be as productive as in the coding environment they are used
to. Adding embedded devices to that equation complicates things further. Code deployment must be taken
care of and especially remote debugging is completely different from the local debugging case. Suddenly,
one requires a gdbserver at the target to be configured and running, the executables at the remote target
should be stripped of debugging information (and needs to be copied there) but the local copy of the
executables should have the debug info, etc. . Summarized, for the Windows or desktop-only developers
there are plenty of challenges (or should I say: traps?) waiting. And considering that the number of
embedded devices is ever growing, as is their computational power, this leads to two conclusions:
software for embedded devices will get even more complex, and more and more non-embedded-
developers will suddenly be in the situation where they have to develop for that platform. But even die-
hard-embedded-developers welcome tools that make their life easier.
One of these tools is Eclipse. Eclipse is an open-source software framework written primarily in Java.
While originally only aiding the JAVA developer, the CDT (C++ Development Tools) add-on provided
support for C/C++ projects, syntax highlighting and debugging. CDT relies on a GNU tool chain which
must be provided and integrated into Eclipse by the user and on Cygwin as the underlying Unix
emulation layer to function properly.
This paper will first show how to install all the software required starting with Cygwin. We will then
show how to create a cross compiler of your own with Cygwin. The next section covers the installation of
Eclipse with additional plugins required for software development. This include subversion access,
remote shells and remote debugging. Finally, we will show how one can use Eclipse for remote
debugging.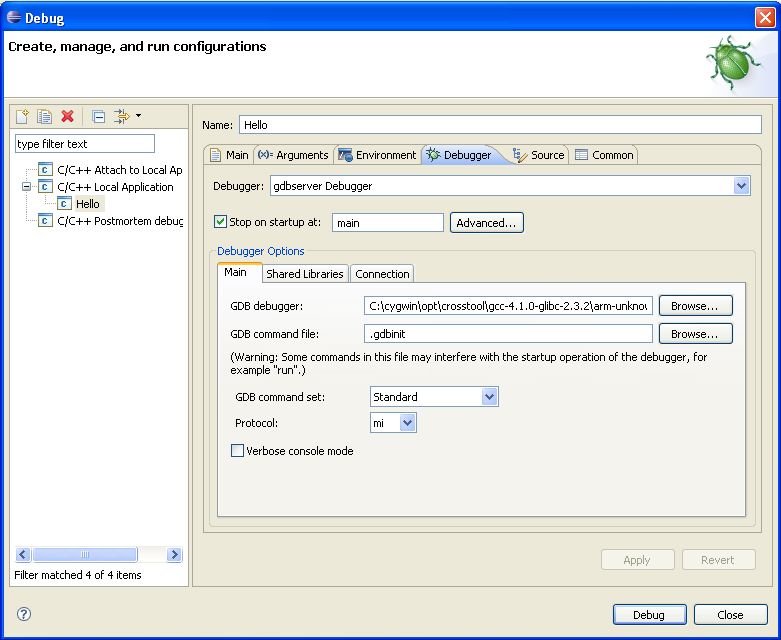
Introduction
A few years ago, an embedded Linux software developer only had a single option: to develop his
software on Linux. Cross compilers were created painfully by hand, a process that could last for a week
or two depending on the number of fixes one had to write for the compiler. It was a slow, tedious and
error-prone process, and to some degree, it still is. I'm confident that most developers probably said to
themselves: I never wanted to know so much about gcc/gclibc/... internals! Just let me write my
application for that device! Today, the situation is slightly better. There are finally tools available that
allow even newbie developers to get started fairly quickly. Most of these software tools are available for
Windows and Linux. Which platform you choose for development is entirely up to you. Although we are
assuming Windows as operating system, most of this article applies to Linux users too. So lets start by
obtaining the required tools!

Software Installation

Cygwin Setup
The first step is to install Cygwin from http://www.cygwin.com. Download the installer and start it. I
recommend to keep the default settings except when selecting packages. Make sure to select the
Web→{wget} package, also select Utils→{diffutils, patch}, Devel→{bison, flex, gdb, gcc, make,
subversion} and other developer packages your project requires (dependent packages will be
automatically resolved). If you want to add other packages later on, simply restart the Cygwin setup.
Having installed Cygwin, start it and type gcc --version to test if gcc is working properly.
Also add c:\cygwin\bin to your PATH environment variable.

Crosscompiler
The next step is to create a cross compiler that works with Cygwin. One can either do this painfully by
hand, or build on the work of others, in this case on the work of Dan Kegel. His crosstool project
provides a fully automated build script covering plenty of different architectures and compiler versions.
The latest stable version can be found at http://www.kegel.com/crosstool/, the latest developer snapshot
can be downloaded via subversion from http://crosstool.googlecode.com. I suggest to go with the
developer version because it covers newer compiler versions and supports configurations using the Native
Posix Thread Library (NPTL). Start Cygwin and type the following command in the shell:
                    svn checkout http://crosstool.googlecode.com/svn/trunk crosstool
Now, if you look in your crosstool/src directory, you will find several shell scripts named demo-
.sh. Open the file for the architecture you require, in my case I build for ARM, thus I
chose the demo-arm.sh file. This script has one line for each known working toolchain
for this architecture, for example:

                 RESULT_TOP=/opt/crosstool
                 [...]
                 #eval `cat arm.dat gcc-4.1.0-glibc-2.2.2.dat` sh all.sh --notest
                 eval `cat arm.dat gcc-4.1.0-glibc-2.3.2.dat` sh all.sh --notest
                 #eval `cat arm.dat gcc-4.1.0-glibc-2.3.2-tls.dat` sh all.sh --notest

The RESULT_TOP variable defines where the cross compiler will be installed to. You choose the gcc and
glibc version by simple uncommenting the line that you want. If a configuration is not present you can
create your own gcc*.dat file and add it, just note that chances are higher for untested configurations to
fail. Also, if you require a gdbserver to build, you must add the '--gdb' option to the line:
                    eval `cat arm.dat gcc-4.1.0-glibc-2.3.2.dat` sh all.sh --notest --gdb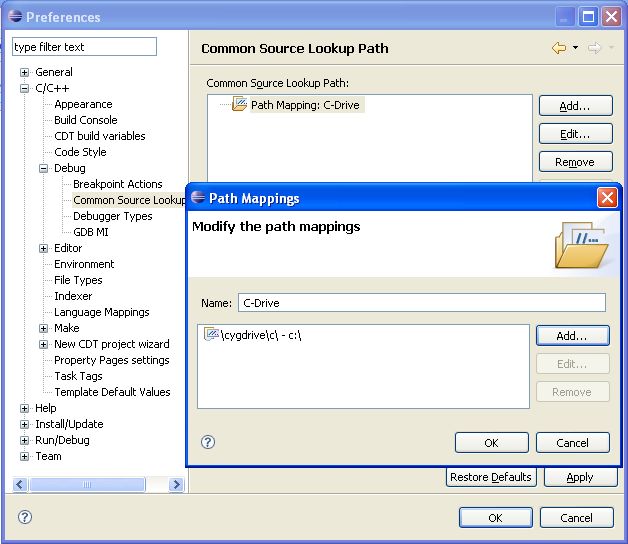
I will use the above configuration for testing. The created cross compiler will be installed to
/opt/crosstool. Building itself is simple. Change to your crosstool/src directory and execute your chosen
demo shell script. Depending on your machine a build can take up to a few hours. Most configurations
are tested on native Linux only, i.e. there is no 100% guarantee that the build will succeed on Cygwin.
After the build, check your /opt/crosstool directory. With the above configuration it should contain a
subdirectory named gcc-4-1-0-glibc-2.3.2 which contains an arm-unknown-linux-gnu folder. Its bin
subfolder should contain the cross compiling gcc binaries and a gdbserver. If required, install the
gdbserver at the remote target device.

Eclipse
Before installing Eclipse, assert that you have a recent version of the Java Runtime Environment installed
(JRE1.5 or later should be fine). Then go to http://www.eclipse.org and download the latest Eclipse IDE
for C/C++ developers (as of writing this article: v3.3). Install it by decompressing the zip file to a
directory of your choice.

Using Eclipse
When starting Eclipse it will ask you to choose a working space directory where it will create new
projects and store configuration options. Initially a welcome screen will be shown, close the tab to reveal
the default C/C++ perspective view behind.

    Figure 1: C-Drive Path Mapping

To enable source lookup during debugging, one must add a path mapping from Cygwin- to Windows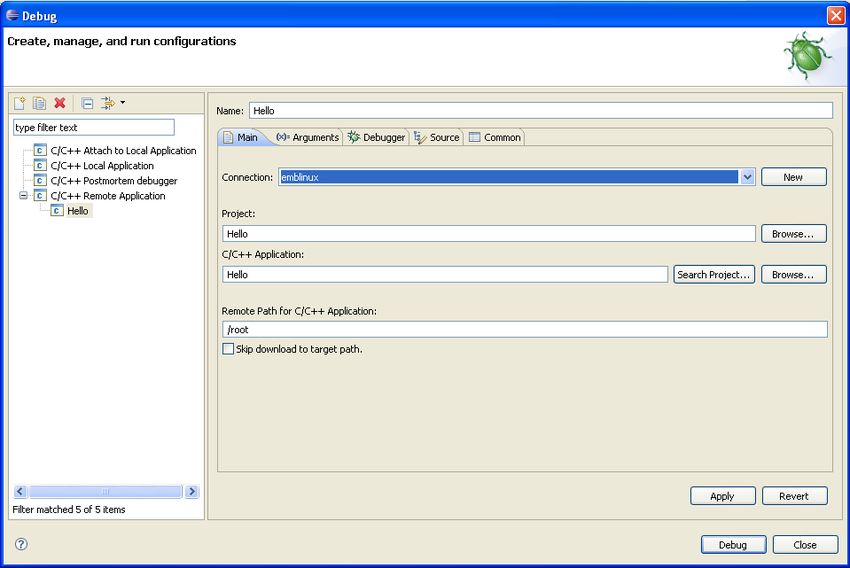
paths to Eclipse. Go to Windows->Preferences and add a path mapping as shown in Figure 1. Repeat this
for each drive letter containing source code.

              Figure 2: Adding a new Plugin Site

Integration with Subversion/CVS
Eclipse supports subversion via a plugin. As shown in Figure 2, go to Help->Software Updates->Find
and Install and select "Search for new Features...". Add as new remote site
http://subclipse.tigris.org/update_1.2.x. Install the plugin, restart and you can now check out projects from
SVN by clicking on the New button (Note: File->New will not contain an entry for SVN!).
CVS support is already built-in, simply go to File->Import.

Remote File System Support
Remote file system support is realized via the Device Software Development Platform (DSDP) plugin.
Add a new plugin site with the url http://download.eclipse.org/dsdp/tm/updates/ and install the DSDP
plugin. The DSDP project contains the remote system explorer that allows you to connect and work with
a variety of remote systems, either through ssh, ftp or dstore. It also allows you to do remote compiling
and to connect via telnet/ssh to your remote target.
To be able to do remote debugging with DSDP, you must use the dstore protocol which unfortunately
requires a JRE to be installed on the remote device, Perl is also recommended . You can download the
dstore server from the DSDP web page at http://download.eclipse.org/dsdp/tm/downloads/.
If you can't use dstore, I recommend using ssh which at least allows file transfers.

Creating a C++ Project
Generally, there are two different kind of C++ projects. The first are managed C++ projects, i.e. Eclipse
will create the Makefile for you and automatically update it whenever you add/remove a source file. We
will pretty much ignore this option. The latter are so called "Makefile Projects" where simply an external
Makefile is used which is perfect for companies that already have a build/make environment for Linux
that they want to continue to use on Windows. Thanks to Cygwin you can do that. Just make sure that
    ●   all Makefiles have UNIX style line endings
    ●   all path/file entries are Cygwin style (i.e. you have to perform the path mapping if any is
        required)
    ●   if including other Makefiles, make sure that they are included via absolute Cygwin paths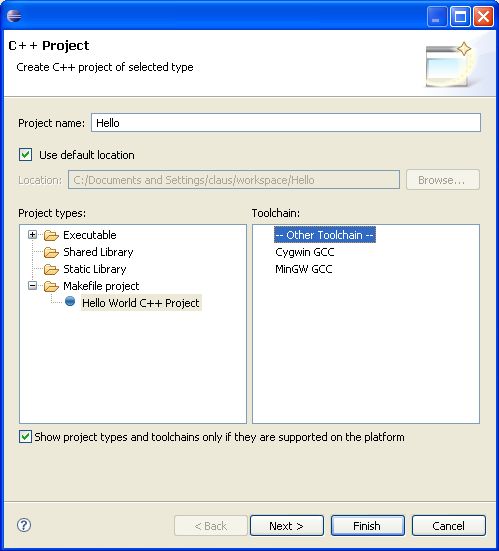
Figure 3: Create new Makefile Project                 Figure 4: Import an existing Project

Create Makefile Projects
Create the project by clicking on File->New->C++ Project. Name it, choose Makefile project and select
Other Toolchain as shown in Figure 3. Eclipse will create a default Makefile and a simple Hello World
C++ file.

Import an Existing Project
Importing an existing project is similar to creating a Makefile project. Note that there is a File->Import
option available. Don't use it! It does not import Makefiles. Instead proceed as in the Create Makefile
case. Create a new C++ project and specify the location where the Makefile resides (see Figure 4).
Eclipse will now parse your project and find all C++ files in that directory. After parsing, it will
automatically try to build the project.
In both Makefile scenarios, it is your responsibility to add new source files to the Makefile and to tell it
which cross compiler it should use. All options are set via the Makefile. Also make sure that your
Makefile produces a debug version and a stripped debug version of your executable.

Debugging an Application
To debug an application you first have to create a new connection to your device:
    ●   Change to the Remote System Explorer perspective (Window->Change Perspective)
    ●   Click on the New button and create a new RSE connection.
    ●   Now choose the type of connection and set the IP address/name.
    ●   The first time you access the connection, it will ask for a user name and a non empty password.

Depending on whether you can use dstore or not, the next steps vary.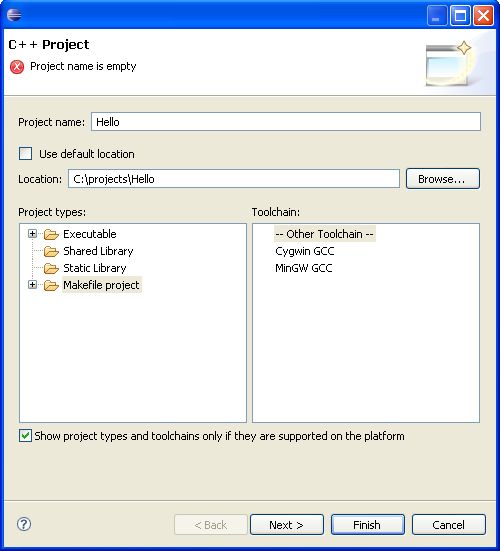
Figure 5: Debugging With Dstore

Debugging with Dstore
With dstore debugging is rather simple. Make sure that the gdbserver on the remote target is installed
and in the global PATH environment, then switch in Eclipse to the C++ perspective and do the following:
    ●   Right click on the binary containing the debug info and select Debug As->Open Debug Dialog.
    ●   Select C/C++ Remote Application and create a new configuration. Now set the connection and
        the remote path (Figure 5), switch to the debugger view and set your cross compiled gdb. Then
        apply your settings and debug.

Debugging without Dstore
If you cannot use dstore, you have to upload the files manually:
    ●   Upload the built binary to the target via the connection.
    ●   Check that the file is executable. If not, open a terminal (Window->Show View->Other) and
        connect via telnet/ssh and change the file access rights manually.
    ●   Start the gdbserver by typing (assuming you connect via TCP):
                            gdbserver winhostname:gdbserverport executable [args]
Figure 6: Debugging Without Dstore
Now create a debugging configuration:
● Make sure you are in the C++ perspective.
● Right click on the binary containing the debug info and select Debug As->Open Debug Dialog.
● Select C/C++ Local Application and create a new configuration.
● Switch to the Debugger tab and change the Debugger to gdbserver Debugger as shown in Figure
6. Don't forget to update the GDB debugger to point to your cross compiler's GDB.
● Now switch to the Connection settings and configure where gdb will find the gdbserver
application.
● Start debugging.
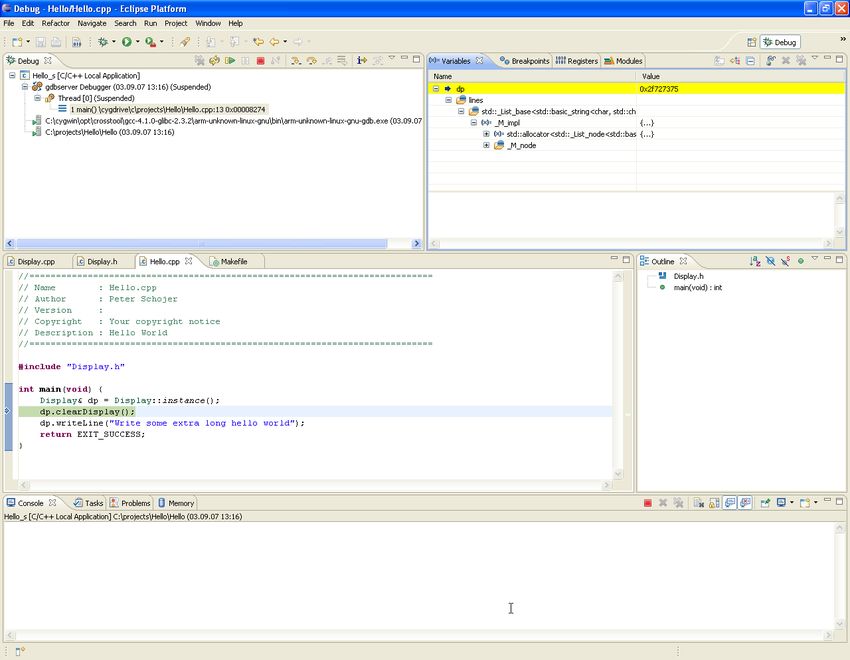
If successful, Eclipse will ask you to open the debug perspective (shown in Figure 7) and break at the first
line of the code. If you see no source code, your eclipse is missing path mappings for that source file
location.
Sometimes it can happen, that Eclipse will reject a (previously working) configuration as being illegal.
Deleting and recreating the configuration might help in this case.Figure 7: Eclipse Debugging Conclusion In this paper we have shown how embedded Linux developers can use existing open-source software to compile their projects on Windows. We provided pointers to the required software packages and have highlighted the most common errors. Furthermore, we have shown how to create a cross compiler with Cygwin and on how to use Eclipse for remote debugging. The JAVA dstore server is the essential component for remote debugging with Eclipse. If the remote device features no dstore daemon, Eclipse offers only minimal time saving compared to the non GUI debugging case. Unfortunately, for most embedded devices it will not be feasible to provide a JRE at the remote device. Still, while requiring more manual steps than the dstore scenario, manual debugging with Eclipse is possible and will surely improve over time.
You can also read