VWR Pinocchio Super INSTRUCTION MANUAL - European catalogue numbers: VWR International
←
→
Page content transcription
If your browser does not render page correctly, please read the page content below
VWR® Pinocchio Super

                 INSTRUCTION MANUAL

European catalogue numbers:
710-0950       Pinocchio Super Petri
710-0949       Pinocchio Super Contact
710-0955       Pinocchio Super Petri Validated
710-0951       Pinocchio Super Contact Validated

Version:   2.2
Issued:    July 2016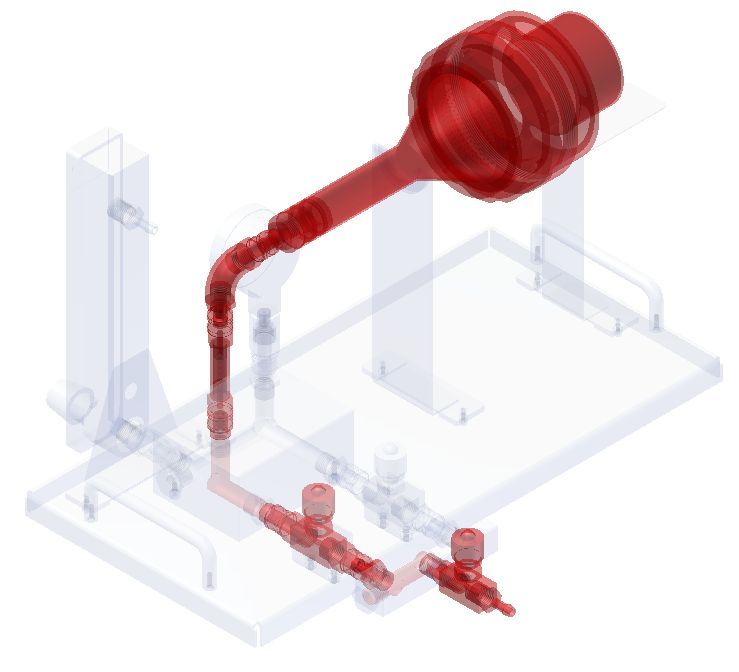
Legal address of manufacturer
Europe
VWR International S.r.l.
Via San Giusto, 85
20153 Milano (MI)
Italy
+ 39 023320311
http://it.vwr.com
Country of origin: Italy
2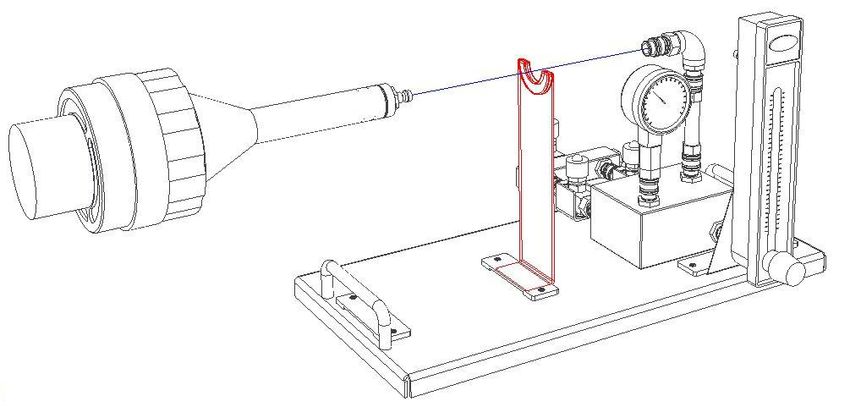
Table of contents

Warning                          4
Safety information               4

                                         ENGLISH
Installation                     5
Intended use                     7
Specifications                   7
Instructions for                 8
Maintenance                      10
Technical service                11
Warranty                         11
Equipment disposal               12

                             3
Warning
PLEASE READ THE INFORMATION CONTAINED IN THIS MANUAL BEFORE USING THE UNIT.
THE MANUFACTURER DOES NOT ACKNOWLEDGE ANY RESPONSIBILITY FOR AN IMPROPER USE
OF THIS EQUIPMENT AND NOT FOLLOWING THESE DIRECTIONS FOR USE.
ENGLISH
Using this manual will help you use this instrument efficiently. The manual should be kept in a convenient
place near the instrument for ease of use.
Safety information
Please follow the guidelines below, and read this manual in its entirety to ensure safe operation of the unit.
Use the device just for the indicated purposes
The device must be correctly installed according to manual instructions, before starting any operation
Use original spare parts and accessories for any replacement
If this device is used with extremely high pressurised gas you must connect a reducer to the inlet in
order to have a maximum of 6 bar to the inlet
Avoiding damage to the instrument
Be aware that pressure applied to the inlet is lower than 6 bar.
Avoiding damage to operator
Do not use this device with gas with an oxygen concentration more than 21%.
Do not use this device with gas harmful for humans or the environment.
4
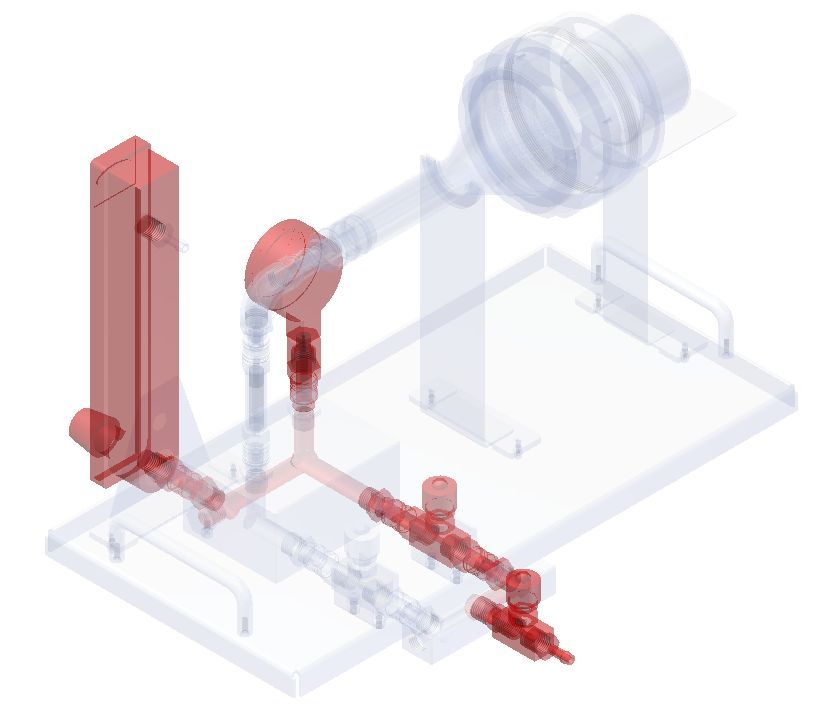
Installation

The compactness of “Pinocchio Super II” sampler enables the device to be located where space is limited.
The simple construction coupled with simple operation enable accurate reports on air–gas microbiology

                                                                                                                    ENGLISH
quality. The unit can be completely dismantled for easy cleaning and autoclave sterilisation. The pressure
gauge and the airflow meter are not autoclavable. Follow the schematic drawing for assembly. All
connections are “quick disconnect”.
Connect the unit to the desired point of sampling using suitable sterile tubing. The inlet gas valve should be in
a closed position.

ASSEMBLING

1) Connect the inlet splitter to the basement according to the following picture.

2) Connect the pressure gauge to the base according to the following picture.

                                                        5
3) Connect the elbow arm to the base according to the following picture.
ENGLISH
4) Connect the flow meter and its holder to the base according to the following picture.
5) Connect the sampling arm and its holder to the base according to the following picture.
6Intended use
The “Pinocchio Super II” microbiological gas sampler is a portable instrument for determining the level of existent
microbiological contaminants in the compressed gas of aseptic manufacturing operations.
ENGLISH
For laboratory use only. Not intended for any animal or human therapeutic or diagnostic use.
Specifications
HxWxD 245x400x200 mm
Weight 5 kg
Construction Stainless steel / anodized aluminium
Airflow meter 50/400 litres
Operating temperature 10 .... 40 °C
Electrical power supply N/A
Compressed air Max. inlet pressure 6 bar
7Overview
The Pinocchio Super II microbiological gas sampler is a portable instrument for determining the level of
existent microbiological contaminants in the compressed gas of aseptic manufacturing operations.
ENGLISH
An official validation of the Pinocchio Super II air sampler is required as part of an inspection. The flow meter
should be calibrated by an official agency at regular intervals (usually every year). Official validation of the
flow meter can also be performed by VWR INTERNATIONAL customer support service.
Instructions for use
PREPARATION
1) Connect the unit to the desired point of sampling using suitable sterile tubing. The inlet gas valve should
be in a closed position.
2) Insert an identified contact plate or Petri dish with sterile medium in the Pinocchio funnel housing and
screw it to the conical head. Do not connect to the Pinocchio Super II.
AIRFLOW ADJUSTMENT
C
D1
D2
D
3) Fully open the flow meter knob (pos. “C” Figure 1).
4) Fully close the D and D2 valves.
5) Fully open the D1 valve.
6) Open the line of compressed air or gas.
7) Start opening the D valve slightly, ensuring that the manometer is not indicating a pressure greater than 6
bar.
8) Open the D valve until you see the desired airflow on the flow meter, the suggest value is 100 l/min (210
SCFH). The purpose of this operation is to obtain a known volume of air, without contaminating the sampling
circuit.
8COMPRESSED GAS SAMPLING
ENGLISH
D1
D
D2
9) Connect the Pinocchio funnel to the Pinocchio Super II.
10) Fully close the (D1) valve.
11) Fully open the (D2) valve and start the count down.
12) Close the inlet gas valve after 10 minutes (or when 1000 litres of air is collected).
13) Unscrew the head and transfer the contact plate (RODAC) or Petri dish to a laboratory for incubation.
The Pinocchio Super II is now ready for a new test.
Count the Colony Forming Units in the plate at the end of incubation time and report the results as CFU/1000
litres of gas/compressed air.
SAMPLING DATA RECORDING
If the sampling data needs to be recorded, replace the plate housing with a SAS Super air sampler and start
from point 4 to 6.The time will be regulated by the sampler timer.
CALIBRATION
The airflow meter can be officially calibrated each year.
CLEANING & STERILISATION
The unit can be dismantled for easy cleaning and autoclave sterilisation.
IMPORTANT NOTE!
AIRFLOW METER AND PRESSURE GAUGE ARE NOT AUTOCLAVABLE.
9CONVERSION TABLE “SCFH” TO LITRES PER MINUTE
The meters airflow readings should be translated into litres per minute. Follow the reported table.
SCFH l/min
ENGLISH
150 70,8
160 75,5
170 80,2
180 85,0
190 89,7
200 94,4
210 99,1
220 103,8
230 108,5
240 113,3
250 118,0
260 122,7
Maintenance
Daily cleaning of the instrument will prevent most future faults. It is possible to clean the instrument with a
mild detergent and a soft wet cloth.
WARNING
Do not use any cleaning product containing halogens or other aggressive substance to clean the
instrument. Usage of these products can cause rust.
10Technical service
Web resources
Visit the VWR website at vwr.com for:
ENGLISH
• Complete technical service contact information
• Access to the VWR online catalogue and information about accessories and related products
• Additional product information and special offers
Contact us For information or technical assistance contact your local VWR representative or visit vwr.com.
Warranty
VWR International warrants that this product will be free from defects in material and workmanship for a
period of two (2) years from date of delivery. If a defect is present, VWR will, at its option and cost, repair,
replace, or refund the purchase price of this product to the customer, provided it is returned during the
warranty period. This warranty does not apply if the product has been damaged by accident, abuse, misuse,
or misapplication, or from ordinary wear and tear. If the required maintenance and inspection services are not
performed according to the manuals and any local regulations, such warranty turns invalid, except to the
extent, the defect of the product is not due to such non-performance.
Items being returned must be insured by the customer against possible damage or loss. This warranty shall
be limited to the aforementioned remedies. IT IS EXPRESSLY AGREED THAT THIS WARRANTY WILL BE
IN LIEU OF ALL WARRANTIES OF FITNESS AND IN LIEU OF THE WARRANTY OF MERCHANTABILITY.
Compliance with local laws and regulations
The customer is responsible for applying for and obtaining the necessary regulatory approvals or other
authorisations necessary to run or use the product in its local environment. VWR will not be held liable for any
related omission or for not obtaining the required approval or authorisation, unless any refusal is due to a
defect of the product.
11Equipment disposal
ENGLISH
This equipment is marked with the crossed out wheeled bin symbol to indicate that this equipment must not
be disposed of with unsorted waste.
Instead it's your responsibility to correctly dispose of your equipment at lifecycle end by handing it over to an
authorised facility for separate collection and recycling. It's also your responsibility to decontaminate the
equipment in case of biological, chemical and/or radiological contamination, so as to protect from health
hazards the persons involved in the disposal and recycling of the equipment.
For more information about where you can drop off your waste of equipment, please contact your local dealer
from whom you originally purchased this equipment.
By doing so, you will help to conserve natural and environmental resources and you will ensure that your
equipment is recycled in a manner that protects human health.
Thank you
12Inhaltsverzeichnis
DEUTSCH
Warnung 14
Sicherheitsinformationen 14
Installation 15
Verwendungszweck 17
Spezifikationen 17
Gebrauchsanweisung 18
Wartung 20
Technischer Kundendienst 21
Garantie 21
Entsorgung des Produktes 22
13Warnung
LESEN SIE SICH VOR DER VERWENDUNG DIESES GERÄTS DIESE BEDIENUNGSANLEITUNG
DURCH.
DEUTSCH
DER HERSTELLER ÜBERNIMMT KEINE VERANTWORTUNG BEI UNSACHGEMÄSSER VERWENDUNG
DIESES GERÄTS UND NICHTBEACHTUNG DIESER BEDIENUNGSANLEITUNG.
Diese Bedienungsanleitung hilft Ihnen bei der effektiven Verwendung Ihres Geräts. Bewahren Sie sie in der
Nähe des Geräts auf, um bei Bedarf darauf zugreifen zu können.
Sicherheitshinweise
Befolgen Sie die nachstehenden Anweisungen, und lesen Sie diese Bedienungsanleitung sorgfältig durch,
um einen sicheren Betrieb des Geräts zu gewährleisten.
Verwenden Sie das Gerät nur für den vorgesehenen Zweck.
Das Gerät muss vor Inbetriebnahme entsprechend dieser Bedienungsanleitung ordnungsgemäß
+++installiert werden.
Verwenden Sie für den Austausch ausschließlich Originalersatzteile und Zubehör.
Wenn dieses Gerät mit extrem hohem Gasdruck betrieben wird, muss ein Druckminderer an den
Einlass angeschlossen werden, der den Druck auf maximal 6 bar begrenzt.
Bei der Verwendung des Geräts sind folgende Punkte zu beachten.
Vermeidung von Schäden am Gerät
Der Druck am Einlass darf maximal 6 bar betragen.
Vermeidung von Verletzung des Bedieners
Dieses Gerät darf nur mit Gas mit einer maximalen Sauerstoffkonzentration von 21 %
betrieben werden.
Verwenden Sie dieses Gerät nicht mit Gas, das eine Gefahr für Menschen oder die Umwelt
darstellt.
14Installation
Dank seiner Kompaktheit lässt sich der Probenehmer „Pinocchio Super II“ überall dort aufstellen, wo Platz
DEUTSCH
knapp ist. Die einfache Konstruktion sowie der einfache Betrieb ermöglichen genaue Berichte zur
mikrobiologischen Qualität von Luftgas. Das Gerät kann zur einfachen Reinigung und Autoklavsterilisation
vollständig zerlegt werden. Das Manometer und der Strömungsmesser sind nicht autoklavierbar. Folgen Sie
bei der Montage der Schemazeichnung. Alle Anschlüsse sind Schnellverbindungen.
Schließen Sie das Gerät mithilfe geeigneter steriler Schläuche an der gewünschten Probenahmestelle an.
Das Gaseinlassventil muss dabei geschlossen sein.
MONTAGE
1) Den Einlassstromteiler gemäß der nachfolgenden Abbildung an der Grundplatte anschließen.
2) Das Manometer gemäß der nachfolgenden Abbildung an der Grundplatte anschließen.
153) Das Winkelstück gemäß der nachfolgenden Abbildung an der Grundplatte anschließen.
DEUTSCH
4) Den Strömungsmesser mit seiner Halterung gemäß der nachfolgenden Abbildung an der Grundplatte
anschließen.
5) Den Probenahmearm mit seiner Halterung gemäß der nachfolgenden Abbildung an der Grundplatte
anschließen.
16Verwendungszweck
DEUTSCH
Der Probenehmer für mikrobiologisches Gas „Pinocchio Super II“ ist ein tragbares Instrument zur Feststellung von
mikrobiologischer Kontaminierung im komprimierten Gas bei aseptischen Fertigungsverfahren.
Nur für Laborzwecke. Nicht vorgesehen für Therapie- oder Diagnosezwecke bei Tieren und Menschen.
Spezifikationen
HxBxT 245x400x200 mm
Gewicht 5 kg
Konstruktion Edelstahl/anodisiertes Aluminium
Strömungsmesser 50/400 Liter
Betriebstemperatur 10 bis 40 °C
Stromversorgung k. A.
Komprimierte Luft Max. Einlassdruck: 6 bar
17Übersicht
Der Probenehmer für mikrobiologisches Gas „Pinocchio Super II“ ist ein tragbares Instrument zur
Feststellung von mikrobiologischer Kontaminierung im komprimierten Gas bei aseptischen
DEUTSCH
Fertigungsverfahren.
Eine offizielle Überprüfung des Luftkeimsammlers „Pinocchio Super II“ ist im Rahmen einer Inspektion
erforderlich. Der Strömungsmesser muss in regelmäßigen Intervallen (üblicherweise jährlich) von einer
Behörde kalibriert werden. Die offizielle Überprüfung des Strömungsmessers kann auch vom Kundendienst
von VWR INTERNATIONAL vorgenommen werden.
Gebrauchsanweisung
VORBEREITUNG
1) Das Gerät mithilfe geeigneter steriler Schläuche an der gewünschten Probenahmestelle anschließen.
Das Gaseinlassventil muss dabei geschlossen sein.
2) Eine gekennzeichnete Abklatschplatte oder Petrischale mit sterilem Medium in das
Pinocchio-Trichtergehäuse einsetzen und an dem konischen Kopf festschrauben. Nicht an den Pinocchio
Super II anschließen.
EINSTELLEN DES LUFTSTROMS
C
D1
D2
D
3) Den Strömungsmesser vollständig aufdrehen (Pos. „C” in Abbildung 1).
4) Die Ventile D und D2 vollständig schließen.
5) Das Ventil D1 vollständig öffnen.
6) Die Leitung für komprimierte Luft oder Gas öffnen.
7) Das Ventil D langsam aufdrehen und darauf achten, dass der Druck am Manometer 6 bar nicht
übersteigt.
8) Das Ventil D öffnen, bis der gewünschte Luftstrom am Strömungsmesser angezeigt wird, der empfohlene
Wert beträgt 100 l/min (210 SCFH). Zweck dieses Vorgangs ist der Erhalt eines bekannten Luftvolumens,
18ohne den Probenkreislauf zu kontaminieren.
DEUTSCH
DEUTSCH
PROBENAME VON KOMPRIMIERTEM GAS
D1
D
D2
9) Den Pinocchio-Trichter am Pinocchio Super II anschließen.
10) Das Ventil (D1) vollständig schließen.
11) Das Ventil (D2) vollständig öffnen und den Countdown starten.
12) Das Einlassgasventil nach 10 Minuten schließen (oder nachdem 1000 Liter Luft erfasst wurden).
13) Den Kopf abschrauben und die Abklatschplatte (RODAC) oder Petrischale zur Inkubation in ein Labor
verbringen.
Der Pinocchio Super II ist jetzt für einen neuen Test bereit.
Zählen Sie die koloniebildenden Einheiten (KbE) auf der Abklatschplatte als KbE/1000 Liter
Gas/komprimierte Luft.
AUFZEICHNEN DER PROBENAHMEDATEN
Wenn die Probenahmedaten aufgezeichnet werden müssen, tauschen Sie das Plattengehäuse durch den
Luftkeimsammler SAS Super aus, und fahren Sie mit den Schritten 4 bis 6 fort. Die Zeit wird vom
Kurzzeitmesser des Probenehmers gesteuert.
CALIBRATION
Der Strömungsmesser sollte jährlich kalibriert werden.
REINIGUNG UND STERILISATION
Das Gerät kann zur einfachen Reinigung und Autoklavsterilisation demontiert werden.
WICHTIGER HINWEIS!
DER STRÖMUNGSMESSER UND DAS MANOMETER SIND NICHT AUTOKLAVIERBAR.
19UMRECHNUNGSTABELLE VON „SCFH“ ZU LITER PRO MINUTE
Die Angaben auf dem Strömungsmesser sollten in Liter pro Minute umgerechnet werden. Verwenden Sie
dazu die folgende Tabelle.
SCFH l/min
150 70,8
160 75,5
170 80,2
180 85,0
190 89,7
200 94,4
210 99,1
220 103,8
230 108,5
240 113,3
250 118,0
260 122,7
Wartung
Eine tägliche Reinigung des Instruments kann die zur Vermeidung der meisten Probleme beitragen. Das
Instrument kann mit einem milden Reinigungsmittel und einem weichen feuchten Tuch gereinigt werden.
WARNUNG
Zur Reinigung des Instruments keine Reinigungsmittel verwenden, die Halogene oder andere
aggressive Substanzen enthalten, da solche Mittel zur Rostbildung führen können.
20Technischer Kundendienst
Web-Ressourcen
Auf der VWR Website unter www.vwr.com finden Sie die folgenden Informationen:
DEUTSCH
• Alle Kontaktdaten des technischen Kundendienstes
• VWR Online-Katalog sowie Informationen über Zubehör und zugehörige Produkte
• Weiterführende Produktinformationen und Sonderangebote
Kontakt Wenn Sie Informationen oder technische Unterstützung benötigen, wenden Sie sich an
Ihr VWR Vertriebszentrum oder besuchen Sie unsere Website unter www.vwr.com
Gewährleistung
VWR International gewährleistet, dass dieses Produkt ab Lieferung zwei (2) Jahre frei von
Material- und Herstellungsfehlern ist. Liegt ein Fehler vor, entscheidet VWR nach eigenem
Ermessen, das Produkt kostenlos zu reparieren oder auszutauschen oder dem Kunden den
Kaufpreis des Produkts zu erstatten, sofern es innerhalb des Gewährleistungszeitraums
zurückgesendet wird. Diese Gewährleistung erlischt, wenn das Produkt, versehentlich oder
absichtlich, durch unsachgemäßen Gebrauch oder durch normalen Verschleiß beschädigt wurde.
Sofern die erforderlichen Wartungsarbeiten und Inspektionen nicht entsprechend der
Bedienungsanleitung und den lokalen Erfordernissen durchgeführt werden, erlischt die
Gewährleistung, es sei denn, dieses Unterlassen ist nicht ursächlich für den auftretenden Fehler
des Produktes.
Zurückgesendete Artikel müssen vom Kunden gegen Schäden und Verlust versichert werden.
Diese Gewährleistung ist auf die zuvor genannten Rechte beschränkt. ES WIRD
AUSDRÜCKLICH VEREINBART, DASS DIESE GEWÄHRLEISTUNG ANSTELLE JEGLICHER
GEWÄHRLEISTUNG DER EIGNUNG UND ANSTELLE DER GEWÄHRLEISTUNG DER
ALLGEMEINEN GEBRAUCHSTAUGLICHKEIT GILT.
Befolgung lokaler Gesetze und anderer Rechtsvorschriften
Der Kunde ist dafür verantwortlich, die notwendigen behördlichen Genehmigungen und anderen
Bewilligungen zu beantragen und zu erhalten, die erforderlich sind, das erworbene Produkt an seinem
Standort zu betreiben und zu nutzen. VWR kann nicht haftbar gemacht werden, wenn der Kunde es
unterlässt, die hierzu erforderlichen Handlungen vorzunehmen, oder dafür, dass die notwendigen
Genehmigungen oder Bewilligungen nicht erteilt werden, es sei denn, eine entsprechende Ablehnung ist auf
einen Mangel des Produktes zurückzuführen.
21Entsorgung des Produktes
DEUTSCH
Dieses Produkt ist mit dem Symbol der „durchgestrichenen Mülltonne“ versehen. Das bedeutet, dass dieses
Produkt nicht mit dem Restmüll entsorgt werden darf. Stattdessen ist es in Ihrer Verantwortung, das Produkt
am Ende der Nutzungsdauer ordnungsgemäß zu entsorgen, indem Sie es an eine autorisierte
Entsorgungseinrichtung geben, die das Produkt separat sammelt und dem Recycling zuführt. Sie sind
außerdem dafür verantwortlich, die Anlage im Falle einer biologischen, chemischen bzw. radioaktiven
Verunreinigung zu dekontaminieren, um die Personen, die mit der Entsorgung und dem Recycling beauftragt
sind, keiner Gesundheitsgefahr auszusetzen. Weitere Informationen über den Ort, an dem Sie Ihr Produkt
abgeben können, erhalten Sie bei Ihrem Händler vor Ort, bei dem Sie das Produkt ursprünglich gekauft
haben.
Wenn Sie wie oben beschrieben vorgehen, helfen Sie, natürliche Ressourcen zu schonen und stellen sicher,
dass Ihr Produkt so recycelt wird, dass die Gesundheit der Menschen geschützt wird.
Vielen Dank!
22Table des matières
Avertissement 24
FRANÇAIS
Informations de sécurité 24
Installation 23
Usage prévu 27
Spécifications 27
Mode d'emploi 28
Maintenance 30
Service technique 31
Garantie 31
Elimination des déchets de cet équipement 32
23Avertissement
VEUILLEZ LIRE LES INFORMATIONS CONTENUES DANS CE MANUEL AVANT D'UTILISER L'UNITÉ.
LE FABRICANT DÉCLINE TOUTE RESPONSABILITÉ POUR TOUTE MAUVAISE UTILISATION DE
L'ÉQUIPEMENT OU TOUT NON-RESPECT DES INDICATIONS RELATIVES À L'UTILSIATION.
FRANÇAIS
Ce manuel vous aidera à utiliser votre appareil de manière efficace. Nous vous conseillons de le garder à
proximité de votre appareil pour pouvoir le consulter facilement.
Informations de sécurité
Suivez les instructions ci-dessous et lisez le présent manuel dans son intégralité pour garantir une utilisation
sûre de l'unité.
N'utilisez le dispositif que pour les objectifs indiqués.
Avant toute utilisation, lisez ce manuel d'instructions afin d'installer le dispositif correctement.
En cas de remplacement, utilisez des pièces de rechange et des accessoires d'origine.
Si le dispositif est utilisé avec du gaz à très haute pression, vous devez raccorder un réducteur à la
prise afin d'obtenir un maximum de 6 bars pour celle-ci.
VWR recommande l'utilisation de……..
Éviter d'endommager l'instrument
Veuillez noter que la pression appliquée à la prise est inférieure à 6 bars.
Éviter les dommages pour l'opérateur
N'utilisez pas le dispositif avec un gaz ayant une concentration d'oxygène supérieure à
21%.
N'utilisez pas le dispositif avec du gaz dangereux pour les humains ou l'environnement.
24Installation
L'encombrement réduit de l'échantillonneur « Pinocchio Super II » permet de placer le dispositif dans des
lieux où l'espace est limité. La construction simple associée à un fonctionnement tout aussi simple permet
FRANÇAIS
d'obtenir des rapports précis sur la qualité microbiologique de l'air et des gaz. L'unité est démontable pour
un nettoyage et une stérilisation faciles par autoclave. La jauge de pression et le débitmètre d'air ne sont
pas autoclavables. Veuillez suivre le schéma de principe pour l'assemblage. Toutes les connexions sont de
type « raccords rapides ».
Raccordez l'unité au point d'échantillonnage souhaité en utilisant un tuyau stérile adapté. Le robinet
d'admission de gaz doit être en position fermée.
ASSEMBLAGE
1) Raccordez le répartiteur d'admission d'air comme indiqué sur l'illustration suivante.
2) Raccordez la jauge de pression à la base comme indiqué sur l'illustration suivante.
253) Raccordez le bras coudé à la base comme indiqué sur l'illustration suivante.
FRANÇAIS
4) Raccordez le débitmètre et son support à la base comme indiqué sur l'illustration suivante.
5) Raccordez le bras d'échantillonnage et son support à la base comme indiqué sur l'illustration suivante.
26Usage prévu
Le préleveur de gaz pour l'analyse microbiologique « Pinocchio Super II » est un instrument portatif permettant de
déterminer la contamination microbiologique présente dans les gaz comprimés lors de processus de fabrication
aseptique.
FRANÇAIS
À utiliser en laboratoire uniquement. Ne doit pas être utilisé pour le traitement ou le diagnostic en médecine humaine ou
vétérinaire.
Spécifications
HxWxD 245x400x200 mm
Poids 5 kg
Construction Acier inoxydable/aluminium anodisé
Débitmètre d'air 50/400 litres
Température de fonctionnement 10...40 °C
Alimentation électrique Sans objet
Air compressé Pression max. 6 bars
27Présentation
Le préleveur de gaz pour l'analyse microbiologique « Pinocchio Super II » est un instrument portatif
permettant de déterminer la contamination microbiologique présente dans les gaz comprimés lors de
processus fabrication aseptique.
FRANÇAIS
Une validation officielle du préleveur d'air Pinocchio Super II est requise dans le cadre d'une inspection. Le
débitmètre doit être calibré par une agence officielle à intervalles réguliers (généralement tous les ans). La
validation officielle du débitmètre peut également être réalisée par le service d'assistance à la clientèle de
VWR INTERNATIONAL .
Mode d'emploi
PRÉPARATION
1) Raccordez l'unité au point d'échantillonnage souhaité en utilisant un tuyau stérile adapté. Le robinet
d'admission de gaz doit être en position fermée.
2) Insérez une boîte de contact identifiée ou une boîte de Petri avec un milieu stérile dans le boîtier de
l'entonnoir Pinocchio et vissez le à la tête conique. Ne la raccordez pas au Pinocchio Super II.
RÉGLAGE DU DÉBIT D'AIR
C
D1
D2
D
3) Ouvrez complètement le bouton du débitmètre (position « C » Figure 1).
4) Fermez complètement les valves D et D2.
5) Ouvrez complètement la valve D1.
6) Ouvrez la ligne d'air ou de gaz compressé.
7) Commencez par ouvrir légèrement la valve D en vous assurant que le manomètre indique une pression
supérieure à 6 bars.
8) Ouvrez la valve D jusqu'à ce que le débitmètre indique le débit d'air souhaité. La valeur suggérée est de
100 l/min (210 SCFH). Le but de cette opération est d'obtenir un volume d'air connu sans contaminer le
circuit d'échantillonnage.
28ÉCHANTILLONAGE DE GAZ COMPRESSÉ
FRANÇAIS
D1
D
D2
9) Raccordez l'entonnoir du Pinocchio au Pinocchio Super II.
10) Fermez complètement la valve (D1).
11) Ouvrez complètement la valve (D2) et commencez le compte à rebours.
12) Fermez le robinet d'admission de gaz après 10 min (ou lorsque 1000 litres d'air ont été recueillis).
13) Dévissez la tête et transférez la boîte de contact (RODAC) ou la boîte de Petri dans un laboratoire pour
incubation.
Le Pinocchio Super II est désormais prêt pour un nouveau test.
À la fin de la période d'incubation, comptez les unités formant une colonie dans la boîte puis indiquez les
résultats, en CFU/1000 litres, de gaz/air compressé.
ENREGISTREMENT D'ÉCHANTILLONNAGE DE DONNÉES
Si l'échantillonnage de données nécessite d'être enregistré, remplacez le boîtier de la boîte de contact par
un préleveur d'air Super SAS et suivez les points 4 à 6. Le temps sera réglé par la minuterie du préleveur.
CALIBRATION
Le débitmètre d'air peut être officiellement calibré tous les ans.
NETTOYAGE ET STÉRILISATION
L'unité est démontable pour un nettoyage et une stérilisation faciles par autoclave.
REMARQUE IMPORTANTE !
LE DÉBITMÈTRE D'AIR ET LA JAUGE DE PRESSION NE SONT PAS AUTOCLAVABLES.
29TABLEAU DE CORRESPONDANCE DES « SCFH » EN LITRES PAR MINUTE
Les résultats de débit d'air doivent être traduits en litres par minute. Suivez le tableau indiqué.
FRANÇAIS
SCFH l/min
150 70,8
160 75,5
170 80,2
180 85,0
190 89,7
200 94,4
210 99,1
220 103,8
230 108,5
240 113,3
250 118,0
260 122,7
Maintenance
Un nettoyage quotidien de l'instrument permet d'éviter des dysfonctionnements. Il est possible d'utiliser un
détergent doux et un chiffon doux humide.
AVERTISSEMENT
Pour nettoyer l'instrument, n'utilisez pas de produit nettoyant contenant des halogènes ou d'autres
substances agressives car leur utilisation pourrait le faire rouiller.
30Service technique
Ressources sur le Web
Visitez le site Web de VWR à l'adresse www.vwr.com pour :
• Coordonnées complètes du service technique.
FRANÇAIS
• Accès au catalogue en ligne de VWR et à des informations sur les accessoires et produits
connexes.
• Informations supplémentaires sur les produits et les offres spéciales.
Contactez-nous Pour plus d'informations ou une assistance technique, contactez votre
représentant VWR local ou visitez le site www.vwr.com
Garantie
VWR International garantit ce produit pièces et main-d'œuvre pour une durée de deux (2) ans à
compter de la date de livraison. En cas de vice, VWR pourra, à sa discrétion et à ses frais, réparer,
remplacer ou rembourser au client le prix d'achat du produit, à condition qu'il lui soit retourné au
cours de la période de garantie. Cette garantie n'est pas applicable si le dommage provient d'un
accident, d'une utilisation abusive ou incorrecte, d'une mauvaise application ou de l'usure
normale du produit. Cette garantie deviendrait non valide dans le cas où les services de
maintenance et de vérification requis ne seraient pas exécutés conformément aux manuels et
réglementations locales, sauf exception si le défaut du produit n'est pas imputable à cette non
exécution.
Il est recommandé au client d'assurer les éléments retournés contre les risques éventuels
d'endommagement ou de perte. Cette garantie se limite aux réparations susmentionnées. IL EST
EXPRESSÉMENT CONVENU QUE LA PRÉSENTE GARANTIE SE SUBSTITUE À TOUTES
LES GARANTIES DE CONFORMITÉ ET DE VALEUR MARCHANDE.
Conformité à la législation et aux réglementations locales
Le client est chargé de la demande et de l'obtention des approbations réglementaires et autres
autorisations nécessaires à l'utilisation ou à l'exploitation du Produit dans l'environnement local.
VWR ne saura être tenu responsable de toute omission ou non obtention des approbations ou
autorisations requises, sauf exception si le refus est dû à un défaut du produit.
31Elimination des déchets de cet équipement
FRANÇAIS
Cet équipement est muni du symbole de la poubelle rayée, cela veut dire que cet équipement ne peut pas
être éliminé comme les déchets résiduels. Au lieu de cela, vous êtes responsable d’éliminer l'équipement
dûment en donnant celui-ci à une institution autorisée qui s'occupe de la collecte séparée et du recyclage de
l'équipement. En outre, vous êtes responsable de décontaminer l’équipement en cas de pollution biologique,
chimique ou radiologique afin de protéger les personnes qui sont chargés de l’élimination et du recyclage.
Pour des informations supplémentaires par rapport au bureau où vous pouvez rendre votre équipement,
veuillez vous adresser à votre commerçant qui vous a vendu l’équipement.
Si vous procédez comme décrit ci-dessus, vous contribuez au ménagement et à la préservation des
ressources naturelles et assurez que votre équipement sera recyclé de manière appropriée.
Merci beaucoup!
32Sommario
Avvertenza 34
ITALIANO
Informazioni per la sicurezza 34
Montaggio 35
Uso previsto 37
Specifiche 37
Istruzioni d'uso 38
Manutenzione 40
Assistenza tecnica 41
Garanzia 41
Smaltimento dell’apparecchio 42
33Avvertenza
LEGGERE ATTENTAMENTE LE INFORMAZIONI CONTENUTE NEL PRESENTE MANUALE PRIMA DI
USARE LO STRUMENTO.
ITALIANO
IL PRODUTTORE NON È RESPONSABILE IN ALCUN MODO DELL'USO IMPROPRIO DELLO
STRUMENTO E DELLA MANCATA CONFORMITÀ ALLE PRESENTI ISTRUZIONI PER L'USO.
Nel presente manuale sono contenute informazioni per il corretto utilizzo dello strumento. Tenere il manuale
vicino allo strumento per averlo sempre a portata di mano.
Norme di sicurezza
Attenersi alle linee guida seguenti e leggere attentamente e interamente il presente manuale per garantire il
funzionamento sicuro dello strumento.
Utilizzare lo strumento solo per gli scopi indicati
Prima di essere messo in funzione, lo strumento deve essere installato correttamente e in conformità
alle istruzioni riportate nel presente manuale
In caso di sostituzioni di parti dello strumento, utilizzare parti di ricambio e accessori originali
Se lo strumento viene utilizzato con gas ad alta pressione, collegare un riduttore all'ingresso per
limitare la pressione massima all'ingresso a 6 bar
VWR raccomanda...
Evitare di danneggiare lo strumento
Assicurarsi che la pressione applicata all'ingresso sia inferiore a 6 bar.
Evitare infortuni all'operatore
Non utilizzare questo apparecchio con gas a una concentrazione di ossigeno superiore al
21%.
Non utilizzare questo dispositivo con gas nocivi per la salute umana o per l'ambiente.
34Montaggio
Il design compatto del campionatore "Pinocchio Super II" consente di collocare il dispositivo in spazi ristretti.
La struttura semplice associata al funzionamento intuitivo consentono di ottenere risultati accurati sulla
ITALIANO
qualità microbiologica di aria e gas. L'unità può essere smontata completamente per facilitare la pulizia e la
sterilizzazione in autoclave. Il pressostato e il flussometro non sono autoclavabili. Seguire lo schema per
l'assemblaggio. Tutti i raccordi sono "a sgancio rapido".
Collegare l'unità al punto di campionamento desiderato utilizzando appositi tubi sterili. La valvola di
ingresso del gas deve essere in posizione chiusa.
ASSEMBLAGGIO
1) Collegare il ripartitore di ingresso alla base come mostrato in figura.
2) Collegare il pressostato alla base come mostrato in figura.
353) Collegare il braccio a gomito alla base come mostrato in figura.
ITALIANO
4) Collegare il flussometro e il relativo supporto alla base come mostrato in figura.
5) Collegare il braccio di campionamento e il relativo supporto alla base come mostrato in figura.
36Uso previsto
Il campionatore microbiologico per gas Pinocchio Super II è uno strumento portatile per determinare il livello di
contaminanti microbiologici presenti nel gas compresso utilizzato in operazioni di produzione asettiche.
ITALIANO
Solo per l'uso in laboratorio. Non adatto per uso terapeutico o diagnostico sull'uomo o su animali.
Dati tecnici:
AxLxP 245X400x200 mm
Peso 5 kg
Struttura Acciaio inox/alluminio anodizzato
Flussometro 50/400 l
Temperatura di esercizio 10 – 40 °C
Alimentazione elettrica N/D
Aria compressa Pressione di ingresso max: 6 bar
37Descrizione generale
Il campionatore microbiologico per gas Pinocchio Super II è uno strumento portatile che consente di
determinare il livello di contaminanti microbiologici presenti nel gas compresso utilizzato in operazioni di
ITALIANO
produzione asettiche.
Come parte dell'ispezione, è richiesta una validazione ufficiale del campionatore d'aria Pinocchio Super II. Il
flussometro deve essere calibrato da un ente ufficiale a intervalli regolari (generalmente una volta l'anno).
La validazione ufficiale del flussometro può essere eseguita anche dal servizio di assistenza clienti
VWR INTERNATIONAL .
Istruzioni d'uso
PREPARAZIONE
1) Collegare l'unità al punto di campionamento desiderato utilizzando appositi tubi sterili. La valvola di
ingresso del gas deve essere in posizione chiusa.
2) Inserire una piastra a contatto o una capsula di Petri identificata con terreno sterile nell'alloggiamento
dell'imbuto del Pinocchio e avvitare alla testa conica. Non collegare al campionatore Pinocchio Super II.
REGOLAZIONE DEL FLUSSO D'ARIA
C
D1
D2
D
3) Aprire completamente la manopola del flussometro (pos. "C" in figura 1).
4) Chiudere completamente le valvole D e D2.
5) Aprire completamente la valvola D1.
6) Aprire il tubo di aria compressa o gas.
7) Iniziare ad aprire lentamente la valvola D, verificando che il manometro non indichi una pressione
superiore a 6 bar.
8) Aprire la valvola D finché il flussometro non indica il flusso di aria desiderato. Il valore suggerito è di
100 l/min (210 SCFH). Lo scopo di questa operazione è ottenere un volume di aria noto, senza
contaminare il circuito di campionamento.
38CAMPIONAMENTO DEL GAS COMPRESSO
ITALIANO
D1
D
D2
9) Collegare l'imbuto Pinocchio al campionatore Pinocchio Super II.
10) Chiudere completamente la valvola (D1).
11) Aprire completamente la valvola (D2) e avviare il conto alla rovescia.
12) Chiudere la valvola di ingresso del gas dopo 10 minuti (o dopo aver raccolto 1000 l di aria).
13) Svitare la testa e trasferire la piastra a contatto (RODAC) o la capsula di Petri in un laboratorio per
l'incubazione.
Il campionatore Pinocchio Super II è pronto per il campionamento successivo.
Contare le CFU (Colony Forming Units, Unità formanti colonie) nella piastra al termine del tempo di
incubazione e annotare i risultati come CFU/1000 l di gas/aria compressa.
REGISTRAZIONE DEI DATI DI CAMPIONAMENTO
Se i dati di campionamento devono essere registrati, sostituire l'alloggiamento della piastra con un
campionatore d’aria SAS Super ed eseguire i passi da 4 a 6. La durata sarà regolata dal timer del
campionatore.
CALIBRAZIONE
Il flussometro può essere calibrato ufficialmente ogni anno.
PULIZIA E STERILIZZAZIONE
L'unità può essere smontata per facilitare le operazioni di pulizia e sterilizzazione in autoclave.
NOTA IMPORTANTE!
IL FLUSSOMETRO E IL MANOMETRO NON SONO AUTOCLAVABILI.
39TABELLA DI CONVERSIONE DA "SCFH" A LITRI AL MINUTO
ITALIANO
I valori del flusso d'aria devono essere convertiti in litri al minuto. Attenersi alla tabella.
SCFH l/min
150 70,8
160 75,5
170 80,2
180 85,0
190 89,7
200 94,4
210 99,1
220 103,8
230 108,5
240 113,3
250 118,0
260 122,7
Manutenzione
Pulire giornalmente lo strumento per prevenire la maggior parte dei malfunzionamenti. È possibile pulire lo
strumento con un detergente delicato e un panno umido e morbido.
AVVERTENZA
Non utilizzare prodotti detergenti contenenti alogeni o altre sostanze aggressive per pulire lo
strumento, in quanto causerebbero la formazione di ruggine.
40Assistenza tecnica
Risorse sul web
Visitare il sito web VWR all'indirizzo www.vwr.com per:
ITALIANO
• Informazioni complete sui contatti dell'Assistenza tecnica
• Accesso al catalogo on-line VWR e ad ogni altra informazione relativa agli accessori e ai prodotti
collegati
• Ulteriori informazioni sui prodotti e sulle promozioni
Contatti Per informazioni o assistenza tecnica, contattare i nostri uffici VWR o visitare il sito.
www.vwr.com
Garanzia
VWR International garantisce per questo prodotto l'assenza da difetti nei materiali e di
fabbricazione per un periodo di due (2) anni dalla data di consegna. In caso contrario, VWR
provvederà, a sua discrezione e a proprie spese, alla riparazione, sostituzione o al rimborso del
prezzo di acquisto del prodotto al cliente, purché venga restituito durante il periodo di garanzia. La
presente garanzia non copre eventuali danni accidentali o causati da abuso, uso o applicazione
impropri o dal normale logorio dell'apparecchio. Qualora i servizi di ispezione e manutenzione
necessari non vengano eseguiti secondi i manuali e le eventuali normative locali, tale garanzia
risulta non valida, salvo nella misura in cui il difetto del prodotto non sia causato dalla mancata
prestazione dei suddetti servizi.
Il cliente dovrà assicurare le parti da restituire contro eventuali danni o perdite. La presente
garanzia è limitata ai suddetti rimedi. SI CONCORDA ESPRESSAMENTE CHE LA PRESENTE
GARANZIA SOSTITUISCE TUTTE LE GARANZIE DI IDONEITÀ E LA GARANZIA DI
COMMERCIABILITÀ.
Conformità a leggi e normative locali
Il cliente è responsabile della richiesta e dell'ottenimento delle approvazioni normative necessarie
o di altre autorizzazioni necessarie per eseguire o utilizzare il prodotto nel suo ambiente locale.
VWR non sarà ritenuta responsabile delle relative omissioni o del mancato ottenimento
dell'approvazione o autorizzazione necessaria, a meno che l'eventuale rifiuto non sia dovuto a un
difetto del prodotto.
41Smaltimento dell’apparecchio
ITALIANO
Questo apparecchio è provvisto del simbolo del cassonetto barrato, il che significa che il prodotto non può
essere smaltito con i rifiuti non riciclabili. Avete invece la responsabilità di smaltire regolarmente il prodotto al
termine della vita in servizio, consegnandolo ad un servizio autorizzato che lo raccolga separatamente e lo
avvii al riciclaggio. Siete inoltre responsabili della decontaminazione dell’apparecchio in caso di inquinamento
biologico, chimico o radiologico, per non danneggiare la salute delle persone incaricate dello smaltimento e
del riciclaggio. Potete richiedere ulteriori informazioni riguardo al punto dove potete consegnare
l’apparecchio dal rivenditore locale presso il quale avete originariamente acquistato il prodotto.
Se procederete come descritto sopra, contribuirete a preservare le risorse naturali, ambientali e tecniche ed
assicurare il riciclaggio del vostro strumento proteggendo la salute degli esseri umani.
Molte grazie!
42Índice
ESPAÑOL
Advertencia 44
Información de seguridad 44
Instalación 45
Uso previsto 47
Especificaciones 47
Instrucciones de uso 48
Mantenimiento 50
Servicio técnico 51
Garantía 51
Eliminación del equipo 52
43Advertencia
LEA LA INFORMACIÓN CONTENIDA EN ESTE MANUAL ANTES DE UTILIZAR LA UNIDAD.
EL FABRICANTE NO SE HACE RESPONSABLE SI SE USA EL EQUIPO DE FORMA INADECUADA Y NO
ESPAÑOL
SE SIGUEN ESTAS INSTRUCCIONES DE USO.
La utilización de este manual le ayudará a usar este instrumento de forma eficiente. El manual debe
mantenerse en un lugar apropiado, cerca del instrumento, para mayor comodidad.
Información de seguridad
Siga las siguientes instrucciones y lea este manual en su totalidad para garantizar que la unidad se usa de
forma segura.
Utilice el dispositivo solo para los fines indicados.
El dispositivo debe instalarse correctamente de acuerdo con el manual de instrucciones antes de
iniciar cualquier operación.
Utilice piezas de repuesto y accesorios originales para cualquier recambio.
Si este dispositivo se usa con un gas a una presión extremadamente alta, debe conectar un reductor
a la entrada para permitir el paso de un máximo de 6 bares.
Cómo evitar daños al dispositivo
Asegúrese de que la presión aplicada a la entrada sea inferior a 6 bares.
Cómo evitar daños al usuario
No utilice este dispositivo con un gas con una concentración de oxígeno superior al 21%.
No utilice este dispositivo con un gas nocivo para los humanos o el medioambiente.
44Instalación
El diseño compacto del muestreador "Pinocchio Super II" permite colocar el dispositivo en espacios
reducidos. Gracias a su estructura sencilla combinada con su fácil uso, se consiguen mediciones precisas
ESPAÑOL
de la calidad microbiológica del aire/gas. La unidad se puede desmontar completamente para favorecer
una limpieza sencilla y la esterilización en autoclave. El manómetro y el medidor de flujo de aire no son
esterilizables en autoclave. Siga el dibujo esquemático para montar el dispositivo. Todas las conexiones
son de desconexión rápida.
Conecte la unidad al punto de muestreo deseado utilizando tubos esterilizados adecuados. La válvula de
entrada de gases debe estar en posición cerrada.
MONTAJE
1) Conecte el divisor de entrada a la base de acuerdo con la siguiente imagen.
2) Conecte el manómetro a la base de acuerdo con la siguiente imagen.
453) Conecte el brazo acodado a la base de acuerdo con la siguiente imagen.
ESPAÑOL
4) Conecte el medidor de flujo y su soporte a la base de acuerdo con la siguiente imagen.
5) Conecte el brazo de muestreo y su soporte a la base de acuerdo con la siguiente imagen.
46Uso previsto
El muestreador microbiológico de gases "Pinocchio Super II" es un instrumento portátil para determinar el nivel de
contaminantes microbiológicos existentes en el gas comprimido de las operaciones de fabricación asépticas.
ESPAÑOL
Para uso de laboratorio exclusivamente. No diseñado para uso terapéutico ni diagnóstico en seres humanos o animales.
Especificaciones
Al x An x Pr 245 x 400 x 200 mm
Peso 5 kg
Materiales Acero inoxidable / aluminio anodizado
Medidor de flujo de aire 50/400 l
Temperatura de funcionamiento 10 ... 40 °C
Fuente de alimentación eléctrica N/D
Aire comprimido Presión máxima de entrada de 6 bares
47Descripción general
El muestreador microbiológico de gases Pinocchio Super II es un instrumento portátil para determinar el
nivel de contaminantes microbiológicos existentes en el gas comprimido de las operaciones de fabricación
ESPAÑOL
asépticas.
Se necesita una validación oficial del muestreador de aire Pinocchio Super II como parte de una inspección.
Un organismo oficial debe calibrar el medidor de flujo en intervalos regulares (normalmente todos los años).
El servicio de asistencia al cliente de VWR International también puede validar oficialmente el medidor de
flujo.
Instrucciones de uso
PREPARACIÓN
1) Conecte la unidad al punto de muestreo deseado utilizando tubos esterilizados adecuados. La válvula de
entrada de gases debe estar en posición cerrada.
2) Inserte una placa de contacto identificada o una placa de Petri con un medio estéril en la carcasa del
embudo Pinocchio y enrósquela al cabezal cónico. No la conecte a Pinocchio Super II.
AJUSTE DEL FLUJO DE AIRE
C
D1
D2
D
3) Abra completamente la perilla del medidor de flujo (posición "C", Figura 1).
4) Cierre completamente las válvulas D y D2.
5) Abra completamente la válvula D1.
6) Abra la línea de gas o aire comprimido.
7) Empiece a abrir ligeramente la válvula D; asegúrese de que el manómetro no indica una presión superior
a 6 bares.
8) Abra la válvula D hasta que vea el flujo de aire deseado en el medidor de flujo, el valor recomendado es
de 100 l/min (210 SCFH). El objetivo de esta operación es conseguir un volumen conocido de aire sin
contaminar el circuito de muestreo.
48MUESTREO DE GAS COMPRIMIDO
ESPAÑOL
D1
D
D2
9) Conecte el embudo Pinocchio a Pinocchio Super II.
10) Cierre completamente la válvula (D1).
11) Abra completamente la válvula (D2) y comience la cuenta atrás.
12) Cierre la válvula de entrada de gases después de 10 minutos (o cuando se recojan 1000 litros de aire).
13) Desenrosque el cabezal y transfiera la placa de contacto (RODAC) o placa de Petri al laboratorio para
la incubación.
Pinocchio Super II está listo para una nueva prueba.
Cuente las unidades formadoras de colonias que se encuentran en la placa al final del tiempo de
incubación y recoja los resultados como CFU/1000 litros de gas/aire comprimido.
REGISTRO DE LOS DATOS DE MUESTREO
Si tienen que registrarse los datos de muestreo, sustituya la carcasa de la placa por un muestreador de aire
SAS Super y siga los puntos 4 a 6. El temporizador de muestreo regulará el tiempo.
CALIBRATION
El medidor de flujo de aire puede calibrarse oficialmente todos los años.
LIMPIEZA Y ESTERILIZACIÓN
Se puede desmontar la unidad para una limpieza sencilla y una esterilización en autoclave.
NOTA IMPORTANTE
EL MEDIDOR DE FLUJO DE AIRE Y EL MANÓMETRO NO SON ESTERILIZABLES EN AUTOCLAVE.
49TABLA DE CONVERSIÓN DE "SCFH" (PIES CÚBICOS ESTÁNDAR POR HORA) A LITROS
ESPAÑOL
POR MINUTO
Las lecturas del medidor de flujo de aire deben traducirse a litros por minuto. Siga la tabla indicada.
SCFH l/min
150 70,8
160 75,5
170 80,2
180 85,0
190 89,7
200 94,4
210 99,1
220 103,8
230 108,5
240 113,3
250 118,0
260 122,7
Mantenimiento
La limpieza diaria del instrumento evitará gran parte de los posibles fallos. El instrumento se puede limpiar
con un detergente suave y un paño suave húmedo.
ADVERTENCIA
No limpie el instrumento con productos de limpieza que contengan halógenos u otras sustancias.
El uso de estos productos puede tener efectos corrosivos.
50Servicio técnico
Recursos en Internet
Visite la página de VWR en www.vwr.com para:
ESPAÑOL
• Obtener los contactos del servicio técnico
• Acceder al Catálogo en línea de VWR y obtener información acerca de accesorios y productos
relacionados
• Información adicional sobre productos y ofertas especiales
Contacto Para obtener más información o asistencia técnica póngase en contacto con su
representante local de VWR o visite. www.vwr.com
Garantía
VWR International garantiza que este producto estará libre de defectos de material y fabricación
durante un periodo de dos (2) años a partir de la fecha de entrega. En el caso de que exista algún
defecto, VWR elegirá, a su elección y corriendo con los gastos, reparar, cambiar o rembolsar el
importe de este producto al cliente, siempre y cuando se devuelva durante el periodo de la
garantía. Esta garantía no se aplica si el producto ha sufrido daños a causa de un accidente,
abuso, uso indebido o incorrecto o del desgaste por el uso normal. Si los servicios de inspección
y mantenimiento precisos no se efectúan de acuerdo con las indicaciones de los manuales o las
normativas locales aplicables, la garantía no será válida, salvo si el defecto del producto no se
debe a dicho incumplimiento.
El cliente debe asegurar los productos devueltos contra posibles daños o pérdida. Esta garantía
se limita a los recursos anteriormente mencionados. SE ACUERDA EXPRESAMENTE QUE
ESTA GARANTÍA SUSTITUYE A TODAS LAS GARANTÍAS DE IDONEIDAD Y
COMERCIALIDAD.
Cumplimiento de leyes y normativas locales
El cliente tiene la responsabilidad de solicitar y conseguir las autorizaciones reglamentarias
necesarias o cualquier otro tipo de autorización necesaria para utilizar el producto en su entorno
local. VWR no se responsabiliza de cualquier omisión relacionada o de la no obtención de la
autorización necesaria, a menos que la desestimación se deba a un defecto del producto.
51Eliminación del equipo
ESPAÑOL
Este equipo se halla identificado con el símbolo de un cubo de basura tachado, lo que significa que no debe
eliminarse en los desechos residuales habituales. En lugar de ello, usted es responsable de eliminar el
equipo de forma adecuada al finalizar su vida útil, llevándolo a un centro autorizado que lo recoja y proceda a
su reciclaje. Usted también es responsable de descontaminar el equipo si contiene impurezas biológicas,
químicas o radiológicas, para evitar riesgos en la salud de las personas encargadas de la eliminación y el
reciclaje. Cualquier información adicional que necesite sobre el lugar de entrega de su equipo podrá
solicitarla al distribuidor donde realizó originalmente la compra.
Si procede como se describe arriba, ayudará a proteger los recursos naturales y técnicos del medio
ambiente y garantizará que su equipo se recicle de modo que se proteja la salud de las personas.
Muchas gracias
52Índice
Aviso 54
PORTUGUÊS
Informações de segurança 54
Instalação 55
Fins a que se destina 57
Especificações 57
Instruções de utilização 58
Manutenção 60
Garantia 61
Eliminação do equipamento 62
53Aviso
LEIA AS INFORMAÇÕES CONTIDAS NESTE MANUAL ANTES DE UTILIZAR A UNIDADE.
O FABRICANTE NÃO ASSUME QUALQUER RESPONSABILIDADE NA SEQUÊNCIA DE UMA
UTILIZAÇÃO INDEVIDA DESTE EQUIPAMENTO E DO NÃO CUMPRIMENTO DAS INSTRUÇÕES DE
PORTUGUÊS
UTILIZAÇÃO.
A utilização do presente manual ajudá-lo-á a utilizar o instrumento de modo eficiente. O manual deve ser
mantido num local prático, junto do instrumento, para facilitar a utilização.
Informações de segurança
Respeite as diretrizes abaixo e leia este manual na sua íntegra, com vista a garantir um funcionamento
seguro da unidade.
Utilize o dispositivo somente para os fins indicados
O dispositivo deve ser utilizado corretamente, de acordo com as instruções indicadas no manual,
antes de dar início a qualquer operação
Em todas as tarefas de substituição de peças, utilize peças e acessórios sobressalentes originais
Se este dipositivo for utilizado com gás extremamente pressurizado, deve ligar um redutor à entrada
para obter um nível máximo de 6 bar na mesma
A VWR não recomenda a utilização de……..
Evitar danificar o instrumento
Certifique-se de que a pressão aplicada na entrada é inferior a 6 bar.
Evitar lesões do operador
Não utilize este dispositivo com gás que apresente uma concentração de oxigénio superior
a 21%.
Não utilize este dispositivo com gás prejudicial para seres humanos ou para o ambiente.
54You can also read