WIFI BIRD BOX CAMERA QUICK START GUIDE - PLEASE READ ME BEFORE YOU START! - SPYCAMERACCTV
←
→
Page content transcription
If your browser does not render page correctly, please read the page content below
WiFi Bird Box Camera
  Quick Start Guide
    Please read me before you start!
Congratulations! You are now the proud owner of a Green Feathers Bird Box
Camera. For years we have been a leading provider of wildlife cameras and
our bird box cameras are a number one choice for those wanting to watch
wildlife in their very own garden from the comfort of the sofa.

Please take a couple of minutes to have a read through this booklet before
you get started. Not only are there some helpful hints and tips, but we also
have some guidelines to help you plan the installation of your camera.

With just a bit of time, a cup of tea and a friend you’ll be up-and-running in
no time. We hope you enjoy your camera!

                                                                            3
HOW TO SET UP A WI-FI CAMERA Before You Begin • Do not mount the camera into the bird box until you know it is working correctly • Check the Wi-Fi strength at the site of your bird box using a smartphone or tablet • Plug in the power supply into the trailing cable of the camera and remove the lens cap • If using a MicroSD card, insert the card into the slot before powering up Download the app onto your smartphone or tablet Search for iCSee Pro on Apple App Store or Google Play Store. Alternatively scan the QR codes below. iOS Android 4

METHOD ONE: Connect the Camera to Your Wi-Fi Network
Works with 2.4GHz Wi-Fi networks only
1. Connect your phone/tablet to the Wi-Fi network you want the camera to use
2. Power up the camera and allow about 30 seconds for the camera to boot
3. Open the app and tap Local Login
4. To add a new device, select the icon in the top-right
5. Tap Set up my device to Wi-Fi & then Next step
6. On the next screen you should see the name of your Wi-Fi network. Enter your Wi-Fi
network password here and tap Confirm
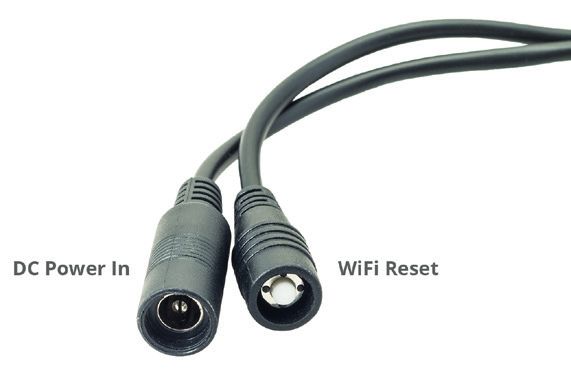
7. The app will now start searching for your camera. At
this point firmly double press the white reset button
on the end of the cable (see right)
8. Wait for the app to scan your network for the camera
9. Once the device is found it will prompt you to create a
password. Set a strong password by entering it twice
here. Remember to make a note of it should you need
it in the future
10. On the next page enter a name for the camera
11. You should now be able to see live video over Wi-Fi from your bird box camera!
5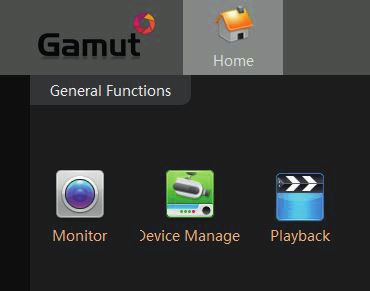
METHOD TWO: Connect to the Camera Directly You can skip this step if you have already connected your camera to your network. If you don’t have a WiFi network in the area you can connect to the camera directly using your smartphone or tablet. Please note the range on this mode is limited and you won’t be able to remotely connect to the camera when you are away from your house. • Power up the camera and allow about 30 seconds for the camera to boot • Open the Wi-Fi settings on your smartphone or tablet and the network beginning beye should appear in the list • Select and enter the password 1234567890. Should this Wi-Fi Network not appear it may mean that you need to reset the camera. To do this press and hold the reset button for 15 seconds on the camera. • Once connected, open the app and tap Local Login • To add a new device, select the icon in the top-right • Now tap More (top-right) to expand the options and tap AP Mode • Tap AP Connection • Your camera will be added to the device list and the live stream will open 6

CONFIGURING CAMERA SETTINGS
You can configure basic camera settings using the app. Enter the settings menu while live
viewing the camera by tapping the Settings icon in the top-right.
How to Enable Audio
Go to Advanced Setting: Toggle on Audio and tap Save
How to Enable Motion Detection & Push Notifications
Go to Alarm Setting: Toggle on Open Alarm, Set Alarm Action to Take a Video & Toggle on
Alarm Push
How to Format MicroSD card
Go to Storage Managment: Tap Format SD Card
This will delete all recordings and snapshots on the card
How to Sync Time & Date
Go to General About Device: Tap Device Time & then OK
7INSTALLING THE PC SOFTWARE Now that your camera is set up on your network, you may also want to watch and record footage on your Windows PC. To do this, you can download the Gamut CMS5 software. Download and install the software from this link: https://bit.ly/2wFZVI5 • Once installed, find and run CMS5. Click Login. • Select Device Manage • Find your camera in the list and select the tick box • Click Add If you have set a password, click on the pencil icon on the right and enter it here • Now head back to the Home menu and open Monitor • Find your device on the right and double-click • Now the live stream should appear • You can watch back recorded footage using the Playback section 8
ATTACHING TO A BIRD BOX
If you have one of our bird boxes
You can use the easy-fit screw thread provided to attach
the camera’s bracket to the pre-drilled hole on the box.
If you do not have one of our bird boxes
You can still use a screw to attach the camera’s bracket
to the wooden panel.
You can prevent the bracket rotating by using a
drawing pin or equivalent to stop it moving.
FIND MORE HELP ONLINE
Read our in-depth set-up guides.
green-feathers.co.uk/help
9WHERE TO PLACE YOUR BIRD BOX Different birds have different needs when it comes to choosing where to place your bird box. Generally you should look to place your box in a quiet spot in the garden amongst other plants or trees, making sure to leave a clear path in for your birds to make their landing. Unless there is a tree or building providing shade, it is generally a good idea to face the box between north and east to avoid direct sunlight and strong winds. Tilting the box slightly forward will also help to prevent rain from coming straight into the nesting area. For blackbirds, robins and wrens you should place your bird box 1.5 to 2 metres high, well surrounded by planting. For sparrows, starlings, tits and spotted flycatchers you should place your bird box 2 to 4 metres high and slightly covered with a clear entrance. For woodpeckers, owls and kestrels you should place your bird box between 3 to 5 metres high in a nice open space. If there are cats and other bird predators in the area then you should look to place your bird box a minimum of 2 metres above ground level. 10
5m - Woodpeckers, Owls

3m - Sparrows, Tits, Starlings

          2m - Robins, Wrens

                         11
BOOSTING THE LIGHTING IN YOUR BIRD BOX Your camera’s night vision helps to improve the picture at night but you can benefit from adding an extra light source to improve daytime images. Use one of our energy-efficient LED lamps to help with this. Our daylight lamps automatically switch off at night to ensure the birds are not disturbed and get a good night’s sleep. They provide extra light during the day to boost your camera image’s vibrancy and exposure. Search our website for BBLED to find out more. 12
SEND US YOUR FOOTAGE
Do you have some excellent footage captured on your bird box camera? Send us your video
or images and we’ll give you an exclusive discount code for your friends and family.
There are many ways to get in touch with us:
info@green-feathers.co.uk
@GreenFeathersUK
/greenfeathersbbc
13Something fun for a Saturday afternoon
to attract wildlife into your garden. Great
in winter when food is scarce. Productive,
enjoyable and most of all cheap!
Types of Container Ingredients Equipment
Yoghurt pots Lard or suet Mixing bowl
Coconut shells Bird seed Saucepan
Small plant pots Porridge oats Mixing spoon
String Peanuts (suitable for birds) Cling film
Lollipop sticks or twigs Raisins Bowl of cold water
Kitchen scraps Rubber gloves (optional)
14Method 1. Melt the lard/suet into the saucepan, don’t let it burn 2. Once melted, put all dry ingredients into a mixing bowl and then add the lard/suet. If you are going to mix everything together using your hands then make sure that the fat has cooled down enough before you get your hands stuck in! 3. Preparing the containers. Now you have the mixture ready, get a piece of string and loop it and tie a knot in the end of it. Remember not to make the loop too small such that it won’t fit over the branch/hook etc. 4. Press the soft mixture into the yoghurt pot/chosen container and around the string, making it as compact as possible so that the string doesn’t escape. 5. Once filled to the top of the yoghurt pot, leave the mixture to cool. Storing in a cold shed or garage would be ideal, you could just as easily store them in the fridge. 6. After the mixture is chilled, you need to remove it from the container. The best way to do this is to partially fill a bowl with warm water and place the container in. This way the water will warm the fast slightly in order to soften it allowing you to remove the fat balls. 15
FIND MORE HELP ONLINE
Read our in-depth set-up guides.
green-feathers.co.uk/helpYou can also read