2021 ROOF DRAINAGE AND VENTILATION MAT INSTALLATION GUIDE - ADVANCEDBUILDINGPRODUCTS.COM
←
→
Page content transcription
If your browser does not render page correctly, please read the page content below

2021 ROOF DRAINAGE AND
     VENTILATION MAT
    INSTALLATION GUIDE

ADVANCEDBUILDINGPRODUCTS.COM
CedAir-Mat installation under Cedar Shingles

                                      CEDAIR-MAT®

Note: Recommended on a 3/12 roof slope or greater. Shingle
installation can be used with 3-ply tapersawn shake
application.

1. Install plywood decking onto roof rafters.

2. Install roofing felt over the entire roof deck, and make sure
that it extends 1/4" beyond the edge of the roof deck.
Overlap layers at least 4" working toward the ridge.

3. Tack or nail down CedAir-Mat in place every 3 square feet.
CedAir-Mat can be installed with either side up. Some
installers prefer the flat side up to provide a better nailing
surface, but the product will work as intended either way.

Do not overlap the CedAir-Mat® material. Butt each course
tightly against the previous course and at vertical seams.

To avoid walking directly on CedAir-Mat®, work from the
fascia to the ridge while installing shingles. Note: The
surfaces may be slippery, especially when wet.

4. Install cedar shingles per manufacturer’s instructions.
Utilize a nail length that will allow for 3/4" penetration into
sheathing or completely through sheathing. Allow 3/8" for
the additional thickness of the CedAir-Mat® material.

Best Practice Tip: We recommend installing CedAir-Mat®
with a Ridge Vent product. This continuous ventilation from
the roof edge to the peak will maximize the effects of
CedAir-Mat® and increase drying potential of the shingles or
shakes, even without cutting a slot for ridge ventilation.
CedAir-Mat installation Under Cedar Shakes

                                                   CEDAIR-MAT®

Note: Recommended on a 4/12 roof slope or greater.

1. Install plywood decking onto roof rafters.

2. For eave protection, install 36" of roofing felt, and make
sure that it extends 1/4" beyond edge of roof deck.

3. Tack or nail down CedAir-Mat in place every 3 square feet.
CedAir-Mat can be installed with either side up. Some
installers prefer the flat side up to provide a better nailing
surface, but the product will work as intended either way. Do
not overlap the CedAir-Mat® material. Butt each course
tightly against the previous course and at vertical seams. To
avoid walking directly on CedAir-Mat®, work from the fascia
to the ridge while installing shingles. Note: The surfaces may
be slippery, especially when wet.

4. An 18" wide strip of #30 roofing felt should be laid over
the top portion of the shakes and extend onto the
CedAir-Mat® material.

Position the bottom edge of the felt above the butt of the
shake at a distance equal to twice the weather exposure per
manufacturer’s installation instructions.

Utilize a nail length that will allow for 3/4" penetration into
sheathing or completely through sheathing. Allow 3/8" for
the additional thickness of the CedAir-Mat® material.

Best Practice Tip: We recommend installing CedAir-Mat®
with a Ridge Vent product. This continuous ventilation from
the roof edge to the peak will maximize the effects of
CedAir-Mat® and increase drying potential of the shingles or
shakes, even without cutting a slot for ridge ventilation.
R-Vent installation Under Metal

1. Install plywood decking onto roof rafters.

2. Install roofing felt over the entire roof deck, and make sure
that it extends 1/4" beyond the edge of the roof deck.
Overlap layers at least 4" working toward the ridge.

3. Tack or nail down R-Vent® in place every 3 square feet.
R-Vent® can be installed with either side up. Some installers
prefer the flat side up to provide a better nailing surface, but
the product will work as intended either way.

Do not overlap the R-Vent® material. Butt each course tightly
against the previous course and at vertical seams.

To avoid walking directly on R-Vent®, work from the fascia to
the ridge while installing metal roofing panels. Note: The
surfaces may be slippery, especially when wet.

4. Install metal roofing materials per manufacturer’s
instructions. Utilize a nail length that will allow for 3/4"
penetration into sheathing or completely through sheathing.
Allow 3/8" for the additional thickness of the R-Vent®
material.

Best Practice Tip: We recommend installing R-Vent® with a
Ridge Vent product. This continuous ventilation from the roof
edge to the peak will maximize the effects of R-Vent® and
increase drying potential of the metal roofing panels, even
without cutting a slot for ridge ventilation.

CedAir-Mat Drip Edge Shingles & Shakes Detail

          CEDAIR-MAT®

Installation Note:
*Note: The felt must overhang the fascia board by a
minimum of 1/2”if a drip edge is not being installed.
When using a rake edge cap or drip edge, install edging
pieces on top of the deck.

1. Install prepainted aluminum or galvanized rake edge cap
or drip edge above the deck.

2. Install felt first and then install CedAir-Mat® on top of the
roof deck, per instructions.

3. Install Cedar shingles or shakes per manufacturer’s
instructions.

Best Practice Tip: We recommend installing CedAir-Mat®
with a Ridge Vent product. This continuous ventilation from
the roof edge to the peak will maximize the effects of
CedAir-Mat® and increase drying potential of the shingles or
shakes, even without cutting a slot for ridge ventilation.

Alternative installation: If you are concerned with severe
wind driven rain, CedAir-Mat® can be installed held off the
rake edge by up to 1”. Cedar shingles or shakes can be nailed
tightly to the roof deck at the rake edges to provide
additional protection. Air flow will occur through the
spaces between the cedar shingles and shakes, but will not
be maximized when the rake is restricted.
CedAir-Mat Valley Flashing Detail

 CEDAIR-MAT®

Installation Note:
*Shingle Installation Shown

When flashing a valley on a cedar roof utilizing CedAir-Mat®,
apply the flashing underneath the shingle or shake/
interleaved felt and on top of the CedAir-Mat® and felt.

1. At valley, install a 24” wide strip of #30 roofing felt on top
of the CedAir-Mat® material.

2. Install a center-crimped metal valley flashing that is 22”
wide (8” min. each side for shingles, 11” min. each side for
shakes), and made of aluminum or galvanized steel.

3. Leave an open valley width of 4” to 8” depending on
anticipated water volume when installing Cedar shingles or
shakes. Make sure that they are not applied with the grain
parallel to the valley centerline, and that those areas
extending into the valley should be cut at the correct angle.
Joints between shingles or shakes must not break into the
valley.
CedAir-Mat Integration with Ridge Vent: Coming Soon!

                 RIDGE CAP

Installation Note:

At each eave, install with continuous soffit ventilation
equivalent to 9 sq. in. per linear foot.

Cedar cap must overhang Ridge Vent by a minimum of 1/2”
on each side. The ridge cap must overhang Ridge Vent
material by a minimum of 1” at each gable end.

When installing Cedar Shingles, apply #30 roofing felt onto
roof decking followed by CedAir-Mat® and shingles.

When installing Cedar Shakes, apply CedAir-Mat® directly
onto plywood and apply felt per shake-manufacturer’s
installation instructions.
Product Data: CedAir-Mat

                                       Suggested Applications:

                                       •   Cedar Roofing

Core Design
1. Nylon 6 core mesh with a dimpled configuration. This
   creates the pressure equalized airspace between the
   Cedar roofing material and the sheathing below.

Benefits
• Provides space for continuous drainage and air flow
   between the solid roof deck and the shingles or shakes.
•   Maintains a thermal break between roofing and
    sheathing that prevents thermal cupping and warping,
    and reduces potential rotting.
•   Lightweight and easy for installers to handle. Bends and
    conforms to any type of contoured roof.
•   Prolongs life of membrane and roof structure by allowing
    the underside of shingles or shakes to dry, eliminating
    excess moisture. Helps prevent damage to felt as well.
•   75% greater air flow compared to competitive products.

PHYSICAL DATA               CedAir-Mat
Core Material               Nylon 6
Thickness                   0.407 in. (10.35 mm)
Roll Weight                 14 lbs. (6.35 kg)
Length                      61.5 ft. (18.75 m)
Width                       39 in. (99.06 cm)
Coverage Area               200 sq. ft. (18.58 sq. m) = 2 Squares
Rolls per Pallet            12

TECHNICAL DATA
Mass / Unit Area    ASTM D 5261             8.66 oz / sq. yd.
Tensile Strength    ASTM 5035 mod.          MD 100 lbs. / sq. ft.
                                            TD 68.8 lbs. / sq. ft.
Elongation          ASTM 5035 mod.              MD 60%
                                                TD 53%
Surface Burning     ASTM E 84                   Class A
Flow Rate           ASTM D 4716             5.1 Cu.Ft./Min./Ft width
MD = Machine Direction / TD = Transverse Direction
* All measurements are nominal
Product Data: R-Vent
Suggested Applications:
• Metal Roofing
Core Design
1. Nylon 6 core mesh with a random configuration. This
creates the pressure equalized airspace between the
metal roofing material and the sheathing below.
Benefits
• Provides space for continuous drainage and air flow
between the solid roof deck and the metal roofing
materials.
• Reduces sound transmission through panels.
• Lightweight and easy for installers to handle. Bends and
conforms to any type of contoured roof.
• Maintains a thermal break between roofing & sheathing.
• Prolongs life of membrane and roof structure by allowing
the underside of the metal roofing material to dry,
eliminating excess moisture. Helps prevent damage to
felt as well.
PHYSICAL DATA R-Vent
Core Material Nylon 6
Thickness 0.361 in. (9.16 mm)
Roll Weight 12.0 lbs. (5.44 kg)
Length 61.5 ft. (18.75 m)
Width 39.0 in. (99.06 cm)
Coverage Area 200 sq. ft. (18.58 sq. m)
Rolls per Pallet 18
TECHNICAL DATA
Mass / Unit Area ASTM D 5261 8.66 oz / sq. yd.
Tensile Strength ASTM 5035 mod. MD 100.0 lbs. / sq. ft.
TD 68.8 lbs. / sq. ft.
Elongation ASTM 5035 mod. MD 60%
TD 53%
MD = Machine Direction / TD = Transverse Direction
* All measurements are nominalFrequently Asked Questions
• What # Felt should be used?
The Cedar Shake & Shingle Bureau recommends #30 felt
as an underlayment allowing for better protection to
decking.
• What is the difference between shingles and shakes?
Shingles are sawn and have a smooth finish, providing
uniformity and smooth appearance. Shakes are hand split
and have a rough finish. They do not have a uniform
thickness or width.
• What is the minimum pitch that CedAir-Mat can be
applied?
2/12”.
• Nail Length?
Add 1/2” to the Cedar Shake & Shingle Bureau
recommended nail length, See Page 12 of the Bureau
New Roof Construction Manual. Nail should penetrate
3/4” into deck sheathing.
• Nail Installation—Hand Nailed vs. Nail Gun-able?
Preferred method is Hand Nailed so you can control the
pressure and prevent overdriving and/ or splitting the
shake or shingle.
• Can I use synthetic roof underlayment or ice & water on
the entire Roof Deck?
The Cedar Shake & Shingle Bureau does not recommend
this building practice. Always contact the Cedar Shake &
Shingle Bureau to confirm your installation meets
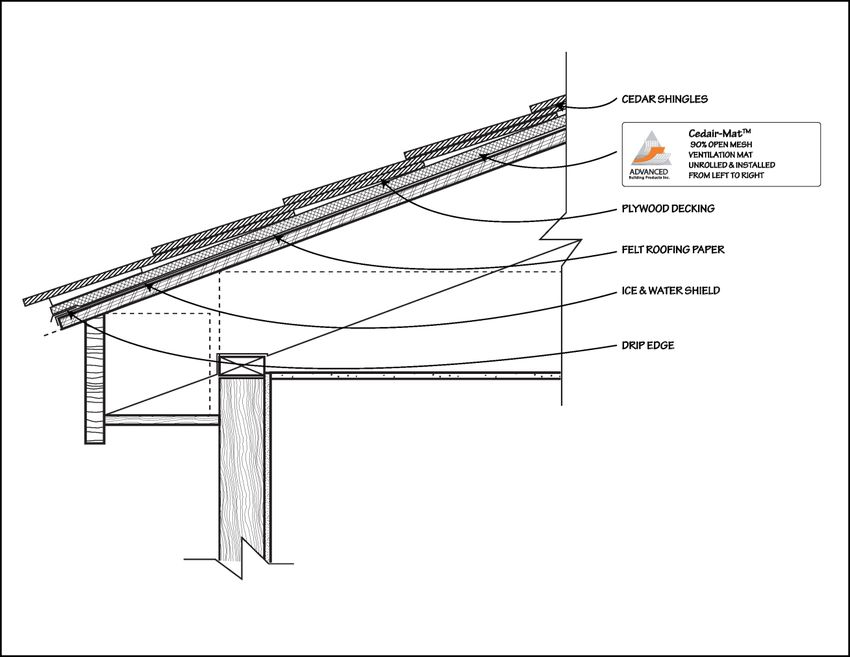
recommended requirements for wood shingles or shakes.CedAir-Mat: 75% Better Airflow than Competitive Products!
Cedar Shingles
CedAir-Mat®
Plywood Decking
Felt Roofing Paper
Ice & Water Shield
Drip Edge
Compression is key. Among the many benefits CedAir-Mat
boast, the most important one is the fact that our product
creates 75% greater air flow compared to other competitive
roof ventilation products currently on the market.
How have we attained this? It simply comes down to our
manufacturing process. Our ability to conform and adjust
compression strengths provide us with a great advantage
that will give contractors and homeowners peace of mind for
years to come.
CedAir-Mat (10mm)
Competitive Product (6mm)For information on our Mortairvent® and Watairvent®
Furring Strip products, please see the 2021 ENGINEERED
RAINSCREEN PRODUCT INSTALLATION GUIDE
95 CYRO DRIVE, SANFORD, ME, 04073
PHONE: 800.252.2306 FAX: 207.490.2998
www.advancedbuildingproducts.comYou can also read