Installing Kerabit Dual on a roof - Note before installation
←
→
Page content transcription
If your browser does not render page correctly, please read the page content below
1 (6)
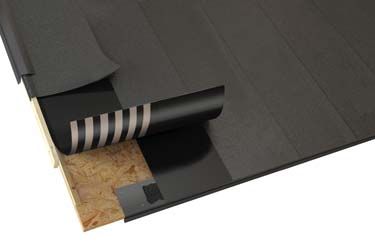
Installing Kerabit Dual on a roof
Note before installation
Kerabit Dual is suitable for roofs with a slope of 1:2 – 1:20.
Membrane rolls are stored in the vertical position, protected from rain and sun damage. Before installation,
store the rolls at a temperature of +15 °C, or warmer, for at least a day. The membrane rolls are unrolled in
advance for them to straighten out. This helps avoid bumps in the surface. The time that the straightening out
requires depends on the temperature (approximately 1 to 4 hours). When installing a roofing, the temperature
must be over +10 °C and the weather rainless (a roofing must not be installed when it is raining).
Suitable bases include rough tongued and grooved boards or moisture proof construction panels (e.g. Kerabit
OSB roofing board). The base must be non-sagging, even, clean, and dry.
A hook-bladed carpet knife is needed to machine the Kerabit Dual membrane. Kerabit Tiviistysliima sealing
adhesive is used for gluing. For nailing, hot-galvanized, broad-headed clout nails are used. The nails must
penetrate the wood underlay.
Before starting the installation of the roofing, ensure proper and sufficient
roof ventilation. If the roof slope is 1:2 to 1:5, the ventilation may be en-
hanced with the Kerabit Ridge Vents. Ridge vents are installed to extend
the entire length of the roof ridge. See Ridge Vent Installation Instructions
Before installation of the roofing, triangle batten strips are fixed to the
base of chimneys and upturns.
Bitumen roofing felts are always installed from the lower eaves upwards
to avoid superimposed seams.
Note that a roofing is only installed on top of chimneys and large lead-
throughs when the lead-through has been completed (see, Chimney and
large lead-throughs). In a roofing that has been installed according to the
installation instructions does not have a single nail in view. Ensure proper adhesion of all the glued surfaces by
walking on them, for example. The adhesiveness of the seam may be enhanced, if need be, by warming the
adhesive surfaces of the membranes carefully with a hot air blower (Note: hot work requiring a hot work permit).
Take the high adhesiveness of the adhesive into account when installing Dual. Once the adhesive surfaces ha-
ve been laid against one another and have adhered to one another, the installation can no longer be amended
without new lengths.
Renovation sites
As a general rule, a joint-sealed roofing may on renovation sites be installed on top of the old bitumen roofing,
if the roof ventilation is working and the underlaying structures are in order. The new roofing must be installed
in parallel with the old roofing so that the longitudinal seams of the roofings do not fall in the same place. The
bumps/pouches must be cut as well as glued and nailed to the underlay before the new roofing is installed.
Installation direction
It is recommended that Kerabit Dual is installed vertically.
Nordic Waterproofing Oy www.kerabit.fi/en
Tel. +358 10 851 10002 (6)
Valleys i.e. mitre-cuts
Kerabit 2500 UB underlay membrane with a polyester frame is
installed at the bottom of the valley, which is glued to the surface
throughout its area (a glue layer of approximately 1 mm), and nai-
100 mm
led by the edges at intervals of 100 mm. On the lower eaves, an
100 mm
eaves flashing is installed.
On top of the underlay membrane, a Kerabit Valley Membrane
Dual of the same colour as the roofing with adhesive on the bot-
tom, which is nailed it at the edges at 100 mm intervals.
Eaves flashing
On lower eaves, Kerabit Eaves Flashings are installed. The ex-
tension points of the flashings are overlapped by at least 50 mm
10 mm and fixed by felt nails or KFR-headed thin sheet screws at inter-
vals of 100 mm in a zigzag pattern. At extensions, the drip of the
topmost flashing is opened and the drip of the lower flashing is
installed within the opened one.
For verges, there are three options: Kerabit Eaves flashing, Verge flashing with ridge, and Verge flashing.
The first two referred to must be installed before installing the roofing, similarly to the flashings of the lower
eaves. The installation of the verge flashings is started at the lower eaves towards the ridge.
Note! When using Kerabit verge flashing with ridge, sealing adhesive is finally added to the seam of the
membrane and flashing. When using Kerabit verge flashing, triangle batten strips of 50 x 50 mm are first
attached, and facing boards to their sides. The membrane is folded over the facing board and fixed to the
facing board. Finally, the verge flashings are fixed to the facing board, see image at top right.
For sheet metal plating of top eaves, Kerabit Verge flashing with ridge or Verge flashing is used.
See installation instructions of Kerabit eaves flashings.
Nordic Waterproofing Oy www.kerabit.fi/en
Tel. +358 10 851 10003 (6)
Installation of Dual membranes
600 mm
500 mm Cut the Dual membrane along the line dividing the adhesive and gra-
nulated surfaces into two pieces the same length as the roof section. If
the length of the roll is not enough, take account of the +150 mm/pcs
overlap in dimensioning the membranes. The piece with the adhesive
surface will be the starting strip and the granulated one will be the end
500 mm strip.
600 mm
Align the starting strip that you cut to be parallel with the verge, the
lower edge approximately 10 mm above the fold of the flashing. Roll
up the aligned strip halfway back from the lower eaves. Spread a 1
mm layer of sealing adhesive on the eaves flashing along the width of
the strip. Cut the protective plastic cover on the bottom side. Roll out
the strip while simultaneously removing the film and press the strip to
attach it evenly to the underlay and the lower eaves flashing. Install the
other end of the strip in the same way.
Turn the plastic film covering of the starting strip back and set the ea-
ves flashing of the verge on top of the adhesive surface of the starting
strip. Nail the flashing to the underlay in a zigzag pattern at 100 mm
intervals. Turn the protective plastic cover back.
Align the subsequent membrane with the lower and side edges on top
of the starting strip. Roll up the aligned membrane halfway back from
the lower eaves. Cut the protective plastic cover on the top side of the
starting strip, and then remove it for the visible part. Nail the starting
strip to the underlay at the edge at 100 mm intervals in a zigzag pat-
tern. Spread an approx. 1 mm layer of sealing adhesive on the flashing
of the lower eaves over a width of 500 mm.
Cut the protective plastic cover on the bottom side of the membrane.
Roll out the membrane while simultaneously removing the film and
press the membrane to attach it evenly to the starting strip and eaves
flashing. Install the other end of the membrane in the same way.
Nordic Waterproofing Oy www.kerabit.fi/en
Tel. +358 10 851 10004 (6)
Align the next membrane strip on top of the adhesive surface of the pre-
vious strip so that the granulated surfaces meet. Repeat the same pro-
cedure with each strip
Continue the installation until you reach the other end of the roof. De-
pending on excessive width, the last strip can be cut to fit the edge of the
eaves before or after installing the strip.
Turn the protective plastic cover of the adhesive surface back, set the
eaves flashing of the verge on top of the adhesive surface and nail to
the underlay at 100 mm intervals in a zigzag pattern. Turn the protective
plastic cover back.
The last strip to be installed is always the end strip with the granulated
surface. Do not nail the last strip!
If there is a valley in the roof, install the membranes from the panes on top
of Dual Valley membrane so that the adhesive surfaces thereof are cove-
red. Cut the ends of the membranes to the line of the valley with the help
of a measuring board, remove the protective plastic cover of the Valley
membrane, and fix the Dual membranes carefully on the entire length of
the overlap. Glue with sealing adhesive at the stripes of the bottom side
to the Dual Valley membrane Do not nail at the overlap.
Details
500 mm Extensions
m Overlap the membranes by 150 mm. Cut off piece from the corners of the
100 m
600 mm
membrane as illustrated in the attached drawing. Nail the end of the lower
membrane to the membrane every 100 mm. Glue the topmost membrane
by using a sealing adhesive by the width of the overlap to the lower one.
100 mm
You can achieve a finished-off seam by using masking tape.
150 mm
Nordic Waterproofing Oy www.kerabit.fi/en
Tel. +358 10 851 10005 (6)
Ridge
Cut the membranes of the first pane flush with the ridge, and nail to the
underlay at the top edge at intervals of 100 mm. Turn the membranes
of the second pane 200 mm over the ridge and glue with sealing ad-
hesive over the overlapping area, and nail at the adhesive surface at
200 mm intervals of 100 mm.
Upturns
Cut the membrane strips needed for an upturn, which extend by at
least 300 mm to the vertical surface and by at least 150 mm. Glue
the strips throughout with sealing adhesive and ensure the mechanical
fixing of the upturn by nailing at the top edge. Protect the upturn with
300 mm sheet metal plating so that water cannot get between the membrane
and the vertical surface.
150 mm
Round lead-throughs
The easiest method to seal round-shaped lead-throughs is by using
pre-shaped ready-to-use sealing products. Spread adhesive to the
underlay on the area of the seal collar, install the lead-through seal
and nail the collar to the roof structure. Cut Dual at 100–150 mm from
the edge of the lead-through collar. Cut a piece of Dual approximately
one metre long, and cut a hole the size of the lower section of the lead-
through seal into it. When sizing the location of the hole, note that the
piece overlaps the installed Dual by 150 mm. Spread glue on the seal
collar and the granulated surface of the overlap area and set the piece
on top of the collar. Overlap the next membrane by 150 mm on top of
the piece above the lead-through seal and glue the extension at the
granulated surface using sealing adhesive (see, Extensions). Do not
nail the membrane at the lead-through collar.
When you next reach the lead-through, cut off the membrane so that
its top end reaches 150 mm above the lead-through. Make a cut into
the end of the membrane and cut a hole the size of the seal. Press the
end of the membrane on top of the collar
100 mm
Continue with the next membrane so that the bottom end of the mem-
brane reaches to the middle of the seal. Cut off a piece at the seal as
100 mm
shown in the image. Glue the overlap carefully at the granulated sur-
face, and seal the joint between the membrane and the lead-through
with sealing adhesive.
Nordic Waterproofing Oy www.kerabit.fi/en
Tel. +358 10 851 10006 (6)
When the lead-through hole is located at a maximum of 50 mm from the edge of the membrane or partially at
the edge of the membrane, the installation can be done as follows:
Make a cut into the side of the membrane and cut a hole the size of the
seal. Spread glue on the seal collar and install the membrane.
Continue the installation until the next time you reach the lead-through.
Cut the membrane so that its top end reaches 150 mm above the lead-
through. Make a cut into the end of the membrane and cut a hole the
size of the seal. Press the end of the membrane on top of the collar.
Continue with the next membrane so that the bottom end of the mem-
100 mm brane reaches to the middle of the seal. Cut off a piece at the seal as
shown in the image. Glue the overlap carefully at the granulated sur-
face, and seal the joint between the membrane and the lead-through
100 mm
with sealing adhesive.
Chimneys and other large lead-throughs
Before installation of the roofing, install a triangle batten strip to the base
of a chimney or another large lead-through to round-out the angle. In-
stall Kerabit Dual below the lead-through, and on the sides on the top
edge of the triangular fillet. Only install the membrane above the lead-
through after you have completed the chimney upturns.
Cut upturn pieces according to the attached image from the granulated
part of Kerabit Dual, or of Kerabit 10+. Glue the pieces throughout to the
chimney and the underlay in the numerical order of the image. Mechani-
cally anchor the pieces by their top edge.
Below and on the sides
of the chimney, the
pieces overlap over the
roofing, on top of the
chimney below the roof-
ing. Carefully glue the
membrane on top of the
chimney to the upturn piece. Cover the chimney with sheet-metal
plating.
Note! Chimneys in log buildings Make a plywood collar at least
400 mm in height around the chimney (leave a gap to the chim-
ney) and attach it to the roof structure using a triangle batten strip.
Continue as in the above.
Subsequent measures
If through fixings are installed on the roof later, ensure that they
are waterproof. Check the condition of the roof at least twice
every year and clean it if necessary.
27.3.2018
Nordic Waterproofing Oy www.kerabit.fi/en
Tel. +358 10 851 1000You can also read