AN1902 Assembly guidelines for QFN (quad flat no-lead) and SON (small outline no-lead) packages Rev. 9 - 28 April 2021 - NXP
←
→
Page content transcription
If your browser does not render page correctly, please read the page content below
AN1902
  Assembly guidelines for QFN (quad flat no-lead) and SON
  (small outline no-lead) packages
  Rev. 9 — 28 April 2021                                             Application note

Document information
Information     Content
Keywords        QFN, SON, PCB, Assembly, Soldering
Abstract        This document provides guidelines for the handling and board mounting of
                QFN and SON packages including recommendations for printed-circuit board
                (PCB) design, soldering, and rework.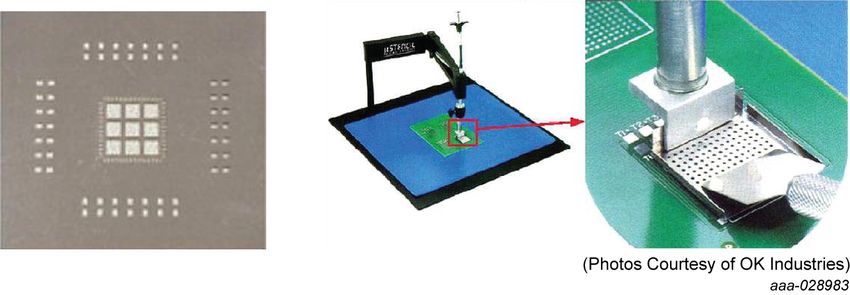
NXP Semiconductors
                                                                                                                         AN1902
                   Assembly guidelines for QFN (quad flat no-lead) and SON (small outline no-lead) packages

Revision history
Rev            Date               Description
v.9            20210428           Updated description in Section 7.1 and Section 7.2
v.8            20180206           Rewrote to combine Freescale AN1902 and NXP AN10365 application notes into a
                                  single document.

AN1902                                  All information provided in this document is subject to legal disclaimers.   © NXP B.V. 2021. All rights reserved.

Application note                                         Rev. 9 — 28 April 2021
                                                                                                                                                 2 / 50
NXP Semiconductors
                                                                                                                           AN1902
                   Assembly guidelines for QFN (quad flat no-lead) and SON (small outline no-lead) packages

1        Introduction
                          This application note provides guidelines for the handling and board mounting of NXP's
                          QFN and SON packages including recommendations for printed-circuit board (PCB)
                          design, board mounting, and rework. Generic information of package properties such
                          as moisture sensitivity level (MSL) rating, board level reliability, mechanical and thermal
                          resistance data are also provided. Semiconductor components are electrical (ESD) and
                          mechanical sensitive devices. Proper precautions for handling, packing and processing
                          are described.

2        Scope
                          This application note contains generic information about various QFN and SON
                          packages assembled at NXP and NXP's assembly and test vendors. Refer to Section 9
                          "Downloading package information from NXP website" of this application note for step
                          by step instructions for retrieving package information. For more details about NXP
                          products, visit www.nxp.com or contact the appropriate product application team.
                          Development efforts are required to optimize the board assembly process and application
                          design per individual product requirements. Additionally, industry standards (such as
                          IPC and JEDEC), and prevalent practices in the board assembly environment are good
                          references.

3        SON and QFN packages

                    3.1 Package description
                          The small outline no-lead (SON)/quad flat no-lead (QFN) is a small size, lead-less
                          plastic package with a low profile, moderate thermal dissipation, and good electrical
                          performance. It is a surface mount package with metallized terminal pads located at the
                          bottom surface of the package. SON have terminal pads along two opposite edges of the
                          package versus QFN with terminal pads along the four edges of the bottom surface. SON
                          is sometimes also referred as DFN: Dual flat no-lead package.
                          QFN/SON are also designed with the die attach pad exposed at the bottom side to create
                          an efficient heat path to the PCB. Heat transfer can be further facilitated by metal vias in
                          the thermal land pattern of the PCB. The exposed pad also enables ground connection.
                          QFN/SON are suitable for a broad range of applications in consumer, industrial, and
                          automotive area, including sensor and power applications.
                          QFN/SON main features are:
                                                                   2                                 2
                          • Package size: < 1 × 1 mm to 12 × 12 mm
                          • Maximum seated height: 0.35 mm to 2.10 mm (standard: 0.85 mm)
                          • Terminal counts:
                            – Single row 4 to 72
                            – Multi-row up to 184
                          • Terminal pitch: 0.35 mm to 0.90 mm
                          • Terminal plating: Ni-Pd-Au, Sn
                          • Meets RoHS, ELV and REACH
                          • Halogen-free and lead-free compliant

AN1902                                    All information provided in this document is subject to legal disclaimers.   © NXP B.V. 2021. All rights reserved.

Application note                                           Rev. 9 — 28 April 2021
                                                                                                                                                   3 / 50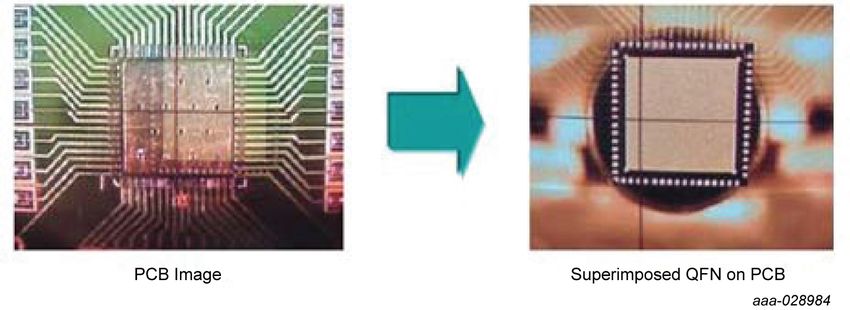
NXP Semiconductors
                                                                                                                          AN1902
                   Assembly guidelines for QFN (quad flat no-lead) and SON (small outline no-lead) packages

                           Figure 1. Examples of small size QFN and SON package types

                           Figure 2. Examples of large size QFN and SON package types

                          NXP adopted the package design rules under JEDEC, documents MO-220 (standard
                          QFN), and MO-229, MO-241 (SON/DFN), respectively.

                    3.2 Punch- and sawn-type packages
                          The QFN/SON package are assembled using two different methods:
                          • The sawn-type is molded in a single mold cavity or mold array process (MAP) and
                            separated into individual packages during a final saw process.
                          • The punch-type is molded in individual cavities and separated using a punch tool.

AN1902                                   All information provided in this document is subject to legal disclaimers.   © NXP B.V. 2021. All rights reserved.

Application note                                          Rev. 9 — 28 April 2021
                                                                                                                                                  4 / 50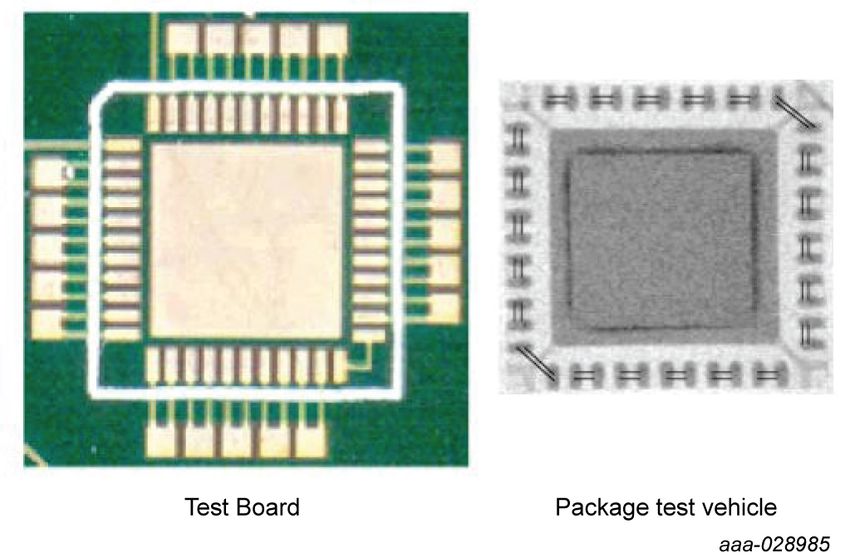
NXP Semiconductors
                                                                                                                          AN1902
                   Assembly guidelines for QFN (quad flat no-lead) and SON (small outline no-lead) packages

                           Figure 3. Comparison of sawn-type and punch-type QFN

                          Both package types are JEDEC-compliant designs. The MAP-molded, sawn type is the
                          standard for NXP's packages.

                    3.3 Package design
                          Figure 4 shows a cross-section of a typical sawn QFN/SON. The package design is
                          leadframe based. The die is usually glued to the die pad of the leadframe, either with
                          a conductive or nonconductive adhesive. Electrical interconnections from the die to
                          the terminal pads are made with wire bonding. The die pad is exposed external to the
                          package.

                           Figure 4. Cross-section of a sawn QFN with exposed pad

                          Chip-on-lead (COL) package designs enable a near chip-scale integration (Figure 5). The
                          die is placed on internally extended terminal fingers using an insulating, but thermally
                          conductive adhesive. This allows a larger die to be assembled in the same package size
                          using conventional wire bonding, and also enables flip chip interconnects with solder
                          bumps or copper pillars.

AN1902                                   All information provided in this document is subject to legal disclaimers.   © NXP B.V. 2021. All rights reserved.

Application note                                          Rev. 9 — 28 April 2021
                                                                                                                                                  5 / 50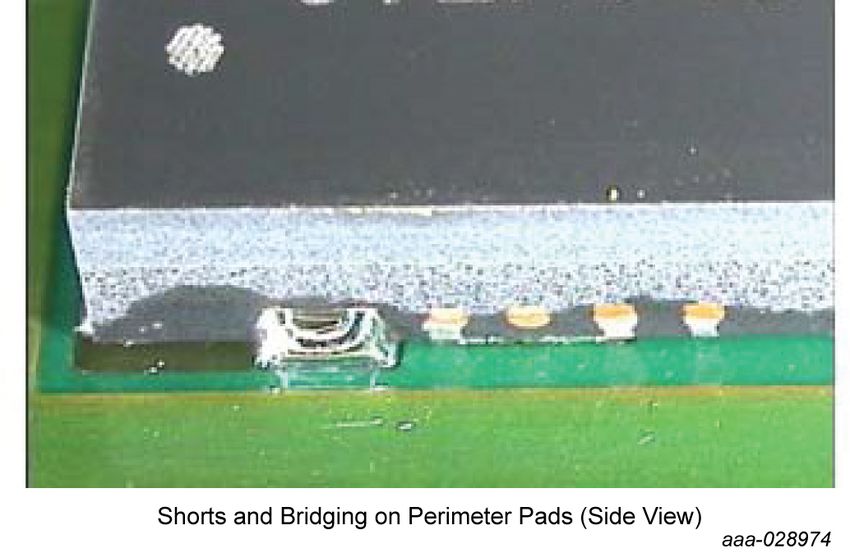
NXP Semiconductors
                                                                                                                           AN1902
                   Assembly guidelines for QFN (quad flat no-lead) and SON (small outline no-lead) packages

                           Figure 5. Chip-on-lead (COL) package design

                    3.4 Package terminal types
                          QFN/SON terminal pads can vary in design, shape, and dimensions. Two different
                          terminal designs are common for sawn QFN distinguishable by the geometry of the outer
                          terminal ends.

                   3.4.1 Fully-exposed terminal ends
                          This is the standard design of NXP packages (Figure 6). Terminal ends are exposed all
                          the way to the edge of the package when viewed from the bottom of the package. The
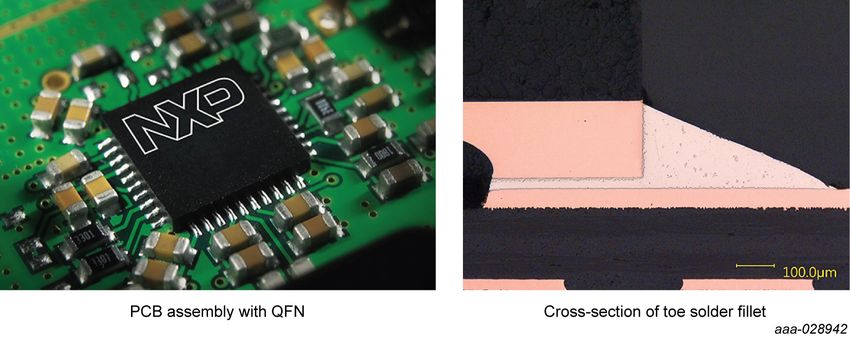
                          lead ends are fully exposed to the side of the package. It is possible that a solder fillet
                          is formed up the side of the component if the terminal end is properly wetted. This may
                          not be the case if the bare copper has been oxidized during NXP dry-bake step or during
                          customer storage.

                           Figure 6. Fully-exposed terminal ends (package bottom and side view)

                   3.4.2 Pull-back terminal ends
                          The terminal ends are pulled back from the package edge (Figure 7). Mold compound is
                          visible at the package edge between the edge and the end of the terminal when viewed
                          from the package bottom side. The terminal end is slightly recessed, no solder fillet is
                          expected after the solder reflow process.

AN1902                                    All information provided in this document is subject to legal disclaimers.   © NXP B.V. 2021. All rights reserved.

Application note                                           Rev. 9 — 28 April 2021
                                                                                                                                                   6 / 50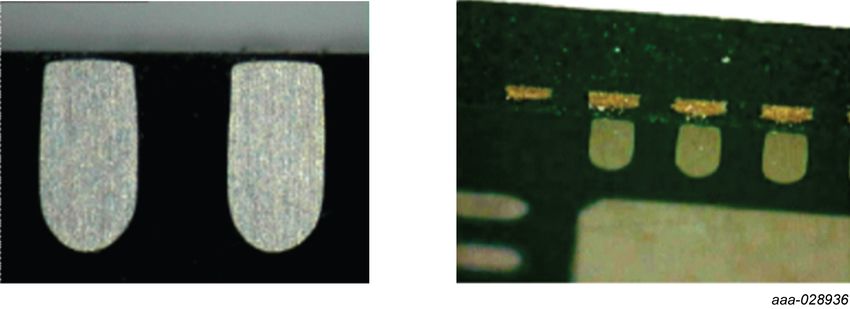
NXP Semiconductors
                                                                                                                          AN1902
                   Assembly guidelines for QFN (quad flat no-lead) and SON (small outline no-lead) packages

                           Figure 7. Pull-back terminal ends (package bottom and side view)

                   3.4.3 Terminal ends with side wettable flank
                          Wettable flanks (WF) are modifications to the fully-exposed terminal ends, which promote
                          solder wetting for the formation of a solder fillet. Uniform solder fillets are needed to
                          enable inspection for solder failures using automatic optical inspection (AOI) and avoids
                          the need for x-ray inspection, with additional cost and layout restrictions for the PCB.
                          Figure 8 shows that NXP's primary WF features are step cuts and dimples at the terminal
                          ends. The step cut is formed during the package singulation process, while the “dimpled”
                          terminal is formed during the half-etching step of the leadframe fabrication process. The
                          fillets are formed and should be visible on the PCB after the solder reflow process, as
                          shown in Figure 9 and Figure 10.
                          Fillet formation, size and shape is highly dependent upon solder paste, stencil design,
                          board layout, reflow profile, and other PCB assembly parameters. To get optimal results,
                          follow the guidelines in Section 4.2 "PCB footprint design".

                           Figure 8. Wettable flank (WF) features of QFN/SON terminal ends

AN1902                                   All information provided in this document is subject to legal disclaimers.   © NXP B.V. 2021. All rights reserved.

Application note                                          Rev. 9 — 28 April 2021
                                                                                                                                                  7 / 50
NXP Semiconductors
                                                                                                                           AN1902
                   Assembly guidelines for QFN (quad flat no-lead) and SON (small outline no-lead) packages

                           Figure 9. Solder fillets cross-sections after reflow

                           Figure 10. SEM Images of solder fillets cross-sections after reflow

4        Printed-circuit board (PCB) guidelines

                    4.1 PCB design guidelines and requirements
                          As the package size shrinks and the terminal count increases, the dimensional tolerance
                          and positioning accuracy affects subsequent processes. Part interchangeability is also
                          a concern when two separate suppliers provide production parts for the PCB. The
                          optimized PCB layout for one supplier may have issues (manufacturing yield and/or
                          solder joint life) with the other supplier's parts. When more than one source is expected,
                          the PCB layout should be optimized for both parts. Additional information of this topic is
                          provided in this section.
                          A proper PCB footprint and stencil design is critical to surface mount assembly yields
                          and subsequent electrical and mechanical performance of the mounted package. The
                          design starts with obtaining the correct package drawing. Package outline drawings are
                          available at www.nxp.com (follow the procedure described in Section 9 "Downloading
                          package information from NXP website"). The drawing contains the package dimensions
                          as well as the recommended footprint (land pattern) for soldering.
                          Figure 11 shows an example package outline drawing for a HVQFN48 (plastic thermal
                                                                                                             3
                          enhanced very thin, quad flat package; no leads; 48 terminals; body 7 × 7 × 0.85 mm ).
                          Figure 12 shows a proposal for the reflow soldering footprint of this HVQFN48 package.

AN1902                                    All information provided in this document is subject to legal disclaimers.   © NXP B.V. 2021. All rights reserved.

Application note                                           Rev. 9 — 28 April 2021
                                                                                                                                                   8 / 50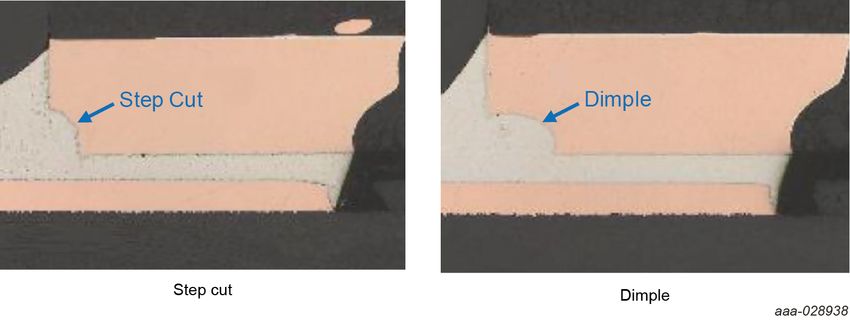
NXP Semiconductors
                                                                                                                                                                       AN1902
                   Assembly guidelines for QFN (quad flat no-lead) and SON (small outline no-lead) packages

                                                                          D                                          B       A

                             terminal 1
                            index area
                                                                                                                                                 A
                                                                                                                                                      A1
                                                                                                                             E                                                                   c

                                                                                                                                                                detail X

                                                                          e1                                                                                                   C

                                               e                                1/2 e        b                           v        C A B               y1 C                          y
                                               13                                                         24             w        C
                                     L
                                                                                                               25
                                          12
                                                                                                                     e

                                    Eh                                                                                       e2

                                                                                                                    1/2 e

                                           1                                                                   36
                              terminal 1
                             index area            48                                                 37
                                                                          Dh
                                                                                                                                                                              X

                                                                                                 0                    2.5                 5 mm
                                                                                                                     scale

                              Dimensions (mm are the original dimensions)

                                 Unit(1)           A       A1        b         C        D            Dh        E         Eh        e      e1     e2        L   v         w         y       y1

                                      max 1.00 0.05 0.30                               7.1           5.25      7.1       5.25                          0.5
                               mm     nom 0.85 0.02 0.21                       0.2     7.0           5.10      7.0       5.10     0.5     5.5   5.5    0.4     0.1      0.05 0.05          0.1
                                      min 0.80 0.00 0.18                               6.9           4.95      6.9       4.95                          0.3

                                                                                                                                                                                   aaa-028940

                           Figure 11. QFN case outline drawing example HVQFN48

AN1902                                              All information provided in this document is subject to legal disclaimers.                                     © NXP B.V. 2021. All rights reserved.

Application note                                                     Rev. 9 — 28 April 2021
                                                                                                                                                                                                9 / 50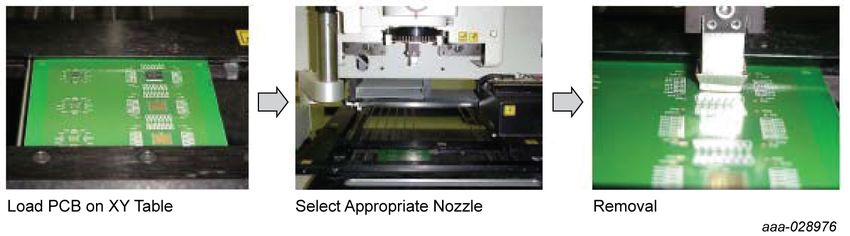
NXP Semiconductors
                                                                                                                                                                               AN1902
                   Assembly guidelines for QFN (quad flat no-lead) and SON (small outline no-lead) packages

                                                                                                                   Hx

                                                                                                                   Gx

                                                                                    D                 P                                       0.105                          0.125

                                                       C

                                                                                         nSPx
                                                                                                                                SPx
                                                                               nSPy

                                                                                                                                             SPy

                                       Hy    Gy                                   SPy tot                                                                                     SLy By        Ay

                                                                                                                 SPx tot

                                                                                                                  SLx
                                                                                                                                                              X
                                                                                                                   Bx                                                               0.29

                                                                                                                   Ax                                                               0.24

                                                                                            Recommended stencil thickness: 0.1 mm

                                    solder land                           solder land plus solder paste                                                           detail X                       0.85 0.9

                                    solder paste deposit                  occupied area

                            Dimensions in mm

                               P       Ax         Ay       Bx      By       SLx      SLy       SPx        SPy     SPx tot SPy tot      C           D   nSPx       nSPy       Gx       Gy         Hx     Hy

                             0.50     8.00    8.00         6.20   6.20     5.50      5.50      0.82       0.82     3.26    3.26       0.90     0.29     3          3         7.25    7.25        8.25   8.25

                                                                                                                                                                                             aaa-028941

                           Figure 12. Reflow soldering footprint for HVQFN48

                          Note: This footprint is meant be used as guideline and a starting point for individual PCB
                          designs. To achieve optimum assembly quality, the user must adapt the footprint to meet
                          needs, assembly, and application environment.

AN1902                                                 All information provided in this document is subject to legal disclaimers.                                        © NXP B.V. 2021. All rights reserved.

Application note                                                         Rev. 9 — 28 April 2021
                                                                                                                                                                                                        10 / 50
NXP Semiconductors
AN1902
Assembly guidelines for QFN (quad flat no-lead) and SON (small outline no-lead) packages
Figure 13. A well-soldered QFN/SON package
The cross-section picture in Figure 13 shows the goal of a well-soldered QFN/SON
terminal, void-free solder joint and a smooth solder fillet.
4.2 PCB footprint design
4.2.1 Guidelines for perimeter land patterns
A land is the conductive pattern on the PCB used for the solder connection of a
component. The land pattern is a combination of lands intended for the board mounting
of a particular component. In NXP documents land patterns are also referred as footprint
for reflow soldering.
NXP follows the generic requirements for surface mount design and land pattern
standards from the Institute for Printed Circuits (IPC) document IPC-7351. The document
can be purchased from the IPC's website http://www.ipc.org/ online store, and includes
guidelines for a large number of QFN/SONs, based on assumed package dimensions.
NXP also recommends considering the guidelines given in IPC-7093 Design and
Assembly Process Implementation for Bottom Termination Components for QFN/SON
PCB and process design.
4.2.1.1 Guidelines for size of perimeter Cu-lands:
All PCB land calculation should be based on the nominal size of the package terminal.
Length of perimeter lands:
• The land should extend ~0.05 mm towards the center of the package (Figure 14).
• The land should extend ≥ 0.20 mm from the package edge to the exterior for QFN/SON
with fully-exposed lead ends.
• The land should extend ≥ 0.40 mm from the package edge to the exterior for QFN/
SON with side wettable flanks to form inspectable toe solder fillets (Figure 14). If board
space allows, a longer land extension (such as 0.60 mm) will generally result in more
consistent fillet formation because it will be influenced less by PCB assembly issues
(e.g. misalignment).
• The PCB land should not extend beyond the package edge for packages with pull-back
terminal ends.
AN1902 All information provided in this document is subject to legal disclaimers. © NXP B.V. 2021. All rights reserved.
Application note Rev. 9 — 28 April 2021
11 / 50NXP Semiconductors
AN1902
Assembly guidelines for QFN (quad flat no-lead) and SON (small outline no-lead) packages
Length of Cu land
exterior to the package edge
≥ 0.2 mm
QFN Package
Lead
Cu Land
Printed Circuit Board
~0.05 mm
Extend of Cu Land
towards package center
Fully exposed lead ends
Length of Cu land
exterior to the package edge
≥ 0.4 mm
QFN Package
Lead
Cu Land
Printed Circuit Board
~0.05 mm
Extend of Cu Land
towards package center
Lead ends with side wettable flank
aaa-028943
Figure 14. Length of perimeter copper lands
Width of perimeter lands:
• The PCB land width should be approximately the same as the nominal package
terminal width (see Table 1).
• Terminal pitch needs to be designed using the exact dimensions of 0.40, 0.50, 0.65,
0.80, and 1.00 mm.
Table 1. Recommended land width as a function of terminal pitch
Terminal pitch (mm) Land width (mm)
0.40 0.200
0.50 0.250
0.65 0.370
0.80 0.400
1.00 0.500
4.2.1.2 Solder mask guidelines for perimeter lands
For perimeter PCB lands, it is recommended to use non-solder mask-defined (NSMD),
because they provide significant advantages over solder mask-defined (SMD) lands
AN1902 All information provided in this document is subject to legal disclaimers. © NXP B.V. 2021. All rights reserved.
Application note Rev. 9 — 28 April 2021
12 / 50NXP Semiconductors
AN1902
Assembly guidelines for QFN (quad flat no-lead) and SON (small outline no-lead) packages
in terms of dimensional tolerances and registration accuracy. The NSMD has a solder
mask opening that is larger than the copper land, and the PCB pad area is controlled
by the size of the copper land. Since the copper etching process is capable and stable,
a smaller size copper land can be defined more accurately. Figure 15 shows the pad
design concepts.
The solder mask should be pulled away from the perimeter lands to account for the
registration tolerance of the solder mask. The opening should be 0.12 to 0.15 mm larger
than the land size resulting in 0.060 to 0.075 mm clearance between the copper land and
solder mask (IPC-7351).
0.060 - 0.075 mm 0.060 - 0.075 mm
Solder Mask Copper Land Solder Mask Solder Mask Copper Land Solder Mask
Printed Circuit Board Printed Circuit Board
SMD: Solder Mask Defined Land Design NSMD: Non-Solder Mask Defined Land Design
(not recommended) (recommended) aaa-028944
Figure 15. SMD and NSMD land designs
Each land should have its own solder mask opening with a web of solder mask between
two adjacent leads (Figure 16). IPC-7351 recommends having at least 0.075 mm of web
width to ensure adhesion to the PCB surface is sufficient. Minimum solder mask width will
also depend on PCB manufacturer capabilities.
Individual solder mask openings will not work for pitches ≤ 0.40 mm, taking requirements
for minimum spacing and width of solder mask into account. A single large solder mask
opening for all lands can be used as an alternative design for small pitches (Figure 16).
Solder Mask Solder Mask
Cu Land
Cu Land
Individual solder mask openings Large solder mask opening
for pitch ≤ 0.50 mm for pitch ≤ 0.40 mm aaa-028945
Figure 16. Solder mask design for perimeter land pattern
4.2.1.3 Clearance to vias and adjacent components
Placement of exposed, not covered by solder mask, PCB vias and traces near package
corners should be avoided to eliminate potential shorting between exposed package tie-
bar features.
Other surface mount devices and insertion components (THT or through hole technology)
should be placed sufficiently away from package land pattern area to avoid potential
package and board defects.
4.2.1.4 Pin 1 keep out area
Different design features are used to identify the package orientation and location of
“Pin 1” on package bottom side. This can either be a small square pad (left), a notch
in the exposed pad (middle), or a chamfer in the exposed pad corner (right) as shown
in Figure 17. The feature is not necessarily included in the package outline drawing as
AN1902 All information provided in this document is subject to legal disclaimers. © NXP B.V. 2021. All rights reserved.
Application note Rev. 9 — 28 April 2021
13 / 50NXP Semiconductors
AN1902
Assembly guidelines for QFN (quad flat no-lead) and SON (small outline no-lead) packages
published. In the event of an open trace on the PC-board, there may be unintentional
contact between this trace and the small square pad, leading to a malfunction. To prevent
this, NXP prescribes a “keep out” area for the corner/pin 1 area of the PC-board, as
indicated in Figure 17, which applies to all designs.
Pin 1 Keep Out Keep Out Keep Out
48 37 48 37 48 37
1 36 1 36 1 36
Pin 1
Pin 1
12 25 12 25 12 25
13 24 13 24 13 24
Small pad Notch Chamfer
aaa-028946
Figure 17. Gray “Pin 1” keep out area (package transparent top view)
4.2.1.5 Keep out areas for QFN accelerometer sensors
Avoid positioning screw holes for PCB attachment near the accelerometer location.
Doing so may flex the PCB and affect product performance.
To prevent the risk of package tie-bar shorting with PCB traces, it is recommended that
vias and other insertion components are kept at least 2 mm away from the package
edge.
4.2.2 Guideline for exposed pad land patterns
QFN/SON packages with an exposed pad (EP) on the bottom, enhance the thermal and
electrical performance of the package. The die is attached directly to the exposed pad
thus providing an efficient heat removal path, as well as excellent electrical grounding
to the PCB as shown in Figure 18. To further optimize thermal performance, the PCB
design should include thermal vias and a thermal plane(s).
Package Body Die Bond Wire Package-to-Board
Encapsulation Solder Joint
Material
PCB Signal
Package Trace
Lead Frame
PCB Internal PCB Thermal Via Area
Copper Plane
Heat Transfer Path
aaa-028947
Figure 18. Cross-section of QFN/SON package and PCB showing heat transfers
Although the land pattern design of the perimeter lands for exposed pad packages
should be the same as that for non-thermally/electrically enhanced packages, extra
AN1902 All information provided in this document is subject to legal disclaimers. © NXP B.V. 2021. All rights reserved.
Application note Rev. 9 — 28 April 2021
14 / 50NXP Semiconductors
AN1902
Assembly guidelines for QFN (quad flat no-lead) and SON (small outline no-lead) packages
features are required during the PCB design and assembly stage for effectively mounting
thermally/electrically enhanced packages. In addition, repair and rework of assembled
exposed pad packages may involve some extra steps, depending upon the current
rework practice within the company.
4.2.2.1 Spacing between perimeter and exposed pad land pattern
The design of the land pattern and the size of the exposed thermal pad depends
strongly on the thermal characteristics and power dissipation of the specific product
and application. To maximize both removal of heat from the package and electrical
performance, a land pattern must be incorporated on the PCB within the footprint of the
package corresponding to the exposed metal pad (as shown in Figure 19).
The size of the land pattern can be larger, smaller, or even take on a different shape
than the exposed pad on the package. However, the area that can be soldered (which
should be defined by the solder mask) should be approximately the same size/shape as
the exposed pad area on the package to maximize the thermal/electrical performance. A
clearance of at least 0.25 mm should be designed on the PCB between the outer edges
of the exposed pad land pattern and the inner edges of perimeter land pattern to avoid
any shorts.
Exposed Pad Exposed Pad
Land Pattern Land Pattern
Solderable Area Solderable Area
Min. 0.25 mm Min. 0.25 mm
Min. 0.25 mm Min. 0.25 mm
SMD exposed pad land pattern NSMD exposed pad land pattern aaa-028948
Figure 19. Minimum clearance between perimeter and exposed pad land pattern
4.2.2.2 Segmented exposed pad land pattern design
Alternatively, the land pattern for the exposed pad can be segmented into a symmetric
array of square or rectangular lands, as shown in Figure 20. The land array can be
created either by segmentation of a full copper area by solder mask openings, or by
NSDM defined copper lands.
• Recommended edge length/width of a matrix land is between 1.0 to 2.0 mm
• Distance between the lands should be 0.40 mm
The segmented PCB design facilitates the solder paste flux outgassing during reflow,
thereby promoting a lower voiding level of the completed solder joint. The maximum
size of a single solder void is limited by the dimensions of a single matrix segment at the
same time.
AN1902 All information provided in this document is subject to legal disclaimers. © NXP B.V. 2021. All rights reserved.
Application note Rev. 9 — 28 April 2021
15 / 50NXP Semiconductors
AN1902
Assembly guidelines for QFN (quad flat no-lead) and SON (small outline no-lead) packages
0.4 mm 0.4 mm
0.4 mm 0.4 mm
0.4 mm 0.4 mm 0.4 mm 0.4 mm
SMD exposed pad land pattern NSMD exposed pad land pattern aaa-028932
Figure 20. Segmented exposed pad land patterns
4.2.2.3 Thermal vias in the exposed pad land pattern
While the land pattern on the PCB provides a means of heat transfer/electrical grounding
from the package to the board through a solder joint, thermal vias are necessary to
effectively conduct the heat from the surface of the PCB to the ground plane(s). These
vias act as “heat pipes”. The number of vias is application specific and depends upon the
product power dissipation and electrical conductivity requirements.
• Thermal and electrical analysis and/or testing are recommended to determine the
minimum number of vias required.
• Maximum thermal and electrical performance is achieved when an array of vias is
incorporated in the land pattern at a 1.20 mm grid, as shown in Figure 21.
• It is recommended that the via diameter be 0.30 to 0.33 mm with 35 µm Cu plating
2
thickness (1.0 oz/ft ). This is desirable to avoid any solder-wicking inside the via
during the soldering process, which may result in solder voids in the joint between the
exposed pad and the thermal land.
• If the copper plating does not plug the vias, then the thermal vias can be “tented” with
solder mask on the top surface of the PCB to avoid solder wicking inside the via during
assembly. The solder mask diameter should be at least 0.10 mm larger than the via
diameter.
AN1902 All information provided in this document is subject to legal disclaimers. © NXP B.V. 2021. All rights reserved.
Application note Rev. 9 — 28 April 2021
16 / 50NXP Semiconductors
AN1902
Assembly guidelines for QFN (quad flat no-lead) and SON (small outline no-lead) packages
Pitch 1.2 mm
0.
3
m
m
Pitch 1.2 mm aaa-028949
Figure 21. Exposed pad land pattern with array of thermal vias
Design options for combination of vias with a segmented exposed pad land pattern are
shown in Figure 22.
a) b)
a) Via in pad (SMD)
b) Via in pad (NSMD)
c) Via between pads (SMD)
c) aaa-028964
Figure 22. Segmented exposed pad land pattern with vias
4.2.3 Pad surface finish
Almost all PCB finishes are compatible with QFN/SONs, including:
• Organic solderability protectant (OSP)
AN1902 All information provided in this document is subject to legal disclaimers. © NXP B.V. 2021. All rights reserved.
Application note Rev. 9 — 28 April 2021
17 / 50NXP Semiconductors
AN1902
Assembly guidelines for QFN (quad flat no-lead) and SON (small outline no-lead) packages
• Electroless nickel immersion gold (ENIG)
• Immersion Sn
• Immersion Ag
Hot air solder leveled (HASL) finish may cause uneven surface issues and extra caution
is required.
5 Board assembly
5.1 Assembly process flow
Figure 23 shows a typical surface mount technology (SMT) process flow. Use of standard
pick and place process and equipment is recommended and manual or hand soldering
should be avoided.
SOLDER PASTE POST PRINTING COMPONENT
PRINTING INSPECTION PLACEMENT
POST REFLOW
PRE-REFLOW
REFLOW INSPECTION
INSPECTION
(VISUAL/AOI/X-RAY)
aaa-028968
Figure 23. SMT process flow
5.2 Solder paste printing
5.2.1 Solder paste
Solder paste is a homogenous mixture of fine metal alloy particles, flux, and viscosity
modifiers to adjust printing and reflow properties. The main features of solder pastes are:
• Solder alloy:
NXP recommends using lead-free solder paste, in line with environment legislation
(RoHS, ELV). A variety of lead-free alloys is available for PCB assembly, with
different physical properties and melting temperatures. Common solders alloys
are combinations of Tin, Silver, and Copper: SnAg3Cu0.5 (SAC305), SnAg4Cu0.5
(SAC405), or SnAg3.8Cu0.7 (SAC387), with a melting range between 217 to 220 °C.
The peak reflow temperature for these alloys shall be > 235 °C.
• Solder spheres:
A main component of the paste is the low-oxide spherical powder made from the solder
alloy. The amount of solder powder in the paste is referred to as the metal load and
is typically in the range of 83 to 92 % by weight. The spherical shape and controlled
size of the powder particles ensures a uniform printing and a stable paste volume for
each solder land. The solder pastes are classified by spheres size according to IPC
standard J-STD-005 (see Table 2). Smaller spheres allow higher printing resolution and
smaller pitches. The rule of thumb is that the minimum dimension of the smallest stencil
opening shall be larger than 4 to 6 sphere diameters.
AN1902 All information provided in this document is subject to legal disclaimers. © NXP B.V. 2021. All rights reserved.
Application note Rev. 9 — 28 April 2021
18 / 50NXP Semiconductors
AN1902
Assembly guidelines for QFN (quad flat no-lead) and SON (small outline no-lead) packages
Table 2. Solder paste type
Sphere diameter
Paste type
Min. (µm) Max. (µm)
3 25 45
4 20 38
5 10 25
6 5 15
• Flux:
Flux is needed to remove surface oxidation, prevents oxidation during reflow and
improves the wetting of the solder alloy. Solder pastes are classified into three types
based on the flux type according to IPC standard J-STD-004:
– Rosin-based flux
– Water-soluble flux
– No-clean flux
Rosin-based and water-soluble fluxes require cleaning of the PCB after reflow
process. Standard rosin chemistries are normally cleaned with solvents, semi-
aqueous solutions or aqueous/saponifier solutions, while the water-soluble
chemistries are cleaned with pure water.
No-clean flux doesn’t require cleaning, but normally a little residue remains on the
PCB after soldering. In general, it is recommended to use a no-clean solder paste,
because cleaning of flux residues from underneath the package is not feasible for a
QFN/SON-style package (due to the low package standoff).
5.2.2 Stencil thickness
The thickness of the stencil determines the amount of solder paste deposited onto the
printed circuit board land pattern. Due to the fine pitch and small terminal geometry
used, care must be taken when printing the solder paste on to the PCB. Typical stencil
thicknesses are given in Table 3.
Table 3. Typical Stencil Thickness
Package pitch (mm) Stencil thickness (µm)
0.50 150
0.40 100 to 125
Since QFN/SON are (most likely) not the only package on the actual production PCB,
the recommended stencil thickness for the other packages may be thicker than desired.
For such a case, a step-down stencil is recommended, where most of the stencil for the
PCB has a typical thickness, but the area for the QFN/SON would be reduced to 100 to
150 µm, depending on the package pitch.
5.2.3 Stencil design
The dimension of the stencil openings should be a minimum 25 to 30 µm (5 to 10 %)
smaller than the size of the corresponding copper lands to account for alignment and
PCB tolerances. A fillet at the corners reduces the adhesion to the solder paste and
improves the paste release (Figure 24). The fillet radius depends on the solder paste
type; i.e. it should be larger than the diameter of the solder spheres.
AN1902 All information provided in this document is subject to legal disclaimers. © NXP B.V. 2021. All rights reserved.
Application note Rev. 9 — 28 April 2021
19 / 50NXP Semiconductors
AN1902
Assembly guidelines for QFN (quad flat no-lead) and SON (small outline no-lead) packages
R > Ø Solder Sphere
copper land
STENCIL OPENING
min. 25 - 30 µm
min. 25 - 30 µm aaa-028969
Figure 24. Stencil opening size and corner radius
A minimum aperture size is needed to ensure the proper release of the solder paste
during stencil printing (Figure 24). The area ratio and the aspect ratio between stencil
opening and stencil thickness are used to determine the minimum dimensions,
respectively.
smallest aperture dimension (a or b)
Aspect Ratio =
t stencil thickness
r
min [a, b]
Aspect Ratio = > 1.5
t
OPENING
STENCIL
a Example: Minimum width for stencil thickness 150 µm
b
> 1.5 = > b > 1.5 x 150 µm = > b > 225 µm
150 µm
projected aperture area
Area Ratio =
b aperture side wall area
Aperture Dimensions ab - r2 (4 - )
Area Ratio = > 0.66
2t [a + b + r ( - 4)] aaa-028970
Figure 25. Area ratio and aspect ratio
Maximum thermal/electrical performance requires that the exposed pad of the package
is soldered to the land pattern on the PCB. The maximum aperture size of the stencil
should not exceed > 5 mm on either side (Figure 26a). Larger openings should be
subdivided into an array of smaller openings as shown in Figure 26b. The spacing
between segments on the stencil should be 0.150 mm or more. Narrower spacing
between segments can become a manufacturing issue.
AN1902 All information provided in this document is subject to legal disclaimers. © NXP B.V. 2021. All rights reserved.
Application note Rev. 9 — 28 April 2021
20 / 50NXP Semiconductors
AN1902
Assembly guidelines for QFN (quad flat no-lead) and SON (small outline no-lead) packages
≤ 5 mm > 5 mm
min.
0.15 mm
min.
25 - 30 µm
min. 25 - 30 µm min. 0.15 mm
a) b)
a) Large land < 5 mm edge length, with
single stencil opening
min. b) Large land > 5 mm edge length, with
25 - 30 µm segmented stencil openings
c) Segmented land pattern with individual
stencil openings
min. 25 - 30 µm
c) aaa-028971
Figure 26. Stencil design for exposed pad
An array of smaller paste deposits for exposed pad land supports outgassing of the flux
during reflow. Otherwise the evaporated flux is entrapped in the solder joint and creates
large solder voids. Smaller QFN/SON packages can take advantage of this stencil design
even for exposed pad size < 5 mm.
The target solder paste coverage of the land should be about 60 % to 65 % of the lands
area to achieve a good solder joint. Smaller solder paste volumes could have adverse
effects on the solder joint reliability. If the product dissipates a large amount of heat, the
solder paste deposit can be increased. Too much paste can cause the component to float
and have misconnections of terminals. Solder paste deposits should be arranged so that
paste is never printed directly over an unplugged via.
5.3 Component placement
Increased package interconnection density requires precise and accurate pick and place
tools. To meet this tight requirement, a placement machine equipped with an optical
recognition system for the centering of the PCB and the components during the pick-and-
place motion is recommended. A placement accuracy study is suggested to calculate
compensations required.
Products in QFN/SON packages are assembled on NXP's production lines and
production lines operated by NXP's assembly and test vendors. Packages with the same
outline can have different design features to identify the package orientation and location
of pin 1 when the package is viewed from bottom side (see Section 4.2.1.4 "Pin 1 keep
out area"). Also, the leadframe finish may reflect differently in the vision system. If parts
AN1902 All information provided in this document is subject to legal disclaimers. © NXP B.V. 2021. All rights reserved.
Application note Rev. 9 — 28 April 2021
21 / 50NXP Semiconductors
AN1902
Assembly guidelines for QFN (quad flat no-lead) and SON (small outline no-lead) packages
are supplied by more than one assembly line, then it is necessary to create dedicated
equipment recipes.
Refer to Section 10.4 "Packing of devices", for package orientation and location of pin 1
in JEDEC trays or tape and reel carriers.
5.4 Reflow soldering
The temperature profile is the most important control in reflow soldering, and it must be
fine tuned to establish a robust process. The actual profile parameters depend upon the
solder paste and alloy used; the recommendations from paste manufacturers should be
followed. Nitrogen reflow is recommended to improve solderability and to reduce defects
(like solder balls).
When a board is exposed to the reflow oven temperature, certain areas on the board
will heat faster than others depending on the thermal mass. Large components and
large copper areas in the board will heat up slower than small components and board
areas with little copper. The actual temperature shall be measured with thermocouples
at various places on the PCB surface to ensure that the reflow temperature is reached
everywhere on the board.
The temperature of package top surface shall be monitored at the same time, to validate
that the peak package body temperature (TP) does not exceed the MSL classification of
individual devices (see IPC/JEDEC J-STD020).
300
Temperature
(°C)
TP = 260 °C
250
TL = 220 °C
200
150
100
50
Ramp-up, Reflow, max.
Ramp-up, < 3°C/sec Soak, max. 110 sec/150-180°C 3°C/sec 90 sec/ > 220°C Ramp-down, < 6°C/sec
0
0 50 100 150 200 250 300
Reflow Temperature Reflow Temperature = 240 °C, Reflow Time = 40 s
TP = Peak Package Body Temperature
TL = Liquidous Temperature aaa-028972
Figure 27. Typical reflow profile for QFN with lead-free SAC solder
Figure 27 shows a typical time/temperature profile (blue) for reflow soldering with lead-
free SAC solder alloys using a multi-zone reflow oven. The maximum allowed package
body temperature at every stage of the process (depending on the IPC/JEDEC J-
STD-020 classification of the package) is represented by the dashed gray line.
The reflow profile is divided into five stages:
AN1902 All information provided in this document is subject to legal disclaimers. © NXP B.V. 2021. All rights reserved.
Application note Rev. 9 — 28 April 2021
22 / 50NXP Semiconductors
AN1902
Assembly guidelines for QFN (quad flat no-lead) and SON (small outline no-lead) packages
• Ramp-up to soak
The printed circuit board should be heated evenly to avoid overheating of components.
Volatile solvents in the solder paste start to outgas during ramp up. Too fast
temperature increase could cause solder balling. The maximum ramp-up rate shall not
exceed 3 °C/second to avoid overstress to the package.
• Pre-heat and soak
The PCB assembly is held at 150 to 180 °C temperature for 60 to 120 seconds
during thermal soak. The volatiles in the solder paste will be removed and the flux is
being activated to reduce oxides from the pads and lands. Time and temperature are
recommended by the paste supplier depending on the flux type.
• Ramp-up to reflow
The PCB assembly is uniformly heated above the liquidous temperature of the solder
alloy. Again, the maximum ramp-up rate shall not exceed 3 °C/second to avoid
overstress to the package.
• Reflow
The recommended peak reflow temperature for SAC alloys shall be > 235 °C. The
period above the liquidous temperature (TL) is called the reflow time. It shall be long
enough to allow the liquid solder to uniformly wet the pad and land surfaces and to form
an intermetallic phase. Too long reflow time may lead to brittle solder joints and could
cause damage to the board and components. The peak package body temperature
(TP) must not exceed 260 °C and the time above 255 °C must not exceed 30 seconds
depending on IPC/JEDEC classification.
• Cool down
Fast cool down prevents excess intermetallic formation and creates a fine grain
structure of the solder alloy. The ramp-down rate can be faster than the ramp-up, but
shall not exceed 6 °C/second to avoid overstress.
The reflow profile for exposed pad packages need not be any different than the one used
for non-thermally/electrically enhanced packages.
Cross referencing with the device data sheet is recommended for any additional board
assembly guidelines specific to the exact product used.
5.5 Inspection
Unlike traditional leaded components, the solder joints of QFN/SON are formed primarily
underneath the package. To verify any open or short circuits (bridging) after reflow
soldering, optical inspection and x-ray inspection are recommended. Micro-sectioning is
another method of inspecting solder joint quality during process optimizations, but it is
less suitable to production inspection (due to slow processing).
Figure 28 shows the x-ray image of a soldered QFN44 package with exposed pad and
pull-back terminal ends. The dark gray areas represent the solder joints. Light gray spots
within the solder joints are due to solder voids. The perimeter lands are well soldered
with very little voiding. The land pattern for the exposed pad is segmented with a thermal
via within each square. The voids around the vias are not regarded as defects.
AN1902 All information provided in this document is subject to legal disclaimers. © NXP B.V. 2021. All rights reserved.
Application note Rev. 9 — 28 April 2021
23 / 50NXP Semiconductors
AN1902
Assembly guidelines for QFN (quad flat no-lead) and SON (small outline no-lead) packages
Figure 28. X-ray inspection of a QFN package after soldering
Figure 29 shows an example of shorted solder joints caused by excess spread of solder
paste during reflow or high solder amount.
Figure 29. Visual optical inspection of QFN after assembly
Figure 30 shows an issue with excess solder voids at the exposed pad. The large single
copper land used for the exposed pad prevents the proper outgassing of volatile solvents
from the solder paste. The perimeter solder joints show either poor wetting or shorts
between terminals.
AN1902 All information provided in this document is subject to legal disclaimers. © NXP B.V. 2021. All rights reserved.
Application note Rev. 9 — 28 April 2021
24 / 50NXP Semiconductors
AN1902
Assembly guidelines for QFN (quad flat no-lead) and SON (small outline no-lead) packages
Figure 30. X-ray of QFN package after assembly
6 Repair and rework procedure
6.1 Repairing
Repairing a single solder joint of QFN/SON or the soldered exposed die pad is not
recommended. The solder joints of terminals and exposed pad underneath the package
cannot be soldered in a controlled way.
6.2 Reworking
If a defective component is observed after board assembly, the device can be removed
and replaced by a new one. This rework can be performed using the method described in
this section.
When performing the rework:
• In any rework, the PCB is heated. The thermal limits of PCB and components (e.g.,
MSL information) must be followed.
• During heating, the combination of rapid moisture expansion, materials mismatch,
and material interface degradation can damage the component and PCB. To prevent
moisture induced failures, it is recommended that the PCB assembly and components
have had strict storage control with a controlled environment such as dry air or
nitrogen. In addition, a pre-bake can help to remove the moisture.
• The influence of the heating on adjacent packages must be minimized. Do not exceed
the temperature rating of the adjacent packages.
• Heating conditions will differ due to differences in the heat capacities of the PCB (board
thickness, number of layers) and mounted components used; thus, the conditions must
be set to correspond to the actual product and its mounted components.
AN1902 All information provided in this document is subject to legal disclaimers. © NXP B.V. 2021. All rights reserved.
Application note Rev. 9 — 28 April 2021
25 / 50NXP Semiconductors
AN1902
Assembly guidelines for QFN (quad flat no-lead) and SON (small outline no-lead) packages
• NXP follows industry-standard component level qualification requirements, which
include three solder reflow passes. The three reflow passes simulate board level attach
to a double-sided board and includes one rework pass.
• The removed QFN/SON package should be properly disposed of, so that it is not
accidentally mixed with new components.
A typical QFN/SON rework flow process comprises seven stages:
1. Tooling preparation
2. Component removal
3. Site preparation
4. Solder paste printing
5. Component placement
6. Reflow soldering
7. Inspection
Individual process steps for reworking a QFN/SON package are described in subsequent
sections.
Note: NXP product quality guaranty/warranty does not apply to products that have been
removed, thus, component reuse should be avoided.
6.2.1 Tooling preparation
Various rework systems for SMD are available on the market. In general, the rework
station should have a split light system, an XY table for alignment, and a hot air system
with a top and bottom heater for component removal. For processing QFN/SON
packages, a system should meet the requirements described in the following sections.
6.2.1.1 Heating system
The hot air temperature and the air flow must be controlled so that the component is
heated in a targeted and controlled manner. The heating should be appropriate for the
package size and thermal mass. PCB preheating from bottom side is recommended.
Infrared heating can be applied for preheating of the PCB, but it should only augment the
hot air flow to the component side. Nitrogen can be used instead of air.
6.2.1.2 Vision system
The bottom side of the package as well as the site on the PCB should be observable. For
precise alignment of the package to PCB, a split light system should be implemented.
Microscope magnification and resolution should be appropriate for the pitch of the device.
6.2.1.3 Moving and additional tools
Placement equipment should have good accuracy. In addition, special vacuum tools may
be required to remove solder residue from PCB pads.
6.2.2 Component removal
If a component is suspected to be defective and is returned, no further defects must
be introduced to the device during removal of the component from the PCB, because
this may interfere with subsequent failure analysis. The following recommendations are
intended to reduce the chances of damaging a component during removal.
AN1902 All information provided in this document is subject to legal disclaimers. © NXP B.V. 2021. All rights reserved.
Application note Rev. 9 — 28 April 2021
26 / 50NXP Semiconductors
AN1902
Assembly guidelines for QFN (quad flat no-lead) and SON (small outline no-lead) packages
6.2.2.1 Moisture removal
Dry bake components before removal at 125 °C for 16 to 24 hours for boards with
SMT components, or at 95 °C for 16 to 24 hours for boards with temperature-sensitive
components.
6.2.2.2 Temperature profile
During de-soldering, ensure that the package peak temperature is not higher and that the
temperature ramps are not steeper than the standard assembly reflow process.
6.2.2.3 Mechanical
Do not to apply high mechanical forces for removal. High force can damage the
component and/or the PCB, which may limit failure analysis of the package.
• For large packages, pipettes can be used (implemented on most rework systems)
• For small packages, tweezers may be more practical
If suspected components are fragile, then it is especially necessary to determine if
they can be electrically tested directly after de-soldering, or if these components must
be preconditioned prior to testing. In this case, or if safe removal of the suspected
component is not possible (or too risky), the whole PCB (or the part of the PCB
containing the defective component) should be returned.
An air nozzle of correct size should be used to conduct the heat to the QFN/SON
component leads, so that a vacuum pick-up tool can properly remove the component
(see Figure 31). The temperature setting for the top heater and the bottom heater
depends on the component rating. A PCB bottom temperature setting of 150 °C is
recommended. Many assembly sites have extensive in-house knowledge on rework, and
their experts should be consulted for further guidance.
Figure 31. Package removal process
If the PCB is large, it is important to avoid bending of the printed circuit material due to
thermal stress, so a bending prevention tool must be placed on the bottom of the printed
circuit board, and a bottom heater installed (to allow heating of the entire printed circuit
board, to raise work efficiency).
Reuse of removed semiconductor packages is not recommended.
6.2.3 Site preparation
After the component is removed, the PCB pads must be cleaned to remove solder
residue, to prepare for the new component placement. This may be completed
by vacuum de-soldering, solder sucker, solder wick braid, etc., after applying flux.
Remaining solder residue and projections can cause the solder stencil to not closely
AN1902 All information provided in this document is subject to legal disclaimers. © NXP B.V. 2021. All rights reserved.
Application note Rev. 9 — 28 April 2021
27 / 50NXP Semiconductors
AN1902
Assembly guidelines for QFN (quad flat no-lead) and SON (small outline no-lead) packages
adhere to the substrate during solder paste printing, leading to improper solder paste
supply during component mount.
Moreover, when the solder residue flows all the way to an adjacent through-hole, the
solder paste printed on the pad can be transferred via suction, to the through-hole during
reflow, which may cause improper connection. A solvent may be necessary to clean the
PCB of flux residue. A de-soldering station can be used for solder dressing. It should be
noted that the applied temperature should not exceed the rating of PCB material which
can contribute to pad peeling from the PCB. This is typically a manual operation that is
directly attributed to experience and skill.
Non-abrasive or soft bristle brushes should be used as abrasive brushes (e.g., steel
brushes) can contribute to bad solder joints. Before placing a new component on the site,
solder paste should be applied to each PCB pad (by printing or dispensing). A no-clean
solder paste is recommended.
6.2.4 Solder paste printing
Solder supply during rework is done using specialized templates and tools. A mini-stencil
with the same stencil thickness, aperture opening, and pattern as the normal stencil are
placed in the component site. A mini-metal squeegee blade deposits solder paste in the
specific area (see Figure 32). The printed pad should be inspected, to ensure even and
sufficient solder paste before component placement.
If neighboring parts are so close to the QFN/SON components that the mini-stencil
method is not an option, then apply solder paste carefully on each component pad using
a paste dispensing system. The volume of solder paste must be controlled, to prevent
shorting on the component and/or neighboring components. Preferably, the same type of
solder paste should be used as was originally applied on the board.
Figure 32. Mini-stencil and mini-squeegee
6.2.5 Component placement
The last step of the repair process is to solder the new semiconductor component on the
board. When remounting the component, consider using rework equipment that has good
optical or video vision capability. A split-light system displays images of both package
leads and PCB pads by superimposing two images. Alignment of the leads and pads is
completed with an adjusting XY which enables correct soldering (see Figure 33).
Regular lead array QFN/SON exhibits self alignment in any direction, including X-axis
shift, Y-axis shift, and rotational misplacement. Exposed pads may not exhibit a strong
self-alignment capability, so precise placement of the component on the PCB is required.
AN1902 All information provided in this document is subject to legal disclaimers. © NXP B.V. 2021. All rights reserved.
Application note Rev. 9 — 28 April 2021
28 / 50NXP Semiconductors
AN1902
Assembly guidelines for QFN (quad flat no-lead) and SON (small outline no-lead) packages
Figure 33. Split-light placement images
6.2.6 Reflow soldering
The new component is soldered to the PCB using the same temperature profile as the
normal reflow soldering process (see Section 5.4 "Reflow soldering"). During soldering,
the package peak temperature and temperature ramps must not exceed those of the
normal assembly reflow process. Note that it may be necessary to dry bake the board
before it is exposed to reflow temperatures a second time.
The PCB might need to be cleaned if they do not get clean in the “normal” process, or if
the rework was not done using “no clean” materials.
6.2.7 Inspection
To verify any open or short circuits (bridging) after soldering, optical inspection and x-ray
inspection are recommended.
7 Board level reliability
7.1 Board level reliability testing
Board Level Reliability (BLR) testing is performed to determine a measure of board-level
reliability when exposed to thermal cycling. There are several different names for BLR,
including:
• Second-level reliability (2nd-level reliability)
• Solder Joint Reliability (SJR)
• Temperature Cycling on Board (TCoB)
Information provided here is based on tests performed by NXP on QFN/SON devices
using a daisy chain wire bond configuration. BLR temperature cycling conditions may
vary widely, depending on the application and specific user. It is recommended that
users run this test using production surface-mount process and board design to develop
application-specific information.
Typically, board level temperature cycling tests are performed according to JEDEC
condition G (-40 °C to 125 °C).
The board-level reliability test results are provided per product due to specific
dependence on dimensions, such as lead size and pitch. Samples of QFN/ SON in daisy
chain format are used to study the Board Level Reliability. Such as were routed in PCB
layer, with a complementary pattern designed on the test PCB to provide one electrical
AN1902 All information provided in this document is subject to legal disclaimers. © NXP B.V. 2021. All rights reserved.
Application note Rev. 9 — 28 April 2021
29 / 50NXP Semiconductors
AN1902
Assembly guidelines for QFN (quad flat no-lead) and SON (small outline no-lead) packages
circuit (net) through the package. Example of daisy-chain test PCB and QFN package is
shown in Figure 34.
Figure 34. Daisy-chain test PCB and QFN package
7.2 Board level reliability results
To get results from NXP board level reliability tests, contact the NXP sales team.
8 Package thermal characteristics
8.1 General thermal performance
Since the thermal performance of the package in the final application will depend on a
number of factors (like board design, power dissipation of other components on the same
board, ambient temperature), the thermal package properties provided by NXP should
only serve as a reference. In applications where the thermal performance is considered
to be critical, NXP recommends running application-specific thermal calculations in the
design phase, to confirm the on-board thermal performance. NXP can generate so-called
compact thermal models (CTM) of the specific product, that can be used in system level
simulations. In order to obtain such a model please contact your NXP sales team.
Exposed pad packages may require the exposed pad to be connected to the PCB
for thermal and/or electrical measurement. For optimized thermal performance, it is
recommended to form a thermal pass into the PCB, by connecting the exposed pad
to the top and/or bottom and/or inner copper layers of the PCB. The PCB copper area
and number of thermal vias connected to the exposed pad required to achieve the
proper thermal performance on the PCB is application specific, and depends on the
package power dissipation and the individual board properties (thermal resistance of the
application PCB).
8.2 Package thermal characteristics
Junction temperature is a function of die size, on-chip power dissipation, package
characteristics, mounting site (board) temperature, ambient temperature, air flow, power
dissipation of other components on the board, and board thermal technology.
Additional factors to be considered in PCB design and the thermal rating of the final
application (amongst others) are:
AN1902 All information provided in this document is subject to legal disclaimers. © NXP B.V. 2021. All rights reserved.
Application note Rev. 9 — 28 April 2021
30 / 50NXP Semiconductors
AN1902
Assembly guidelines for QFN (quad flat no-lead) and SON (small outline no-lead) packages
• Thermal characteristics of the PCB (metal density, number of thermal vias, thermal
conductivity of thermal vias)
• Quality and size of PCB solder joints (effective PCB pad size, potential solder voiding in
the thermal path solder joints that may reduce the effective solder area)
The stated values are meant to define the package thermal performance in a
standardized environment (one package on a standardized board).
Thermal properties of the individual products are usually given in the NXP product data
sheets as appropriate. Product data sheets are available at http://www.nxp.com. For
more details on thermal properties, contact NXP.
8.3 Package thermal properties definition
The thermal performance of QFN/SON packages with and without exposed pads is
typically specified by thermal properties such as RθJA, RθJC and ΨJT (in °C/W). Thermal
characterization is performed by physical measurement and by running complex
simulation models under the following conditions:
• One thermal board type:
– Four-layer board (2s2p), per JEDEC JESD51-7 and JESD51-5 (exposed pad
packages only)
• Two boundary conditions:
– Natural convection (still air), per JEDEC JESD51-2
– Cold plate method, per MIL SPEC-883 method 1012.1
8.3.1 RθJA: Theta junction-to-ambient natural convection (still air)
Junction-to-ambient thermal resistance (Theta-JA or RθJA per JEDEC JESD51-2) is a
one-dimensional value that measures the conduction of heat from the junction (of the
hottest temperature on die) to the environment (ambient) near the package in a still
air environment. The heat that is generated on the die surface reaches the immediate
environment along two paths:
• Convection and radiation off the exposed surface of the package, and
• Conduction into-and-through the test board, followed by convection and radiation off
the exposed board surfaces.
TJ TA
RθJA = (TJ - TA)/P
RθJA = Thermal resistance,
Junction to ambient, °C/W
TJ = Die junction temperature, °C
TT = Top of package temperature, °C
P = Power dissipated by device, W
aaa-028986
Figure 35. Junction and ambient temperature (still air)
8.3.2 RθJC: Theta junction-to-case
Junction-to-case thermal resistance (Theta-JC or RθJC per MIL SPEC-883 Method
1012.1) indicates the average thermal resistance between the die and the case top
AN1902 All information provided in this document is subject to legal disclaimers. © NXP B.V. 2021. All rights reserved.
Application note Rev. 9 — 28 April 2021
31 / 50You can also read


