Antivirus Solution Guide for Clustered Data ONTAP: Trend Micro
←
→
Page content transcription
If your browser does not render page correctly, please read the page content below
Technical Report

Antivirus Solution Guide for Clustered Data
ONTAP: Trend Micro
Saurabh Singh and Brahmanna Chowdary Kodavali, NetApp
July 2016 | TR-4312

Abstract
An antivirus solution is key for enterprises to be able to protect their data from viruses and
malware. Storage systems running the NetApp® clustered Data ONTAP® 8.2.1 operating
system can be protected through an off-box antivirus solution. This document covers
deployment procedures for the components of the solution, including the antivirus software,
along with best practices for the configuration of each component.
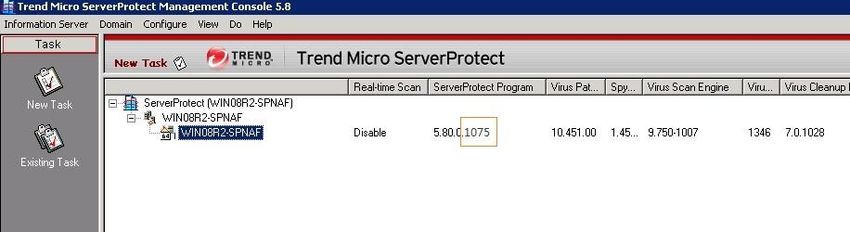
TABLE OF CONTENTS

1   Introduction ........................................................................................................................................... 4
    1.1     Audience .........................................................................................................................................................4

    1.2     Purpose and Scope ........................................................................................................................................4

2   Antivirus Solution Architecture .......................................................................................................... 5
    2.1     Components of Vscan Server .........................................................................................................................5

    2.2     Components of System Running Clustered Data ONTAP ..............................................................................5

    2.3     Workflow for Configuring and Managing Virus Scanning ................................................................................6

3   Vscan Server Requirements ................................................................................................................ 7
    3.1     Antivirus Software Requirements ....................................................................................................................7

    3.2     Antivirus Connector Requirements .................................................................................................................9

4   Installing and Configuring Antivirus Engine ..................................................................................... 9
    4.1     Download Trend Micro ServerProtect for NetApp 5.8 .....................................................................................9

    4.2     Configure Firewall Settings for ServerProtect for NetApp ...............................................................................9

    4.3     Install ServerProtect for NetApp....................................................................................................................10

    4.4     Install ServerProtect for NetApp 5.8 SP1 Package .......................................................................................14

    4.5     Configure ServerProtect for NetApp .............................................................................................................15

5   Installing and Configuring Antivirus Connector ............................................................................. 17
    5.1     Install Antivirus Connector ............................................................................................................................17

    5.2     Add SVMs to Antivirus Connector .................................................................................................................18

6   Configuring Vscan Options in Clustered Data ONTAP................................................................... 19
    6.1     Create Scanner Pool .....................................................................................................................................19

    6.2     Apply Scanner Policy to Scanner Pool ..........................................................................................................21

    6.3     Create Vscan Policy ......................................................................................................................................21

    6.4     Enable Virus Scanning on SVM ....................................................................................................................24

7   Managing Vscan Options in Clustered Data ONTAP ...................................................................... 24
    7.1     Modify Vscan File-Operations Profile for CIFS Share ...................................................................................24

    7.2     Manage Scanner Pools .................................................................................................................................25

    7.3     Manage On-Access Policies .........................................................................................................................28

    7.4     Manage On-Demand Task ............................................................................................................................29

8   General Best Practices ...................................................................................................................... 30
    8.1     Best Practices for Clustered Data ONTAP ....................................................................................................30
    8.2     Best Practices for Trend Micro ServerProtect for NetApp .............................................................................32

2         Antivirus Solution Guide for Clustered Data ONTAP: Trend Micro                                                        © 2016 NetApp, Inc. All rights reserved.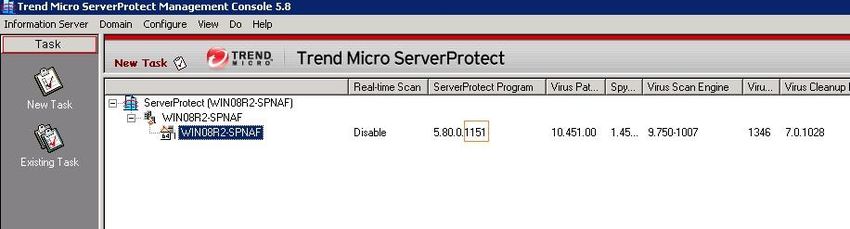
9     Troubleshooting and Monitoring ...................................................................................................... 32
      9.1     Troubleshooting Virus Scanning ...................................................................................................................32

      9.2     Monitoring Status and Performance Activities...............................................................................................33

LIST OF TABLES
Table 1) Installation scenarios on Windows. ..................................................................................................................8
Table 2) Prerequisite for adding a clustered Data ONTAP antivirus shim to ServerProtect. ........................................15
Table 3) Prerequisites for installing Antivirus Connector. .............................................................................................17
Table 4) Prerequisites for adding an SVM to Antivirus Connector. ...............................................................................18
Table 5) Prerequisite for configuring a scanner pool for SVMs. ...................................................................................19
Table 6) On-demand task parameters. .........................................................................................................................23
Table 7) Prerequisites for enabling virus scanning on the SVM. ..................................................................................24
Table 8) Prerequisite for modifying the Vscan file-operations profile............................................................................24
Table 9) Types of file-operations profiles......................................................................................................................25
Table 10) Prerequisite for adding privileged users to a scanner pool. ..........................................................................26
Table 11) Prerequisite for adding Vscan servers to a scanner pool. ............................................................................27
Table 12) On-demand task parameters. .......................................................................................................................29
Table 13) Common virus-scanning issues....................................................................................................................32
Table 14) Virus-scanning issues related to ServerProtect for NetApp. .........................................................................33
Table 15) Commands for viewing information about the connection status of Vscan servers. .....................................34
Table 16) offbox_vscan counters: Vscan server requests and latencies across Vscan servers. .............................34
Table 17) offbox_vscan_server counters: individual Vscan server requests and latencies. ..................................35
Table 18) offbox_vscan_server counters: Vscan server utilization statistics. ........................................................36

LIST OF FIGURES
Figure 1) Antivirus solution architecture. ........................................................................................................................5
Figure 2) Workflow for configuring and managing virus scanning. .................................................................................7
Figure 3) ServerProtect three-tier architecture (graphic supplied by Trend Micro). ........................................................8

3           Antivirus Solution Guide for Clustered Data ONTAP: Trend Micro                                              © 2016 NetApp, Inc. All rights reserved.
1 Introduction
The off-box antivirus feature provides virus-scanning support to the NetApp clustered Data ONTAP
operating system. In this architecture, virus scanning is performed by external servers that host antivirus
software from third-party vendors. This feature offers antivirus functionality that is similar to the
functionality currently available in Data ONTAP operating in 7-Mode.
The off-box antivirus feature provides two modes of scanning:
On-access scanning. Triggers in-band notifications to the external virus-scanning servers during
various file operations, such as open, close, rename, and write operations. Due to the in-band nature
of these notifications, the client’s file operation is suspended until the file scan status is reported back
by the virus-scanning server, a Windows Server instance that is referred to as Vscan server.
On-demand scanning. Introduced in ONTAP 9, this feature enables AV scanning whenever required
on files/folders in a specific path through a scheduled job. It leverages the existing AV servers
configured for on-access AV scanning to run the scanning job. The on-demand job updates the “scan
status” of the files and reduces an additional scan on the same files when accessed next unless the
files are modified. It can be used to scan volumes that cannot be configured for on-access scanning,
such as NFS exports.
The Vscan server, upon receiving a notification for a scan, retrieves the file through a privileged CIFS
share and scans the file contents. If the antivirus software encounters an infected file, it attempts to
perform remedial operations on the file. The remedial operations are determined by the settings that are
configured in the antivirus software.
After completing all necessary operations, the Vscan server reports the scan status to clustered Data
ONTAP. Depending on the scan status, clustered Data ONTAP allows or denies the file operation
requested by the client.
On-access scan for clustered Data ONTAP is currently available only for the CIFS-related traffic. This
feature is similar to the antivirus feature in the 7-Mode implementation with the following key
enhancements:
Granular scan exclusion. Clustered Data ONTAP gives you the ability to exclude files from virus
scanning based on file size and location (path) or to scan only the files that are opened with execute
permissions.
Support for updates to the antivirus software. Clustered Data ONTAP supports rolling updates of
the antivirus software and maintains information about the software running version along with the
scan status of files. If the antivirus software running in a single server in a scanner pool is updated to
a later version, the scan status of all files that have already been scanned is not discarded.
Security enhancements. Clustered Data ONTAP validates incoming connection requests sent by
the Vscan server. Before the server is allowed to connect, the connection request is compared to the
privileged users and IP addresses defined in the scanner pools to verify that it is originating from a
valid Vscan server.
1.1 Audience
The target audience for this document is customers who want to implement virus scanning for clustered
Data ONTAP storage systems that use the CIFS protocol.
1.2 Purpose and Scope
The purpose of this document is to provide an overview of the antivirus solution on clustered Data
ONTAP, with deployment steps and best practices.
4 Antivirus Solution Guide for Clustered Data ONTAP: Trend Micro © 2016 NetApp, Inc. All rights reserved.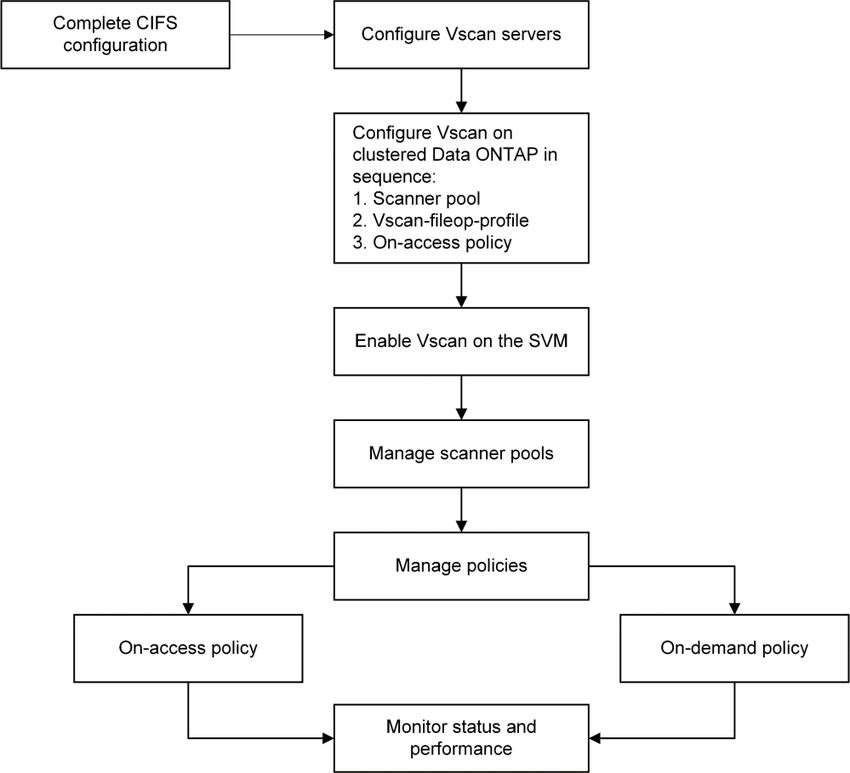
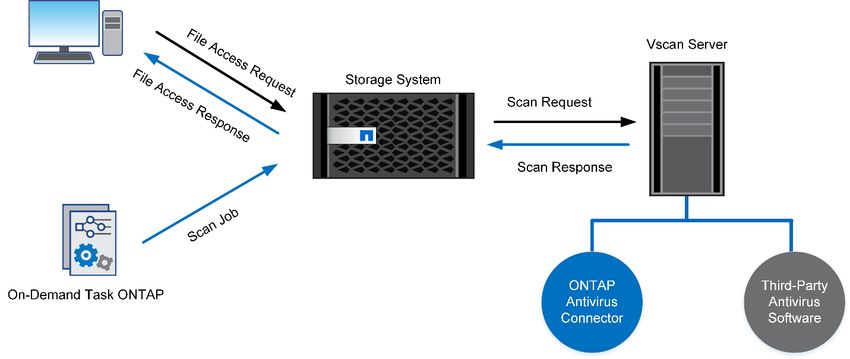
2 Antivirus Solution Architecture
The antivirus solution consists of the following components: the third-party antivirus software, clustered
Data ONTAP Antivirus Connector, and the clustered Data ONTAP virus-scanning settings. You must
install both the antivirus software and Antivirus Connector on the Vscan server. Figure 1 shows the
architecture of the antivirus solution.

Figure 1) Antivirus solution architecture.

2.1   Components of Vscan Server

Antivirus Software
The antivirus software is installed and configured on the Vscan server to scan files for viruses or other
malicious data. The antivirus software must be compliant with clustered Data ONTAP. You must specify
the remedial actions to be taken on infected files in the configuration of the antivirus software.

Antivirus Connector
Antivirus Connector is installed on the Vscan server to process scan requests and provide communication
between the antivirus software and the storage virtual machines (SVMs; formerly called Vservers) in the
storage system running clustered Data ONTAP.

2.2   Components of System Running Clustered Data ONTAP

Scanner Pool
A scanner pool is used to validate and manage the connection between the Vscan servers and the SVMs.
You can create a scanner pool for an SVM to define the list of Vscan servers and privileged users that
can access and connect to that SVM and to specify a timeout period for scan requests. If the response to
a scan request is not received within the timeout period, file access is denied in mandatory scan cases.

Scanner Policy
A scanner policy defines when the scanner pool is active. A Vscan server is allowed to connect to an
SVM only if its IP address and privileged user are part of the active scanner pool list for that SVM.

5      Antivirus Solution Guide for Clustered Data ONTAP: Trend Micro           © 2016 NetApp, Inc. All rights reserved.
Note: All scanner policies are system defined; you cannot create a customized scanner policy.
A scanner policy can have one of the following values:
Primary. Makes the scanner pool always active.
Secondary. Makes the scanner pool active only when none of the primary Vscan servers is
connected.
Idle. Makes the scanner pool always inactive.
On-Access Policy
An on-access policy defines the scope for scanning files when they are accessed by a client. You can
specify the maximum file size for files to be considered for virus scanning and file extensions and file
paths to be excluded from scanning. You can also choose a filter from the available set of filters to define
the scope of scanning.
On-Demand Task
The on-demand scan, introduced in ONTAP 9, runs the AV scanning job on files/folders in a specific path
through a scheduled job whenever required. It leverages the existing AV servers configured for on-access
AV scanning to run the scanning job.
Vscan File-Operations Profile
The Vscan file-operations profile parameter (-vscan-fileop-profile) defines which file operations
on the CIFS share can trigger virus scanning. You must configure this parameter when you create or
modify a CIFS share.
2.3 Workflow for Configuring and Managing Virus Scanning
Figure 2 shows a workflow with the high-level steps that you must perform to configure and manage virus
scanning activities.
6 Antivirus Solution Guide for Clustered Data ONTAP: Trend Micro © 2016 NetApp, Inc. All rights reserved.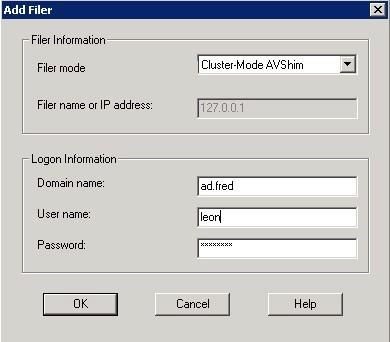
Figure 2) Workflow for configuring and managing virus scanning.
3 Vscan Server Requirements
You must set up one or more Vscan servers for files on your system to be scanned for viruses and
malware. To set up a Vscan server, you must install and configure the antivirus software provided by the
vendor and Antivirus Connector.
3.1 Antivirus Software Requirements
The antivirus engine featured in this document is Trend Micro ServerProtect for NetApp 5.8.
ServerProtect for NetApp protects networks through a three-tier architecture that has the following
components:
The ServerProtect management console is a portable console that gives network administrators
centralized control of multiple network servers and domains.
The information server is the main communication hub (middleware) between the management
console and the normal servers that the information server manages. One information server can
manage multiple normal servers.
The normal server can be any server on a network in which ServerProtect is installed. This server is
the first line of defense in the ServerProtect architecture and the component where all the action
takes place.
Figure 3 shows the relationships between the ServerProtect components.
7 Antivirus Solution Guide for Clustered Data ONTAP: Trend Micro © 2016 NetApp, Inc. All rights reserved.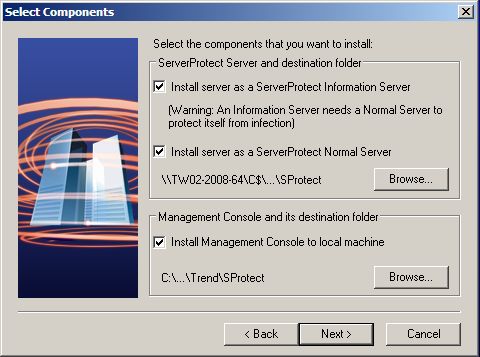
Figure 3) ServerProtect three-tier architecture (graphic supplied by Trend Micro).

Table 1 presents the Windows platforms that the ServerProtect components support.

Table 1) Installation scenarios on Windows.

    Operating System                         Information Server           Normal Server         Management Console
    Windows Server 2003 family               Yes                          Yes                   Yes
    32-bit

    Windows Server 2003 family               Yes (WOW64)                  Yes                   Yes (WOW64)
    64-bit

    Windows Server 2008 family               Yes                          Yes                   Yes
    32-bit

    Windows Server 2008 family               Yes (WOW64)                  Yes                   Yes (WOW64)
    64-bit

    Windows Server 2008 Core 32-             No                           Yes                   No
    bit

    Windows Server 2008 Core 64-             No                           Yes                   No
    bit

    Windows Server 2012 family               Yes                          Yes                   Yes

    Windows XP Professional                  No                           No                    Yes

    Windows Vista desktop family             No                           No                    Yes

    Windows 7 desktop family                 No                           No                    Yes

    Windows 8 desktop family                 No                           No                    Yes

Note:     For more information about the system requirements for Trend Micro ServerProtect for NetApp,
          see the Getting Started Guide for ServerProtect for NetApp 5.8. SP1.

8        Antivirus Solution Guide for Clustered Data ONTAP: Trend Micro                   © 2016 NetApp, Inc. All rights reserved.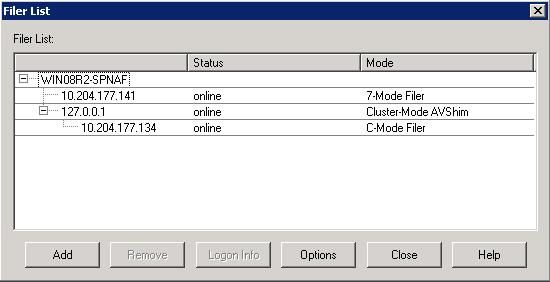
3.2 Antivirus Connector Requirements
Antivirus Connector has the following system requirements:
It must be installed on one of the following Windows platforms:
Windows Server 2012 R2
Windows Server 2012
Windows Server 2008 R2
Windows Server 2008
Note: You can install different versions of the Windows platform on different Vscan servers
scanning the same SVM.
Note: You must enable SMB 2.0 on the Windows Server instance (Vscan server) on which you
install and run Antivirus Connector.
.NET 3.0 or later must be enabled on Windows Server.
4 Installing and Configuring Antivirus Engine
You must install, configure, and run Trend Micro ServerProtect for NetApp 5.8 on the Vscan servers for
files stored on the system running clustered Data ONTAP to be scanned and cleaned.
4.1 Download Trend Micro ServerProtect for NetApp 5.8
To download Trend Micro ServerProtect for NetApp 5.8 Service Pack 1 (SP1), complete the following
step:
Navigate to the Trend Micro Software Download Center page and download the following materials:
Installation package for ServerProtect for NetApp 5.8
Installation package for ServerProtect for NetApp 5.8 SP1
Getting Started Guide for ServerProtect for NetApp 5.8 SP1
Readme file for ServerProtect for NetApp 5.8 SP1
4.2 Configure Firewall Settings for ServerProtect for NetApp
Before you can install ServerProtect for NetApp, you must configure your firewall settings.
Firewall Settings for Machine Running Management Console
Open ports 1000 through 1009 for TCP.
Ports 1000 to 1009 are used by the management console to receive event response messages from
the information server.
The management console listens to port 1000 during startup. If this port is being used by another
program, the management console listens to ports 1001 through 1009 until it finds an available port.
Firewall Settings for Information Server
Open ports 5005 through 5014 for TCP.
Port 5005 is used to receive commands from the management console. Normally, port 5005 must be
opened. If this port is being used by another program, find an available port between ports 5006 and
5014 and open the firewall.
Open ports 3000 through 3009 for UDP.
Port 3000 is used to receive broadcast messages. If port 3000 is being used by another program, find
an available port between ports 3001 and 3009 and open the firewall.
9 Antivirus Solution Guide for Clustered Data ONTAP: Trend Micro © 2016 NetApp, Inc. All rights reserved.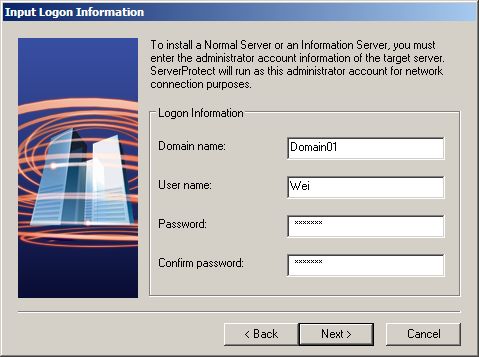
Open ports 137 through 139 for Remote Procedure Call (RPC) over named pipes:
137 (UDP)
138 (UDP)
139 (TCP)
Open port 3628 for TCP.
Port 3628 is used to receive event response messages.
Open port 1921 for SPX or TCP with NetWare.
Port 1921 is used to communicate with NetWare by using SPX or TCP.
Firewall Settings for Windows on Normal Server
Open port 5168 for listening to RPC over TCP/IP from the information server.
Port 5168 is used to receive commands from the information server.
Open ports 137 through 139 for named pipes:
137 (UDP)
138 (UDP)
139 (TCP)
4.3 Install ServerProtect for NetApp
ServerProtect for NetApp 5.8 is composed of three components. These components can be installed
either on one machine or on different machines. This procedure explains how to install the components
on one machine.
Note: For information about how to install the components separately, how to install them remotely, or
how to install them in silent mode, see the Getting Started Guide for ServerProtect for NetApp 5.8
SP1 that you downloaded with the installation package.
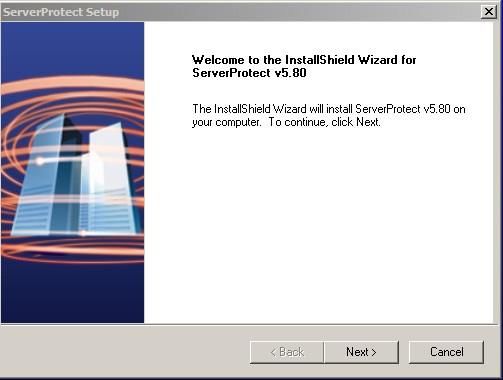
To install all ServerProtect for NetApp components on the same machine, complete the following steps:
Extract the ServerProtect for NetApp GM package that you downloaded to a temporary folder to start
the ServerProtect installation wizard.
On the Welcome page of the wizard, click Next.
10 Antivirus Solution Guide for Clustered Data ONTAP: Trend Micro © 2016 NetApp, Inc. All rights reserved.Read and accept the software license agreement. Click Yes.
ServerProtect checks the boot sector of the storage hardware for viruses. Click OK to continue.
11 Antivirus Solution Guide for Clustered Data ONTAP: Trend Micro © 2016 NetApp, Inc. All rights reserved.On the User Information page, provide your user information, including the product’s serial number.
Click Next.
Note: If you do not provide the serial number, the installation wizard installs a trial version of
ServerProtect. The trial license is valid for 30 days. If you enter an invalid serial number, the
wizard prompts you to reenter the correct serial number.
On the Select Components page, make the following selections and then click Next:
a. Select the checkboxes for the components that you want to install. Select all components that are
appropriate for the desired setup.
b. Select a destination folder. The default installation path is :\Program
Files\Trend\SProtect, but you can choose hidden shared storage devices, such as C$ or
D$, as destination folders.
12 Antivirus Solution Guide for Clustered Data ONTAP: Trend Micro © 2016 NetApp, Inc. All rights reserved.If you chose to install either a normal server or an information server, the next wizard page is the
Input Logon Information page. Enter the domain name, user name, and password of the administrator
account for the target server. Confirm the password and click Next.
13 Antivirus Solution Guide for Clustered Data ONTAP: Trend Micro © 2016 NetApp, Inc. All rights reserved.After you complete the installation, go to the desktop and double-click the shortcut to the
ServerProtect for NetApp management console. The information server and the normal server should
be listed in the management console window.
Note: The build number of the normal server is 1075.
4.4 Install ServerProtect for NetApp 5.8 SP1 Package
To install the ServerProtect for NetApp 5.8 SP1 package, complete the following steps:
If the management console is running, close it before you proceed with the ServerProtect for NetApp
5.8 SP1 installation.
Copy the ServerProtect for NetApp 5.8 SP 1 installation file that you previously downloaded to a
temporary folder.
Run the patch file.
Read the software license agreement:
If you disagree with the terms of the agreement, select I Do Not Agree with the Terms of the
Legal Agreement and click Cancel to cancel the installation.
Otherwise, select I Accept the Terms of the Legal Agreement and click Next.
The installation program opens the readme file. Read it carefully and click Install. The information
server deploys the patch to the normal servers 30 seconds after the installation is completed and then
restarts the ServerProtect services.
Go to the desktop and double-click the shortcut to the ServerProtect for NetApp management console.
The information server and the normal server should be listed in the management console window.
Note: The build number of the normal server should have changed from 1075 to the SP1 build
number. In this example, the SP1 build number is 1151.
14 Antivirus Solution Guide for Clustered Data ONTAP: Trend Micro © 2016 NetApp, Inc. All rights reserved.4.5 Configure ServerProtect for NetApp
A normal server can protect multiple clustered Data ONTAP antivirus shims at the same time. Use the
ServerProtect management console to add clustered Data ONTAP antivirus shims to a normal server.
Before you can add a clustered Data ONTAP antivirus shim to ServerProtect for NetApp, the prerequisite
in Table 2 must be in place.
Table 2) Prerequisite for adding a clustered Data ONTAP antivirus shim to ServerProtect.
Description
You have an account that is part of the list of privileged users in all clustered Data ONTAP systems that are
managed by the antivirus shim.
To add a clustered Data ONTAP antivirus shim to ServerProtect for NetApp, complete the following steps:
Open the management console.
Right-click a normal server and select Filer List on the domain browser tree.
In the Filer List dialog box, click Add.
In the Add Filer dialog box, specify the following information and then click OK:
a. From the Filer Mode drop-down list, select Cluster-Mode AVShim.
b. In the Domain Name box, type the name of the domain in which the clustered Data ONTAP
antivirus shim is located.
c. In the User Name and Password boxes, type your clustered Data ONTAP antivirus shim login
credentials.
15 Antivirus Solution Guide for Clustered Data ONTAP: Trend Micro © 2016 NetApp, Inc. All rights reserved.Best Practice
Install the clustered Data ONTAP antivirus shim on the same machine as the normal server. Ensure
that the antivirus shim and the clustered Data ONTAP storage system are correctly configured before
you add the antivirus shim to ServerProtect for NetApp. For more information about configuring the
antivirus shim and the clustered Data ONTAP system, see the Clustered Data ONTAP 8.2 Antivirus
Configuration Guide.
Note: If a clustered Data ONTAP antivirus shim manages multiple clustered Data ONTAP systems,
the login account must be one of the privileged users on all clustered Data ONTAP systems
that are managed by the antivirus shim. For more information, see the Clustered Data ONTAP
8.2 Antivirus Configuration Guide.
Click OK in the message that confirms that the antivirus shim was added successfully.
16 Antivirus Solution Guide for Clustered Data ONTAP: Trend Micro © 2016 NetApp, Inc. All rights reserved.Verify that the clustered Data ONTAP antivirus shim and the clustered Data ONTAP system that is
managed by the antivirus shim are listed in the Filer List dialog box.
Note: For more information about how to configure ServerProtect for NetApp, see the Getting
Started Guide for ServerProtect for NetApp 5.8 SP1 that you downloaded with the installation
package.
5 Installing and Configuring Antivirus Connector
To enable the antivirus engine to communicate with one or more SVMs, you must install Antivirus
Connector and configure it to connect to the SVMs.
5.1 Install Antivirus Connector
Before you can install Antivirus Connector, the prerequisites in Table 3 must be in place.
Table 3) Prerequisites for installing Antivirus Connector.
Description
You have downloaded the Antivirus Connector setup file from the NetApp Support site and saved it to a
directory on your hard drive.
You have verified that the requirements to install Antivirus Connector are met.
You have administrator privileges to install Antivirus Connector.
To install Antivirus Connector, complete the following steps:
Run the setup file for Antivirus Connector to start the installation wizard.
On the Welcome page of the wizard, click Next.
On the Destination Folder page, either keep the Antivirus Connector installation in the suggested
folder or click Change to install to a different folder. Click Next.
On the Data ONTAP AV Connector Windows Service Credentials page, enter your Windows service
credentials or click Add to select a user. Click Next.
Note: This user must be a valid domain user and must exist in the SVM’s scanner pool.
17 Antivirus Solution Guide for Clustered Data ONTAP: Trend Micro © 2016 NetApp, Inc. All rights reserved.Best Practices
You must add the credentials used as service accounts to run the Antivirus Connector service as
privileged users in the scanner pool.
The same service account must be used to run the antivirus engine service.
On the Ready to Install the Program page, click Back to make any changes to the settings or click
Install to begin the installation. A status box opens and charts the installation progress.
On the InstallShield Wizard Completed page, select the Configure ONTAP Management LIFs
checkbox if you want to continue with the configuration of the Data ONTAP management LIFs.
Best Practices
Credentials used for polling must have at least read access to the network interface.
For security purposes, consider using a separate user to poll the Data ONTAP management LIFs.
The preferred accounts are cluster admin and vsadmin.
Select the Show the Windows Installer Log checkbox if you want to view the installation logs.
Click Finish to end the installation and close the wizard. The Configure ONTAP Management LIFs for
Polling icon is saved on your desktop for you to configure the Data ONTAP management LIFs.
Important
By default, the ONTAP AV Connector service does not have logging enabled. To enable logging, add
the following two values to the Vscan server registry:
The TracePath string value (gives the local path to the logging file; for example,
c:\folder\avshim.log)
The TraceLevel DWORD value (controls the logging level; level 2 is verbose and 3 is debug)
You must add the registry values to one of the following locations:
HKLM\SOFTWARE\Wow6432Node\Data ONTAP\Clustered Data ONTAP Antivirus
Connector\v1.0
HKLM \SOFTWARE\Data ONTAP\Clustered Data ONTAP Antivirus Connector\v1.0
For more details, see the NetApp KB 2018449 article: Troubleshooting Workflow: Clustered Data
ONTAP Antivirus Connector (Offbox\Offboard AV).
5.2 Add SVMs to Antivirus Connector
To send files for virus scanning, you must configure Antivirus Connector to connect to one or more SVMs
by entering the Data ONTAP management LIF, the poll information, and the account credentials. The
management LIF is polled to retrieve the list of data LIFs. Before you can add SVMs to Antivirus
Connector, the prerequisites in Table 4 must be in place.
Table 4) Prerequisites for adding an SVM to Antivirus Connector.
Description
You have verified that the cluster management LIF or the IP address of the SVM is enabled for ontapi.
You have created a user with at least read-only access to the network interface command directory for
ontapi. For more information about creating a user, see the security login role create and
security login create man pages.
18 Antivirus Solution Guide for Clustered Data ONTAP: Trend Micro © 2016 NetApp, Inc. All rights reserved.Description
Note: You can also use the domain user as an account by adding an authentication tunnel SVM for an
administrative SVM. For more information, see the security login domain tunnel man page.
To add an SVM to Antivirus Connector, complete the following steps:
Right-click the Configure ONTAP Management LIFs for Polling icon, which was saved on your
desktop when you completed the Antivirus Connector installation. Select Run as Administrator.
In the Configure Data ONTAP Management LIFs for Polling dialog box, configure the following
settings:
a. Specify the management LIF of the SVM:
If you have an existing management LIF or IP address, enter the management LIF or IP address
of the SVM that you want to add.
If you want to create a management LIF, create one with the role set to data, the data protocol
set to none, and the firewall policy set to mgmt. For more information about creating a LIF, see
the Clustered Data ONTAP 8.2 Network Management Guide.
Note: You can also enter the cluster management LIF. If you specify the cluster management LIF,
all SVMs that are serving CIFS within that cluster can use the Vscan server.
b. Enter the poll duration in seconds.
Note: The poll duration is the frequency with which Antivirus Connector checks for changes to the
SVMs or to the cluster’s LIF configuration. The default poll interval is 60 seconds.
c. Enter the account name and password.
d. Click Test to verify connectivity and authenticate the connection.
e. Click Update to add the management LIF to the list of management LIFs to poll.
f. Click Save to save the connection to the registry.
g. Click Export if you want to export the list of connections to a registry import/export file.
Note: Exporting the list of connections to a file is useful if multiple Vscan servers use the same set
of management LIFs.
6 Configuring Vscan Options in Clustered Data ONTAP
After you set up the Vscan servers, you must configure scanner pools and on-access policies on the
storage system running clustered Data ONTAP. You must also configure the Vscan file-operations profile
parameter (-vscan-fileop-profile) before you enable virus scanning on an SVM.
Note: You must have completed the CIFS configuration before you begin to configure virus scanning.
6.1 Create Scanner Pool
You must create a scanner pool for an SVM or a cluster to define the list of Vscan servers and privileged
users that are allowed to access and connect to that SVM or cluster. Before you can configure a scanner
pool, the prerequisite in Table 5 must be in place.
Table 5) Prerequisite for configuring a scanner pool for SVMs.
Description
SVMs and Vscan servers must be in the same domain or in trusted domains.
19 Antivirus Solution Guide for Clustered Data ONTAP: Trend Micro © 2016 NetApp, Inc. All rights reserved.Scanner pools have the following characteristics and limits:
You can create a scanner pool for an individual SVM or for a cluster.
A scanner pool for a cluster is available to all SVMs within that cluster. However, you must apply the
scanner policy individually to each SVM within the cluster.
You can create a maximum of 20 scanner pools per SVM.
You can include a maximum of 100 Vscan servers and privileged users in a scanner pool.
Best Practices
Ensure that you have added all Vscan servers for serving the SVM to the scanner pool. NetApp
recommends having at least two servers per scanner pool. Having more than one Vscan server
improves fault tolerance and allows regular maintenance.
The number of Vscan servers to be connected per SVM depends on the size of the environment.
To enable multi-tenancy compliance in a secure multi-tenancy architecture, you must use different
privileged users for different SVMs.
Configure Scanner Pool for SVM
To configure a scanner pool for an SVM, complete the following step:
Run the vserver vscan scanner-pool create command.
This example shows how to create a scanner pool named SP1 on the SVM named vs1:
vserver vscan scanner-pool create -vserver vs1 -scanner-pool SP1 -servers 1.1.1.1,2.2.2.2 -
privileged-users cifs\u1,cifs\u2
Note: For information about the parameters that you can use with this command, see the Vserver
vscan scanner-pool create man page.
Configure One Scanner Pool for Use with Multiple SVMs
You can configure virus scanning to leverage the same pool of Vscan servers for all SVMs instead of
using a separate pool for each SVM.
NetApp recommends that you use the domain account for the Vscan servers as the privileged access
credentials in the scanner pool configuration. Using this account makes the configuration less complex
and easier to troubleshoot for authentication issues.
Cluster-Scoped Configuration
In a cluster-scoped configuration, the pool of Vscan servers is used for scanning all SVMs in the cluster.
To configure a cluster-scoped scanner pool, complete the following steps:
Create a scanner pool with the cluster scope.
vserver vscan scanner-pool create -vserver -scanner-pool -
servers -privileged-users
Configure Antivirus Connector with the cluster management LIF.
Apply a scanner policy to the scanner pool, enable the on-access policy, and enable virus scanning
for each SVM.
SVM-Scoped Configuration
In an SVM-scoped configuration, the pool of Vscan servers is used for scanning specific SVMs in the
cluster. To configure an SVM-scoped scanner pool, complete the following steps:
20 Antivirus Solution Guide for Clustered Data ONTAP: Trend Micro © 2016 NetApp, Inc. All rights reserved.Create a scanner pool with the SVM scope. Create the same configuration on all SVMs.
vserver vscan scanner-pool create -vserver -scanner-pool -
servers -privileged-users
Configure Antivirus Connector with the SVM management LIF or the data LIF.
Apply a scanner policy to the scanner pool, enable the on-access policy, and enable virus scanning
for each SVM.
Note: Due to the trust relationship between domains, the authentication request is sent to the
corresponding domain.
6.2 Apply Scanner Policy to Scanner Pool
You must apply a scanner policy to every scanner pool defined on an SVM. The scanner policy defines
when the scanner pool is active. A Vscan server is allowed to connect to the SVM only if the IP address
and privileged user of the Vscan server are part of the active scanner pool list for that SVM.
You can apply only one scanner policy per scanner pool at a time. By default, the scanner policy has the
value idle. Scanner policies can have two other values, primary and secondary. The primary policy
always takes effect, whereas the secondary policy takes effect only if the primary policy fails.
Best Practice
Verify that you applied a primary policy to a primary scanner pool and a secondary policy to the backup
scanner pool.
To apply a scanner policy to a scanner pool, complete the following step:
Run the vserver vscan scanner-pool apply-policy command.
This example shows how to apply the scanner policy named primary to a scanner pool named SP1
on the SVM named vs1:
vserver vscan scanner-pool apply-policy -vserver vs1 -scanner-pool SP1 -scanner-policy primary
Note: For information about the parameters that you can use with this command, see the vserver
vscan scanner-pool apply-policy man page.
6.3 Create Vscan Policy
A Vscan policy needs to be created to define the purview under which the Vscan acts. There are two
ways in which Vscan can be used. These define the policies of Vscan.
On-access policy
On-demand policy
On-Access Policy
You must create an on-access policy for an SVM or for a cluster to define the scope of virus scanning. In
the policy, you can specify the maximum file size for files to be considered for scanning and the file
extensions and file paths to exclude from scanning:
By default, clustered Data ONTAP creates an on-access policy named default_CIFS and enables
it for all existing SVMs. You can use the default_CIFS on-access policy or create a customized on-
access policy.
You can create an on-access policy for an individual SVM or for a cluster. The on-access policy for
the cluster is available to all SVMs within that cluster. However, you must enable the on-access policy
individually on each SVM within the cluster.
21 Antivirus Solution Guide for Clustered Data ONTAP: Trend Micro © 2016 NetApp, Inc. All rights reserved. You can create a maximum of 10 on-access policies per SVM. However, you can enable only one on-
access policy at a time.
You can exclude a maximum of 100 paths and file extensions from virus scanning in one on-access
policy.
Best Practices
Consider excluding large files (file size can be specified) from virus scanning because they might
result in a slow response or a scan request timeout for CIFS users. The default file size for
exclusion is 2GB.
Consider excluding file extensions such as .vhd and .tmp because files with these extensions
might not be appropriate for scanning.
Consider excluding file paths such as the quarantine directory or paths in which only virtual hard
drives or databases are stored.
Verify that all exclusions are specified in the same policy, because only one policy can be enabled
at a time. NetApp highly recommends that you specify the same set of exclusions on the antivirus
engine. For more information about supported exclusions, contact Trend Micro.
Create On-Access Policy
To create an on-access policy, complete the following step:
Run the vserver vscan on-access-policy create command.
This example shows how to create an on-access policy named Policy1 on the SVM named vs1:
vserver vscan on-access-policy create -vserver vs1 -policy-namePolicy1 -protocol CIFS -filters
scan-ro-volume -max-file-size 3GB -file-ext-to-exclude "mp3","txt" -paths-to-exclude "\vol\a
b\","\vol\a,b\"
Note: By default, the scan-mandatory filter is enabled if other filters are not specified. Use double
quotes ("" or "-") to disable filters. For information about the parameters that you can use with
the vserver vscan on-access-policy create command, see the command’s man
page.
Enable On-Access Policy
After you create an on-access scan policy, you must enable it for an SVM. You can enable only one on-
access policy of a specified protocol for each SVM at a time.
To enable an on-access policy for the SVM, complete the following step:
Run the vserver vscan on-access-policy enable command.
This example shows how to enable an on-access policy named Policy1 on the SVM named vs1:
vserver vscan on-access-policy enable -vserver vs1 -policy-name Policy1
Note: For information about the parameters that you can use with this command, see the vserver
vscan on-access-policy enable man page.
On-Demand Policy
To run an on-demand scan, you must create and schedule an on-demand task. There are parameters
that needs to be defined when creating an on-demand task such as task name, maximum file size for files
to be considered for scanning, file extensions, file paths to exclude from scanning and so on.
An on-demand task needs be created for individual SVMs
A maximum of 10 on-demand tasks can be created for each SVM, but only one can be scheduled or
run at a time
22 Antivirus Solution Guide for Clustered Data ONTAP: Trend Micro © 2016 NetApp, Inc. All rights reserved. An on-demand task creates a report, which has information regarding the statistics related to the
scans. This report can be accessed by either using a command (specified later in this document) or
by downloading the report file created by the task at the location defined.
Create On-Demand Task
To create an on-demand task, complete the following step.
Run the vscan on-demand-task create command.
The following example shows how to create an on-demand task:
vscan on-demand-task create -vserver -task-name -scan-paths
/vol1,/vol2 -report-path -request-timeout -cross-junction
true –directory-recursion true -scan-priority normal -paths-to-exclude -file-ext-to-
exclude -max-file-size 10GB
Table 6 describes the parameters used in the command.
Table 6) On-demand task parameters.
Parameter Description
vserver The Vserver on which the on-demand scanning is configured. On a secure
multi-tenant environment, vserver implicitly points to the Vserver on which
Vserver admin is working. This attribute defines the scope of scanning.
task-name The name of the on-demand task.
scan-paths A list of paths of the files or directory that need to be scanned. The path
must be provided in UNIX format and from the root of the Vserver.
report-directory The path to the directory where the report file is created. The path must be
provided in UNIX format and from the root of the Vserver.
schedule The schedule according to which the on-demand task should be run. The
schedule can be created from set of commands in the job schedule
directory.
max-file-size The maximum file size for scanning. If a value is not provided, all files,
irrespective of their sizes, are considered for scanning.
paths-to-exclude A comma-separated list of paths to exclude from the scan.
file-ext-to-exclude A comma-separated list of file extensions to exclude from the scan. This can
also contain regular expression such ass ? and *.
file-ext-to-include A comma-separated list of file extensions to include in the scan. This can
also contain regular expression such as ? and *. The default value is *.
scan-files-with-no-ext Specifies whether a file without an extension need to be scanned or not.
request-timeout The total request service time limit in seconds.
cross-junction Specifies whether the on-demand task is allowed to cross volume junctions.
If the parameter is set to false, crossing junctions is not allowed. The
default value is true.
directory-recursion Determines whether the on-demand task is allowed to recursively scan
through subdirectories. If the parameter is set to false, recursive scanning is
not allowed. The default value is true.
scan-priority The priority of the on-demand scan requests generated by this task.
report-log-level The verbosity of the report file.
23 Antivirus Solution Guide for Clustered Data ONTAP: Trend Micro © 2016 NetApp, Inc. All rights reserved.Run an On-Demand Task
After an on-demand task is created, it can be run immediately or you can wait for the task to run
according to the schedule.
To run the task at any given point, run the following command:
vscan on-demand-task run -vserver -task-name
For more details on on-demand task, see section “ Manage On-Demand Task.”
6.4 Enable Virus Scanning on SVM
After you configure the scanner pool, the on-access policy, and the Vscan file-operations profile
parameter, you must enable virus scanning on the SVM to protect the data. When virus scanning is
enabled on the SVM, the SVM connects to the Vscan servers that are listed in the active scanner pool for
that SVM. Before you can enable virus scanning on the SVM, the prerequisites in Table 7 must be in
place.
Table 7) Prerequisites for enabling virus scanning on the SVM.
Description
You have created one or more scanner pools and applied a scanner policy to them.
You have created an on-access policy and enabled it on the SVM.
You have configured the Vscan file-operations profile parameter.
You have verified that the Vscan servers are available.
To enable virus scanning on the SVM, complete the following step:
Run the vserver vscan enable command.
This example shows how to enable virus scanning on the SVM named vs1:
vserver vscan enable -vserver vs1
Note: For information about the parameters that you can use with this command, see the vserver
vscan enable man page.
7 Managing Vscan Options in Clustered Data ONTAP
7.1 Modify Vscan File-Operations Profile for CIFS Share
When you create a CIFS share, you must configure the -vscan-fileop-profile parameter to specify
which operations performed on the CIFS share can trigger virus scanning. By default, the parameter is
set to standard. You can use the default value or change it by running the vserver cifs share
modify command. Before you can modify the Vscan file-operations profile for a CIFS share, the
prerequisite in Table 8 must be in place.
Table 8) Prerequisite for modifying the Vscan file-operations profile.
Description
You have created a CIFS share.
Note: Virus scanning is not performed on CIFS shares for which the -continuously-available
parameter is set to Yes.
24 Antivirus Solution Guide for Clustered Data ONTAP: Trend Micro © 2016 NetApp, Inc. All rights reserved.Table 9 lists the file-operations profile types and the file operations that they monitor.
Table 9) Types of file-operations profiles.
Profile Type File Operations That Trigger Scanning
no_scan None
standard Open, close, and rename
strict Open, read, close, and rename
writes_only Close (only for newly created or modified files)
Best Practices
Use the default, standard profile.
To further restrict scanning options, use the strict profile. However, using this profile generates
more scan requests and affects performance.
To maximize performance with liberal scanning, use the writes_only profile. This profile scans
only the files that have been modified and closed.
To modify the value of the -vscan-fileop-profile parameter, complete the following step:
Run the vserver cifs share modify command.
Note: For more information about modifying the CIFS shares, see the Clustered Data ONTAP 8.2
File Access Management Guide for CIFS.
7.2 Manage Scanner Pools
You can manage scanner pools to view the scanner pool information and modify the Vscan servers and
privileged users that are associated with the scanner pool. You can also modify the request and response
timeout period and delete a scanner pool if it is no longer required.
View Scanner Pools of SVMs
To view information about all scanner pools belonging to all SVMs or about one scanner pool that
belongs to a specific SVM, complete the following step:
Run the vserver vscan scanner-pool show command.
These examples show how to view the list of scanner pools of all SVMs and a scanner pool of a
specific SVM:
Cluster::> vserver vscan scanner-pool show
Scanner Pool Privileged Scanner
Vserver Pool Owner Servers Users Policy
-------------------------------------------------------------
vs1 new vserver 1.1.1.1, 2.2.2.2 cifs\u5 idle
vs1 p1 vserver 3.3.3.3 cifs\u1 primary
cifs\u2
2 entries were displayed.
Cluster::> vserver vscan scanner-pool show -vserver vs1 -scannerpool
new
Vserver: vs1
Scanner Pool: new
Applied Policy: idle
Current Status: off
Scanner Pool Config Owner: vserver
List of IPs of Allowed Vscan Servers: 1.1.1.1, 2.2.2.2
25 Antivirus Solution Guide for Clustered Data ONTAP: Trend Micro © 2016 NetApp, Inc. All rights reserved.List of Privileged Users: cifs\u5
Note: For information about the parameters that you can use with this command, see the vserver
vscan scanner-pool show man page.
View Active Scanner Pools of SVMs
You can view the list of active scanner pools belonging to all SVMs. The list of active scanner pools is
derived by merging the information about the active scanner pools on all SVMs.
To view the list of active scanner pools of all SVMs, complete the following step:
Run the vserver vscan scanner-pool show-active command.
Note: For information about the parameters that you can use with this command, see the vserver
vscan scanner-pool show-active man page.
Modify Scanner Pool
You can update the scanner pool information to modify the list of Vscan servers and privileged users that
can connect to the SVM and the request and response timeout period.
To modify the scanner pool information, complete the following step:
Run the vserver vscan scanner-pool modify command.
Note: For information about the parameters that you can use with this command, see the vserver
vscan scanner-pool modify man page.
Delete Scanner Pool
If you no longer need an unused scanner pool, you can delete it. To delete a scanner pool, complete the
following step:
Run the vserver vscan scanner-pool delete command.
Note: For information about the parameters that you can use with this command, see the vserver
vscan scanner-pool delete man page.
Add Privileged Users to Scanner Pool
You can add one or more privileged users to a scanner pool to define the privileged users who can
connect to an SVM. Before you can add any users to the scanner pool, the prerequisite in Table 10 must
be in place.
Table 10) Prerequisite for adding privileged users to a scanner pool.
Description
You have created a scanner pool for the SVM.
To add one or more privileged users to a scanner pool, complete the following step:
Run the vserver vscan scanner-pool privileged-users add command.
This example shows how to add the privileged users named cifs\u2 and cifs\u3 to a scanner
pool named SP1 on the SVM named vs1:
vserver vscan scanner-pool privileged-users add -vserver vs1 -scannerpoolSP1 -privileged-users
cifs\u2,cifs\u3
Note: For information about the parameters that you can use with this command, see the vserver
vscan scanner-pool privileged-users add man page.
26 Antivirus Solution Guide for Clustered Data ONTAP: Trend Micro © 2016 NetApp, Inc. All rights reserved.Remove Privileged Users from Scanner Pool
If you no longer require privileged users, you can remove them from the scanner pool. To remove one or
more privileged users from a scanner pool, complete the following step:
Run the vserver vscan scanner-pool privileged-users remove command.
Note: For information about the parameters that you can use with this command, see the vserver
vscan scanner-pool privileged-users remove man page.
View Privileged Users of All Scanner Pools
To view the list of privileged users of all scanner pools, complete the following step:
Run the vserver vscan scanner-pool privileged-users show command.
Note: For information about the parameters that you can use with this command, see the vserver
vscan scanner-pool privileged-users show man page.
Add Vscan Servers to Scanner Pool
You can add one or more Vscan servers to a scanner pool to define the Vscan servers that can connect
to an SVM. Before you can add Vscan servers to the scanner pool, the prerequisite in Table 11 must be
in place.
Table 11) Prerequisite for adding Vscan servers to a scanner pool.
Description
You have created a scanner pool for the SVM.
To add one or more Vscan servers to a scanner pool, complete the following step:
Run the vserver vscan scanner-pool servers add command.
This example shows how to add a list of Vscan servers to a scanner pool named SP1 on the SVM
named vs1:
vserver vscan scanner-pool servers add -vserver vs1 -scanner-pool SP1 -servers
10.10.10.10,11.11.11.11
Note: For information about the parameters that you can use with this command, see the vserver
vscan scanner-pool servers add man page.
Remove Vscan Servers from Scanner Pool
If you no longer require a Vscan server, you can remove it from the scanner pool. To remove one or more
Vscan servers from a scanner pool, complete the following step:
Run the vserver vscan scanner-pool servers remove command.
Note: For information about the parameters that you can use with this command, see the vserver
vscan scanner-pool servers remove man page.
View Vscan Servers of All Scanner Pools
You can view the list of Vscan servers of all scanner pools to manage the Vscan server connections. To
view the Vscan servers of all scanner pools, complete the following step:
Run the vserver vscan scanner-pool servers show command.
Note: For information about the parameters that you can use with this command, see the vserver
vscan scanner-pool servers show man page.
27 Antivirus Solution Guide for Clustered Data ONTAP: Trend Micro © 2016 NetApp, Inc. All rights reserved.7.3 Manage On-Access Policies
You can manage on-access policies to define the scope of scanning when files are accessed by a client.
You can modify the maximum file size that is allowed for virus scanning and the file extensions and file
paths to be excluded from scanning. You can also delete and disable an on-access policy if it is no longer
required.
View On-Access Policies of SVMs
You can view information about all on-access policies belonging to all SVMs or one on-access policy
belonging to one SVM to manage on-access policies. To view on-access policies, complete the following
step:
Run the vserver vscan on-access-policy show command.
These examples show how to view the list of on-access policies of all SVMs and the on-access policy
of one SVM:
Cluster::> vserver vscan on-access-policy show
Policy Policy File-Ext Policy
Vserver Name Owner Protocol Paths Excluded Excluded Status
-------------------------------------------------------------------
Cluster default_ cluster CIFS - - off
CIFS
vs1 default_ cluster CIFS - - on
CIFS
vs1 new vserver CIFS \vol\temp txt off
vs2 default_ cluster CIFS - - on
CIFS
4 entries were displayed.
Cluster::> vserver vscan on-access-policy show -instance -vserver
vs1 -policyname new
Vserver: vs1
Policy: new
Policy Status: off
Policy Config Owner: vserver
File-Access Protocol: CIFS
Filters: scan-ro-volume
Max File Size Allowed for Scanning: 4GB
File-Paths Not to Scan: \vol\temp
File-Extensions Not to Scan: txt
Note: For information about the parameters that you can use with this command, see the vserver
vscan on-access-policy show man page.
Modify On-Access Policy
You can modify an on-access policy to redefine the scope of scanning when files are accessed by a
client. You can also modify the maximum file size for files to be considered for virus scanning and the file
extensions and paths to be excluded from scanning.
To modify an on-access policy, complete the following step:
Run the vserver vscan on-access-policy modify command.
Note: For information about the parameters that you can use with this command, see the vserver
vscan on-access-policy modify man page.
Disable On-Access Policy
To disable an on-access policy for an SVM, complete the following step:
Run the vserver vscan on-access-policy disable command.
28 Antivirus Solution Guide for Clustered Data ONTAP: Trend Micro © 2016 NetApp, Inc. All rights reserved.You can also read