Avid Maestro | Virtual Set - User Guide Version 2019.2
←
→
Page content transcription
If your browser does not render page correctly, please read the page content below
Avid® Maestro | Virtual Set
                     User Guide
                  Version 2019.2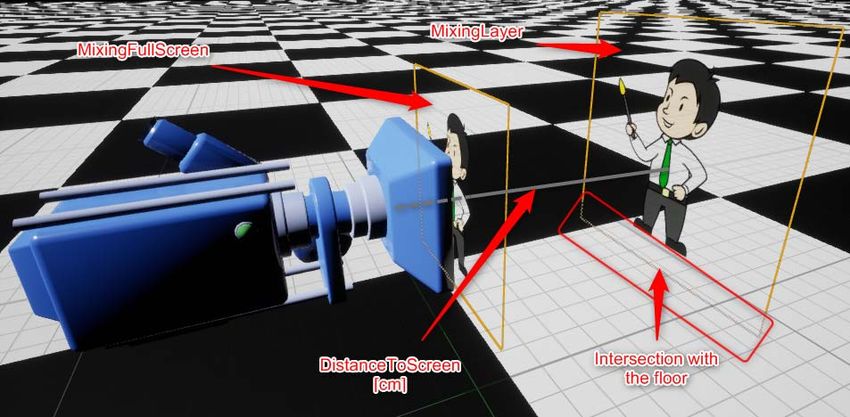
Legal Notices
Product specifications are subject to change without notice and do not represent a commitment on the part of Avid Technology, Inc.
This product is subject to the terms and conditions of a software license agreement provided with the software. The product may only be used in
accordance with the license agreement.
This product may be protected by one or more U.S. and non-U.S patents. Details are available at www.avid.com/patents.
This document is protected under copyright law. An authorized licensee of may reproduce this publication for the licensee’s own use in learning how to
use the software. This document may not be reproduced or distributed, in whole or in part, for commercial purposes, such as selling copies of this
document or providing support or educational services to others. This document is supplied as a guide for . Reasonable care has been taken in preparing
the information it contains. However, this document may contain omissions, technical inaccuracies, or typographical errors. Avid Technology, Inc. does
not accept responsibility of any kind for customers’ losses due to the use of this document. Product specifications are subject to change without notice.
Copyright © 2018 Avid Technology, Inc. and its licensors. All rights reserved.
The following disclaimer is required by Epic Games, Inc.:
Unreal® is a trademark or registered trademark of Epic Games, Inc. in the United States of America and elsewhere.
Unreal® Engine, Copyright 1998 - 2018 Epic Games, Inc. All rights reserved."
The following disclaimer is required by Apple Computer, Inc.:
APPLE COMPUTER, INC. MAKES NO WARRANTIES WHATSOEVER, EITHER EXPRESS OR IMPLIED, REGARDING THIS PRODUCT,
INCLUDING WARRANTIES WITH RESPECT TO ITS MERCHANTABILITY OR ITS FITNESS FOR ANY PARTICULAR PURPOSE. THE
EXCLUSION OF IMPLIED WARRANTIES IS NOT PERMITTED BY SOME STATES. THE ABOVE EXCLUSION MAY NOT APPLY TO YOU.
THIS WARRANTY PROVIDES YOU WITH SPECIFIC LEGAL RIGHTS. THERE MAY BE OTHER RIGHTS THAT YOU MAY HAVE WHICH
VARY FROM STATE TO STATE.
The following disclaimer is required by Sam Leffler and Silicon Graphics, Inc. for the use of their TIFF library:
Copyright © 1988–1997 Sam Leffler
Copyright © 1991–1997 Silicon Graphics, Inc.
Permission to use, copy, modify, distribute, and sell this software [i.e., the TIFF library] and its documentation for any purpose is hereby granted
without fee, provided that (i) the above copyright notices and this permission notice appear in all copies of the software and related documentation, and
(ii) the names of Sam Leffler and Silicon Graphics may not be used in any advertising or publicity relating to the software without the specific, prior
written permission of Sam Leffler and Silicon Graphics.
THE SOFTWARE IS PROVIDED “AS-IS” AND WITHOUT WARRANTY OF ANY KIND, EXPRESS, IMPLIED OR OTHERWISE, INCLUDING
WITHOUT LIMITATION, ANY WARRANTY OF MERCHANTABILITY OR FITNESS FOR A PARTICULAR PURPOSE.
IN NO EVENT SHALL SAM LEFFLER OR SILICON GRAPHICS BE LIABLE FOR ANY SPECIAL, INCIDENTAL, INDIRECT OR
CONSEQUENTIAL DAMAGES OF ANY KIND, OR ANY DAMAGES WHATSOEVER RESULTING FROM LOSS OF USE, DATA OR
PROFITS, WHETHER OR NOT ADVISED OF THE POSSIBILITY OF DAMAGE, AND ON ANY THEORY OF LIABILITY, ARISING OUT OF
OR IN CONNECTION WITH THE USE OR PERFORMANCE OF THIS SOFTWARE.
The following disclaimer is required by the Independent JPEG Group:
This software is based in part on the work of the Independent JPEG Group.
This Software may contain components licensed under the following conditions:
Copyright (c) 1989 The Regents of the University of California. All rights reserved.
Redistribution and use in source and binary forms are permitted provided that the above copyright notice and this paragraph are duplicated in all such
forms and that any documentation, advertising materials, and other materials related to such distribution and use acknowledge that the software was
developed by the University of California, Berkeley. The name of the University may not be used to endorse or promote products derived from this
software without specific prior written permission. THIS SOFTWARE IS PROVIDED ``AS IS'' AND WITHOUT ANY EXPRESS OR IMPLIED
WARRANTIES, INCLUDING, WITHOUT LIMITATION, THE IMPLIED WARRANTIES OF MERCHANTABILITY AND FITNESS FOR A
PARTICULAR PURPOSE.
Copyright (C) 1989, 1991 by Jef Poskanzer.
Permission to use, copy, modify, and distribute this software and its documentation for any purpose and without fee is hereby granted, provided that the
above copyright notice appear in all copies and that both that copyright notice and this permission notice appear in supporting documentation. This
software is provided "as is" without express or implied warranty.
Copyright 1995, Trinity College Computing Center. Written by David Chappell.
Permission to use, copy, modify, and distribute this software and its documentation for any purpose and without fee is hereby granted, provided that the
above copyright notice appear in all copies and that both that copyright notice and this permission notice appear in supporting documentation. This
software is provided "as is" without express or implied warranty.
Copyright 1996 Daniel Dardailler.
Permission to use, copy, modify, distribute, and sell this software for any purpose is hereby granted without fee, provided that the above copyright
notice appear in all copies and that both that copyright notice and this permission notice appear in supporting documentation, and that the name of
Daniel Dardailler not be used in advertising or publicity pertaining to distribution of the software without specific, written prior permission. Daniel
Dardailler makes no representations about the suitability of this software for any purpose. It is provided "as is" without express or implied warranty.
Modifications Copyright 1999 Matt Koss, under the same license as above.
2
Copyright (c) 1991 by AT&T.

Permission to use, copy, modify, and distribute this software for any purpose without fee is hereby granted, provided that this entire notice is included in
all copies of any software which is or includes a copy or modification of this software and in all copies of the supporting documentation for such
software.

THIS SOFTWARE IS BEING PROVIDED "AS IS", WITHOUT ANY EXPRESS OR IMPLIED WARRANTY. IN PARTICULAR, NEITHER THE
AUTHOR NOR AT&T MAKES ANY REPRESENTATION OR WARRANTY OF ANY KIND CONCERNING THE MERCHANTABILITY OF
THIS SOFTWARE OR ITS FITNESS FOR ANY PARTICULAR PURPOSE.

This product includes software developed by the University of California, Berkeley and its contributors.

The following disclaimer is required by Nexidia Inc.:
© 2010 Nexidia Inc. All rights reserved, worldwide. Nexidia and the Nexidia logo are trademarks of Nexidia Inc. All other trademarks are the property
of their respective owners. All Nexidia materials regardless of form, including without limitation, software applications, documentation and any other
information relating to Nexidia Inc., and its products and services are the exclusive property of Nexidia Inc. or its licensors. The Nexidia products and
services described in these materials may be covered by Nexidia's United States patents: 7,231,351; 7,263,484; 7,313,521; 7,324,939; 7,406,415,
7,475,065; 7,487,086 and/or other patents pending and may be manufactured under license from the Georgia Tech Research Corporation USA.

The following disclaimer is required by Paradigm Matrix:
Portions of this software licensed from Paradigm Matrix.

The following disclaimer is required by Ray Sauers Associates, Inc.:
“Install-It” is licensed from Ray Sauers Associates, Inc. End-User is prohibited from taking any action to derive a source code equivalent of “Install-It,”
including by reverse assembly or reverse compilation, Ray Sauers Associates, Inc. shall in no event be liable for any damages resulting from reseller’s
failure to perform reseller’s obligation; or any damages arising from use or operation of reseller’s products or the software; or any other damages,
including but not limited to, incidental, direct, indirect, special or consequential Damages including lost profits, or damages resulting from loss of use or
inability to use reseller’s products or the software for any reason including copyright or patent infringement, or lost data, even if Ray Sauers Associates
has been advised, knew or should have known of the possibility of such damages.

The following disclaimer is required by Videomedia, Inc.:
“Videomedia, Inc. makes no warranties whatsoever, either express or implied, regarding this product, including warranties with respect to its
merchantability or its fitness for any particular purpose.”

“This software contains V-LAN ver. 3.0 Command Protocols which communicate with V-LAN ver. 3.0 products developed by Videomedia, Inc. and V-
LAN ver. 3.0 compatible products developed by third parties under license from Videomedia, Inc. Use of this software will allow “frame accurate”
editing control of applicable videotape recorder decks, videodisc recorders/players and the like.”

The following disclaimer is required by Altura Software, Inc. for the use of its Mac2Win software and Sample Source Code:
©1993–1998 Altura Software, Inc.

The following disclaimer is required by Ultimatte Corporation:
Certain real-time compositing capabilities are provided under a license of such technology from Ultimatte Corporation and are subject to copyright
protection.

The following disclaimer is required by 3Prong.com Inc.:
Certain waveform and vector monitoring capabilities are provided under a license from 3Prong.com Inc.

The following disclaimer is required by Interplay Entertainment Corp.:
The “Interplay” name is used with the permission of Interplay Entertainment Corp., which bears no responsibility for Avid products.

This product includes portions of the Alloy Look & Feel software from Incors GmbH.

This product includes software developed by the Apache Software Foundation (http://www.apache.org/).

© DevelopMentor

This product may include the JCifs library, for which the following notice applies:
JCifs © Copyright 2004, The JCIFS Project, is licensed under LGPL (http://jcifs.samba.org/). See the LGPL.txt file in the Third Party Software
directory on the installation CD.

Avid Interplay contains components licensed from LavanTech. These components may only be used as part of and in connection with Avid Interplay.

This product includes the Warlib library, for which the following notice applies:
Copyright Jarle (jgaa) Aase 2000 - 2009

COPYRIGHT file which is included in the distribution:

warlib is copyright Jarle (jgaa) Aase 2000 - 2009

The warlib C++ Library is free software; you can redistribute it and/or modify it under the terms of the GNU Lesser General Public License as
published by the Free Software Foundation; either version 3.0 of the License, or (at your option) any later version.

The warlib C++ Library is distributed in the hope that it will be useful, but WITHOUT ANY WARRANTY; without even the implied warranty of
MERCHANTABILITY or FITNESS FOR A PARTICULAR PURPOSE. See the GNU Lesser General Public License for more details.

Portions copyright © 2012 Avid Technology, Inc.

                                                                            3
Attn. Government User(s). Restricted Rights Legend
U.S. GOVERNMENT RESTRICTED RIGHTS. This Software and its documentation are “commercial computer software” or “commercial computer
software documentation.” In the event that such Software or documentation is acquired by or on behalf of a unit or agency of the U.S. Government, all
rights with respect to this Software and documentation are subject to the terms of the License Agreement, pursuant to FAR §12.212(a) and/or DFARS
§227.7202-1(a), as applicable.
Trademarks
003, 192 Digital I/O, 192 I/O, 96 I/O, 96i I/O, Adrenaline, AirSpeed, ALEX, Alienbrain, AME, AniMatte, Archive, Archive II, Assistant Station,
AudioPages, AudioStation, AutoLoop, AutoSync, Avid, Avid Active, Avid Advanced Response, Avid DNA, Avid DNxcel, Avid DNxHD, Avid DS
Assist Station, Avid Ignite, Avid Liquid, Avid Media Engine, Avid Media Processor, Avid MEDIArray, Avid Mojo, Avid Remote Response, Avid Unity,
Avid Unity ISIS, Avid VideoRAID, AvidRAID, AvidShare, AVIDstripe, AVX, Beat Detective, Beauty Without The Bandwidth, Beyond Reality, BF
Essentials, Bomb Factory, Bruno, C|24, CaptureManager, ChromaCurve, ChromaWheel, Cineractive Engine, Cineractive Player, Cineractive Viewer,
Color Conductor, Command|24, Command|8, Control|24, Cosmonaut Voice, CountDown, d2, d3, DAE, D-Command, D-Control, Deko, DekoCast, D-
Fi, D-fx, Digi 002, Digi 003, DigiBase, Digidesign, Digidesign Audio Engine, Digidesign Development Partners, Digidesign Intelligent Noise
Reduction, Digidesign TDM Bus, DigiLink, DigiMeter, DigiPanner, DigiProNet, DigiRack, DigiSerial, DigiSnake, DigiSystem, Digital Choreography,
Digital Nonlinear Accelerator, DigiTest, DigiTranslator, DigiWear, DINR, DNxchange, Do More, DPP-1, D-Show, DSP Manager, DS-StorageCalc, DV
Toolkit, DVD Complete, D-Verb, Eleven, EM, Euphonix, EUCON, EveryPhase, Expander, ExpertRender, Fader Pack, Fairchild, FastBreak, Fast Track,
Film Cutter, FilmScribe, Flexevent, FluidMotion, Frame Chase, FXDeko, HD Core, HD Process, HDpack, Home-to-Hollywood, HYBRID,
HyperSPACE, HyperSPACE HDCAM, iKnowledge, Image Independence, Impact, Improv, iNEWS, iNEWS Assign, iNEWS ControlAir, InGame,
Instantwrite, Instinct, Intelligent Content Management, Intelligent Digital Actor Technology, IntelliRender, Intelli-Sat, Intelli-sat Broadcasting
Recording Manager, InterFX, Interplay, inTONE, Intraframe, iS Expander, iS9, iS18, iS23, iS36, ISIS, IsoSync, LaunchPad, LeaderPlus, LFX,
Lightning, Link & Sync, ListSync, LKT-200, Lo-Fi, MachineControl, Magic Mask, Make Anything Hollywood, make manage move | media, Marquee,
MassivePack, Massive Pack Pro, Maxim, Mbox, Media Composer, MediaFlow, MediaLog, MediaMix, Media Reader, Media Recorder, MEDIArray,
MediaServer, MediaShare, MetaFuze, MetaSync, MIDI I/O, Mix Rack, Moviestar, MultiShell, NaturalMatch, NewsCutter, NewsView, NewsVision,
Nitris, NL3D, NLP, NSDOS, NSWIN, OMF, OMF Interchange, OMM, OnDVD, Open Media Framework, Open Media Management, Painterly
Effects, Palladium, Personal Q, PET, Podcast Factory, PowerSwap, PRE, ProControl, ProEncode, Profiler, Pro Tools, Pro Tools|HD, Pro Tools LE, Pro
Tools M-Powered, Pro Transfer, QuickPunch, QuietDrive, Realtime Motion Synthesis, Recti-Fi, Reel Tape Delay, Reel Tape Flanger, Reel Tape
Saturation, Reprise, Res Rocket Surfer, Reso, RetroLoop, Reverb One, ReVibe, Revolution, rS9, rS18, RTAS, Salesview, Sci-Fi, Scorch, ScriptSync,
SecureProductionEnvironment, Serv|GT, Serv|LT, Shape-to-Shape, ShuttleCase, Sibelius, SimulPlay, SimulRecord, Slightly Rude Compressor,
Smack!, Soft SampleCell, Soft-Clip Limiter, SoundReplacer, SPACE, SPACEShift, SpectraGraph, SpectraMatte, SteadyGlide, Streamfactory,
Streamgenie, StreamRAID, SubCap, Sundance, Sundance Digital, SurroundScope, Symphony, SYNC HD, SYNC I/O, Synchronic, SynchroScope,
Syntax, TDM FlexCable, TechFlix, Tel-Ray, Thunder, TimeLiner, Titansync, Titan, TL Aggro, TL AutoPan, TL Drum Rehab, TL Everyphase, TL
Fauxlder, TL In Tune, TL MasterMeter, TL Metro, TL Space, TL Utilities, tools for storytellers, Transit, TransJammer, Trillium Lane Labs, TruTouch,
UnityRAID, Vari-Fi, Video the Web Way, VideoRAID, VideoSPACE, VTEM, Work-N-Play, Xdeck, X-Form, Xmon and XPAND! are either registered
trademarks or trademarks of Avid Technology, Inc. in the United States and/or other countries.
Footage
Arizona Images — KNTV Production — Courtesy of Granite Broadcasting, Inc.,
Editor/Producer Bryan Foote.
Canyonlands — Courtesy of the National Park Service/Department of the Interior.
Ice Island — Courtesy of Kurtis Productions, Ltd.
Tornados + Belle Isle footage — Courtesy of KWTV News 9.
WCAU Fire Story — Courtesy of NBC-10, Philadelphia, PA.
Women in Sports – Paragliding — Courtesy of Legendary Entertainment, Inc.
News material provided by WFTV Television Inc.
Avid Maestro | Virtual Set User Guide v2019.2 • Created 2/4/19 • This document is distributed by Avid in online (electronic) form
only, and is not available for purchase in printed form.
4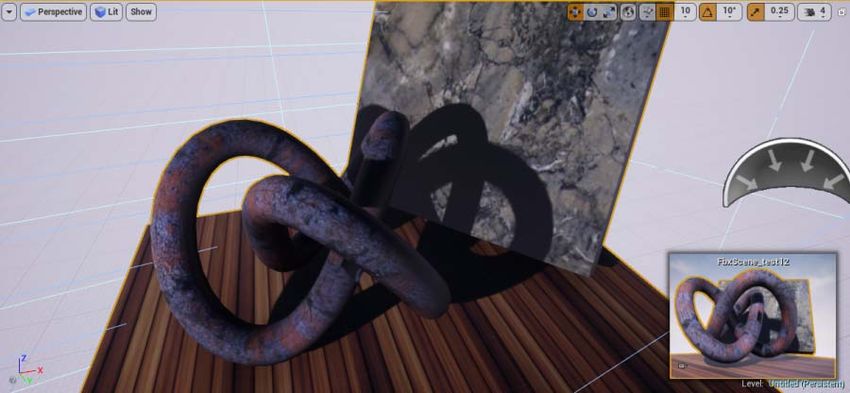
Contents

            Symbols and Conventions . . . . . . . . . . . . . . . . . . . . . . . . . . . . . . . . . . . . . . . . . . . . . . . . . . . . . . . . . . . . 8
Chapter 1   Introduction . . . . . . . . . . . . . . . . . . . . . . . . . . . . . . . . . . . . . . . . . . . . . . . . . . . . . . . . . . . . . . 9
            What is Maestro | Virtual Set? . . . . . . . . . . . . . . . . . . . . . . . . . . . . . . . . . . . . . . . . . . . . . . . . . . . . . . . . . 9
            Maestro | Virtual Set Workflow . . . . . . . . . . . . . . . . . . . . . . . . . . . . . . . . . . . . . . . . . . . . . . . . . . . . . . . 10
            System Requirements. . . . . . . . . . . . . . . . . . . . . . . . . . . . . . . . . . . . . . . . . . . . . . . . . . . . . . . . . . . . . . . 11
                  User Tested Specifications . . . . . . . . . . . . . . . . . . . . . . . . . . . . . . . . . . . . . . . . . . . . . . . . . . . . . . . 11
                  Licensing . . . . . . . . . . . . . . . . . . . . . . . . . . . . . . . . . . . . . . . . . . . . . . . . . . . . . . . . . . . . . . . . . . . . 12
                  Features. . . . . . . . . . . . . . . . . . . . . . . . . . . . . . . . . . . . . . . . . . . . . . . . . . . . . . . . . . . . . . . . . . . . . . 12
Chapter 2   Working with Unreal Engine 4 . . . . . . . . . . . . . . . . . . . . . . . . . . . . . . . . . . . . . . . . . . . . . 14
            Getting Started . . . . . . . . . . . . . . . . . . . . . . . . . . . . . . . . . . . . . . . . . . . . . . . . . . . . . . . . . . . . . . . . . . . . 14
            Unreal Engine 4 Tutorials . . . . . . . . . . . . . . . . . . . . . . . . . . . . . . . . . . . . . . . . . . . . . . . . . . . . . . . . . . . 14
            Unreal Engine Game Framework. . . . . . . . . . . . . . . . . . . . . . . . . . . . . . . . . . . . . . . . . . . . . . . . . . . . . . 14
            What is Blueprint and its Advantage over C++ . . . . . . . . . . . . . . . . . . . . . . . . . . . . . . . . . . . . . . . . . . . 15
            Learning Blueprint . . . . . . . . . . . . . . . . . . . . . . . . . . . . . . . . . . . . . . . . . . . . . . . . . . . . . . . . . . . . . . . . . 15
                  Instructions . . . . . . . . . . . . . . . . . . . . . . . . . . . . . . . . . . . . . . . . . . . . . . . . . . . . . . . . . . . . . . . . . . . 15
                  Blueprint Communication . . . . . . . . . . . . . . . . . . . . . . . . . . . . . . . . . . . . . . . . . . . . . . . . . . . . . . . 15
                  Editor Tips and Tricks . . . . . . . . . . . . . . . . . . . . . . . . . . . . . . . . . . . . . . . . . . . . . . . . . . . . . . . . . . 16
            Authoring Using Unreal Engine. . . . . . . . . . . . . . . . . . . . . . . . . . . . . . . . . . . . . . . . . . . . . . . . . . . . . . . 16
Chapter 3   Authoring with Unreal Editor . . . . . . . . . . . . . . . . . . . . . . . . . . . . . . . . . . . . . . . . . . . . . . 17
            Maestro | Virtual Set Authoring Workflow . . . . . . . . . . . . . . . . . . . . . . . . . . . . . . . . . . . . . . . . . . . . . . 17
            Avid Maestro | Virtual Set Solution for Unreal Editor . . . . . . . . . . . . . . . . . . . . . . . . . . . . . . . . . . . . . 18
                   Supporting Blueprint Projects . . . . . . . . . . . . . . . . . . . . . . . . . . . . . . . . . . . . . . . . . . . . . . . . . . . . 18
                   Project resources hierarchy. . . . . . . . . . . . . . . . . . . . . . . . . . . . . . . . . . . . . . . . . . . . . . . . . . . . . . . 19
                   Changing Scenes on Air . . . . . . . . . . . . . . . . . . . . . . . . . . . . . . . . . . . . . . . . . . . . . . . . . . . . . . . . . 19
                   Preview for Scene Creator . . . . . . . . . . . . . . . . . . . . . . . . . . . . . . . . . . . . . . . . . . . . . . . . . . . . . . . 20
                   Way of Handling Clips . . . . . . . . . . . . . . . . . . . . . . . . . . . . . . . . . . . . . . . . . . . . . . . . . . . . . . . . . . 20
                   Way of Handling Video Insertions . . . . . . . . . . . . . . . . . . . . . . . . . . . . . . . . . . . . . . . . . . . . . . . . . 20
                   Plugins Support. . . . . . . . . . . . . . . . . . . . . . . . . . . . . . . . . . . . . . . . . . . . . . . . . . . . . . . . . . . . . . . . 20
                   Project Preparation . . . . . . . . . . . . . . . . . . . . . . . . . . . . . . . . . . . . . . . . . . . . . . . . . . . . . . . . . . . . . 20
                          New Scene with Starter Content . . . . . . . . . . . . . . . . . . . . . . . . . . . . . . . . . . . . . . . . . . . . . . . 21
                   Importing Content. . . . . . . . . . . . . . . . . . . . . . . . . . . . . . . . . . . . . . . . . . . . . . . . . . . . . . . . . . . . . . 23
                   Creating Map (level). . . . . . . . . . . . . . . . . . . . . . . . . . . . . . . . . . . . . . . . . . . . . . . . . . . . . . . . . . . . 24
                   Preview . . . . . . . . . . . . . . . . . . . . . . . . . . . . . . . . . . . . . . . . . . . . . . . . . . . . . . . . . . . . . . . . . . . . . . 24
                   Final Cooking . . . . . . . . . . . . . . . . . . . . . . . . . . . . . . . . . . . . . . . . . . . . . . . . . . . . . . . . . . . . . . . . . 24
                   Unreal Editor Extensions . . . . . . . . . . . . . . . . . . . . . . . . . . . . . . . . . . . . . . . . . . . . . . . . . . . . . . . . 24
            Working with Exports . . . . . . . . . . . . . . . . . . . . . . . . . . . . . . . . . . . . . . . . . . . . . . . . . . . . . . . . . . . . . . 25

                                                                                  5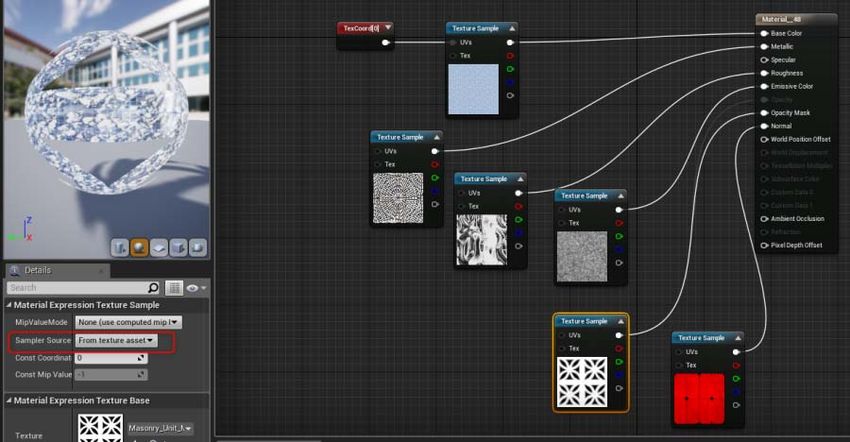
Example 1: Registering of text content for a TextRenderActor object . . . . . . . . . . . . . . . . . . . . . 26
                  Example 2: Registering of an X axis position for a simple Cone object . . . . . . . . . . . . . . . . . . . . 26
                  Helper Functions. . . . . . . . . . . . . . . . . . . . . . . . . . . . . . . . . . . . . . . . . . . . . . . . . . . . . . . . . . . . . . . 27
            Working with Animations . . . . . . . . . . . . . . . . . . . . . . . . . . . . . . . . . . . . . . . . . . . . . . . . . . . . . . . . . . . 28
                  Skeleton Animations. . . . . . . . . . . . . . . . . . . . . . . . . . . . . . . . . . . . . . . . . . . . . . . . . . . . . . . . . . . . 31
            Working with Alpha Matte . . . . . . . . . . . . . . . . . . . . . . . . . . . . . . . . . . . . . . . . . . . . . . . . . . . . . . . . . . 34
                  Augmented Reality Objects . . . . . . . . . . . . . . . . . . . . . . . . . . . . . . . . . . . . . . . . . . . . . . . . . . . . . . 34
                  Garbage Objects . . . . . . . . . . . . . . . . . . . . . . . . . . . . . . . . . . . . . . . . . . . . . . . . . . . . . . . . . . . . . . . 34
                  Alpha Matte Composition (Helpers) . . . . . . . . . . . . . . . . . . . . . . . . . . . . . . . . . . . . . . . . . . . . . . . 37
                         AR Objects . . . . . . . . . . . . . . . . . . . . . . . . . . . . . . . . . . . . . . . . . . . . . . . . . . . . . . . . . . . . . . . 37
                         Garbage Objects . . . . . . . . . . . . . . . . . . . . . . . . . . . . . . . . . . . . . . . . . . . . . . . . . . . . . . . . . . . 38
                  Alpha Matte Composition (Manual). . . . . . . . . . . . . . . . . . . . . . . . . . . . . . . . . . . . . . . . . . . . . . . . 41
                         Garbage Objects . . . . . . . . . . . . . . . . . . . . . . . . . . . . . . . . . . . . . . . . . . . . . . . . . . . . . . . . . . . 41
                  Troubleshooting . . . . . . . . . . . . . . . . . . . . . . . . . . . . . . . . . . . . . . . . . . . . . . . . . . . . . . . . . . . . . . . 41
                         Translucent Materials . . . . . . . . . . . . . . . . . . . . . . . . . . . . . . . . . . . . . . . . . . . . . . . . . . . . . . . 41
                  Generating Garbage Matte Objects . . . . . . . . . . . . . . . . . . . . . . . . . . . . . . . . . . . . . . . . . . . . . . . . 42
            Working with Depth of Field (DoF) . . . . . . . . . . . . . . . . . . . . . . . . . . . . . . . . . . . . . . . . . . . . . . . . . . . 46
                  DoF Example Scenarios . . . . . . . . . . . . . . . . . . . . . . . . . . . . . . . . . . . . . . . . . . . . . . . . . . . . . . . . . 50
                  Diagnostics . . . . . . . . . . . . . . . . . . . . . . . . . . . . . . . . . . . . . . . . . . . . . . . . . . . . . . . . . . . . . . . . . . . 51
            Working with Video Insertions . . . . . . . . . . . . . . . . . . . . . . . . . . . . . . . . . . . . . . . . . . . . . . . . . . . . . . . 52
                  Virtual Screen Preparation . . . . . . . . . . . . . . . . . . . . . . . . . . . . . . . . . . . . . . . . . . . . . . . . . . . . . . . 52
                  Advanced Workflow. . . . . . . . . . . . . . . . . . . . . . . . . . . . . . . . . . . . . . . . . . . . . . . . . . . . . . . . . . . . 53
                  Assigning Exports. . . . . . . . . . . . . . . . . . . . . . . . . . . . . . . . . . . . . . . . . . . . . . . . . . . . . . . . . . . . . . 56
                  Runtime . . . . . . . . . . . . . . . . . . . . . . . . . . . . . . . . . . . . . . . . . . . . . . . . . . . . . . . . . . . . . . . . . . . . . 57
            Working with NDI® Insertions . . . . . . . . . . . . . . . . . . . . . . . . . . . . . . . . . . . . . . . . . . . . . . . . . . . . . . . 57
                  Preparing the Virtual Screen. . . . . . . . . . . . . . . . . . . . . . . . . . . . . . . . . . . . . . . . . . . . . . . . . . . . . . 58
                  Advanced Workflow. . . . . . . . . . . . . . . . . . . . . . . . . . . . . . . . . . . . . . . . . . . . . . . . . . . . . . . . . . . . 61
                  Assigning Exports. . . . . . . . . . . . . . . . . . . . . . . . . . . . . . . . . . . . . . . . . . . . . . . . . . . . . . . . . . . . . . 64
                  Runtime . . . . . . . . . . . . . . . . . . . . . . . . . . . . . . . . . . . . . . . . . . . . . . . . . . . . . . . . . . . . . . . . . . . . . 66
            Working with Unreal Planar Reflections . . . . . . . . . . . . . . . . . . . . . . . . . . . . . . . . . . . . . . . . . . . . . . . . 67
                  Enabling Planar Reflections . . . . . . . . . . . . . . . . . . . . . . . . . . . . . . . . . . . . . . . . . . . . . . . . . . . . . . 67
                  Troubleshooting Planar Reflections . . . . . . . . . . . . . . . . . . . . . . . . . . . . . . . . . . . . . . . . . . . . . . . . 68
            Working with AvidTalent . . . . . . . . . . . . . . . . . . . . . . . . . . . . . . . . . . . . . . . . . . . . . . . . . . . . . . . . . . . 70
                  Export Examples. . . . . . . . . . . . . . . . . . . . . . . . . . . . . . . . . . . . . . . . . . . . . . . . . . . . . . . . . . . . . . . 73
Chapter 4   Building an Unreal Engine Scene . . . . . . . . . . . . . . . . . . . . . . . . . . . . . . . . . . . . . . . . . . . 74
            Building Scenes with the “Avid Base Template” . . . . . . . . . . . . . . . . . . . . . . . . . . . . . . . . . . . . . . . . . 74
Chapter 5   Troubleshooting . . . . . . . . . . . . . . . . . . . . . . . . . . . . . . . . . . . . . . . . . . . . . . . . . . . . . . . . . 81
            How to Improve the Performance of Maestro | Virtual Set . . . . . . . . . . . . . . . . . . . . . . . . . . . . . . . . . . 81
            Frequently Asked Questions . . . . . . . . . . . . . . . . . . . . . . . . . . . . . . . . . . . . . . . . . . . . . . . . . . . . . . . . . 83

                                                                                6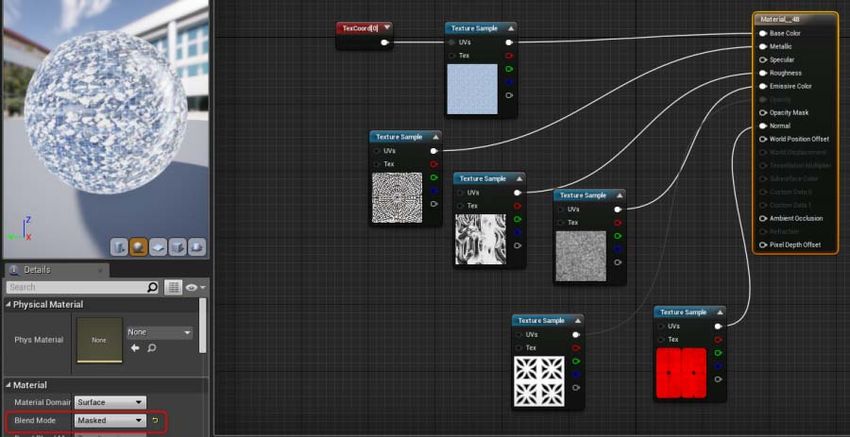
Appendix A   Guidelines for exporting from 3Ds Max® to Unreal . . . . . . . . . . . . . . . . . . . . . . . . . . . . 86
             Introduction . . . . . . . . . . . . . . . . . . . . . . . . . . . . . . . . . . . . . . . . . . . . . . . . . . . . . . . . . . . . . . . . . . . . . . 86
             Animations . . . . . . . . . . . . . . . . . . . . . . . . . . . . . . . . . . . . . . . . . . . . . . . . . . . . . . . . . . . . . . . . . . . . . . . 86
             Materials. . . . . . . . . . . . . . . . . . . . . . . . . . . . . . . . . . . . . . . . . . . . . . . . . . . . . . . . . . . . . . . . . . . . . . . . . 87
                    Baked Texture Method . . . . . . . . . . . . . . . . . . . . . . . . . . . . . . . . . . . . . . . . . . . . . . . . . . . . . . . . . . 91
Appendix B   Guidelines to Configure Mixing in Maestro | Virtual Set . . . . . . . . . . . . . . . . . . . . . . . . 94
             Introduction . . . . . . . . . . . . . . . . . . . . . . . . . . . . . . . . . . . . . . . . . . . . . . . . . . . . . . . . . . . . . . . . . . . . . . 94
             How Does It Work? . . . . . . . . . . . . . . . . . . . . . . . . . . . . . . . . . . . . . . . . . . . . . . . . . . . . . . . . . . . . . . . . 94
                    Mixing FullScreen Options . . . . . . . . . . . . . . . . . . . . . . . . . . . . . . . . . . . . . . . . . . . . . . . . . . . . . . 95
                    AR Objects . . . . . . . . . . . . . . . . . . . . . . . . . . . . . . . . . . . . . . . . . . . . . . . . . . . . . . . . . . . . . . . . . . . 95
                           Translucent Materials Issue . . . . . . . . . . . . . . . . . . . . . . . . . . . . . . . . . . . . . . . . . . . . . . . . . . 96
                    Garbage. . . . . . . . . . . . . . . . . . . . . . . . . . . . . . . . . . . . . . . . . . . . . . . . . . . . . . . . . . . . . . . . . . . . . . 97
             Example Configuration . . . . . . . . . . . . . . . . . . . . . . . . . . . . . . . . . . . . . . . . . . . . . . . . . . . . . . . . . . . . . 97

                                                                                   7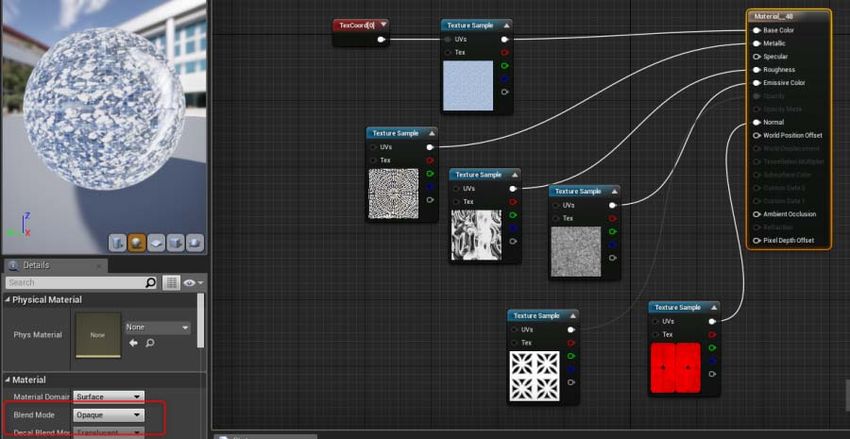
Using This Guide

Symbols and Conventions
     Avid documentation uses the following symbols and conventions:

     Symbol or Convention       Meaning or Action

     n                          A note provides important related information, reminders,
                                recommendations, and strong suggestions.

     c                          A caution means that a specific action you take could cause harm to
                                your computer or cause you to lose data.

     w
                                A warning describes an action that could cause you physical harm.
                                Follow the guidelines in this document or on the unit itself when
                                handling electrical equipment.

     >                          This symbol indicates menu commands (and subcommands) in the
                                order you select them. For example, File > Import means to open the
                                File menu and then select the Import command.

                                This symbol indicates a single-step procedure. Multiple arrows in a list
                                indicate that you perform one of the actions listed.

     (Windows), (Windows        This text indicates that the information applies only to the specified
     only), (Macintosh), or     operating system, either Windows or Macintosh OS X.
     (Macintosh only)

     Bold font                  Bold font is primarily used in task instructions to identify user interface
                                items and keyboard sequences.

     Italic font                Italic font is used to emphasize certain words and to indicate variables.

     Courier Bold font          Courier Bold font identifies text that you type.

     Ctrl+key or mouse action   Press and hold the first key while you press the last key or perform the
                                mouse action. For example, Command+Option+C or Ctrl+drag.

     | (pipe character)         The pipe character is used in some Avid product names, such as
                                Interplay | Production. In this document, the pipe is used in product
                                names when they are in headings or at their first use in text.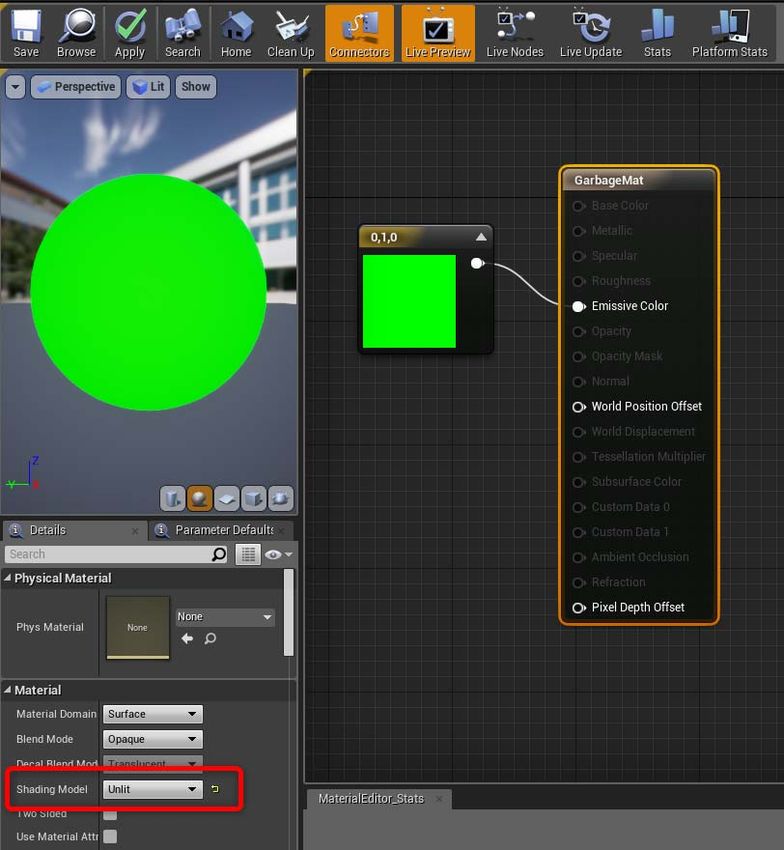
1 Introduction

     In this section:
     •   Maestro | Virtual Set Workflow
     •   System Requirements
     •   User Tested Specifications
     •   Licensing

What is Maestro | Virtual Set?
     A full Avid Maestro | Virtual Set system is made up of 3 software modules:
     •   Maestro | Virtual Set Authoring - set of plugins and templates for the Unreal® Editor tool.
     •   Control Application - control Maestro | Virtual Set Engine and broadcast the graphics created
         with Maestro | Virtual Set Authoring, with applications such as Maestro | News or Maestro |
         Live.
     •   Maestro | Virtual Set Engine - real-time application for rendering the graphics to a video output
         using powerful Unreal Engine on dedicated Render Device.

     The Maestro | Virtual Set Authoring modules together with Unreal Editor address all requirements
     for integrating your OAG applications into an automated studio. First, 3D graphic scenes are created
     in the Unreal Editor, where you can define animated sequences and using additional plugins
     determine what can be changed in real time by “exporting” functions to the Control module.
     Reporters can then insert or import current data into the templates using a Controller, which can be
     run from a remote station.

     Maestro | Virtual Set Authoring takes the advantage of Unreal Editor and addresses it's power into
     Virtual Studio creation tool.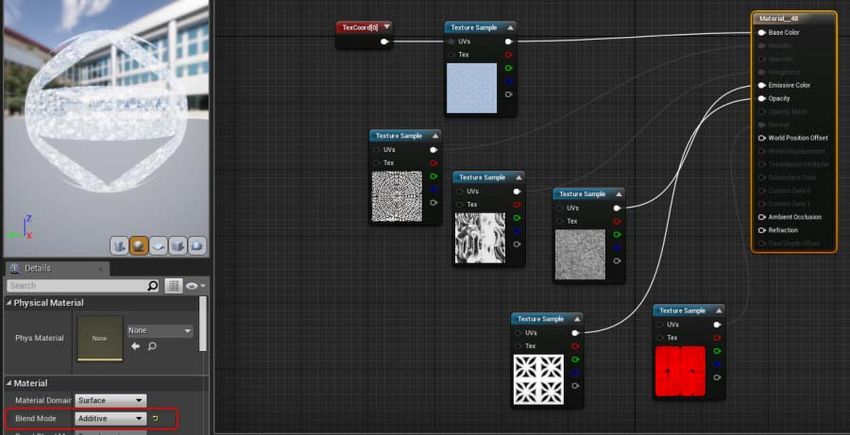
Maestro | Virtual Set Workflow
     The following workflow contains the main tasks performed when creating a scene in Maestro |
     Virtual Set.

                    Unreal Editor - New project from template

                                               Scene            Define           Define            Define
         Create assets   Import assets
                                             composition        Exports        Animations       interactions

                              Unreal Editor – Prepared scene

                         Validate scene                                   Deploy to Runtime Machine

           Unreal Engine Runtime – Controlled by Maestro|Live

           Load/Unload           Activate/                                   Control
                                                    Set Export values                        Camera Tracking
              scene           Deactivate scene                              Animations

                         Maestro|VirtualSet Studio Production

                                                           10
System Requirements
The optimum platform for Maestro | Virtual Set uses an Maestro | Engine 4K with authoring on
Microsoft Windows®. To get started with creating or developing with Unreal Engine 4 right away, a
considerably powerful setup is recommended.
Recommended hardware specifications for Maestro | Virtual Set:
• Windows 7/10 64-bit or Mac OS X 10.9.2 or later
• Intel® i5 or Intel® i7 Quad Core™ processor or similar (2.5 GHz or faster for high-performance
graphics)
• NVIDIA® GeForce® GTX 1050Ti or AMD Radeon 6870 HD series card or higher
• HDD: 1TB (at least)
• RAM: minimum - 8 GB; recommended -16GB 3000MHz
• 24" 1920x1080 resolution capable monitor
• DVD-ROM/CD-Writer or DVD-Writer
• USB Keyboard and Mouse
User Tested Specifications
This section lists PC specifications tested by Maestro | Virtual Set users. The user observations are
not to be seen as official hardware recommendations from Avid.
ASUS G75VW LAPTOP
Example configuration #1:
• OS: Windows 7 64bit
• Processor: Intel i7 2.3ghz
• System Memory: 12 GB
• Graphics: GTX670m
• Average fps: 20~30
• Settings: Default settings
n The ASUS G75VW ROG laptop is used for the engine. The fps is usually fine (unless there are
particle-intense scenes).
Example configuration #2:
• OS: Windows 8 (“8.0”, not 8.1)
• Processor: Intel i7 @2.5GHz
• System Memory: 16GB
• Graphics: 2x Nvidia GT755M
• Average fps: ~30fps with the scaling options all set to “Epic”
• Settings: Everything set to default
11Example configuration #3:
• OS: Windows 7
• Processor: intel i7-3610QM
• System Memory: 4 GB
• Graphics: Nvidia Geforce GTX 660 M
• Average fps: around 30
• Settings: no special settings (high performance energy setting)
Building a Computer for Development
If you are considering building a powerful machine for UE4 development for around $2500, here is a
list of recommended components:
• Intel Core i7 4930K processor
• Intel X79 chipset motherboard
• 32GB RAM
• 1TB SSD
• Nvidia GTX 770 video card
The 4930K is a great cost / CPU power trade-off for compiling the engine and running the editor.
SSDs were found to be the best user experience, and with the advent of the Samsung Evo series even
large amounts of SSD storage have become attainable.
Copious amounts of RAM is the single biggest contributor to a smooth user experience. While the
editor and engine don't use 32 GB, having the memory available for the disk cache is very beneficial,
especially for a programmer compiling the full engine. Going above 32 GB can result in diminishing
returns.
Licensing
Install Maestro | Virtual Set Authoring using the Installation Wizard and the provided installation
guide to help you through the various installation requirements.
After the installation, the HASP ID number or sysinfo of the Authoring Machine should be noted and
sent to Avid support for licensing and registration.
Features
The following features are available for the Maestro | Virtual Set rendering components:
System Functionality Unreal Engine Render Engine
Scene Editing Unreal Editor Maestro | Designer
Tracking Data X X
Animations X X
Exports X X
12System Functionality Unreal Engine Render Engine
Imports from Designer tools X X
Garbage Matte X X
Alpha Matte for AR objects i1 X
Newsroom System Integration X X
Scene Preview X X
Depth of Field X X
Clips X2
Video Insertions X X
Built-in Transitions X
Built-in Charts X
Audio X
Ticker X
1. Opacity elements are mixed with the Background and not with the Camera feed.
2. Clips are not supported in version 2019.2
132 Working with Unreal Engine 4
In this section:
• Getting Started
• Unreal Engine 4 Tutorials
• Unreal Engine Game Framework
• What is Blueprint and its Advantage over C++
• Learning Blueprint
• Authoring Using Unreal Engine
Getting Started
Unreal Engine has an extensive documentation, available online.
• To learn how to install the Engine, see Installing Unreal Engine.
• To find out about the Terminology, see Unreal Engine 4 Terminology.
• For a quick guide about the Editor, see Tools and Editors.
• When you first run Unreal Editor, the Project Browser appears. To learn more about it, see
Project Browser.
Unreal Engine 4 Tutorials
On the Unreal Engine website, you can also find comprehensive tutorials describing the authoring
process in detail:
• Level Designer Quick Start: https://docs.unrealengine.com/en-US/Engine/QuickStart
• Realistic Rendering Example: https://docs.unrealengine.com/en-US/Resources/Showcases/
RealisticRendering
• Lighting and Shadows Quick Start: https://docs.unrealengine.com/en-US/Engine/Rendering/
LightingAndShadows/QuickStart
• Landscape Quick Start Guide: https://docs.unrealengine.com/en-US/Engine/Landscape/
QuickStart
• Video Tutorials: https://www.youtube.com/user/UnrealDevelopmentKit/
playlists?sort=dd&view=50&shelf_id=17
Unreal Engine Game Framework
If you are new to the editor, it will be useful to acquaint yourself with a few basic concepts regarding
the user interface and general workflow. More information can be found in the Unreal Editor
Interface guide (https://docs.unrealengine.com/en-us/Engine/UI).What is Blueprint and its Advantage over C++
The Blueprints Visual Scripting system in Unreal Engine is a complete gameplay scripting system
based on the concept of using a node-based interface to create gameplay elements from within
Unreal Editor. As with many common scripting languages, it is used to define object-oriented (OO)
classes or objects in the engine. Objects defined using Blueprint are referred to as just “Blueprints.”
This system is extremely flexible and powerful as it provides the ability for designers to use virtually
the full range of concepts and tools generally only available to programmers.
For more information on Blueprint, see Blueprints Visual Scripting Documentation (https://
docs.unrealengine.com/en-us/Engine/Blueprints).
Learning Blueprint
Instructions
You can learn Blueprint from the following Unreal Engine tutorials:
Tutorial URL
- Glossary https://docs.unrealengine.com/en-us/Engine/Blueprints/Glossary
- Getting started https://docs.unrealengine.com/en-us/Engine/Blueprints/Scripting
- Level Blueprint Editor https://docs.unrealengine.com/en-US/engine/blueprints/editor/
uibreakdowns/levelbpui
- Blueprint Class UI https://docs.unrealengine.com/en-us/Engine/Blueprints/Editor/
UIBreakdowns/ClassBPUI
- Anatomy of Blueprint https://docs.unrealengine.com/en-us/Engine/Blueprints/Anatomy
- Workflow tools https://docs.unrealengine.com/en-us/Engine/Blueprints/Workflow
- Specialized Node Groups https://docs.unrealengine.com/en-us/Engine/Blueprints/UserGuide
Blueprint Communication
To learn how the Blueprints interact with one another, visit the following pages:
Tutorial URL
- Blueprint Communication Usage https://docs.unrealengine.com/en-us/Engine/Blueprints/UserGuide/
BlueprintCommsUsage
- Direct Communication https://docs.unrealengine.com/en-us/Engine/Blueprints/UserGuide/
BlueprintComms
- Event Dispatchers https://docs.unrealengine.com/en-US/engine/blueprints/editor/
uibreakdowns/levelbpui
- Blueprint Interfaces https://docs.unrealengine.com/en-US/Engine/Blueprints/UserGuide/
Types/Interface/UsingInterfaces
15Tutorial URL
- Casting https://docs.unrealengine.com/en-US/Engine/Blueprints/UserGuide/
CastNodes
Editor Tips and Tricks
The Blueprint Editor has a lot of productivity boosting shortcuts built-in, and while many will come
naturally as you use the editor, others are a little bit hidden. The table below lists some useful Unreal
Engine tips and tricks:
Tutorial URL
- Blueprint Editor Cheat Sheet https://docs.unrealengine.com/en-US/Engine/Blueprints/UserGuide/
CheatSheet
- Best Practices https://docs.unrealengine.com/en-us/Engine/Blueprints/BestPractices
- Performance and Profiling https://docs.unrealengine.com/en-US/Engine/Performance
- Blueprint Interfaces https://docs.unrealengine.com/en-US/Engine/Blueprints/UserGuide/
Types/Interface/UsingInterfaces
- Casting https://docs.unrealengine.com/en-US/Engine/Blueprints/UserGuide/
CastNodes
Authoring Using Unreal Engine
Artist Quick Guide (https://docs.unrealengine.com/en-US/Engine/Content/QuickStart) provides
comprehensive information on how to create and modify export scenes to Unreal Engine.
n Make sure to select Blueprint instead of C++ when starting a project.
To learn about Asset Creation, visit https://docs.unrealengine.com/en-US/Engine/Content/
AssetCreation
Unreal Engine features an FBX import pipeline which allows simple transfer of content from any
number of digital content creation applications that support the format. To learn more about it, visit
the FBX Content Pipeline (https://docs.unrealengine.com/en-US/Engine/Content/FBX) manual.
163 Authoring with Unreal Editor
In this section:
• Maestro | Virtual Set Authoring Workflow
• Avid Maestro | Virtual Set Solution for Unreal Editor
• Working with Exports
• Working with Animations
• Working with Alpha Matte
• Working with Depth of Field (DoF)
• Working with Video Insertions
• Working with NDI® Insertions
• Working with Unreal Planar Reflections
Maestro | Virtual Set Authoring Workflow
• Use one of the templates for a Blueprint
based project delivered in the Maestro |
Start a project Virtual Set Authoring package.
from Avid
template
• To create your scene, first add objects, and
then define their placement in a three-
Position objects dimensional space.
in the Editor
Viewport
• You can define unique characteristics for each
object added to the scene, customizing the
Define groups geometric properties of the objects according
to your requirements.
and geometric
properties
• You can give character to the scene by
defining attributes such as color, material,
texture and lighting for each object.
Define surface
attributes• You can export most parameters to the
Maestro | Live Controller, where data can be
Export and edit imported and manipulated in real-time.
real-time
parameters
• Unreal Editor enables you to animate almost
anything in your scene and control it in real-
time by means of the Maestro | Live
Create and edit Controller.
animations
• Unreal Editor allows you to render preview of
a scene and test it.
In-Editor Testing
(Play & Simulate)
• Project can be saved on any storage for future
use.
Save Scene
Avid Maestro | Virtual Set Solution for Unreal Editor
There are a few basic concepts which distinguish the Maestro | Virtual Set workflow from a regular
game development by means of Unreal Editor.
Supporting Blueprint Projects
Our solution is only supporting Blueprint type projects. When starting a new project for the authoring
purpose, you should follow the Blueprint approach and avoid C++.
18Project resources hierarchy
All resources related to the project need to be stored in a single folder inside Content. The structure
below that folder is not important and can be organized freely. It also applies to all asset resources
binded to the project, e.g. Marketplace.
Example 1:
Project VirtualStudioA was created in Unreal Editor. The whole tree contains resources (like levels,
materials, textures, blueprints, etc.) which were stored under Content/VirtualStudioA.
Changing Scenes on Air
Content prepared by the designer has to be cooked for the target platform and deployed to an
available shared space on a HDVG machine (Control_Data).
19To enable this, the Unreal Editor contains an additional button which triggers an automatic process of
cooking and packing the scene for a Linux based platform. It also deploys the scene for a future use
on a HDVG machine. The separation between the content and the launcher allows for a free scene
manipulation in runtime.This in turn gives the controllers the possibility to load/unload content and
show it without having to restart the rendering process.
Preview for Scene Creator
Additionally, the Unreal Editor can still be employed as a real preview of the scene, using the tracked
camera object available as an Add-on. This way, you could adjust final output parameters and
settings in the Unreal Editor. Additional controls are built into the Unreal Editor to allow simulated
control over the tracked camera for testing purposes.
Way of Handling Clips
Currently, MediaPlayer is not supported directly from an Unreal scene. Our solution takes advantage
of the mixing with Render Engine functionality, which is handling all tasks related to Clips and
Video Insertions.
Way of Handling Video Insertions
Video Insertions can be taken from the SDI/IP board (Working with Video Insertions) or in form of
NDI streams (Working with NDI® Insertions).
Plugins Support
Presently, our solution supports only content plugins from the Marketplace and external sources.
There are no further restrictions, as long they follow the resource structure mentioned above.
For plugins containing any C++ code the support is limited as the cooked scene is migrating between
platforms and it is controlled on-air.
Project Preparation
A basic description of how to work with the Project Browser can be found in the Unreal
Documentation.
Use the Blueprint project only and place all resources under an appropriate folder in Content.
20The Avid template projects should be used as a starting point.
New Scene with Starter Content
Creating a new scene with the starter content option requires additional steps.
21After creating a new scene using the Starter Content, you should move the content directory into the
project directory:
n Because of caching inside the Unreal Editor, it is sometimes required to fix the references.
To fix the references, right-click on the target folder and select the Fix Up Redirections in Folder
option.
22After moving the content directory into the right place, you can delete the empty directory:
Importing Content
Supplementary Unreal assets can be found on the Marketplace and added directly to the project using
the Epic Games Launcher (as illustrated on the picture below) or migrated from a different project
directly to the appropriate structure inside Content as described in the Unreal Engine Migrating
Assets (https://docs.unrealengine.com/en-us/Engine/Content/Browser/UserGuide/Migrate) user
guide.
23External resources can be imported from FBX files which are created with applications such as
Autodesk MotionBuilder, Autodesk Maya, and Autodesk 3ds Max. The approach is supporting
particular objects (https://docs.unrealengine.com/latest/INT/Engine/Content/FBX) as well as full
scenes (https://docs.unrealengine.com/en-us/Engine/Content/FBX/FullScene).
Creating Map (level)
After the project preparation, you focus on the Level creation. Using Unreal Engine 4 terminology, a
Level is made up of a collection of Static Meshes, Volumes, Lights, Blueprints and more. All
working together to bring the desired virtual environment. All these elements are used afterwards to
render a virtual studio on a dedicated rendering machine (HDVG). More information about Levels
can be found in the Unreal Engine Levels (https://docs.unrealengine.com/en-us/Engine/Levels)
manual. The actual Level name should be in line with the Project name to simplify controlling.
For preview purposes, a creator should add an AvidCamera Pawn instance to allow tracked camera
preview.
Preview
Any time during the Authoring process, an author is able to play the level to see how it will be
rendered. When using an AvidCamera Pawn actor on a scene, an author can take control over a
tracked camera and simulate its working directly from the editor. It can be also needed to set some
additional settings and post-processing effects.
Final Cooking
After finishing the map preparation, an author triggers deploying the project into Control_Data and
thus makes it available to the render machine and controller.
Unreal Editor Extensions
The following Unreal Editor extensions are available:
• 1 click solution to cook the map (level) package and deploy it to the Render Unit.
- cross-compilation for Linux platform
- store the cooked map (level) in Control_Data
- mimic scene_data.xml file to simplify controlling
24• Tracked camera visualization
• Defining exports for level components and other parameters
• Additional content, e.g.:
- Actors
- Blueprints
- Textures
Item Description
1 Garbage matte object creation plugin
2 Map (level) cooking and deployment
3 Additional content inside the content tree
4 Additional content inside the content browser
5 Editor viewport
6 Play the level with fake tracking
Working with Exports
Maestro | Virtual Set provides maximum flexibility for manipulation of on-air graphics in real time.
By exporting parameters from Maestro | Virtual Set Authoring to the Control module, data can be
sent to any actor on a scene (e.g. animated sequences, object properties, and text strings), allowing
them to be updated in real time. For example, a bar may grow and change color in real time to
represent the score and colors of the winning team.
25Defining Exports is straightforward thanks to the built-in Blueprint graph editor in the Unreal Editor.
Avid Maestro | Virtual Set Authoring plugins allow to connect any action and object property to the
named Export, which is easy to control from an external controller.
An export is a predefined user function available in the Blueprint Editor. The name of the function is
the actual name of the export and an external controller can use it to send data through a common
communication protocol (ReTalk3). The solution combines simple use cases as well as complex
functionalities involving multiple objects and math, which allows for animated actions based on real-
time data.
Example 1: Registering of text content for a TextRenderActor object
The below procedure describes how to register content for a particular TextRenderActor object.
To register the text content for a TextRenderActor object:
1. Click the Create Export button in the Blueprint Editor.
A new function with predefined signature is added to the list.
2. Change the function name to something meaningful. In this example, Text_Value is used.
n The actual name of the export function can be changed anytime. It will be set in a scene during the
Deploy process.
3. Create logic inside the function. In our example, text for a particular TextRender is set.
Example 2: Registering of an X axis position for a simple Cone object
The below procedure describes how to register the X axis position of a Cone object.
To register the X axis position of a Cone object:
1. Click the Create Export button in the Blueprint Editor.
A new function with predefined signature is added to the list.
2. Change the function name to something meaningful. In this example, Position_X is used.
3. Create logic inside the function. In our example, text for a particular Cone object is set.
26The list of available exports will be visible inside the Controller UI and the real value can be
changed in runtime.
Helper Functions
Additional helper functions can be used in the BlueprintEditor for various actions such as connecting
to exports.
The AvidCamera plugin provides helper functions to manipulate some of the parameters:
DoF Enable
Enable/Disable Depth Of Focus (DoF).
Value: 0/1
DoF Set Aperture
Set Aperture if not provided by camera tracking.
Value: Aperture as number (eg 5.6)
27DoF Use Real Camera Focus
Use focus distance from camera tracking.
Value: 0/1
DoF Use Real Camera Aperture
Use the Aperture value from camera tracking (if provided).
Value: 0/1
Working with Animations
The SceneLoader supports animations done by a MatineeActor or LevelSequence.
To create an animation with a Matinee Actor:
1. Add a Matinee Actor to the level,
or edit a Matinee Actor.
282. Add an empty group.
3. Add a track, for example a movement track.
4. Add actor(s) to the group.
a. Select the actor(s).
b. Add the selected actor(s) by right-clicking on the group.
295. Add keyframes.
a. Move the time slider to the desired time position.
b. Move the actor (movement track).
c. Add the keyframe.
n Repeat these steps to add more keyframes.
n To have the correct animation length in a Controller, keep the timeline length the same as the last
keyframe of the animation.
To create a Level Sequence animation:
1. Add a Level Sequence to the level.
2. Add a track for a specific actor.
3. Right-click on the track and change Properties > When finished to Keep State.
304. Add keyframes.
a. Move the time slider to the desired time position.
b. Change the value of the property that you are animating.
c. Add the keyframe.
n Repeat these steps to add more keyframes.
n To have the correct animation length in a Controller, keep the timeline length the same as the last
keyframe of the animation.
Skeleton Animations
Skeleton animations can be controlled as simple exports.
In the example below, the idea is to have the same objects with the same animations sequences, but
not running in a parallel motion. As presented on the image below:
31Offset for each of players are controlled by the following property Animation > Initial Position:
32Using The Blueprint Editor, you can attach an Avid export to the selected property, as illustrated on
the example below:
33Working with Alpha Matte
The Maestro | Virtual Set solution is able to produce a Fill+Key output. The Key consists of Matt for
augmented reality (AR) objects and of garbage Matt. It can be used by ChromaKey to mix Virtual
Studio background, camera feed foreground and AR elements on top of that.
Augmented Reality Objects
AR objects should be rendered on top of a talent in the Virtual Studio.
Properties
For translucent objects, Maestro | Virtual Set generates the Alpha Matte value according to their
Opacity.
n Translucent objects will be mixed with the Background graphics and not with the talent.
Garbage Objects
Garbage objects are used when overshooting to composite a Virtual Studio into the shot that is larger
than the green screen.
Properties
These objects are not rendered on the Fill output - they exists only in the Key.
34These objects do not take depth into account - the whole Garbage geometry will be visible on the
Key output.
Editor View
35Fill + Key
The Alpha Matte value is according to Opacity of Garbage objects to allow for creation of smooth
edges.
36Alpha Matte Composition (Helpers)
AR Objects
To create Alpha Matte composition for AR objects:
1. Select an object from World Outliner which should be visible on top of a talent.
2. Click Add Component in the Details panel.
3. Start typing "alp" in the Search box to find the AlphaMatteSceneComponent and press Enter.
4. A component is added which will mark the object in the runtime for AR use case.
37Garbage Objects
To create garbage objects, you need to add a special object “Garbage Root Actor” on the top of the
hierarchy. Then, all child geometry will be recognized as garbage objects. The “Garbage Root Actor”
object has all types of transformations blocked in the editor mode. It can only be modified in the
game mode.
To manually create garbage matte objects:
1. Select an object “Garbage Root Actor” from the Modes tab and drag it into scene.
2. Create geometry of the garbage objects, according to your needs (may be complex). In this
example we will use 2 Planes.
383. Create material for the garbages objects and apply it to planes.
4. Select all garbage objects and change Mobility to “Movable”.
395. Select all garbage objects and move them under the GarbageRootActor.
40Alpha Matte Composition (Manual)
Garbage Objects
All child objects of GarbageRootActor will be treated as garbage objects which means that they
will not be seen in the Fill viewport, but they will be visible in the Key viewport.
Troubleshooting
Translucent Materials
Custom Depth does not work on translucent materials.For translucent materials, you need a second
copy of the mesh using a simple opaque material with Custom Depth enabled and Render Main pass
disabled. More information can be found on the AnswerHub.
For a simple object, using the AlphaMatteSceneComponent helper resolves this problem.
41To force CustomDepth on Translucent materials used in an object:
1. Open the material editor.
2. Enable Allow Custom Depth Writes in the Translucency section of the material’s Details
panel.
n Because of Unreal optimizations, materials with opacityTo generate a garbage matte object:
1. Open the Avid Garbage Matte Editor.
It allows to define a size for each of garbage matte object part. Additionally, it also gives the
option to select one of two ways of garbage matte generation: wrapped blur part and not
wrapped.
2. Enter the dimension values in cm, specific to your scene (1-4).
Select the parts of the garbage matte object that you want to generate (5).
Select the type of the object (Wrapped/ not wrapped) (6).
Press the 'Create' button (7).
433. After pressing the 'Create' button, the FBX Scene Import Option window appears.
Press the 'Import' button.
4. The window showing the progress of import appears for a few seconds.
445. The geometry of the garbage matte object appears in your scene.
In the Content Browser window, you can see the components of the garbage matte object.
In the World Outliner you can see all components. As you can see GarbageRootActor was
created and garbage object is child of GarbageRootActor.
45Working with Depth of Field (DoF)
n An in-depth description of the Depth of Field feature can be found in the Unreal Documentation at
https://docs.unrealengine.com/en-us/Engine/Rendering/PostProcessEffects/DepthOfField.
Depth of Field is broken up into three layers - Near, Far, and the Focal Region - each of which are
processed separately and then later composited together to achieve the final effect. Objects in the
near and far layers - objects not in the focal region - are always fully blurred. Then, these layers are
blended with the non-blurred scene.
• Objects within the focal region use the non-blurred scene layer.
• Objects in the near or far layers, but outside any transition regions, are fully blended to the
blurred layer.
• Objects within a transition region are blended linearly between the non-blurred scene layer and
their blurred layer based on their position within the transition region.
Circle Depth of Field
Important parameters (which could be exposed as export parameters):
• Enable/Disable
• Aperture F-stop - it defines the Iris
• Focal distance in cm
• Depth Blur km for 50%
• Depth Blur Radius - Depth blur radius in pixels at 1920x
• Focal Region in cm
• Near Transition Range in cm
46• Far Transition Range in cm
Depth of Field Implementation Using Information from Tracking Camera
Parameter Description
Overwrite depth of field settings When enabled, it sets the current method of DoF
depending on the next field - “Depth of field method”
and changes the max blur size depending on the field
“Depth of field max blur %“.
DoF method Select the DoF calculation method.
DoF max blur % Change the max blur size.
Calculate DoF distance When enabled, it calculates the Focus plane distance
from tracking.
47Parameter Description
Focus plane distance Value taken from Maestro | Tracker. It represents the
real focal plane.
Near Transition Value of the transitional blur area before the Focal
region.
Far Transition Value of the transitional blur area after the Focal
region.
Focal region The value represents the size of the area that will be
sharp.
Use real camera focus Switch between two methods 1: normalized focal
plane value, 2: real focal plane value.
Use real camera aperture Switch between two methods 1: manual set, 2: real
camera aperture value.
48You can also read