Beadographer User Guide - Version 2.1 February 2021
←
→
Page content transcription
If your browser does not render page correctly, please read the page content below
Beadographer User Guide
     Version 2.1 • February 2021
WELCOME TO BEADOGRAPHER!            6

Watch the Tutorials                  6

Join the Beadographer Common Room    6

Errors and Feature Requests          6

STARTING A NEW PROJECT              7

Choosing your beads                  7

Choosing a pattern                   7

Rows and columns                     7

Custom bead size                     7

FINDING YOUR WAY AROUND             8

Areas of the screen                  8

Showing more tools                   8

Showing more styles                  8

Bead Cat                             8

Keyboard shortcuts                   8

USEFUL TOOLS TO GET STARTED         9

Draw tool                            9

Erase tool                           9

Paint tool                           9

Rectangle tool                       9

Undo and Redo                        9

Screenshot                           9

CHANGE THE VIEW                     10

Hand tool                           10

Zoom tools                          10

SELECT BEADS                        10

                                     2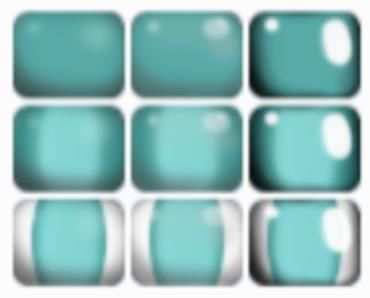
Marquee tool                            10

Select tool                             10

Color select tool                       10

Transform tools                         11

Keyboard shortcuts                      11

Changing the style of selected beads    11

Moving or copying beads                 11

Copying and pasting between projects    11

USING THE PALETTE                       12
Selecting a swatch                      12

Editing a swatch                        12

Selecting all beads of the same style   12

Creating a new swatch                   12

The eyedropper tool                     13

The bead library                        13

Bead library results                    13

Searching the library                   13

Searching for a specific color          13

USING AN IMAGE FILE                     14
Working with an image                   14

Uploading an image                      14

Moving and transforming the image       14

Converting the image to beads           14

Deleting the image                      15

OTHER TOOLS                             15

Beading mode                            15

Moving the highlighted beads            15

                                         3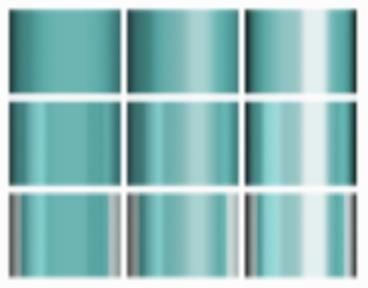
Mirror tool                                 15

Ruler tool                                  15

Row shift tool                              16

Bead Soup tool                              16

BEADOGRAPHER MENU AREA                      17

SETTINGS                                    17

Trim Project                                17

Get Project Code (save to cloud)            17

MY PROJECTS                                 18

Back Up Your Work                           18

Upload File                                 18

Autosave                                    18

Duplicate project                           18

PALETTE                                     19

Palette table                               19

Deleting unused swatches                    19

Deleting selected swatches                  19

Creating Bead Soup with selected swatches   19

Saving current palette to my palettes       19

Auto-assigning symbols to all styles        19

Matching styles to bead library             19

VIEW                                        20

EXPORT                                      21

Max Panel Width                             21

Starting bead                               21

                                             4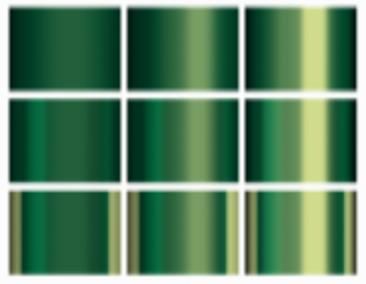
Beading direction              21

Header image                   21

My images                      21

REFERENCE TABLES               22

Bead Libraries                 22

Patterns                       22

GUIDE TO FINISH OPTIONS        23
Round beads (no tint)          23

Round beads (yellow tint)      23

Cylinder beads (no tint)       23

Cylinder beads (yellow tint)   23

                                5
Welcome to Beadographer!
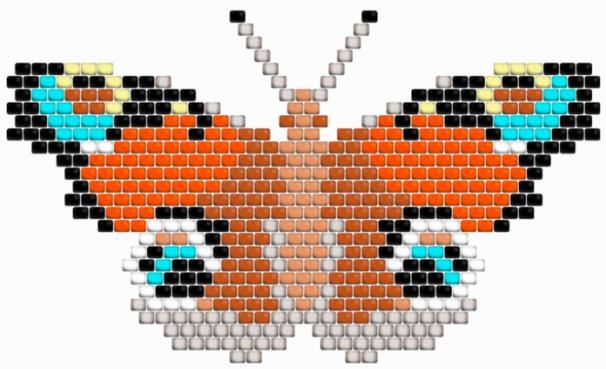
Beadographer lets you design patterns for beading projects. Create designs using seed beads or
plastic fuse beads. You can make so many things, including bracelets, ornaments, tapestries, and
loom designs.
Beadographer is currently developed for Windows, Mac, and iPad only. If you use Beadographer
on other devices, you may encounter errors.
Beadographer has a free version and a membership version. There are three extra features of the
membership version. You can:
• save your work for later
• export PDFs with diagrams and word charts
• load pre-made patterns and templates from the Beadographer Pattern Library for
customizing or use in your design
To learn more about Beadographer, and for more information on becoming a member, visit
beadographer.com/about.
Watch the Tutorials
Our video tutorials are a quick and easy way to learn how to use the app. You can find them at
the Beadographer Youtube channel. Subscribe on Youtube to get notified when we release new
videos.
Join the Beadographer Common Room
We set up the Facebook Group Beadographer Common Room as a friendly place where users
can connect with each other, share designs and tips, and ask for advice.
Errors and Feature Requests
If you found an error with Beadographer, or if you have a feature that you would like to see in a
future version, you can contact us by following the directions on our website.
6Starting a new project
When starting a new project, you choose the following options to create the project:
Choosing your beads
Choose the bead library that you want to work with. These include Miyuki seed beads, TOHO
seed beads, and fuse beads. Fuse bead brands include Perler, Artkal, and Hama beads.
If the beads you want to work with are not listed, you can select a library that most closely
matches the appearance of your beads, and then use a custom bead size. For full information
about each library, see § Bead Libraries.
Choosing a pattern
The pattern refers to the layout of the beads. Choose the pattern which matches the stitch or
layout you want to work with. In some patterns, some tools and features are not available. For
full information, see § Patterns.
Rows and columns
Choose the number of rows and columns that you want in your project. This can be changed
later. The app displays the approximate project size below. For very large canvases (over 60
thousand beads) Beadographer shows a warning that the app may run slowly, depending on your
device memory.
Custom bead size
With some patterns, you can specify a custom bead size, which overrides the default size (this
depends on the bead library you have chosen). You can specify bead size in inches or mm. The
bead diameter is the size across the bead when looking through the hole. The bead width is the
length of the hole. The aspect ratio is the ratio between these two numbers. The bead width must
stay within 50-100% of the bead diameter.
7Finding your way around
Areas of the screen
Beadographer has three areas of the screen:
• The canvas takes up most of the page. This is where you create your design.
• Tools are organized on the toolbar along the top.
• Bead styles are arranged on the palette on the left of the page.
If you click on the chest icon on the toolbar, another panel opens up. This is the bead
library.
The gear icon at the top-left of the toolbar shows the menu, which gives you further
options and tools.
Showing more tools
Some tools may be hidden, depending on the size of your browser window. To see the
hidden tools, click on the “...” button at the right-hand-side of the toolbar.
Showing more styles
Click on the → button at the top of the palette to see all the hidden styles.
Bead Cat
Bead Cat will give you hints as you learn to use the app. Clicking on Bead Cat will give you
extra hints. You can hide Bead Cat any time by clicking Hide hints. You can restore Bead Cat
by navigating to View → Show Bead Cat in the menu
Keyboard shortcuts
Keyboard shortcuts (also called hotkeys) are features of the app that can be accessed quickly by
pressing one or more keys on the keyboard. Using these shortcuts can speed up your work. They
are listed in this guide in brackets after each corresponding function.
8Useful tools to get started
Draw tool
The draw tool (D) is selected when a new project opens. This tool allows you to draw on
the canvas. Simply click on the canvas and beads will appear. Change bead style by
clicking on a different bead on the palette.
While using the draw tool, access the erase tool by holding down shift.
Access the eyedropper tool by holding down alt/option.
Erase tool
The erase tool (E) will remove beads from the canvas.
Paint tool
The paint tool (P) adds or changes entire regions of beads.
Rectangle tool
The rectangle tool (R) is used for creating rectangles of beads. It is useful for quickly
drawing a lot of beads.
Undo and Redo
The undo tool (alt/option + Z) undoes the most recent action.
To redo an action, click the redo tool.
When you undo an action and then alter the canvas, you can no longer redo to return to a
previous state.
Screenshot
Use this tool to download an image screenshot of the current canvas view.
9Change the view
Hand tool
The hand tool (H) moves and rotates the current view of the canvas. You can also move
the view at any time with the arrow keys.
When the hand tool is active, the rotate tool appears in the center of the canvas. You can use this
to rotate the canvas. Clicking on the red button in the middle of the rotate tool will reset the
angle. Clicking more times on the button will rotate the canvas by 90 degrees.
Zoom tools
The zoom out tool (-) and zoom in tool (=) change the zoom of the current view.
Q, U, X, and G are all useful keyboard shortcuts for changing the view.
Q toggles bead symbols, U toggles inactive (empty) beads, X turns on
and off rendering the bead’s finish, and G toggles showing the guides.
Select beads
Marquee tool
The marquee tool (M) selects beads in a rectangular area. Click and drag on the canvas to
select beads. Hold down shift to make additional selections. If you click on the marquee
tool a second time, it will turn yellow. This indicates that you can copy selected beads by
dragging them.
Select tool
The select tool (S) lets you individually select or deselect beads. Hold down shift to
deselect individual beads. Click on an empty space to deselect all the beads. If you click
on the select tool a second time, it will turn yellow. This indicates that you can copy selected
beads by dragging them.
Color select tool
The color select tool selects all beads of one color and deselects all other beads. This is
useful when you want to try changing the color palette of a project. If you click on the
color select tool a second time, it will turn yellow. This indicates that you can copy selected
beads by dragging them.
10Transform tools
These six tools appear whenever the marquee, select, or color select tools are active. The
transform tools allow you to transform the selected beads, either rotating or flipping them. Only
the selected beads will move; other beads will not be affected. The erase button in this panel will
erase the selected beads.
When selected beads move on top of another bead, the unselected bead will be
overwritten.
Keyboard shortcuts
There are two extra keyboard functions for selecting beads. These shortcuts only work when the
marquee, select, or color select tools are active.
• Press A to select all beads.
• Press I to invert the current selection. All beads that were selected will be deselected; all beads
that were not selected will now be selected.
Changing the style of selected beads
When any of the marquee, select, or color select tools are active, you can change the style of all
selected beads by clicking on a bead in the palette. All the selected beads will then be assigned
this style.
Moving or copying beads
When any of the marquee, select, or color select tools are active, you can move selected beads by
dragging them. If you hold down alt/option and drag the beads, you will copy the current
selection. This is useful for quickly creating repeating patterns.
When selected beads move on top of another bead, the unselected bead will be
overwritten.
Copying and pasting between projects
To copy beads to another project, select beads you want to copy, then press Alt + C to copy the
beads. Then open another project and press Alt + V to paste.
When copying between projects, the beads will be pasted into the same location on the
canvas as where they were when copied. They will overwrite any beads in the new
location. If the canvas is a different size, the beads may not appear. If the type of bead is
different in the new project, the beads will change finish and will lose their description.
11Using the palette
Selecting a swatch
Clicking on a swatch in the palette will be selected. You can drag the swatches around the palette
to re-arrange the order of your swatches.
If the marquee, select, or color select tools are active, clicking a swatch will change the style of
the selected beads. If a non-drawing tool is active, the draw tool will become active when you
select a swatch.
Editing a swatch
Shift + clicking on a swatch in the palette will open the Edit Swatch dialog box. This will let
you change any aspect of the swatch. Beads on the canvas will be updated to reflect any changes
you make.
Selecting all beads of the same style
Alt + clicking on a swatch will select all the beads of that style on the canvas.
Creating a new swatch
The large bead at the bottom of the palette shows the active style. It shows the active style of
bead used for adding beads to the canvas. Clicking on the active style bead will show the color
picker toolbar.
You can also access the color picker toolbar by clicking on the palette icon in the toolbar.
• Move the three sliders in the color picker toolbar to change the color of the active style.
• Click one of the six finish-selector beads (to the right of the active style bead). This will
change the finish of the bead. On the top row, you can choose between matte, semi-gloss,
and gloss finishes. On the bottom row, you can choose between opaque, transparent and
inside color beads. This feature is not available for fuse beads. See the § Guide to finish
options for more details.
• Enable a secondary color (tint) by clicking on the lower button in the color picker menu.
A second (white) handle will appear on the top slider, which will allow you to change the
tint of the bead. This is useful for representing metallic and irridescent beads.
• When you are happy with the style you have created, add it as a new swatch by clicking
the + button. Alternatively, if you add a bead to the canvas with a new style, it will
automatically get added to the palette.
12The eyedropper tool
This tool allows you to select a style of bead on the canvas. The active style will change
to reflect the style you chose. This is convenient for selecting directly from the canvas.
You can also access the eyedropper tool by holding down alt/option while the draw tool is
active.
The bead library
Another way to add styles to your palette is through the bead library. Click on the chest
icon in the toolbar to open the bead library panel.
When the bead library panel opens, a list of beads will be displayed. These are the beads from
the library that most closely match the active style’s current color. This feature allows you to
search the library by color.
If you change the active style, the bead library will be re-sorted to match the new color of the
active style. You can scroll through the bead library results by using the up and down arrows on
the bead library panel.
Bead library results
When you choose a bead from the bead library, three buttons will appear.
• Add swatch to palette
• Replace the currently selected swatch with this style
• Add to favorites. This means that a heart will be displayed whenever this style is shown
in the bead library. You can use favorites for reminding yourself which beads you already
own, for example.
Searching the library
You can search the names and descriptions of beads in the bead library by typing in the search
box at the bottom of the bead library panel. If you enter multiple words, multiple filters will be
applied; so, if you want to find beads that are both blue and opaque, you can enter “blue
opaque.” You can also search by product code, for example “DB1808”.
Searching for a specific color
If you have a specific color you want to add to your canvas, you can enter a six-digit hex code
(for example, 1a2e45) which represents that color. The active style will immediately change to
the color represented by that code, and the bead library will be re-sorted.
13Using an image file
Working with an image
You can add an image on top of the canvas as a useful reference for your work. For example,
you could use it to trace animal shapes from photographs or designs you have made with other
design tools. You can also convert the image into beads.
Uploading an image
Click the image tool to upload an image. Accepted image types are .jpg and .png. Only
one image is supported at one time; if an image is already present on the canvas, it will be
replaced.
Images are not currently saved as part of project files, so if you want to work with the
same image during different sessions, you will need to upload it again and move it to the
same position.
Moving and transforming the image
When the image tool is highlighted, you can move the image around the canvas by dragging it.
The image toolbar also appears on the canvas. The upper slider controls the size of the image,
and the lower slider controls the opacity (how transparent the image is). Dragging the red dot
next to the image on the canvas allows you to rotate the image.
Changing the image opacity can help you trace over an image.
Converting the image to beads
To convert the image into beads, press the convert to beads button on the image toolbar.
A dialog will appear that gives you options for converting the image:
• Number of Colors. This allows you to choose the number of colors used during the
conversion. For example, selecting 5 will limit the conversion to using 5 colors.
• Use only styles in palette. This option will limit the conversion to the beads you
currently have in your palette. For example, if you have only black and white beads in
your palette, the image will come out with only black and white beads.
• Method. This is the method that the app uses to find the closest bead color to the specific
part of the image. RGB compares the red, green, and blue components of the image data,
and HSV compares the hue, saturation and value of the image data. Usually RGB works
best, but you can try HSV as another option.
14Deleting the image
To delete the image, click the trashcan button on the image toolbar.
Other tools
Beading mode
Beading mode highlights a row or column of beads to help you navigate through your
work when creating it. To start beading mode, click on the beading mode tool, then click
on the bead where you want to start your work.
Moving the highlighted beads
Click on the arrow buttons to move the highlighted row or column. Or, if you are using the
keyboard, press Enter to advance the highlighted beads one space, and Backspace to move in the
other direction. With some patterns you can click the circular arrow button (or press shift) to
change the orientation of the highlighted beads.
Mirror tool
The mirror tool lets you add beads in a symmetric pattern. To add a mirror, click on the
mirror tool, then click on a bead where you want the mirror to pass through. Click Enter
or click on the mirror tool again to change between four modes:
• Horizontal reflection
• Vertical reflection
• Both horizontal and vertical reflection
• No mirror
For triangle patterns, there is only one mirror mode available (a 3-way mirror.) For medallion
patterns, there are the following mirror modes:
• Horizontal reflection
• Vertical reflection
• Symmetrical rotation (3 types: 2-way, 4-way, 8-way)
• No mirror
Ruler tool
To measure a length between two points, drag a line on the canvas. You can change the
units between inches and centimeters in the menu under View → units.
15Row shift tool
The row shift tool toggles the offset of an individual row. This allows you to create
custom row patterns, for example combining 1- and 2- drop peyote. The Row Shift tool is
not available for every type of bead pattern.
You can use the row shift tool to create a canvas with a mixture of
offset and square rows. You can use this feature to design brick stitch
projects with added fringe areas.
Bead Soup tool
The Bead Soup tool allows you to randomly combine colors when you are adding colors
to the canvas with the draw, paint, and rectangle tools. To enable Bead Soup in the menu,
select swatches in the upper table of the palette menu, and then click create bead soup with
selected swatches.
Now when you click on the Bead Soup tool, the active style will be replaced with the bead soup
image. This means that whenever you use the draw, paint, or rectangle tools, beads will be taken
at random from the swatches you added to the soup. You can exit Bead Soup mode by clicking
on any swatch in the palette, or creating a new swatch in the color picker toolbar.
16Beadographer Menu Area
File Available in membership version only
This section allows you to modify your current project. The options on this page are the same as
when starting a new project. See § Starting a New Project for more details.
The choices available on this page will depend on the pattern and bead library that you have
chosen. For example, you cannot convert a loom pattern into a medallion pattern because they
have incompatible layouts. Learn more about the options for different patterns at § Patterns.
If you decrease the number of rows and columns in your project, you may delete beads.
This cannot be undone. To avoid losing your work, please duplicate your project first in
My Projects section of the menu.
Trim Project
This action trims off empty rows and columns from all around your project. This allows you to
design your project on a larger canvas and then reduce its size later for export.
Get Project Code (save to cloud)
This button saves a snapshot of the current project to the cloud and returns an access code which
you can use to load the project again later. This allows you to move your project across browsers
or devices easily. You can also share your project code with other users.
The project saved in the cloud cannot be updated. Future changes to the project will not
be applied to the version in the cloud. In order to share an updated version of the project,
you need to get a new code.
Anyone with the access code can access your project. Only share the code if you wish the
project to be publicly available.
17My Projects Available in membership version only
My Projects lets you manage all the projects you have created.
Back Up Your Work
We recommend frequently backing up your work to avoid losing it. To back up your projects,
click Backup. To download a file individually, select a file in My Projects, and click
Download. This will download a .zip file of all your projects.
Upload File
This button loads one or more project files from your computer. Project files have the file
extension .bead.
.bead files can only be read by Beadographer. If you want to download
an image or PDF of your work, use the screenshot tool or the Export
tab in the menu.
Autosave
Beadographer automatically saves your work as you go. The app will save your work each time
you make a change to the canvas or palette.
Projects are saved inside your internet browser. If you delete your offline data from your
browser, you will delete all your projects! To save your projects outside the browser, you
must download the files using the Backup button.
Duplicate project
This will add a duplicate of the selected file to your saved projects. This lets you try out changes
to a project and return to the saved copy later.
If you often design projects with the same specifications and palette,
you can save a blank canvas as a template, then duplicate it to easily
create new projects with the same specifications.
18Palette
This part of the menu manages your current palette and your saved palettes.
Palette table
The first table is a list of all your current swatches. You can click on the table to edit the
description, symbol, finish, and transparency options for each swatch. You can sort the swatches
by any of the table columns, and select the swatches using the checkbox in the left column.
Deleting unused swatches
This button will delete all of the swatches that are not in use in the project. In other words, it will
delete all swatches with a bead count of 0. This is a quick way to clear away unused swatches
once you are happy with your styles.
This action cannot be undone.
Deleting selected swatches
Select swatches in the palette table, then click this button. This button will only be available if all
selected swatches are not in use on the canvas. In order to delete a swatch with beads in use, you
first have to delete its associated beads from the canvas.
Creating Bead Soup with selected swatches
This button will add each of the selected swatches to a Bead Soup. See § Bead Soup tool for
details.
Saving current palette to my palettes Available in membership version only
This button will save the current palette. You can do this if you have a set of bead styles that you
want to reuse in multiple projects. After saving, the palette will appear in the lower table.
Auto-assigning symbols to all styles
This button will assign symbols A, B, C... to all swatches that do not have a symbol already
assigned in the symbol column.
Matching styles to bead library
This will match each swatch to the bead in the bead library with the closest color.
This action will overwrite ALL the description, color, and finish information of every
style in the palette. It will also clear all unused swatches. This cannot be undone.
19Settings
This menu lets you change user preferences and the appearance of your project. Four of the
options have hotkeys enabled so you can toggle them without having to use the menu.
Setting Notes
Theme Changes the toolbar and background color of the app.
Units Changes the units for the ruler tool.
Show row and column numbers These are the numbers in the bottom right hand corner of
the screen in the main app.
Show tooltips These are the yellow hints that show when you hover
over different parts of the app with your mouse.
Show bead symbols (Q) These are the letters associated with each bead style. For
example A = red, B = green, C = black...
Show inactive beads (U) Inactive beads are the spaces between your beads on the
canvas.
Render as simple blocks (X) This option shows each bead as a simple shape with no
realistic finish.
Show Bead Cat
Show Bead Cat on start
Enable mouse scroll This allows you to use your mouse wheel (or two fingers
on a touch pad) to scroll the view of your project.
Guides (G) Set guides to help you keep track of where you are in
larger projects.
Horizontal guide spacing Sets the distance between horizontal guide lines.
Vertical guide spacing Sets the distance between vertical guide lines.
Color Sets the color of the guide lines.
20Export Available in membership version only
The table at the top of the page shows the various elements that will make up your PDF export.
You can move these elements around by dragging the left column of the table. You can also add
and delete elements. The available elements are:
• Title
• Subtitle
• Paragraph
• Project image: This is the image of the entire project.
• My image: This is one of the images that you have uploaded below using the file input
button next to the text My Images (see below).
• Bead list: This is a list of all the bead styles in the project, including the number of each
bead used.
• Diagrams and charts: This section contains one or more diagrams and word charts,
depending on the size and type of the project.
Extra page breaks can be added before elements by clicking in the Break column of the table.
Max Panel Width
This number sets the widest row that you would like to bead. For example, if your project is 100
beads wide, but your loom is only 30 beads wide, set this number as 30. The app will divide your
canvas up into equal-sized panels which you can combine together.
Starting bead
This refers to the first bead you intend to pick up when creating your project.
Beading direction
In loom mode only, you may choose to read the pattern horizontally or vertically.
Header image
Upload an image (for example, a logo) that will appear at the very top of the first page of the
project.
My images
These are custom images you want in your PDF. For example, a photograph of the finished
piece. You can upload multiple images, and include them by adding new rows to the table.
Images will appear in alphabetical order by file name.
21Reference Tables
Bead Libraries
Name Bead diameter (mm) Bead width (mm) Bead shape
Miyuki Round 8/0 3 2.35 Round
Miyuki Round 11/0 2 1.57 Round
Miyuki Round 15/0 1.5 1.18 Round
Miyuki Delica 8/0 3 2.3 Cylinder
Miyuki Delica 10/0 2.2 1.69 Cylinder
Miyuki Delica 11/0 1.6 1.23 Cylinder
Miyuki Delica 15/0 1.3 1 Cylinder
TOHO Round 6/0 4 3.13 Round
TOHO Round 8/0 3 2.35 Round
TOHO Round 11/0 2.2 1.72 Round
TOHO Round 15/0 1.5 1.18 Round
TOHO Aiko 11/0 1.8 1.38 Cylinder
TOHO Treasure 11/0 1.8 1.38 Cylinder
Fuse Beads 5 N/A Fuse
Patterns
Pattern name Project type(s) Bead type Notes (below)
Loom Bead loom, square stitch Seed beads 1
Brick (2- 3- drop) Brick stitch Seed beads
Peyote (2- 3- drop) Peyote / gourd stitch Seed beads
Herringbone Herringbone / Ndebele stitch Seed beads 6
Right Angle Weave Right Angle Weave Seed beads 3, 6
Triangle Peyote stitch Seed beads 2, 3, 4, 6
Huichol Huichol, netting Seed beads 2, 3, 5, 6
Medallion Circular medallions Seed beads 2, 3, 4
Square For grid designs Fuse beads
Brick (fuse) For hexagonal / star designs Fuse beads
Round For circular pegboards Fuse beads 2, 4, 5, 6
Notes:
1. You can export the pattern either horizontally or vertically
2. The paint tool is unavailable, and you cannot drag or transform beads.
3. Custom seed bead sizes are unavailable
4. Guides are unavailable
5. Beading mode is unavailable
6. Row shift tool is unavailable
22Guide to finish options
For information on how to set the finish, including the color of the secondary color (tint), please
see § Creating a new swatch.
Round beads (no tint) Round beads (yellow tint)
Matte Semi-Gloss Gloss Matte Semi-Gloss Gloss
Opaque Opaque
Transparent Transparent
Inside color Inside color
Cylinder beads (no tint) Cylinder beads (yellow tint)
Matte Semi-Gloss Gloss Matte Semi-Gloss Gloss
Opaque Opaque
Transparent Transparent
Inside color Inside color
23You can also read