Bioscreen C User's Manual - Oy Growth Curves Ab Ltd
←
→
Page content transcription
If your browser does not render page correctly, please read the page content below
User's Manual

Bioscreen C
 Oy Growth Curves Ab Ltd

         Version 2.1.5
             2009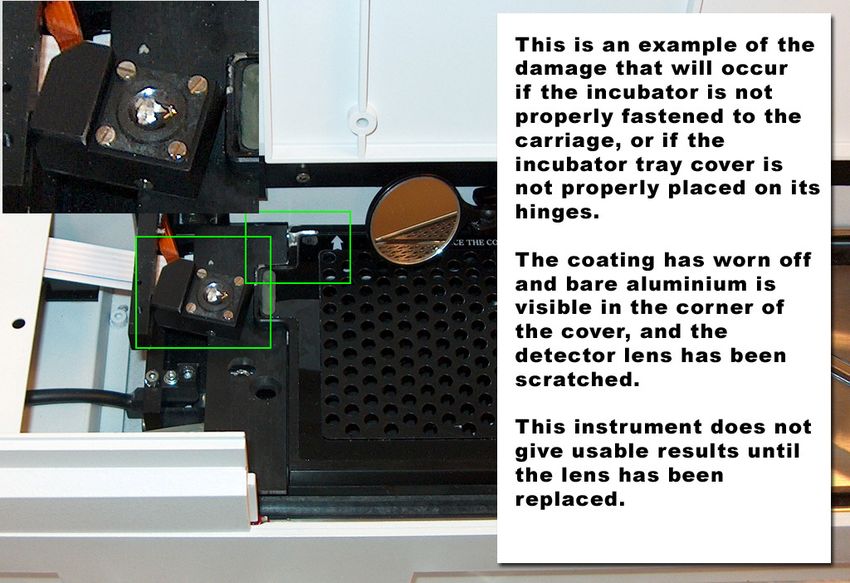
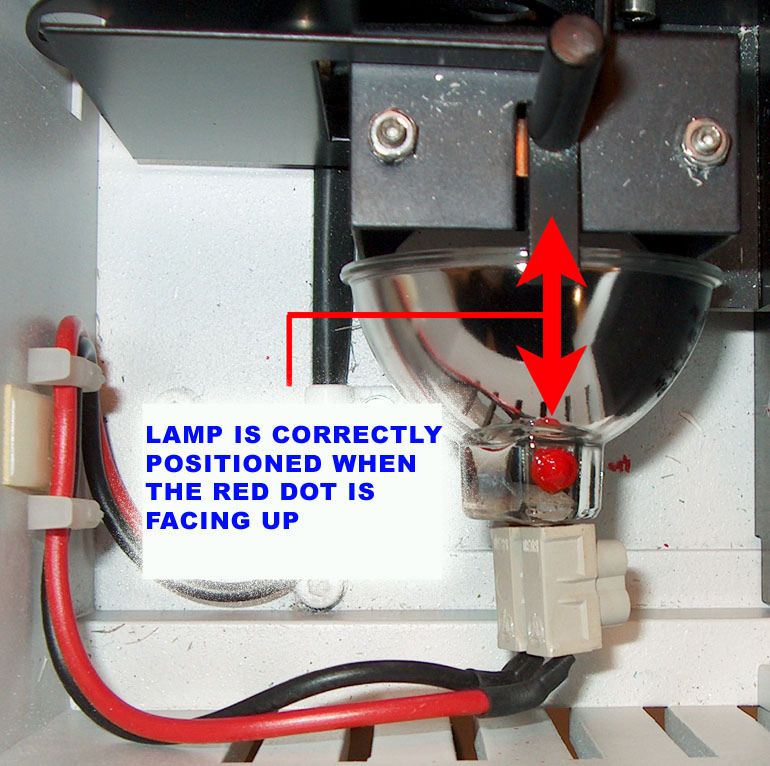
Table of Contents

                                           8   Technical Specifications               23
1   How to Use this Manual            2        8.1   General Specifications           23
                                               8.2   Safety Specifications            23
2   Getting Started                   3        8.3   Photometric System               24
    2.1   Unpacking                   3        8.4   Incubator for Honeycomb Plates   24
    2.2   Instrument Tests            3        8.5   Honeycomb 2 Plates               25
    2.3   Installing the PC           5        8.6   PC and Printer Requirements      25
    2.4   System Check                6        8.7   EU Directive on Waste (WEEE)     25

3   System Description                7    9   Guide for Manual Dispensing            26
    3.1   Overview                    7
    3.2   Applications                7    10 Guide to Anaerobic Experiments          27
    3.3   Software                    7
    3.4   Bioscreen Reader            8    11 User Replaceable Parts                  27

4   Operation                         9    12 Appendix
    4.1   Principles of Operation     9              Bioscreen C Service Request
    4.2   Planning an Experiment      9
    4.3   Pre-start Checklist         9
    4.4   Start-up                    9
    4.5   Running an Experiment       11
    4.6   Data Handling               12

5   Maintenance                       13
    5.1 Maintenance Steps &
        Frequency                     13
    5.2 Cleaning                      13
    5.3 Checking the Heat Transfer
        Fluid                         14
    5.4 Replacing the Fuses           14
    5.5 Replacing the Lamp            15

6   Troubleshooting Guide             16
    6.1 Optical Problems              16
    6.2 Temperature Problems          17
    6.3 Operational Problems          18

7   About Bioscreen                   19
    7.1 Product History               19
    7.2 System Description            19
    7.3 Comparison with Manual
        Techniques                    20
    7.4 Bioscreen Limitations         20
    7.5 Applications                  20
    7.6 Capabilities of Bioscreen C   21
    7.7 Unique Features of
        Bioscreen C                   22
    7.8 Test Example                  22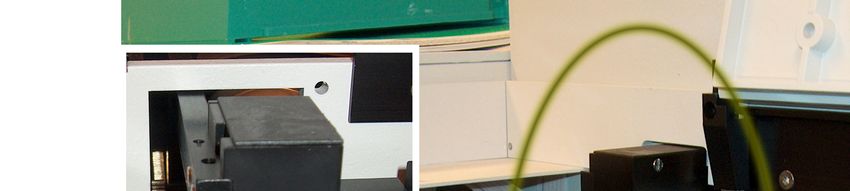
Microbiology Reader Bioscreen C                                                          User's Manual
____________________________________________________________________________________________________________

                                   Honeycomb 2
                                   multiwell plates

                                    Lamp and filter                                Incubator compartment
                                    wheel cabinet     Measurement                  2 Honeycomb plates,
                                                      compartment                  sample tray

                                                                                             Analyzer cover

            Heat transfer                                 Bioscreen keyboard for
                            Heating-cooling compartment                                  Bioscreen display
            fluid window                                  built-in service tests

    Figure 1     Growth Curves Ltd´s Bioscreen System and the Components of Bioscreen reader.

____________________________________________________________________________________________________________

                                                          1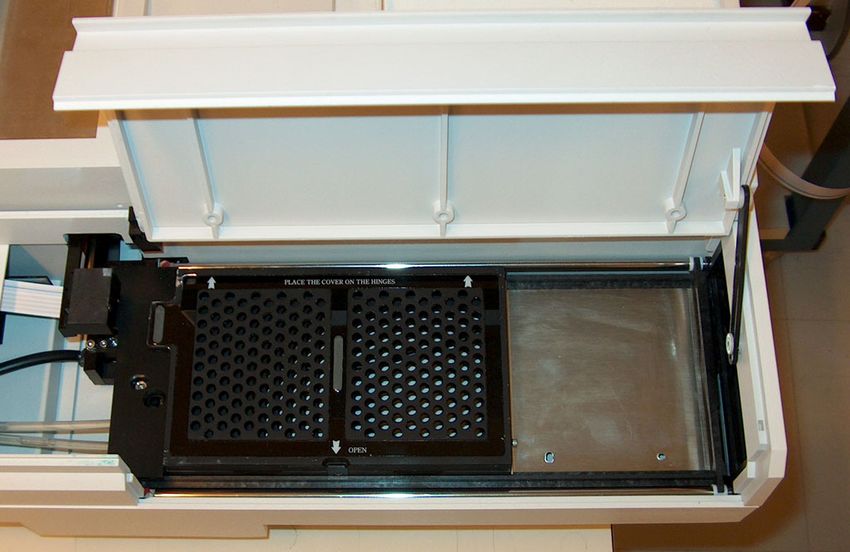
Microbiology Reader Bioscreen C                                                          User's Manual
____________________________________________________________________________________________________________

1. HOW TO USE THIS MANUAL
Start by looking at the pictures in this first section. Figure 1 illustrates a schematic layout of your Bioscreen C
system and the modules of the instrument. The growth results that you will get with EZExperiment software
are shown in Figure 2 as an MS Excel format.

Section 2 will walk you through how to unpack your Bioscreen, how to hook it up and what checks you need
to run before starting an experiment.

Section 3 provides a description of the system: components and general applications.
Section 4 describes how Bioscreen operates and gets you started running your first experiment.

Section 5 lists the maintenance steps required, when and how to do them.
Section 6 lists some common problems encountered and how to troubleshoot them.

Section 7 tells you about Bioscreen´s history, system description and some examples of applications.
Section 8 contains technical specifications and in sections 9, 10 and 11 you will find some useful information
about the use of Bioscreen.

If anything is not clear or you need help, please contact your Bioscreen sales representative.

                         Figure 2       Growth OD results presented in MS Excel.

____________________________________________________________________________________________________________

                                                         2
Microbiology Reader Bioscreen C                                                          User's Manual
____________________________________________________________________________________________________________

2. GETTING STARTED

2.1 Unpacking
These are the elements you will find in your Bioscreen shipping carton:

2.1.1 Supplement pack:
    • Black plastic case containing the filter wheel
    • Dust cover for Bioscreen
    • Power cord for the instrument
    • 2 spare fuses in a small carton

2.1.2 Bioscreen folder:
    • Bioscreen User’s Manual
    • Bioscreen Software alternatives
            -EZExperiment software CD
            -Instructions how to download Norden Lab Professional, Norden Lab Network or Norden Lab
             Web – Bioscreen C software editions from the Internet
    • Packing list, Discrepancy Report, Quick Start Instructions, Warranty Statement, Warranty
        Registration Form and other Bioscreen documentation

2.1.3 Protective packaging for the instrument
    • Lift the Bioscreen instrument with protective foam corners out of the carton.
    • Remove foam corners and save with other packaging. The box may be useful for future
        transportation / service etc.
    • Remove protective poly film cover from the instrument.

2.1.4 Accessory pack (below the instrument)
    • Connector cable (instrument to PC) & USB cable
    • Spare halogen lamp
    • Tool packet
    • A bottle of heat transfer fluid
    • 4 Honeycomb plates
    • Spare locking piece
    • Spare ground piece

2.2 Instrument Tests
2.2.1 Inserting the filter wheel
Remove the filter wheel from the black box, open the left rear lid over the lamp and very carefully insert the
filter wheel into the slot parallel to the instrument in the optical module with the gears facing backwards and
the numbers facing forward of the instrument. Please see Figure 3 on the next page.

The magnets will draw the wheel into the correct position. Close the rear lid. The magnets in the filter wheel
prevent the wheel from being placed incorrectly. Do not force the wheel incorrectly in place – try to turn it the
other way around instead.

Caution:     Avoid touching the filter lenses. Fingerprints on the lenses diminish the amount of light passing
             through to the detector.

Caution:     Do not touch or remove the filter wheel while running the instrument.

____________________________________________________________________________________________________________

                                                        3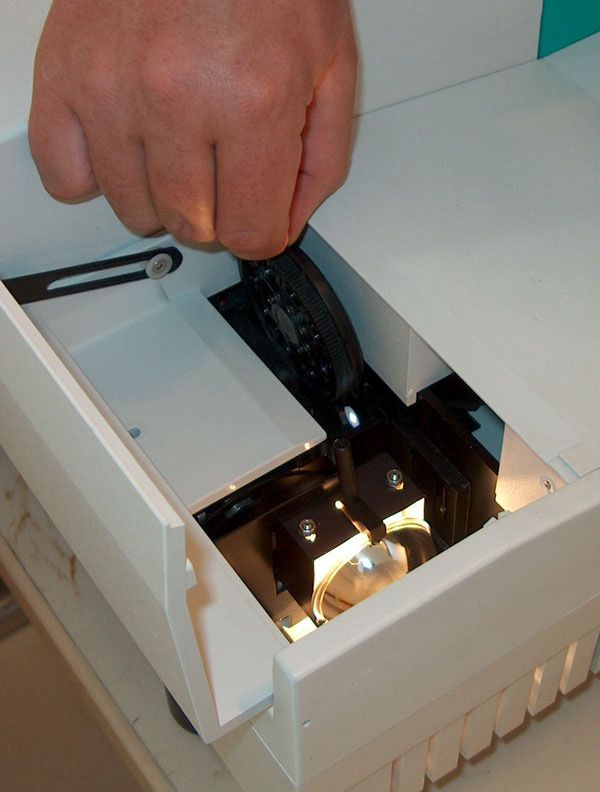
Microbiology Reader Bioscreen C                                                          User's Manual
____________________________________________________________________________________________________________

          Figure 3        Placing the filter wheel.

Connect the power cord to the back of the Bioscreen instrument. Plug it in.

Caution: Before turning the Bioscreen on ALWAYS remember to check that the incubator cover is in its
         right position. Improper placing of the cover can cause serious damage to the instrument which is
         NOT covered by warranty! Always close the lid before starting an experiment, as placing fingers
         etc. inside a running instrument can cause serous physical injury. Please see chapter 4.4 (Start up)
         for more information.

         Also remember to check that the green cover of the measurement compartment is properly in place.

Turn on the instrument (the switch is on right side towards the back).

2.2.2 Running the instrument test:
    • When the instrument is ready to start, 0.0 is shown on the LED display.
    • Press MODE on keypad, display will read tESt.
    • Press 21, then press ENTER on keypad and the pump will start etc.
    • Allow the instrument to run for at least 5 minutes.
    • If there is a problem, the test sequence will automatically terminate.
    • If the instrument is OK, it will keep displaying readings and continue to run.
    • To stop the instrument, press the RESET key, then switch the instrument off.

____________________________________________________________________________________________________________

                                                       4
Microbiology Reader Bioscreen C                                                          User's Manual
____________________________________________________________________________________________________________

2.2.3 Running the heat transfer fluid test
The heat transfer fluid level is checked at the window of the incubator at the front of the instrument. With the
Bioscreen turned ON, the green lamp in the tank window lets you see the level of the heat transfer liquid. The
fluid level should be above the minimum level marked at . The heat transfer fluid tank is full when you
receive your Bioscreen, but remember to check the fluid level on a regular basis!

Caution: Don’t operate Bioscreen if the fluid level is too low, it can seriously damage the instrument.

The heat transfer fluid is in a bottle inside the accessory pack included with your system. To add more fluid,
do the following:
    • Switch the Bioscreen ON.
    • Unscrew the plug on the upper part of the heat transfer fluid window.
    • Press ENTER - 21 - ENTER on your Bioscreen instrument keypad. The heat transfer liquid pump
        starts a continuous circulation of the heat transfer fluid.
    • With a pipette, take up a few milliliters of heat transfer fluid and dispense it through the hole from which
        you removed the plug. Keep dispensing until the level in the fluid window is well above the minimum.
    • Screw back the plug. Press STOP on the keypad.

Note:     When the pump is on, some fluid can leak out of the hole. Please wipe it up.

Caution: The heat transfer fluid contains ethylene glycol, which is harmful if swallowed. Keep the bottle
         clearly labeled and wash your hands after the use of the liquid.

2.2.4 Running a temperature check
After checking the fluid level, switch the Bioscreen ON. Wait until "00" appears on the LED display. Press
ENTER – 22 – ENTER –18 – ENTER on the keypad.

Note:    This instructs the instrument to operate at 18 °C. Feel free to select another temperature, but the
         instrument can only operate within 6 degrees below ambient. If lower operating temperatures are
         required, the instrument must be run in a cold room.

A loud noise caused by the start of heat transfer liquid circulation will be heard for a few seconds. It takes
approximately 30 minutes to reach the programmed temperature. Please also note that all temperature
settings are done through a computer and not on the keypad in the future real experiments.

2.3 Installing the PC
2.3.1 Connecting to PC
Connect the cable between the Bioscreen and your computer’s COM port. Alternatively you can use the
attached USB to RS-232 cable, if your PC isn’t equipped with a COM port. Just remember to install the driver
and read through the users’s guide from the attached CD.

Place the EZExperiment software CD into the computer and install the software. Follow the steps indicated
on the PC screen to complete the installation. At the end of the installation, a microscope icon will appear on
your menu screen. Click on this icon to start the EZExperiment software.

There are also commercial softwares available that are more diverse than the EZExperiment software.
Please visit at www.nordenlogic.com/download_bioscreen.html and familiarize yourself with the alternatives.

2.3.2 Setting the clock
EZExperiment is designed to run on a 24-hour clock. Since most U.S. Windows programs are set up with a
12-hour clock and AM/PM settings, the clock in your PC may have to be adjusted to run the EZExperiment.

To change your clock settings on your computer to 24 hour time, open the “Control Panel” in your start menu.
Double-click on “Regional and Language Options”. Click the “Customize” button next to the language drop-
down menu. In the “Customize Regional Options” window, click on the “Time” tab. Change the Time Format
to read HH:mm:ss instead of hh:mm:ss (Capital H implies a 24 hour clock).

____________________________________________________________________________________________________________

                                                        5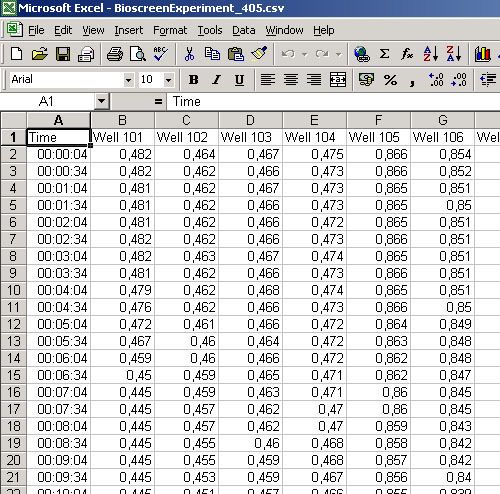
Microbiology Reader Bioscreen C                                                          User's Manual
____________________________________________________________________________________________________________

Delete “AM” and “PM” from the drop-down menus for “AM setting” and “PM settings”. Click “OK” to exit the
“Customize Regional Options” window and then click “Apply” in the “Regional and Language Options”
window. Double check the clock in the lower right hand corner of your desktop. It should now be changed to a
24-hour clock.

2.4 System Check
2.4.1 Inserting a Honeycomb plate
Open the right front lid of the instrument; examine the black incubator tray cover. Press the spring catch
towards you (where you see the markings  OPEN). Lift the incubator tray cover by pushing it back and up.

Remove the Honeycomb plate from the plastic pouch and place it to the incubator tray. Plate number one is
to be placed to the left and plate number two to the right side. Make sure that the cut-off corner of the plate is
in the left front of the tray. Carefully replace the incubator tray cover, making sure that the bottom hinges fit
through the slots in the back of the cover and close the lock on the front side.

CAUTION: Make sure that the incubator tray cover is firmly seated in place. Otherwise, serious damage can
         occur and the lenses in the instrument can be destroyed. First place the cover on the hinges in the
         back where the white arrows point, then gently push down and lock the front part marked with a
         white arrow and the text OPEN. Always double check this before turning the instrument on! See
         Figure 4 (and Figure 7 for the position of the lenses).

2.4.2 Setting the system check program
Click on the EZExperiment icon to open the program. A window with settings will appear. Enter the number of
samples (2), duration of the run (2 min.) and the interval (20 sec.). Press START and another screen will
come up. Select the folder where you want the data to be stored (preferable a local one, not on the server)
and then press ENTER. Please remember to always read the separate software instructions!

Note:     If you get an error message: “Bioscreen not found”, try another COM-port setting from the settings-
          menu. Or try using the USB – RS232 cable instead. Remember to install the drivers!

2.4.3 Examining the results
EZExperiment will signal the instrument to start running. The software will collect the data. When 2 minutes is
up, there will be seven OD readings with measurement times. These will automatically be exported to an MS
Excel file and be displayed there. You may choose a line graph from MS Excel to chart the results. All values
should be the same within +/- 0.003 OD readings.

Note:     Readings may vary if the measurement is done immediately after the instrument has been turned
          on. A minimum of 30 minutes prewarming (with the instrument turned on) is recommended before
          starting the measurements.

____________________________________________________________________________________________________________

                                                        6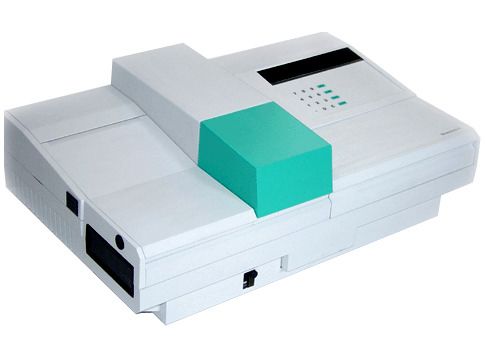
Microbiology Reader Bioscreen C                                                          User's Manual
____________________________________________________________________________________________________________

3. SYSTEM DESCRIPTION

3.1 Overview
The Bioscreen C Reader System is a fully automated instrument developed to perform a wide range of
microbiology experiments. The system consists of:

    •   Bioscreen C reader which includes an incubator and a measurement units
    •   EZExperiment software
    •   Norden Logic Professional software (downloaded from the Internet)
    •   Honeycomb plates (consumables)
    •   PC and a printer (supplied by a customer)

The incubation temperature can be set from 1 to 60 °C in steps of 0.1 °C. The measurement is done
kinetically using the principle of vertical photometry. All functions are controlled by computer software
according to the parameters entered by the user. The maximum capacity is 200 samples per run.

Honeycomb 2 plates are sterilized by gamma radiation and packed in individual bags. The instrument can
handle one or two plates at a time. Each well of the plate is an individual test vessel, so 200 microbiological
growth monitoring experiments can be performed in a single run.

3.2 Applications
Bioscreen C monitors the growth of microorganisms by measuring turbidity of liquid growth medium in the
well. These measurements are done kinetically, and recorded as optical density measurements. These
values are recorded by PC.

Bioscreen C can measure growth of any organism that will cause turbidity in its growth medium. This includes
bacteria, yeast, fungi, cells, phage etc.

Some applications for the system include: microbiology research, development of new antibiotics, protein
expression, development of new preservatives, optimization of fermentation processes, development of
waste treatment processes, bioassays, kinetic MIC, food QC, cell culturing, growth medium development,
tests to study effects of pH or chemicals on microorganisms etc.

3.3 Software
The EZExperiment software is simple and easy to use. The program stores all results from the experiment in
a CSV file. Data may readily be opened or exported to MS Excel for graph generation and analysis.

The more complex Norden Logic Professional software has a large number of functions and can be used for
30 days free of charge. Complete installation information is available at
www.nordenlogic.com/download_bioscreen.html

____________________________________________________________________________________________________________

                                                        7
Microbiology Reader Bioscreen C User's Manual
____________________________________________________________________________________________________________
3.4 Bioscreen Reader
The reader includes three interrelated systems: mechanical transport, incubator and optical system (for the
elements, see Figure 1). These three systems work in a coordinated way to provide automated
heating/cooling, sample indexing and OD readings.
3.4.1 Mechanical transport
The incubator tray assembly holds the Honeycomb plates in the correct position. The assembly shuttles left
from the plate loading section into the measurement compartment, where light is passed through each well of
the plate and the detector makes the OD readings.
3.4.2 Incubator
The incubator consists of the incubator tray itself (fixed, non-removable) and the incubator tray cover (on
hinges). The heating-cooling liquid circulates continuously in the incubator tray to keep the temperature stable
and at a selected value.
NOTE: Check & adjust the level of the heat transfer liquid level weekly by examining the fluid window.
3.4.3 Optical system
A halogen lamp produces light which then passes through the chopper wheel. The light path is turned 90
degrees by a mirror. Light then passes through the filter wheel. The correct filter is chosen by making the
appropriate entry during the experiment’s set-up. (In most cases, a wide band filter is used to measure
turbidity). Filtered light moves through an optical fiber to the lens assembly in the measurement
compartment, below the Honeycomb plates. Light passes through the bottom of each well and results are
collected by the detector. The detector is on a retractable arm which moves into the right places above the
plate.
Detector
UV-mirror
Chopper wheel
2 Honeycomb
plates with covers
(200 sample wells)
Lens
Optical fiber
Filter wheel
Halogen lamp
Figure 4 The optical system.
____________________________________________________________________________________________________________
8Microbiology Reader Bioscreen C User's Manual
____________________________________________________________________________________________________________
4. OPERATION
4.1 Principles of Operation
The changes in turbidity or the formation of color in the culture medium due to the growth of microorganisms
is measured kinetically with a vertical photometer. In this technique a light beam passes up through the
bottom of the plate well, through the sample suspension to the detector.
In the optical arrangement the halogen lamp emits a light beam, which is carried through the chopper and a
UV-mirror to the filter wheel (Fig. 4). The interference filters of the wheel are selected with the PC software.
The filtered beam enters an optical fiber, which leads the light upward to the lens of the measuring device.
After passing through a Honeycomb plate well the light enters the detector.
The measuring device is moved along the Y-axis while the incubator tray with the plate is moved along the X-
axis. This enables rapid measurement of all wells in the plate.
The incubator consists of an incubator tray, a cover of the incubator tray and a temperature control system.
After filling the plate with experimental materials, the top cover is placed manually on the top of the incubator
tray and properly closed. During the incubation and measuring, the incubator tray cover remains in place.
The temperature control system maintains the incubation temperature set by the program. The temperature
control system consists of a peltier element. Monoethylene glycol and water mixture (1:1) is used as a heat
transfer liquid. The incubation temperature is continuously monitored and saved so that the user can read it if
wanted.
4.2 Planning an Experiment
Bioscreen C allows you to run 200 samples at a time. At elevated temperatures (thermophilic fermentation)
the growth curves may appear in 2-3 hours. Bacteria (such as E. coli) will develop a growth curve in 4-18
hours at 37 °C.
In Bioscreen C the growth of a microorganism becomes visible twice as fast as in a petri dish. If a continuous
shaking feature is used, the growth may become visible even 4 times faster than in a solid medium. At
refrigerator temperatures, microorganisms grow slowly. A growth curve may take 1 week to develop.
It may be possible to start a Bioscreen C experiment in the evening before leaving the laboratory, and have
200 growth curves ready in the morning.
4.3 Pre-Start Checklist
• Check that the filter wheel is clean.
• Check that there are no spills inside the instrument.
• Check that there is enough heat transfer liquid.
• Check that the incubating temperature is not more than 6 °C below ambient.
• Check that the cables are connected thoroughly.
4.4 Start-up
• Make sure that the incubator tray cover is properly in place. CAUTION: See Fig. 5 on the next page!
• Switch ON Bioscreen C and your PC.
• Start the computer software and perform the System Check (See Section 2.4)
____________________________________________________________________________________________________________
9Microbiology Reader Bioscreen C User's Manual
____________________________________________________________________________________________________________
CAUTION: Do not store computer disks near the data processor or over the reader. There are several
small magnets inside Bioscreen. Their magnetic field can destroy the contents of your disk.
ATTENTION: Always check the correct placement of the incubator tray cover! Damage caused by improper
operation is not covered by warranty!
Please be careful to place the incubator tray cover properly in its hinges. The most common cause of
Bioscreen “malfunction” is careless placing of the cover. This prevents free track movement and will damage
your instrument.
Always make sure that the incubator tray cover is properly placed and closed before starting an experiment.
First place the cover on the hinges in the back where the white arrows point, then gently push down and lock
the front part marked again with a white arrow and the text OPEN. Always double check this before turning
the instrument on. Close the lid above the incubator to avoid physical injury when the instrument is
operational. Make sure that every person that uses the instrument is aware of this notification!
Figure 5 Check the correct placement of the incubator tray cover.
____________________________________________________________________________________________________________
10Microbiology Reader Bioscreen C User's Manual
____________________________________________________________________________________________________________
4.5 Running an Experiment
After dispensing media into the wells, manually insert the Honeycomb plate into the incubator tray. Be sure to
place the Honeycomb plate in the correct position (i.e. marked corner in left front). Place the incubator tray
cover on two hinges situated on the rear of the tray. Place the rear left and right corners carefully. Snap the
front of the cover into the catch with the text OPEN.
Caution: Make sure that the cover is firmly in place. Improper positioning can damage your instrument.
The incubation temperatures that can be used depend on the ambient (room) temperature (see Fig. 6). The
user may select any of the eight filters on the filter wheel: wavelengths from 405 to 600 nm including a
wideband filter between 420 and 580 nm. Usually WB (wide band) filter is used to measure turbidity because
it is less sensitive to color changes. During the measurements all instrument covers must be closed.
Caution: Open covers can interrupt the test, produce wrong results or result in personal physical injury for
fingers etc.
Between the measurements the cover can be opened. Make sure that the Bioscreen has come to a full stop
and it is safe to open the cover. If the cover is opened between measurements, make sure that there’s
enough time to safely operate and to properly close the cover again before the next measurement will take
place. New samples can be added or samples for other studies can be taken.
Caution: Do not put fingers or anything else between the incubator and a base frame (the space under
the green cover). Serious damage can be caused if the instrument starts to measure with the
cover open.
Note: When the incubator cover is opened, condensation may occur on the sample plate cover. If this
occurs, adjust the time between the measurements so the condensation disappears before the
next measurement.
When the experiment is completed, remove and dispose the used plates (if necessary). Clean the inside of
the incubator tray and the cover with ethanol-moistened tissues (if necessary). A white powderlike substance
can occur because of the movements of the plate in the incubator tray, especially if the shaking function is
regularly used.
____________________________________________________________________________________________________________
11Microbiology Reader Bioscreen C User's Manual
____________________________________________________________________________________________________________
Range of available incubation temperatures
70 °C at ambient temperature of 25 °C.
60 °C
50 °C
Temperature
40 °C
30 °C
20 °C
10 °C
0 °C
25 °C
0 °C 10 °C 20 °C 30 °C 40 °C 50 °C
Ambient temperature
Example 1. At ambient temperature 10 °C the incubating temperature can be set at 4 - 40 °C.
Example 2. At ambient temperature 20 °C the incubating temperature can be set at 14 - 50 °C.
Example 3. At ambient temperature 30 °C the incubating temperature can be set at 24 - 60 °C.
Figure 6 Range of incubating temperatures that can be selected at different ambient temperatures.
4.6 Data Handling
EZExperiment software handles the OD measurements and stores the data on a computer hard disk. OD
data and well numbers are stored in CSV format (comma separated list). This data can automatically be
exported to MS EXCEL, if desired.
This approach lets the user to handle Bioscreen data using any DOS, OS/2 or Windows graphical, scientific
or statistical software. Examples: MS EXCEL, LOTUS, DBASE, STATISTICA, MATHCAD, MATHEMATICA,
COREL DRAW, HARVARD GRAPHICS, STATGRAPHICS, MS WORD, LABVIEW, WINLIMS, ORIGIN,
SIGMAPLOT, SIGMASTAT, TABLECURVE, PEAKFIT, LABWORKS, SCIENTIST or others. Curve drawing
can be done in MS EXCEL or with any of these other curve-plotting software programs.
The Norden Logic Professional software is a complete system with both calculation and graphs of the
measurements – together with a wide list of many other functions. Please have a look at it and try it for free
during the 30 days free trial period!
Disclaimer: All use of the EZExperiment software is done entirely at the users own risk. Growth Curves
Ltd. assumes no liability for any problems the user of the software might encounter, including
but not limited to any loss of data, samples or any of the similar.
Growth Curves Ltd. assumes no liability for software developed by other companies, including
without limitation software of Norden Logic Oy. Any and all claims relating to software shall be
addressed to the licensor or developer.
____________________________________________________________________________________________________________
12Microbiology Reader Bioscreen C User's Manual
____________________________________________________________________________________________________________
5. MAINTENANCE
5.1 Maintenance Steps & Frequency
During normal operation we recommend the following maintenance procedures:
• Cleaning of lenses Weekly / more often if necessary
• Cleaning of the filter wheel Weekly
• Replacing the fuses As needed
• Replacing the lamp As needed
• Adding the heat transfer fluid As needed / Check weekly
• Decontamination Before service call
(Please see Appendix A)
5.2 Cleaning
WARNING: Bioscreen can be used with substances containing or producing hazardous compounds.
Remember to clean the contaminated parts properly after use to avoid health risks. This is
particularly important when the Bioscreen is sent out of the laboratory or if a service visit is
needed. Your service rep may ask you to provide a written certificate of decontamination.
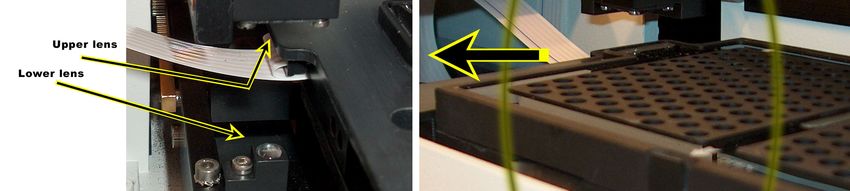
5.2.1 Cleaning the lenses
If the lenses are dirty, clean them with alcohol and a lint-free cloth. Avoid harsh treatment. There are two
lenses, one below and the other one above the incubator.
Figure 7 Position of both upper and lower lens.
____________________________________________________________________________________________________________
13Microbiology Reader Bioscreen C User's Manual
____________________________________________________________________________________________________________
5.2.2 Cleaning the outer surface
Unplug Bioscreen from the power outlet before cleaning. All the surfaces of the instrument can be cleaned
with a moist, soft cloth and mild detergent. Make sure that no liquid enters the instrument.
5.2.3 Cleaning the filter wheel
Check the filter wheel once a week and clean it if necessary:
• Turn the power off.
• Open the cover of the lamp cabinet.
• Lift the filter wheel up. Avoid touching the filter surfaces.
• Clean the filter surfaces with a lens paper. If necessary, use purified alcohol.
• Put the filter wheel back so that the toothed edge is facing backwards.The magnets will draw the
wheel into the correct position. Do not try to force it to the right place, turn it around instead.
• Close the cover.
5.2.4 Cleaning the incubator tray
Clean the incubator tray with a soft cloth and alcohol.
WARNING: Be careful when filling up the Honeycomb plates. If the experiment is supposed to create gas or
similar, make sure you do not over fill the wells. The flooding of the wells can cause damage to
the sensitive optical lenses underneath the incubator tray!
Caution: Don’t immerse the incubator tray cover in cleaning solution.
5.3 Checking the Heat Transfer Fluid Level
The heat transfer fluid level is checked at the window of the incubator at the front of the instrument. With the
Bioscreen turned ON, the green lamp in the tank window lets you see the level of the heat transfer liquid. The
fluid level should be above the minimum level marked at . The heat transfer fluid tank is full when you
receive your Bioscreen, but remember to check the fluid level on a regular basis!
Caution: Don’t operate Bioscreen if the fluid level is too low, it can damage the instrument.
The heat transfer fluid is in a bottle inside the accessory pack included with your system. To add more fluid,
do the following:
• Switch the Bioscreen ON.
• Unscrew the plug on the upper part of the heat transfer fluid window.
• Press ENTER - 21 - ENTER on your Bioscreen instrument keypad. The heat transfer liquid pump
starts a continuous circulation of the heat transfer fluid.
• With a pipette, take up a few milliliters of heat transfer fluid and dispense it through the hole from which
you removed the plug. Keep dispensing until the level in the fluid window is well above the minimum.
• Screw back the plug. Press STOP on the keypad.
Note: When the pump is on, some fluid can leak out of the hole. Please wipe it up.
Caution: The heat transfer fluid contains ethylene glycol, which is harmful if swallowed. Keep the bottle
clearly labeled and wash your hands after the use of the liquid.
5.4 Replacing the Fuses
• Switch the power off.
• Disconnect the power cord from the mains.
• The fuses are on the back of the Bioscreen in the power cord block. The fuseholder can be removed
after the lower cord is detached from the block. The fuseholder is attached with two small clips which
are released by pressing them towards each other.
• Change the blown fuses to new ones and put the fuseholder back into the power cord block.
____________________________________________________________________________________________________________
14Microbiology Reader Bioscreen C User's Manual
____________________________________________________________________________________________________________
• Connect the instrument to the mains and switch it on.
CAUTION: Replace the blown fuses only with fuses with the same rating shown on the serial plate of the
instrument. Failure to do this may cause instrument damage and/or personal injury.
5.5 Replacing the Lamp
CAUTION: Do not bend the lamp pins. Do not touch the reflective surface of the bulb.
CAUTION: LAMP MAY BE VERY HOT!! Do not touch with bare hands.
• Switch the power off.
• Disconnect the power cord from the mains.
• Open the cover of the lamp cabinet.
• Open the two screws of the lamp connectors with the tool provided. Lift the lamp
holder upwards and remove the lamp.
• Install the new lamp so that the red dot points upwards. Place the lamp connector to the lamp pins
and tighten the screws firmly. Check that the lamp is correctly positioned.
• Close the cover, plug the power cord in and switch the Bioscreen C on.
Figure 8 Replacing the lamp. Figure 9 Positioning the lamp.
NOTE: Do not open the screws painted in red.
NOTE: There are some brands of lamps that will not give enough light for the wavelength range that the
Bioscreen uses. Only those lamps sold AND pre-tested by Growth Curves Ltd. are guaranteed to
operate properly.
Use only these certified lamps pre-tested and approved by Growth Curves Ltd. in order to avoid
the F1-b2 / “too little light” -error!
____________________________________________________________________________________________________________
15Microbiology Reader Bioscreen C User's Manual
____________________________________________________________________________________________________________
6. TROUBLESHOOTING GUIDE
6.1 Optical problems
Description Filter error (FE)
Cause Filter is missing.
Solution Be sure that the filter wheel is properly installed and all the filters
are in place.
Description Blank error (F1 - B2)
Cause Insufficient light to the amplifier.
The lamp is burned out or the lamp is of the wrong model.
The filters and / or lenses are dirty.
Solution Change the lamp to a pre-tested and approved lamp sold only by
Growth Curves Ltd. Clean the filters and lenses.
Note Sometimes old lamps can cause problems. They are lit, but the
amount of ultraviolet light is not sufficient for the measurement.
This can cause false assumption that the lamp is OK when it is
not.
Description Blank error (F1 - B3)
Cause Too much light is reaching the detector.
The filter wheel is missing or the cover is open.
Solution Check that the filter wheel is properly installed and all the filters
are in place. Close the covers.
Description Unnatural growth curves
Cause 1) Sediment accumulates to the bottom of the sample wells, then it
moves randomly when the sledge moves.
2) The cover has been opened during the measurement and this
has elevated the measurement values.
3) Ambient temperature is too high or too low to keep the
programmed incubation temperature.
Solution 1) Use shaking before each measurement to keep it in
suspension.
2) Do not open the cover during the measurement.
3) Place instrument in a room (or box) of higher or lower
temperature.
____________________________________________________________________________________________________________
16Microbiology Reader Bioscreen C User's Manual
____________________________________________________________________________________________________________
Description Instrument gives elevated readings which lower gradually to
normal after a few minutes.
Cause The vapors from the sample have condensed on the sample plate
cover. This happens when measurement temperature is lowered
during the measurement, or when the run has been aborted and
started again, or when the incubator cover has been removed
during the measurement.
Solution Make the measurement to start from lower temperatures and
measure the warmest last. If reverse temperature measurements
are needed, give the instrument enough time to stabilize to desired
temperature before measurement. If condensation occurs while
experiment has been aborted, warm up the instrument and sample
as usually done when starting the experiment.
Description Absorbance values oscillate randomly. Static noise is very
high.
Cause The incubator tray is loose in its carriage. The locking screws are
loose and the incubator is not firmly secured in its place.
Solution If the carriage locking screws are loose, tighten them firmly (but
not too tight).
Service A loose incubator tray can be tightened by the operator.
Note With very old instruments this behavior can be caused by electrical
interferences. Newer instruments have protective coating on the
chassis that prevents EMP disturbances.
If the problem arises after the instrument has been relocated (or
other changes have been made in the operational environment),
this is the probable cause. Try to solve the problem by using the
instrument in another location, or use better regulated power
outlets (reserved for computer use only).
6.2 Temperature problems
Description Desired temperature is not reached.
Cause 1) Desired temperature out of operational range.
2) Ambient temperature too low or too high.
3) Heat transfer fluid level is too low.
Solution 1) Refer to operations manual about correct operational range.
2) Place instrument in a room (or box) of higher or lower
temperature.
3) Replenish the heat transfer fluid.
____________________________________________________________________________________________________________
17Microbiology Reader Bioscreen C User's Manual
____________________________________________________________________________________________________________
6.3 Operational problems
Description The instrument does not work.
Cause Power cord is not connected properly or primary fuses are blown.
Solution Check that the power cord is properly connected from both ends.
Check the primary fuses in the power socket.
Description No connection between the computer and the Bioscreen C.
Cause 1) Serial cable is not connected.
2) Incorrect COM-port setting.
3) Incorrect serial cable. Use modem cable supplied with
Bioscreen.
Solution 1) Check the serial cable from both ends.
2) Check COM-settings from EZExperiment settings menu.
3) Check the cable. If you have a null modem cable, be sure to
attach the null modem adapter between the cable and the
Bioscreen C.
Note Bioscreen C used to be delivered with null modem cable and
adapter. Now they are shipped with standard peripheral cables.
Description Instrument gives periodically totally wrong readings during a
long experiment.
Cause Computer power saving features interfere with serial port
communication.
Solution Turn off all power saving features from your computer. Please
consult with your IT department if necessary.
Description Motor runs incubator against an obstacle, which causes
noise.
Cause Incubator tray cover is not placed properly over the hinges.
The cover crashes against the optical detector assembly.
Solution Place the cover properly over the hinges. Wiggle it to be sure it’s
in place.
Check for damage on the upper lens (in the detector assembly).
If the lens has been damaged, it must be replaced.
Description Carriage movement is normal but noisy.
Cause Incubator tray cover is not placed properly over the hinges.
The cover crashes with the detector assembly.
Solution Place the cover properly over the hinges. Wiggle it to be sure it’s
in place.
Check for damages on the upper lens (in the detector assembly).
If the lens has been damaged, it must be replaced.
____________________________________________________________________________________________________________
18Microbiology Reader Bioscreen C User's Manual
____________________________________________________________________________________________________________
7. ABOUT BIOSCREEN
7.1 Product History
Waiting for days for Petri dishes is just too long when you're carrying out microbiological assays. But what
about the alternatives? Surely you have considered automation – but you need a system that operates on an
accepted biological principle to produce meaningful results and which is versatile enough to carry out a wide
range of both routine and research assays. Such a system is available: Bioscreen C.
Bioscreen C was developed by Labsystems Oy, a Finnish company heavily involved in biotechnology and
laboratory instrumentation. They have manufactured over 16,000 ELISA readers and over 1 million
Finnpipettes. About 20 years ago, they saw a need for a new generation of instruments designed specifically
for microbiology. This led them to develop Bioscreen C – a fully automated growth curve reader that gives
results in less than a day.
After Labsystems Oy was acquired by Thermo Electron, the strategic decision was made to sell off the
Bioscreen C line to a newly-formed company, Oy Growth Curves Ab Ltd. (Helsinki, Finland). Oy Growth
Curves Ab Ltd. now manufactures the Bioscreen C instrument for distribution throughout the world.
7.2 System Description
Bioscreen C is a fully automated instrument developed to perform a wide range of microbiology experiments
automatically. The system consists of a reader (which incorporates an incubator and a measurement unit),
sample plates and software.
EZExperiment software, which records OD readings over time, is included in the system. Norden Logic
Professional software can be downloaded from the website www.nordenlogic.com and used for free during
the 30 days trial period. Bioscreen C is designed to be used with a PC and a printer (not supplied with the
system). Users can export data to commercially available scientific software packages such as MS Excel for
additional data handling if required. (Norden Logic SW works differently, please see its homepage.)
The incubation temperature selection ranges from 1 to 60 °C in steps of 0.1 °C. The maximum temperature
of 60 °C is reached when the lid is 60 °C and the cassette holding the samples has reached 59 °C. Bioscreen
can reach 6 °C below and 30 °C above ambient temperature. If lower temperatures are desired, the whole
Bioscreen must be placed in a cooled room. Measurement is done kinetically using the principle of vertical
photometry. All functions are controlled by computer software according to the parameters entered by the
user. The maximum capacity is 200 samples at a time.
Each well can be considered as an individual test vessel where monitoring of the microbiological growth in
200 experiments can be performed simultaneously. Two 100-well Honeycomb plates can be read at the
same time.
This Honeycomb multiwell plate technology positions 100 wells in a similar footprint as a 96-well plate. The
plate was designed to both give the most even temperature possible across the whole plate, as well as to
eliminate evaporation and condensation, common problems with conventional 96-well plates. A unique
incubator has a liquid circulation heat exchanger which gives constant temperatures to all wells. This is
essential for developing high quality growth curves.
____________________________________________________________________________________________________________
19Microbiology Reader Bioscreen C User's Manual
____________________________________________________________________________________________________________
7.3 Comparison with Traditional Manual techniques
Using standard growth medium Bioscreen C directly measures growth. Thus the data produced correlates
directly with classical assays. So, you can simply transfer your present working method to Bioscreen C and
enjoy the benefits of automation.
Bioscreen C provides consistent final results both for research and routine work. You can run a wide range of
assays. Simply by changing the program parameters, you can cover a wide range of routine and research
applications.
Bioscreen C lets you work more cost-effectively: you can save dramatically on media and consumable costs
(petri dishes, test tubes etc.).
Bioscreen C performs 200 tests automatically (each well is one test) at the same time. It works unattended,
twenty-four hours a day, seven days a week. You can complete as many tests in just a few weeks as would
normally take a year by using traditional manual techniques.
7.4 Bioscreen Limitations
• Growth media must be in a liquid form.
• The maximum volume of each well is 400 µl (50 µl sample + 350 µl growth media).
• Incubation temperature range is from 1.0 to 60.0 °C (-6 /+30 °C from ambient temperature).
• Incubating time is from 1 to 1600 hours.
• 200 simultaneous tests can be performed.
7.5 Applications
All microorganisms increase the turbidity of broth (growth medium) when growing and multiplying in it. In
addition to microorganism growth monitoring, the growth of phage and suspended cell cultures can be
monitored by Bioscreen C.
The range of Bioscreen C tests is virtually endless – miniaturized bioassays, measurement of effects of
chemicals, pH, temperature and other parameters on micro-organisms, antibiotic susceptibility tests, QC of
food (total count) and others.
A user can dispense any "favorite" micro-organism with any chemical and broth in empty multiwell plates to
monitor kinetically the growth of the culture i.e. the development of turbidity or color in 200 wells at a time.
Most tests that are run in test tubes with broth can be run automatically by Bioscreen C.
7.5.1 Examples of Applications
1. To follow the growth (turbidity development) of 200 cultures simultaneously by simultaneous
recording of the parameters of the growth curves.
2. To measure the total count of microorganisms of food samples.
3. Microbiological assays for measuring the amount of vitamins, amino acids, antibiotics, disinfectants,
toxicants, biostimulators, growth retardants, or other chemicals.
4. To develop the production of microbiological protein from organic waste.
5. To develop new antimicrobial/antifungal agents.
6. To develop microbiological preservatives.
7. To develop microbiological single-cell-protein (SCP) production processes.
____________________________________________________________________________________________________________
20Microbiology Reader Bioscreen C User's Manual
____________________________________________________________________________________________________________
8. In production of enzymes, proteins, fatty acids or other substances.
9. To develop wastewater treatment biofilm and activated sludge processes. To find optimal conditions
for biodegradation of pollutants.
10. To study microbiological processes at different temperatures.
11. To determine minimal inhibitory concentration (MIC) of antimicrobials, or to determine the lethal dose
(LD) of antibiotics or other compounds.
12. To develop microorganisms with wanted characteristics.
13. To detect the presence and level of bacteriuria.
14. To measure the toxicity and potential mutagenicity of different compounds.
15. To study the metabolic processes of microorganisms and cells.
16. To study microbiological processes of production of yogurt, beer, wine or foods.
17. To measure the combined effect of various parameters (e.g. pH, temperature, water activity, salt
concentration, chemicals) on pure and mixed cultures.
18. To study the growth kinetics of bacteriophage (dropping growth curves).
19. LAL tests (Limulus amoebocyte lysate gel assay) for endotoxin assay.
20. Mathematic modeling of microorganism, phage or cell growth with the help of MS Excel or similar
programs.
21. To develop selective or broad range growth media for microorganisms or cells.
7.6 Capabilities of Bioscreen C MBR
Bioscreen C provides measurement of turbidity of samples kinetically. All microorganisms (bacteria, fungi,
yeast, algae) produce turbidity by multiplication in broth. Conventional test tube tests where the turbidity or
color change occurs can be run with the "mini-tubes" in a Honeycomb plate with Bioscreen C.
Bioscreen C is an open system: the user can him/herself decide what is put into the wells. Any
microorganism, broth or chemical can be dispensed into the wells for monitoring growth kinetically and
automatically.
Anaerobic bacteria can be grown (by sealing the cover to the plate in an oxygen-free gas; alternatively the oil
layer technique can be used). One can also monitor bacteriophage growth (dropping growth curves),
amoebae (Limulus) growth and other processes where the turbidity changes. The results are reported as
CSV formatted OD numbers.
For vertical light photometry, all visible light wavelengths can be used. The standard filters provided in the
filter wheel are: 405, 420, 450, 492, 540, 580, and 600 nm and a wide band filter. Other wavelength filters
may be available by special request.
The wide band filter is a "white" filter for turbidity measurement (band area 420-580 nm). Usually the wide
band filter is used in microbiology work because the results are not affected by change of color of growth
medium. The results indicate only a development of turbidity. In special work for high sensitivity where the
color change is needed, other filters can be used.
____________________________________________________________________________________________________________
21Microbiology Reader Bioscreen C User's Manual
____________________________________________________________________________________________________________
7.7 Unique Features of Bioscreen C MBR
(Compared to conventional plate readers)
• No condensation or evaporation of the sample.
Patented technology assures there will be no liquid condensation on plate cover, which can mask true
results. The cover also eliminates sample evaporation which can distort results. Bioscreen C is the only
reader that keeps the cover on during the entire experiment.
• Tight temperature range for reliable results.
Temperature range is from 1 to 60 °C, with temperature variation held within +/- 0.1 degree.
Conventional plate readers can not keep these tolerances, and hence provide less reliable results.
• Choice of optical measurements.
The user can choose of seven wavelengths plus wide-band for turbidity measurements (unaffected by
change in color in the wells.)
• 200 results at a time.
Conventional readers read a 96 well plate in one run, but Bioscreen C can measure 200 results at a
time.
• Unique versatility and reliability.
Other readers are not designed for microbiology work, or for long-term use with an incubating time of
up to 1600 hours. Bioscreen C has proven its versatility for a wide range of applications in over 500
sites worldwide, with some units in use for over 20 years.
7.8 Test Example
Bioscreen C is an optical mechanical equipment for measurement of turbidity of samples kinetically. To
understand if Bioscreen C is capable of performing any particular test it is necessary to know if the test
involves a turbidity (or color) change during growth in broth. All microorganisms (bacterial, fungal, yeast,
algae) produce turbidity by multiplication in broth. Most of the test tube tests where the turbidity or color
change occurs can be made in the "mini-test-tubes" of Bioscreen C.
In addition to multipurpose research work the Bioscreen C is also used for routine work e.g. for measurement
of the amount of bacteria in samples (food QC, bacteriuria etc.) and for microbiological assay tests (of
vitamins, antibiotics or other chemicals). Among many other studies the Bioscreen C is excellent for
measuring the effect of antibiotics on microorganisms in vitro. For example:
Let’s imagine that we need to check in vitro the effect of 5 new antibiotics on 10 different bacteria. For
comparison 5 old antibiotics are also tested. We will use 5 different concentrations of each antibiotic, and
perform the tests at 5 different temperatures and at 3 different pH. Also all tests are performed in 3 parallels.
So the number of tests needed to create this model of antibiotic effect is:
10 antibiotics (5 new ones and 5 old ones for comparison)
10 bacteria (e.g. strain 1... strain 10)
5 concentrations of each antibiotic (e.g.1, 5, 20, 50, 100 µg/ml)
5 different temperatures (e.g. 30, 36, 37, 37.5 and 38 °C)
3 different pH (e.g. 6.5, 7.5 and 8.5)
3 parallels for each test
10 x 10 x 5 x 5 x 3 x 3 = 22 500 growth curve tests
To perform these tests manually (max. 20 tests per day) takes 22 500 : 20 = 1125 working days. Assuming
200 working days per year it takes 1 125 : 200 = 5.6 years + additional time for data handling. With Bioscreen
C 400 tests per day are possible if the growth curve is received in less than 12 hours (it is usually possible if
the continuous shaking feature is used). Bioscreen runs these 22 500 tests in 56 days. This experiment can
be performed by traditional manual means in 6 years or by Bioscreen C in 2 months.
____________________________________________________________________________________________________________
22Microbiology Reader Bioscreen C User's Manual
____________________________________________________________________________________________________________
8. TECHNICAL SPECIFICATIONS
8.1 General Specifications
Nominal voltages: 100/240 VAC 50/60 Hz
110/220 VAC 50/60 Hz
Operating voltage range: 10% of nominal
90-130 VAC (100/110 VAC)
180-260 VAC (220/240 VAC)
Power consumption: 1.6 A 100, 110 VAC
0.8 A 220, 240 VAC
Weight: 22 kg
Dimensions (WxDxH): 62 cm x 38 cm x 23 cm
Primary fuses: T 4A/250V IEC 127/III at 100/110 V
T 2A/250V IEC 127/III at 220/240 V
Ambient temperature range:
Transportation and storage: -25 – +50 °C
Operation: +5 – +40 °C (this is an ambient temperature surrounding
Bioscreen, incubation temperature inside the incubator is
1 - 60 °C and it can go 6 °C below or 30 °C above ambient
temperature / max. 60 °C).
8.2 Safety Specifications
Bioscreen C fulfills
the following requirements: IEC 1010-1 including Amendments 1 and 2
The safety specifications are met also under the following environmental conditions in addition or in excess to
those stated in the operating conditions:
Altitude: up to 2000 m
Temperature: +5 °C – +40 °C
Humidity: max. 85% at normal room temperature
Mains supply fluctuations: ±10%
Installation category (over voltage category): II according to IEC 664-1 (Note 1)
Pollution degree: 2 according to IEC 664-1 (Note 2)
“WEEE” EU Directive (2002/96/EC)
____________________________________________________________________________________________________________
23Microbiology Reader Bioscreen C User's Manual
____________________________________________________________________________________________________________
NOTE 1 Installation category (over-voltage category) defines the level of transient over-voltage, which the
instrument is designed to withstand safely. It depends on the nature of the electricity supply and
its over-voltage protection means. For example in CAT II which is the category used for
instruments in installations supplied from supply comparable to public mains such as hospital
and research laboratories and most industrial laboratories the expected transient over-voltage is
2500 V for a 230 V supply and 1500 V for a 120 V supply.
NOTE 2 Pollution degree describes the amount of conductive pollution present in the operating
environment. Pollution degree 2 assumes that normally only non-conductive pollution such as
dust occurs with the exception of occasional conductivity caused by condensation.
Both of these affect the dimensioning of the electrical insulation within the instrument.
8.3 Photometric System
Linear range: 0.0-2.0A max.dev. < 2%
Noise: max. 0.002A at 0.0A
Drift max: 0.003A
Resolution: 0.001A
Warm-up time: 30 min
Optics: Fiber optics with filter
Light source: Quartz-Halogen lamp 8V/50W, average lifetime with newer
instruments (serial number over 110001-300) approximately
4000 hours
Filters: 8 filters:
405, 420, 450, 492, 540, 580, 600 nm, and WB.
WB is a wide band filter (420-580 nm) for turbidity
measurement (it is rather insensitive to color changes).
Half band width: 3-10 nm
Detector: Silicon photocell
8.4 Incubator for Honeycomb Plates
Cuvette type (multiwell plate type): Honeycomb 2 (HC 2) plate, 100 wells per plate
Capacity: 2 plates / 200 wells in incubator
Incubating temperature: 1.0 - 60.0 °C, selectable with steps of 0.1 °C. Depends on
ambient temperature (see fig. 6). Bioscreen can go 6 °C below
or 30 °C above ambient temperature (max. 60 °C).
Temperature uniformity: ± 0.1 °C across a Honeycomb 2 plate.
Heating time from 20 °C to 30 °C: 30 min
Dispensing temperature: Room temperature
Heat transfer fluid (heating-cooling liquid): Mixture of monoethylene glycol and water 1:1
____________________________________________________________________________________________________________
24You can also read