BIRD CAGE MIRROR MIRROR - FREESPIRIT FABRICS
←
→
Page content transcription
If your browser does not render page correctly, please read the page content below
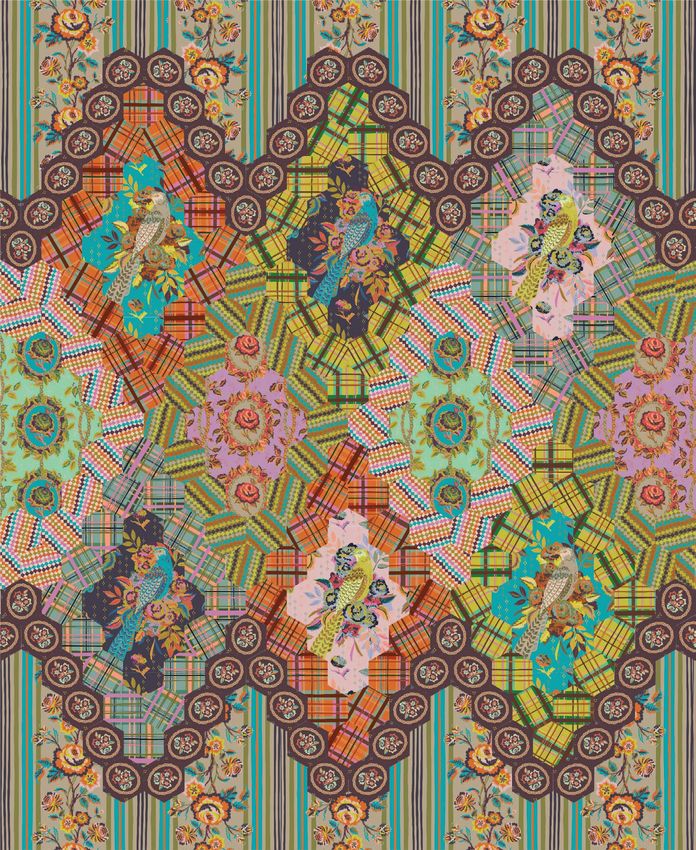
Bird Cage Mirror
Mirror
Featuring New Vintage by Kathy Doughty
Frames of English paper pieced hexagons create
windows to showcase the large-scale prints
of New Vintage by Kathy Doughty. Two edge
finishes offer options, so pick your pleasure.

 Collection:             New Vintage by Kathy
                         Doughty

 Technique:              English Paper Piecing, Hand
                         Appliqué
 Skill Level:            Intermediate
 Finished Size:          59" x 72" (149.86cm x 182.88cm)

All possible care has been taken to assure the accuracy of
this pattern. We are not responsible for printing errors or
the manner in which individual work varies. Please read the
instructions carefully before starting this project. If kitting it is
recommended a sample is made to confirm accuracy.

                                         freespiritfabrics.com    1 of 9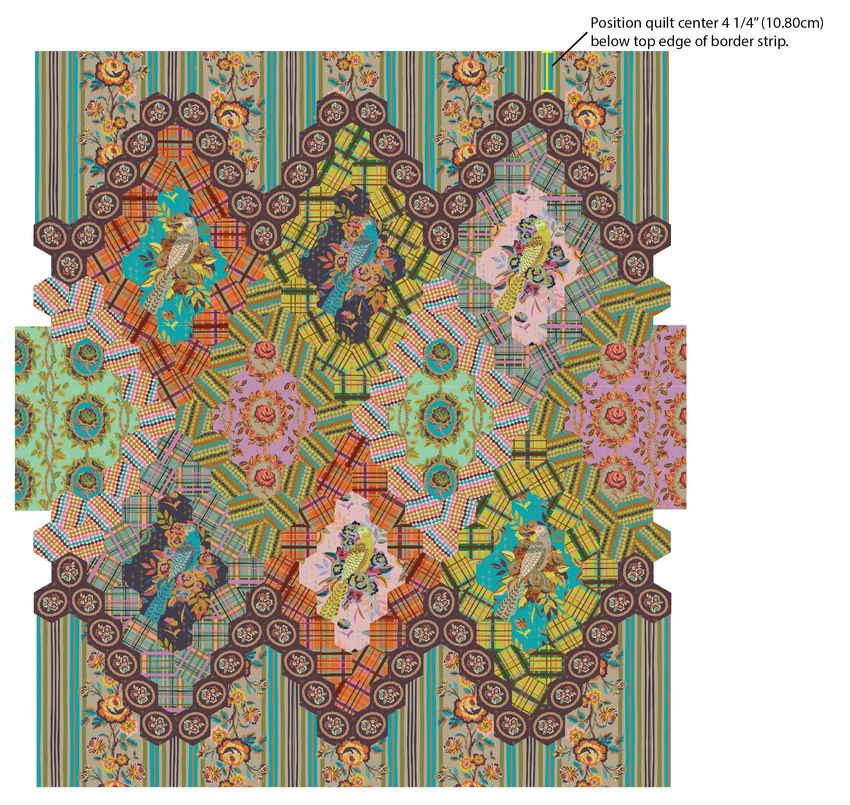
Bird Cage Mirror Mirror
Project designed by Kathy Doughty
Tech edited by Linda Turner Griepentrog

Fabric Requirements
DESIGN                      COLOR                    ARTICLE CODE                                    YARDAGE
                                                                                                     3
(A)   L’oiseau              Azure                    PWMO038.AZURE                                    ⁄4 yard (0.69m)
                                                                                                     3
(B)   L’oiseau              Puff                     PWMO038.PUFF                                     ⁄4 yard (0.69m)
                                                                                                     3
(C)   L’oiseau              Currant                  PWMO038.CURRANT                                  ⁄4 yard (0.69m)
                                                                                                     3
(D)   Plaid                 Chartreuse               PWMO039.CHARTREUSE                               ⁄4 yard (0.69m)
                                                                                                     3
(E)   Plaid                 Marmalade                PWMO039.MARMALADE                                ⁄4 yard (0.69m)
                                                                                                     3
(F)   Plaid                 Tiffany                  PWMO039.TIFFANY                                  ⁄4 yard (0.69m)                             (A)                        (B)                     (C)      (D)                  (E)
                                                                                                     2
(G)   Charmed               Jade                     PWMO040.JADE                                      ⁄3 yard (0.61m)
                                                                                                     2
(H)   Charmed               Lilac                    PWMO040.LILAC                                     ⁄3 yard (0.61m)
(I)   Vintage Rose          Macaron                  PWMO041.MACARON                                 23⁄8 yards (2.17m)
(J)   Mini Charm            Ganache                  PWMO042.GANACHE                                 2 yards (1.83m)
                                                                                                     3
(K)   Tapestry Stripe       Fete                     PWMO045.FETE                                     ⁄4 yard (0.69m)
                                                                                                     3
(L)   Tapestry Stripe       Gala                     PWMO045.GALA                                     ⁄4 yard (0.69m)
                                                                                                     5
(M)   Tapestry Stripe       Gala                     PWMO045.GALA*                                    ⁄8 yard (0.57m)                             (F)                        (G)                     (H)       (I)                 (J)

* optional binding

Backing (Purchased Separately)
44" (111.76cm) wide
Vintage Rose                Citron                   PWMO041.CITRON                                  41⁄2 yards (4.11m)
OR                                                                                                                                                (K)                        (L)                     (M)     Backing
108" (274.32cm) wide			                                                                                  1
                                                                                                     2 ⁄4 yards (2.06m)                                                                                        44"
                                                                                                                                                                                                           (111.76cm)
Additional Requirements
•     100% cotton thread in a color to match
•     (218) 2" (5.08cm) hexagon papers
•     Acrylic template with 3⁄8" (.95cm) seam allowance for 2" (5.08cm) hexagons (optional)
•     Fabric glue stick
•     Embroidery and/or Milliners needles
•     67" x 80" (170.18cm x 203.20cm) batting (optional for bound finish)
•     Freezer paper (optional)

Copyright© 2020                 All possible care has been taken to assure the accuracy of this pattern. We are not responsible for printing errors or the manner in which individual work varies.         freespiritfabrics.com         2 of 9
                                Please read the instructions carefully before starting this project. If kitting it is recommended a sample is made to confirm accuracy.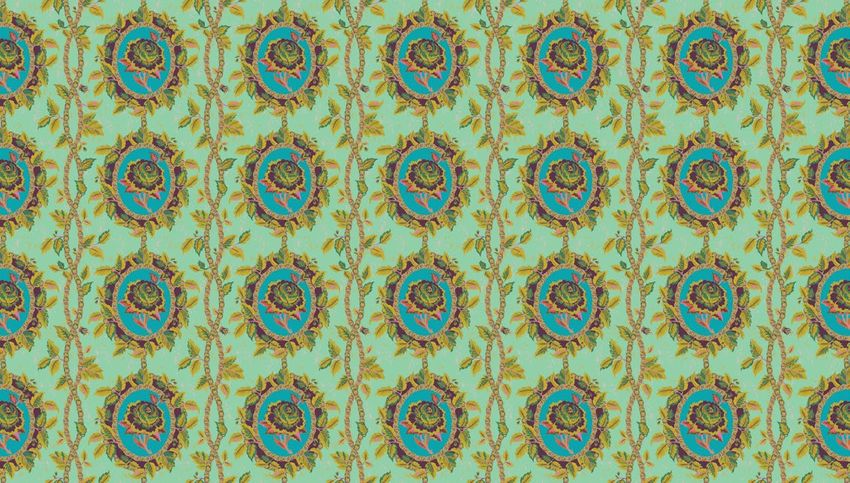
Bird Cage Mirror Mirror
Cutting:                                                                                                                             Fabrics A, B, and C, fussy-cut from each:
WOF = Width of Fabric                                                                                                                (2) 14" x 18" (35.56cm x 45.72cm) rectangles, centered over the bird
LOF = Length of Fabric                                                                                                               motifs
                                                                                                                                                                    Fabric A, B, and C Cutting
Cutting diagrams have been provided for fussy-cutting fabric pieces
for the quilt. These diagrams are only to be used as a guide. The fabric
requirements specified are cut straight from the bolt and the beginning
and ending points of the repeat may differ from the diagrams. There has
been extra yardage allowed in the fabric requirements to ensure that                                                                                                                                           14” x 18”
all of the fussy-cut pieces can be cut no matter where the print repeat                                                                                                                                        (35.56cm x 45.72cm)
                                                                                                                                                                                                               Cut 2
begins.

To Cut Hexagons for English Paper Piecing:
Fussy Cutting: Center a hexagon paper over the desired design on the
right side of a single layer of fabric. Cut around the template adding a
3
 ⁄8" (.95cm) seam allowance to all sides.
Optional Acrylic Template: Center the template over the desired design
on the right side of a single layer of fabric and cut around.

Non-Fussy Cutting: Place a hexagon paper, with points on the top and                                                                 Fabrics D, E, and F, cut from each:
bottom, on the right side of a 5" (12.70cm) strip of fabric. Cut around                                                              (4) 5" x WOF (12.70cm x WOF); sub-cut (32) hexagons
the template adding a 3⁄8" (.95cm) seam allowance to all sides. Work
across the strip for the maximum number of hexagons per strip.

                                   Hexagon Strip Cutting

2” (5.08cm)
 Hexagon

                  3/8” (.95cm) Seam Allowance            5” (12.70cm) x WOF strip, right side up

Optional Acrylic Template: Place the template, with points on the top
and bottom, on the right side of a 5" (12.70cm) strip of fabric and cut
around.

Copyright© 2020                     All possible care has been taken to assure the accuracy of this pattern. We are not responsible for printing errors or the manner in which individual work varies.   freespiritfabrics.com       3 of 9
                                    Please read the instructions carefully before starting this project. If kitting it is recommended a sample is made to confirm accuracy.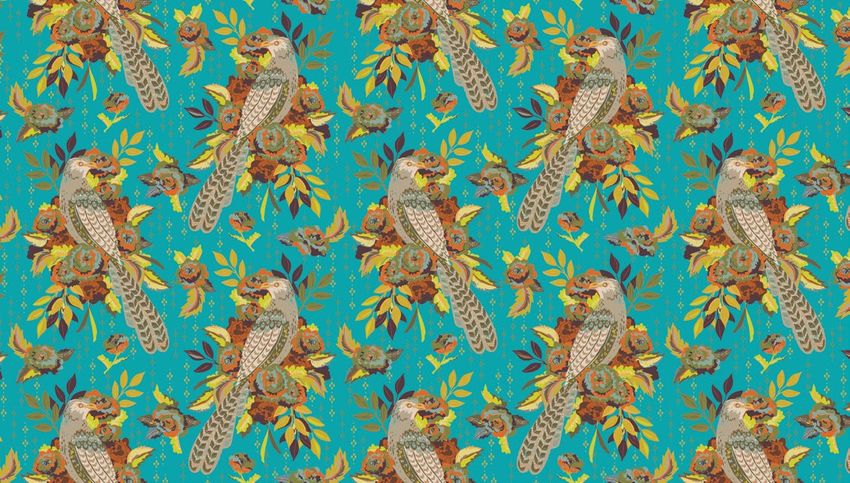
Bird Cage Mirror Mirror
Fabrics G and H, fussy-cut from each:                                                                                                                                             Fabric J Cutting
(2) 14" x 18" (35.56cm x 45.72cm) rectangles, centered over the floral
cameos
                                                                                                                            2” (5.08cm)
                  Fabric G and H Cutting                                                                                     Hexagon
                                                                                                                               Cut 64

                                                                              14” x 18”
                                                                              (35.56cm x 45.72cm)
                                                                              Cut 2

Fabric I, fussy-cut:
(4) 18" x WOF (45.72cm x WOF), so there are 2 sets of 2 strips over the
same repeat in the print

Fabric J, fussy-cut:
(64) hexagons, centered over the floral cameos (shown right)

Fabric K and L, cut from each:
(4) 5” x WOF (12.70cm x WOF); sub-cut (29) hexagons

Fabric M, cut: (Optional Binding)
(7) 21⁄2” x WOF (6.35cm x WOF)

Copyright© 2020           All possible care has been taken to assure the accuracy of this pattern. We are not responsible for printing errors or the manner in which individual work varies.         freespiritfabrics.com   4 of 9
                          Please read the instructions carefully before starting this project. If kitting it is recommended a sample is made to confirm accuracy.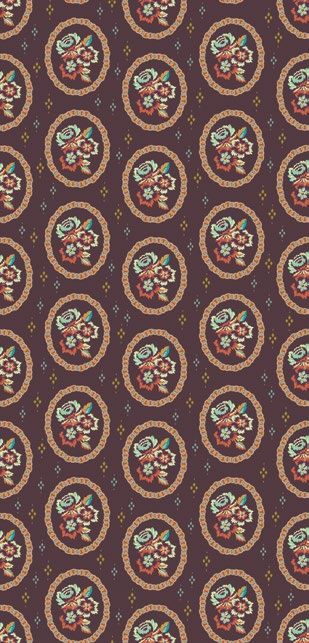
Bird Cage Mirror Mirror
Instructions                                                                                                                                                               5. Lay out (13) Fabric K hexagons, in a
                                                                                                                 Fig. 1                                                       half frame as shown in Fig. 2. Sew the
Pieces are sewn right sides together. Some                                                                        Fig. 1                                                      hexagons together along the adjoining
knowledge of English Paper Piecing is assumed.
                                                                                                                                                                              edges.
                                                                                                                      D                                                                        Fig. 2
Baste Hexagon Edges                                                                                                                                                                                 Fig. 2
1. Center a 2" (5.08cm) hexagon paper
   template on the wrong side of a Fabric D                                                                                                                                                        K
   hexagon. Use a fabric glue stick to apply
   glue around the outside edge of the paper.
   Working around the paper, one side at a
   time, fold the 3⁄8" (.95cm) seam allowance
   of the Fabric D Hexagon over the paper
   template and finger-press to adhere to the
   glue.
2. Repeat Step 1 to baste the edges of (32)
   Fabric D, E, and F; (64) Fabric J and (29)
   Fabric K and L hexagons.

Hexagon Frames
3. Lay out (16) Fabric D hexagons, in a frame                                                               Fabric D Frame
   as shown in Fig. 1. Tip: Use a square piece                                                                 Make 2
   of cardboard or foam core to lay out the
   hexagons in the frame shape. Sew the                                   Flat Backstitch: Position two hexagons flat,                                                                        Fabric K Half Frame
   hexagons together along the adjoining                                  wrong side up, aligning the edges to be sewn.                                                                             Make 1
   edges using the flat backstitch or your                                Start stitching a short distance in from the
   favorite method. Repeat to make (2)                                    corner and make three stitches back to the                                                       6. Repeat Step 5 to make (1) Fabric L half
   Fabric D Frames.                                                       corner gliding the needle across the flat edge                                                      frame.
                                                                          over the join of the seam to make invisible
                                                                          stitches. Reverse at the end and stitch across
                                                                          the joining edges.

                                                                          4. Repeat Step 3 to make (2) Fabric E and F,
                                                                             and (1) Fabric K and L frames.

Copyright© 2020          All possible care has been taken to assure the accuracy of this pattern. We are not responsible for printing errors or the manner in which individual work varies.            freespiritfabrics.com   5 of 9
                         Please read the instructions carefully before starting this project. If kitting it is recommended a sample is made to confirm accuracy.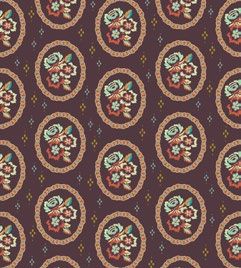
Bird Cage Mirror Mirror
Frame Centers                                                                                                   Fig. 4                                                    10. Place the Fabric K half frame on the right
                                                                                                                 Fig. 4
Note: Follow the Quilt Layout diagram for the                                                                                                                                 side of a Fabric G rectangle, lining up
placement of the frame center print designs.                                                                                                                                  the floral cameos with what would be the
                                                                                                                                                                              center of the frame if it was complete, and
7. 7. Place a Fabric E frame on top of a                                                                                                                                      pin. (Fig. 5) Appliqué the inside edge of
   Fabric A rectangle, centering the frame                                                                                                                                    the half frame to Fabric G, starting and
   over the bird motif and pin. (Fig. 3)                                                                                                                                      stopping where shown. Carefully trim the
   Appliqué the inside edge of the frame to                                                                                                                                   excess Fabric G behind the frame to leave
   Fabric A.                                                                                                                                                                  a 1⁄2" (1.27cm) seam allowance.

               Fig. 3
                      Fig. 3
                                                                                                                                                                                                        Fig. 5
                                                                                                                                                                                                  Fig. 5
                  E
                                                                                                                                                                                                    K
                                                                                                                                                                            Start appliqué.                   Center of frame.

                               Appliqué around
                               the inside edge.                                                                                                                                                                       Appliqué around
                                                                                                                                                                                                                      the inside edge.
                                                                                                                                                                                              G
                  A
                                                                         9. Repeat Steps 7 and 8 to add centers to the
                                                                            frames to make (1) of each of the following
                                                                            combinations (center fabric/frame fabric):
                                                                            Fabric C/D, B/F, C/F, B/E, D/A, G/K, and
                                                                            H/L. Tip: To repeat the exact placement,
                                                                            iron freezer paper onto the first bird.
                                                                                                                                                                            Stop appliqué.                       Trim to 1/2” (1.27cm)
                                                                            Trace a few critical elements and remove
                                                                                                                                                                                                                 seam allowance.
                                                                            the paper. Use the freezer paper for the
                                                                            second medallion and iron onto the fabric
8. Carefully trim the excess Fabric A behind                                matching the elements.
   the frame to leave a 1⁄2" (1.27cm) seam
   allowance beyond the appliqué stitches.
   (Fig. 4)

Copyright© 2020         All possible care has been taken to assure the accuracy of this pattern. We are not responsible for printing errors or the manner in which individual work varies.                 freespiritfabrics.com         6 of 9
                        Please read the instructions carefully before starting this project. If kitting it is recommended a sample is made to confirm accuracy.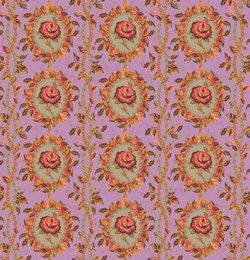
Bird Cage Mirror Mirror
11. Place the Fabric L half frame on the left                                 Quilt Top Assembly
    side of a Fabric H rectangle, lining up                                                                                                                                    18. Repeat Steps 16 and 17 to attach the
                                                                              Note: Follow the Quilt Layout diagram on
    the floral cameos with what would be the                                                                                                                                       bottom border to complete the quilt top.
                                                                              page 9 while assembling the quilt. Pay close
    center of the frame if it was complete, and
    pin. (Fig. 6) Appliqué the inside edge of
                                                                              attention to the orientation of directional prints.                                              Finishing
    the half frame to Fabric H, starting and                                                                                                                                   19. Remove the remaining hexagon papers
    stopping where shown. Carefully trim the                                  12. Lay out the (8) frames and (2) half frames                                                       from the side edges. Press the hexagon
    excess Fabric H behind the frame to leave                                     and sew together along the adjoining                                                             side seam allowances open.
    a 1⁄2" (1.27cm) seam allowance.                                               edges.                                                                                       20. Trim the side edges of the quilt even with
                                                                              13. Sew (32) Fabric J hexagons along the top                                                         the 3⁄8" (.95cm) seam allowance of the full
                   Fig. Fig.
                        6    6                                                    edge of the frames. Repeat to sew Fabric J                                                       Fabric J hexagons at the bottom of the
                                                                                  hexagons along the bottom edge of the                                                            zigzag as shown in Fig. 7.
                                                                                  frames to complete the quilt center.
                     L                                                        14. Remove the papers from all of the                                                                                             Fig. 7
                                                                                                                                                                                                           Fig. 7
Center of frame.                  Start appliqué.                                 hexagons except for the outside edges.
                                                                              15. Sew together the (2) 18" x WOF (45.72cm x
                                                                                  WOF) Fabric I strips, end to end, matching
                                                                                  the print. Repeat to make (2) long strips.
                                                                                                                                                                                                                I
                                                                                  Cut (2) 18" x 62" (45.72cm x 157.48cm)
                                                                                  top/bottom border strips, centered on the                                                          Press seam
                         H                                                        floral stripe.                                                                                     allowances
                                                                              16. Lay out the top border strip, right side                                                           open.                                  Fabric J Hexagon at
                                                                                  up. Center the quilt center on top of the                                                                                         J       bottom of zig zag.
                                                                                  border strip, so the points of the top                                                          Trim even with
                                                                                  Fabric J hexagons are 41⁄4" (10.80cm) from                                                      3/8” (.95cm) seam            K
                                  Stop appliqué.
                                                                                  the border top edge. Removing the paper                                                         allowance.
                                                                                  pieces as you go, pin and baste the top
                                                                                  edge of the quilt center in place.
                                                                              17. Appliqué the top edge of the quilt center
                                                                                                                                                                                                       G
                                                                                  to the top border. Remove the basting
                                                                                  stitches and trim the excess border strip
                                                                                  behind the quilt center leaving 1⁄2" (1.27cm)
                                                                                  seam allowance.                                                                                                 Left edge of Quilt Top

Copyright© 2020              All possible care has been taken to assure the accuracy of this pattern. We are not responsible for printing errors or the manner in which individual work varies.                     freespiritfabrics.com     7 of 9
                             Please read the instructions carefully before starting this project. If kitting it is recommended a sample is made to confirm accuracy.
Bird Cage Mirror Mirror
Note: The original quilt was finished using                                 27. Leaving an 8" (20.32cm) tail of binding, sew
the pillowcase finish method with no batting.                                   the binding to the top of the quilt through
Instructions for pillowcase finish, with or without                             all layers matching all raw edges, using a
                                                                                3
batting, or optional binding with batting are                                    ⁄8" (.95cm) seam allowance. Miter corners.
included.                                                                       Stop approximately 12" (30.48cm) from
                                                                                where you started. Lay both loose ends
Pillowcase Finish                                                               of binding flat along quilt edge. Where
21. Prepare the backing and lay out right side                                  the loose ends meet, fold them back on
    up (on batting, if using).                                                  themselves and press to form a crease.
22. Position the quilt top on the back, right                                   Using this crease as your stitching line, sew
    sides together and pin. Trim the backing                                    the two open ends of the binding right
    and batting (if using) to match the quilt top.                              sides together. Trim seam to 1⁄4" (.64cm)
23. Sew a 3⁄8" (.95cm) seam around the outside                                  and press open. Finish sewing binding to
    of the quilt leaving an opening for turning                                 quilt.
    on one edge. Check to ensure all of the                                 28. Turn the binding to the back of quilt and
    hexagon seam allowances on the sides are                                    hand-stitch in place.
    caught in the seam. Press the seams flat,
    then open.
24. Turn the quilt right side out and press flat.
    Slipstitch the opening closed and topstitch
    1
      ⁄2" (1.27cm) around the quilt edge.

(Optional) Binding Finish
25. Sew together the 21⁄2" (6.35cm) Fabric M
    binding strips end to end using diagonal
    seams and a 1⁄4" (.64cm) seam allowance.
    Press seams open. Press the binding strip
    in half wrong sides together.
26. Layer backing (wrong side up), batting, and
    quilt top (right side up). Baste the layers
    together and quilt as desired. Trim excess
    batting and backing even with the top after
    quilting is completed.

Copyright© 2020            All possible care has been taken to assure the accuracy of this pattern. We are not responsible for printing errors or the manner in which individual work varies.   freespiritfabrics.com   8 of 9
                           Please read the instructions carefully before starting this project. If kitting it is recommended a sample is made to confirm accuracy.
Bird Cage Mirror Mirror
                                                                                          Quilt Layout

Copyright© 2020   All possible care has been taken to assure the accuracy of this pattern. We are not responsible for printing errors or the manner in which individual work varies.   freespiritfabrics.com   9 of 9
                  Please read the instructions carefully before starting this project. If kitting it is recommended a sample is made to confirm accuracy.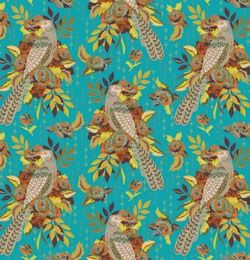
You can also read