Cary Eclipse Fluorescence Spectrophotometer User's Guide
←
→
Page content transcription
If your browser does not render page correctly, please read the page content below

Cary Eclipse
Fluorescence
Spectrophotometer

User’s Guide
Notices                                  Warranty                                  contract clause. Use, duplication or
                                                                                   disclosure of Software is subject to
                                         The material contained in this            Agilent Technologies’ standard
© Agilent Technologies, Inc. 1999,       document is provided “as is,” and is      commercial license terms, and non-
2000 and 2011-2012                       subject to being changed, without         DOD Departments and Agencies of the
No part of this manual may be            notice, in future editions. Further, to   U.S. Government will receive no
reproduced in any form or by any         the maximum extent permitted by           greater than Restricted Rights as
means (including electronic storage      applicable law, Agilent disclaims all     defined in FAR 52.227-19(c)(1-2) (June
and retrieval or translation into a      warranties, either express or implied,    1987). U.S. Government users will
foreign language) without prior          with regard to this manual and any        receive no greater than Limited Rights
agreement and written consent from       information contained herein,             as defined in FAR 52.227-14 (June
Agilent Technologies, Inc. as governed   including but not limited to the          1987) or DFAR 252.227-7015 (b)(2)
by United States and international       implied warranties of merchantability     (November 1995), as applicable in any
copyright laws.                          and fitness for a particular purpose.     technical data.
                                         Agilent shall not be liable for errors
Manual Part Number                       or for incidental or consequential        Safety Notices
                                         damages in connection with the
8510175800
                                         furnishing, use, or performance of
                                         this document or of any information          CAUTION
Edition                                  contained herein. Should Agilent and
                                                                                   A CAUTION notice denotes a hazard.
Fourth edition, January 2012             the user have a separate written
                                                                                   It calls attention to an operating
                                         agreement with warranty terms
Printed in Malaysia                                                                procedure, practice, or the like that, if
                                         covering the material in this
Agilent Technologies, Inc.                                                         not correctly performed or adhered to,
                                         document that conflict with these
                                                                                   could result in damage to the product
                                         terms, the warranty terms in the
                                                                                   or loss of important data. Do not
                                         separate agreement shall control.
                                                                                   proceed beyond a CAUTION notice
                                                                                   until the indicated conditions are fully
                                         Technology Licenses                       understood and met.
                                         The hardware and/or software
                                         described in this document are
                                         furnished under a license and may be         WARNING
                                         used or copied only in accordance
                                         with the terms of such license.           A WARNING notice denotes a
                                                                                   hazard. It calls attention to an
                                         Restricted Rights Legend                  operating procedure, practice, or the
                                         If software is for use in the             like that, if not correctly performed or
                                         performance of a U.S. Government          adhered to, could result in personal
                                         prime contract or subcontract,            injury or death. Do not proceed
                                         Software is delivered and licensed as     beyond a WARNING notice until the
                                         “Commercial computer software” as         indicated conditions are fully
                                         defined in DFAR 252.227-7014 (June        understood and met.
                                         1995), or as a “commercial item” as
                                         defined in FAR 2.101(a) or as
                                         “Restricted computer software” as
                                         defined in FAR 52.227-19 (June 1987)
                                         or any equivalent agency regulation or

2                                            Cary Eclipse Fluorescence Spectrophotometer User’s Guide
Contents
Contents
1. Safety Practices and Hazards 7
Lamp module 7
Ultraviolet radiation 8
Electrical hazards 8
Panels, covers and modules 9
Other precautions 9
Warning and caution messages 10
Information symbols 11
Color coding 13
CE compliance 13
Electromagnetic compatibility 14
EN55011/CISPR11 14
ICES/NMB-001 15
2. Introduction 17
Installation requirements 17
Documentation 17
Conventions 18
Specifications 18
Environmental 18
Weights and dimensions 19
Power 19
Connections 19
Cary Eclipse Fluorescence Spectrophotometer User’s Guide 3Contents
Fuses 20
Nitrogen supply 20
3. Installation 21
Single cell holder 22
Aligning 24
Other sample holders 25
Purging 25
Nitrogen 25
Pressure regulator and gauge 25
Supply tubing 26
Gas manifold 26
Flowmeter 26
Installing the software 26
Installing the USB-GPIB-HS Converter 28
Registering the Cary Eclipse software 28
Uninstalling the software 29
Software Status Bulletin 29
4 Cary Eclipse Fluorescence Spectrophotometer User’s GuideContents
4. Maintenance and Spare Parts 31
Cleaning 32
Lamp module 32
Replacing 32
Aligning 35
Fuses 38
Replacing 38
Checking 39
Spare Parts 39
5. Troubleshooting 41
Instrument offline 41
Connect button instead of Start 42
Instrument performance testing 42
Cary Eclipse Fluorescence Spectrophotometer User’s Guide 5Contents
This page is intentionally left blank.
6 Cary Eclipse Fluorescence Spectrophotometer User’s GuideSafety Practices and Hazards
1. Safety Practices and Hazards
Lamp module 7
Ultraviolet radiation 8
Electrical hazards 8
Panels, covers and modules 9
Other precautions 9
Warning and caution messages 10
Information symbols 11
Color coding 13
CE compliance 13
Electromagnetic compatibility 14
Your Agilent Cary Eclipse instrument and accessories have been
carefully designed so that when used properly you have an accurate,
fast, flexible and safe analytical system.
If the equipment is used in a manner not specified by the
manufacturer, the protection provided by the equipment may be
impaired.
Information on safety practices appears throughout the
documentation (both hard copy and online) provided with your
instrument and accessories. Before using the instrument or
accessories, you must thoroughly read these safety practices.
Observe all relevant safety practices at all times.
Lamp module
The lamp is enclosed in a self-contained module. This module
contains components operating at high voltages. To avoid electric
shock, NEVER disassemble the module.
Cary Eclipse Fluorescence Spectrophotometer User’s Guide 7Safety Practices and Hazards
When operating, the lamp module emits high intensity visible and
ultraviolet (UV) radiation that can cause serious damage to eyes. To
avoid eye damage, never operate the lamp outside the instrument.
Ultraviolet radiation
Hazardous ultraviolet (UV) radiation is emitted by the xenon flash
lamp in the instrument. This radiation can cause serious damage to
eyes. Never look directly at the UV source lamp. Always wear safety
glasses manufactured to an approved standard and which are
certified or otherwise warranted to protect the eyes from UV
radiation when the lamp is operating and the sample compartment is
open.
Electrical hazards
The Cary Eclipse system and some accessories contain electrical
circuits, devices, and components operating at dangerous voltages.
Contact with these circuits, devices and components can cause death,
serious injury, or painful electrical shock.
Panels or covers which are retained by screws on the
spectrophotometer and accessories and carry a warning may be
opened ONLY by Agilent-trained, Agilent-qualified, or Agilent-
approved customer service representatives. Consult the manuals or
product labels supplied with your computer, monitor and printer to
determine which parts are operator-accessible.
Good grounding is essential to avoid a potentially serious electric
shock hazard. Ensure that there is an integral ground connection
between the metal base of the spectrophotometer and accessories
and the three pin earth-grounded receptacle. Consult the manuals or
product labels supplied with your computer, monitor and printer for
their grounding requirements.
NOTE The safety classification is given as Equipment Class I.
8 Cary Eclipse Fluorescence Spectrophotometer User’s GuideSafety Practices and Hazards
Application of the wrong supply voltage can create a fire hazard and
a potentially serious shock hazard, and could seriously damage the
Cary Eclipse system, accessories and any attached ancillary
equipment.
Do not connect the Cary Eclipse, your computer, monitor, printer or
accessories to the mains power supply until you have made sure that
they are correctly set for the mains power supply in the specific
outlet in your laboratory to which the equipment will be connected.
Consult the manuals supplied with your computer, monitor and
printer for their specific voltage requirements.
Replace blown fuses with fuses of the size and rating as stipulated in
the text adjacent to the fuse holder or in the manuals where listed.
Replace or repair faulty or frayed insulation on power cords.
Panels, covers and modules
You are permitted to remove the top colored cover to
Replace the lamp module.
Adjust the lamp module.
Any other panels or covers, which are retained by screws on the
spectrophotometer and accessories, may be opened ONLY by Agilent-
trained, Agilent-qualified, or Agilent-approved service engineers.
Consult the manuals or product labels supplied with your computer,
monitor and printer to determine which parts are operator-
accessible.
Operators and other unauthorized personnel are permitted access
ONLY to the lamp module and the sample compartment of the Cary
Eclipse. ALWAYS switch off the instrument and disconnect the mains
cord before changing a lamp module.
Other precautions
The lamp module operates at a high temperature, and touching it
may result in burns. Before replacing a lamp module that has been
operating, switch off the Cary Eclipse and ensure that the lamp
module has cooled, or protect your fingers from burns.
Cary Eclipse Fluorescence Spectrophotometer User’s Guide 9Safety Practices and Hazards
Do not block the ventilation grilles on the spectrophotometer and
accessories. Consult the manuals supplied with your computer,
monitor and printer for their specific ventilation requirements.
Use of the Cary Eclipse system and accessories may involve
materials, solvents and solutions, which are flammable, corrosive,
toxic or otherwise hazardous.
Careless, improper, or unskilled use of such materials, solvents and
solutions can create explosion hazards, fire hazards, toxicity and
other hazards which can result in death, serious personal injury, and
damage to equipment and property.
ALWAYS ensure that laboratory safety practices governing the use,
handling and disposal of such materials are strictly observed. These
safety practices should include the wearing of appropriate safety
clothing and safety glasses.
Warning and caution messages
Carefully read all warnings and cautions and observe them at all
times.
A Warning message is used in the text when failure to observe
instructions or precautions could result in death or injury. Warnings
have the following format:
WARNING Hazard Type
Nature of the hazard, information on how to avoid the hazard, and possible
consequences if you don’t.
The triangular symbols that appear in conjunction with warnings are
outlined in the next section.
A Caution message is used when failure to observe instructions could
result in damage to equipment (Agilent-supplied and/or other
associated equipment).
10 Cary Eclipse Fluorescence Spectrophotometer User’s GuideSafety Practices and Hazards
Cautions have the following format:
CAUTION Caution information appears here.
Information symbols
The following triangular symbols appear in conjunction with
warnings on the spectrometer and associated documentation. The
hazard they depict is shown below each symbol:
Corrosive liquid Ejecting parts Electrical shock
Extreme cold Eye hazard Fire hazard
Heavy weight Heavy weight Hot surface
(danger to feet) (danger to hands)
Moving parts Noxious gas Sharp edge
Cary Eclipse Fluorescence Spectrophotometer User’s Guide 11Safety Practices and Hazards
The following symbol may be used on warning labels attached to the
instrument. When you see this symbol, refer to the relevant operation
or service manual for the correct procedure referred to by that
warning label.
The following symbols also appear on the instrument or in the
documentation:
I Mains power on.
0 Mains power off.
Single phase alternating current.
Direct current.
Fuse.
Indicates that a high voltage xenon flash lamp is present.
Xe
Focus.
↔ Horizontal movement.
↕ Vertical movement.
When attached to the rear of the instrument, indicates that the
product complies with the requirements of one or more EU
directives.
When attached to the rear of the product, indicates that the product
has been certified (evaluated) to CSA 61010.1 and UL 61010-1.
12 Cary Eclipse Fluorescence Spectrophotometer User’s GuideSafety Practices and Hazards
Color coding
The various indicator lights appearing on Agilent instruments and
associated accessories are color-coded to represent the status of the
instrument or accessory.
A steady green light indicates the instrument is in normal or
standby mode.
A flashing green light indicates the instrument is
scanning/reading.
A steady orange light indicates the instrument is starting up.
A flashing orange light indicates that there is a problem with the
instrument, and it may require servicing.
A steady yellow light indicates that the instrument is initializing.
CE compliance
Agilent Cary Eclipse instruments have been designed to comply with
the requirements of the Electromagnetic Compatibility (EMC)
Directive and the Low Voltage (electrical safety) Directive (commonly
referred to as the LVD) of the European Union. Agilent has
confirmed that each product complies with the relevant directives by
testing a prototype against the prescribed EN (European Norm)
standards.
Proof that a product complies with the directives is indicated by:
The CE marking appearing on the rear of the product.
The documentation package that accompanies the product,
containing a copy of the Declaration of Conformity. This
declaration is the legal declaration by Agilent that the product
complies with the directives and also shows the EN standards to
which the product was tested to demonstrate compliance.
Cary Eclipse Fluorescence Spectrophotometer User’s Guide 13Safety Practices and Hazards
Electromagnetic compatibility
EN55011/CISPR11
Group 1 ISM equipment: group 1 contains all ISM equipment in
which there is intentionally generated and/or used conductively
coupled radio- frequency energy which is necessary for the internal
functioning of the equipment itself.
Class A equipment is equipment suitable for use in all
establishments other than domestic and those directly connected to a
low voltage power supply network which supplies buildings used for
domestic purposes.
This device complies with the requirements of CISPR11, Group 1,
Class A as radiation professional equipment. Therefore, there may be
potential difficulties in ensuring electromagnetic compatibility in
other environments, due to conducted as well as radiated
disturbances.
Operation is subject to the following two conditions:
1 This device may not cause harmful interference.
2 This device must accept any interference received, including
interference that may cause undesired operation.
If this equipment does cause harmful interference to radio or
television reception, which can be determined by turning the
equipment off and on, the user is encouraged to try one or more of
the following measures:
1 Relocate the radio or antenna.
2 Move the device away from the radio or television.
3 Plug the device into a different electrical outlet, so that the device
and the radio or television are on separate electrical circuits.
4 Make sure that all peripheral devices are also certified.
5 Make sure that appropriate cables are used to connect the device
to peripheral equipment.
14 Cary Eclipse Fluorescence Spectrophotometer User’s GuideSafety Practices and Hazards
6 Consult your equipment dealer, Agilent Technologies, or an
experienced technician for assistance.
7 Changes or modifications not expressly approved by Agilent
Technologies could void the user’s authority to operate the
equipment.
ICES/NMB-001
This ISM device complies with Canadian ICES- 001.
Cet appareil ISM est conforme à la norme NMB-001 du Canada.
Cary Eclipse Fluorescence Spectrophotometer User’s Guide 15Safety Practices and Hazards
This page is intentionally left blank.
16 Cary Eclipse Fluorescence Spectrophotometer User’s GuideIntroduction
2. Introduction
Installation requirements 17
Documentation 17
Specifications 18
Installation requirements
Before receiving your instrument, you will have been provided with a
Cary Eclipse Site Preparation Guide, which describes the
environmental and operating requirements of the Agilent Cary
Eclipse system. You must prepare your laboratory according to these
instructions before the Cary Eclipse can be installed. You should
keep the site preparation guide for future reference. If you have
misplaced your copy, you can obtain a replacement from your local
Agilent office or from the Agilent website, www.agilent.com
Documentation
You have been provided with the following documentation to help
you set up and operate your Cary Eclipse system:
This user’s guide, with safety practices and hazards information,
instructions for installing and maintaining the components of the
Cary Eclipse and software, and troubleshooting information
Extensive Help (provided with the Cary Eclipse software)
containing context-sensitive Help, step-by-step instructions for
frequently performed analyses and instructions for using any
accessories you ordered.
Cary Eclipse Fluorescence Spectrophotometer User’s Guide 17Introduction
Conventions
The following conventions have been used in procedures throughout
the documentation:
Menus, menu items, buttons and check boxes have been typed in
bold. (for example, ‘click OK’ and ‘From the Edit menu, choose
Copy’.
ALL CAPITALS indicate keyboard commands. For example,
‘press ENTER’ and ‘press SHIFT+F8’.
Specifications
The instrument is suitable for indoor use only and is classified
Pollution degree 2 and Installation Category II (EN 61010-1).
Environmental
Table 1. Suitable conditions during instrument transportation, non-operation and operation
Condition Altitude (m, ft) Temperature Relative humidity,
(°C, °F) non-condensing (%)
Non-operating (transport) 0–2133, 0–7000 5–45, 41–113 20–80
Operating within performance 0–853, 0–2800 10–35, 50–95
8–80
specifications 853–2133, 2800–7000 10–25, 50–77
For optimum analytical performance, it is recommended that the
ambient temperature of the work area be between 20 and 25 °C (68
and 77 °F) and be held constant to within ±2 °C throughout the
entire working day.
18 Cary Eclipse Fluorescence Spectrophotometer User’s GuideIntroduction
Weights and dimensions
Weight
Packed: 54 kg (119 lb)
Unpacked: 31 kg (68 lb)
Dimensions (width x depth x height)
Packed: 820 x 760 x 560 mm (32 x 30 x 22 in)
Unpacked: 600 x 610 x 280 mm (24 x 24 x 11 in)
Power
Voltage: 100–240 VAC ±10%
Frequency: 50 to 60 Hz ±1 Hz
Consumption: 180 VA (approximately)
Mains inlet coupler: 3/2 A 120/250 VAC 50–60 Hz IEC type
Connections
Mains power cord
Only use the country specific, Agilent supplied power cord with your
Cary Eclipse.
Front
Accessory connection: 25-pin D-range connector (low voltage DC/AC
and digital/analog lines)
Rear
IEEE 488 (GPIB Cary Eclipse system connection)
Cary Eclipse Fluorescence Spectrophotometer User’s Guide 19Introduction
Sample compartment
9-pin D-range connector (low voltage AC/DC)
15-pin D-range connector (low voltage AC/DC)
25-pin D-range connector (low voltage AC/DC)
Fuses
T3.15 AH 250 V (5 x 20 mm) IEC127 Sheet 5
NOTE For safety reasons, any other internal fuse or circuit breaker is not operator
accessible, and should be replaced only by Agilent-authorized personnel.
Fuse information on the rear of the instrument is the most up-to-
date.
Nitrogen supply
70 kPa (10 psi)
20 Cary Eclipse Fluorescence Spectrophotometer User’s GuideInstallation
3. Installation
Single cell holder 22
Other sample holders 25
Purging 25
Installing the software 26
Installing the USB-GPIB-HS Converter 28
Registering the Cary Eclipse software 28
Uninstalling the software 29
Software Status Bulletin 29
The Agilent Cary Eclipse must be installed only by an Agilent-trained
or Agilent-authorized representative.
WARNING Heavy Weight Hazard
The Cary Eclipse weighs over 30 kg (66 lb). To avoid injury to personnel or
damage to equipment, always use two or more people when lifting or
carrying the instrument. Never attempt to lift the instrument alone.
Following the instructions, in the site preparation guide, you should
have:
Unpacked the fluorescence spectrophotometer and placed it on
the workbench.
Unpacked the computer and placed it on the workbench.
Installed the operating system software on the computer.
Cary Eclipse Fluorescence Spectrophotometer User’s Guide 21Installation
This chapter describes how to install the:
Sample holders used with the Cary Eclipse.
Cary Eclipse software, in case you ever need to reinstall it.
Instructions for installing/replacing the lamp module are included in
the ‘Maintenance’ chapter.
Single cell holder
A single cell holder is supplied as standard with the Cary Eclipse.
Follow these instructions to install and align it.
To install the single cell holder:
1 Slide back the sample compartment lid (‘1’ in Figure 1), lift up
and remove the front panel (2) and check that the sample
compartment is empty.
1
2
3
Figure 1. Cary Eclipse showing the sample compartment lid (1) and front panel
(2) and Lamp Access Panel (3)
2 Position the cell holder base on the locating pins.
22 Cary Eclipse Fluorescence Spectrophotometer User’s GuideInstallation
3 Lock the cell base by turning the lever (‘2’ in Figure 2) to the
right.
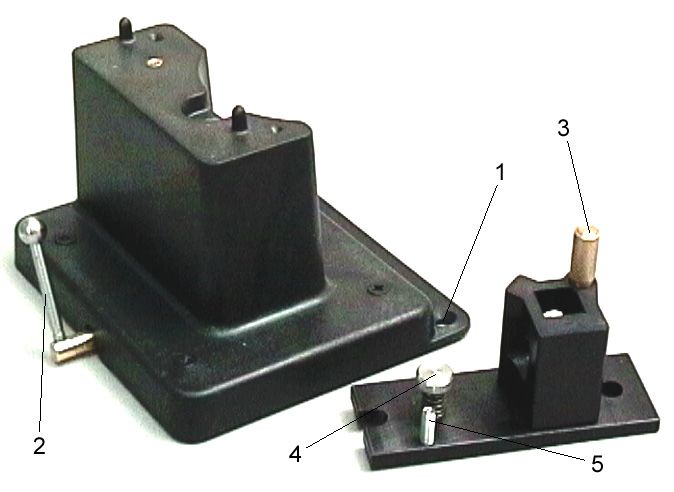
Figure 2. Cell holder base (left) and Single cell holder
1) Locating holes 2) Cell holder locking lever
3) Cell lifter and height adjuster 4) Cell holder thumbscrew
5) Pitch adjustment screw
4 Place the single cell holder on the cell holder base so that the cell
lifter (3) is at the rear of the sample compartment.
5 Secure the cell holder by tightening the spring-loaded
thumbscrew (4).
Cuvette height adjustment
Turning the cell lifter (3) in a clockwise direction will raise the
cuvette.
Turning the cell lifter (3) in an counter-clockwise direction will
lower the cuvette platform.
NOTE To lower the cuvette you will have to push the cuvette down because of the
tension created by the single cell holder.
Cary Eclipse Fluorescence Spectrophotometer User’s Guide 23Installation
Cuvette pitch adjustment
1 Turning the pitch adjustment screw (5) in a clockwise direction
will raise the front of the cell holder.
2 Turning the pitch adjustment screw (5) in an anti-clockwise
direction will lower the front of the cell holder.
NOTE The pitch adjustment screw requires a 2.5 mm hex key.
Aligning
To align the single cell holder (containing a microcell):
1 Start the Align application by clicking the Start button in the
Windows taskbar and choosing All Programs > Agilent > Cary
Eclipse > Align.
2 Click the Cary tab.
3 Place a fluorescent sample (for example, anthracene) in a
microcell and adjust the excitation and emission wavelengths to
get a signal.
4 Click Apply. (The wavelengths should change and the green
power indicator on the instrument should continue flashing to
indicate that the instrument is active.)
5 Place a small piece of white paper in the light path to the right of
the cell (use a wavelength of 540 nm). If the beam appears as
though it will strike the cell aperture, move the paper to the left
of the cell and check that the beam is passing through the cell. (If
the beam does not appear as though it will pass through the cell,
adjust the height of the cell as described on Page 23).
6 Using the 2.5 millimeter hexagonal ball driver, adjust the pitch
adjustment screw (‘5’ in Figure 2) and note the intensity of the
light striking the paper. Continue to adjust the adjustment screw
until the beam hitting the paper appears the most intense.
NOTE You may need to dim the room lights to see the light beam.
24 Cary Eclipse Fluorescence Spectrophotometer User’s GuideInstallation
Other sample holders
Other sample holders are available for use with the Cary Eclipse.
Instructions for their use are included in the Help provided with the
Cary Eclipse software.
Purging
The nitrogen purging system is not supplied by Agilent, but the
following items are available from appropriate commercial suppliers.
Nitrogen
Liquid nitrogen (in conjunction with a heat exchanger) is
recommended because it is less expensive than compressed nitrogen
and is usually of better quality. If compressed nitrogen must be used,
the gas must be dry, oil-free and uncontaminated.
CAUTION Never use compressed nitrogen from a supplier who uses oil or water in the
compression process. Such processes invariably leave fine particles of oil
suspended in the nitrogen, which will form an oily deposit on optical surfaces.
Use nitrogen from a supplier who fills containers from immersion pumps
lubricated with liquid nitrogen.
NOTE The instrument warranty will be void if damage is caused by the use of
unsatisfactory nitrogen.
Pressure regulator and gauge
Operating pressure is from 70 kPa (10 psi). Always use an
appropriate regulator and gauge to ensure that the nitrogen supply is
consistently maintained at the correct pressure.
Cary Eclipse Fluorescence Spectrophotometer User’s Guide 25Installation
Supply tubing
Use clean, flexible plastic (Tygon polyvinyl chloride (PVC) or
equivalent) tubing of 6 millimeter (1/4 inch) internal diameter. Never
use rubber tubing because it may be treated internally with talc,
which can be blown into the optical system.
CAUTION Never use rubber tubing, because it may be treated internally with talc, which
can be blown into the optical system.
Gas manifold
A gas manifold should be fitted with an inlet suitable for connection
to the nitrogen supply system and an outlet suitable for connection to
the spectrophotometer.
Flowmeter
A flowmeter (complete with control valves) should be inserted in the
system between the nitrogen supply system and the
spectrophotometer. The flowmeter should be capable of monitoring
flow rates between 0 and 30 liters per minute (64 cubic feet per
hour).
Installing the software
To install the Cary Eclipse WinFLR software:
1 Log on to the instrument computer with Administrator
privileges.
2 Insert the software disk, and click OK.
If using Windows 7 operating system, a User Account Control
dialog box will appear, click Yes for ‘Do you want to allow
the following program to make changes to this computer?’.
NOTE If no installation screen appears, run ‘EclipseSetup.exe’ from the CD directory.
26 Cary Eclipse Fluorescence Spectrophotometer User’s GuideInstallation
3 Follow the prompts on the screen until the ‘Select Destination
Location’ window appears. Confirm the directory in which you
would like to install the application. Alternatively, click Browse
to choose a different location. Click Next.
NOTE Agilent strongly recommends that the Agilent\Cary Eclipse WinFLR folder and
applications be installed in the recommended directory.
4 The ‘Folder Does Not Exist’ dialog box may appear. Click Yes to
create the folder.
5 Follow the prompts on the screen until the ‘Ready to Install’
window appears. Click Install.
NOTE During the installation of the .Net Framework and GPIB driver, the computer may
appear frozen and the ‘Cancel’ button is unavailable. This is correct. The
installation can take 3 to 5 minutes. Do not try to exit the installation during this
time.
6 If prompted to complete installation of Cary WinFLR by
restarting your computer, select No, I will restart the computer
later. Click Finish.
7 Remove the Cary Eclipse Software disk from the CD drive and
insert the Cary Eclipse Help disk, as prompted.
If using Windows 7 operating system, a User Account Control
dialog box will appear, click Yes for ‘Do you want to allow
the following program to make changes to this computer?’.
NOTE If no installation screen appears, run ‘CaryFlrHelp\setup.exe’ from the CD directory.
8 Follow the instructions on the screen to install the Help.
9 When the status indicates ‘Finished’, click Close.
10 Remove the Help disk from the CD drive.
Cary Eclipse Fluorescence Spectrophotometer User’s Guide 27Installation
Installing the USB-GPIB-HS Converter
To install a National Instruments USB-GPIB-HS converter:
NOTE Ensure that the Cary Eclipse WinFLR software has been installed.
1 Turn off the computer.
2 Connect one end of the converter to the instrument and the other
end to the USB connection on the back of the computer.
3 Turn on the computer.
Registering the Cary Eclipse software
To register the Cary Eclipse software:
1 Click Start > All Programs > Agilent > Cary Eclipse and then
the desired application. Alternatively, double-click the Cary
Eclipse folder on the desktop
2 The first time the Cary Eclipse software is opened a Software
Registration dialog will appear. Click Next.
NOTE Ensure the software registration is completed by the user of the instrument. For
further information refer to the Software Registration Help.
3 Complete all the fields on the ‘Customer Details’ page. Click
Next.
NOTE The Product Key is found on the cover of the Agilent Cary Eclipse software
CD/DVD case which was delivered with the instrument.
4 Complete all the fields on the ‘Product Details’ page. Click Next.
5 Complete all the fields on the ‘Work Environment Details’ page.
Click Register.
6 A dialog appears stating ‘Your Agilent Software Registration has
been successful’.
28 Cary Eclipse Fluorescence Spectrophotometer User’s GuideInstallation
NOTE If your computer is not connected to the internet, refer to the Software
Registration Help for further information.
7 The application will now open, and you can collect your data.
TIP To familiarize yourself with the Cary Eclipse WinFLR software, browse the Help
after installing the software. To access the Help, with a Cary Eclipse application
open press F1 on your keyboard or click Start > All Programs > Agilent > Cary
Eclipse > Cary Eclipse Help.
Uninstalling the software
To uninstall the Cary Eclipse software:
1 Click the Windows Start button. Choose Settings, Control Panel,
Add/Remove programs.
2 Scroll until you find ‘Cary Eclipse WinFLR’.
3 Click Add/Remove and then Yes. Follow the instructions on the
screen.
NOTE During the uninstallation, you may be prompted to remove certain drivers/files.
Click ‘No’ to these prompts, as other programs may rely on these files to run.
4 Repeat the process for the Cary Eclipse Help.
Software Status Bulletin
Before proceeding further, you should read the Software Status
Bulletin document supplied with the software and the Agilent Cary
Eclipse WinFLR version 1.2 Release Notes.pdf located in the install
directory. These documents contain the latest release information
and important notes.
Cary Eclipse Fluorescence Spectrophotometer User’s Guide 29Installation
This page is intentionally left blank.
30 Cary Eclipse Fluorescence Spectrophotometer User’s GuideMaintenance and Spare Parts
4. Maintenance and Spare Parts
Cleaning 32
Lamp module 32
Fuses 38
Spare Parts 39
This chapter includes the maintenance procedures for the Cary
Eclipse that may be carried out by an operator. Any maintenance
procedures not specifically mentioned in this chapter should be
carried out only by Agilent-trained, Agilent-qualified or Agilent-
authorized customer service representative.
WARNING Eye Hazard
This instrument contains an intense light source. Viewing of the light source
either directly or via a reflecting surface will cause eye damage. Operators
and other unauthorized personnel must NEVER remove the black cover over
the optics.
NOTE This section refers only to maintenance procedures for the Cary Eclipse
fluorescence spectrophotometer. You should refer to your computer and printer
manuals for their maintenance procedures, and to the Cary Eclipse Help for the
maintenance procedures for any Cary Eclipse accessories you ordered.
Cary Eclipse Fluorescence Spectrophotometer User’s Guide 31Maintenance and Spare Parts
Cleaning
Any spills in the sample compartment should be immediately wiped
up.
The exterior surfaces of the Cary Eclipse spectrophotometer should
be kept clean. All cleaning should be done with a soft cloth. If
necessary, this cloth can be dampened with water or a mild
detergent. Do not use organic solvents or abrasive cleaning agents.
Lamp module
This section describes how to replace the lamp module and realign
the light beam. Before changing the lamp module, always disconnect
the Cary Eclipse from the mains supply.
NOTE These instructions are also provided in the Cary Eclipse Help, including videos
to demonstrate the procedure. To access the Cary Eclipse Help, click Start > All
Programs > Agilent > Cary Eclipse > Cary Eclipse Help.
Replacing
WARNING Eye and Electrical Shock Hazards
When operating, the lamp module emits high intensity light which can
damage eyes. To avoid eye damage, never operate the lamp module outside
the instrument.
The lamp module contains components operating at high voltages. To avoid
electric shock, NEVER disassemble the lamp module.
32 Cary Eclipse Fluorescence Spectrophotometer User’s GuideMaintenance and Spare Parts
To remove the lamp module:
1 Disconnect the Cary Eclipse from the mains power supply.
2 Remove the lamp access panel (see Figure 1).
3 Facing the front of the Eclipse, turn the instrument onto its right
side to get access to the base.
4 On the base of the instrument, undo and remove the four thumb
screws of the lamp module cover (see Figure 3).
Figure 3. Base of the Eclipse showing the lamp module cover thumb screws (1)
5 Loosen the three bolts marked with a black dot (labeled ‘1’ in
Figure 4), until the lamp module is free to move through the front
opening.
Figure 4. Lamp module showing 1) Bolts and 2) Plug
Cary Eclipse Fluorescence Spectrophotometer User’s Guide 33Maintenance and Spare Parts
6 Move the lamp module towards the front of the instrument to
disengage two guide pins at the rear.
7 Partially withdraw the module through the opening in the base.
8 Squeeze the clip on the plug (labeled ‘2’ in Figure 4) and remove
it from its socket
9 Completely withdraw the lamp module.
WARNING Eye and Electrical Shock Hazards
When operating, the lamp module emits high intensity light which can
damage eyes. To avoid eye damage, never operate the lamp module outside
the instrument.
The lamp module contains components operating at high voltages. To avoid
electric shock, NEVER disassemble the lamp module.
To install the lamp module:
1 Plug the connector of the new lamp module into the socket in the
instrument.
2 Fit the lamp module in the base of the Cary Eclipse, ensuring that
the two guide pins are correctly located and that the wiring is
kept clear of the other parts of the instrument.
3 Tighten the three bolts through the front panel. Replace the lamp
access panel.
4 Replace the lamp module cover and tighten the four
thumbscrews.
5 Return the instrument to its upright position
6 Replace the power cable at the rear.
7 Turn on the computer and the instrument.
NOTE After replacing the lamp module, you must align the lamp module.
34 Cary Eclipse Fluorescence Spectrophotometer User’s GuideMaintenance and Spare Parts
Aligning
For optimum performance of the instrument, the lamp module must
be aligned.
To align the lamp module:
NOTE The instrument power must be on for the alignment procedure.
1 Start the Align application by clicking the Start > Programs >
Agilent > Cary Eclipse > Align.
2 Remove the lamp access panel (see Figure 1) to access the lamp
alignment screws.
3 In the Align application, click the Cary tab and set up these
instrument parameters:
Ex. Wavelength (nm): 540
Ex. Slit (nm): 1.5
Ave. time (s): 0.1
PMT voltage: Medium
NOTE Emission parameters are not important for this procedure.
4 Click the Graph tab.
5 View the reference signal by clicking the Reference Signal button
on the toolbar.
6 Click the Vertical Rescale button to find the signal range.
7 Click the Scale button and enter an upper limit that is 20%
higher than the current signal and a lower limit that is 20% lower
than the current signal. This will make the adjustment easier
when observing the graph.
8 Adjust the bottom left screw (vertical adjustment, labeled ‘1’ in
Figure 5) for maximum signal with the supplied 5.5 millimeter
nut driver (you may need to adjust the y-axis scaling on the
screen).
Cary Eclipse Fluorescence Spectrophotometer User’s Guide 35Maintenance and Spare Parts
NOTE The brass adjustment screws for vertical and horizontal adjustment are clearly
marked.
Figure 5. 1) Vertical adjustment screw 2) Horizontal adjustment screw
9 Adjust the top right screw (horizontal adjustment, labeled ‘2’ in
Figure 5) for maximum signal (see Figure 6) with the supplied
5.5 millimeter nut driver (you may need to adjust the y-axis
scaling).
36 Cary Eclipse Fluorescence Spectrophotometer User’s GuideMaintenance and Spare Parts
Figure 6. 1) Maximum signal level
10 Click the Lamp tab.
11 Click the Save conditions button to store instrument parameters.
NOTE Clicking the ‘Save conditions’ button will store the current instrument
parameters as well as the maximum reading.
Cary Eclipse Fluorescence Spectrophotometer User’s Guide 37Maintenance and Spare Parts
Fuses
The Cary Eclipse spectrophotometer contains two fuses that are
located at the back of the instrument.
Replacing
To replace a fuse:
1 Disconnect the Cary Eclipse instrument from the power supply.
2 Replace the blown fuse with one of the same type and rating, as
indicated in Chapter Error! Reference source not found..
The fuses have a code marked on the cap (for example, T 3.15 AH
250 V). This refers to the fuse characteristic (‘T’: time lag, ‘F’: fast-
acting), the current rating (‘x’: amperes), the braking capacity (‘H’:
heavy, ‘L’: low) and the voltage rating (‘y’: volts).
NOTE Fuse information on the rear of the instrument is the most up-to-date.
WARNING Electrical Shock and Fire Hazards
To prevent reduced safety protection or unwanted fusing, always ensure
that the code on the fuse cap matches the information printed next to the
fuse holders.
38 Cary Eclipse Fluorescence Spectrophotometer User’s GuideMaintenance and Spare Parts
Checking
To check a fuse:
1 Disconnect the Cary Eclipse instrument from the mains power
supply.
2 Open the hinged cap and pull out the fuse holder (lower red
section). Both fuses are held in this fuse holder.
3 Check that each fuse is the correct type and that they are not
damaged. If necessary, replace the fuse (refer to Page 38).
4 Place the fuses into the red fuse holder and push this red fuse
holder into the main fuse holder and then lower the cap.
5 Reconnect the Cary Eclipse instrument to the mains power
supply and turn on the instrument.
NOTE If a fuse repeatedly blows, it may indicate other problems with the Cary Eclipse
instrument.
Spare Parts
Please see the Agilent website for a complete listing of spare parts:
www.agilent.com
Cary Eclipse Fluorescence Spectrophotometer User’s Guide 39Maintenance and Spare Parts
This page is intentionally left blank.
40 Cary Eclipse Fluorescence Spectrophotometer User’s GuideTroubleshooting
5. Troubleshooting
Instrument offline 41
Connect button instead of Start 42
Instrument performance testing 42
This chapter contains troubleshooting information to help you solve
various problems you may encounter when setting up or using your
Cary Eclipse.
If you are having problems with your software, check the information
in this chapter to see if there is a solution to your problem. You may
also find a solution to your problem in the:
‘Troubleshooting’ section of the Help. To view this, click Start >
All Programs > Agilent > Cary Eclipse > Cary Eclipse Help. Click
‘Troubleshooting’ and follow the links.
Software Status Bulletin documents that were shipped with the
Cary Eclipse WinFLR software.
If you still have not found the solution to your problem, contact your
local Agilent office or representative.
Instrument offline
Problem
When I start the Cary WinFLR software, the application reports that
the instrument is ‘Offline’.
Solutions
Make sure the computer has been restarted after the Cary Eclipse
WinFLR software is installed.
Cary Eclipse Fluorescence Spectrophotometer User’s Guide 41Troubleshooting
Check the connection of the main instrument cable (USB-GPIB-
HS) attaching the computer to the instrument.
Ensure the instrument has completed its initialization tests
before you start the Cary Eclipse WinFLR software.
Contact your local Agilent office.
Connect button instead of Start
Problem
When I start the Cary Eclipse WinFLR application, I want to use the
‘Start’ button but it has changed to a ‘Connect’ button — why?
Solution
Check to see if you have any other Cary applications running. If they
are not collecting data, click the ‘Connect’ button to get control of the
instrument.
Instrument performance testing
Problem
The results of your instrument performance tests do not meet
specifications (the results obtained during factory testing are
included in the packing crate with the instrument).
Solution
Check the following:
The sample compartment is empty.
The cable connecting the instrument to the computer is correctly
connected and the retaining screws are tightened.
42 Cary Eclipse Fluorescence Spectrophotometer User’s GuideTroubleshooting
The lamp is pulsing during initialization. This is indicated if the
green power indicator on the front of the instrument flashes (you
should be able to hear the lamp and you should also be able to
hear the monochromator and the filter wheel moving). If the
lamp is not pulsing you may have a hardware conflict.
The lamp is correctly aligned (refer to Chapter 4 for instructions
on aligning the lamp).
WARNING Eye and Electrical Shock Hazards
When operating, the lamp module emits high intensity light which can
damage eyes. To avoid eye damage, never operate the lamp module outside
the instrument.
The lamp module contains components operating at high voltages. To avoid
electric shock, never disassemble the lamp module.
Cary Eclipse Fluorescence Spectrophotometer User’s Guide 43Troubleshooting
This page is intentionally left blank.
44 Cary Eclipse Fluorescence Spectrophotometer User’s Guidewww.agilent.com In This Guide The guide describes the following: Safety Practices and Hazards Introduction Installation Maintenance Troubleshooting © Agilent Technologies 1999, 2000, 2011-2012 Printed in Malaysia 01/12 8510175800 8510175800 8510175800 Issue 4
You can also read