Cisco UCS and Intel SGX with Fortanix Confidential Computing Manager
←
→
Page content transcription
If your browser does not render page correctly, please read the page content below

White paper
Cisco public

              Cisco UCS© and Intel© SGX
               with Fortanix Confidential
                 Computing Manager

© 2022 Cisco and/or its affiliates. All rights reserved.   Page 1 of 56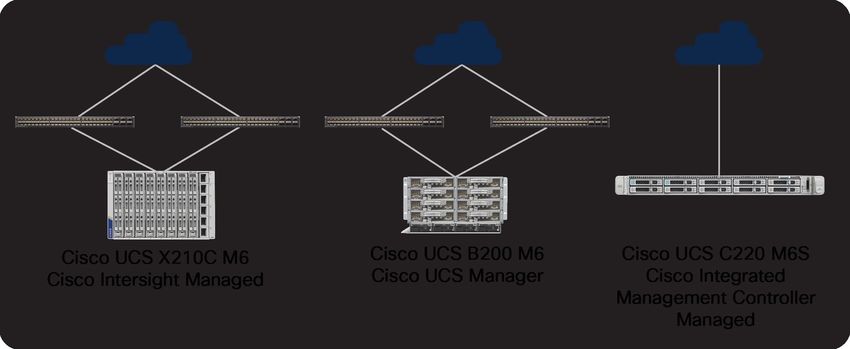
Contents
Executive summary                                                    3
Introduction                                                         3
Solution design                                                      6
Hardware BIOS configuration                                        10
Software configuration                                             17
Elasticsearch and secure enclaves                                  28
MariaDB and secure enclaves                                        41
Appendix                                                           54
Conclusion                                                         55
For more information                                               56

© 2022 Cisco and/or its affiliates. All rights reserved.   Page 2 of 56
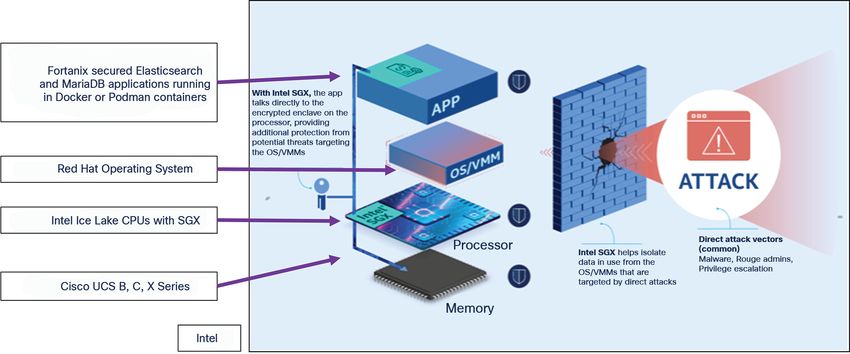
This document describes a proof-of-concept configuration and deployment of Intel©
Software Guard Extensions (SGX) with Fortanix Confidential Computing Manager™ (CCM)
on Cisco Unified Computing System™ Manager (UCSM), Cisco Intersight™ Managed Mode
(IMM), and Cisco© Integrated Management Controller (CIMC). In addition, instructions
have been provided for securing and deploying Elasticsearch and MariaDB containerized
applications into secure enclaves onto UCS X-Series blade servers, UCS B-Series blade
servers, and UCS C-series rack servers.

Executive summary
This document describes a proof-of-concept configuration and deployment of Intel Software Guard Extensions
(SGX) with Fortanix Confidential Computing Manager (CCM) on the Cisco Unified Computing System
(Cisco UCS). It provides the necessary configuration steps for enabling Intel SGX in multiple Cisco UCS
management solutions and hardware platforms, including Cisco UCS Manager (UCSM) with UCS B-Series
blade servers, Cisco UCS Intersight Managed Mode (IMM) with UCS X-Series blade servers, and Cisco
Integrated Management Controller (CIMC) with UCS C-Series rack servers.

This paper will review multiple use cases utilizing the Fortanix Confidential Compute Manager solution to easily
convert non-secured versions of Elasticsearch and MariaDB containerized applications into secured images
running in Intel secure SGX enclaves.

Cisco UCS with Intel SGX and Fortanix Confidential Compute Manager outlined in this paper provides a starting
point and learning experience for quickly and easily implementing confidential computing into your environment.

Introduction
Confidential Computing
What is confidential computing and why is it used? The definition from the Confidential Computing Consortium
(CCC) is as follows: confidential computing protects data in use by performing computation in a hardware-
based trusted execution environment. These secure and isolated environments prevent unauthorized access or
modification of applications and data while they are in use, thereby increasing the security level of organizations
that manage sensitive and regulated data.

The CCC defines a Trusted Execution Environment (TEE) as an environment that provides a level of assurance
of data integrity, data confidentiality, and code integrity by utilizing hardware-backed techniques for achieving
these security guarantees. TEEs can also provide code confidentiality, authenticated launch, programmability,
recoverability, and attestability.

Existing encryption technologies have focused on encrypting data-at-rest and data-in-transit; confidential
computing extends this encryption to data-in-use.

© 2022 Cisco and/or its affiliates. All rights reserved.                                                  Page 3 of 56
Intel SGX
What is Intel Software Guard Extensions (Intel SGX)?

The definition from Fortanix is as follows: Intel SGX is an extension to the x86 architecture that allows running
applications in completely isolated secure enclaves. Intel SGX applications are isolated from other applications
running on the same system, but also from the operating system, the hypervisor, the system management
module as well as the BIOS, and the firmware. The memory of secure enclaves is also encrypted to thwart
physical attacks. These security guarantees prevent even system administrators with physical access to the
SGX nodes from tampering with the application once it is started. Intel SGX supports data sealing, which allows
enclaves to persist data securely such that the data can only be read by the enclave. Through remote
attestation, Intel SGX enables third parties to verify that an application is indeed running inside an enclave and
the application has not been tampered with.
Cisco UCS and Intel SGX
Cisco UCS supports Intel SGX on the Intel Ice Lake–enabled UCS B-Series and X-Series blade servers and C-
Series rack servers. Additionally, Cisco UCS management platforms including Cisco Intersight, UCS Manager,
and Cisco Integrated Management Controller have the necessary BIOS tokens available for configuring Intel
SGX accordingly.
Fortanix Confidential Computing Manager
Fortanix is a data-first multicloud security company. As the industry’s first and largest provider of confidential
computing solutions, Fortanix decouples data security from infrastructure. Fortanix solutions empower
organizations with centralized controls to secure data spread across clouds, applications, SaaS, databases, and
data centers. Over a hundred enterprises worldwide, especially in privacy-sensitive industries such as
healthcare, fintech, financial services, government, and retail use Fortanix for cloud security and privacy.

Fortanix implements Intel SGX across a range of its products. The Fortanix Data Security Manager implements
Intel SGX in its Key-Management Service (KMS), which provides secure generation, storage, and use of
cryptographic keys, certificates, and secrets. Runtime Encryption Technology provides a comprehensive
environment for developing, operating, and maintaining Intel SGX enclaves and other enclave technologies.
Enclave OS is the runtime environment for code to run inside enclaves, based on simply repackaging existing
images without requiring any changes to application binaries. The ability to run existing software without
modification dramatically reduces the time, cost, and complexity associated with deploying it in a confidential
computing environment. Enclave OS operates a root of trust established in the CPU to create a region of
memory that is inaccessible to any process outside the application itself, regardless of privilege level.

© 2022 Cisco and/or its affiliates. All rights reserved.                                                 Page 4 of 56

Fortanix solution

The Fortanix Confidential Computing Manager is a cloud-native SaaS environment that provides a single pane
of glass for managing secure enclaves and confidential computing nodes, on premises or in any cloud or hosted
environment with supported hardware. It controls the enclave lifecycle, including enablement for policy
enforcement on running applications. The Confidential Computing Manager also performs highly efficient
attestation services, with minimal burden placed on developers.

The Enclave Development Platform (EDP) is an open-source environment for writing Intel SGX enclaves from
scratch, using the Rust programming language. The design of the EDP is optimized by years of in-house use by
Fortanix to develop various products, making it exceptionally efficient and developer friendly. Rust combines
high computational performance with built-in code safety measures, especially for safe concurrency and
memory safety.
Audience
This proof of concept is targeted toward technical engineers, administrators, and architects who are interested
in a hands-on introduction to the various components needed for successfully running applications within
secure enclaves. It is assumed that the audience has a working knowledge of the following technologies:
    1. Cisco UCS IMC (standalone), UCS Manager, and/or Cisco Intersight service/server profiles

    2. Red Hat Enterprise Linux

    3. Docker Hub or other container repositories

    4. Docker and/or Podman container technologies

© 2022 Cisco and/or its affiliates. All rights reserved.                                               Page 5 of 56
Solution design
Solution overview
The architecture for this solution is relatively simple in order to highlight the confidential computing technologies
being utilized. The systems tested include UCS M6 series (B-Series, X-Series, and C-Series) supporting the
Intel Ice Lake processor family, which is needed to support the current implementation of Intel SGX. Server
BIOSs have been configured with Intel SGX technologies enabled utilizing Cisco UCS Manager Service profiles
and BIOS policies, Cisco Intersight Managed Mode using server profiles and BIOS policies, and Cisco
Integrated Management Controller BIOS policies. The systems have been loaded with Red Hat 8.x Operating
Systems. Fortanix Confidential Computing / Runtime Encryption has been loaded onto these systems with two
example applications implemented: Elasticsearch and MariaDB.

Additionally, we have demonstrated the Elasticsearch and MariaDB container implementations using two
different market leading container technologies: Podman, which is the native container technology included with
Red Hat 8.x, and Docker, the container technology that preceded Podman on Red Hat. We provide installation
steps and commands utilizing both container technologies in this paper.

Solution overview

Solution flow
The solution setup consists of multiple parts. It covers basic setup of the UCS policies and profiles, post
operating system installation configuration including Intel SGX and attestation driver installation, Fortanix CCM
installation, repository configuration, Elasticsearch and MariaDB image conversion, and container deployment
and testing. The high-level flow of the solution setup follows:
    1. Install and configure Intel SGX BIOS tokens on Cisco UCS M6 B-Series, C-Series, or X-Series
       utilizing UCSM, Intersight, or CIMC.

    2. Deploy Red Hat Enterprise Linux and install Intel SGX and attestation drivers and Fortanix agents.

    3. Test basic functionality of Intel SGX to confirm that secure enclaves and attestation are working.

    4. Utilize Fortanix CCM to convert the Elasticsearch application to a secure image, then load and test.

    5. Utilize Fortanix CCM to convert MariaDB application to a secure image, then load and test.

© 2022 Cisco and/or its affiliates. All rights reserved.                                                    Page 6 of 56
Requirements
The following sections detail the physical hardware, software revisions, and firmware versions required to install
Intel SGX Fortanix on Cisco UCS. The hardware requirements are general and can deviate based on the
specifications given below. One physical Cisco UCS M6 system is required for this implementation; the system
can be either B-Series or X-Series blade servers or C-Series rack servers (standalone or Fabric Interconnect
attached). Please see below the list of valid Intel Ice Lake CPUs offered by Cisco at the time of this writing. The
firmware, operating system, drivers, and application versions are specific to this white paper, and deviations
have not been tested and may not work as expected.

Table 1.         Hardware components used in this white paper

    Component                        Model                                Quantity       Comments

    Cisco UCS servers                Cisco UCS C220 M6S                   1              2 x Intel Xeon Platinum 8368 (2.4 GHz, 38 cores,
                                                                                         512 GB SGX Enclave Capacity)
                                                                                         2-TB Memory
                                                                                         M.2 RAID Controller with 2x240GB Drives
                                     Or                                                  (System/Data)
                                                                                         1 x VIC 1467
                                     Cisco UCS B200 M6                    1              2x Intel Xeon Platinum 8368 (2.4 GHz, 38 cores,
                                                                                         512 GB SGX Enclave Capacity)

                                     Or                                                  1-TB Memory
                                                                                         12Gb SAS/SATA RAID Controller with 2x480GB
                                                                                         SATA SS
                                     Cisco UCS X210C M6                   1              1 x VIC 1440
                                                                                         1x Intel Xeon Gold 6348 (2.6 GHz, 28 cores, 64
                                                                                         GB SGX Enclave Capacity
                                                                                         256 GB Memory
                                                                                         M.2 RAID Controller with 2x240GB Drives
                                                                                         (System/Data)
                                                                                         1x VIC 14425

    UCS Fabric               6454                                         2
    Interconnect (for B or X
    Series blade servers)

Intel CPU options (SGX Enclave Capacity (per processor))*
    8380, 8368, 8352S, 5318S                                                                                               512 GB

    8362, 8360Y, 8358, 8352Y, 8352M, 8351N, 6354, 6348, 6346, 6342, 6338T, 6338N, 6338, 6336Y,                             64 GB
    6334, 6330N, 6330, 6326, 6314U, 6312U, 5320T, 5320, 5318Y, 5318N, 5317, 5315Y

    8358P, 8352V, 4316, 4314, 4310T, 4310, 4309Y                                                                           8 GB

*
    SGX Enclave Capacity is the size of the private memory region that makes up the secure enclave. The size of the enclave capacity has a
    direct correlation to the size of the application that can be loaded into the enclave at any one time.

© 2022 Cisco and/or its affiliates. All rights reserved.                                                                           Page 7 of 56
Software components

Table 2.        Software versions

 Layer                                          Component                                    Version or release

 Cisco UCS C220 M6S                             Firmware version                             4.2(1a)

 Cisco UCS B200 M6                              Firmware version                             4.2(1f)

 Cisco UCS X210C M6                             Firmware version                             5.0(1d)

 Software                                       Red Hat Enterprise Linux                     8.3 (rhel-8.3-x86_64-dvd.iso)

 Software                                       Intel SGX DCAP Driver                        1.36.2

 Software                                       Intel SGX Multi-Package Registration Agent   1.12.100.3

 Software                                       Fortanix CCM Node Agent                      3.1.2.810

 Software                                       Elasticsearch                                7.1.0

 Software                                       MariaDB                                      10.3.11

 Software                                       Docker                                       20.10.12

 Software                                       Podman                                       3.3.1

Website access
It is necessary to create accounts on the following websites to successfully complete this proof of concept. It is
recommended that this be completed prior to beginning the Fortanix and application installations to avoid
delays during configuration steps.

Docker Repository – Navigate to https://hub.docker.com and sign up for a free Docker Hub account. This will
be utilized for storing and pulling the secure images created within this proof of concept.

Fortanix Confidential Computing Manager (CCM) – Navigate to https://ccm.fortanix.com and sign up for a
free CCM account. This will be utilized for registering secure compute nodes, securing images, and managing
the secure infrastructure. User ID creation and confirmation can take up to 24 hours.

© 2022 Cisco and/or its affiliates. All rights reserved.                                                                 Page 8 of 56
Physical topology

Topology overview
The solution contains three possible topology configurations consisting of UCS M6 series (B-Series, X-Series,
or C-Series). These servers can either be connected to UCS Fabric Interconnects or directly connected to
Cisco Nexus® Ethernet network switch(es) (the type of Ethernet network switch is not a dependency). Each
Cisco UCS server has a minimum of 10Gb Ethernet connectivity and has internet connectivity. As this is a proof
of concept, high availability and high performance have not been designed into the solution; however, these can
be implemented if desired. Red Hat Enterprise Linux (RHEL) 8.3 with a registered Red Hat subscription is
required.

Data center topology

Network design
The network design for this proof of concept is very basic and only requires a single vNIC being created with
internet access. Intersight, UCS Manager, and Cisco Integrated Management Controller network and VLAN
creation and configuration are out of the scope for this document, and it is assumed that the reader can
configure the necessary service/server profiles to establish internet access to the server running the Red Hat
Enterprise Linux operating system.

Naming scheme and DNS
Domain Name System (DNS) for querying Fully Qualified Domain Names (FQDNs) has been configured for the
Red Hat Enterprise Linux server. The FQDN has been added to the RHEL /etc/hostname file that is noted in the
RHEL configuration section below.

© 2022 Cisco and/or its affiliates. All rights reserved.                                                Page 9 of 56
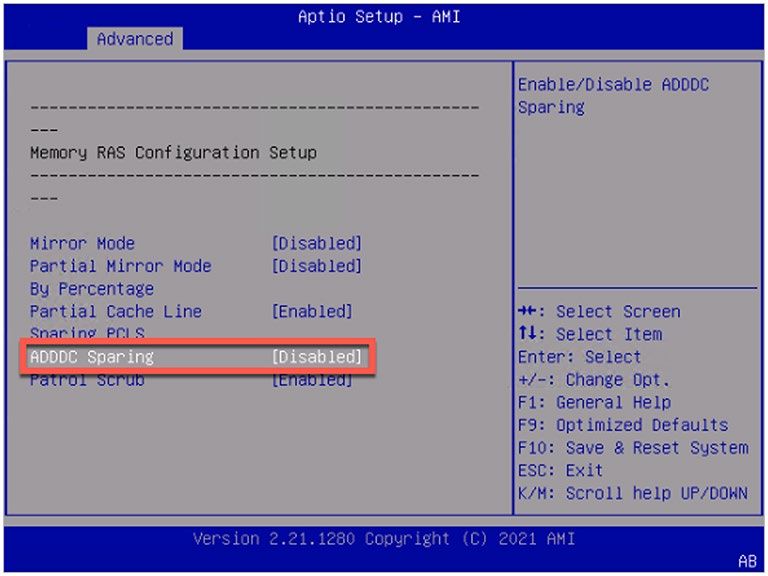
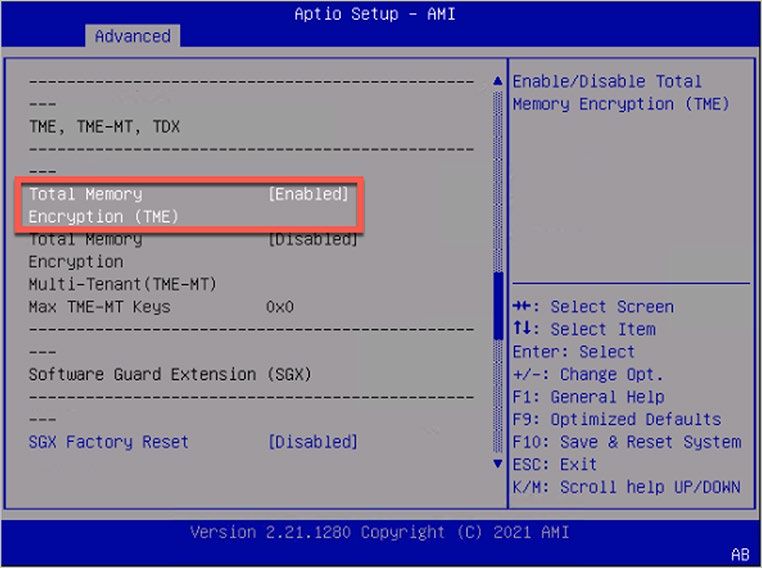
Hardware BIOS configuration
UCS BIOS configuration / Intel SGX enablement

Cisco Integrated Management Controller / C240M6 BIOS Configuration
Enable Runtime Encryption in the BIOS

Assuming your system is compatible with SGX (UCS M6 with compatible Intel CPU – see above for the
applicable CPUS), the following lists the options needed for SGX enablement in BIOS:

At BIOS POST, click  BIOS Setup when prompted.

Go to the Advanced tab and click Socket Configuration.

© 2022 Cisco and/or its affiliates. All rights reserved.                                        Page 10 of 56
In Advanced/Socket Configuration, navigate to the menu items below, and configure accordingly (see the
screenshots below):

          Common RefCode Configuration-> UMA-Based Clustering = [Disable (All2All)]

          Memory Configuration-> Memory RAS Configuration-> ADDDC Sparing = [Disabled]
          Processor Configuration-> Total Memory Encryption (TME) = [Enabled]
          Processor Configuration-> SW Guard Extensions (Intel® SGX) = [Enabled]

          Processor Configuration-> PRMRR Size – 8G

          Processor Reserved Memory Range Registers (PRMRR) - The size of the protected region in the systems
          DRAM. The maximum size of the PRMRR field in the BIOS configuration will match the amount of the
          SGX Enclave Capacity value for the Intel CPU being utilized.
          Processor Configuration-> SGXLEPUBKEYHASHx Write Enable = [Enabled]

          Processor Configuration-> Enable/Disable SGX Auto MP Registration Agent = [Enabled]

© 2022 Cisco and/or its affiliates. All rights reserved.                                           Page 11 of 56
© 2022 Cisco and/or its affiliates. All rights reserved. Page 12 of 56
When the BIOS token configurations have been completed, press F10 to save and reset the system. Please go
to the Software Configuration section below for operating system installation and configuration.

Cisco UCS Manager / B200 M6 BIOS Policy Configuration

Create a Server BIOS Policy with SGX specific configurations:

Servers/Policies/root/BIOS Policies/policy_name

          Advanced>Processor>SW Guard Extensions (SGX) = Enabled
          Advanced>Processor>Total Memory Encryption (TME) = Enabled

          Advanced>Processor>SGX Write Enable = Enabled
          *Advanced>Processor>PRMRR Size = 8G
          *Note: At the time of this writing, the Processor Reserved Memory Range Registers (PRMRR) token is not
          currently available within UCS Manager BIOS Policy; it is necessary to configure this token through the
          F2 BIOS setup. Once the above Server BIOS Policy has been configured and applied to the server, open
          a KVM window to this server and see the prior section “Cisco Integrated Management Controller” for
          configuring the PRMRR Size token.
          Advanced>Processor>SGX Auto MP Registration Agent = Enabled
          Advanced>RAS Memory>Memory RAS configuration = Maximum Performance
          Advanced>RAS Memory>UMA Clustering = Disable (All2All)

© 2022 Cisco and/or its affiliates. All rights reserved.                                               Page 13 of 56
© 2022 Cisco and/or its affiliates. All rights reserved. Page 14 of 56
Cisco Intersight / X210C M6 Server BIOS Policy Configuration

Create a Server BIOS Policy with SGX specific configurations:

     ●    Configure>Policies>BIOS>policy_name>create/edit
     ●    Memory> Memory RAS Configuration> maximum performance
     ●    Memory> UMA Based Clustering > Disable (All2All)
     ●    Trusted Platform>Software Guard Extensions (SGX)> enabled
     ●    Total Memory Encryption (TME)> enabled
     ●    SGX Auto MP Registration Agent> enabled
     ●    SGX Write Enable> enabled

© 2022 Cisco and/or its affiliates. All rights reserved.              Page 15 of 56
*PRMRR Size – 8G The size of the protected region in the systems DRAM. The maximum size of the PRMRR field in the BIOS configuration will match the amount of SGX Enclave Capacity value for the Intel CPU being utilized. *Note: At the time of this writing, the Processor Reserved Memory Range Registers (PRMRR) token is not currently available within the Intersight Server BIOS configuration; it is necessary to configure this token through the F2 BIOS setup. Once the above Server BIOS Policy has been configured and applied to the server, open a KVM window to this server and see the prior section “Cisco Integrated Management Controller” for configuring the PRMRR Size token through the F2 Setup. © 2022 Cisco and/or its affiliates. All rights reserved. Page 16 of 56
Software configuration
Red Hat Enterprise Linux / Intel SGX / Fortanix configuration and enablement
This proof of concept has been tested utilizing Red Hat Enterprise Linux version 8.3 (rhel-8.3-x86_64-dvd.iso).
It is assumed that the server hardware has been configured, RHEL 8.3 has been installed, the license has been
registered with Red Hat, Ethernet connectivity has been configured, internet access has been established, and
the operating system is at the login or command prompt.

The following options were chosen during the RHEL 8.3 operating system installation utilized in this paper:

Software selection: The base environment chosen during installation was “Server – An integrated, easy-to-
manage server.”

Installation Destination: Local Standard Disk (single disk or RAID disk)

Network interface was configured using nmtui, with IP address, subnet, gateway, and DNS specified.

Hostname was configured by editing the /etc/hostname file.
Document command syntax/conventions
Commands are listed after the # symbol within the gray boxes.

Copy-and-pasting of the commands is recommended to avoid errors.

Commands may include variables within brackets ; please replace the bolded text and remove the
brackets within the commands.

Commands within the gray boxes may wrap to the next line. Copy-and-pasting should capture all necessary
spacing. If manually typing the commands, please be careful to include any necessary spacing, which may not
be obvious between wrapped lines.

For the most accurate copy-and-pasting of commands, and to avoid errant spacing between commands that
span multiple lines, utilize a PDF reader such as Adobe Acrobat Reader for reading and utilizing this document.
Validate BIOS Runtime Encryption
Validate that the BIOS Runtime Encryption is correctly enabled by downloading and running the sgx-detect
utility as shown below:

 # wget https://download.fortanix.com/sgx-detect/centos8/sgx-detect
 # chmod +x sgx-detect
 # ./sgx-detect

If the BIOS has been configured correctly, the output of the sgx-detect command will resemble the output
below. If the SGX instruction set is not all green (as shown in the output below), please review the BIOS
configuration steps given above before proceeding.

© 2022 Cisco and/or its affiliates. All rights reserved.                                               Page 17 of 56
The remaining sections of the sgx-detect output will turn from red x’s to green checks as we progress through
this document.
Prerequisites for SGX on Red Hat Enterprise Linux
Full documentation for the RHEL SGX prerequisites can be found at the link below. We have included, below,
simplified instructions for implementing these prerequisites.

https://github.com/intel/SGXDataCenterAttestationPrimitives/tree/DCAP_1.10.3/driver/linux

As an example, the instructions in the prerequisites are as shown below.

Matching kernel headers

To check if matching kernel headers are installed:

 # ls /usr/src/kernels/$(uname -r)

 arch certs drivers fs init Kconfig lib Makefile.rhelver Module.symvers samples security System.map usr
 vmlinux.id block crypto firmware include ipc kernel Makefile mm net scripts sound tools virt

A directory listing like the one shown above is displayed if the correct headers are already installed.

If the above command has no results, the headers are not installed. The correct headers to match the current
kernel can be installed using the following command:

 # sudo yum install -y "kernel-devel-uname-r = $(uname -r)"

© 2022 Cisco and/or its affiliates. All rights reserved.                                                  Page 18 of 56
Rerun the following command, and the directory listing should now produce the following results:

 # ls /usr/src/kernels/$(uname -r)

 arch certs drivers fs init Kconfig lib Makefile.rhelver Module.symvers samples security System.map usr
 vmlinux.id block crypto firmware include ipc kernel Makefile mm net scripts sound tools virt

If the latest headers are preferred or the above command is not successful, the following commands will install
the latest headers and the latest kernel (this step is not needed if the matching headers are already installed):

 # sudo yum install kernel-devel

After the above command, if the matching headers are still missing in /usr/src/kernels, try updating the kernel
and reboot using the commands below. Then choose the updated kernel on the boot menu.

 # sudo yum install kernel

 # sudo reboot

Installing additional packages

 # sudo yum install -y elfutils-libelf-devel
 # sudo yum groupinstall -y 'Development Tools'

 # sudo yum update -y libmodulemd

Setup EPEL REPO and enable DKMS
DKMS (Dynamic Kernel Module Support) ensures that the SGX driver is automatically updated after each kernel
update.

 # sudo yum install -y https://dl.fedoraproject.org/pub/epel/epel-release-latest-8.noarch.rpm

 # sudo yum install -y dkms

Install Python

 # yum install -y python3

Installing Docker or updating Podman
The default container technology in Red Hat >=8.0 is Podman. This paper will provide instructions for both
Podman and Docker container technologies. If Podman is preferred, please follow the steps for updating
Podman. If Docker is preferred, it will be necessary to first de-install Podman and then install Docker.

Updating Podman to latest release

If Podman is preferred, follow these steps to update both Podman and conmon components:

 # yum update podman -y

 # yum update conmon -y

Deinstalling Podman and installing Docker

If Docker is preferred, follow these steps to deinstall Podman and install Docker.

© 2022 Cisco and/or its affiliates. All rights reserved.                                                Page 19 of 56
Deinstall Podman:

  # sudo yum remove docker \

                   docker-client \

                   docker-client-latest \
                   docker-common \

                   docker-latest \

                   docker-latest-logrotate \

                   docker-logrotate \
                   docker-engine \

                   podman \
                   runc

Install Docker:

 # dnf config-manager --add-repo=https://download.docker.com/linux/centos/docker-ce.repo
 # dnf install docker-ce --nobest -y

 # systemctl start docker
 # systemctl enable docker

The Podman de-installation/Docker installation instructions given above can also be found at the following
Docker link: https://docs.docker.com/engine/install/rhel/
Installing SGX components
Install DCAP driver

Intel® Software Guard Extensions Data Center Attestation Primitives (DCAP) provides SGX attestation support
targeted for data centers, cloud services providers, and enterprises for Intel Ice Lake servers.

 # wget https://download.01.org/intel-sgx/sgx-dcap/1.9/linux/distro/rhel8.2-
 server/sgx_linux_x64_driver_1.36.2.bin

 # chmod +x sgx_linux_x64_driver_1.36.2.bin

 # ./sgx_linux_x64_driver_1.36.2.bin

Steps to confirm successful DCAP driver install:

 # lsmod | grep sgx

 Results:

 intel_sgx                           57344      4

© 2022 Cisco and/or its affiliates. All rights reserved.                                              Page 20 of 56
SGX-Detect checkpoint
Running ./sgx-detect at this point will show the following results:
Download and install Intel Registration Service Agent
The SGX Multi-Package Registration Agent performs SGX technology discovery and collection of SGX attributes
on an SGX enabled platform (single-socket/multi-socket). The registration is required to support remote
attestation of the SGX machine with Intel's attestation service.
# wget https://download.01.org/intel-sgx/sgx-dcap/1.12.1/linux/tools/SGXMultiPackageAgent/rhel8.2-
server/sgx_rpm_local_repo.tgz
# tar -zxvf sgx_rpm_local_repo.tgz
Install yum-utils:
# yum install -y yum-utils
To add the local RPM package repository to the system repository configuration, you can use the following
command. You need to replace PATH_TO_LOCAL_REPO_FILE with the path and the name of the directory
created where the sgx_rpm_local_repo.tgz was uncompressed above.
# sudo yum-config-manager --add-repo file:///
e.g. # sudo yum-config-manager --add-repo file:///root/sgx_rpm_local_repo
# sudo yum --nogpgcheck install -y libsgx-ra-network libsgx-ra-uefi sgx-ra-service
© 2022 Cisco and/or its affiliates. All rights reserved. Page 21 of 56To confirm that `PLATFORM_ESTABLISHMENT or TCB_RECOVERY passed successfully.` run the following command and check the output: # cat /var/log/mpa_registration.log The output should be like the following: [12-11-2021 03:06:32] INFO: SGX Registration Agent version: 1.12.100.3 [12-11-2021 03:06:32] INFO: Starts Registration Agent Flow. [12-11-2021 03:06:32] INFO: Registration Flow - Registration status indicates registration is completed successfully. MPA has nothing to do. [12-11-2021 03:06:32] INFO: Finished Registration Agent Flow. Install libsgx-enclave-common # sudo yum --nogpgcheck install -y libsgx-enclave-common Install and run the AESMD-DCAP Architectural Enclave Service Manager (AESM) is the system services management agent for SGX enabled applications. The container provides the implementation of this service with support for the DCAP protocol. Instructions are provided for both Podman and Docker installations. Podman: # mkdir -p /var/run/aesmd # sudo podman run --privileged --detach --restart always --device /dev/sgx/enclave --volume /var/run/aesmd:/var/run/aesmd --name aesmd docker.io/fortanix/aesmd-dcap:latest Docker: # mkdir -p /var/run/aesmd # docker run --detach --restart always --device /dev/sgx/enclave --volume /var/run/aesmd:/var/run/aesmd --name aesmd docker.io/fortanix/aesmd-dcap:latest © 2022 Cisco and/or its affiliates. All rights reserved. Page 22 of 56
SGX-Detect checkpoint

Running ./sgx-detect at this point will show the following results:

Installing Fortanix components
It is necessary to register for a Fortanix Confidential Computing Manager (CCM) user ID (“userid” in what
follows) and install the Fortanix CCM Node Agent. The CCM node agent assists with the following:

     ●    Verification of hardware and platform software running on compute nodes
     ●    Enabling registration of compute nodes to Fortanix CCM when installed on a compute node
     ●    Assisting with application attestation and visibility for Fortanix CCM

Create a ccm.fortanix.com userid

Create a ccm.fortanix.com userid and password following steps 1 and 2 of the Confidential Computing Manager
Quickstart Guide at the following link: https://support.fortanix.com/hc/en-us/articles/360043484152-
Quickstart-Guide

© 2022 Cisco and/or its affiliates. All rights reserved.                                              Page 23 of 56
Retrieve join token from ccm.fortanix.com The join token is a unique identifier associated with a Fortanix CCM account that is utilized for registering a compute node to CCM. Log in to ccm.fortanix.com, From the dashboard, navigate to Infrastructure, and click “+ENROLL COMPUTE NODE”. © 2022 Cisco and/or its affiliates. All rights reserved. Page 24 of 56
Click “Copy” to copy the join token that will be used for installing the CCM Node Agent.

Install and run the CCM node agent

Replace  in the podman or docker command below with the join token previously copied.

Podman:

 # mkdir -p /var/opt/fortanix/em-agent

 # sudo podman run --restart always --detach --privileged --volume /dev/sgx:/dev/host/sgx --volume
 /var/run/aesmd:/var/run/aesmd --volume /var/opt/fortanix/em-agent:/var/opt/fortanix/em-agent -e
 AGENT_MANAGER_AUTH_BASIC_TOKEN= -e ATTESTATION_TYPE=DCAP -p 9092:9092 --name em-agent
 docker.io/fortanix/em-agent:latest

*Note: Currently there is a bug with the Podman “restart always” parameter; this bug is targeted to be resolved
in Podman >=3.4.x. Please see appendix A for instructions on configuring systemd to restart the aesmd and
em-agent containers upon reboot for proper system operations.

Docker:

 # docker network create enclave-network

 # mkdir -p /var/opt/fortanix/em-agent
 # docker run --restart always --detach --privileged --volume /dev/sgx:/dev/host/sgx --volume
 /var/run/aesmd:/var/run/aesmd --network=enclave-network -e AGENT_MANAGER_AUTH_BASIC_TOKEN=
 -e ATTESTATION_TYPE=DCAP -p 9092:9092 --name em-agent docker.io/fortanix/em-agent:latest

© 2022 Cisco and/or its affiliates. All rights reserved.                                              Page 25 of 56
Verify CCM registration

Navigate to ccm.fortanix.com>Infrastructure>Compute Nodes. If em-agent has been successfully installed, the
compute node should now be listed.

Validate configuration with Python application “pythonflask”

The following exercise will validate that everything is working as expected up to this point using a simple secure
Python application called “pythonflask” hosted at Fortanix’s Docker repository. As previously mentioned,
instructions have been provided for both Podman and Docker container engines.

Load and run pythonflash

Podman:

  # sudo podman run --device /dev/sgx/enclave:/dev/sgx/enclave -v /var/run/aesmd:/var/run/aesmd -e
  "discovery.type=single-node"                  docker.io/fortanix/pythonflask-app-eos:latest
  Fortanix(R) EnclaveOS Runtime Encryption Platform 3.1.355-EM

  Copyright 2017-2021 Fortanix, Inc. All rights reserved.

   * Serving Flask app 'flaskapp' (lazy loading)

   * Environment: production

      WARNING: This is a development server. Do not use it in a production deployment.

      Use a production WSGI server instead.

   * Debug mode: on
   * Running on all addresses.

      WARNING: This is a development server. Do not use it in a production deployment.

   * Running on http://10.88.0.4:5000/ (Press CTRL+C to quit)

   * Restarting with stat

   * Debugger is active!

   * Debugger PIN: 812-915-583

© 2022 Cisco and/or its affiliates. All rights reserved.                                               Page 26 of 56
Docker:
# docker run -it --device /dev/sgx/enclave:/dev/sgx/enclave -v /var/run/aesmd:/var/run/aesmd -e
"discovery.type=single-node" docker.io/fortanix/pythonflask-app-eos:latest
Fortanix(R) EnclaveOS Runtime Encryption Platform 3.1.355-EM
Copyright 2017-2021 Fortanix, Inc. All rights reserved.
* Serving Flask app 'flaskapp' (lazy loading)
* Environment: production
WARNING: This is a development server. Do not use it in a production deployment.
Use a production WSGI server instead.
* Debug mode: on
* Running on all addresses.
WARNING: This is a development server. Do not use it in a production deployment.
* Running on http://172.17.0.4:5000/ (Press CTRL+C to quit)
* Restarting with stat
* Debugger is active!
* Debugger PIN: 708-870-119
Test pythonflash
Test the pythonflash application by running a curl command in a separate terminal session on the same host
where pythonflash has been installed (use the URL/IP/Port displayed in your output [refer to your own output for
the correct URL/IP/Port]) and verify the output per the commands listed below.
Podman and Docker:
# curl -v
* Trying 10.88.0.4...
* TCP_NODELAY set
* Connected to 10.88.0.4 (10.88.0.4) port 5000 (#0)
> GET / HTTP/1.1
> Host: 10.88.0.4:5000
> User-Agent: curl/7.61.1
> Accept: */*
>
* HTTP 1.0, assume close after body
< HTTP/1.0 200 OK
< Content-Type: text/html; charset=utf-8
< Content-Length: 11
< Server: Werkzeug/2.0.0 Python/3.7.10
< Date: Sun, 14 Nov 2021 12:48:31 GMT
<
* Closing connection 0
© 2022 Cisco and/or its affiliates. All rights reserved. Page 27 of 56Elasticsearch and secure enclaves Using Fortanix Confidential Computing Manager (CCM), the Elasticsearch open-source application will now be migrated from an unsecure to a secured image running in an SGX enclave. Securing and running the Elasticsearch application Docker.IO image repository creation A public, private, and/or local repository needs to be created to store the secured Elasticsearch image. These instructions will utilize Docker.IO as the image repository. Create a Docker repository called “es-sgx” for the Elasticsearch secure image destination: Create secure Elasticsearch image using Fortanix CCM Sign in to the Fortanix CCM at ccm.fortanix.com, and then click the Applications tab. On the Applications page, click + ADD APPLICATION to add a new application. © 2022 Cisco and/or its affiliates. All rights reserved. Page 28 of 56
Choose the application type “Enclave OS Application”:

In the Add application form, fill in all the required fields per the below (Application name, Input image name,
Output image name, ISVPRODID, ISVSVN, Memory Size, Thread Count):

Add application parameters:
Application name: ElasticSearch-Secure

Description: Enter a description here

Input image name: docker.io/fortanix/es-sgx

(Note: The input image name is the source location and registry name of the non-secured Elasticsearch
application that will be pulled and subsequently secured. The native image of Elasticsearch is a customized
image of Elasticsearch 7.1.0 with OpenJDK 1.8.0_292.)

Output image name: docker.io//es-sgx

(Note: The output image name is the target location and registry name where the secured Elasticsearch
application will be pushed once converted by CCM.)

© 2022 Cisco and/or its affiliates. All rights reserved.                                                 Page 29 of 56
Add Labels:
Not required for this example.

Add Application Platform Configuration/Intel SGX/enclave parameters:
ISVPRODID: 1

(Note: ISVPRODID is a numeric product identifier. A user must choose a unique value in the range of 0-65535
for their applications.)

Memory size: 8GB

(Note: The memory size of the EnclaveOS enclave. Specify Memory size greater >= 8GB to meet the memory
requirements of Elasticsearch and Java.)

Thread count: 512

(Note: The thread count to support the application.)

Add Application Certificate Configuration:
Add a certificate using the Application Certificate configuration section. A converted application can request a
certificate from Fortanix CCM when your application is started. The certificates are signed by the Fortanix CCM
Certificate Authority, which issues certificates only to enclaves presenting a valid attestation.

Choose “Add a Certificate.”

© 2022 Cisco and/or its affiliates. All rights reserved.                                               Page 30 of 56
Domain: fortanix.com

(Note: Enter the allowed domain(s) for the application. These are domains that appear in the TLS certificates
issued by the Fortanix CCM. You can add multiple domains separated by a comma.)

Type: Certificate issued by Confidential Computing Manager

(Note: This is non-changeable.)

Key type: RSA

(Note: This is non-changeable.)

RSA Key Size: 2048

(Note: RSA key size in bits.)

Key path: /opt/fortanix/enclave-os/app-config/rw/key.pem

(Note: The key path that will be accessible by the application.)

Certificate path: /opt/fortanix/enclave-os/app-config/rw/cert.pem

(Note: The certificate path that will be accessible by the application.)

Chain path: Not required.

© 2022 Cisco and/or its affiliates. All rights reserved.                                              Page 31 of 56
Add Application Advanced Settings:
Environment variables: Not required

Read/Write directories: /, /tmp, /var, /run

Java runtime: Not required

CA Cert Path: /etc/ca.pem

Install the CA Certificate into the system trust store (optional): Leave as default.

Choose “CREATE” button to save the application.

© 2022 Cisco and/or its affiliates. All rights reserved.                               Page 32 of 56
Add image to application

Once the application parameters have been configured, it is necessary to add an image to the application. Click
the + Image button:

Add image parameters:
Specify the un-secured image name tag from the source registry and the resulting secured image name tag to
be saved to the target registry.

Image type and input image name

Image Type: Intel SGX

Input image name

Tag: native

(Note: The tag of the application input Docker image. The native image of Elasticsearch is a customized image
of Elasticsearch 7.1.0 with OpenJDK 1.8.0_292.)

Add registry credentials: The Fortanix source registry is public and does not require credentials.

© 2022 Cisco and/or its affiliates. All rights reserved.                                             Page 33 of 56
Output image name
Tag: secure

(Note: The tag of the converted/secured Docker image to be saved in the target registry.)

Add Registry Credentials: Enter Username and the Password of the private target registry (this is your registry)
where the secure image will be pushed.

ISVSVN: 1

(Note: ISVSVN is a numeric security version to be assigned to the enclave. This number should be incremented
if a security-relevant change is made to the application.)

© 2022 Cisco and/or its affiliates. All rights reserved.                                              Page 34 of 56
Click “CREATE” to create the secure image.

The image conversion may take a couple of minutes with a success message displaying when complete. Click
the notifications panel on the top right to build and approve the image and domain Whitelist.

Click the notifications in the box to build and approve the Whitelists.

Click on each of the Whitelist tasks and approve.

© 2022 Cisco and/or its affiliates. All rights reserved.                                        Page 35 of 56
When image and domain Whitelists have been approved, navigate to the Application Screen, Image Section,
and the es-sgx:secure image will be listed and Approved with a green check. The image is now ready for the
client to pull and run.

© 2022 Cisco and/or its affiliates. All rights reserved.                                           Page 36 of 56
Running the Elasticsearch application

The private IP address for the registered host will need to be retrieved from the Infrastructure/Compute Nodes
screen in Fortanix CCM. This IP address will be passed as a parameter for running the secure Elasticsearch
container.

Navigate to the Fortanix CCM Infrastructure/Compute Nodes screen and retrieve the registered hosts’ IP
address.

Log in to your Docker registry as required and then run the secure Elasticsearch image.

Podman:

 # podman login docker.io

 # podman run --name es01-test -p 9200:9200 -p 9300:9300 -e "discovery.type=single-node" -e
 NODE_AGENT_BASE_URL=http://:9092/v1/ --device
 /dev/sgx/enclave:/dev/sgx/enclave -v /var/run/aesmd:/var/run/aesmd docker.io/your repository login
 name/es-sgx:secure

Docker:

  # docker login docker.io

  # docker run --name es01-test -p 9200:9200 -p 9300:9300 --network=enclave-network -e
  "discovery.type=single-node" -e NODE_AGENT_BASE_URL=http://:9092/v1/ --device /dev/sgx/enclave:/dev/sgx/enclave -v /var/run/aesmd:/var/run/aesmd
  docker.io/your repository login name/es-sgx:secure

Note: Starting the Elasticearch database can take an extended period (up to 6+ minutes with EnclaveOS
set to 8GB) while the memory is configured.

© 2022 Cisco and/or its affiliates. All rights reserved.                                              Page 37 of 56
The Elasticsearch database is ready when the following message is displayed:

 # Cluster health status changed from [RED] to [GREEN]

Test Elasticsearch

Test the Elasticsearch application by running a curl command in a separate terminal on the same host where
Elasticsearch has been installed, and verify the output per that which is shown below:

Podman and Docker:

  # curl -u elastic -k              https://localhost:9200/

  Password: UNbwjHAwQzbJZNyE6wr5 (enter this password when prompted)

  Results:

  {

      "name" : "068d8cb76cc7",

      "cluster_name" : "elasticsearch",
      "cluster_uuid" : "amChTL3WR7qlnP6IGZiSeQ",

      "version" : {
           "number" : "7.1.0",
           "build_flavor" : "default",

           "build_type" : "deb",
           "build_hash" : "606a173",

           "build_date" : "2019-05-16T00:43:15.323135Z",
           "build_snapshot" : false,

           "lucene_version" : "8.0.0",

           "minimum_wire_compatibility_version" : "6.8.0",

           "minimum_index_compatibility_version" : "6.0.0-beta1"
      },
      "tagline" : "You Know, for Search"

  }

  # curl -u elastic -k https://localhost:9200/_cluster/health?pretty

  Password: UNbwjHAwQzbJZNyE6wr5 (enter this password when prompted)

  If the “status” field reports green or yellow, the database is ready for further loading of data and
  queries to be performed.
  {

      "cluster_name" : "elasticsearch",

      "status" : "green",

      "timed_out" : false,

      "number_of_nodes" : 1,

      "number_of_data_nodes" : 1,
      "active_primary_shards" : 1,

      "active_shards" : 1,

      "relocating_shards" : 0,

© 2022 Cisco and/or its affiliates. All rights reserved.                                            Page 38 of 56
"initializing_shards" : 0,
"unassigned_shards" : 0,
"delayed_unassigned_shards" : 0,
"number_of_pending_tasks" : 0,
"number_of_in_flight_fetch" : 0,
"task_max_waiting_in_queue_millis" : 0,
"active_shards_percent_as_number" : 100.0
}
Helpful commands
Listing containers:
Podman:
# podman container list
CONTAINER ID IMAGE COMMAND CREATED STATUS PORTS NAMES
41cc99be8e62 docker.io/fortanix/aesmd-dcap:latest 4 days ago Up 4 days ago aesmd
f7930c15ce4a docker.io/fortanix/em-agent:latest /run.sh 4 days ago Up 4 days ago 0.0.0.0:9092->9092/tcp em-agent
068d8cb76cc7 docker.io/sshefa/es-sgx:secure 16 hours ago Up 14 hours ago 0.0.0.0:9200->9200/tcp,0.0.0.0:9300->9300/tcp es01-test
# podman ps --all
CONTAINER ID IMAGE COMMAND CREATED STATUS PORTS NAMES
41cc99be8e62 docker.io/fortanix/aesmd-dcap:latest 4 days ago Up 4 days ago aesmd
f7930c15ce4a docker.io/fortanix/em-agent:latest .run.sh 4 days ago Up 4 days ago 0.0.0.0:9092->9092/tcp em-agent
068d8cb76cc7 docker.io/sshefa/es-sgx:secure 16 hours ago Up 14 hours ago 0.0.0.0:9200->9200/tcp, 0.0.0.0:9300->9300/tcp es01-test
# podman image list
REPOSITORY TAG IMAGE ID CREATED SIZE
docker.io/sshefa/es-sgx secure 1b0c261806b7 19 hours ago 1.54 GB
docker.io/fortanix/em-agent latest cb82c10df3b3 7 weeks ago 98.8 MB
docker.io/fortanix/aesmd-dcap latest 47a0a4d6745b 3 months ago 45.4 MB
Note: The Podman “–restart always” parameter currently does not work due to a known Podman bug. If
the system is reset or rebooted, then the aesmd-dcap, em-agent, and es-sgx containers will be in an
“Exited” status, requiring these containers to be manually restarted.
After restart, “podman container list” will be empty due to the containers not restarting:
# podman container list
CONTAINER ID IMAGE COMMAND CREATED STATUS PORTS NAMES
© 2022 Cisco and/or its affiliates. All rights reserved. Page 39 of 56To manually restart aesmd-dcap, em-agent, and es-sgx containers (note that the status’s show as Exited): # podman ps –all CONTAINER ID IMAGE COMMAND CREATED STATUS PORTS NAMES 41cc99be8e62 docker.io/fortanix/aesmd-dcap:latest 4 days ago Exited (0) 7 minutes ago aesmd f7930c15ce4a docker.io/fortanix/em-agent:latest ./run.sh 4 days ago Exited (0) 7 minutes ago 0.0.0.0:9092->9092/tcp em-agent 68d8cb76cc7 docker.io/sshefa/es-sgx:secure 17 hours ago Exited (143) 7 minutes ago 0.0.0.0:9200->9200/tcp 0.0.0.0:9300->9300/tcp es01-test # podman restart 41cc99be8e62 # podman restart f7930c15ce4a # podman restart 068d8cb76cc7 alternatively: # podman restart 41cc99be8e62 f7930c15ce4a 068d8cb76cc7 # podman ps –all CONTAINER ID IMAGE COMMAND CREATED STATUS PORTS NAMES 41cc99be8e62 docker.io/fortanix/aesmd-dcap:latest 4 days ago Up 2 minutes ago aesmd f7930c15ce4a docker.io/fortanix/em-agent:latest ./run.sh 4 days ago Up About a minute ago 0.0.0.0:9092->9092/tcp em-agent 68d8cb76cc7 docker.io/sshefa/es-sgx:secure 17 hours ago Up 56 seconds ago 0.0.0.0:9200->9200/tcp 0.0.0.0:9300->9300/tcp es01-test Docker: # docker container list CONTAINER ID IMAGE COMMAND CREATED STATUS PORTS NAMES a521070f872c sshefa/es-sgx:secure "/opt/fortanix/encla…" 7 minutes ago Up 7 minutes 0.0.0.0:9200->9200/tcp, :::9200->9200/tcp, 0.0.0.0:9300->9300/tcp, :::9300->9300/tcp es01-test f0fda8c26fa6 fortanix/em-agent:latest "./run.sh" 6 hours ago Up 2 hours 0.0.0.0:9092->9092/tcp, :::9092->9092/tcp em-agent 749d7e2d4388 fortanix/aesmd-dcap:latest "/bin/wait-sgx-devic…" 19 hours ago Up 2 hours aesmd # docker ps –-all CONTAINER ID IMAGE COMMAND CREATED STATUS PORTS NAMES a521070f872c sshefa/es-sgx:secure "/opt/fortanix/encla…" 5 minutes ago Up 5 minutes 0.0.0.0:9200->9200/tcp, :::9200->9200/tcp, 0.0.0.0:9300->9300/tcp, :::9300->9300/tcp es01-test f0fda8c26fa6 fortanix/em-agent:latest "./run.sh" 6 hours ago Up 2 hours 0.0.0.0:9092->9092/tcp, :::9092->9092/tcp em-agent 749d7e2d4388 fortanix/aesmd-dcap:latest "/bin/wait-sgx-devic "6 hours ago Up 2 hours aesm # docker image list REPOSITORY TAG IMAGE ID CREATED SIZE sshefa/es-sgx secure ef3f90e1ff13 2 hours ago 1.53GB fortanix/em-agent latest 6473b74c6f6d 2 weeks ago 96.8MB fortanix/aesmd-dcap latest 47a0a4d6745b 5 months ago 45.3MB © 2022 Cisco and/or its affiliates. All rights reserved. Page 40 of 56
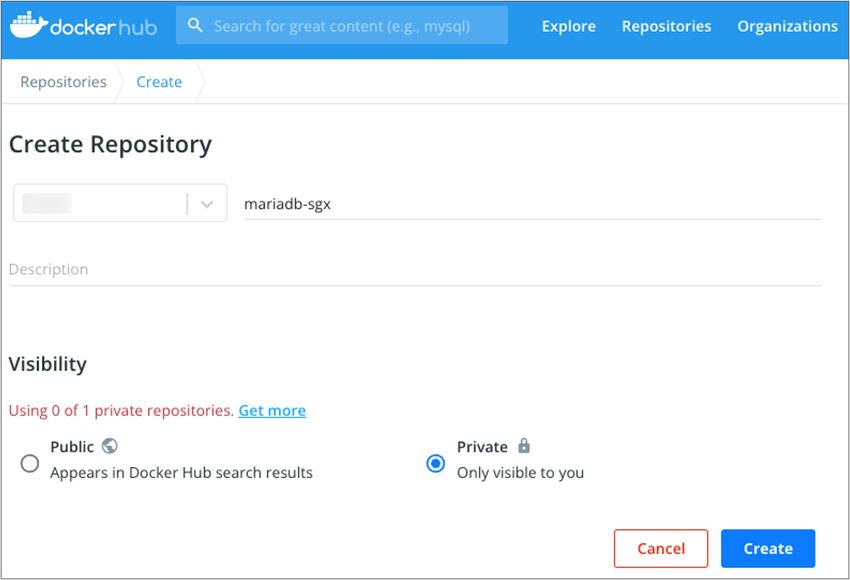
To remove es01-test Elasticsearch DB container in Exited state so that it can be re-run:

  # docker stop
  # docker rm

  Then re-run the Elasticsearch DB using the original # docker run --name es01-test… above.

MariaDB and secure enclaves
Using Fortanix Confidential Computing Manager (CCM), the MariaDB open-source application will now be
migrated from an unsecure to a secured image running in an SGX enclave.
Securing and running the MariaDB application
Docker.IO image repository creation

A public, private, and/or local repository needs to be created to store the secured MariaDB image. These
instructions will utilize Docker.IO as the image repository.

Create a Docker repository called “mariadb-sgx” for the MariaDB secure image destination:

© 2022 Cisco and/or its affiliates. All rights reserved.                                             Page 41 of 56
Create secure MariaDB image using Fortanix CCM

Sign in to the Fortanix CCM at ccm.fortanix.com, and then click the Applications tab.

On the Applications page, click + ADD APPLICATION to add a new application.

Choose the application type “Enclave OS Application”:

In the Add application form, fill in all the required fields as shown below (Application name, Input image name,
Output image name, ISVPRODID, ISVSVN, Memory Size, Thread Count):

© 2022 Cisco and/or its affiliates. All rights reserved.                                                Page 42 of 56
Add application parameters:
Application name: MariaDB-Secure

Description: Enter a description here

Input image name: docker.io/fortanix/mariadb-sgx

(Note: The input image name is the source location and registry name of the non-secured MariaDB application
that will be pulled and subsequently secured. The native image of MariaDB is a customized image of MariaDB
10.3.11.)

Output image name: docker.io//mariadb-sgx

(Note: The output image name is the target location and registry name where the secured MariaDB application
will be pushed once converted by CCM.)

Add Application Labels Parameters:
Not required for this example.

Add Application Platform Configuration/Intel SGX/enclave parameters:
ISVPRODID: 1

(Note: ISVPRODID is a numeric product identifier. A user must choose a unique value in the range of 0-65535
for their applications.)

Memory size: 2GB

(Note: The memory size of the EnclaveOS enclave. Specify Memory size greater >= 2GB to meet the memory
requirements of MariaDB.)

Thread count: 128

(Note: The thread count to support the application.)

© 2022 Cisco and/or its affiliates. All rights reserved.                                           Page 43 of 56
Add Application Certificate Configuration:
Add a certificate using the Application Certificate Configuration section. A converted application can request a
certificate from Fortanix CCM when your application is started. The certificates are signed by the Fortanix CCM
Certificate Authority, which issues certificates only to enclaves presenting a valid attestation.

Choose “Add A Certificate”

Domain: fortanix.com

(Note: Enter the allowed domain(s) for the application. These are domains that appear in the TLS certificates
issued by the Fortanix CCM. You can add multiple domains separated by a comma.)

Type: Certificate issued by Confidential Computing Manager

(Note: This is non-changeable.)

Key type: RSA

(Note: This is non-changeable.)

RSA Key Size: 2048

(Note: RSA key size in bits.)

Key path: /opt/fortanix/enclave-os/app-config/rw/key.pem

(Note: The key path that will be accessible by the application.)

Certificate Path: /opt/fortanix/enclave-os/app-config/rw/cert.pem

(Note: The certificate path that will be accessible by the application.)

© 2022 Cisco and/or its affiliates. All rights reserved.                                               Page 44 of 56
Chain path: Not required.

Add Application Advanced Settings:
Environment variables: Not required

Read/Write directories: /, /run, /var, /tmp

Java runtime: Not required

CA Cert Path: /etc/ca.pem

Install the CA Certificate into the system trust store (optional): Leave as default.

© 2022 Cisco and/or its affiliates. All rights reserved.                               Page 45 of 56
Choose “CREATE” button to save the application.

Add image to application

Once the application parameters have been configured, it is necessary to add an image to the application. Click
the + Image button:

Add image parameters:
Specify the un-secured image name tag from the source registry and the resulting secured image name tag to
be saved to the target registry.

Image type and input image name

Image Type: Intel SGX

Input image name

Tag: native

(Note: The tag of the application input Docker image. The native image of MariaDB is a customized image of
MariaDB 10.3.11.)

Add Registry Credentials: The Fortanix source registry is public and does not require credentials.

© 2022 Cisco and/or its affiliates. All rights reserved.                                             Page 46 of 56
Output image name
Tag: secure

(Note: The tag of the converted/secured Docker image to be saved in the target registry.)

Add Registry Credentials: Enter the Username and the Password of the private target registry (this is your
registry) where the secure image will be pushed.

ISVSVN: 1

(Note: ISVSVN is a numeric security version to be assigned to the enclave. This number should be incremented
if a security-relevant change is made to the application.)

Click “CREATE” to create the secure image.

© 2022 Cisco and/or its affiliates. All rights reserved.                                             Page 47 of 56
The image conversion may take a couple of minutes with a success message displaying when complete. Click
the notifications panel on the top right to build and approve the image and domain Whitelist.

Click the notifications in the box to build and approve the Whitelists.

Click on each of the Whitelist tasks and approve.

© 2022 Cisco and/or its affiliates. All rights reserved.                                        Page 48 of 56
When the image and domain Whitelists have been approved, navigate to the Application Screen, Image
Section, and the mariadb-sgx:secure image will be listed and Approved with a green check. The image is now
ready for the client to pull and run.

© 2022 Cisco and/or its affiliates. All rights reserved.                                          Page 49 of 56
Running the MariaDB application

The private IP address for the registered host will need to be retrieved from the Infrastructure/Compute Nodes
screen in Fortanix CCM. This IP address will be passed as a parameter for running the secure MariaDB server
container.

Navigate to Fortanix CCM Infrastructure/Compute Nodes screen and retrieve the registered hosts’ IP address.

Log in to your Docker registry as required, create a MariaDB network, and then run the secure MariaDB server
and client applications:

Podman:

 # podman login docker.io

 # podman network create mariadb-network

 Run MariaDB Database:
 # podman run --restart always --device /dev/sgx/enclave:/dev/sgx/enclave -v
 /var/run/aesmd:/var/run/aesmd --name=mariadb-server --env="MYSQL_ROOT_PASSWORD=passwd" --network
 mariadb-network --env NODE_AGENT_BASE_URL="http://:9092/v1" -p
 3306:3306 -d /mariadb-sgx:secure

 Find the IP address of the mariadb-network to be used in the mariadb client run command:
 # podman inspect mariadb-server -f '{{range.NetworkSettings.Networks}}{{.IPAddress}}{{end}}'
 10.89.0.2

 Alternative method to find the IP address of the mariadb server:

 Find the containerid of the mariadb-server:

 # podman ps --all

 CONTAINER ID   IMAGE                                   COMMAND    CREATED         STATUS             PORTS                    NAME

 f8d600c1c1b5   docker.io/fortanix/aesmd-dcap:latest               8 minutes ago   Up 8 minutes ago                            aesmd-dcap

 dd1f48babb5a   docker.io/fortanix/em-agent:latest     . /run.sh   6 minutes ago   Up 6 minutes ago   0.0.0.0:9092->9092/tcp   em-agent

 3c6f867d8f79   docker.io/sshefa/mariadb-sgx:secure                2 minutes ago   Up 2 minutes ago   0.0.0.0:3306->3306/tcp   mariadb-server

© 2022 Cisco and/or its affiliates. All rights reserved.                                                                                        Page 50 of 56
You can also read