ESCRIPTION ONE INSYNC - USER GUIDE
←
→
Page content transcription
If your browser does not render page correctly, please read the page content below
April 2021

eScription One
InSync
User Guide

        All content is the exclusive property of DeliverHealth | Copyright © 2021 DeliverHealth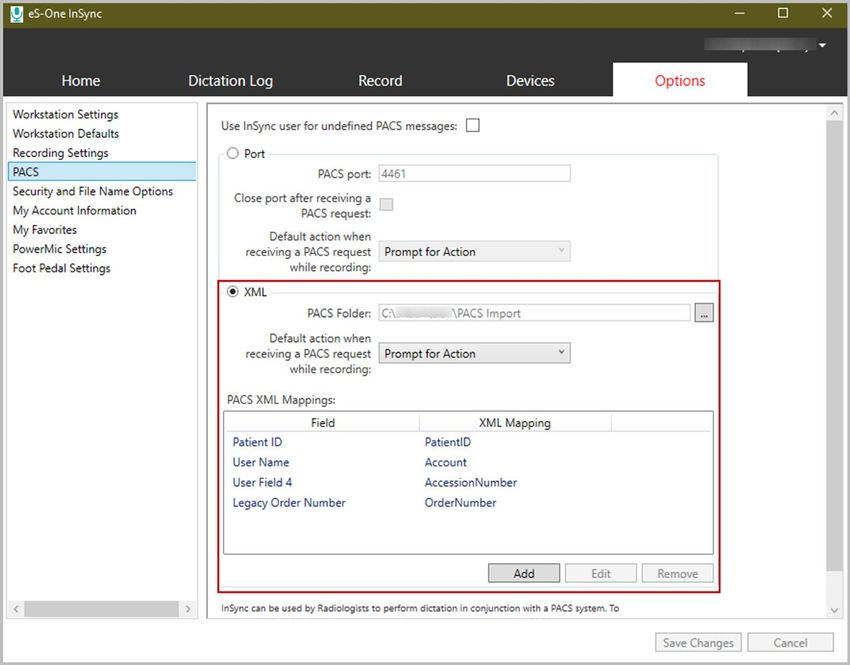
2   eScription One                                                                                                                        April 2021

           Table of contents

           Introduction ......................................................................................................................... 4

           Requirements ...................................................................................................................... 4

           Installing InSync ................................................................................................................. 5

           Starting InSync.................................................................................................................... 9
           Select Region ................................................................................................................................... 9

           System Tray menu .............................................................................................................. 9
           Dictation Selections ........................................................................................................................ 10
           Menu Tab Selections...................................................................................................................... 10
           Other Selections............................................................................................................................. 10

           Home .................................................................................................................................. 11
           Login Menu .................................................................................................................................... 11
           Setting up Multi-Factor Authentication Using Auth0 Guardian ........................................................ 15
           Change Password .......................................................................................................................... 20
           Internet Connection Monitor ........................................................................................................... 20
           Record Dictation............................................................................................................................. 20
           Support Section.............................................................................................................................. 20

           Email Address Verification .............................................................................................. 21

           Resetting your Password ................................................................................................. 22

           Recording with InSync ..................................................................................................... 24
           Appointment List and Functions ..................................................................................................... 25
           Search for a Patient Appointment ................................................................................................... 26
           Record a Dictation .......................................................................................................................... 27
           Demographics Tab ......................................................................................................................... 30
           History Tab..................................................................................................................................... 31

                                                                                                      © 2021 DeliverHealth SOLUTIONS, Inc. All rights reserved.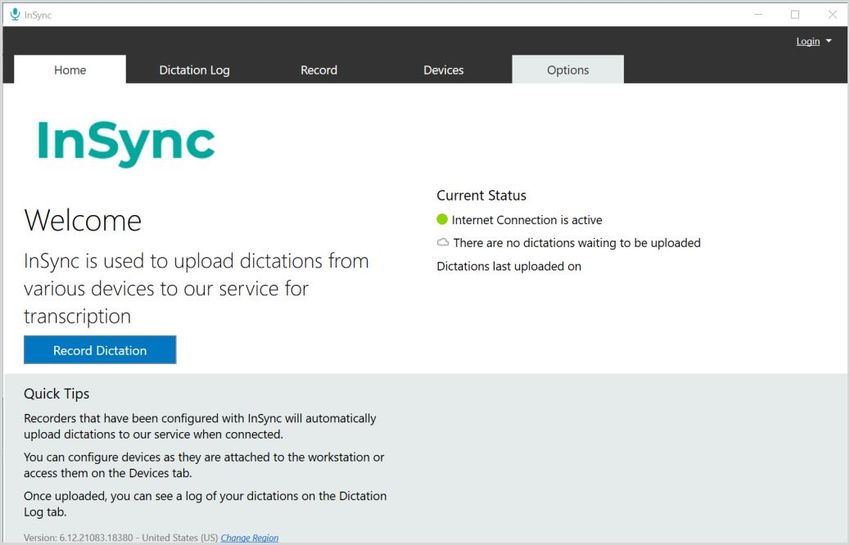
3   eScription One                                                                                                                         April 2021

           Template Tab ................................................................................................................................. 31
           Recording in Docked View ............................................................................................................. 32

           Dictation Log Tab.............................................................................................................. 35

           Devices Tab ....................................................................................................................... 36
           Device Configuration ...................................................................................................................... 36

           Manual Uploading ............................................................................................................. 39
           Upload Individual Audio Files ......................................................................................................... 39
           Batch File ....................................................................................................................................... 41

           Options Tab ....................................................................................................................... 43
           Workstation Settings ......................................................................... Error! Bookmark not defined.
           Workstation Defaults ...................................................................................................................... 44
           Recording Settings ......................................................................................................................... 45
           Manage Logins............................................................................................................................... 47
           PACS ............................................................................................................................................. 48
           Security and File Name Options ..................................................................................................... 52
           My Account Information.................................................................................................................. 53
           My Favorites .................................................................................................................................. 54
           PowerMic Settings ......................................................................................................................... 55
           Foot Pedal Settings ........................................................................................................................ 57

           Support for Olympus RecMic and Philips SpeechMike ................................................. 58
           Plug and Play ................................................................................................................................. 58
           Configuring Olympus RecMics and Philips SpeechMikes ............................................................... 59

           Uninstall InSync ................................................................................................................ 62

           Support .............................................................................................................................. 62

           Appendix 1 - InSync Supported Audio File Types ......................................................... 63

                                                                                                       © 2021 DeliverHealth SOLUTIONS, Inc. All rights reserved.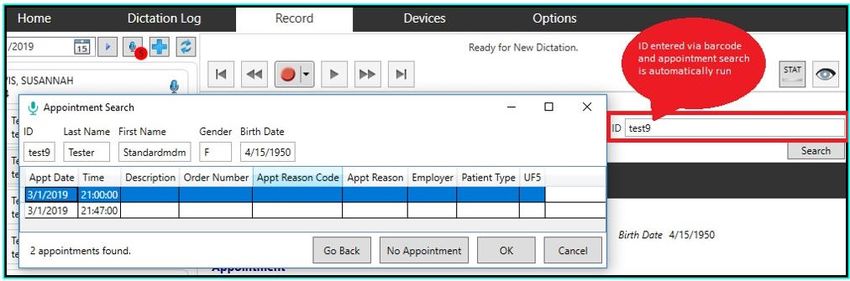
4   eScription One                                                                                                           April 2021

           Introduction
           InSync is a HIPAA-compliant application for sending encrypted voice recordings between the client and Transcription
           Company.

           The InSync application resides on any PC or notebook computer and runs in the background as long as the computer is
           turned on, automatically uploading dictations from digital recorders to the eScription One servers. Clinicians don’t have to
           start the application or click anything. They simply dock the digital recorder and the secure transfer begins. Dictations are
           verified for completeness and then removed from the digital recorder, allowing the clinician to begin dictating again. A
           backup copy of all dictations is securely stored on the docking computer for 14 days by default. InSync is also capable of
           creating dictations on PCs equipped with a microphone.

           InSync supports any digital recorder that connects to a computer as a “removable drive” and records in any of these
           standard audio formats: DSS, DS2, MP3, SRI, WAV, WMA, MSV.

           ! Some older model recorders are not supported by a 64-bit version of Windows. Check with the recorder manufacturer for
           compatibility.

           Requirements
           For InSync to work properly within your Windows environment, the PC must meet the following software and hardware
           requirements:

           Minimum Requirements:
           – Windows 10

           – RAM: 4 GB

           – Hard Drive Free Space: 1 GB

           – .Net FrameWork: 4.7.2 or higher

           – Sound Card with Speakers (or Stereo Headphones)

           – Microphone (if recording dictations on the PC)

           – A monitor capable of displaying a resolution of 1366x768 pixels

           – Internet access with IP Ports 80 and 443 open to initiate an Internet communication session to https://mobile.escription-
             one.com using TLS 1.2.

           – Internet Bandwidth: 3 Mbps download1; Mbps upload or greater

           Recommended Requirements:
           – Windows 10

           – RAM: 8 GB

           – Hard Drive Free Space: 1 GB or more

           – .Net FrameWork: 4.7.2 or higher

           – Sound Card with Speakers (or Stereo Headphones)

                                                                                         © 2021 DeliverHealth SOLUTIONS, Inc. All rights reserved.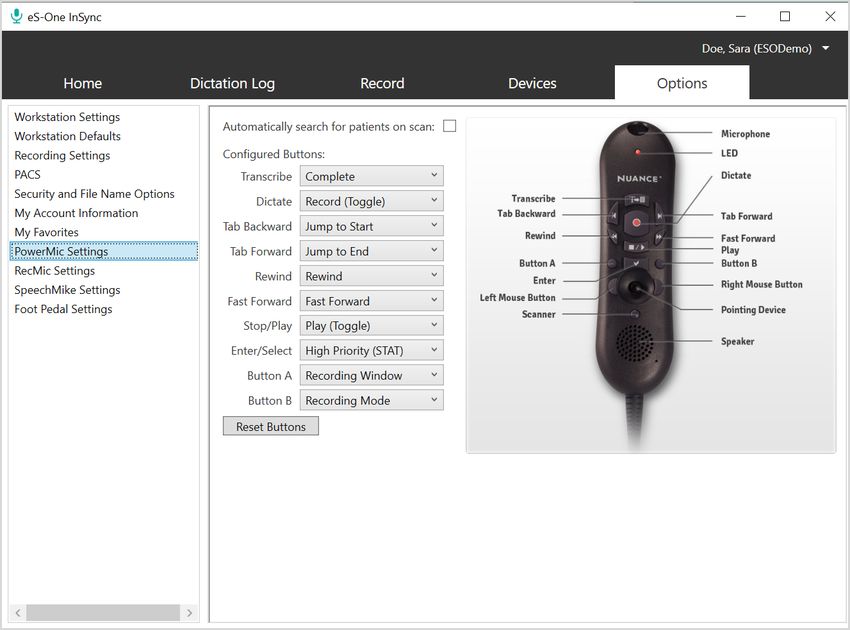
5   eScription One                                                                                                           April 2021

           – Microphone (if recording dictations on the PC)

           – A monitor capable of displaying a resolution of 1366x768 pixels or higher

           – Internet access: High Speed Cable or DSL with IP Ports 80 and 443 open to initiate an Internet communication session
             to https://mobile.escription-one.com using TLS 1.2.

           – Internet Bandwidth: 3 Mbps download;1 Mbps upload or greater

           Note: Macintosh computers are NOT supported.

           Installing InSync
           On a network with multiple users, please make sure the Windows Login ID has installation privileges. If unsure, please
           contact your PC support staff. Download the InSync application from the eScription One software page here:

           Australia https://www.escription-one.com.au/Software/InSync/

           Canada https://www.escription-one.ca/Software/InSync/

           United States https://www.escription-one.com/Software/InSync/

           United Kingdom https://www.escription-one.co.uk/Software/InSync/

           We recommend installing the most recent version.

           Steps:
           Double-click the InSync Setup software file to run it.

           Click Next on the Welcome screen to
           continue with the installation.

                                                                                         © 2021 DeliverHealth SOLUTIONS, Inc. All rights reserved.
6   eScription One                                                                                       April 2021

           Read the license agreement, then check the 'I
           accept the terms in the License
           Agreement' check box. Click the Next button.

           Unless otherwise required by your IT department, choose
           the option to Install for all users of this machine.

           Then click the Next button.

                                                                     © 2021 DeliverHealth SOLUTIONS, Inc. All rights reserved.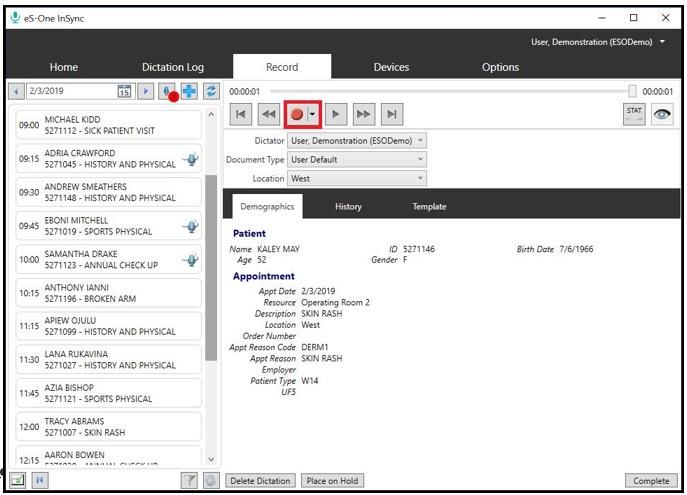
7   eScription One                                                                                                      April 2021

           Unless otherwise required by your IT department, keep
           the default installation path and click the Next button.

           Click the Install button.

           InSync will now install automatically.

           Note: Based on how your User Account control is configured, you may be asked if you want to allow InSync to be
           installed. Click the Yes button.

                                                                                    © 2021 DeliverHealth SOLUTIONS, Inc. All rights reserved.
8   eScription One                                                                                     April 2021

           If you will be using InSync to upload dictations from
           hand-held devices, we recommend that you enable:

           – Launch InSync Now

           – Start InSync with Windows (this starts InSync every
             time you start your PC)

           Click the Finish button to complete the installation.

                                                                   © 2021 DeliverHealth SOLUTIONS, Inc. All rights reserved.
9   eScription One                                                                                                           April 2021

           Starting InSync
           If you did not choose to “Start InSync with Windows” during
           installation (see Installing InSync), you can manually start InSync as
           you need it.

           Click the Windows Button or press the Windows key. Type “insync”
           on the Start screen and click the InSync program.

           By default, InSync will minimize to the System Tray and will not open a window. When
           InSync is running, a small icon in the System Tray area will be present.

           Select Region
           Upon the first time running InSync you will be prompted to select a region. This allows InSync to connect to the proper
           servers for your client. Choose the region that applies to your location or client and press Select.

           In the unlikely event that you need to change your region, you may do so from the Home tab. Click on the blue Change
           Region link to open the Select Region window. Choose the appropriate region and press Select. A confirmation window
           will appear asking if you’d like to restart InSync to apply the region change. Press Yes to continue with the restart and
           apply the region change, or No to maintain the original region setting.

           System Tray menu
           When InSync is running the InSync icon will display in the System Tray.

           Single-click on the InSync icon to access the shortcuts menu for InSync functions. Double-
           click the InSync icon to open the Home tab.

           Please note:

           – Several of the InSync functions require a user to be logged in for the function to work.

           – InSync will automatically upload dictations from configured hand-held recorders without a user logged in.

                                                                                         © 2021 DeliverHealth SOLUTIONS, Inc. All rights reserved.
10   eScription One                                                                                                           April 2021

            Dictation Selections
            – Record New Dictation: This shortcut opens the Recording tab of InSync (covered in
              Recording with InSync). If a user is not already logged in, you will be prompted for login
              credentials prior to opening the Recording tab.

            – Upload Dictations: This shortcut forces InSync to send any files that are waiting to be
              uploaded.

            – Download Dictations: This shortcut forces InSync to check any connected recorders
              for dictations waiting to be uploaded.

            Menu Tab Selections
            Menu selections link to four of the InSync tabs.

            – Home: The Home tab provides an overview of InSync (covered in Home).

            – Dictation Log: The Dictation Log provides a record of uploaded dictations covered in
              Dictation Log Tab).

            – Devices: The Devices tab shows a list of connected devices that can be configured with InSync (covered in Devices
              Tab).

            – Options: Configuration settings for the InSync application are located on this tab (covered in Options Tab).

            Other Selections
            – Last Message: Displays the last message InSync displayed, such as “Completed Uploads” or “Device Detected.”

            – Launch InQuiry: A shortcut to the InQuiry website:

                      o   Australia https://www.escription-one.com.au/inquiry/

                      o   Canada https://www.escription-one.ca/inquiry/

                      o   United States https://www.escription-one.com/inquiry/

                      o   United Kingdom https://www.escription-one.co.uk/inquiry/

            – Help: Links to a support website, if available for your facility.

            – Logout: Logs you out of the user account you are using for InSync. Please note that InSync is still running in the
              background and will automatically upload dictations from supported hand-held recorders that have been configured with
              InSync. However, once logged out, many of the functions of the InSync application are no longer available.

            – Exit: Closes the InSync application. The audio files from connected recorders will not be automatically uploaded.

                                                                                          © 2021 DeliverHealth SOLUTIONS, Inc. All rights reserved.
11 eScription One April 2021
Home
The Home tab provides an overview of InSync and the status of any unsent dictations. To access all the features on the
Home tab, a user must be logged into the application.
Login Menu
To log in, click the Login link in the upper right corner of the InSync Home tab, then choose the Login option.
© 2021 DeliverHealth SOLUTIONS, Inc. All rights reserved.12 eScription One April 2021
Initial Login
When logging in for the first time, click the New Login button at the
bottom of the InSync Login screen.
Enter your Username, Password, and Company, then click Log
In.
The “Forgot Password?” link next to the Login button allows users
who have saved a valid email address to receive password reset
instructions by email if it is lost or forgotten. For more information,
go to Email Address Verification and Resetting your Password.
Note: If multi-factor authentication (MFA) has been enabled for
your company, please see ‘Setting up Multi-Factor Authentication
Using Auth0 Guardian’.
© 2021 DeliverHealth SOLUTIONS, Inc. All rights reserved.13 eScription One April 2021
On the Save Credentials screen, choose which, if any, credentials you would like to save:
Note: To save a password, the ‘Can Save Password in InSync’ option in InCommand must be selected for the user.
Otherwise, ‘Save Username and Password’ will not appear in the dialog.
Logging in after the First Time
The next time you log in, click the saved credentials icon on the
Login screen.
© 2021 DeliverHealth SOLUTIONS, Inc. All rights reserved.14 eScription One April 2021
If you have not saved the password, the login screen opens,
with the username and client filled in. Enter your password and
click Log In.
Note: The pre-filled fields are read-only. To log in with a
different Username and/or Company, click Cancel to return to
the login screen and choose New Login.
To remove a saved login from the screen, click the stop sign icon.
Choose ‘Remove Credentials’ to remove the saved credentials.
Also, any saved Usernames on this PC will appear in a drop-down arrow to the right of the
login link. When logging in, you can choose one of these profiles instead of typing the
username. If the password is not saved for the chosen profile, you will be prompted to
enter the password. The name of the user currently logged in will appear where the Login
link previously was.
© 2021 DeliverHealth SOLUTIONS, Inc. All rights reserved.15 eScription One April 2021
Once logged in, a user can choose to log out by clicking the down arrow, then clicking
Logout.
Alternatively, you may right-click the InSync icon in the system tray, then click Logout.
Setting up Multi-Factor Authentication Using Auth0 Guardian
Multi-factor authentication is another way to verify a user’s identity, adding an extra level of security to the login process.
To set up multi-factor authentication, there will be a one-time procedure that requires you to download an authentication
application called Auth0 Guardian onto your cell phone and create an account. Subsequently, when logging in, you will
only need to accept a notification sent to your phone. This one-time procedure does not need to be repeated for each
client app.
When logging in for the first time after the multi-factor
authentication setting has been enabled, you will enter your
login credentials as usual. Before the application opens, the
‘Secure Your Account’ screen appears. Here you begin the
one-time multi-factor authentication setup.
Step 1: Download the Auth0 Guardian app
Auth0 Guardian is a free security app for performing multi-
factor authentication. With the Guardian app, a notification is
sent directly to your cell phone. There are no codes to
manually enter; just press ‘Allow’ to accept the notification.
If you do not have the Auth0 Guardian app already installed
on your phone, you must first download it from the Apple
store (for iPhone) or Google Play (for Android). Choose the
appropriate button to
view the location of the
app’s download site.
Search ‘Auth0 Guardian’
and download it to your
phone.
Once you have the authentication app downloaded, open it.
In your InSync app, click Continue on the ‘Secure Your Account’ screen.
Note: Other authentication apps may work as well but are not officially supported.
© 2021 DeliverHealth SOLUTIONS, Inc. All rights reserved.16 eScription One April 2021
Step 2: Scan the Activation (QR) code
Next, use the authentication app to scan the activation code that appears in InSync by holding your phone up to the code.
This will link the authentication app to your InSync application.
If the scanner does not automatically open, you may
need to click the plus button at the top of the Guardian
screen to add a new account.
© 2021 DeliverHealth SOLUTIONS, Inc. All rights reserved.17 eScription One April 2021
Step 3: Copy the Recovery Code
After scanning the code, you will receive a recovery code (in
InSync). If you need to log in and do not have your device, you
can paste or enter this code to access InSync. Copy the code
and keep it somewhere safe.
Click the check box indicating that you have recorded the code,
then click Continue.
You now have an account to which a notification request will be
sent each time you log in. The email on your account will be the
email listed for you on the User Information screen in
InCommand.
InSync will now open.
Note: Remember to have your phone nearby when you log in
from now on. See the next section for details.
You have successfully set up multi-factor authentication. Remember to have your phone nearby when you log in from now
on. See the next section for details.
© 2021 DeliverHealth SOLUTIONS, Inc. All rights reserved.18 eScription One April 2021
Logging in with Multi-Factor Authentication
Once you have completed the initial MFA setup process above, you will subsequently log in to InSync as shown in the
steps below.
1. Open the Guardian app.
2. In InSync, enter your login credentials.
The Verify Your Identity screen opens, indicating that a notification has been sent to your phone and is awaiting
confirmation.
3. In the Guardian app, click Allow.
After successful authentication, you will automatically be logged into InSync.
If you do not receive the notification, you can choose to have the notification resent, or you can manually enter the code at
the bottom of the Guardian app (see below).
© 2021 DeliverHealth SOLUTIONS, Inc. All rights reserved.19 eScription One April 2021
If you do not receive a notification, you can choose Manually Enter
Code.
Enter the code appearing at the bottom of the Guardian app.
Click Continue. After successful authentication, you will automatically be logged into InSync.
Note: If you cannot log in with MFA after having done so previously, please contact your admin to have it reset.
© 2021 DeliverHealth SOLUTIONS, Inc. All rights reserved.20 eScription One April 2021
Change Password
Users can change their passwords after logging in by selecting the Change
Password option from the Login menu. Please note that this also changes the
password for InQuiry and eScription One mobile applications.
To change your password, you will need to confirm your
current password, then enter the new password twice.
The password requirements configured for the
company are shown at the top of the screen. If the
password does not meet these requirements, the
screen will display which ones have not been met after
the user presses the ‘Change Password’ button.
Remember that InQuiry, InSync, and eScription One
Mobile all use the same password.
Internet Connection Monitor
The internet connection monitor verifies that InSync is connected to the internet,
and that the ports that InSync uses to transmit data are open. For InSync to
communicate with the server, the Internet connection must register as active.
Record Dictation
The home page contains a link to the Recording tab, as well
as a quick view of any dictations that are on hold or waiting
to be uploaded. Recording functions are covered in Record a
Dictation.
Support Section
This section provides the helpdesk telephone number and email. See Support.
© 2021 DeliverHealth SOLUTIONS, Inc. All rights reserved.21 eScription One April 2021
Email Address Verification
After logging in, the InSync application checks for a valid and verified email address. This email address is used for the
password reset feature.
Valid Email Check: Upon login, if the
user has not already entered an email
address, the Options tab text appears in
red as a reminder that an email address
is recommended. When accessing the
InSync application without a verified e-
mail address, you will receive a notice,
but will still be able to use the
application.
Click the Options tab. A notification icon
appears next to My Account
Information, indicating action is needed.
Click My Account Information. If an
email address does not exist, or has not
been verified, red “Not verified” text
appears next to the email field. Enter an
email address here and press Save Changes.
E-mail verification: An email will be sent to the address to verify it.
© 2021 DeliverHealth SOLUTIONS, Inc. All rights reserved.22 eScription One April 2021
After your email is verified, the Options tab text no longer appears red, and the
notification icon next to My Account Information in the Options tab is removed. A
check mark appears next to the email field in My Account Information in the Options
tab.
Edit email address: The user email address can be edited by going to My Account Information in the Options tab. If the
email address has previously been verified, you will be prompted to verify the updated address.
Resetting your Password
If you have forgotten your password, you can reset it using the steps
below.
1. On the login screen, enter your Username and Client code, then click
Forgot Password?.
2. On the ‘Forgot Password’ screen, click either the Send
Email button or ‘Have reset code?’ link (if you already
have a reset code).
© 2021 DeliverHealth SOLUTIONS, Inc. All rights reserved.23 eScription One April 2021
3. If you choose Send Email, you must have a verified email address (see
above). If so, an email will be sent to you with instructions and a link for
resetting your password. Once you click the link, the ‘Reset Password’
screen appears with the reset code filled in. Enter the remaining
information, then click the Reset Password button.
If you choose ‘Have reset code?, the ‘Reset Password’ screen appears
without the reset code filled in. Enter the code and remaining information,
then click the Reset Password button.
If you selected ‘Send Email’, you can also copy and paste the code from
the email and paste it here.
© 2021 DeliverHealth SOLUTIONS, Inc. All rights reserved.24 eScription One April 2021
Recording with InSync
Users can record a dictation with a PC-attached microphone by accessing the Record Tab in InSync. A user must be
logged into InSync in order to use the features of the Record Tab. The user account must also be configured to be a
dictator. There are several ways to access the record screen in InSync:
– Right click the InSync Icon in
the system tray and select
Record New Dictation.
– Click the Record dictation link
on the InSync Home tab.
– Select the Record tab in the
InSync application to begin
recording.
© 2021 DeliverHealth SOLUTIONS, Inc. All rights reserved.25 eScription One April 2021
Appointment List and Functions
The left half of the screen displays the dictator’s appointment schedule. Like the mobile application, the appointments will
populate with the information sent to eScription from the scheduling system used by the facility.
Use the Left Arrow and Right Arrow buttons to decrease or increase the selected
day by one. Type a date into the box or click the Calendar icon to select a date from
the calendar.
The number in the red circle over the On Hold icon indicates how many dictations are on hold (a dictation has been
started but not uploaded) across all appointment days.
▪ Click the On Hold icon to display only dictations on
hold for all days.
▪ Click the On Hold icon again to display all
appointments for the selected day.
IMPORTANT: When you first enter the Dictation Tab, it
will show you all On-Hold Dictations. Click the On Hold
button to show today’s appointments.
A microphone icon indicates a dictation on hold which
needs to be completed.
The microphone over the cloud means a dictation was
completed on another device. That dictation cannot be
accessed here.
The check mark indicates that a dictation has been
made and uploaded for transcription on this device.
The page with check mark indicates the transcription has been completed and is ready for review.
Click on an appointment to start the dictation process for that appointment.
Click the Add New Dictation button to start a dictation for a patient not on the Schedule. You can search for a
patient (see Search for a Patient Appointment) or dictate without attaching patient or appointment data.
Click the Refresh button to get the most up to date Appointment list from the server.
The bottom of the Appointment List contains:
Switch View: Click this button to display the compact recording view so as to not clutter up your PC screen
while dictating. If you do not have a microphone connected and enabled on your PC, the compact or ‘docked’
view is not available. See also Recording in Docked View.
Move to First Dictation: Move to the first (oldest) appointment date with a dictation on hold.
© 2021 DeliverHealth SOLUTIONS, Inc. All rights reserved.26 eScription One April 2021
Schedule Settings: click this icon to open the Schedule Settings menu. Options
include:
o Sort By: Sort appointments by: Appointment Time, Patient Full Name, Patient Last
Name then First Name, or Patient First Name then Last Name.
o Statuses: Show appointments that have: Dictations on other Devices, Dictation
Uploading, Dictation Completed, Dictation Transcribed, and Hidden Appointments.
o Resources: Display appointments based upon the Resource ID assigned to the
appointment.
Recording Settings: This button opens a dialog to adjust the recording options. These settings can also be
accessed on the Options tab and are discussed in Recording Settings.
Click on a patient appointment record to start the dictation process.
When an appointment is selected, the patient appointment details are displayed in
the Demographics tab.
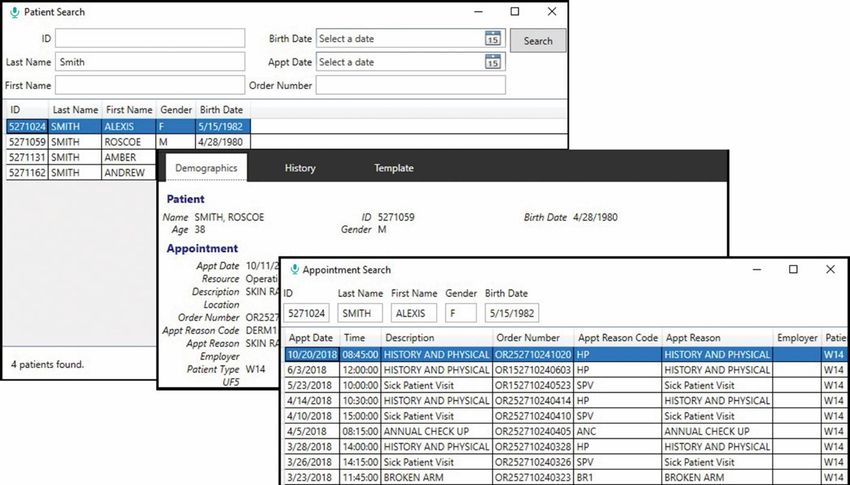
Search for a Patient Appointment
There are times when you may need to dictate on a patient that is not on your appointment list. For example:
– The mapping of appointments to resources and dictators is not set up on the eScription One platform.
– The patient appointment is with another doctor.
– The appointment schedule does not include who sees the patient.
Note: Many field labels on the Demographic tab are customizable.
To start a Search, click on the Add button on the Record tab.
© 2021 DeliverHealth SOLUTIONS, Inc. All rights reserved.27 eScription One April 2021
On the Demographics tab, enter the
search criteria and click the Search
button. Note that the search field is
customizable and may change,
based on the selected document
type.
The search button can also be
pressed without any search criteria
entered. This opens the Patient
Search window and allows you to
search using additional parameters.
After entering all search criteria, press the Search button.
Select a record in the search results and click OK. The Patient information updates the Demographics tab, then a list of all
appointments for that patient appears.
Select an appointment and click the OK button.
The Appointments Search window closes, and the selected appointment is added to your appointment list in InSync. The
appointment will remain selected and ready for dictation.
Record a Dictation
To record a dictation, choose an appointment from the Appointment List or add a new dictation (with or without a patient).
© 2021 DeliverHealth SOLUTIONS, Inc. All rights reserved.28 eScription One April 2021
Select the dictator. Typically, only your name is
available here. However, if you have been given
‘Proxy’ (permission to dictate on behalf of
someone else) to another account within the
same facility, select the appropriate dictator.
Select the Document Type and Location from
the drop-down menu. These two lists show the document types and locations that are available to you. You can shorten
these lists by defining favorites in the Options Tab (see My Favorites).
Use the dictation control panel to record, review, and edit your dictation.
Slider Bar: Shows where you are in playback mode, or
where dictation will be inserted when recording. The
number on the left is the time position into the recording. The number of the right is the total time of the recording.
Jump to Start and Jump to End: Moves the playback position to the
beginning or end of the dictation.
Rewind and Fast Forward: Moves the playback position backward or forward
5 seconds. This number can be changed in Recording Settings in the Options
tab.
Record: Records audio. Select the drop-down arrow on the Record button to
change the recording mode. The Record button icon changes to reflect the
chosen recording mode.
• Append Recording: New dictation is added to the end of the audio
file when recording.
• Insert Recording: New dictation is inserted into the dictation at the
point indicated by the slider bar. No dictation will be overwritten or
deleted.
• Overwrite Recording: New dictation is added to the point indicated
by the slider bar. Existing dictation is overwritten.
Sound Meter: While recording, the dictation
control buttons are replaced with a sound meter to
indicate the volume of the dictation or sound being
received by the microphone. When recording is
stopped all the dictation control buttons reappear.
Stop: Stops recording or playback of the dictation.
Play: Plays the dictation from the current position.
STAT: Makes this dictation a STAT priority. STAT dictations are
transcribed faster and may have an additional cost.
Hide Appointment: Removes an appointment from the list. Hidden
appointments can be viewed by displaying Hidden Appointments in the
Schedule Settings. Appointments with a dictation cannot be hidden.
The recording functions can be linked to specific hot keys on the keyboard for your convenience. This is especially
important when using a foot pedal for hands-free recording.
© 2021 DeliverHealth SOLUTIONS, Inc. All rights reserved.29 eScription One April 2021
It is also possible to configure Audio Cues to play during various stages of the recording process. These Shortcut Keys
and Audio Cues can be configured in the Options tab (see Recording Settings).
Delete Dictation: Discards the recorded file. Note: It is not possible to retrieve a deleted dictation.
Place on Hold: Saves the dictation for further changes. Dictations placed on hold are not uploaded to the eScription One
server but are saved in an encrypted format on this PC.
Complete: This button completes the current dictation and uploads it to the eScription One server.
InSync allows dictations to be recorded up to 90 minutes in length. InSync will notify you when the maximum dictation
length has been reached. The dictation will be paused and saved but additional dictation cannot be appended or inserted
into this recording.
If your recorder is not recognizing the sound input from your microphone, check to
see if your microphone is set as the default recording device. Right click on the
speaker icon on your Windows taskbar and click Recording devices.
Make sure that your microphone is set as the Default Device. If set
up properly, the bars to the right should react to any sound input.
If your microphone is not the default device, right-click on it and select Set
as Default Device. To test the input, see if the green bars on the right
react to your sound input. If the test works, it should work with InSync.
Press the Record button to begin recording. When the dictation is ready to
be uploaded, press the Complete button. Dictations can be played back
before and after uploading to the server, but dictations cannot be edited
after uploading.
© 2021 DeliverHealth SOLUTIONS, Inc. All rights reserved.30 eScription One April 2021
Demographics Tab
The Demographics tab allows
you to review the detailed
patient and appointment
information for the appointment
selected from the Appointment
List, or for a new dictation
created by clicking the Add
button.
When a document type has a
patient order display
configured, the order
information appears at the
bottom of the demographics
tab.
© 2021 DeliverHealth SOLUTIONS, Inc. All rights reserved.31 eScription One April 2021
History Tab
Clicking the History tab displays a list of completed transcriptions for the selected patient. Double-click a listed
transcription to open it in a new window.
All the patient and appointment
details are displayed in the left
panel of the Transcription
window. You can search for
specific text within the
transcription using the search
box under the transcription text.
Template Tab
The Template Tab displays the document template for the document type.
Click the drop-down box showing the document type name to also see the dictation templates that are available for use.
These templates can be used as a reference while dictating.
© 2021 DeliverHealth SOLUTIONS, Inc. All rights reserved.32 eScription One April 2021
Recording in Docked View
To maximize screen space, users can record dictations in compact or docked view. In ‘docked view’, InSync appears as a
horizontal toolbar that can be set to a fixed position at the top or bottom of the screen or set to floating (movable around
the screen). The set position is remembered when switching back and forth between normal and docked view. To enter
docked view, click the ‘switch view’ icon at the bottom of the Record tab:
When in docked view, InSync will always stay on top of other open windows.
To set the position of the view, select None, Bottom, or Top from the Dock compact recording screen drop-down
menu on the Options tab.
© 2021 DeliverHealth SOLUTIONS, Inc. All rights reserved.33 eScription One April 2021
Compact view
Below are the InSync options available in docked view:
Recording
Username/
controls or
Logout menu
sound meter Switch
or slide bar
STAT view
Dictation Uploaded
Location
identifier
Delete Place on
Doc Type
hold
– Username – shows the name of the logged in user: Last, First (Client). Use
the drop-down menu next to the username to login/logout of InSync,
login/logout as a different user, or change your password.
– Slide bar – appears after recording, shows where you are in playback mode
during recording.
– Dictation control panel – allows the user to record, review, and edit the
dictation. The buttons on the panel are grayed out when not recording.
– Sound meter – appears after recording, indicates the volume of the
dictation. When recording is stopped, the dictation control buttons reappear.
– STAT – makes the dictation a STAT priority.
– Switch view – switches back to normal view.
© 2021 DeliverHealth SOLUTIONS, Inc. All rights reserved.34 eScription One April 2021
– Dictation Identifier– shows the type of identifier associated with the selected document type (Patient ID, Account
Number, or Order number) and the value of the identifier. If the Require Dictation Identifier option is checked on the
Options tab, a value must be entered in this field before uploading a dictation.
If no value is entered, the following message appears.
– Patient name – shows the patient name associated with the dictation (if applicable). The name appears to the right of
the dictation identifier.
– Document Type – opens a list of the clinician’s available document types.
– Location – opens a list of the clinician’s available locations.
Note: You can shorten these lists by defining favorites on the Options tab (in normal view).
– Delete – deletes the dictation.
– Place on hold – saves the dictation for further changes.
– Check mark – indicates that the dictation has been created and uploaded.
© 2021 DeliverHealth SOLUTIONS, Inc. All rights reserved.35 eScription One April 2021
Dictation Log Tab
InSync maintains a log of all dictations that have been uploaded to the eScription One servers. By default, the dictation
log is saved for 14 days. This retention range can be adjusted in the Options Tab, under Workstation Settings.
The Dictation Log allows a range of records to be displayed based on the date of dictation as well as for all dictators or a
specific dictator. Results can be sorted by clicking on any of the column headings.
Available Options in the Dictation Log are:
Select a record from the Dictation Log and click the Save button. This saves an unencrypted copy
of the audio file to your PC. It allows you to choose where to save it. This button is disabled if the
“Enable Dictation Saving” option is disabled in Options > Security and File Name Options.
Select a record from the Dictation Log and click the Send to Support button. This creates a Help
Desk Ticket in the eScription One platform, encrypts the audio file and activity log, and uploads
them to be part of the ticket. This button should only be used when a dictation has failed to upload,
or as directed by support staff.
If the internet connection was down when files were to be uploaded, they are held in queue for
uploading in the future. If additional files are uploaded, and the internet is available, then all
queued dictation files are also automatically uploaded. However, if additional files are not
processed, then the original files in queue remain in queue. If this occurs, click the Upload
Dictations button to upload all dictation files held in queue.
Click the Print button to print this Dictation Log.
Click the Refresh button to immediately update the Dictation log. The log also auto refreshes
every 5 minutes to show the latest results.
© 2021 DeliverHealth SOLUTIONS, Inc. All rights reserved.36 eScription One April 2021
Devices Tab
The Devices tab lists all the connected devices that are compatible with the InSync application.
The tab displays the following information about all connected devices, including their current InSync status.
– Device Name: Provides the name of the connected device when available. Not all devices can identify themselves to
InSync. Those are displayed as “removable media” with an accompanying drive letter.
– Configured: Indicates if the device has been configured for InSync 6 or later.
– Legacy Configured: Indicates if the device has been configured for InSync version 4.
– Ignored: Indicates if the device has been configured to be ignored by InSync. These devices are typically USB
memory sticks that are not used with dictations. Ignored devices have two hidden files installed on them which are read
by InSync when the device is plugged into the PC and InSync determines they should be ignored. This keeps InSync
from asking you to configure a device each time it is plugged into the PC.
Device Configuration
When a configured device is plugged in, all dictations will be removed from the device and uploaded to the eScription One
servers with the appropriate dictator, document type, and location assigned, based on the device configuration.
Almost any device with storage space that can connect to a PC as removable media can be configured to work with
InSync. Available devices are displayed on the Devices Tab of the InSync User interface.
To configure a device, connect it to a USB port in the PC. When InSync recognizes a removable device, a notification
window opens, asking what you would like to do with the device.
© 2021 DeliverHealth SOLUTIONS, Inc. All rights reserved.37 eScription One April 2021
Configure device: The configuration wizard
will open to configure the device with an
assigned provider and document type and
location lists.
Ignore device: The device is not configured,
and InSync will not prompt you to configure this
device again.
Ask me again later: The device is not
configured or ignored. InSync will prompt you
to configure the device when it is plugged in
again.
If the pop-up window does not appear, you dismissed it, or you want to configure an ignored device, you may go to the
Devices tab and select the device from the list and press the “Configure Device” button at the bottom of the screen.
Next, select the name of the provider that the recorder belongs to. This provider will be assigned to all dictations uploaded
from the recorder.
If the recorder will be used by multiple providers, check the box next to “Always ask me for a user when I sync this
device.” When this option is selected, a pop-up list of usernames is displayed when the recorder is plugged into the PC.
The user must select a provider name to upload the dictations.
Note: The names on this list are the users that the logged in user has proxy access to, which is a configuration option in
the client setup. Please talk to your implementation specialist for more details.
© 2021 DeliverHealth SOLUTIONS, Inc. All rights reserved.38 eScription One April 2021
Next, select the document types to be assigned to the recorder. The number of document types that can be assigned to a
recorder varies based on the recorder model.
– The recorder configuration should only be assigned the document types that the user will be using.
o Each recorder model can save a different number of document types ranging from 3 to 99.
– You do not have to select the maximum number of document types.
– You will be notified if you have exceeded the maximum number of selected document types.
– This list of document types is controlled by the signed-in user’s Document Security configuration.
– Document Security limits which document types are available for dictation for each dictator. Please see your
administrator or MTSO for assistance with Document Security.
Finally, select any additional options.
– Location
o User Default Location: Use the default location as configured for the Dictator or the Client. This is the
most commonly selected option.
o Always ask when syncing: A pop-up window asks the user to select from a list of locations every time this
recorder is synced.
o Use the location of this workstation: Use the location specified in the InSync Workstation Defaults
settings for this PC.
© 2021 DeliverHealth SOLUTIONS, Inc. All rights reserved.39 eScription One April 2021
o Use this location: Select a specific location to assign for all dictations from this recorder.
– Dictation Log
o Show dictation log after upload: When enabled, the dictation log will automatically be displayed after the
files have been moved from the recorder to the PC. As the files are uploaded to the eScription servers, the
receipt code and TID will be displayed on each record.
Click the Finish button to complete the configuration process.
Manual Uploading
InSync has the capability to manually upload dictation files stored on the PC in two different ways. InSync can upload files
individually or in batch from a specified Windows folder.
Upload Individual Audio Files
You must be logged in to InSync to use this feature.
Step 1: Use Windows Explorer to find the audio file.
Right-click on the file to bring up the context sensitive menu.
Select Upload with InSync.
Note: Please see Appendix 1 - InSync Supported Audio File Types for list of
supported audio formats.
Step 2: If you are not already signed into InSync, a login screen will
appear. Please log in to upload the audio file.
© 2021 DeliverHealth SOLUTIONS, Inc. All rights reserved.40 eScription One April 2021
Step 3: Select the dictator from this list, then click the
Apply button.
Step 4: Select a document type for the dictation file to be
uploaded, then click Apply.
Step 5: Select a facility Location to be assigned to the
dictation, then click Apply.
The dictation file is removed from the folder, encrypted, and
queued to be uploaded. If an internet connection is
available, the file will be immediately uploaded to the
eScription One servers.
© 2021 DeliverHealth SOLUTIONS, Inc. All rights reserved.41 eScription One April 2021
Batch File
To upload using batch file uploading,
navigate to the Devices Tab and select the
Upload From Folder button.
Navigate to the Folder that contains the
audio files.
Select files to upload:
– CTRL + A: selects all files.
– Shift + Click: selects files in a series.
– CTRL + Click: select multiple individual
files.
When the selection is complete, click the
Open button.
© 2021 DeliverHealth SOLUTIONS, Inc. All rights reserved.42 eScription One April 2021
Select a user as the provider, then click the Apply button.
Select the document type for these dictation files, then click
Apply.
Note: This document type will be applied to all dictations in
the batch. Please be sure to only select the dictations that
need the same document type.
Select the Location for these dictation files, then click
Apply.
The files are removed from the folder, encrypted, and
queued to be uploaded.
If an internet connection is available, the audio files are
encrypted and uploaded to the eScription One servers.
© 2021 DeliverHealth SOLUTIONS, Inc. All rights reserved.43 eScription One April 2021
Options Tab
The Options tab allows you to configure InSync to best meet your needs.
Workstation Settings
Workstation Settings are specific to the local machine and allow you to configure startup options and retention times for
log records and saved encrypted dictation files.
– Start InSync with Windows: Check this box to start InSync each time Windows starts.
– Show Home Screen on Start: Check this box to open the InSync window at the Home tab when launched, instead of
minimizing the application to the System Tray.
– Do not prompt to configure devices when connected: Check this box to suppress the pop-up window for
configuring devices each time they are connected to the PC via a USB port.
© 2021 DeliverHealth SOLUTIONS, Inc. All rights reserved.44 eScription One April 2021
– Do not show available upgrades on startup: Check to disable any notifications of newer InSync versions when
starting InSync.
– Prompt to upload files bigger than __ MB: If a dictation file exceeds the size entered here, a warning message is
triggered. Each MB represents 3 to 5 minutes of dictation. Files exceeding this limit may not be valid dictations. Very
large audio files also present risks for a successful upload.
– Display dictations on the dictation log for __ days: Set the number of days to retain the log entries of uploaded
dictations.
– Retain encrypted dictations on this workstation for __ days: Set the number of days to retain copies of the
uploaded dictation files in an encrypted format. Enter 0 to prevent dictations from being stored on the PC.
– Remove Dictations from Workstation: Remove all saved encrypted dictation files from the Hard Disk Drive. This also
clears the Dictation Log.
Workstation Defaults
The Workstation Defaults option allows you to choose a default client and default location for dictations uploaded from this
PC. These options are not required, but can be used by the Record tab or by recorders that are configured to upload
based on these settings.
– Default Client: Specifies which client to assign to each dictation when uploading from a recorder if the recorder is
configured to use the workstation default.
– Default Location: Specifies which location to assign to each dictation when uploading from a recorder and the
recorder is configured to use the workstation default
© 2021 DeliverHealth SOLUTIONS, Inc. All rights reserved.45 eScription One April 2021
Recording Settings
Recording Settings configure the behavior of the InSync Record tab.
– Use global recording keys: Enabling this option allows users to control the InSync recording application using the
recording hotkeys, even when InSync is not the active window. This allows dictators to use other applications while still
controlling the recording functions in InSync.
– Keep recording screen on top: Checking this box keeps the InSync recording window on top of any other open
application or window.
– Disable search: The patient and appointment search features are turned off. Any data entered in the patient prompt
field will be saved with the dictation. This option applies to PACS dictations as well.
– Enable auto search on new dictation: When the “New Dictation” button is clicked and this option is enabled, InSync
displays a pop-up window asking the user to enter search criteria for a patient or appointment. If this option is disabled,
no pop-up search window automatically opens.
© 2021 DeliverHealth SOLUTIONS, Inc. All rights reserved.46 eScription One April 2021
– Seconds to jump when rewinding: This option defines how many seconds of dictation are skipped backward each
time the Rewind button is clicked.
– Seconds to jump when fast-forwarding: This option defines how many seconds of dictation are skipped forward
each time the Fast Forward button is clicked.
– Seconds to rewind when restarting playback: Each time the recording is paused, the recording will start playback
this number of seconds before the current playback position when playback is resumed.
– Days until on hold dictation notifications: A pop-up notification appears on login when on hold dictations exist for
appointments that are the set number of days old.
Hot Keys allows the user to define the keyboard shortcuts for the various recording functions.
Note: Due to Windows limitations, the F12 key may not be used.
Use Audio Cues: This option allows the user to redefine the sounds that are played when a specific action button is
clicked (or the assigned “F” key is pressed).
Select File: Can be used to select a specific audio file to play for the Audio Cue.
© 2021 DeliverHealth SOLUTIONS, Inc. All rights reserved.47 eScription One April 2021
Clear File: Used to clear the selection of the sound file for the specific event and disable playing a sound.
Sound Settings: The speaker icon is a shortcut to the Windows audio settings applet. This allows you to select
your microphone and speakers.
Reset Hot Keys: Click this button to reset the Hot Keys back to their default assignments.
Reset Audio Cues: Click this button to reset the Audio Cues back to their default assignments.
Manage Logins
All profiles that had the “Remember Username” option enabled when logging in will be saved and available for selection in
the Login drop-down menu. Any of the saved usernames can be removed in Manage Logins. Select the username to be
removed and click the Remove Login button.
© 2021 DeliverHealth SOLUTIONS, Inc. All rights reserved.48 eScription One April 2021
PACS
InSync can be integrated with Picture Archiving and Communication System (PACS) via the following two methods.
Port
This first method was developed over ten years ago and is included in InSync for backwards compatibility. The radiologist
starts the dictation process by clicking a dictation icon within PACS while viewing an image. The PACS workstation
connects to the IP and port that InSync is listening to. The port number is defined in the PACS port field. The message
sent is a string in this format:
[USERNAME]|[PATIENTID]|[ORDERNUMBER1],[ORDERNUMBER2],[ORDERNUMBER3]
– USERNAME: This is the eScription One username for the dictator.
o The username can be missing from the string but the pipe character (“|”) needs to be present to define the
end of the Username field. In this case, the “Use InSync user for undefined PACS messages” option should
be enabled. The dictation is then assigned to the InSync user who is logged into InSync.
o If the received username matches the account logged into InSync, it will map to that user appropriately.
o If the username matches to an account that the logged-in user has proxy to, it will map appropriately.
© 2021 DeliverHealth SOLUTIONS, Inc. All rights reserved.You can also read