Completing the Statutory Data Return - using SIMS Assessment 2018 - End of Early Years Foundation Stage Profile
←
→
Page content transcription
If your browser does not render page correctly, please read the page content below
Completing the Statutory
End of Early Years Foundation Stage Profile
Data Return
using SIMS Assessment
2018
SIMS in Gloucestershire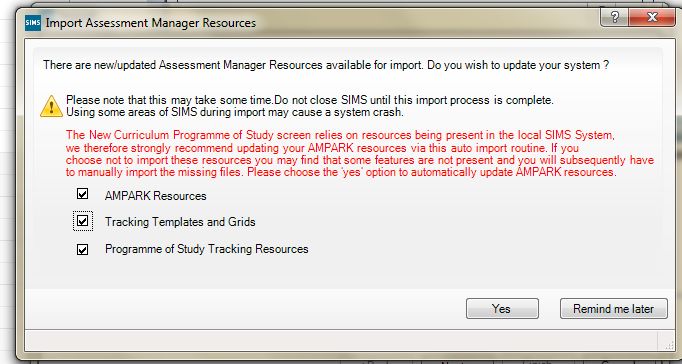
Introduction
Following a similar process as before, schools are being asked to use SIMS Assessment to
record EYFS data for 2018 and then forward it to Data and Performance Team using a CTF
(Common Transfer File).
The EYFS Teacher Assessments should be submitted to Data Management Team from
4th June 2018, but no later than 22th June 2018.
EYFS Transferring records to a child’s new school or setting
The 2018 Assessment and Reporting Arrangements states that, If a child moves to a new
school or setting during the academic year, the original school must send their assessment
of the child’s development against the early learning goals to the new school or setting.
If a child transfers schools before the summer half term holiday, the new setting must report
the child’s EYFS profile data to the LA. If a child transfers schools during the second half of
the summer term the previous school is responsible for reporting to the LA.
Before you start:
1. Please note that you will need to ensure that you have completed the Spring
2018 upgrade to SIMS version 7.180 before proceeding with these instructions.
To check that the SIMS 2018 Spring Upgrade has been applied:
Open SIMS
Select Help | About SIMS .net
SIMS needs to be on version 7.180
2. Permissions in SIMS
Only members of the Assessment Co-Ordinator and Assessment Operator System
Manager User Groups have the required permissions to use the Key Stage Wizard
Manager.
To check or add a new permission, in SIMS, click on Focus | System
Manager | Manage Users.
Click on Search or enter the User Surname and Search.
Double click on the User.
Hyperlink 3. Groups, shows which Groups the User has access to.
Click Add, if necessary and choose the appropriate group either
Assessment Co-Ordinator or Assessment Operator.
Click OK to add group to the list.
Click Save.
.
EYFSP Wizard - 2018 1 SIMS Support Office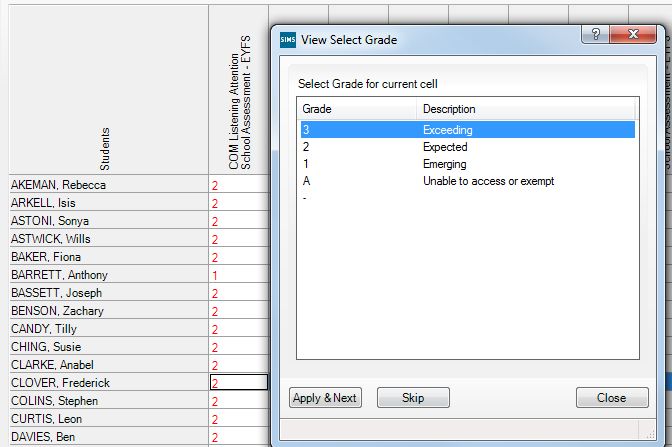
EYFSP - Step 1: Importing the EYFS Profile Wizard

     Before running the Wizard Manager you must first import the EYFSP
     Summary Wizard 2018 into Assessment in SIMS.
 1. From the top menu select Routines | Data In | Assessment | Import to open
    the first page of the Import wizard. If you see a screen similar to the one below,
     click Yes. Please note that this will take at least 30 minutes to import.

     a)     Click on the Browser button             to select the file to import from.

     b)     Navigate to: C:\Program Files\SIMS\SIMS .net\AMPA\England
            Primary (and Middle Deemed Primary)\Assessment Manager.

            Highlight EYFS Profile Wizard 2018 and click Open. The name of the
            selected file will be displayed in the Select the file to import from field.

     c)     Ensure that Overwrite with default values check box is ticked. This
            will ensure that previously imported templates will be correctly updated.
     d)     Click on the Finish button and a message dialog will ask you to confirm
            that you wish to proceed with the import. Click on the Yes button to
            start the import process.
     e)     View the Activity Log to ensure everything has been imported
            successfully.
     f)     Click Close.

EYFSP Wizard - 2018                      2                     SIMS Support Office
EYFSP - Step 2: Running the Early Years Foundation Stage Wizard
2(i) Selecting the EYFS Profile Wizard 2018
a) Select Tools | Performance | Assessment | Wizard Manager to open
the first page of the wizard.
All Wizard definitions that have been imported into Assessment will be
displayed.
Note that if EYFS Profile Wizard 2018 does not appear in the list you will
need to set the Filter to All.
b) Highlight the EYFS Profile Wizard 2018 and click the Next button. (The
Next button will not become available until a wizard is highlighted.)
2(ii) Selecting the Pupil Group
a) Click on the Browser button to open the Group Selector.
b) Normally schools will click on the + symbol in front of Year Group in
order to expand this area. Highlight your reception group and click
Apply. Please note that if you have more than one class in Reception
then this process will need to be repeated for each class by selecting the
required Registration Group.
C) Click on the Next button to continue.
2(iii) EYFS Profile 2018 Marksheet.
a) This page of the Wizard Manager displays the Marksheets created
from the Templates in the imported EYFSP Wizard. If the
marksheets do not appear, then change the filter to “All”. You can
open the marksheet directly from this page and enter, edit and
validate results. Highlight the first marksheet (EYFS Profile 2018)
and click on the Edit Marksheet pencil button to open the
Marksheet.
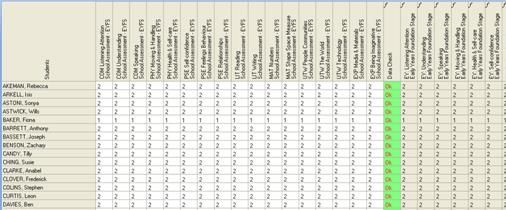
EYFSP Wizard - 2018 3 SIMS Support OfficeA marksheet with your Year R pupils is displayed and columns relating to the
17 assessments that need to be entered.
Optional - You may wish to print a blank marksheet for teachers to use to aid
the process of manual input. Click the Print button, ensuring the Print Blank
Marksheet check box is selected.
Optional – Exporting to Excel. You may wish to export the marksheet to
Excel
Select the required marksheet.
If there is any data on the marksheet, ensure it is saved before exporting.
Click on the Export button. This will export a formatted marksheet to
Excel.
The exported data is now displayed in Excel where it may be edited
and/or saved in the usual way.
Note if you intend to type results in Excel and import these back into
Assessment, please ensure the file type remains as an .xml spreadsheet
and name the file if there is more than one file to import back.
Importing Excel Data (if previously exported).
Select Routines | Data in | Assessment | Import From Spreadsheet to
display the first page of the Import wizard.
Click on the Field Browser button to display the Open dialog. Use this
dialog to locate the file you wish to import.
Highlight the file and click on the Open button to return to the wizard. The
name of the selected file will now be displayed in the Select the file to
import from field.
Click on the Next button, close the Activity Log. Click on the Next
button to continue.
Click Finish to Import from Spreadsheet and Yes to proceed.
The Activity Log will display any results that have not been imported.
Click on Close.
EYFSP Wizard - 2018 4 SIMS Support OfficeEYFSP - Step 3: Entering or checking the data on the EYFS Profile
Marksheet.
3(i) Inputting the data directly into the Marksheet.
a) A grade of 3 (Exceeding), 2 (Expected), 1 (Emerging) or A (Unable to
access or exempt) is required for each pupil in the appropriate white cells.
b) A quick method of entering grade results is to right-click in the first cell and
click Select Grade for Cell from the drop-down list. Drag the View Select
Grade dialog box so this can be viewed with the pupils’ names and the
Result column showing. Double-clicking the result for the first pupil places
that result on the marksheet and moves to the next pupil. Click the Close
button to close the dialog box and return to the marksheet.
c) Each of the white columns without a ƒ enables the entry of an EYFS level of
3, 2, 1 or A as described earlier.
d) Once all these columns are completed click the Save button. The columns
with ƒ in their header will be completed.
To check data previously imported via Excel, open the Marksheet
through the wizard as described in Step 2 and continue over page.
EYFSP Wizard - 2018 5 SIMS Support Officee) The Data Check column is used to check there is an entry for each area for
each pupil.
Important - If the results have been imported from Excel, click Calculate to
populate the formula columns. Do NOT Calculate if the results have been
imported by a third party software e.g. Classroom Monitor as the formula
columns will already be populated.
f) Where a missing result is found, the Data Check column will return a value
of Missing and colour red as shown below.
Make sure levels are entered for all pupils.When you have finished working on
the Marksheet, click on the save button and Close to close down the
Marksheet.
To remove an incorrectly saved score, right-click the cell with the wrong result
and select View/Edit Result History. Highlight the incorrect result and click
the red cross on the right. Click the Yes button to delete. Click the Close
button to close the View/Edit Result History screen.
EYFSP Wizard - 2018 6 SIMS Support OfficeNow highlight the new second marksheet (EYFS Profile Good Level
Development 2018) and click on the Edit Marksheet pencil button to open
the Marksheet.
Click Calculate and Save. This will return a value of Y (yes) or N (no). This
will populate a new area on the EYFS Profile Pupil Report 20187, called
Achieved a Good Level of Development.
g) Click on the Next button to continue to the Reports page of the wizard.
EYFSP - Step 4: EYFSP Reports (Optional).
Note that this section is optional. Most schools will not want to print out the
Individual Reports. If this is the case, simply go to Closing the Wizard - point
4(ii).
4(i) This page displays the Individual Report Template from the EYFSP Wizard
and from here you can print the EYFSP Reports. Before printing you can if
you wish, preview an individual pupil’s report in Microsoft Word.
Previewing EYFSP Reports (Optional)
a) Click on Preview Report icon. By default one pupil is selected.
The report will open in Microsoft Word. (Click enable content if
asked.)
EYFSP Wizard - 2018 7 SIMS Support Officeb) Close the report.
Printing Pupil EYFSP Reports (Optional)
a) To print a report for all pupils in the Group, click Select All.
To print only a selection of pupils in the Group, tick the pupils whose
reports you wish to print.
b) Click on the Print Report button to print the selected pupils’ reports.
Uploading Pupil Reports (Optional)
Pupil reports can be uploaded to SIMS for each pupil. The document will then
be saved and can be accessed at any time through linked documents on the
pupil page.
a) To upload reports for all pupils in the Group, click the Select All button.
b) Click on the upload button .
4(ii) Closing the Wizard
a) Click Next then Click on the Finish button to close the wizard. You will be
asked if you want to proceed because you have not exported the results.
Click Yes.
EYFSP Wizard - 2018 8 SIMS Support OfficeEYFSP Step 5: Creating the CTF for the LA Return
Creating a CTF to send to the LA (EYFSP return)
Common Transfer Files (CTFs) are used to electronically import and export
data. They are the DfE preferred option for data to be sent to LAs.
a) In SIMS, select Routines | Data Out | CTF | Export CTF
b) Select the CTF export type of Early Years Foundation Stage data
(FSP).
c) Click on the down arrow in the Year Group header column and select the
required year group e.g. R
d) Left Click in the first cell of the column Destination School to see the
dropdown arrow.
e) Right Click anywhere within the table and left click on Select All.
f) Click on the down arrow in the Destination School cell and select LA
Transfer from the list.
g) Click on the Export CTF button and Yes to the Address Tidy and Merge
message. When the file has been created a message appears giving the
relevant filename, click OK.
h) When the Exception Log section appears, check the Number of students
processed is the correct number. Click Close to exit the Exception Log
screen.
EYFSP Wizard - 2018 9 SIMS Support Officei) To see the CTF file name select Routines | Data Out | CTF | View
Export History Log. Click on Search to display CTFs created today.
Identify the correct file that you have just created for the LA and make a
note of the filename. (e.g. 9162345_FSP_916XXXX_001.xml). If there is
more than one file, highlight each one in turn and the pupils will be listed
for you to check.
j) You are now ready to send the CTF file via Perspective Lite to the LA.
EYFSP Step 6: Sending the CTF via Perspective Lite
Enquiries on returning files should be directed to the Data and Analysis
Team 01452 328543.
Once the file has been confirmed as being created, it needs to be transferred
to the LA using Perspective Lite.
a) Open Internet Explorer.
b) Log on to Perspective Lite.
https://perspective.angelsolutions.co.uk/perspective/login.aspx
c) Select LA from the home screen banner.
d) Select File Returns.
e) Click Browse and locate the file from L: or S:\SIMS\STAR\CTFOUT.
f) Before proceeding to upload and send please tag this file using the
dropdown and selecting EYFSP.
g) Once this has been done click Upload & Send
EYFSP Wizard - 2018 10 SIMS Support OfficeYou can also read