CONGRESS 305 Business Telephone Téléphone professionnel de bureau - Manual Manuel d'utilisation - CTS
←
→
Page content transcription
If your browser does not render page correctly, please read the page content below
English
French
          CONGRESS 305
                   Business Telephone
     Téléphone professionnel de bureau

Manual
Manuel d'utilisation
13
1 12
v
11
2
10
V
x c 0
1 2 3 9
4 5 6
7 8 9
8
* 0 #
=
h z R r /p s
7
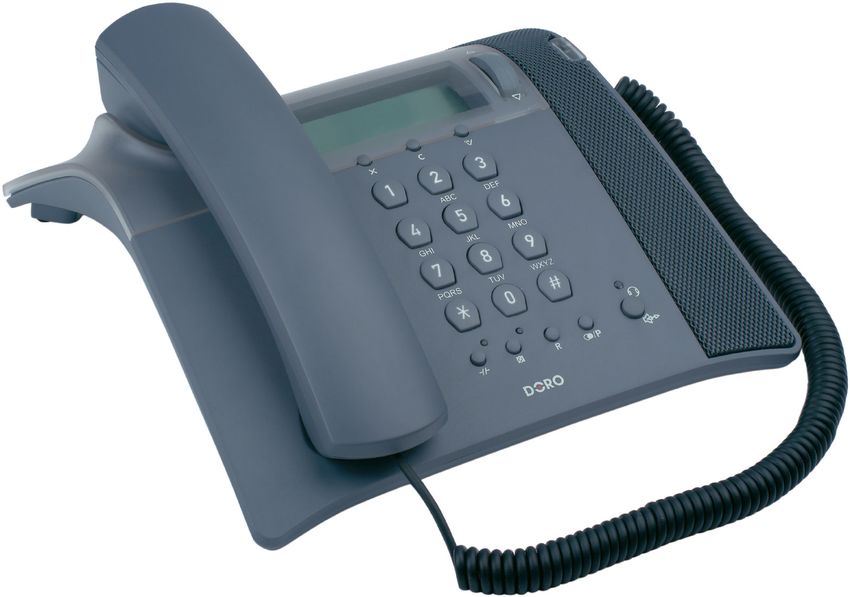
3 4 5 6English (see page 4-21)
1 Hook switch 8 Speakerphone/Headset button &
2 Cancel button indicator light
3 Hold button & indicator light 9 OK button
4 Mute button & indicator light 10 Erase button
5 Recall button 11 Ringer/Message waiting indicator
light
6 Redial/Pause button
12 Scroll (v / V) wheel
7 Microphone
13 Speaker
Français (voir pages 22-37)
1 Pédale de raccrochage/liste des 7 Micro
mémoires 8 Touche haut-parleur/casque avec
2 Touche d'annulation témoins lumineux
3 Touche de mise en garde avec 9 Touche de conrmation
témoins lumineux 10 Touche de correction
4 Touche secret avec témoin 11 Témoin lumineux de Message en
lumineux attente/Sonnerie
5 Touche R 12 Molette de déroulement
6 Touche Bis 13 Haut-parleurEnglish
Installation
Connection
1. Connect the curly cord to the handset and to the socket marked o on the
underside of the telephone.
2. Connect the power adapter to the socket marked DC 9V on the underside of
the telephone and to an electrical wall socket.
3. Connect the telephone line cord to the socket marked t on the underside of
the telephone and to the network wall socket.
4. You will hear a click when the modular plug is correctly in place.
5. Position the cables in the grooves underneath the telephone.
6. Lift the handset and listen for the dial tone. Your telephone is now operational.
Warning!
This unit may only be used together with the supplied adapter.
Connection of additional equipment
On the side of the telephone there is a socket marked 8, this will allow additional
telephone equipment i.e. cordless, modems etc to be connected allowing access to
the telephone line.
Important!
When additional equipment is connected to the socket marked 8, only one device at a time
will operate.
Connection of a headset
A headset can be connected to the socket underneath the telephone marked = .
Once programmed, simply press the headset button = to access an incoming call
or dial tone, press again to terminate the call.
When headset mode has been selected the speakerphone function will NOT
operate.
Important!
The DORO Congress 305 is designed to operate with DORO original headsets. Other
manufacturer headsets may be used, although the function and sound quality cannot be guaranteed.
Any damage occurring due to incompatible or non-Doro headsets being installed will not be covered
under the telephone guarantee.
4 www.doro.comEnglish
Installation
Labels/protective cover
Information such as a company logo can be placed under the protective cover.
This is especially useful where the back of the telephone is facing a customer/
visitor on a reception desk.
The cover is attached with a slider located on the underside of the telephone next
to the socket marked = . Push the slider in the direction of the arrow to unlock
and remove the cover, push in the other direction to lock it.
Hearing Aid compatible
This telephone is hearing aid compatible. Select the T mode on your hearing
aid to enable this feature.
Recall
Press the recall button R followed by the extension number to transfer calls
when connected to a PBX (TBR only).
Access to additional network services can be gained by using the recall button R ,
* and # keys. Contact your network operator for more information.
Timer
Approximately 5 seconds after dialling a timer will be shown on the display. The
timer helps you keep track of how long the call lasts.
Scroll Wheel
The scroll wheel v /V is used to access all areas of the menu system including
the phone book memories, CID memory, telephone settings etc.
Use the scroll wheel wherever the instruction scroll is used.
www.doro.com 5English
Installation
Volume control
The handset/headset earpiece and speakerphone volume may be adjusted during
a conversation using the scroll wheel v /V.
Important!
Please note when programming all references to press =
to press once and then immediately release the button.
Language (UK and Europe)
The display messages can be shown in the following languages: Swedish,
Danish, Norwegian, Finnish, Polish, French, Spanish and English.
1. Press 0. PHONE BOOK will be displayed.
2. Scroll to SET MENU. Press 0.
3. Scroll to LANGUAGE. Press 0.
4. Scroll to the desired language.
5. Press 0 to save.
Insert Zero (AU and NZ)
Use this to select New Zealand CID mode. When enabled the telephone will
automatically insert 0/00 prior to the number received from the network.
1. Press 0. PHONE BOOK will be displayed.
2. Scroll to SET MENU. Press 0.
3. Scroll to INSERT ZERO. Press 0.
4. Scroll to ENABLE or DISABLE.
5. Press 0 to save.
Setting the Time and Date
1. Press 0.
2. Scroll to SET MENU. Press 0.
3. Scroll to DATE & TIME. Press 0.
4. Scroll to 12/24 HOUR. Press 0.
5. Scroll to either 12 or 24. Press 0.
6 www.doro.comEnglish
Installation
6. Scroll to SET DATE&TIME. Press 0.
7. Set the date, month, hour and minute using the keypad.
(DD/MM/TT:MM)
8. Press 0 to save.
9. Press x to exit.
Ringer and Melody
1. Press 0.
2. Scroll to RINGER. Press 0.
3. Scroll to the desired ringer volume (0=off). Press 0.
4. Scroll to the desired ringer melody.
5. Press 0 to save.
Selecting Speakerphone or Headset
This allows you to choose either speakerphone ( S) or headset (= ) operation.
1. Press 0.
2. Scroll to SPEAKER/HEADSET. Press 0.
3. Scroll to either speakerphone or headset.
4. Press 0 to save.
Direct dialling
This allows you to dial a telephone number without lifting the handset or
pressing S/= . Simply dial a telephone number on the keypad and the call will
be connected through the speakerphone or headset (depending on which has
been selected).
1. Press 0.
2. Scroll to SET MENU. Press 0.
3. Scroll to ONE TOUCH. Press 0.
4. Scroll to either ON or OFF. Press 0.
Please note!
When direct dialling is activated you will be unable to correct an error using v/V and C
buttons, you will have to terminate the call and redial.
www.doro.com 7English
Operation
Making a call using the Speakerphone
With speakerphone selected, calls can be made/received by pressing S.
1. Press s. The speakerphone will be activated, the indicator light next to the
button will illuminate and dial tone will be heard.
2. Dial the required telephone number.
3. Speak towards the microphone located on the base unit. (Please refer to the
diagram on page 2, item number 7).
4. Press s to terminate the call.
Please note!
Headset operation is not available if speakerphone has been selected.
Making a call with the headset
With Headset selected, calls can be made/received by pressing = .
1. Press = . The indicator light next to the button will illuminate and dial tone
will be heard.
2. Dial the required telephone number.
3. Press = to terminate the call.
Please note!
Speakerphone operation is not available if headset has been selected.
Pre-Dialling
You can dial a telephone number without lifting the handset or pressing s/= .
1. Dial the telephone number using the keypad, the number will be shown in
the display.
2. If an error is made, move the cursor by scrolling to the required digit. Press
C to remove the digit and enter the correct number using the keypad.
3. Press 0. The speakerphone/headset function will be activated (depending
on which has been selected) and the displayed number will now be dialled.
Please note!
Pre-Dial will not work if Direct Dial has been selected.
8 www.doro.comEnglish
Operation
Redial button
The five most recently dialled numbers can easily be redialled using r :
1. Press r.
2. Scroll to the desired number/name.
3. Press 0. The displayed number/name will now be dialled.
Mute button
The microphone can be muted at any point during a conversation.
1. Press z . The indicator light next to the button will illuminate and MUTED
will be displayed.
2. The microphone (handset/speakerphone or headset) will now be muted.
3. Press z to reactivate the microphone.
On Hold
A call can be placed on hold at any time during a conversation, this allows the
handset to be replaced without losing the incoming caller.
1. While an external call is connected on line.
2. Press h to place a call on hold. The indicator light next to the button
will illuminate.
3. If you are using the handset it may now be replaced on the hook switch.
4. The call can be resumed by lifting the handset or by pressing h again to
connect the speakerphone/headset.
Please note!
Once the call has been placed on Hold and the handset is back on the hook switch, the call can
be picked up by another telephone connected to the same line.
Switching between Handset, Speakerphone or Headset
You can switch between handset, speakerphone or headset (depending on which
has been selected) during a conversation.
1. While an external call is connected on the handset press s/= and replace
the handset
2. While an external call is connected via speakerphone or headset, lift the
handset.
www.doro.com 9English
Menu
Description of the menu system
The telephone has an easy to follow menu system with distinct display texts.
The selected function is indicated by a flashing * symbol.
The following buttons are used to operate the menu system:
0 Access menu system. Move one step forward or confirm selected
option.
v /V
To scroll (Scroll wheel) through the menus.
C To erase/correct an entry.
x To exit a menu or select standby mode by pressing repeatedly.
The menu contains the following main headings:
PHONE BOOK To dial, change or erase a number in the phone book.
CID MEMORY Displays a list of the most recently received numbers.
SPEED DIAL To dial, change or erase speed dial numbers.
ADD ENTRY Storing new telephone numbers/names in the phone book,
and speed dial.
SET MENU Set time, date, operational parameters, LCR etc.
RINGER Ringer options.
SPEAKER/
HEADSET Select speakerphone or headset operation.
10 www.doro.comEnglish
Phone Book
About the Phone book
The Phone book is used store names and telephone numbers. If you subscribe to
a Caller ID service, the name/number of a caller (for those numbers stored in
the Phone book) will be shown while the telephone is ringing.
The phone book will store 99 telephone numbers and names arranged
alphabetically. Telephone numbers can be up to 20 digits in length while names
can be up to 15 characters in length.
Ten of the phone book entries can be stored as a Speed dial, this allows quicker
access (dialling) of a stored number.
Letters
Each number key has been allocated certain letters.
Button Letters/symbols
1.......................................... [Space character]. 1 ? ! : , ’ ( )
2.......................................... A B C 2 Ä Å À Á Â Æ @ ß Ç
3.......................................... D E F 3 Ë È É Ê
4.......................................... G H I 4 Ï Ì Í Î
5.......................................... J K L 5
6.......................................... M N O 6 Ñ Ö Ò Ó Ô Ø
7.......................................... P Q R S 7 ß $
8.......................................... T U V 8 Ü Ù Ú Û
9.......................................... W X Y Z 9
0.......................................... 0 + - @ & / % $ £
www.doro.com 11English
Phone Book
Storing telephone numbers and names
1. Press 0.
2. Scroll to ADD ENTRY. Press 0.
3. Enter the required telephone number, including the area code. Press 0.
4. Enter a name by pressing the corresponding number button (once or
several times) to select the first letter (see the table on the previous page).
Move the cursor using the scroll wheel v /V, or wait for it to move
automatically.
5. Press 0.
6. Select either phone book or speed dial using the scroll wheel v /V,. Press 0.
7. If you choose speed dial, select a position 0 – 9 . Press 0.
8. Enter further telephone numbers/names or to exit press x.
Please note!
If the next letter is not on the same button, you can immediately press the corresponding
button containing the correct letter, without waiting. Press r if you want a pause in the
telephone number.
When MEMORY FULL is displayed, it is not possible to store new telephone numbers
without first erasing an existing entry.
Dialling Numbers from the Phone Book
1. Press 0.
2. Scroll to PHONE BOOK. Press 0.
3. Scroll to the required number/name. You can also quick name search by
pressing the keypad button corresponding to the first letter in the name (see
the table on the previous page). Press 0.
4. Press 0, the displayed name/number will now be dialled.
Dialling using Speed Dial
1. Press 0.
2. Scroll to SPEED DIAL. Press 0.
3. Scroll to the required number/name.
4. Press 0 twice. The displayed number will now be dialled.
12 www.doro.comEnglish
Phone book
Activating direct dialling using speed dial
1. Press 0.
2. Scroll to SET MENU. Press 0.
3. Scroll to SPEED DIALLING. Press 0.
4. Scroll to either Enable or Disable. Press 0.
Direct dialling using speed dial
Press and hold the corresponding number button ( 0 - 9 ) for 3 seconds, the
stored telephone number will now be dialled.
Erasing a speed dial number/phone book entry
1. Press 0.
2. Scroll to PHONE BOOK/SPEED DIAL. Press 0.
3. Scroll to the required number/name. Press 0.
4. Scroll to ERASE. Press 0.
Changing numbers/names in the phone book/speed dial
1. Press 0.
2. Scroll to PHONE BOOK/SPEED DIAL. Press 0.
3. Scroll to the required number/name. Press 0.
4. Scroll to SAVE/EDIT? Press 0.
5. Scroll to the required digit. Press C to remove the highlighted digit and enter
the new digit using the number buttons. Press 0.
6. Scroll to the required letter. Press and release C to remove the highlighted
letter and change the name using the number buttons (refer to the table on
page 11). Press 0.
7. If you choose speed dial, select a position 0 – 9 . Press 0.
8. Enter further telephone numbers/names or to exit press x.
www.doro.com 13English
Caller Identication
Explanation of Caller ID
Caller ID allows you to see who is calling before you answer a call and see who
has called in your absence. Received calls are stored chronologically, with the
sequence number shown to the left.
The call log will store up to 99 telephone numbers. When the log is full the
oldest number will be deleted automatically as the new call is logged. When new
calls have been received the display will show 5.
Please note!
In order for numbers to be shown, the Caller ID service must be provided by your network
operator and a current subscription in place. Contact your operator for more information.
Some PBX’s do not pass CID information from the network to an extension.
Checking
1. Scroll to the required number.
2. To exit press x.
Messages
Apart from telephone numbers, the display can show:
UNAVAILABLE It is an International call or a call from a PBX (no
information received)
SECRET The call comes from a blocked number or a PBX.
a Message indication (sent from your network operator).
5 New calls
% Repeat calls (more than one call from the same number)
Dialling
1. Press 0.
2. Scroll to CID MEMORY. Press 0.
3. Scroll to the required entry. Press 0.
4. Scroll to DIAL?
5. Press 0, and displayed number will now be dialled.
14 www.doro.comEnglish
Caller Identication
Erasing a single telephone number
1. Press 0.
2. Scroll to CID MEMORY. Press 0.
3. Scroll to the telephone number you wish to erase. Press 0.
4. Scroll to DELETE?
5. Press 0. The displayed telephone number will now be erased.
Erasing all numbers
1. Press 0.
2. Scroll to CID MEMORY. Press 0.
3. Press 0.
4. Scroll to ERASE ALL CID?
5. Press 0. All telephone numbers will now be erased.
Transferring numbers to the phone book/speed dial numbers
1. Press 0.
2. Scroll to CID MEMORY. Press 0.
3. Scroll to the telephone number you wish to transfer. Press 0.
4. Scroll to SAVE/EDIT? Press 0.
5. Press 0.
6. Enter a name by pressing the corresponding number button until the first
letter is displayed (refer to the table on page 11). Move the cursor using the
scroll wheel v /V, or wait for it to move automatically.
7. Press 0.
8. Select a memory location from either the phone book or speed dial numbers.
Press 0.
9. If you choose speed dial select a position 0 – 9 , Press 0.
10. Enter further telephone numbers/names or to exit press x.
www.doro.com 15English
Least Cost Routing (LCR)
Least Cost Routing (LCR)
This will allow automatic selection of the telephone network operator of your
choice. The telephone can be set up to add and/or replace certain digits in a
telephone number.
To select an alternate network operator, you would normally dial a prefix code
before the actual phone number.
Example:
You have chosen a network operator for international calls where you need
to dial 9301 before the international dialling code, you can set LCR to
automatically dial a number beginning with 00 as 930100.
Therefore the number 00 46 46 2805000 would automatically be dialled 930100
46 46 2805000.
Please note!
In order to place your call with a certain operator you must be a registered subscriber. A
maximum of four LCR set-ups can be active simultaneously.
Setting Up an LCR number
1. Press 0.
2. Scroll to SET MENU. Press 0.
3. Scroll to LCR. Press 0.
4. Scroll to one of the four settings1 ( - 4 ). Press 0.
5. Enter the dialling sequence to be replaced to the left (up to four digits,
e.g. 00). Use C to erase or change any details.
6. Scroll to the right side of the display, enter the numbers to be added
(max 6, for example 930100). Press 0.
Automatic network prex using LCR
If you want the LCR function to add a prefix in front of all telephone numbers,
leave the space to the left empty by scrolling to the right side and then enter the
network prefix required (maximum 6 digits).
16 www.doro.comEnglish
System Settings
Explanation of system settings
A qualified engineer or your system administrator must program the following
PBX system settings.
Recall time/function
You can select either TBR (3 settings) or ETH recall dependant on your system
requirements. Please contact your network provider for further information.
1. Press 0.
2. Scroll to SET MENU. Press 0.
3. Scroll to RECALL. Press 0.
4. Scroll to the required setting (98, 270, 600, EARTH). Press 0.
Tone/Pulse dialling
The dialling type (Tone or Pulse) can be selected to suit your network
requirements.
Initially select Tone, if you are unable to dial out reprogram for pulse dialling.
1. Press 0.
2. Scroll to SET MENU. Press 0.
3. Scroll to TONE/PULSE. Press 0.
4. Scroll to either TONE or PULSE. Press 0.
Memory pause time
Some PBX’s and telephone exchanges may require a pause in the dialling
sequence, the timing may be adjusted to suit individual requirements. Please
contact your network provider for further information.
1. Press 0.
2. Scroll to SET MENU. Press 0.
3. Scroll to PAUSE. Press 0.
4. Scroll to the required pause time (1, 3, 5 seconds). Press 0.
www.doro.com 17English
System Settings
Message Waiting/Visual ring Indicator
Some PBX systems have a function called Message Waiting where the telephone
will indicate if there are any voice mail messages for you.
The Message Waiting (MW) switch is used to select the required setting and is
located underneath the telephone.
Carefully set the switch to the appropriate setting by inserting a small
screwdriver or similar in the slot. There are four alternatives are available:
LED+, LED-, high voltage (HV) and Visual Ring Indication ( ).
How message waiting operates is dependent on the PBX system in question,
please contact your system administrator for more information.
Important!
When the telephone is connected to PBX systems without a message waiting feature or to a
domestic telephone line, the MW switch must always be set to the Visual Ring Indication
( ) setting.
18 www.doro.comEnglish
Other
Troubleshooting
Check that the telephone cord is undamaged and properly plugged in.
Disconnect any additional equipment that may be connected. If the problem is
resolved, the fault is with the other equipment. Test the equipment on a known
working line. If the product works then the fault is with the line. Please inform
your local telephone company.
UK
If you cannot resolve the fault using the faultfinder section, technical support is
available on the Premium Rate Number: 0906 302 0114.
Calls cost 50 pence per minute (prices correct at the time of going to
press), and is operational between 9AM - 5PM Monday-Friday excluding Bank
Holidays. Alternatively,
E-mail on: tech@doro-uk.com
You can contact us in writing: Consumer Support Group, Doro UK Ltd.,
22 Walkers Road, North Moons Moat, Redditch, Worcestershire, B98 9HE,
(regarding any Spares or Technical query), or
Telephoning (Spares only): 01527 584377
Web site: www.doro-uk.com
Guarantee
This product is guaranteed for a period of 12 months from the date of purchase.
Proof of purchase is required for any service or support required during the
guarantee period.
This guarantee shall not apply to a fault caused by an accident or a similar
incident or damage, liquid ingress, negligence, abnormal usage or any other
circumstances on the purchaser’s part. Furthermore, this guarantee shall not
apply to a fault caused by a thunderstorm or any other voltage fluctuations.
This guarantee does not in any way affect your statutory rights. (As a matter of
precaution, we recommend disconnecting the telephone during a thunderstorm.)
www.doro.com 19English
Other
Australia and New Zealand
If you believe this product is malfunctioning, please refer to the relevant section
and/or consult the troubleshooting guide in this manual to ensure that you have
followed the instructions carefully. As an alternative you can visit our web site
for FAQ’s or send an e-mail for a prompt reply.
Guarantee
This product is guaranteed for a period of 12 months from the date of purchase.
Should you experience difficulties with the product, please contact us for
assistance.
If the product is then found to be faulty you will be asked to return it directly to
us with a copy of the purchase receipt.
This guarantee shall not apply to a fault caused by an accident or a similar
incident or damage, liquid ingress, negligence, abnormal usage or any other
circumstances on the purchaser’s part. Furthermore, this guarantee shall not
apply to a fault caused by a thunderstorm or lightning, excessive or any
other voltage fluctuations or faults on the telephone line. (As a matter of
precaution, we recommend disconnecting the telephone during a thunderstorm).
This guarantee does not affect your statutory rights.
AUSTRALIA NEW ZEALAND
DORO Australia Pty Ltd Atlas Gentech (NZ) Limited
PO Box 6760 Private Bag 14927
Baulkham Hills BC NSW 2153 Panmure
Australia Auckland
New Zealand
Consumer Support Consumer Support
Ph: (02) 8853 8444 Ph: 0900-500-25 (Toll Call)
Fax: (02) 8853-8489 Fax: (09) 574-2722
Email: support@doro.com.au Email: support@atlasgentech.co.nz
Web site: www.doro.com.au
20 www.doro.comEnglish
Other
Technical information
REN (RN for New Zealand)
The REN (Ringer Equivalence Number) or (RN) is of significance only if you
wish to connect more than 1 telephone to your telephone line. A standard
telephone line has a maximum REN capacity of 3 (RN of 5). It is possible
to connect 3 devices with a REN of 1 (RN of 1) with no degradation to the
product’s performance. Exceeding this limit may cause the volume of the ringer
in any phone to decrease or not ring at all.
Notes for operation in New Zealand
ALL PRODUCTS
The grant of a Telepermit for any item of terminal equipment indicates only
that Telecom has accepted that the item complies with the minimum conditions
for connection to its network. It indicates no endorsement of the product by
Telecom, nor does it provide any sort of warranty. Above all, it provides no
assurance that any item will work correctly in all respects with another item of
Telepermitted equipment of a different make or model, nor does it imply that
any product is compatible with all of Telecom’s network services.
This equipment shall not be set to make automatic calls to the Telecom “111”
Emergency Service.
This equipment may not provide for the effective hand-over of a call to another
device connected to the same line.
This equipment should not be used under any circumstances that may constitute
a nuisance to other Telecom Customers.
CND PRODUCTS
If a charge for local calls is unacceptable, the “DIAL” button should NOT be
used for local calls. Only the 7 digits of the local number should be dialled from
your telephone. DO NOT dial the area code digit or the “0” prefix.
www.doro.com 21Français
Installation
Raccordement
1. Reliez le fil du bloc d'alimentation à la prise DC 9V du téléphone et à la
prise de courant.
2. Reliez le câble téléphonique à la prise téléphonique murale et à la fiche t
du téléphone.
3. Reliez le câble spiralé au combiné et à la fiche o du téléphone.
4. Placez les câbles dans les rainures situées en sous le téléphone.
5. Prenez le combiné pour vérifier que vous entendez la tonalité:
6. Choisissez la langue d’utilisation du téléphone (voir la description de la page
32).
Attention !
Cet appareil ne doit être utilisé qu’avec l’adaptateur fourni (SA41-C2020).
Connexion d’autres appareils
La prise marquée 8 située sur le côté du téléphone permet de connecter
d’autres appareils téléphoniques sur la même ligne, tels qu’un téléphone sans
fil, un modem, etc.
Raccordement du casque
La fiche située au dos du téléphone marquée = permet de raccorder le casque.
Remarque!
Le casque DORO d’origine est testé et adapté au modèle Congress 305 de DORO. Vous
pouvez utiliser d’autres types ou marques de casque. Dans ce cas Doro ne peut pas garantir
son fonctionnement correct.
De plus, le casque et le téléphone risquent d’être endommagés. La garantie du téléphone ne
couvre pas ce type de dommage.
Étiquettes/Doublage protecteur
Un logo (ou toute autre information) peut être placé sous la coque translucide
de l’appareil. Ceci est particulièrement utile quand le téléphone doit être
personnalisé, comme par exemple lorsqu’il est placé sur un bureau de réception.
Cette coque translucide est retenue par une glissière. Poussez-la dans la direction
de la flèche pour la soulever, et dans le sens inverse pour la remettre en place.
22 www.doro.comFrançais
Utilisation
Appel avec fonction de correction
Vous pouvez corriger un chiffre du numéro de téléphone avant d’émettre l’appel.
1. Composez le numéro de téléphone.
2. Atteignez le ou les chiffres voulu(s) avec la molette de déroulement v /V.
Corrigez avec la touche C et changez le numéro avec les touches numériques.
3. Appuyez sur 0 pour appeler votre correspondant.
Touche Bis
La touche r permet de rappeler aisément les cinq derniers numéros que vous
avez composés:
1. Appuyez sur r.
2. Atteignez le numéro/nom avec la molette de déroulement v /V.
3. Appuyez sur 0 pour appeler votre correspondant.
Chronomètre
Dans les 5 secondes qui suivent la prise de ligne, un chronomètre se déclenche. Il
vous permet de vérifier la durée de l’appel sur l’afficheur.
Touche Secret
En cours de communication, vous pouvez couper le micro en appuyant sur
la touche z . Appuyez à nouveau sur la touche Secret pour réactiver le micro.
Quand le micro est coupé, le témoin lumineux au dessus de la touche s’allume
et MICRO COUPE est affiché.
www.doro.com 23Français
Utilisation
Réglage du volume
Le niveau du volume du son peut être réglé en cours d’appel.
Réglez le niveau du son avec la molette de déroulement.
Mise en garde
Appuyez sur la touche h pour mettre un appel en garde. Vous pouvez
reprendre l’appel téléphonique en appuyant de nouveau sur cette même touche
ou le reprendre sur un autre téléphone branché sur la même ligne.
Lors de votre communication
1. Appuyez sur la touche h pour mettre l’appel en garde. Raccrochez le
combiné (si utilisé).
2. Pour reprendre l’appel téléphonique, prenez un des combinés présent sur
l’installation.
Utilisation avec appareil auditif
Un amplificateur est intégré au combiné destiné aux personnes portant une
prothèse auditive. Pour utiliser cette fonction, mettez la prothèse sur T.
Autocommutateurs / Opérateurs
Cet appareil peut être installé derrière la plupart des autocommutateurs. Il
peut également vous donner accès à des services additionnels proposés par les
opérateurs. Les touches *, # et R vous permettront d’accéder à ces fonctions ou
services complémentaires.
Pour toute information, adressez-vous directement au fabricant du PABX ou à
votre opérateur.
24 www.doro.comFrançais
Utilisation
Appel en mains libres
Pour activer la fonction mains libres (voir page 33), utilisez la touche S pour
appeler et raccrocher. La fonction casque est désactivée quand la fonction mains
libres ou haut parleur est activée.
1. Appuyez sur s. La fonction mains libres est activé et le témoin lumineux
au-dessus de la touche s’allume.
2. Composez le numéro de téléphone.
3. Parlez en direction du micro situé sur le dessus du téléphone.
4. Appuyez sur s pour mettre fin à la communication.
En cours de conversation vous pouvez alterner entre les modes combiné et
haut-parleur/mains libres.
Appel téléphonique avec casque
Quand la fonction casque est activée (voir page 33), utilisez la touche = pour
appeler et raccrocher (ce qui équivaut à prendre et raccrocher le combiné). La
fonction haut-parleur est désactivée quand la fonction casque est activée.
1. Appuyez sur = . La tonalité est audible dans le casque.
2. Composez le numéro désiré.
3. Appuyez à nouveau sur = pour mettre fin à la communication.
En cours de conversation vous pouvez alterner entre les modes combiné et
casque.
www.doro.com 25Français
Menu
Description du menu
Le symbole * clignote lorsque vous devez choisir un paramètre.
Les touches suivantes permettent d’utiliser les menus:
0 Permet d’accéder au menu et aux sous-menus et de valider la
fonction sélectionnée.
v /V Permet de faire défiler les menus. (Molette de déroulement)
C Permet d’effacer ou de corriger.
x Permet de quitter le menu sélectionné ou revenir à l’écran de
Veille (en appuyant de façon répétée).
Les principales rubriques du menu sont les suivantes:
REPERTOIRE Composer un numéro, le modifier ou l’effacer du répertoire.
JOURNAL DES APP Afficher la liste des derniers appels reçus.
MEMOIRE ABREGEE Composer un numéro en mémoire abrégée, le modifier
ou l’effacer.
AJOUTER ENTREE Enregistrer les numéros de téléphone et noms dans le
répertoire ainsi que les numéros en mémoire abrégée.
MENU REGLAGE Régler l’heure, la date, la langue, le LCR le coût de la
communication, la touche R, la pause, DC/FV, prise de ligne automatique,
l’appel en mémoire abrégée.
SONNERIE Régler le volume et la mélodie de la sonnerie.
CASQUE / AMPLI Pour sélectionner haut-parleur ou casque.
26 www.doro.comFrançais
Répertoire
A propos du répertoire
Le répertoire permet d’enregistrer les noms et numéros de téléphone. Il est
plus rapide d’appeler un numéro en mémoire abrégée que de l’appeler à partir
du répertoire. Si vous êtes abonné au service Présentation du numéro/nom, le
nom/numéro du correspondant s’affichent à la réception de l’appel.
Le répertoire enregistre 99 jeux de noms et numéros de téléphone.
Le répertoire est classé par ordre alphabétique.
Chaque nom peut comporter au maximum 15 caractères, et chaque numéro,
jusqu’à 20 chiffres.
10 numéros du répertoire peuvent être mis en mémoires abrégées, ce qui permet
de les appeler par une simple pression de touche ( 0 - 9 ).
Lettres:
Les touches numérotées correspondent aux caractères suivants
Touche Lettres/symboles
1.......................................... [Espace] . 1 ? ! : , ’ ( )
2.......................................... A B C 2 Ä Å À Á Â Æ @ ß Ç
3.......................................... D E F 3 Ë È É Ê
4.......................................... G H I 4 Ï Ì Í Î
5.......................................... J K L 5
6.......................................... M N O 6 Ñ Ö Ò Ó Ô Ø
7.......................................... P Q R S 7 ß $
8.......................................... T U V 8 Ü Ù Ú Û
9.......................................... W X Y Z 9
0.......................................... 0 + - @ & / % $ £
www.doro.com 27Français
Répertoire
Enregistrement des noms et numéros de téléphone
1. Appuyez sur 0.
2. Atteignez AJOUTER ENTREE. Appuyez sur 0.
3. Composez le numéro de téléphone ainsi que l’indicatif. Appuyez sur 0.
4. Entrez le nom. Appuyez sur la touche numérotée correspondante (une ou
plusieurs fois) pour enregistrer la première lettre. Voir le tableau de la page
précédente.
Déplacez le curseur avec la molette de déroulement ou attendez qu’il se déplace
automatiquement.
5. Appuyez sur 0.
6. Choisissez d’enregistrer cette entrée dans le répertoire ou comme numéro en
mémoire abrégée. Appuyez sur 0.
7. Si vous choisissez mémoire abrégée, sélectionnez une plage 0 - 9 . Appuyez sur
0. Enregistrez d’autres entrées ou quittez en sélectionnant x.
Remarque!
Quand MEMOIRE PLEINE s’affiche, vous devez effacer des entrées existantes avant de
pouvoir en enregistrer de nouvelles.
Si la lettre suivante se trouve sur une autre touche, vous pouvez appuyer immédiatement sur cette
touche pour sélectionner le caractère suivant. Insérez une pause en appuyant sur r.
Appeler les numéros du répertoire
1. Appuyez sur 0.
2. Atteignez REPERTOIRE. Appuyez sur 0.
3. Atteignez le numéro/nom désiré. Vous pouvez aussi effectuer une recherche
rapide en appuyant sur la touche correspondant à la première lettre du nom (voir
le tableau de la page précédente). Appuyez sur 0.
4. Appuyez sur 0 pour appeler votre correspondant.
Appeler les numéros en mémoire abrégée
1. Appuyez sur 0.
2. Atteignez MEMOIRE ABREGEE. Appuyez sur 0.
3. Atteignez le numéro/nom désiré.
4 . Appuyez deux fois sur 0 pour appeler le numéro.
Voir la page suivante pour appel direct/mémoire abrégée.
28 www.doro.comFrançais
Répertoire
Activer la fonction appel direct de la mémoire abrégée
1. Appuyez sur 0.
2. Atteignez MENU REGLAGES. Appuyez sur 0.
3. Atteignez APP MEM ABREGEE. Appuyez sur 0.
4. Choisissez et validez par 0.
Appeler directement avec mémoire abrégée
Appuyez pendant 2 secondes sur la touche numérotée correspondante ( 0 - 9 )
pour appeler votre correspondant.
Supprimer un numéro en mémoire abrégée ou une entrée du répertoire
1. Appuyez sur 0.
2. Atteignez REPERTOIRE/MEMOIRE ABREGEE. Appuyez sur 0.
3. Atteignez le numéro/nom désiré. Appuyez sur 0.
4. Atteignez EFFACER. Appuyez sur 0.
Modier les numéros/noms du répertoire ou les numéros en mémoire
abrégée
1. Appuyez sur 0.
2. Atteignez REPERTOIRE/MEMOIRE ABREGEE. Appuyez sur 0.
3. Atteignez le numéro/nom désiré. Appuyez sur 0.
4. Atteignez SAUVER/EDITER ? Appuyez sur 0.
5. Atteignez le ou les chiffres désiré(s). Pressez la touche C pour corriger le
numéro avec les touches numérotées. Appuyez sur 0.
6. Atteignez la ou les lettres désirée(s). Pressez la touche C pour corriger le nom
avec les touches numérotées. Voir le tableau de la page 27. Appuyez sur 0.
7. Si vous choisissez mémoire abrégée, sélectionnez une plage 0 - 9 . Appuyez
sur 0. Enregistrez d’autres entrées ou quittez en sélectionnant x.
www.doro.com 29Français
Présentation du numéro/nom
Que signie ‘Présentation du numéro/nom’ ?
Présentation du numéro/nom vous permet de voir qui vous appelle avant de
répondre, qui a appelé en votre absence ou qui appelle quand vous êtes en ligne.
Les appels reçus sont enregistrés et numérotés en ordre chronologique.
Le journal enregistre jusqu’à 99 numéros de téléphone. Quand le journal
atteint sa capacité maximum, les numéros les plus anciens sont remplacés
automatiquement par les nouveaux appels.
En mode Veille, les nouveaux appels sont signalés par 5.
Remarque!
Pour que la présentation du numéro/nom puisse fonctionner vous devez vous abonner à ce
service auprès de votre opérateur. Adressez-vous à lui pour toute information complémentaire.
.
Consultation du journal des appelants
1. Atteignez le numéro voulu.
2. Quittez en appuyant sur x.
Appeler
1. Appuyez sur 0.
2. Atteignez JOURNAL DES APP. Appuyez sur 0.
3. Atteignez le numéro voulu. Appuyez sur 0.
4. Atteignez APPELER ?
5. Appuyez sur 0 pour appeler votre correspondant.
Messages
Si le numéro ne peut être fourni par le réseau, l’afficheur indique les messages
suivants:
PAS DISPONIBLE
Il s’agit d’un appel international ou d’un appel provenant d’un
PABX (aucune information reçue)
SECRET L’appel provient d’un numéro verrouillé ou hors annuaire ou d’un
PABX.
o Indication de message envoyé par l’opérateur de votre réseau.
30 www.doro.comFrançais
Présentation du numéro/nom
Effacer un seul numéro de téléphone
1. Appuyez sur 0.
2. Atteignez JOURNAL DES APP. Appuyez sur 0.
3. Atteignez le numéro désiré. Appuyez sur 0.
4. Atteignez EFFACER?
5. Appuyez sur 0. Le numéro est effacé.
Effacer tous les numéros
1. Appuyez sur 0.
2. Atteignez JOURNAL DES APP. Appuyez sur 0.
3. Appuyez sur 0.
4. Atteignez TOUT EFFACER ?
5. Appuyez sur 0. Tous les numéros sont effacés.
Transférer des numéros dans le répertoire ou en mémoire abrégée.
1. Appuyez sur 0.
2. Atteignez JOURNAL DES APP. Appuyez sur 0.
3. Atteignez l’entrée désirée. Appuyez sur 0.
4. Atteignez SAUVER/EDITER ?. Appuyez sur 0.
5. Appuyez sur 0.
6. Entrez le nom. Appuyez sur la touche numérotée correspondante (une ou
plusieurs fois) pour enregistrer la première lettre. Voir le tableau de la page
27.
Déplacez le curseur avec la molette de déroulement ou attendez qu’il se
déplace automatiquement.
7. Appuyez sur 0.
8. Choisissez d’enregistrer votre entrée dans le répertoire ou comme numéro en
mémoire abrégée. Appuyez sur 0.
9. Si vous choisissez mémoire abrégée, sélectionnez une plage 0 - 9 . Appuyez
sur 0. Enregistrez d’autres entrées ou quittez en sélectionnant x.
www.doro.com 31Français
Réglages
Réglage de l’heure et de la date
1. Appuyez sur 0.
2. Atteignez MENU REGLAGES. Appuyez sur 0.
3. Atteignez DATE ET HEURE. Appuyez sur 0.
4. Atteignez 12/24 HEURES. Appuyez sur 0.
5. Atteignez le réglage désiré. Appuyez sur 0.
6. Atteignez REGL.DATE/HEURE. Appuyez sur 0.
7. Réglez la date, le mois, l’heure et les minutes avec les touches numérotées.
(JJ/MM/HH:MM)
8. Appuyez sur 0 pour enregistrer.
Choix de la langue
La langue utilisée par le téléphone peut être modifiée (Suédois, Danois,
Norvégien, Finnois, Espagnol, Français, Polonais et Anglais.)
1. Appuyez sur 0.
2. Atteignez MENU REGLAGE. Appuyez sur 0.
3. Atteignez LANGUE. Appuyez sur 0.
4. Atteignez la langue désirée avec la molette de déroulement v /V.
5. Appuyez sur 0 pour enregistrer.
Numérotation directe
Vous pouvez aussi composer un numéro directement.
Composez le numéro avec les touches numérotées, sans prendre le combiné ou
appuyer sur la touche S/= . L’appel est connecté sur le haut-parleur ou le casque
(selon la fonction activée) et le numéro est appelé.
1. Appuyez sur 0.
2. Atteignez MENU REGLAGES. Appuyez sur 0.
3. Atteignez P. DE LIGNE AUTO Appuyez sur 0.
4. Atteignez le réglage désiré. Appuyez sur 0.
Remarque!
Quand la fonction NUM DIRECT est activée, vous ne pouvez pas utiliser la fonction de
correction (voir page 23).
32 www.doro.comFrançais
Réglages
Réglage de la sonnerie
Votre combiné dispose de différents types de mélodies et volumes.
1. Appuyez sur 0.
2. Atteignez SONNERIE. Appuyez sur 0.
3. Atteignez volume de sonnerie désiré (0=coupée). Appuyez sur 0.
4. Atteignez le type de mélodie désiré .
5. Appuyez sur 0 pour enregistrer.
Sélectionner casque ou haut-parleur
Sélectionnez cette fonction avec la touche S/= .
1. Appuyez sur 0.
2. Atteignez CASQUE / AMPLI. Appuyez sur 0.
3. Atteignez le réglage désiré.
4. Appuyez sur 0 pour enregistrer.
www.doro.com 33Français
Routage préférentiel (LCR)
Routage préférentiel (LCR)
Cette fonction sélectionne automatiquement l’opérateur de réseau téléphonique
de votre choix. Vous pouvez configurer votre téléphone de façon à ajouter
certains chiffres aux numéros de téléphone et/ou en remplacer d’autres.
En général, pour sélectionner le réseau téléphonique d’un opérateur donné, vous
ajoutez un préfixe au numéro de votre correspondant.
Exemple:
Vous avez choisi l’opérateur X pour vos appels internationaux. Pour appeler en
passant par cet Opérateur X vous devez – par exemple – composer le 9301
avant le code de l’international. Vous pouvez régler le routage de façon à ce que,
quand vous composez un numéro commençant par 00, le téléphone remplace
automatiquement 00 par 930100. Par exemple: le numéro 00 46 46 2805000
devient automatiquement 930100 46 46 2805000
Remarque!
Pour faire passer vos communications par un opérateur donné, vous devez être abonné.
Un maximum de quatre réglages de routage préférentiel peuvent être activés simultanément.
Régler un numéro de routage préférentiel
1. Appuyez sur 0.
2. Atteignez MENU REGLAGES. Appuyez sur 0.
3. Atteignez LCR. Appuyez sur 0.
4. Atteignez un des quatre réglages1 ( - 4 ). Appuyez sur 0.
5. Entrez le groupe de chiffres à remplacer à gauche (quatre chiffres max., par
ex. 00). Utilisez C pour effacer ou corriger.
6. Atteignez la partie droite de l’afficheur pour y entrer le numéro de
remplacement (6 chiffres max., par exemple 930100). Appuyez sur 0.
Préxe de réseau automatique avec le LCR
Si vous voulez utiliser la fonction LCR pour ajouter un préfixe à tous vos
numéros de téléphone, laissez l’espace gauche vide.
34 www.doro.comFrançais
Réglages système
Explication des réglages système
Réglages des paramètres techniques pour connexion au central téléphonique de
la société.
Fonction/délai de rappel
Sélectionnez TOUCHE R et le délai. Remarque: La position 270 doit être
utilisée pour la France.
1. Appuyez sur 0.
2. Atteignez MENU REGLAGES. Appuyez sur 0.
3. Atteignez TOUCHE R. Appuyez sur 0.
4. Atteignez le réglage désiré (98, 270, 600, TERRE). Appuyez sur 0.
Numérotation Fréquences Vocales ou Décimales
Sélectionnez le réglage désiré, fréquences vocales ou numérotation Décimale .
1. Appuyez sur 0.
2. Atteignez MENU REGLAGES. Appuyez sur 0.
3. Atteignez DC / FV. Appuyez sur 0.
4. Atteignez le réglage désiré (DC / FV). Appuyez sur 0.
Pause des mémoires
Certains services téléphoniques demandent une pause plus longue.
1. Appuyez sur 0.
2. Atteignez REGLAGES. Appuyez sur 0.
3. Atteignez MENU PAUSE. Appuyez sur 0.
4. Atteignez le réglage désiré 1
( , 3, 5). Appuyez sur 0.
www.doro.com 35Français
Réglages système
Témoin de message en attente
Certains PABX utilisent une fonction appelée Message en attente. Ce téléphone
peut signaler les messages en attente grâce à un témoin lumineux qui clignote
en mode Veille.
Un curseur situé sous l’appareil permet de régler cette fonction.
Insérez la pointe d’un petit tournevis ou objet similaire dans la fente et mettez
le curseur sur la fonction désirée.
Cette fonction varie en fonction du PABX concerné. Pour davantage
d’informations, veuillez contacter le responsable du système.
Choisissez une des quatre options suivantes: LED+, LED-, témoin
lumineux ( ) et haute tension CC (HV).
Quand le téléphone est utilisé sur une ligne analogique,, le témoin lumineux de
sonnerie ( ) doit être sélectionné.
36 www.doro.comFrançais
Autres
Dépannage
Vérifiez que le câble téléphonique est en bon état et qu’il est branché
correctement. Débranchez tout autre matériel, rallonges et téléphones. Si
l’appareil fonctionne alors normalement, la panne est due au matériel
additionnel.
Testez le matériel sur une ligne en état de marche. Si le matériel fonctionne sur
ce raccordement, votre propre ligne téléphonique est défectueuse. Signalez la
panne à votre opérateur.
En cas d’échec de ces solutions, contactez votre revendeur.
Garantie et S.A.V.
Cet appareil est garanti un an à partir de sa date d’achat, la facture faisant
foi. La réparation dans le cadre de cette garantie sera effectuée gratuitement,
pièces et main d’oeuvre.
La garantie est valable pour un usage normal de l’appareil tel qu’il est défini
dans la notice d’utilisation.
Les fournitures utilisées avec l’appareil ne sont pas couvertes par la garantie.
Sont exclues de cette garantie les détériorations dues à une cause étrangère
à l’appareil.
En particulier la garantie ne s’appliquera pas si l’appareil a été endommagé à la
suite d’un choc ou d’une chute, d’une fausse manoeuvre, d’un branchement
non conforme aux instructions mentionnées dans la notice ou aux prescriptions
de l’ART (-Autorité de Régulation des Télécommunications), de l’effet de
la foudre, de surtensions électriques ou électrostatiques, d’une protection
insuffisante contre l’humidité, la chaleur ou le gel.
En cas de panne, adressez-vous au S.A.V. de votre revendeur ou installateur.
Pour la France
En tout état de cause, la garantie légale pour vices cachés s’appliquera
conformément aux articles 1641 et suivants du Code Civil.
Si vous avez des soucis d’utilisation, contactez notre Service d ‘Assistance
Téléphonique au 08 92 68 90 18 ( N° Audiotel - 0,34 Euros/mn )).
www.doro.com 37www.doro.com
You can also read