CUSTOMIZING PRACTICEMASTER GUIDE - TABS3
←
→
Page content transcription
If your browser does not render page correctly, please read the page content below
Customizing PracticeMaster Guide

Tabs3 Billing   PracticeMaster   General Ledg er   A ccounts Pay able   Trust A ccounting

                                 TA B S 3 .CO M
Customizing PracticeMaster Guide

Copyright © 2014-2021

Software Technology, LLC
1621 Cushman Drive
Lincoln, NE 68512
(402) 423-1440
Tabs3.com

Tabs3, PracticeMaster, and the “pinwheel” symbol (   ) are registered trademarks of Software Technology, LLC.

Version 2021 (Wednesday, August 11, 2021)
Customizing PracticeMaster Guide

Table of Contents
 Customizing PracticeMaster Guide                                                1
    Purpose of Guide                                                              1
    How to Use This Guide                                                         2

 Part 1 - Customizing the Database                                               3
    File Maintenance                                                              4
        File Definitions                                                          4
             Field Tab                                                            5
             Index Tab                                                            7
    Form Designer                                                                 8
        Implementing New Fields                                                  13
             Example: Adding a “Date of Last Contact“ field to the Client File   13
        Form Designer Control Panel                                              16
    Customizing the Data Files                                                   17
        Determining What Data to Store                                           17
        Data Storage Options                                                     17
             Virtual Fields                                                      25
        Considerations for Where to Store Data                                   28
    Areas of Practice                                                            35
        Using Predefined Area of Practice Templates                              35
             Installing Areas of Practice                                        35
    WorkFlows                                                                    36

 Part 2 - Day-to-Day Features                                                    37
    Quick Clicks                                                                 37
        Introduction to Quick Clicks                                             38
    Manage Quick Clicks                                                          41
    List Preferences                                                             42
             Preferences for the List Tab                                        42
             List Preferences for PracticeMaster Matter Manager                  44
    Column Layouts                                                               46
        The Default Column Layout                                                48
        The Restricted Column Layout                                             48

                                            -i-
Customizing PracticeMaster Guide

Filtering Data                                                 48
    Search Box                                                 48
    Predefined Filters                                         50
    Custom Filters                                             50
    Optimizing Filters with Indexes                            51
Sort Order                                                     52
QuickViews and Smart tabs                                      53
Calendar                                                       55
    Calendar Program                                           55
Calendar Rights                                                56
Calendar Properties                                            57
    General Tab                                                59
           Display Fields                                      59
           Event Colors                                        61
    Task List                                                  62
           Column Layout                                       62
           Index to Use for Sorting                            62
    Time Zone                                                  62
Calendar Plans & Calendar Plan Templates                       63
    Creating a Calendar Plan Template                          63
    Generating a Calendar Plan                                 65
    Calendar Plan Templates and WorkFlows                      65
Outlook® Synchronization                                       66
Conflict of Interest Searching                                 67
    Reviewing Which Fields are Conflict Checked                69
Convert to Fee Settings                                        71
Other Areas to Customize                                       74
    History Tracking                                           74
    Email Preferences                                          76
    Matter Manager                                             78
           Custom Activity Lists                               78
           Custom Taskbar                                      78
    Timer Preferences & Visual Timer Display Properties        79
           Visual Timer Display Properties                     80
    eNote Preferences                                          81

                                         - ii -
Customizing PracticeMaster Guide

Part 3 - Focus Areas                                          82
   Document Management                                        83
   Document Assembly                                          84
          Overview                                            84
          Word Document Assembly                              84
          HotDocs Document Assembly                           85
   Report Writer                                              86

Resources                                                     87
   Guides & Quick Guides                                      87
   Sample Reports                                             87
   Training Videos                                            87
   Knowledge Base                                             88
   Help                                                       88
   Technical Support                                          88
   Tabs3 Consultants                                          89

Index                                                         90

                                        - iii -
Customizing PracticeMaster Guide

Customizing PracticeMaster Guide
Purpose of Guide
PracticeMaster is a comprehensive practice management software program for law firms that
incorporates a great deal of features. So many features, in fact, that we created a guide to help you
know where to start.

PracticeMaster is set up so that it can be used out of the box when you start using the software.
However, PracticeMaster’s real strength and power lies in its tremendous flexibility.

To help you harness the power of the software, we have developed this Customizing
PracticeMaster Guide. This guide will help you learn how to take advantage of that flexibility, help
you learn how to configure PracticeMaster to best meet your firm’s needs, and show you how you
can customize the different areas of PracticeMaster to work for you. With this guide, you can
familiarize yourself with the areas you want to incorporate first, which can help you develop a rollout
plan.

You don’t need to read this guide from cover to cover (although you most certainly can). Instead,
you can read only the areas you are interested in when you are ready to work with those features.
For example, if you are primarily interested in implementing the Calendar, just read that section for
now. Likewise, if you want to learn about Document Assembly, read that section. Many sections of
this guide cover the basics and also provide the in-depth resources you will want to use to learn
about best practices and how to implement those features.

You may simply want to scan the Table of Contents and decide which areas you want to work with
first. You can do the customization yourself; or, if you prefer, you can work with one of our many
qualified consultants (page 89) to help you streamline this process.

                                                 -1-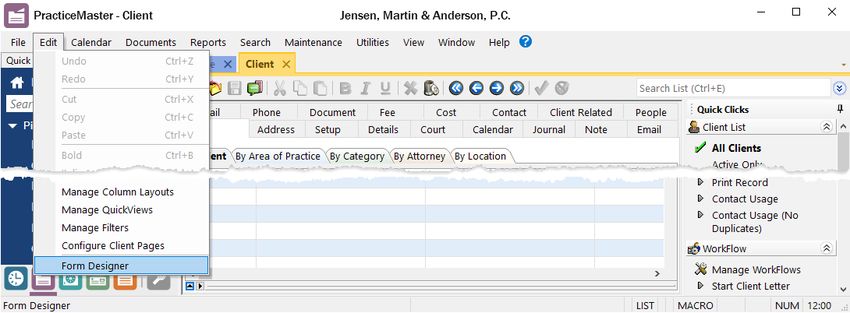
Customizing PracticeMaster Guide

How to Use This Guide
The information in this guide is presented in three distinct sections.

Part 1 - Customizing the Database
The content in this section is aimed towards the Law Firm Administrator or the person(s) most
interested in deciding what information needs to be included in the database. This section presents
information to consider when determining how you want to modify the data files to best meet your
firm’s needs. The information in Part 1 discusses the different types of files, how to use File
Maintenance to modify and create fields and files, how to use Areas of Practice, how to modify your
data entry screens using the Form Designer, and where you can learn about how to use the
extremely powerful WorkFlows to help manage your cases.

Part 2 - Day-to-Day Features
The content in this section includes how you can easily customize the various features that are used
by attorneys, paralegals, and all other employees in the firm on a daily basis. This section includes
features such as Quick Clicks, the PracticeMaster Calendar, Outlook integration, conflict of interest
searching, converting items to fees, Task Folders for navigation, and more.

Part 3 - Focus Areas
The content in this section includes information on the areas that you will want to implement at
some point once PracticeMaster is installed. It’s not easy to change everything all at once, and these
areas are ones that can be implemented when needed or when you are ready to take the next steps,
such as document management, document assembly, and PracticeMaster Report Writer.

                                                  -2-
Customizing PracticeMaster Guide

Part 1 - Customizing the Database
Part 1 of the Customizing PracticeMaster Guide outlines the process of customizing the database
to match your firm’s specifications.

The content covered in this section includes:

     l   An overview of the File Maintenance program, including instructions for adding fields and
         indexes
     l   An introduction to the Form Designer, with instructions on adding fields to PracticeMaster
         form layouts
     l   Information on the various types of files available for customization, and an in-depth look at
         how to determine which file should be used to store particular types of information
     l   An introduction to Areas of Practice, and instructions on how to install predefined Area of
         Practice templates
     l   An introduction to WorkFlows, a powerful tool used for automating common tasks

                                                  -3-
Customizing PracticeMaster Guide

File Maintenance
     Menu:            Maintenance | File Maintenance
     Home:            All Actions | Maintenance | File Maintenance
     Quick Launch:    File Maintenance

The File Maintenance program is one of the most
powerful parts of the PracticeMaster software,
allowing you to customize the data files as you see
fit. Add additional files and fields to track the
information your firm needs most, and remove
fields that aren’t of use. You can also customize file
indexes to speed up the process of sorting records
on the List tab of each file.

The File Maintenance window consists of a file tree
structure that includes all files in PracticeMaster.
Clicking the plus (+) symbol to the left of a branch
expands the branch to display the various files.
Likewise, clicking the minus (-) symbol to the left
of a branch will collapse its contents.

                                                               Figure 1, File Maintenance window

 Note: The File Maintenance program is an exclusive task, meaning that all other users must exit
 PracticeMaster before you can access this feature.

 Tip: You will be prompted to make a backup prior to accessing the File Maintenance program.
 Making a backup allows you to quickly reverse any changes made and protects you from potential
 data corruption if the File Maintenance program is interrupted.

File Definitions
Once the File Maintenance window is displayed, double-click the desired file to display the File
Definition window. The File Definition window consists of Main, Field, Index, and Utility tabs. The
Field and Index tabs are the most important tabs in File Maintenance. These tabs allow you to access
the information that can be customized.

                                                  -4-
Customizing PracticeMaster Guide

Field Tab
The Field tab in the File Definition window is used to add, edit, rename, or delete fields in a file
(Figure 2). A maximum 450 user-defined fields can be defined in a file in addition to protected fields.

Fields can be added or modified using the Field tab. Once a field has been added, it can then be
added to a form layout using the Form Designer (page 8). Once a field has been added to Form
Designer, you can begin using that field during data entry.

Each field must be assigned a Field Type. There are fifteen field types in PracticeMaster. Field types
are used to classify the type of information that can be entered into a field. Common field types
include alpha, date, number, money, phone, email, web page, and more.

 Note: For more information on field types, see PracticeMaster Help.

The Help Text field allows you to enter explanatory text that will be displayed as a screen tip when a
user hovers over a field during data entry. This makes it easy for users to determine the purpose of a
specific field and lets them know what they need to enter.

When creating or modifying fields, you can also edit the Custom Properties for that field. The
Custom Properties available differ depending on which Field Type is selected. Some particularly
useful Custom Properties are explained below; full details on the complete list of Custom Properties
can be found in PracticeMaster Help.

Required                                   Fields that are marked as Required must be filled in before
                                           a user can save the record.

Track History                              The Track History field is used in conjunction with the
                                           History Tracking feature (page 74) to provide an audit trail
                                           of additions and changes made to a particular field.

Restrict Changes                           The Restrict Changes field is used to indicate whether
                                           users must have access rights to Change
                                           Restricted Fields for the current file in order to make
                                           changes to the field. If Restrict Changes is selected, this
                                           field will be read-only for users who do not have access
                                           rights to Change  Restricted Fields for the
                                           current file. Field restrictions apply when changing an
                                           existing record; they do not apply when adding a record.

Include in Conflict Search                 These fields are used in Conjunction with the Conflict of
Include in Contact Search                  Interest and Contact Search reports. More information on
Include on Conflict Report                 each of these fields can be found on page 67 of this guide.

                                                  -5-
Customizing PracticeMaster Guide
Figure 2, File Maintenance - Field tab
▶ To add a field to an existing file definition
1. From the PracticeMaster Maintenance menu, select File Maintenance.
2. From the File Maintenance window, click the plus (+) sign next to the System Files or Areas
of Practice to display the corresponding list(s) of files.
3. Double-click the file you want to edit and select the Field tab.
4. Click the icon or press Ctrl+N. A field named “New Field“ will be created in the Field IDs
list.
a. Replace the “New Field“ text with the name you want to use for your field.
b. Select the desired Field Type.
c. Optionally, modify the default Field Name.
d. Select the desired Custom Properties.
l If the field should be included in the Conflict of Interest Search, be sure to
select the Include in Conflict Search check box.
e. Optionally, use the and icons to reposition the field in the list of Field IDs.
The order of the Field IDs determines the order of the fields on the Default file layout.
5. Click Done.
-6-Customizing PracticeMaster Guide
6. Use the Form Designer to add the field to the data entry screen. More information on the
Form Designer and form layouts can be found on page 8.
Index Tab
Indexes are used to specify the order in which records are displayed within a file. Indexes defined in
File Maintenance are permanent indexes. Although you can click on any column heading in a
lookup window to change the sorting order, permanent indexes provide the added benefits of faster
sorting and the ability to define multiple sort orders (e.g., sort by client name and then primary
timekeeper). Each index can have up to four sort orders defined. Once defined, you can use indexes
in Editor windows, QuickViews, and reports. For non-Platinum users, up to 15 user-defined
permanent indexes can be created per file. For Platinum users, up to 30 user-defined permanent
indexes can be created.
Figure 3, File Maintenance - Index tab
▶ To create a new index
1. From the PracticeMaster Maintenance menu, select File Maintenance.
2. From the File Maintenance window, click the + next to System Files or Areas of Practice to
display the corresponding list of files.
-7-Customizing PracticeMaster Guide
3. Once you have located the desired file, double-click the file and select the Index tab.
4. Click the icon to add a new index.
5. Under the Index IDs list, enter the new Index ID by replacing the “New_Index“ text shown.
a. Enter the desired Description.
b. Enter the desired Sort Order.
6. Click Done to complete the process. When asked to confirm whether you want to continue,
click Yes.
Form Designer
Menu File | Open | (File Name) | Edit | Form Designer
The Form Designer is used to create form layouts. Form layouts are used to determine the
arrangement of fields on the data entry screens in an Editor window. The Form Designer is also used
to specify the tab order of the fields in an Editor window. This makes it easy to set the flow of data
entry to your firm’s specifications. The Form Designer uses a graphical user interface complete with
drag-and-drop capabilities.
To access the Form Designer, you must be on the List tab of the file you want to edit. From the List
tab, click Edit, then select Form Designer.
Figure 4, How to access Form Designer
The Form Designer is made up of tabs, referred to as pages. Each page contains various elements,
including fields, labels, and group boxes. By moving and resizing these fields, you can create a form
layout that works best for your firm.
-8-Customizing PracticeMaster Guide
Figure 5, Form Designer window
▶ To add a field to a PracticeMaster form layout
1. From the PracticeMaster File menu, point to Open and select the file for the form layout you
want to edit.
2. From the Edit menu, select Form Designer.
3. In the Form Designer window, select the tab (page) where you want the new field to appear.
4. Click the (Add Field) button on the toolbar.
5. In the Field Selection List (Figure 6), locate and double-click the field you want to add. The
field will appear at the top left corner of the form.
a. Click the new field and hold down the mouse button.
b. While holding down the mouse button, drag the field to the desired location on the
form.
6. Click the (Run Form) button on the toolbar.
7. Click Yes when prompted to save your changes.
-9-Customizing PracticeMaster Guide
The field will now be available for data entry.
Tip: The Form Designer toolbar includes various sizing and positioning buttons that help place
newly added fields in the desired position. More information on the Form Designer toolbar can be
found in PracticeMaster Help.
All fields in a file can be added to one or more pages. The Other Pages column of the Field Selection
List (Figure 6) includes a count of all pages that the selected field appears on (not including the
currently selected page).
Figure 6, Other Pages column of Field Selection List
You can organize related fields by adding them to a new page. For example, the Court page contains
fields specific to an individual matter’s court information (Figure 7).
- 10 -Customizing PracticeMaster Guide
Figure 7, Client file Court tab
▶ To Add a Page in the Form Designer
1. From the Form Designer window, click the icon, or right-click the form layout
background and select the Add New Page menu option.
2. A new page will automatically be added with a default page name.
3. Right-click the page and select the Rename Page menu option.
4. The Page Name window will be displayed allowing you to specify the desired page name.
You can now add the desired fields to the page.
- 11 -Customizing PracticeMaster Guide
After adding or
otherwise changing
fields in the form
layout, you may also
want to edit the tab
order of the fields.
The tab order
represents the order
used when a user
tabs through the
fields on the page.
Figure 8, Form Designer window with Tab Order displayed
▶ To Set the Tab Order of Fields on a Page
1. From the Form Designer, click the tab of the desired page.
2. Click , or right-click the page and select the Set Tab Order menu option.
3. A number in a colored box will be shown next to each field. These numbers represent the
current tab order.
4. Once the numbers are displayed, you have two options—you can reset the tab order for all
fields, or you can reset the tab order for selected fields.
To reset all fields: Click the field you want to come first in the new tab order. Click the field
you want to come second in the new tab order. Click the field you want to come third in the
new tab order, etc. until all fields are in the desired order. The tab order will update
automatically as you click on each field.
To reset selected fields: Set the counter by holding the Ctrl key and then clicking on a field.
Although nothing will have appeared to happen, the counter will have been set to that
number. The next field you click will increment the counter by one and adjust all subsequent
fields. For example, let’s say you want to switch fields 8 and 9. First set the counter to 7 by
- 12 -Customizing PracticeMaster Guide
holding the Ctrl key and then click on field 7. Next click on field 9 which will be changed to
field 8. The old field number 8 will automatically be changed to 9 since there cannot be two
fields with the same tab order.
5. Finalize your changes by clicking the (Run Form) button.
More Info: Additional information regarding the Form Designer can be found in PracticeMaster
Help.
Implementing New Fields
To summarize, there are two parts to adding additional fields to existing data files.
1. Add the field to the file via File Maintenance.
See “To Add a Field to an Existing File Definition“ on page 6
2. Add the field to the data entry screen via the Form Designer.
See “To Add a Field to Form Layout“ on page 9
To demonstrate this entire process, the following example provides step-by-step procedures using a
specific scenario.
Example: Adding a “Date of Last Contact“ field to the Client File
Let’s say you want to add a new date field called “Date of Last Contact“ to the Client File. You need
to add the new field to the data file structure via File Maintenance and then add the field to the data
entry screen via the Form Designer.
Note: All other users must exit the software in order to perform these steps.
▶ Part 1 - To add a “Date of Last Contact“ field to the Client file
1. From the Maintenance menu in PracticeMaster, select File Maintenance.
2. Double-click Client.
3. Click the Field tab.
a. Click the button to insert a new field.
b. Type over the “New_Field“ text with the appropriate name for the field. For this
example, we will name the field “Date of Last Contact” ..
c. From the Field Type drop-down, select Date.
4. Click Done.
5. Click Yes.
6. When the Task Completed message is displayed, click OK.
- 13 -Customizing PracticeMaster Guide
Figure 9, Example of Date of Last Contact Date field
- 14 -Customizing PracticeMaster Guide
▶ Part 2 - To add the “Date of Last Contact“ to the Form Layout
1. From the File menu, point to Open and select Client.
2. From the List tab, select Edit | Form Designer.
a. Click the page on which you want the Date of Last Contact field to appear.
b. Click the button on the Form Designer toolbar.
i. From the Field Selection List window, scroll down and select the “Last_
Contact_Date“ field.
ii. Click OK.
c. Click and drag the field to the desired position.
d. Click the button.
Figure 10, Date of Last Contact field added to Client file
- 15 -Customizing PracticeMaster Guide
Form Designer Control Panel
A file’s font can be modified to improve legibility and spacing via the Form Designer Control Panel
( ).
Standard Font Select this option to use the standard font face (Segoe UI)
and size (10pt).
Classic Font Select this option to use the font face (MS Sans Serif) and
size (8pt) that was used in prior versions of the software
(i.e., Version 18 and earlier).
Custom Font Select this option to specify a font face and size manually.
When this option is selected, the Select button will be
available to display the Font Dialog Box to choose a font
face and size.
Apply Font to All PracticeMaster Select this check box if you want to change all files in
Files PracticeMaster to use the selected font face and size.
Otherwise, clear this check box if you only want to only
change the font for the current file.
Additionally, you have the option to
Reset to Generic Layout, which
changes the form to simply list all fields
in a single column, or Reset to
OEM Layout, which changes the layout
back to the layout provided in the
software for the current version.
Figure 11, Form Designer Control Panel
- 16 -Customizing PracticeMaster Guide
Customizing the Data Files
One of PracticeMaster’s most powerful features is its customizability. When first starting to use
PracticeMaster, most firms start out using the default data files provided with the software.
PracticeMaster’s default data files store information common to the majority of firms. However,
before long, you may find that you want to add fields to PracticeMaster for storing additional data
that your firm needs to track.
Determining What Data to Store
Before adding additional files and fields to PracticeMaster, you need to determine what information
needs to be tracked, reported on, and used in documents. You must gather the information needed,
organize it into categories, and then determine the best method for storing the data.
The easiest way to do this is to gather hard copies of all of the commonly used documents,
beginning with client questionnaires and client intake forms. Include form letters, email, motions,
reports, communications, and any other commonly used documents. These documents will help you
decide what information to track in your database files.
Once you’ve gathered the hard copies, highlight all of the information that will be stored in
PracticeMaster. You will then use this as a blueprint to determine whether to add a field to an
existing file or create a new file for storing the information.
Keep the hard copies of the documents. You can use these documents later when you start to
incorporate the document assembly features in PracticeMaster (page 84).
Data Storage Options
Once you have determined what data you want to store in PracticeMaster, you must decide where
the data should be stored. You can add fields to existing files, or you can add new files. There are
several types of files in PracticeMaster.
The following diagram of the File Maintenance window shows the different types of files. For
example, you can add fields to the Client file, the Calendar File, or the Contact file. The Contact file is
an example of a Lookup file, which is used to store information that can be referenced via a field in
another file. You can create your own user-defined Lookup files for information you want to
reference in another file. Common Client Related files and Area of Practice files also have unique
characteristics, as shown in the diagram.
- 17 -Customizing PracticeMaster Guide
Figure 12, Customizable Files in PracticeMaster
The following information lists the different files where data can be stored and describes the type of
data stored in each file.
- 18 -Customizing PracticeMaster Guide
Client File Use the Client File to store single pieces of information that can apply to all matters,
regardless of the matter’s Area of Practice. Related fields can be combined onto a
single page using the Form Designer (page 11). For example, the Court tab contains
fields relating to a particular matter’s court information, such as County of Filing,
Court of Jurisdiction, and Judge (Figure 13).
Advantages Disadvantages
l Available for ALL matters l Cannot store multiple records for
l Can use Category pages to only a single matter (e.g., children)
display data for matters assigned
to a specific Area of Practice (page
24)
l Does not require a File Access
code in Word document assembly
Figure 13, Client File, Court tab
- 19 -Customizing PracticeMaster Guide
Contact File Use the Contact File to store information common to different types of contacts in
this file, such as address, email, gender, contact preferences, etc. Contacts can be
categorized by one or more types when the individual contact is added, such as
Attorney, Medical Provider, Adjustor, etc. You can use the Contact File to store fields
for one or more types of contacts. For example, you may have a field for attorneys
that lists the states in which they are licensed to practice law.
Advantages
l One location for contact
information
l Data optionally synchronizes to
Outlook
l Use Category pages to prevent
data from showing for all contacts
Figure 14, Contact File, Misc tab
- 20 -Customizing PracticeMaster Guide
Common Use Common Client Related Files to store information for which you can have
Client multiple records for each client. The Fee file is an example of a common client related
Related Files file. All matters can have fees, and each matter can have multiple fees.
Advantages
l Stores multiple records per matter
l Can be used for multiple areas of
practice
l Used for information that applies
for all matters
l Can optionally show a tab in the
Client Editor window (List tab |
Edit | Configure Client Pages)
Figure 15, Example of a Common Client Related page
- 21 -Customizing PracticeMaster Guide
Area of Use Area of Practice Files to store information that is unique to a particular area of
Practice law. For example, personal injury matters may require medical record information that
Files is not required for real estate matters. Likewise, real estate matters may require
inspection information that is not required for personal injury matters.
Advantages
l Data is grouped by file for that
type of matter (e.g., spouse info,
dependents, stockholders, etc.)
l Accommodates one record or
many records for each matter
l Can store contact information in
Area of Practice file or link to
Contact File (virtual)
l The tabs change in the Client file
based on the client’s Area of
Practice
l Can use the Import Area of
Practice feature to import file
structures
Figure 16, Example of an Area of Practice file
- 22 -Customizing PracticeMaster Guide
Lookup Files Use a Lookup File to store information that can be referenced via a field in another
file. Lookup files can vary in complexity.
l The Document Type file lookup file that allows you to select from a list of
document types.
l The Contact file is a lookup file. You can view contact information via the
Client File to provide an address on the Address tab.
l You can set up a Lookup File to store additional signatory and letterhead
information for users.
l You can set up a Case Status lookup file to track a matter’s current case status.
More information on this example can be found on page 34 (Figure 26).
Advantages Disadvantages
l Can add a field to any file to link l Cannot restrict selection to
to a record in a lookup file existing values
l New records can easily be added
“on the fly”.
l Enter data once and link to it
multiple times
Figure 17, Example of a Lookup File
- 23 -Customizing PracticeMaster Guide
Category Category Pages are a special type of page that are used in the Client file, Contact file,
Pages and Journal file. You can use the Form Designer to design how the pages will look.
l Client category pages are configured for individual Areas of Practice (e.g.,
Personal Injury, Family Law, Workers’ Compensation, etc.). These pages will only
appear when a client belonging to that Area of Practice is selected.
l Contact category pages are configured for individual contact categories (e.g.,
Attorney, Insurance Adjuster, Witness, etc.). These pages will only appear when
a contact belonging to that contact category is selected.
l Journal category pages are configured for individual journal record types (e.g.,
Email, Phone Task, Research Task, etc.). These pages will only appear when a
journal record of that record type is selected.
Advantages Disadvantages
l Allows you to limit data entry to l File limit of 450 user-defined fields
associated record types in addition to protected fields.
l Can reduce the number of visible
pages, improving the organization
of the client file.
Figure 18, Example of a Client Category page
More Info: Additional information regarding Category Pages can be found in Knowledge Base
Article R10566, “Category Pages in PracticeMaster.”
- 24 -Customizing PracticeMaster Guide
Virtual Fields
A virtual field is a field that links to another field in a lookup file (page 23). Virtual fields are used to
display information stored in lookup files in another file. For example, several of the fields on the
Address tab of the Client file are virtual fields that link to information stored in the Contact file
(Figure 19). Virtual fields are read-only; that is, the information cannot be edited from the currently
opened file. Instead, changes must be made via the file that contains the virtual field information.
Virtual fields are an ideal method for displaying information that is already stored in a field via a
lookup file. Rather than reentering the information again in an identical field in the file in which you
want to display this information, you can simply link to the lookup file. This eliminates the risk of
potentially entering inconsistent data or forgetting to update one or more fields.
Figure 19, Virtual Fields in the Client file
To demonstrate how virtual fields work, the following example provides step-by-step procedures for
a specific scenario. Let’s say you want to display a contact’s phone number and email address on the
calendar record. Doing so allows users to see this information without having to click a button to
open the Contact file.
- 25 -Customizing PracticeMaster Guide
▶ Part 1 - To add “Contact Phone #“ and “Contact Email“ fields to the Calendar file
1. From the Maintenance menu in PracticeMaster, select File Maintenance.
2. Double-click Calendar.
3. Click the Field tab.
a. To add the Contact Phone # field to the Calendar file:
i. Click the button to insert a new field.
ii. Type over the “New_Field“ text with the appropriate name for the field. For
this example, we will name the first field “Contact_Phone”.
iii. From the Field Type drop-down, select Virtual.
iv. Replace the Field Name text with the desired label for the field. For this
example, we will enter “Contact Phone #”.
v. From the Lookup Field drop-down, select Related_Party.
vi. From the Field To Copy From drop-down, select Phone 1 (Figure 20).
b. To add the Contact Email field to the Calendar file:
i. Click the button to insert a new field.
ii. Type over the “New_Field“ text with the appropriate name for the field. For
this example, we will enter “Contact_Email”.
iii. From the Field Type drop-down, select Virtual.
iv. From the Lookup Field drop-down, select Related_Party.
v. From the Field To Copy From drop-down, select Email Address.
4. Click Done.
▶ Part 2 - To configure the Calendar file to display contact phone and email information
1. From the File menu, point to Open and select Calendar.
2. From the List tab, select Edit | Form Designer.
a. Click the page on which you want the Contact Phone # and Contact Email fields to
appear.
b. Click the button on the Form Designer toolbar.
c. From the Field Selection List window, while holding down the Shift key, select the
“Contact_Phone“ and “Contact_Email“ fields.
d. Click OK.
e. Click and drag the fields to the desired position.
f. Click the button.
The fields will now appear on the calendar entry window (Figure 21).
- 26 -Customizing PracticeMaster Guide
Figure 20, Example of Contact Phone # Virtual field
Figure 21, Virtual fields added to Calendar file
- 27 -Customizing PracticeMaster Guide
Considerations for Where to Store Data
With so many different types of files available for storing data, it is not always easy to determine
which is the best option to use for the information you want to store. Below are some questions you
can ask yourself to help determine which option is best suited for your purposes.
Can there be multiple instances of the data for a single matter?
If there is only one instance of the data, you can add the field to the Client File, the Contact
File, or an Area of Practice file. But if there can be multiple instances, such as dependents
for a client who is setting up a will, or medical providers for a personal injury case, this
information must be stored in an Area of Practice File or a Common Client Related File.
Is the data used by a single Area of Practice?
If the data is used by a single Area of Practice, the data can be stored in the Client File or an
Area of Practice File.
Is the data used by multiple Areas of Practice?
If the data is used by multiple areas of practice, the data can be stored in the Client File or a
Common Client Related File.
Is the data already stored in another file?
If the data is already stored in another file, you can link to that information using a Lookup
file such as the Contact file. You can also use Virtual fields to display fields from the file in
which the data is stored.
Does the data pertain to a contact rather than a matter?
If the data is contact-specific rather than matter-specific, such as a contact’s date of birth,
the data can be stored in the Contact file.
Note: Keep in mind that there is a limit of 450 user-defined fields in a file in addition to protected
fields. This limit typically is not encountered by most firms but should be kept in mind when
determining where to add additional fields.
- 28 -Customizing PracticeMaster Guide
Examples
Determining the file in which to store data involves weighing the advantages and disadvantages of
each option and determining which method is the most useful for your firm. The following includes
examples of fields you might want to store in PracticeMaster, options for how to do so, and the
thought process used to determine which method works best.
Example 1 - File Reference Number
Suppose all matters at your firm have a File Reference Number that is used to determine where the
physical file containing matter information is stored. Each matter has a unique File Reference
Number.
Option A Because this information is not limited to clients
Client file belonging to a single Area of Practice, and each matter
has a unique File Reference Number, you can simply add a
field to the Client file to store this information (Figure 22).
Figure 22, Example of a File Reference Number field
- 29 -Customizing PracticeMaster Guide
Example 2 - Children in a Family Law Matter
Suppose you have multiple matters in the Family Law Area of Practice that require you to store
information about children. Each matter can have a different number of children.
Option A You could add fields to the Client file to store information
Client file regarding children. However, because not all clients are
Family Law Clients, information regarding children does
not apply to all Areas of Practice. Furthermore, those
clients who do belong to the Family Law Area of Practice
may have multiple children. The number of fields you
would need to add to the Client file to enter information
for each child would depend on the number of children
each client has, and that number could grow the next time
a family law client retained your services. Therefore, this
option is not practical.
Option B This option allows information to appear in the Client file
Client Category page for Family Law clients only. However, fields would still
need to be added to the Client file, which presents the
same issues described in Option A. Therefore, this option
is not practical.
Option C Unlike Options A and B, a Common Client Related file
Common Client Related file would not require the creation of multiple fields in order
to add records for multiple children. However, this option
is not the best choice because records in a Common Client
Related file are available to all clients regardless of Area of
Practice.
Option D (Recommended) Creating a “Children“ Area of Practice file for the Family
Area of Practice file Law Area of Practice limits that information to only those
clients belonging to the Family Law Area of Practice.
Furthermore, the Area of Practice file allows you to create
a separate record for each child. You can also add
additional fields unique to this type of information, such
as date of birth, birth certificate, citizenship, etc. Therefore,
this option is the best option (Figure 23).
- 30 -Customizing PracticeMaster Guide
Figure 23, Example of a “Children“ Area of Practice file
- 31 -Customizing PracticeMaster Guide
Example 3 - Related Contacts
Suppose you have several matters that require you to store contact information for multiple
contacts. Each matter belongs to a different Area of Practice.
Option A Adding this information directly to the Client file will work
Client file to store information for a single contact; however, you
would need to add additional fields for each additional
contact. Therefore, this option is not practical.
Option B (Recommended) A Common Client Related file allows you to link multiple
Common Client Related file contacts to a single client record. An individual record is
created for each contact (Figure 24). You can use virtual
fields in the Common Client Related file to link to the
pertinent information in the Contact file (page 25).
Figure 24, Example of Related Contacts Common Client Related file
- 32 -Customizing PracticeMaster Guide
Example 4 - Employment Info in a Workers’ Compensation Matter
Suppose you have multiple matters in the Workers’ Compensation Area of Practice in which you
need to track employment information. There is only one employer in Workers’ Compensation
matters.
Option A You could add fields to the Client file to store this
Client file information; however, you would not want these fields to
be displayed for non-Workers’ Compensation matters.
Option B (Recommended) Creating an “Employment Info“ Client Category page
Client Category Page allows you to configure the fields you created in the Client
file to appear only when a client belonging to the Workers’
Compensation Area of Practice is selected (Figure 25).
Option C (Alternative) As an alternative, you could store the employment
Area of Practice File information in an Area of Practice file. Some firms prefer to
store this Area of Practice-specific information in the Area
of Practice files. For example, larger firms with many
different Areas of Practice may encounter the 450 user-
defined field limit by adding the necessary fields to the
Client file. Each file in PracticeMaster can have up to 450
user-defined fields in addition to the protected fields.
Figure 25, Example of Employment Info Client Category page
- 33 -Customizing PracticeMaster Guide
Example 5 - Case Status
Suppose you want all matters at your firm, regardless of Area of Practice, to have a Case Status field
that is updated each time progress is made on the case.
Option A You could create a field in the Client file to track the status
Client file of the case. For example, you could create an Alpha type
field that uses a drop-down list to select from a list of
predefined case statuses.
Option B In some cases, a single field may not be able to contain the
Lookup file information you want to include regarding case status.
Instead, you could create a lookup file that contains the
fields you want, such as a generic ’Status’ field and then a
more in-depth ’Status Description’ field (Figure 26).
Figure 26, Example of a Case Status Lookup file
- 34 -Customizing PracticeMaster Guide
Areas of Practice
PracticeMaster categorizes your clients by Area of Practice. You can use the Areas of Practice
provided with PracticeMaster, modify those Areas of Practice, or create your own Areas of Practice
from scratch. We recommend installing the Area of Practice templates provided with PracticeMaster
(page 35).
Using Predefined Area of Practice Templates
Several predefined Area of Practice templates are provided with PracticeMaster. An Area of Practice
Template consists of predefined file definitions for an Area of Practice and may include samples of
precoded documents and reports unique to each Area of Practice. All file definitions, documents,
and reports provided with each Area of Practice Template can be modified.
Areas of Practice are installed with the Area of Practice Template Base Name
PracticeMaster Trial Software with Sample Personal Injury (Plaintiff) PI
Data. Areas of Practice are not installed in Probate PROBATE
the Trial Software, with full-user versions,
Foreclosure FORECLOS
or with Starter Data. However, Areas of
Practice can easily be installed by Business Law BUSLAW
importing Area of Practice templates. Area Family Law FAMILY
of Practice templates provided with Wills & Trust WILLS
PracticeMaster are shown to the right. Criminal Law CRIMLAW
Real Estate REALEST
Workers’ Compensation WC
Administrative ADMIN
Continuing Education CONT_ED
Installing Areas of Practice
If you want to use the Area of Practice templates provided with PracticeMaster, they must be
installed using the Import Area of Practice Template program. Area of Practice templates can be
downloaded from our Web site. Knowledge Base Article R11568 provides instructions on
downloading and installing Areas of Practice. Additional information regarding Area of Practice
Templates can be found in Knowledge Base Article R11568, “Contents of PracticeMaster Area of
Practice Templates.”
- 35 -Customizing PracticeMaster Guide
WorkFlows
A WorkFlow is a set of actions that occur when certain conditions are met, such as when a particular
type of record is added or changed. WorkFlows are a powerful feature that can save you time by
automating common tasks.
Here are some examples of procedures that can be automated using WorkFlows:
l A Fee Agreement is generated when a new matter is saved.
l When a fee is saved with over 8 hours, a WorkFlow notifies both the user and the
Administrator of the error.
l When a Calendar record is deleted, a WorkFlow creates a Journal record with the calendar
entry’s Description, Comments, User/Group information, and Due Date. The user that
deleted the calendar entry is also prompted to enter an explanation as to why the record is
being deleted.
A single WorkFlow can perform up to 10 steps, or actions, including functions such as creating
records, changing existing records, starting emails, sending eNotes, and more.
More Info: Additional information regarding WorkFlows can be found in the PracticeMaster
WorkFlows Guide and in the following Knowledge Base articles at support.Tabs3.com.
• Knowledge Base Article R11307 - “All About WorkFlows”
• Knowledge Base Article R11487 - “Working with Indexes, Filters, and QuickViews”
- 36 -Customizing PracticeMaster Guide
Part 2 - Day-to-Day Features
Part 2 of the Customizing PracticeMaster Guide is designed to introduce those features that will
be accessed by the majority of users on a day-to-day basis. You can customize some features in
PracticeMaster for the entire firm. PracticeMaster allows individual users to customize other features
to meet their specific requirements.
The content covered in this section includes:
l The Quick Clicks pane and how it can be used to customize the way you view data on the
List tab and in the Matter Manager
l How to customize the PracticeMaster calendar to display information in a way best suited to
each user
l An introduction of Outlook integration
l The Conflict of Interest utility and how you can customize what data is searched and
presented during conflict checks
l How to convert records to fees
l How the Task Folders can simplify the task of navigating the software
l Additional items that can be customized to suit user preferences
Quick Clicks
The following subjects will be covered in the Quick Clicks section:
l Introduction to Quick Clicks
l Manage Quick Clicks
l List Preferences
l Column Layouts
l Filtering Data
l Sort Order
l QuickViews and Smart tabs
- 37 -Customizing PracticeMaster Guide
Introduction to Quick Clicks
The Quick Clicks pane provides an easy way to access and organize data files in PracticeMaster. This
pane provides single-click access to a variety of features that will help you navigate your data files.
These features are organized in groups that are customizable on a per-user basis. The Matter
Manager, which is used to quickly view relevant information for a matter, also includes the Quick
Clicks pane.
- 38 -Customizing PracticeMaster Guide
Figure 27, Quick Clicks pane for the Client file
- 39 -Customizing PracticeMaster Guide
By default, the Quick Clicks pane is docked on the right side of the Editor window. However, it can
also be docked on the left side of the Editor window. This is accomplished by clicking on the Quick
Clicks pane title bar and dragging it to the desired position.
The Quick Clicks pane features an Auto Hide mode, which hides the pane from view until it is
needed. This is indicated by a pushpin icon. When the pushpin is displayed vertically, this indicates
that Auto Hide mode is disabled, and the Quick Clicks pane is “pinned“ to the Editor window. When
the pushpin is displayed horizontally, this indicates that Auto Hide mode is enabled, and moving the
mouse away from the Quick Clicks pane will cause it to slide out view. Moving your mouse over the
Quick Clicks button will bring the pane back into view.
Figure 28, “Pinned“ Quick Clicks pane Figure 29, “Unpinned“ Quick Clicks pane
(Auto Hide disabled) (Auto Hide enabled)
Training Videos
You can view the following training video for more information. Clicking the link will open the
training video in your browser. All training videos are also accessible in the software via the Help |
Training Videos menu and at Tabs3.com/video.
Using Quick Clicks
- 40 -Customizing PracticeMaster Guide
Manage Quick Clicks
The Quick Clicks pane can be customized by each user using the Manage Quick Clicks window.
The Manage Quick Clicks window provides customization for each of the Quick Clicks groups all in
one window (Figure 30 and Figure 31). You can access this window by selecting Manage Quick
Clicks under the Customize Current View group of the Quick Clicks pane. This window allows you
to add, copy, edit, and delete items in your groups; provides control over which groups, folders, and
items are available in the Quick Clicks pane; and determines the order in which they will be
displayed.
Note: The Manage Quick Clicks window can also be opened by clicking any of the “Manage“
options found in each Quick Clicks group.
Figure 30, Manage Quick Clicks window Figure 31, Additional Client file
for the Client file Manage Quick Clicks options
The toolbar buttons and right-click menus can be used to access the various tasks in the Manage
Quick Clicks window.
- 41 -Customizing PracticeMaster Guide
List Preferences
Menu: Edit | List | List Preferences
Quick Clicks: Customize Current View | List Preferences
List Preferences are used to determine the visual
settings for the rows displayed on the List tab of
Editor windows for PracticeMaster files (Figure
32). You can use the List Preferences program to
specify row height and color. List preferences are
edited on a per-user, per-file basis. In other words,
user Cathy can maintain her own set of list
preferences separate from user Jim. Cathy can also
have a different set of list preferences in the Client
file than she does in the Fee file.
Figure 32, List Preferences window
Preferences for the List Tab
List preferences for PracticeMaster file lists can be customized as follows.
Show Grid Lines When this option is selected, horizontal rows and vertical
columns will be separated by grid lines. When this option
is cleared, there will be no separator between cells.
Row Height This field determines the height of each row and how text
will wrap. The default value is 1 line; this can be changed
to up to 4 lines.
Row 1/Row 2 Color These fields allow you to use color for visual separation of
each row. Clicking the drop-down arrow will open a Select
Colors window from which you can choose the desired
text color and background color. PracticeMaster assigns
default color settings for each file. For example, the Fee
file uses alternating blue and white rows.
In the following figures, the Fee file has been customized to use different numbers of lines, different
colors, and different grid line settings. As you can see, the List Preferences offer a great deal of
flexibility for optimizing the appearance of your data.
- 42 -Customizing PracticeMaster Guide
Figure 33, List Preferences with 1 row per record and grid lines
Figure 34, List Preferences with 3 rows per record and no grid lines
- 43 -Customizing PracticeMaster Guide
List Preferences for PracticeMaster Matter Manager
Menu: (From Matter Manager) Edit | List | List Preferences
Quick Clicks: (From Matter Manager) Customize Current View (List Preferences)
The Matter Manager program displays matter-specific information in one easy-to-navigate window
(Figure 35). Like the PracticeMaster files, the record list can be customized. However, list preferences
for the Matter Manager differ slightly from the preferences you can specify for PracticeMaster files.
The Row 1/Row 2 Color and Show Grid Lines options are the same; however, there is an additional
option for displaying records based on record type (Figure 36).
Figure 35, Matter Manager
- 44 -Customizing PracticeMaster Guide
Figure 36, List Preferences window
for Matter Manager
Define row colors by record type When this option is selected, you can use the Select
Colors button to open the Record Colors window and
define the text and background color for each record type
(Figure 37). For example, when displaying the All Activity
view, you can show fees in one color and journal records
in another color (Figure 38).
- 45 -Customizing PracticeMaster Guide
Figure 37, Sample Record Colors Figure 38, Matter Manager with custom Record Colors
for Matter Manager List
Preferences
Column Layouts
A column layout is
used to determine
the columns that are
shown in an Editor
window for a file as
well as the order of
the columns. Column
layouts are selected
on the Quick Clicks
pane when viewing
the List tab of the
Editor window.
Figure 39, Column Layout
- 46 -Customizing PracticeMaster Guide
Each column in a column
layout represents a field in a
file. Column layouts are created
and edited via the Column
Layout Editor (Figure 40). You
can access the Column Layout
Editor by clicking on the
Manage Column Layouts
option in the Column Layout
group of the Quick Clicks pane
(Figure 41).
Figure 40, Column Layout Editor
▶ To create a column layout
1. Open the file for which you want to create a column layout.
2. In the Quick Clicks pane,in the Column Layout group, select Manage Column Layouts.
3. Click the icon. The Column Layout Editor window will be displayed.
4. Enter a name for the column layout in the Column Layout Name field.
a. Optionally select the Show for all users check box. This check box determines
whether the column layout will be available for all users or just the user creating the
column layout.
b. From the Available Fields column, select the field you want to display in the column
layout and click Add >>. (Note: Alternatively, double-click a field to add it.)
c. Use the Up and Down buttons to change the order of the fields appearing in the
column layout. The order of the fields determines the order of the columns.
5. When you have finished adding fields to the column layout, click Save.
6. If desired, you can drag and drop the column layout to a different position in the list.
After closing the Manage Quick Clicks window, you will see your column layout in the list of
available column layouts in the Quick Clicks pane. Selecting the column layout will apply the
column layout. The currently selected column layout is indicated by a green check mark ( ).
- 47 -Customizing PracticeMaster Guide
Tip: When creating column layouts, consider the fields you search most often when looking up
information. These are also the fields that will be searched by default when filtering records using
the Search box (page 48).
The Default Column Layout
The Default column layout is shown as (default) in the
Quick Clicks pane. The Default column layout includes all
fields in a file. The fields are positioned in the order they
are used in File Maintenance. The Default column layout
cannot be edited or deleted.
Figure 41, Quick Clicks Column Layout
group
The Restricted Column Layout
The Restricted column layout is a special column layout that is used to prevent users without access
rights for certain information from seeing that information as part of another column layout. For
example, perhaps you have a user who has browse calendar rights but has no rights to the Client file.
When the user selects the client lookup button, only the Client ID, Client Name, and Name Search
fields will be shown because those are the fields in the Restricted column layout for the Client file. If
desired, you can add or change fields in the Restricted column layout. You cannot delete the
Restricted column layout. A list of the default fields for each file can be seen in Help. The fields
listed in Help will be used if the Restricted column layout’s list of fields is blank.
Filtering Data
PracticeMaster provides powerful tools for filtering data. Filtering makes it easy to find the records
you want to see by eliminating records that do not meet the specified criteria. There are several ways
to filter records.
Search Box
The easiest way to filter data in a List tab is to use the Search box, which is displayed in the upper-
right corner of a file’s Editor window.
- 48 -Customizing PracticeMaster Guide
Figure 42, Search box
The Search box can search either all fields displayed in a column layout or search only a specific
field.
l To search all fields displayed in a column layout, enter your search term in the Search List
field.
l To search a specific field, click the button and enter your search term in the labeled field.
In Figure 42 above, the Client list has been filtered to show only clients with the text “White“
appearing somewhere in the column layout.
You can also perform searches for
information located in fields that are not part
of the current column layout. To do this, you
must manually enter the Field ID in the
Search box along with the term you want to
search. For example, to search the Work
Description field when the Work Description
is not part of the column layout, enter
“Desc:“ (without the quotation marks) before
the text you want to search for (Figure 43). Figure 43, Example of a search for a field that is not part of
the column layout
- 49 -Customizing PracticeMaster Guide
Tip: More information on the Search box can be found in the PracticeMaster Search Guide.
Predefined Filters
There are special filters built into PracticeMaster to make
your searches easier. For example, a special List Group is
available in the Quick Clicks pane of the Client, Contact,
and Timekeeper files. Filters that show all records or only
those records that are active are included in this group.
Figure 44, Predefined Client List filters
Custom Filters
You can create and save custom filters using the Filter Editor. This powerful utility allows you to
create simple or complex filters based on your needs. Figure 45 shows an example of a filter that
displays only clients with a value of “Omaha“ in the Location field.
Figure 45, Filter Editor window
- 50 -Customizing PracticeMaster Guide
▶ To create a new filter
1. From the Quick Clicks pane, under the Filter group, select Manage Filters.
2. Click the icon.
3. Enter the Filter Name by typing over the default text of “New Filter“.
4. Optionally select the Show for all users check box to share the filter with all users.
5. Click the New Row button.
a. Select the desired field from the list.
b. Select the Test Condition field and select the desired value.
c. Select the Test Value field and enter the desired value.
6. Optionally, click New Row and repeat step 5 to add additional conditions to your
expression.
7. Click Save.
8. You can drag and drop the filter to a different position in the list in the Manage Quick Clicks
window.
9. Close the Manage Quick Clicks window.
Once you have created your filter and closed the Manage Quick Clicks window, it will be available
for selection in the Quick Clicks pane.
Optimizing Filters with Indexes
You can significantly improve filtering time by creating filters that take advantage of indexes.
Indexes are a list of all records in a file that are sorted by a specific field you have chosen. More
information on indexes can be found on page 7. Knowledge Base Article R11487, “Working with
Indexes, Filters, and QuickViews,“ provides additional information on the criteria required in order to
use an index when filtering.
More Info: Additional information on expressions and filters can be found in the PracticeMaster
Help and in the following Knowledge Base articles at support.Tabs3.com:
• Knowledge Base Article R11493 - “All About Expressions”.
• Knowledge Base Article R11515 - “Filter Expression Examples”.
- 51 -You can also read