Day Camp in a Box - DAY CAMP IN A BOX! Have fun and learn new things with the Green Mountain Council's
←
→
Page content transcription
If your browser does not render page correctly, please read the page content below
Green mountain council

Day Camp in a Box

 Have fun and learn new things
with the Green Mountain Council’s
       DAY CAMP IN A BOX!

               Green Mountain Council DAYCAMP IN A BOX   1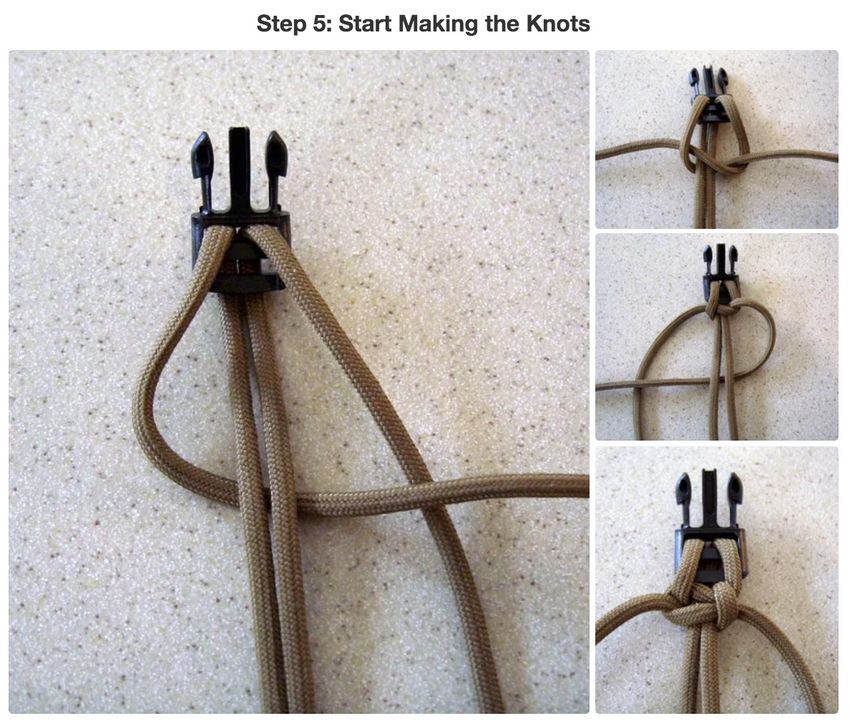
Before starting
              Materials you will need that are not in the box and that
              you likely have in your home:
              Day 1: Trail mix ingredients (p. 7), dye ingredients (p. 6), toilet paper, tape, paper,
              safety glasses, markers/stickers, old cloth or plastic sheet, gloves, iron.
              Day 2: Monster Bite ingredients, bowl, cookie sheet, mixing spoon, stapler, tape,
              paper towel
              Day 3: “6 Essentials” items, eggs, pot of water, tongs, optional items to add to
              eggs, scissors, small hammer, tape, scissors, hole punch
              Day 4: Goop ingredients, half-and-half, sugar, vanilla, ice cream toppings, ice
              cubes, stapler, scissors
              Day 5: Shelter-building items (indoors), aluminum foil, foil dinner ingredients (p.
              26), peanut butter (or other sticky food), scissors

              Throught this book the    *   indicates materials included in the box.

              Webelos is a two-year program, the first year working on the Webelos rank and
              the second year working on the Arrow of Light rank. When we refer to Webelos
              here, we mean both Webelos and Arrow of Light dens.

              A PDF file of this booklet and the printed pages in this box are available to be
              reprinted, if needed, on our website at https://www.scoutingvermont.org/day-
              camp-in-a-box.html

              Share all the activities that you are doing at home in our Facebook group
              “GMC-Day Camp in a Box”: https://www.facebook.com/groups/
              gmcdaycampinabox/

2   Green Mountain Council DAY CAMP IN A BOX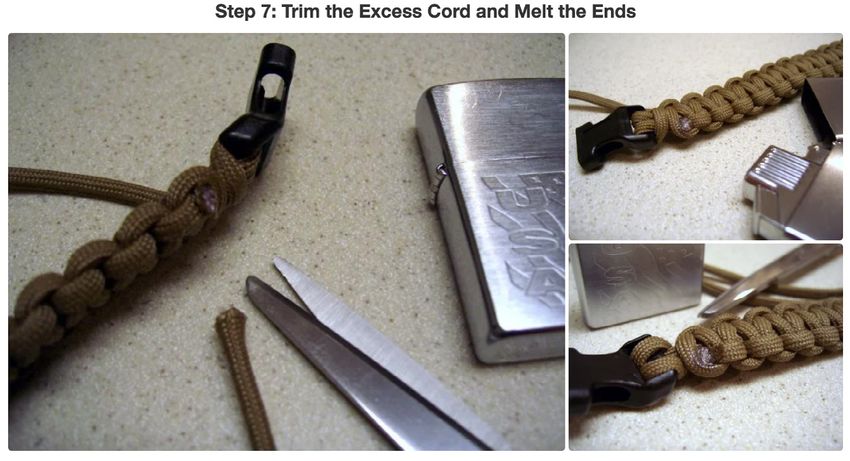
PLEASE NOTE:
       We have put this Day Camp in a Box together in hopes your Cub Scout will enjoy
       the activities and have a little bit of Day Camp fun during this unusual summer.
Many of these activities REQUIRE adult supervision and none of them are intended to
be done without the involvement of an adult. Some are more complicated and your
camper will likely need some guidance. There are a couple of cooking activities in
particular that necessitate help, some knot activities, and many other things that will be
most successful with a family approach. We hope you will participate right along with
them as the Cub Scout program is intended to be a family activity.

If you complete the activities in the box, you have achieved:
Day Camp in general
If you complete the box you can get credit for the Summertime Pack Activity award!
- Wolf: Call of the Wild requirement 1 (attend day camp)

Day One
Activity 1 (Scout Skills)
- Webelos: Webelos Walkabout (requirement 2)
Activity 3 (Cub Cooking)
- Tigers: Tiger Bites requirement 6
Activity 4 (Insect Scavenger Hunt)
- Tigers: My Tiger Jungle (requirement 1)

Day Two
Activity 1
- Wolf (need to do overhand and square knot) -- Requirement 5 of Call of the Wild
- Bears (need to do two half hitches) -- Requirement 5 of Bear Necessities
- AOLs (need to do square knot, two half hitches and taut-line) -- Requirement 5a of
Scouting Adventure
Activity 4
- Lion: Ready, Set, Grow (requirement 3)
- Wolf: Grow Something (requirement 1) NOTE: This requirement also requires that you
observe for 30 days and take a picture or make a drawing once each week

                                             Green Mountain Council DAYCAMP IN A BOX         3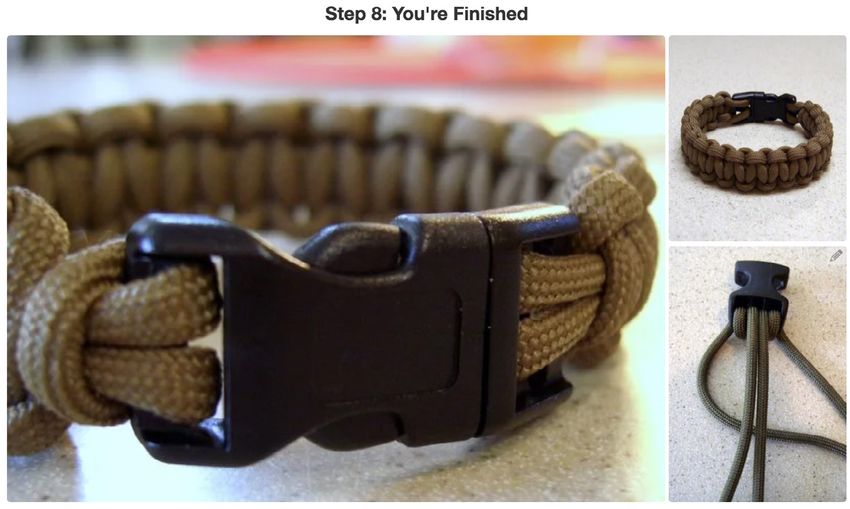
Day Three
    Activity 1
    - Tigers: Tigers in the Wild (requirement 1)
    - Wolf: Paws on the Path (requirement 1)
    - Bear: Bear Necessities ( (requirement 2)

    Day Four
    Activity 5
    - Tigers: Sky is the Limit (requirement 1 if you go outside and observe the night sky and
    alk about what you see)

    Day Five
    Activity 4
    - Tiger: Tigers in the Wild (requirement 1)
    - Wolf: Paws on the Path (requirement 5)
    - Bear: Fur, Feathers, and Fern (requirement 1)
    - Webelos: Webelos Walkabout (requirement 4)

4   Green Mountain Council DAY CAMP IN A BOX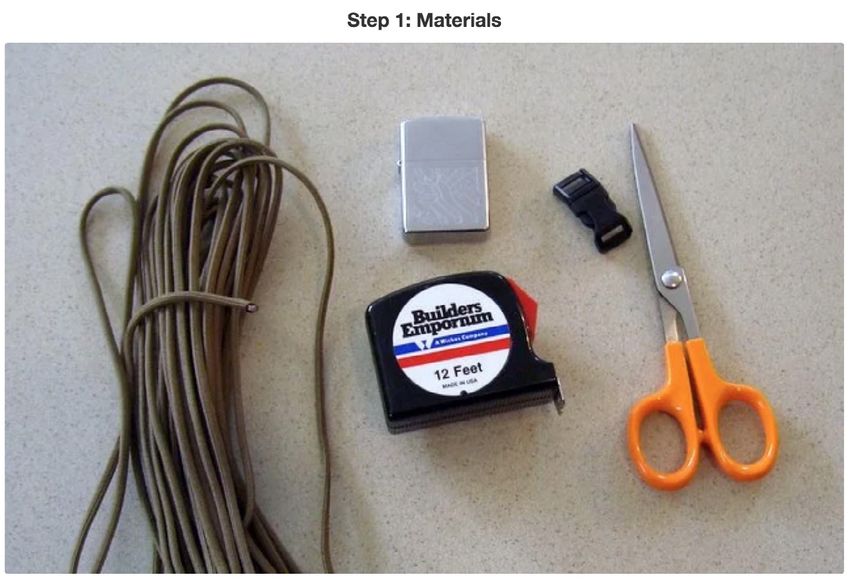
Day 1
SONG OF THE DAY: The Moose Song
This is a repeat after me song!
FIND THE SONG AT THIS LINK: https://www.scoutingvermont.org/day-camp-in-a-box.html

There was a moose                              He was a lazy moose
And he drank a lot of juice                    Because he drank a lot of juice
There was a moose                              He was a lazy moose
And he drank a lot of juice                    Because he drank a lot of juice
                                               REFRAIN
REFRAIN: Wo oh oh oh
Waka Waka Waka Wa                              Now that moose is dead
Way oh Way oh                                  Because he drank his juice in bed
Waka Waka Waka Wa                              Now that moose is dead
                                               Because he drank his juice in bed
                                               REFRAIN

Activity 1: SCOUT SKILL
First Aid Canister Neckerchief Slide
Materials needed: film canister,* band aids,* alcohol wipes,* gloves,* safety pin,* leather
strapping,* label*

Instructions:
1- Place the label on the film canister.
2- Loop the leather strapping through the holes and tie in the back. The loop should be
small enough to put your neckerchief through as this will be a neckerchief slide.
3- Put the first aid items in the canister and put the lid on!
You can use this as a neckerchief slide but also on your belt, backpack, or anywhere else
that it will be handy.

                                              Green Mountain Council DAYCAMP IN A BOX         5
Activity 2: CRAFT
    Color your drawstring bag with natural dyes!
    Website (credits): https://www.bhg.com/decorating/lessons/basics/how-to-make-natural-
    fabric-dyes/

    Materials needed: Old cloth or plastic sheet, gloves, iron, fruits and vegetalbes.
    You can choose as many colors as you want to dye your drawstring bag.
    • Blue: blueberries and blackberries
    • Red: raspberries and beets
    • Yellow and ochre dyes: lemon and orange peels and turmeric
    • Green: spinach leaves
    • Orange: onion skins
    • Purple: red cabbage leaves

    After you've chosen which colors you'd like to create, it's time to make your natural dye. To
    do so, you'll need the following:

    •   1 cup chopped fruit or vegetable material
    •   Saucepan
    •   2 cups water
    •   2-3 Tbsp. vinegar or salt
    •   Strainer
    •   Glass container or jar

    You’ll need about 1 cup of your chosen chopped fruit or vegetable to produce color. Feel
    free to use extra for a more vivid dye.

    Instructions:
    1- Add the ingredients to a saucepan and pour in 2 cups of water. If you're doing a large
    batch, you'll need twice as much water as your ingredient measurement.
    2- Next, you’ll need to add a mordant, which is a substance added to dye to help it bind to
    the material.
    Add 2-3 Tablespoons of vinegar or salt as your mordant.
    3- Set your burner to medium heat and bring the water to a simmer. Let simmer for about
    an hour. The longer you simmer the ingredient, the richer the color will be.

6   Green Mountain Council DAY CAMP IN A BOX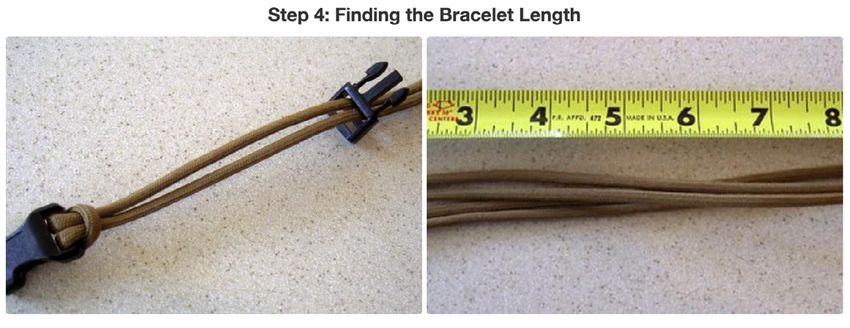
Did
                                                                       manu you kno Inter
                                                                    indus factur w that esting
                                                                    to w try bein e of clo the che fact:
                                                                          a                 t
4- Switch off the heat and allow the water to cool to room           like cter pollug the seching resmicals us
                                                                    healt rtain d tion? M ond lar ult in th ed in the
                                                                            e
temperature. Strain your dye into a glass container                        h        y        a       g        e
                                                                      toda so good es, are hny of thest contrfashion
and discard fruit or vegetable material.                                    y and job f azar ese c ibut
                                                                                 helpi or usi dous hemic or
                                                                                       ng ou ng n to hu als,
5- Protect your work surface with an old cloth or plastic                                    r env atura man
                                                                                                  ironm l dyes
sheet, and wear gloves to avoid staining your skin.                                                     ent!*
Dampen fabric with water first.
This will help the dye soak into your material.

Next dip your item into the dye and wait. The longer time you give it, the deeper and
richer the color will be and the more the dye will spread. If you want an ombré effect or
only to dye one section of the fabric, fold it and leave a blank section draped out of the
dye bowl. Use rubber bands, clothespins, or masking tape to form a resist-dye design.
When you’re satisfied with the color and design, remove your material from the natural
dye. Let dry completely, then iron on high heat to set the colors permanently.

Repeat washings may cause colors to fade, but you can re-dye your item if needed.
Of course, if you choose not to dye, markers can add personality to your bag!
*Source: https://www.fairechild.com/blogs/the-faire-child-blog/eco-impact-of-textiles

Activity 3: Cub Cooking
Trail Mix
Trail mix is an amazing, fun, and yummy snack food that can go with you and give
you lots of energy to keep hiking or doing whatever you are doing. Yes, you can buy
it premixed in the store but making it yourself is WAY better! We are going to look at
healthy options to add to your trial mix – nuts, seeds, dried fruits (not coated in sugar),
and fun stuff (popcorn, Chex mix (cereal), things like that). With the help of an adult, start
by looking in your own kitchen – what things might you put in your trail mix? Here is a list
of ideas and options … but put in what you like:

RAW NUTS (be safe - only use these if you or anyone else who will be around you are
not allergic): Almonds, peanuts, walnuts, pecans, cashews
SEEDS: Pumpkin and sunflower are common and taste better if lightly salted (but you
do not need the salt for them to be delicious).

                                                Green Mountain Council DAYCAMP IN A BOX                         7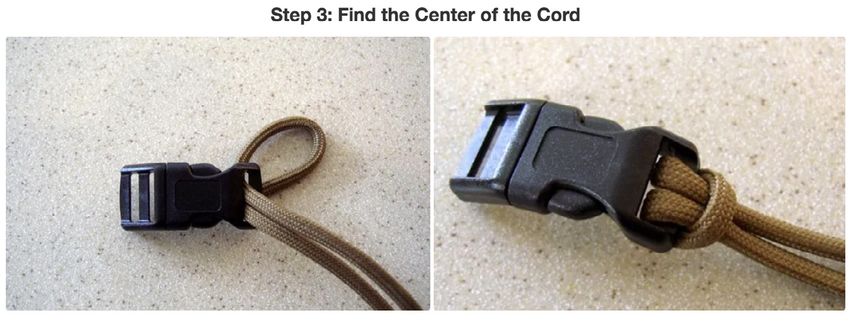
DRIED FRUITS: Cherries, raisins, cranberries (craisins), apricots, apples, papaya, banana
    chips, coconut – whatever you like that isn’t coated in sugar.
    FUN STUFF: The sky is the limit here – chocolate (just be careful about this in the summer
    so you don’t end up with a melted mess), popcorn, favorite cereal, small pieces of
    graham crackers, M&Ms

    Materials needed: Any combination of the ingredients on the list – your imagination and
    creativity is the only limit here! When you have all your ingredients, put them in a Ziploc
    or a small container and you will be ready to have lots of energy on the trail or in the
    back yard! Experiment and try out different combinations of ingredients.

    SHARE YOUR CREATION: When you have found that perfect combination of snacking
    fun, share your recipe with your fellow campers in our Facebook group! You can put a
    picture of your creation there, too.

    Activity 4: LET’S GET MOVING
    INSECT SCAVENGER HUNT
    Materials needed: Insect Scavenger Hunt activity page,* outdoors space
    Instructions:
    With an adult, explore your backyard, a nearby park, or a hiking trail and see how many
    insects you can find!
    Take care to observe and “Leave No Trace.”
    Ask your adult to post in our Facebook group the coolest insect you found!

    Activity 5: FUN TIMES
    SELTZER ROCKET
    Material needed: Film canister,* water, Alka-Seltzer,* index card or other paper, safety
    goggles, ruler,* square of toilet paper, tape or glue, crayons or markers and stickers
    Instructions:
    1. The Rocket Body: wrap a piece of paper around the film canister, cut the paper with
    approximately a 1/4” overlap. make sure the height of your paper is also shorter than
    your canister so the lid fits on tight. This is the rocket body skin.

8   Green Mountain Council DAY CAMP IN A BOX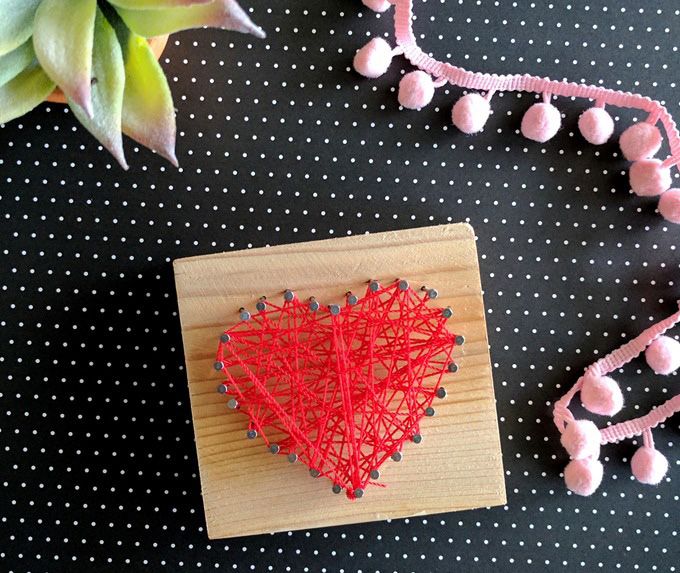
2. The Cone: trace around something round, cut out the circle. Mark a triangle pizza
slice in the circle, make sure the slice tip starts in the center of your circle. Cut out the
slice shape fold the circle onto itself to make a cone.
3. Decorate your rocket body skin and cone then tape them onto the canister. Make
sure the canister is open on the bottom and to leave ¼” of the canister unpapered so the
lid fits securely.
4. We recommend going outdoors so you can place your rocket on a hard level surface
(even an old board would work).
5. PUT ON YOUR SAFETY GOGGLES OR EYE PROTECTION!
6. Get someone to help with this next part- Holding the rocket upside down fill the
canister 1/3 with water. Take the small square of toilet paper and make a shallow nest
to put the Alka-Seltzer in. Then attach the cap and tear away any extra toilet paper.
7. Ready for launch! When you are ready, set the rocket down and back away to watch it
LIFT OFF!
7.
HowRepeat!
        the SELTZER
ROCKET Works:
Basically, the gas
produced by the Alka-
Seltzer and water builds
up in the film canister
until there is enough
pressure to blow the
lid off the canister and
propel it into the air. It’s
Isaac Newton’s third
law of motion in action:
“For every action there is
an opposite and equal
reaction.”
And now...

help cosmonaut
find path to
rocket!

                                                Green Mountain Council DAYCAMP IN A BOX         9
Day 2
     SONG OF THE DAY: The Birdie Song
     This is a repeat after me song!
     FIND THE SONG AT THIS LINK: https://www.scoutingvermont.org/day-camp-in-a-box.html

     Way up in the sky the big birdies fly                      shhhhhhh -
     While down in the nest the little birdies rest             YOU MIGHT WAKE UP THE BIRDS!!
     With a wing on the left                                    The sun rises up the dew goes away
     And a wing on the right                                    Good Morning Good Morning
     The sweet little birdies sleep all through the night       The little birdies say

     Activity 1: Scout Skill
     Practice Your Knots!
     Materials needed: Paint stick,* two pieces of paracord,* stuff to decorate your stick
     however you like, the list in this box*

     Knot tying is a key skill that at a minimum can make your life easier and at times could
     even save a life in a survival situation. So it’s important for a Scout to know at least the
     basic ones. The ones required for each rank are listed on page 3 of this book. This Knot
     Stick can be a great tool to help you practice!

     Instructions:
     1- Decorate your paint stick.
     2-Insert the two different colored pieces of paracord, one through each hole in the stick.
     3- Tie the ends together using an overhand knot.
     4- Flip the paintstick over and tie another overhand knot. This will keep the paracord
     secured to the paint stick.

10    Green Mountain Council DAY CAMP IN A BOX
5- Now, when you sit, place the paint stick under your leg and use the paracord to
practice tying other knots!
There’s a lot of knot-tying help available on the Internet. A fabulous site is
www.animatedknots.com.
Once you have mastered a few basic knots, it’s amazing what you can build with rope
and a few sticks. Check out the camp gadgets in this video from the 2017 National Boy
Scout Jamboree: https://scoutpioneering.com/favorite-projects/
Activity 2: Craft
Pony Bead Flag
Materials needed: Ziploc enclosed,* Metal loop,* hemp string,* red,* white and blue
pony beads*
Instructions:
Fold string in half and attach to the metal loop with a Lark’s Head
knot (also known as a Cow Hitch). You can look here for a video on
tying the Lark’s Head:
https://www.youtube.com/watch?v=WyzUmetVJFA.
This should give you two strings of equal length to start your bead
project. Lay out the first row and feed string through both sides. Pull
tight and go onto second row. When the last row is completed, you
can end with a square knot.
Look here for a video on tying a square knot: https://www.youtube.
com/watch?v=qri_pPmySWg.
Feel free to tie any extra beads as dangles on your flag!
Activity 3: CUB COOKING
Monster Bites
Need an energy boost? These are just the thing! They do not require baking, and you
can mix up whatever combination of ingredients you want. They are yummy and great
to have as a mid-afternoon pick me up snack! You can also wrap them up and take
them with you on your adventures.
Green Mountain Council DAYCAMP IN A BOX 11Instructions:
Get a big bowl that all your ingredients will fit into and have room to stir. Add the following
to the bowl:
1-1/4 cup old fashioned oats
1/2 cup peanut butter (or sun butter)
1/2 cup honey
1/2 cup chocolate chips or M&Ms
- Mix it all up with a big spoon until everything is combined and coated.
- Take a smaller spoon make 1-1/2” balls, rolling them in your hands.
- Put the Monster Bites on a cookie sheet lined with parchment (not a big deal if you don’t
have the parchment) and then chill in the refrigerator for about an hour and they will
harden.
- Store them in a closed container or freeze them if you want to save for more than a week.
- You can add whatever you want to these Monster Bites – be creative.
Enjoy!!
Activity 4: LET’S GET MOVING
PLANT SEEDS
Materials needed: zip top bag,* paper towel, water, staples and stapler, seeds,* tape
Instructions:
1- Fold the paper towel so it fits completely inside the zip top bag.
2- Staple a line of staples (about 1/2 an inch from each other) across the bag, about 2
inches from the bottom. The staples will hold the seeds above the paper towel.
3- Put 1 inch of water in the bag.
4- Place the seeds in the bag so they rest on the staples, close the bag, and tape it on a
sunny window
5- Observe as the seeds begin to sprout. Notice how the roots and shoots grow! After the
leaves grow, you can transplant it to a pot or a sunny spot your garden.
6- These are sunflower seeds and will flower into the autumn.
All your seeds need to grow is water, oxygen, and warm sunlight – and maybe sing
them a Cub Scout song now and then – they like that too!
Fun Fact: Did you know that another word for “sprout” is “germinate”? How long did it
take your seeds to germinate? When your seeds grow into plants they should produce
very pretty sunflowers in different colors!
12 Green Mountain Council DAY CAMP IN A BOXActivity 5: FUN TIMES
WINDJAMMERS
Materials needed: Pool noodle,* skewer for mast,* cardstock for sail,* something to float
and race the boat in.
Instructions:
• On the blue card stock, draw a sail and cut it out
• Take your piece of pool noodle, insert the bamboo skewer into it, and attach the sail.
• Put your boat in some water and see how fast you can get it to go. Anything will work –
bathtub, sink,
• Here are some things to try:
Blow on the sail, use a straw to blow on the sail, make a different shape sail to see if it
goes faster, try using the circle for the sail and see how that works, move the sail higher
or lower on the mast to see how it changes, move the mast to different places on your
boat – have fun with it! And have your adult put a picture of your fastest boat in our
Facebook group for others to enjoy.
DO NOT SAIL YOUR BOAT IN A POOL OR OTHER LARGE WATER WITHOUT
AN ADULT.
TRIVIA Question.
What is the difference between a boat and a ship?
cannot carry a ship.”
remember that “A ship can carry a boat, but a boat
way to differentiate between a ship and a boat is to
fishing, or to ferry people. It is said that the best
DAY 3
of watercraft used for recreational purposes,
whereas boat is a generic term used for a variety
are specifically made to carry cargo or passengers,
Answer: The most important aspect is the size. Ships
COLOR ME!
Green Mountain Council DAYCAMP IN A BOX 13DAY 3
IMPORTANT NOTE: Materials for this day include 100 feet of kite string on a string
winder, which is inside the gold-colored envelope. Cut off approximately 18” and set
aside to use for a later project. The remaining is meant to be used for both string art
and kite flying. 20 feet is adequate for this kite design. Depending on the order in which
these projects are done, you may wish to measure off the 20 feet and wrap that around
a piece of cardboard. Then you can re-attach this to the winder when the string art is
complete.
SONG OF THE DAY: Aga Flaga (the other birdie song)
FIND THE SONG AT THIS LINK: https://www.scoutingvermont.org/day-camp-in-a-box.html
Early in the morning, when I’m fast asleep Gonna buy some birdseed, for my
There’s a little birdie, that goes cheep cheep window sill
And that little birdie, has a funny name Just to keep him quiet, just to keep him still
It’s It’s
Called For
REFRAIN: Ogga Flogga Fleega Flogga REFRAIN
Ish Connish Genogga Nogga
Ogga Flogga Fleega Flogga Birdie!
Activity 1: SCOUT SKILL
Six Essentials
The Cub Scout “6 Essentials” are things you want to have ready to go and take with you
on your outdoor adventures. They are things to keep you safe and make trips more fun.
Material needed: Ziploc,* the list in this box*
- First-aid kit: adhesive bandages, moleskin, gauze, antibiotic ointment, etc.
- Water bottle: filled and large enough to last until it can be filled again
- Flashlight: for emergency use only
14 Green Mountain Council DAY CAMP IN A BOX- Trail food: such as the Trail Mix and the Monter Bites you have made
- Sun protection: sunscreen of SPF 30 or greater and a hat
- Whistle: also for emergency use only
Instructions:
Cut out the 6 Essentials list to keep in your bag.
Take your Ziploc and your list and, with an adult’s help, find the things on your list. Put
them in your bag, or keep close by it, and keep in a safe place so it is ready to go for your
next adventure.
If you want more information about this, check out this link:
https://blog.scoutingmagazine.org/2017/08/08/cub-scout-six-essentials-half-dozen-
items-pack-every-campout-hike/
Green Mountain Council DAYCAMP IN A BOX 15Activity 2: CRAFT
String Art
Materials needed: wooden board,* small nails,* string* (REMINDER: cut a piece that
is approximately 18” long and set aside for a project on day 5), pencil,* paper (optional),
scissors, small hammer, watercolor paints (optional)
Find a hard, flat surface to use for this project. A garage floor, sidewalk, driveway, another
board to put underneath – any surface that will not be damaged when nails punch
through the back side of the board, because they will!
Instructions:
1. Select a pattern for your artwork. Draw your own or use something from a magazine,
coloring book or online clipart. The heart shape in the illustrations are here only to show
the method - be creative! In selecting your pattern, consider whether you want to use
your string to simply outline the shape, or to create lines within the shape.
OPTIONAL STEP: Your strings will stand out more if you take the time to color the
smooth side of your board with paint or markers. Staining the board is also a good
method, if you have an adult that knows how to do this and can help you with that. The
darkness of the color(s) you use in this step will determine the best method to use in #2.
2. Transfer your pattern to the smooth side of the board. There are a number of ways to
do this:
a- With light pencil, draw directly on the
board.
b- On the backside of your paper pattern,
use the side of a lead pencil to blacken
behind the lines of your design. Turn the
page over, position on the board, and trace
the pattern. The pencil lead will transfer to
the board. (This method may not show up
well if you colored the board with a dark
color.)
c-Tape the pattern to the board.
16 Green Mountain Council DAY CAMP IN A BOX3. Pound in nails along the outline of your pattern. Nail them in enough so that they are
not wiggly. Try to keep the space between nails close to the same. You could draw
dots on your pattern to mark where the nails should go if this helps. The distance is
completely up to you. The closer the nails, the more string lines you will have if you are
filling in your shape, and the smoother the curved lines will be if you are doing an outline.
4. If you have taped your paper
pattern to the board, remove it
once the nails are in.
5. Tie the end of the string to one
nail with a tight knot. Now you’re
ready to start wrapping the string
around the nails.
Be sure to keep the wrapping
nice and tight. There is no “right”
way to complete your project. You
can wrap the string from nail to
nail along your lines, or cross from
one side of the pattern to another.
Experiment with the different ways
that lines can intersect, and the
patterns they can make. You can
try different ways of wrapping
the string as much as you want,
because it’s not locked in until you …
6. Tie a tight knot around the last
nail. Cut off extra string carefully.
You could apply a dot of clear glue
to the knots to keep them secure.
7. Share a picture of your art in our
our Facebook group!
Green Mountain Council DAYCAMP IN A BOX 17Activity 3: CUB COOKING
Omelet in a Bag (Adult supervision required)
This activity requires adult supervision because it involves cooking in boiling water.
This is a super easy and delicious way to make a hearty and healthy breakfast at home
or on a campout!
Materials needed: Quart Ziploc,* eggs, mix-ins, salt & pepper, pot of boiling water, tongs
Instructions:
- With the help of an adult, heat a pot of water (big enough to fit the Ziploc into) and bring
it to a boil.
- While the water is heating, take your Ziploc and add your eggs to it – no need to add
milk or water. Also add whatever else is going into your omelet (list of some ideas is
below).
- Seal up the baggie, being careful to remove as much air as possible.
- Squish the bag to break up the eggs and mix in all the add ins.
- When the water is boiling and the contents of the bag are evenly mixed, slowly lower
the baggie into the water with tongs and cook for about 10 minutes (the eggs should not
be runny anymore).
- When cooked, remove the baggie from the pot with the tongs.
- Very carefully open the bag and let the omelet roll out onto a plate.
- Put any additional items you want on your omelet, grab a spoon or fork and dig in!
Mix-in ideas: cheese (any kind – cheddar, muenster, swiss, etc), broccoli, cooked
sausage, ham, onions, peppers, spinach, mushrooms, tomatoes – almost any kind of
vegetable! Be creative . . . try something new and let us know how you liked it.
Toppings: Avocado, salsa, ketchup, hot sauce, chives, more cheese – whatever
sounds good!
18 Green Mountain Council DAY CAMP IN A BOXActivity 4: LET’S GET MOVING
Fly a Kite
Materials needed: paper,* string,* plastic ribbon,* wooden
skewer,* ruler,* tape, scissors, something to punch a small hole in
paper
Instructions are included with the materials in the gold-colored
envelope.
This kite will fly with no wind on kid-power! Get outside and run
with your kite to see how high it will go!
Activity 5: FUN TIMES CO
LOR
CATAPULT M E!
Materials needed: craft sticks,* plastic spoon,* rubber bands*
See instructions on how to make two different catapults in Appendix A,
page 30.
Instructions: Make a target to shoot at with your catapult! You can try to shoot
marshmallow, raisins, dry beans, M&Ms! You can record how far your catapult shoots
and share it on our Facebook page
Green Mountain Council DAYCAMP IN A BOX 19DAY 4
SONG OF THE DAY: Froggie
This is a repeat after me song!
FIND THE SONG AT THIS LINK: https://www.scoutingvermont.org/day-camp-in-a-box.html
Dog Jump froggie jump little froggie
Dog Cat Gobble up all those worms and spiders
Dog Cat Mouse Fleas and flies scrumpdillyish
Froggie Ribbit ribbit ribbit ribbit croak
Itsy bitsy teeny weeny tiny little froggie Faster (Louder)
Activity 1: SCOUT SKILL
Paracord Bracelet
Materials needed: Paracord,* buckle*
Instructions: See Appendix B, page 33. Note that the paracord ends have have already
been fused
Activity 2: CRAFT
Goop!
Here are two different recipes using cornstarch to make goop! Try one or try them all!
Cloud Dough
Materials needed: 2 heaping cups cornstarch, 1 cup hair conditioner
Instructions:
20 Green Mountain Council DAY CAMP IN A BOX- Measure and add your cornstarch to a large bowl.
- Measure your conditioner and put into your bowl of cornstarch.
- Use a long spatula to mix your ingredients until it gets hard to mix.
- Use your hands to finish kneading the dough together!
https://pagingfunmums.com/2013/11/01/soft-as-a-cloud-playdoughusing-only-2-
ingredients/
Playdough
Materials needed: 1/2 cup cornstarch, 1 cup baking soda, 3/4 cup water; optional: 2-3
drops essential oil and/or 4-5 drops food coloring
Instructions:
- With an adult, put the cornstarch, baking soda, and water in a saucepan and stir.
- Place the saucepan on the stove top and turn the heat to medium.
- Stir the mixture constantly. It will start to bubble slightly and that’s when it begins to turn
solid. Once a ball starts to form (4-5 minutes) take the pan off the heat.
- Place the dough on a piece of parchment paper and let cool.
Once the dough is cool, you can add the essential oil and/or food coloring. Knead the
dough until soft enough to play with!
Activity 3: CUB COOKING
Ice Cream
Material needed:
• 1-gallon Ziploc,*
• 1- quart Ziploc,*
• rock salt,*
• 1 cup half-and-half (milk really won’t work but you could use cream)
• 2 Tablespoons Sugar
• 1/2 teaspoon Vanilla extract
• About 3 cups of ice
Green Mountain Council DAYCAMP IN A BOX 21• Whatever toppings you want (crumbled cookies, sprinkles, chocolate or other sauces,
whipped cream, anything you like to put on ice cream)
• A spoon to eat your ice cream!
Instructions
To make ice cream, put the half-and-half, sugar, and vanilla in the quart (smaller) ziploc,
squeeze as much of the air out as you can, and seal it up tightly. Double check it is
sealed – you do not want the salty ice getting in your yummy ice cream!
Put the ice in the gallon ziploc with the salt. Then take your sealed quart ziploc and put
it inside the gallon bag with the ice and salt and seal that up. Now comes the work: you
need to shake, roll, mush, squeeze the bag for about 10-15 minutes! You will begin to see
it freezing up but keep going – it gets creamier if you keep it moving for the whole time.
When it is done (you will see that it is no longer liquid and has become ice cream)
simply take the smaller bag out of the bigger bag, rinse off the salt water from the smaller
bag, grab your spoon and dig in! Add whatever toppings you like, and enjoy!
Other ideas
You can use Kosher or table salt if you have that at home and want to try it again.
Put mix-ins right in the bag (strawberries, chocolate sauce, oreos, etc) and mash them
while making your ice cream.
**Be careful to not break the bags. Salty ice cream is not quite so delicious.
** If it is very hot outside (and we would recommend doing this outside) it likely won’t
work as well because it can’t freeze as fast. Staying in the shade on a cooler day will help
make great ice cream.
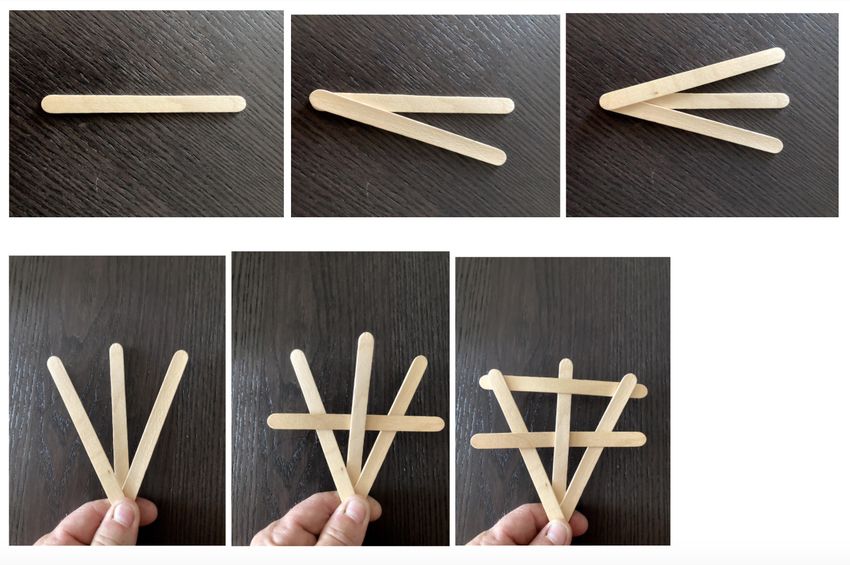
Activity 4: LET’S GET MOVING
HIGH FLYING FUN
Materials needed: craft sticks,* rubber bands*
Instructions: Find instructions on how to make two different kinds of Craft Stick
Chuckers in Appendix C, page 36.
Then find the worksheet in this box and take the High Flying Challenge!
22 Green Mountain Council DAY CAMP IN A BOXActivity 5: FUN TIMES
NIGHT SKY
Materials needed: circular sky map,* star wheel’s outer sleeve,* stapler and staples,
scissors
Instructions:
1- Circular sky map: Trim away the gray so you are left with a circle.
2- Star Wheel’s outer sleeve: Cut around the top of the Star Wheel but keep the white
rectangle on the bottom. Cut out the white oval in the middle.
3- Fold the white rectangle at the bottom of the sleeve back and staple on each side,
where the lines indicate.
4- Slip in the circular sky map so it shows in the oval in the middle. Turn the circular sky
map so the month you are using it and the approximate time you are using it are in line.
Notice the constellations you can observe show in the oval in the middle.
We can use the location of the sun in the
sky in order to determine direction. Stand
outside in the morning and look up at
the sky (never look directly into the sun).
Where is the sun currently located? The
sun rises in the east. Therefore, the location
of the sun in the morning is towards the
east. Compare this to the location of the
sun in the sky in the late afternoon. The sun
sets in the west. At noon local time, the sun
is directly overhead. Scource: https://www.geographyrealm.com/understanding-
direction-based-sun/
At night you find North with the North Star.
If you stand facing Polaris, then, you’re
facing the direction north. If you place
Polaris to your back, you’re facing south.
You can use Polaris to find directions only
in the Northern Hemisphere, however.
South of the equator, Polaris drops below
the northern horizon.
Green Mountain Council DAYCAMP IN A BOX 23DAY 5
SONG OF THE DAY: Cub Scout Vespers
FIND THE SONG AT THIS LINK: https://www.scoutingvermont.org/day-camp-in-a-box.html
As the night comes to this land Yes I will always give good will
On my honor I will stand I’ll follow my Akela still
I will help the Pack to go And until I stop to rest
As the Pack helps me to grow I will do my very best
Activity 1: SCOUT SKILLS
Build a Shelter!
We are going to pretend to camp out in the wilderness . . . in our own shelter! Later on
in Scouts BSA, we will build shelters out of sticks and rope but for now we can have fun
at home and be creative with things around the house. Make sure you check with your
adult before building your shelter (you don’t want to have to move it!).
Materials needed: anything you can find around your home to make a “shelter”:
blankets, boxes, ropes, clothes line, tarps, sleeping bags, pillows, cushions, sheets,
clothespins, clips - whatever you can build your own shelter out of.
Instructions: Make sure you pick a location that works for your household. You can
make a free-standing shelter out of boxes or using the back of a couch or other furniture.
Or you might be able to run a rope from a door hinge or other hard point across the
room to support a blanket. Don’t forget to put lots of pillows and other soft things to make
it really cozy.
If you are a Webelos, take it outside – find a tree limb or branches that are already down
(don’t cut anything down to do this), and use a tarp to make an outdoors shelter.
Post a picture of your shelter creation on our Facebook group!
24 Green Mountain Council DAY CAMP IN A BOXActivity 2: CRAFT
Scout Law Cootie Catcher
A folded paper “fortune teller,” also known as a “Cootie
Catcher,” is a centuries-old origami model. When first
introduced in the United States, it was turned upside-
down from how we use it today, creating a 4-section
container that could hold and pour salt.
Materials needed: 2 Patterns,* scissors, paper & crayons/markers if you want to make
another
Instructions: The pattern for a Cub Scout Cootie Catcher and a Shark Cootie Catcher,
with instructions on how to fold them, are in this box. [NOTE: BEGIN FOLDING with the
design face down.] The files are also available at: https://www.scoutingvermont.org/day-
camp-in-a-box.html
Practice on those, then you’re ready to create your own! Start with a square piece of
paper, make the folds as instructed, then unfold and using the Cub pattern as a guide,
put four different colors or designs in each corner, add the numbers, and write your text.
It might be a fortune, or answers to a question that the other player might ask, such as
YES, NO, MAYBE.
There are lots of awesome ideas and templates online; search for “Cootie Catcher
images”. If you need a little more help with the folding, see this video: https://www.
youtube.com/watch?v=DHT3N-pXVTY
TRIVIA: Where does the word “cootie” come from?
meaning “dog tick,” and was brought back by British soldiers after World War I.
Answer: Most sources believe the word “cootie” came from the Malay word kutu,
Green Mountain Council DAYCAMP IN A BOX 25Activity 3: CUB COOKING
Foil Dinner (Adult supervision required)
Materials needed: Aluminum foil, dinner ingredients (see below)
Instructions:
This is a favorite for campouts or even to enjoy at home! You can cook them over a
campfire/charcoal (use a second layer of foil) or in your oven. You can combine the
food any way you want, put in more of what you like and leave out what you don’t like.
Here is a basic recipe, but be creative and add other things.
1- Preheat the oven to 375 degrees
2- Take a large piece of heavy-duty aluminum foil (or 2 layers of regular weight foil) - at
least 12”x15” (bigger makes it easier to seal) - you will need 4 of them.
3- Collect your ingredients: you can use any combination of food to cook in your foil. The
“traditional” foil dinner is listed here, but swap in whatever you like and sounds good to
eat.
Directions for Foil Dinner to serve four:
You will need these ingredients:
• 1 pound ground beef (or turkey or chicken)
• 1 package dry onion soup mix
• 4 small potatoes (can use frozen hashbrowns)
• 2 cups carrots (veggies can be frozen)
• 1 large onion cut into slices about ¼” thick
• A little garlic salt, olive oil, salt and pepper
• Condensed cream of mushroom soup (optional)
- Mix the beef and onion soup mix in a bowl and divide into 4 patties
- Mix the vegetables, oil and seasoning in a bowl
- Put roughly equal amounts of the vegetable mix on each of the 4 pieces of aluminum
foil
- Put a patty on each pile of veggies
-Top with a spoonful of the mushroom soup if you are using it
- Seal up the aluminum foil really tightly so it won’t leak. Learn how to make a leak-proof
foil pack at this link: https://www.youtube.com/watch?v=CyBKA6Dl2D8
26 Green Mountain Council DAY CAMP IN A BOXIf you are cooking in the oven, put the foil packs on a cookie sheet and bake for about 40
minutes.
You can also cook it on a grill, charcoal, or a campfire - just put an extra layer of foil on
and cook about 40 minutes.
OTHER OPTIONS:
Add any of these things that you like: cheese, peppers, peas, corn, mushrooms, shrimp,
sausage – anything you like to eat can go in the foil! Be creative - you can really use any
veggies or proteins, and you do not need to add meat if you don’t want to.
Don’t forget to share a picture of your dinner in our Facebook group – and let us know if
you liked it!
Activity 4: LET’S GET MOVING!!
Materials needed: Your family and some outdoors spaces
Outdoor Code:
As an American, I will do my best to - Be clean in my outdoor manners, Be careful with
fire, Be considerate in the outdoors, and Be conservation minded.
Leave No Trace Principles:
1- Plan ahead
2- Stick to the trails
3- Manage your pets
4- Leave what you find
5- Respect other visitors
6- Take your trash with you
Instructions:
Tigers: Tiger Adventure - Go for a short hike with your family. You can also read the other
requirements for Tigers in the Wild and likely complete this adventure!
Wolves: Go on a 1-mile hike with your family and find 2 interesting things, discuss them
with your family. Look at Paws on the Path and try to complete this Adventure
Green Mountain Council DAYCAMP IN A BOX 27Bears: While hiking or walking for one mile, identify six signs that any mammals, birds,
insects, reptiles, or plants are living near the place where you choose to hike or walk.
Look at the requirements for the Fur, Feathers, and Ferns Adventure and see if you can
complete them.
Webelos/Arrow of Light: With a family member, hike 3 miles. Before your hike, plan and
prepare a nutritious lunch or snack. Enjoy it on your hike, and clean up afterward. Check
out the Webelos Walkabout Adventure and see how much you can complete.
COLOR ME!
Activity 5: FUN TIMES
BIRD FEEDER
Materials needed: pinecone,* string,* birdseed,* peanut butter
(or other sticky food)
Instructions:
1- Take your pinecone and attach the piece of string to it so it won’t come off (this is the
piece of string you cut when you made the kite and string art). Tie a sturdy knot (square
knot is good) to make sure it doesn’t fall when birds land on it. Make a loop so you can
hang it outside when it is all loaded with bird food.
2- There are two options for coating your pine cone: mix the seed into the peanut butter
(works better) or coat the pine cone and roll it in the seeds.
3- If you are allergic to peanuts, other things that would work are sun butter, bacon
grease (lard), any nut butter, or Crisco.
4- Put some peanut butter (or whatever is being used) in a bowl and mix in some bird
seed. Then mush the mixture into the pine cone (don’t break up the pine cone but push
the mixture into the spaces).
5- The other option to get the seeds on the pinecone is to coat the pine cone with your
choice of sticky food and either “dip” the coated pinecone into the bag of seed or put the
seed on a plate and roll it around (this will work better).
6- Take your feeder outside and hang it somewhere you can watch it and where it won’t
be in direct sun (or very little sun). You don’t want your bird food to melt off the pine cone.
28 Green Mountain Council DAY CAMP IN A BOX7- Watch what kind of birds come get some food. Share in our Facebook group if you
see something interesting eating from the feeder!
We hope you have enjoyed your Day Camp in a Box! While you have reached the end,
you can continue to watch your plants grow, try some of the Cub Cooking recipes
again, continue to make the best catapult, and make more string art, just to name a
few things. You will soon receive your patch to wear proudly and remember the fun
things you havecompleted.
And don’t forget to join us next summer for Day Camp 2021
when we will be going
“DOWN ON THE FARM”!!
Appendix A
Green Mountain Council DAYCAMP IN A BOX 29CATAPULT 1 30 Green Mountain Council DAY CAMP IN A BOX
Appendix A
CATAPULT 2

             Green Mountain Council DAYCAMP IN A BOX   31
32 Green Mountain Council DAY CAMP IN A BOX
Appendix B
Paracord Bracelet
LEARN MORE AT (credits): https://www.instructables.com/id/Paracord-bracelet-with-a-
side-release-buckle/

                                                        You’ll need paracord, or equivalent
                                                        1/8” diameter cord, a tape
                                                        measure or ruler, scissors, side
                                                        release buckle, and a lighter
                                                        (torch lighter works best). The
                                                        amount of cord used can vary,
                                                        but for this example we’ll use
                                                        10 feet of paracord to start with.
                                                        Actual amount of cord used for the
                                                        bracelet is about 1 foot of cord for
                                                        every 1 inch of knotted bracelet
                                                        length. So if your wrist is 8 inches
                                                        you’d use approximately 8 feet of
                                                        cord.

                                                        Wrap the paracord around you
                                                        wrist and make a note of where
                                                        the cord meets. Hold this point
                                                        next to your ruler or tape measure
                                                        and that’s your wrist size.

                                                        Hold the ends of the cord together
                                                        and find the center of the loop.
                                                        Take the center of the cord and
                                                        pull it thru one end of the buckle
                                                        (either side of the buckle, it doesn’t
                                                        matter). Now pull the cord ends
                                                        thru the loop until it’s tightened up
                                                        and attached to the buckle.

                                          Green Mountain Council DAYCAMP IN A BOX                33
Take buckle apart and and pull the
free ends of the cord thru the other
part of the buckle, sliding it up towards
the attached part. You’re going to
measure the distance between the
two buckle ends for the bracelet size
for your wrist. Add about 1 inch to your
measured wrist length, this will make
the finished bracelet a comfortable fit.
You’re measuring from the end of the
female part of the buckle to the flat part
of the male end of the buckle (the part
with the prongs, they don’t count for the
measurement because the fit inside
the female part of the buckle when the
bracelet is closed).
The knot used for the bracelet has a few
different names, cobra stitch, Solomon
bar, and Portuguese sinnet. Take the
cord on the left side and place it under
the center strands running between the
buckle ends. Now take the cord on the
right side under the left side cord, over
the center strands, and thru the loop of
the left side cord. Tighten up the cords
so the half knot you just formed is next
to the buckle. Now take the right side
cord under the center strands. The left
side cord goes under the right side
cord, over the center strands and thru
the loop of the right side cord. Tighten
up the cords (not too tight, just until they
meet the resistance of the knot) and
now you have a completed knot. You
will continue doing this alternating the
left and right sides as you go. If you don’t
alternate, you’ll quickly see a twisting of
the knots, just undo the last knot and
alternate it to correct.
Keep tying the knots until you have filled
the space between the buckle ends. The
knots should be uniform from one end
to the other. Tie each knot with the same
tension to keep the them all the same
size.
34 Green Mountain Council DAY CAMP IN A BOXYou can now use your scissors to
trim off the extra cord close to the
last knot that you tied. I trim one
at a time and use my lighter to
quickly melt the end I cut. Wait a
second for the melted cord to cool
just a bit and then use my thumb
to press the melted end onto the
surrounding cord so it hardens as
it attaches. You must be careful
with this step. The melted cord is
extremely hot, and it’s possible to
get burned, so you might also try
using a soldering iron or wood
burning tool for the melting step
if you wish. Or even use something like a butter knife, the side of your lighter, or the knurled section of a
tool to flatten out the melted end of the cord to finish it.
An alternative to melting the ends, is to tuck/pull the ends under the last couple of knots (I have used
hemostats to do this on the inside of the bracelet) then trim them to finish. It does work, and is just barely
noticeable as the cords add a slight bulge at that end of the bracelet.
If you did everything correctly, it
should look something like this
finished one. Once you know
what you’re doing you can vary
the amount of cord used by
making the knots tighter or looser
and pushing the knots closer
together as you go.
A tip for paracord bracelets:
If the side release buckle is
large enough, you can loop the
paracord around them again
before you start knotting, to fill in
the extra room on the buckle.
The 1/2” side release buckles are a tight fit for this, but will work, and the 5/8” size are just right.
This leaves a two strand core for the bracelet when you start knotting.
Now, you could also have a four strand core by starting with a lark’s head on the first buckle end, double
wrap on the second buckle end (at your wrist size), run the cord back to and over the first buckle end,
and then start knotting over the four strand core.
Or, for a six strand core, lark’s head the first buckle, run the two strands around the second buckle (at
your wrist size), back to and around the first buckle (now has four strands around), then back to and
around the second buckle, and then start knotting around the six core strands.
This gives extra cord in case you need it for whatever, but it also makes the paracord bracelets thicker
and more rounded, which I personally didn’t care for and that’s why I stick with the two strand core.
Green Mountain Council DAYCAMP IN A BOX 35Appendix C
CHUCKER 1
36 Green Mountain Council DAY CAMP IN A BOXAppendix C
CHUCKER 2
Green Mountain Council DAYCAMP IN A BOX 37You can also read